1
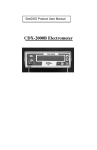
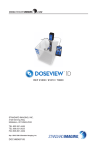
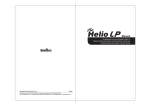
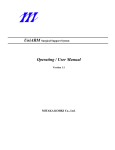
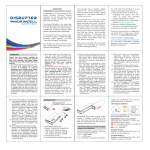
SeeDOS Product User Manual
SeedVac ™
Table of Contents
Subject
Page
General Precautions .............................................................
Customer Responsibility ......................................................
Overview...............................................................................
Needle Loading ....................................................................
Seed Counting ......................................................................
Magazine Loading ...............................................................
Maintenance .........................................................................
Service .................................................................................
Parts and Accessories ..........................................................
Warranty ..............................................................................
Page 1
2
2
3
4
4
5
5
5
8
9
General Precautions
Failure to observe these precautions may result in injury to personnel
or damage to device.
CAUTION:
CAUTION:
CAUTION:
WARNING:
Proper use of this device depends on careful reading of all
instructions and labels.
Steam Sterilize (autoclave) or ETO sterilize only.
Do not gamma ray sterilize.
Do not sterilize pump or power supply.
After steam sterilization, unit will be hot.
Allow adequate cooling time before handling.
Do not drop or mishandle unit.
Customer Responsibility
This product and its components will perform properly and reliably only when
operated and maintained in accordance with the instructions contained in this manual
and accompanying labels. A defective device should not be used. Parts which may
be broken or missing or are clearly worn, distorted or contaminated should be
replaced immediately with genuine replacement parts manufactured by or made
available from Standard Imaging Inc.
CAUTION: Federal law in the U.S.A. and Canada restricts the sale, distribution or use of this device to, by or on the order of a licensed medical practitioner.
The use of this device should be restricted to the supervision of a qualified medical
physicist. Handling of radioactive sources is potentially hazardous and should be
performed by qualified personnel.
Should repair or replacement of this device become necessary after the warranty period, the customer should seek advice from Standard Imaging Inc. prior to
such repair or replacement. If this device is in need of repair, it should not be used
until all repairs have been made and the product is functioning properly and ready
for use. The owner of this device has sole responsibility for any malfunction resulting from abuse, improper use or maintenance, or repair by anyone other than
Standard Imaging Inc.
The information in this manual is subject to change without notice. No part of
this manual may be copied or reproduced in any form or by any means without
prior written consent of Standard Imaging Inc.
Page 2
Overview
The SeedVacTM is a vacuum driven device designed to pull prostate implant
seeds and spacers into a special needle fitted with a glass or plastic tip. These seeds
and spacers are then placed into an implant needle. The prescribed sequence of
seeds and spacers is visually verified in the glass tip before being placed into the
needle.
The SeedVacTM is composed of the following parts: A vacuum pump, Fig.1, an
aluminum hand piece, Fig. 2, which includes autoclaveable tubing to connect to
the vacuum pump, a special needle, fitted with a glass or plastic tip to collect the
seeds and spacers, Fig. 3, and an optional cartridge loading needle, used when
inserting seeds into the cartridge of a Mick® TP Magazine (REF 7609, 7609-D),
Fig. 4.
A brass shield near the end of the hand piece provides radiation protection
during the loading procedure. In addition, a fine screen embedded inside the hand
piece prevents seeds from being sucked into the flexible tubing or vacuum pump.
If a seed is accidentally sucked into the hand piece, simply turn off the vacuum
pump and point the tip of the hand piece downward.
The needles attach to the hand piece via a standard Luer lock. For the collection needles, a crimp at the junction of the glass tube and the stainless steel tube
prevents any material from being sucked into the hand piece. Replacement tips
should be sterilized and held in reserve in case one becomes non-sterile during
loading. For the cartridge loading needle, a single seed is picked up at one time and
manipulated as needed.
The tubing and aluminum hand piece must be sterilized between each use. All
materials have been carefully selected to accommodate repeated sterilizations.
A UL® listed wall transformer (non-sterilizable) supplies the vacuum pump
with power.
Page 3
Needle Loading
To ease needle loading, the SeedVac needles can be rotated to point them in a
direction suitable for collecting seeds. To do so, attach a needle, loosen the set
screw holding the luer fitting, rotate the needle to the desired positon, tighten the
set screw. This should be done prior to sterilization. Sterilize the hand piece and
several needles prior to use, following the sterilization equipment manufacturer’s,
or healthcare facility’s recommendations. Users should validate the chosen sterilization procedures. Do not sterilize the vacuum pump or its wall transformer.
Connect the tubing of the hand piece to the vacuum pump, and one of the
collection needles to the hand piece, following the accepted sterility procedures
set up by your institution. Turn on the pump. The seeds and spacers should already
be available and in sight near the loading area. To create a vacuum, place your
finger over the hole near the front of the hand piece applying firm pressure to make
a seal. As long as your finger remains over the hole there will be a continuous
vacuum. Touch the glass tip to the seed or spacer to be picked up. Positioning the
tip at a 30 - 40 degree angle will work well for sucking the seeds or spacers into the
glass tube, Fig. 5. In addition, by working behind a Needle Loading Shield, such
as SI Model No. 90070, one can reduce finger dose by angling the tip around the
side of the Shield.
Draw the desired sequence of seeds and spacers into the glass tip. The sequence can be verified by visualizing the seeds and spacers through the glass. To
load the needle, place the glass tip into the inner lumen of the implant needle,
being certain to seat the tip near the bottom of the lumenal funnel to insure a smooth
flow of seeds into the needle. Lift your finger from the hole to break the vacuum
and release the seeds into the needle.
WARNING: Tilting the glass tip with respect to the lumen of the implant
needle during this needle loading procedure could result in breakage of the glass
tip. Use every precaution to prevent this and be certain that no glass shards fall into
the needle under any circumstances. Glass needle tip breakage is an extremely
unlikely event, but users should be aware of this possibility and avoid it.
Seed Counting
The SeedVac™ can also be useful for counting seeds as they are received from
the manufacturer.
Simply verify the number of seeds that will fit into the glass tip at one time,
and then count the number of full tips that can be filled, plus any remainder. This
greatly reduces manual counting time and radiation exposure time.
Page 4
Magazine Loading
Insert the optional Cartridge Loading Needle onto the Luer lock tip of the
SeedVac™. Prepare the seeds and magazines to be loaded as usual, utilizing a
stabilizing device for the cartridge, such as the Mick® V-Block (REF 7509). Enable the vacuum, and pick up a single seed as close to its center as possible, Fig.
6. If the seed is accidentally sucked into the needle tip, it will be able to proceed
only a short distance (less than the seed length) before being stopped by a permanent block inside the needle tip. Simply lift your finger to disable the vacuum and
drop the seed. Carefully insert the seed into the cartridge, and slide downward.
Maintain the vacuum during this entire time to ensure maximum seed holding power. Release the vacuum only after the seed is in place. Repeat as needed
to fill the cartridge.
Note: The tip is centered on the seed before insertion. Maintain the vacuum until the seed is
fully in position within the cartridge.
Figure 6: Inserting the seed
into the magazine cartridge
Maintenance
Exterior cleaning of the vacuum pump can be done with a soft brush and a
cloth. Gently brush all surfaces to remove dirt and dust. Remove any remaining
dirt with a cloth slightly dampened with a solution of mild detergent and water or
a liquid disinfecting agent. Be especially careful that this is an external cleaning
only and do not permit any liquid to seep into the vacuum pump in any manner
during cleaning.
Check each glass tip before sterilization and use to make certain that no cracks
or chips are visible. Discard any damaged tips. Replacement needle sets are available from Standard Imaging, REF 72009 or 72010.
Service
There are no serviceable parts on the SeedVac™.
Page 5
Vacuum port
On/Off
Vacuum Pump
Figure 1
Radiation shield
Finger hole
to enable/release vacuum
Embedded screen
Luer lock tip
Hand Piece
Figure 2
Crimp to prevent seed uptake
Stainless steel
Flexible joint
Glass or plastic tube
Standard luer fitting
Special Needle for Seed/Spacer Collection
Figure 3
Page 6
Stainless steel
Notch for seed pickup
Standard luer fitting
Optional Cartridge Loading Needle
Figure 4
30° - 40°
Typical Seed Loading Method.
Figure 5
Page 7
Parts and Accessories List
REF
Description
90091
SeedVac™
72009
Replacement Glass Tip Set
(10 glass tips without needles)
72010
Replacement Needle Assembly Set
(3 needle assemblies and 6 spare glass tips)
72011
Wall Mount Power Supply
80191
Instruction Manual
30378
Optional Cartridge Needle
11095
.035” Hex Wrench
Notice: We welcome your evaluation of this manual.
Your comments and suggestions help us improve our publications.
Doc No. 80191-03, 8/00, 9 pgs.
Page 8
Warranty
This product is sold by Standard Imaging Inc. under the warranty
herein set forth. The warranty is extended only to the buyer purchasing
the product directly from Standard Imaging Inc. or as a new product from
an authorized dealer or distributor of Standard Imaging Inc.
For a period of twelve (12) months from the date of original delivery
to the purchaser or a distributor, this product is warranted against functional defects in materials and workmanship, glass components excluded,
provided it is properly operated under conditions of normal use, and that
repairs and replacements are made in accordance herewith. The foregoing warranty shall not apply if the product has been disassembled, altered or repaired other than by Standard Imaging Inc. or if the product
has been subject to abuse, misuse, negligence or accident.
Standard Imaging’s sole and exclusive obligation and the purchaser’s
sole and exclusive remedy under the above warranties are limited to repairing or replacing free of charge, at Standard Imaging’s option, a product: (1) which contains a defect covered by the above warranties; (2) which
are reported to Standard Imaging not later than seven (7) days after the
expiration date of the 12-month warranty period; (3) which are returned
to Standard Imaging promptly after discovery of the defect; and (4) which
are found to be defective upon Standard Imaging’s examination. Transportation charges are the buyer’s responsibility. STANDARD IMAGING
INC. SHALL NOT BE OTHERWISE LIABLE FOR ANY DAMAGES, INCLUDING BUT NOT LIMITED TO, INCIDENTAL DAMAGES, CONSEQUENTIAL DAMAGES, OR SPECIAL DAMAGES.
THIS WARRANTY IS IN LIEU OF ALL OTHER WARRANTIES, EXPRESSED OR IMPLIED, WHETHER STATUTORY OR OTHERWISE, INCLUDING ANY IMPLIED WARRANTY OF FITNESS FOR A PARTICULAR PURPOSE. IN NO EVENT SHALL STANDARD IMAGING INC. BE
LIABLE FOR ANY INCIDENTAL OR CONSEQUENTIAL DAMAGES RESULTING FROM THE USE, MISUSE OR ABUSE OF THE PRODUCT OR
CAUSED BY ANY DEFECT, FAILURE OR MALFUNCTION OF THE
PRODUCT, WHETHER A CLAIM OF SUCH DAMAGE IS BASED UPON
THE WARRANTY, CONTRACT, NEGLIGENCE, OR OTHERWISE.
© 2000 Standard Imaging Inc.
Distributed
by SeeDOS
Ltd
7601 Murphy
Drive
WI 53562
For furtherMiddleton,
information
or a quotation
(608) 831 - 0025
please Phone:
contact
Colin
Walters at
Fax: (608) 831 - 2202
Web
site: www.standardimaging.com
[email protected]
Page 9