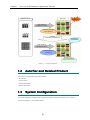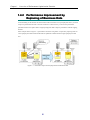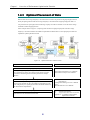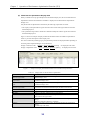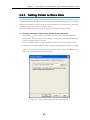
1
SnapSAN™ AutoTier User Guide August 2012 10400408-001 ©2012 Overland Storage, Inc. All rights reserved. Overland®, Overland Data®, Overland Storage®, ARCvault®, DynamicRAID®, LibraryPro®, LoaderXpress®, Multi-SitePAC®, NEO®, NEO Series®, PowerLoader®, Protection OS®, REO®, REO 4000®, REO Series®, Snap Appliance®, Snap Care® (EU only), SnapServer®, StorAssure®, Ultamus®, VR2®, and XchangeNOW® are registered trademarks of Overland Storage, Inc. GuardianOS™, RAINcloud™, SnapDisk™, SnapEDR™, Snap Enterprise Data Replicator™, SnapExpansion™, SnapSAN™, SnapScale™, SnapServer DX Series™, SnapServer Manager™, SnapWrite™, and SnapServer Manager™ are trademarks of Overland Storage, Inc. All other brand names or trademarks are the property of their respective owners. The names of companies and individuals used in examples are fictitious and intended to illustrate the use of the software. Any resemblance to actual companies or individuals, whether past or present, is coincidental. PROPRIETARY NOTICE All information contained in or disclosed by this document is considered proprietary by Overland Storage. By accepting this material the recipient agrees that this material and the information contained therein are held in confidence and in trust and will not be used, reproduced in whole or in part, nor its contents revealed to others, except to meet the purpose for which it was delivered. It is understood that no right is conveyed to reproduce or have reproduced any item herein disclosed without express permission from Overland Storage. Overland Storage provides this manual as is, without warranty of any kind, either expressed or implied, including, but not limited to, the implied warranties of merchantability and fitness for a particular purpose. Overland Storage may make improvements or changes in the product(s) or programs described in this manual at any time. These changes will be incorporated in new editions of this publication. Overland Storage assumes no responsibility for the accuracy, completeness, sufficiency, or usefulness of this manual, nor for any problem that might arise from the use of the information in this manual. Preface This user guide explains how to install, setup, and use your new SnapSAN AutoTune for Windows software to analyze the causes of lowered responses in the disk array subsystem and improving its performances. This guide assumes that you are familiar with computer hardware, data storage, and network administration terminology and tasks. It also assumes you have basic knowledge of Internet SCSI (iSCSI), Serial-attached SCSI (SAS), Serial ATA (SATA), Storage Area Network (SAN), and Redundant Array of Independent Disks (RAID) technology. Product Documentation and Firmware Updates Overland Storage SnapSAN product documentation and additional literature are available online, along with the latest release of the software. Point your browser to: http://docs.overlandstorage.com/snapsan Follow the appropriate link to download the latest software file or document. For additional assistance, search at http://support.overlandstorage.com. Overland Technical Support For help configuring and using your SnapSAN Manager Suite for Windows, search for help at: http://support.overlandstorage.com/kb You can email our technical support staff at [email protected] or get additional technical support information on the Contact Us web page: http://www.overlandstorage.com/company/contact-us/ For a complete list of support times depending on the type of coverage, visit our web site at: http://support.overlandstorage.com/support/overland_care.html Conventions Convention Description & Usage Boldface Words in a boldface font (Example) indicate items to select such as menu items or command buttons. Ctrl-Alt-r This type of format details the keys you press simultaneously. In this example, hold down the Ctrl and Alt keys and press the r key. NOTE A Note indicates neutral or positive information that emphasizes or supplements important points of the main text. A note supplies information that may apply only in special cases—for example, memory limitations or details that apply to specific program versions. IMPORTANT An Important note is a type of note that provides information essential to the completion of a task or that can impact the product and its function. CAUTION A Caution contains information that the user needs to know to avoid damaging or permanently deleting data or causing physical damage to the hardware or system. WARNING A Warning contains information concerning personal safety. Failure to follow directions in the warning could result in bodily harm or death. Menu Flow Indicator (>) Words in bold font with a greater than sign between them indicate the flow of actions to accomplish a task. For example, Setup > Passwords > User indicates that you should press the Setup button, then the Passwords button, and finally the User button to accomplish a task. Information contained in this guide has been reviewed for accuracy, but not for product warranty because of the various environments, operating systems, or settings involved. Information and specifications may change without notice. Table of Contents Chapter 1 Overview of Performance Optimization Function ................................................................ 1 1.1 Performance Optimization Function......................................................................................... 1 1.2 AutoTier and Related Product .................................................................................................. 2 1.3 System Configuration ................................................................................................................ 2 1.4 Operation Example of Performance Optimization Function .................................................... 3 1.5 Function Overview .................................................................................................................. 11 1.6 Concurrent Use of Partitioning Function ................................................................................ 14 Chapter 2 Installation of Performance Optimization Function ........................................................... 17 2.1 Server Installation ................................................................................................................... 17 2.2 Client Installation .................................................................................................................... 17 2.3 Installation of Work Disks for Optimization ............................................................................ 18 Chapter 3 Operation of Performance Optimization Function (GUI).................................................... 21 3.1 Description of Screen .............................................................................................................. 21 3.2 Operation on Screen ............................................................................................................... 35 Chapter 4 Operation of Performance Optimization Function (CLI) ..................................................... 74 4.1 Logical Disk Movement Command ......................................................................................... 74 4.2 Logical Disk Movement Speed Modification Command ......................................................... 78 Appendix A Estimating Size of Files for Auto Tier Function ............................................................... 77 Appendix B Licenses ........................................................................................................................... 79 B.1 Apache log4j License ............................................................................................................... 79 B.2 Flex License ............................................................................................................................. 85 B.3 OpenSSL License...................................................................................................................... 86 Index........................................................................................................................................................ 90 Chapter 1 Overview of Performance Optimization Function Chapter 1 Overview of Performance Optimization Function The performance optimization function is capable of analyzing the causes of lowered responses in the disk array subsystem and improving its performances. An administrator, with use of the performance optimization function, analyzes the performances of disk array under the control of SnapSAN Manager, by centralized operations on a SnapSAN Manager client and tunes the performances as necessary. 1.1 Performance Optimization Function As the volume of business data increases day by day, the scale and capacity of disk array become larger. Access patterns have also been diverted due to the use by multiple business systems. To maintain quick response of the business system, it is necessary to monitor the load state of disk arrays and detect a bottleneck and improve it. This work, however, requires advanced technical knowledge and techniques of performance analysis and tuning operations. Furthermore, when it is necessary to tune the performance, business operations may be stopped for a while, causing inconvenience to business operations. The AutoTier solves such problems. Introduction of the AutoTier makes it possible to properly and easily conduct painstaking performance analysis and tuning operations. A tuning operation can be done while business is in operation, thereby maintaining optimal disk performance around the clock without stopping business operations. 1 Chapter 1 Overview of Performance Optimization Function Application Server Disk Array I/O concentration Large number of diversified accesses Performance deterioration due to bottleneck AutoTier Performance analysis/tuning Cancellation of bottleneck Large number of diversified accesses Optimal performance with no bottleneck Dynamic execution of rearrangement without stopping business operations Figure 1-1 Concept of AutoTier 1.2 AutoTier and Related Product The AutoTier is for the following program products: BaseProduct AccessControl Performance Monitor ReallocationControl 1.3 System Configuration For system configuration examples when using the performance optimization function, refer to Chapter 3 “System Configuration” in the “Manual Guide”. 2 Chapter 1 Overview of Performance Optimization Function 1.4 Operation Example of Performance Optimization Function The following effects can be expected by installing the performance optimization function. Resolution of bottlenecks Bottlenecks can be resolved by moving business data from a high-load physical disk (pool or RANK) to a low-load physical disk. For details, refer to 1.4.1 “Resolution of Bottlenecks”. Performance improvement by replacing business data Performance can be improved by replacing business data from a low-speed physical disk to a high-speed physical disk. For details, refer to 1.4.2 “Performance Improvement by Replacing of Business Data”. Optimal placement of data Data can be placed optimally by moving business data that is not used frequently to a low-priced physical disk with large capacity. For details, refer to 1.4.3 “Optimal Placement of Data”. Data migration when adding a node (For a disk array with node) Load of a node can be distributed by adding a node and moving business data from a high-load node to the added node. For details, refer to 1.4.4 “Data Migration When Adding a Node”. The performance optimization function can execute the above operations without stopping your business. Operations of the performance optimization function are explained in the subsequent sections with examples. 3 Chapter 1 Overview of Performance Optimization Function 11..44..11 R Reesso off B ollu Bo ottttlleen uttiio on no neecckkss When I/Os are concentrated and a physical disk is highly loaded, it is possible to level the load without stopping business by moving a logical disk bound to the physical disk to a low-load physical disk. In the example shown in Figure 1-2, a bottleneck can be resolved by replacing LD01 with Work Disk for Optimization LD02 and distributing I/O concentrating to POOL000 to POOL001. Figure 1-2 4 Resolution of Bottlenecks Chapter 1 Overview of Performance Optimization Function Operation flow Reference Monitoring and analyzing the load state Activate the performance optimization function screen and analyze the load state based on the busy ratios displayed on the screen. The busy ratios are color-coded according to the height of the ratios. In addition, since the information can be displayed in graphs, the bottlenecks of concentrated I/Os can be detected easily. Use of the performance monitoring function and the performance analysis function together allows more effective monitoring and analysis. “Performance Monitoring User’s Manual” “Performance Analysis User’s Manual” 3.2 “Operation on Screen” Planning replacement After detecting a bottleneck, replace the logical disk to distribute the loads, and resolve the bottleneck. Use of the replacement plan function can plan effective replacement easily. 1.5.2 3.2 “Replacement Plan” “Operation on Screen” 1.5.3 3.2 “Replacement Effect Prediction” “Operation on Screen” Predicting replacement effect Effect of the planned replacement can be checked before practicing the replacement process. You can verify the effect of replacement by comparing the busy ratios before and after replacement, which are indicated in values and graphs. After verifying sufficient effect of replacement, proceed to the next step of performance tuning shown below. 1.5.4 “Performance Tuning” 3.2 “Operation on Screen” 4.1 “Logical Disk Movement Command” Appendix A “Command of Performance Optimization Function” Replacing Execute the planned replacement practically. Verifying logical disk performance after replacement Verify that the bottleneck is resolved as expected by using the performance monitoring function and the performance analysis function as a result of replacement. 5 “Performance Monitoring User’s Manual” “Performance Analysis User’s Manual” Chapter 1 Overview of Performance Optimization Function 11..44..22 P Peerrffo byy mp prro orrm ovveem maan meen nccee IIm ntt b R Reep off B pllaacciin Bu ussiin ng neessss D go Daattaa At initial binding, for the business for which business data is bound on a low-speed physical disk, if you need to improve performance later due to increase of business or other reasons, you can use the performance optimization function to replace data to a high-speed physical disk to improve performance without stopping business. In the example shown in Figure 1-3, performance of business using LD01 is improved by replacing LD01 on a low-speed physical disk with the Work Disk for Optimization LD02 bound in a high-speed physical disk area. Figure 1-3 Performance Improvement by Replacement of Business Data 6 Chapter 1 Overview of Performance Optimization Function Operation flow Reference Monitoring and analyzing the load status Use the performance monitoring function and the performance analysis function to monitor and analyze performance of the source logical disk. Preparing a Work Disk for Optimization As results of monitoring and analysis of the load status, if movement is needed, bind a logical disk that will be a Work Disk for Optimization in the pool configured by high-speed physical disks and add the attribute of the Work Disk for Optimization. Replacing Execute replacement, handling the prepared Work Disk for Optimization as the destination of movement. “Performance Monitoring User’s Manual” “Performance Analysis User’s Manual” “Placement of Work Disks for Optimization” “Configuration Setting Tool User’s Manual (GUI)” “LD Administrator User’s Manual” 2.3.2 1.5.4 “Performance Tuning” 3.2 “Operation on Screen” 4.1 “Logical Disk Movement Command” Appendix A “Command of Performance Optimization Function” Verifying logical disk performance after replacement Verify that the replacement produces the expected result by using the performance monitoring function and the performance analysis function. 7 “Performance Monitoring User’s Manual” “Performance Analysis User’s Manual” Chapter 1 Overview of Performance Optimization Function 11..44..33 O Op Pllaacceem off D pttiim Daattaa maall P meen ntt o Business data whose usage frequency is decreased does not need to be placed on a high-speed physical disk mostly. Replacing business data whose usage frequency is decreased from a high-speed physical disk to a low-priced and low-speed physical disk with large capacity can make investment cost for the entire storage reasonable without stopping business. In the example shown in Figure 1-4, replacing LD01 bound on a high-speed physical disk whose usage frequency is decreased with the Work Disk for Optimization LD02 bound in a low-speed physical disk area implements optimal placement of data. Figure 1-4 Optimal Placement of Business Data Operation flow Reference Analyzing usage frequency To analyze usage frequency of a logical disk, check IOPS, transfer rate, and transition of busy ratios of the logical disk by using the performance monitoring function and the performance analysis function. Preparing a Work Disk for Optimization As results of analysis of usage frequency, if movement is needed, bind a logical disk that will be a Work Disk for Optimization in the pool configured by low-speed physical disks and add the attribute of the Work Disk for Optimization. Replacing Execute replacement, handling the prepared Work Disk for Optimization as the destination of movement. 8 “Performance Monitoring User’s Manual” “Performance Analysis User’s Manual” “Placement of Work Disks for Optimization” “Configuration Setting Tool User’s Manual (GUI)” “LD Administrator User’s Manual” 2.3.2 1.5.4 “Performance Tuning” 3.2 “Operation on Screen” 4.1 “Logical Disk Movement Command” Appendix A “Command of Performance Optimization Function” Chapter 1 Overview of Performance Optimization Function 11..44..44 D Daattaa M Miig Wh heen grraattiio No nA od dee Ad dd on diin nW ng g aa N For a disk array with node, when a node in which business data is placed is highly loaded and business performance might be degraded. In this case, the load can be distributed between nodes by adding a node and moving business data to the added node. If the performance optimization function is not installed, you need to stop business to move data. If the performance optimization function is installed, you can move data without stopping business when adding a node. In the example shown in Figure 1-5, node performance leveling is performed by replacing LD00 bound on the node node000 that is highly loaded with the Work Disk for Optimization LD01 bound on the added node node001. Figure 1-5 Data Migration When Adding a Node 9 Chapter 1 Overview of Performance Optimization Function Operation flow Reference Monitoring and analyzing the load state of a node Monitor and analyze the load status of a node by using the performance monitoring function and the performance analysis function, and check whether a bottleneck exists on node resources. If a bottleneck is found, analyze business on the node and determine the business to be moved. “Performance Monitoring User’s Manual” “Performance Analysis User’s Manual” Adding a node Add a node. Binding a pool to the added node Bind a pool in which a Work Disk for Optimization is placed to the added node. Preparing a Work Disk for Optimization Bind a logical disk that will be a Work Disk for Optimization in the bound pool, and add the attribute of the Work Disk for Optimization. Replacing Execute replacement, handling the prepared Work Disk for Optimization as the destination of movement. “Configuration Setting Tool User’s Manual (GUI)” “Placement of Work Disks for Optimization” “Configuration Setting Tool User’s Manual (GUI)” “LD Administrator User’s Manual” 2.3.2 1.5.4 “Performance Tuning” 3.2 “Operation on Screen” 4.1 “Logical Disk Movement Command” Appendix A “Command of Performance Optimization Function” Verifying performance of the logical disk after replacement Verify that the replacement produces the expected result by using the performance monitoring function and the performance analysis function. 10 “Performance Monitoring User’s Manual” “Performance Analysis User’s Manual” Chapter 1 Overview of Performance Optimization Function 1.5 Function Overview The performance optimization function provides the capability of “Bottleneck Detection Support”, “Replacement Plan”, “Replacement Effect Prediction”, and “Performance Tuning”. This section describes outlines of the functions. 11..55..11 B ottttlleen Bo neecckk D Deetteeccttiio on nS Su up pp po orrtt Concentration of I/O in a specific physical disk causes I/O competition thereby deteriorating response. The degree of concentration of I/O in a physical disk can be indicated as the physical disk’s operating time per unit time. This value is expressed as the physical disk’s Busy Ratio. The AutoTier monitors the load state of physical disks at specified intervals and displays the obtained Busy Ratio for each physical disk on the dedicated client screen. Analysis of the Busy Ratio displayed on the dedicated client screen allows you to detect a physical disk (bottleneck location) in which I/O concentrates. The AutoTier features the following display of the Busy Ratio, which enables the analysis suitable for the business system and visual detection of the bottleneck. The analysis period (Busy Ratio calculation period) can be specified in terms of the exponent condition for the date, days of the week, and time zone. Display a Busy Ratio in three-level with color-coding. Display over-time changes of Busy Ratio in three different colors. 11..55..22 R n Pllaan ntt P meen pllaacceem Reep Upon detecting a physical disk with concentrated I/Os (bottleneck part), logical disks are moved (replaced) to tune performances. This function displays information about the movement destination logical disks, which are best suited for the source logical disk. This function automatically finds the destination logical disks that are highly effective for I/O distribution after moving disks, and displays the disks in the order of effectiveness. An administrator is allowed to tune the performances on the basis of the information and remove the bottleneck. 11..55..33 R Reep pllaacceem meen ntt E Effffeecctt P Prreed diiccttiio on n An effect of load distribution after logical disk movement can be estimated before logical disk movement. This function displays the changes of Busy Ratios in source and destination logical disks or RANK/pool, in graph format. An administrator is allowed to verify that I/O will not concentrate after moving disks, and tune the performances on the basis of the estimated effects. 11 Chapter 1 Overview of Performance Optimization Function 11..55..44 P Peerrffo orrm maan nccee T Tu un niin ng g The AutoTier moves logical disks located in a high load physical disk in which I/O concentrates to a low load RANK so as to distribute the concentration of I/O thereby canceling the I/O competition and removing the bottleneck. In addition, moving a logical disk whose usage frequency is low in a low-priced physical disk with large capacity enables you to use resources in the entire storage effectively. This is called performance tuning. The performance tuning can be executed instantly, or at a registered time. Figure 1-6 shows the concept of performance tuning implement by the performance optimization function. The work disks shown in the figure are logical disks dedicated to the use for the performance tuning (the Work Disk for Optimization). By moving a logical disk, placement of the Moved Material Logical Disk and the Work Disk for Optimization is switched. The logical disks are moved inside the disk array without affecting any business system. As a result, performance tuning is possible while business is in operation. Transfer of logical disks will not require any setting changes or access methods to business systems. High-load physical disk (= bottleneck) I/O concentrates in logical disks (LDx, LDy, LDz) causing a high-load state. Exchange Low-load physical disk Logical disk in which I/O concentrates is replaced with a work disk. I/O to LDx has been moved to the low-load physical disk thereby canceling the high-load state. Distribution of I/O cancels the bottleneck Work disk Figure 1-6 Concept of Performance Tuning 12 Chapter 1 Overview of Performance Optimization Function Due to performance tuning effect and so on, the performance optimization by the performance tuning function has limitation. Logical disks cannot be moved in the cases described below. When you perform the tuning operation or configuration setting of the disk array, please note the following: * For other than disk arrays with pool A moved material logical disk is located in the same RANK as a Work Disk for Optimization. A moved material logical disk and a Work Disk for Optimization are different in capacity. A moved material logical disk is multi-RANK type. A logical disk is a cache resident disk. * For disk arrays with pool A moved material logical disk is located in the same pool as a Work Disk for Optimization. A moved material logical disk and a Work Disk for Optimization are different in capacity. A logical disk is a cache resident disk. A logical disk is a snapshot-related volume (except the BV (Note 1)). A logical disk is a System Volume. A logical disk to which data protection setting has already been set. A logical disk (virtual capacity logical disk) is being released. (Note 2) Note 1: BV: base-volume (original volume which is the copy-source.) Note 2: For details about how to release the capacity, refer to the “Thin Provisioning User’s Manual”. 13 Chapter 1 Overview of Performance Optimization Function 1.6 Concurrent Use of Partitioning Function The partitioning function partitions resources (disk, cache memory, and port) of a disk array on a logic basis such as business to bind and manage virtual storage (VSPAR: Virtual Storage Partition) that has independent resources. For details on the partitioning function, refer to the “Partitioning User’s Manual”. The performance optimization function implements more efficient performance tuning operation by concurrent use of the partitioning function. In the partitioning function, the virtual storage described above is referred to as a partition. A user who performs operation management of a specific partition is referred to as a partition user. A storage group user (user who performs operation management of all disk arrays) gives authorization to operate a specific partition to a partition user. A partition user is also classified into some user roles as in the case of a storage group user, and can operate the functions provided by performance optimization for the partitions whose management authorization is given and can reference the provided information. monitor Table 1-1 User Roles Allows only reference. operator Allows all operations. administrator Allows all operations. When the partitioning function is installed, the following performance optimization functions are provided to a storage group user and a partition user. Storage group user - A storage user can reference all information on performance optimization. - If a user role is an operator or higher, the storage user can execute all operations. No restriction is imposed on the operational range. Partition user - A partition user can reference information on the pools and logical disks allocated to the partition whose management authorization is given. - If a user role is an operator or higher, the partition user can execute all operations. The operational range is limited to the logical disks and Work Disk for Optimization allocated to the partitions whose management authorization is given. Example 1 When source logical disk LDx and destination Work Disk for Optimization WK are allocated to the same partition: 14 Chapter 1 Overview of Performance Optimization Function The partition user (whose user role is an operator or higher) of Partition-A can execute all operations. Example 2 When source logical disk LDy and destination Work Disk for Optimization WK are allocated to different partitions: The partition user (whose user role is an operator or higher) who has the management authorization of Partition-A and Partition-B can execute all operations. In the following cases, replacement cannot be executed between a source logical disk and a Work Disk for Optimization that belongs to different partitions. Partition allocation of the pool to which the source logical disk or the Work Disk for Optimization belongs is Exclusive. The source logical disk and the Work Disk for Optimization belong to different nodes. 15 Chapter 1 Overview of Performance Optimization Function If the partitioning function is available and replacement is executed between a source logical disk and a Work Disk for Optimization that belong to different nodes, the logical disks use the cache segment allocated to the same partition of each destination node after replacement. Example: When LD that will be a source logical disk belongs to Partition-A to which cache segment_1 of node000 is allocated, and the destination Work Disk for Optimization WK belongs to Partition-A to which cache segment_2 of node001 is allocated: After replacement, the source LD uses cache segmane_2 of the destination node node001, and the destination Work Disk for Optimization WK uses cache segment_1 of the node000. Cache segment_2 Cache segment_1 Cache segment_1 Cache segment_2 Execution of Replacement Replacement If cache segment capacity of the destination node is smaller than that of the source node, and the load to the cache segment of the destination node is higher than the load to the cache segment of the source node, performance may not be improved even if replacement is executed. When replacement is executed between logical disks that belong to different nodes, you need to consider cache segment capacity and performance of cache segments adequately. 16 Chapter 2 Installation of Performance Optimization Function Chapter 2 Installation of Performance Optimization Function 2.1 Server Installation 22..11..11 O Op peerraattiin ng gE En nvviirro on nm meen ntt The operating environment of the target hardware, operation OS, memory, and disk Capacity is the same as that of SnapSAN Manager. For the operating environment, refer to the installation guide. For details on the required program products and target storage, refer to “Functions of Optional Software” in the “Manual Guide”. You need to unlock the licenses of the performance optimization function and required program products for the disk array to be applied when installing the performance optimization function. 22..11..22 IIn n on nssttaallllaattiio The performance optimization function is simultaneously installed when the SnapSAN Manager is installed. For installation and uninstallation, refer to the installation guide. 22..11..33 E g ng Seettttiin ntt S meen nm on En nvviirro The operating environment of the performance optimization function is the same as that of SnapSAN Manager. For the operating environment setting, refer to the installation guide. 2.2 Client Installation 22..22..11 O Op peerraattiin ng gE En nvviirro on nm meen ntt The operating environment of the performance optimization function is the same as that of SnapSAN Manager. For the operating environment setting, refer to the installation guide. 22..22..22 IIn nssttaallllaattiio on n The performance optimization function is simultaneously installed when the SnapSAN Manager client is installed. For installation and uninstallation, refer to the installation guide. 17 Chapter 2 Installation of Performance Optimization Function 2.3 Installation of Work Disks for Optimization When a logical disk is moved, another logical disk which is hidden from all business systems and no access is ensured is required. This logical disk is called a Work Disk for Optimization. 22..33..11 S Seettttiin ng gW Wo orrkk D Diisskkss ffo orr O Op pttiim miizzaattiio on n You can set Work Disks for Optimization by using the LD Administrator function of the SnapSAN Manager. For the setting method, refer to the “LD Administrator User’s Manual”. Due to the performance optimization function’s limitation of logical disk movement and the nature of the Work Disk for Optimization, logical disks listed below cannot be specified as Work Disks for Optimization. Please note this point when you specify configuration of the disk array. * For other than disk arrays with pool A logical disk is multi-RANK type. A logical disk is set as a pair of Volume Cloning/Remote Replication (Note 1). A logical disk is a cache resident disk. * For disk arrays with pool A logical disk is set as a pair of Volume Cloning/Remote Replication (Note 1). A logical disk is a cache resident disk. A logical disk is a snapshot-related volume (except the BV). A logical disk is a System Volume. A logical disk is a previously set data protection setting. An LD capacity quota or logical disk for which LD capacity threshold is set (in the case of virtual capacity logical disk) (Note 2). In addition, the maximum number of work disks for optimization which can be set for each disk array is predetermined. The maximum number of work disks for optimization depends on the specification of each disk array. Therefore, check the number when configuring the settings for the disk array. Note 1: For details on Volume Cloning/Remote Replication, refer to the “Data Replication User’s Manual (Function Guide)” and “Data Replication User’s Manual (Installation and Operation Guide)” in accordance with your OS in use. Note 2: For details on virtual capacity logical disk, LD capacity quota, and LD capacity threshold, refers to “Thin Provisioning User’s Manual”. 18 Chapter 2 Installation of Performance Optimization Function 22..33..22 P Pllaacceem off W Wo orrkk D meen ntt o Diisskkss ffo orr O Op pttiim miizzaattiio on n Generally, a bottleneck in performance occurs due to an increase of the amount of data, which results from an increase of the amount of work, or an access pattern change. If the amount of the business increases, usually the load is distributed by adding physical disks. When tuning performance with the performance optimization function, arrange Work Disks for Optimization and move logical disks from high-load physical disks. A tuning operation can be performed without stopping operations. Work Disks for Optimization are to be used when the performance optimization function eliminates the cause of a bottleneck in performance. There is no need to arrange them when installing a disk array subsystem. To place work disks for optimization, the following conditions must be satisfied according to the moved material logical disk. The capacity of the moved material logical disk must be identical to that of the Work Disk for Optimization. A Work Disk for Optimization needs to be placed in a RANK or pool in which the moved material logical disk is not placed. The area of a Work Disk for Optimization is used from business after movement. Therefore, they must be placed appropriately based on understanding of performance characteristics. Main points are as follows: Load of a RANK or pool in which a Work Disk for Optimization is placed When a RANK or pool in which a Work Disk for Optimization is placed is highly loaded, performance will not be improved after movement. Before placing a Work Disk for Optimization in a RANK or pool, check the load state of the RANK or pool. RAID type A logical disk can be moved even if the RAID type is different between the moved material logical disk and the destination Work Disk for optimization. Since each RAID type, however, has different characteristics, you need to select the RAID type that is appropriate for operations when placing a Work Disk for Optimization. For details on each RAID type, refer to the “Configuration Setting Tool User’s Manual (GUI)”. Physical disk type A logical disk can be moved even if the types of physical disks that make up the pool including the moved material logical disk and the destination Work Disk for Optimization are different. Generally, the FC disk drive or the SAS disk drive is used for mission-critical tasks that require high performance and nonstop operation. The SATA disk drive is used for backup and an archive that require 19 Chapter 2 Installation of Performance Optimization Function low cost and large capacity. Performance of the FC and SAS disk drives are said to be higher than that of the SATA disk drive. SSDs (Solid State Drives), which are faster and offer better performance than FC and SAS disk drives, are also supported. Use the type of disk drive suitable for your purpose. Rotation speed of a physical disk A logical disk can be moved even if the rotation speed is different between the moved material logical disk and physical disks that make up the pool including the destination Work Disk for Optimization. Performance of a physical disk with high rotation speed is said to be higher than that of a physical disk with low rotation speed. Number of physical disks making up a pool to which logical disks belong If a pool is made up of a lot of physical disks of the same RAID type, data to be saved is distributed across physical disks and parallel processing is allowed. As a result, high-speed access performance can be achieved. If a pool is made up of physical disks of different RAID types, performance cannot always be increased in proportion to the number of physical disks because characteristic of RAID. Performing placement of Work Disks for Optimization when introducing a disk array subsystem is one of the operation modes. If Work Disks for Optimization are allocated beforehand, performance can be tuned without physical disks being added. However, since it is difficult to predict occurrence of a bottleneck in performance, placement of Work Disks for Optimization needs to be designed after due consideration. Note the following when placing Work Disks for Optimization when introducing a disk array subsystem : Utilization ratio of a disk array subsystem Work Disks for Optimization cannot be used for business. Be careful that the utilization ratio of the disk array subsystem does not decrease due to the setting of Work Disks for Optimization. 20 Chapter 3 Operation of Performance Optimization Function (GUI) Chapter 3 Operation of Performance Optimization Function (GUI) This chapter will describe the composition of the AutoTier dedicated client screen and its method of operation. 3.1 Description of Screen Figure 3-1 shows the AutoTier main screen. This section will describe the composition of the screen. (1) Menu Bar (2) Tool Bar (3) Analysis Period Display Area (5) Detailed Display Area (6) Work Disk for Optimization Display Area (7) Movement Progress Information Display Area (4) Configuration Display Area (8) Status Bar Figure 3-1 21 AutoTier Screen Chapter 3 Operation of Performance Optimization Function (GUI) The screen is divided into eight areas from (1) to (8), as shown in Figure 3-1. Descriptions for each area are as follows: If you log into the system to which the partitioning function is installed as a partition user, only the resources of the partitions the user can manage are displayed in the display area. The order in which the [Number], [Type], and [LD Name] columns are displayed on each screen differs depending on the setting of the SnapSAN Manager client. For details on the setting method, refer to the “Client Start/Stop” of the “User’s Manual” or “User’s Manual (UNIX)” in accordance with your OS. The order on each screen is described in the explanation of the related screen. (1) Menu Bar Select necessary items from the menu to perform operations. For details, refer to Help. (2) Tool Bar Among menu functions, buttons for frequently used menu functions are provided to enable the one-click operation. For details about each button, refer to Help. Menu functions provided as tool bar buttons Save Settings Start LD Movement Stop LD Movement Change LD Movement Speed Change LD Movement Schedule Analysis Property Replacement Plan Replacement Effect Prediction Busy Ratio Graph (3) Analysis Period Display Area Displays the current analysis period (Busy Ratio calculation period). (4) Configuration Display Area Configuration of the disk array that uses the AutoTier is separated into the “disk array layer” and the “RANK/pool layer” and displayed in a tree view form. Figure 3-2 shows an example of the display. 22 Chapter 3 Operation of Performance Optimization Function (GUI) (i) (ii) Figure 3-2 Example of Display of Disk Array Configuration At the start of the screen or when you select “Update to The Current Information” from the menu, only a disk array layer which is the initial state of the screen is displayed. In Figure 3-2, the number (i) indicates a disk array layer and (ii) indicates a RANK/pool layer. Table 3-1 provides descriptions of each layer. Table 3-1 Disk Array Layer and RANK/Pool Layer Layer Description Disk Array layer Displays icons and the disk array name which correspond to respective disk array models. An icon for the disk array which is not monitored by the SnapSAN Manager server is displayed in gray. RANK/Pool layer Displays the number and icon for the RANKs/pools bound in the disk array. Signal colors indicating the degree of the Busy Ratio are appended to the icon. The signal colors can be changed on the Analysis Property dialog ([Sort of Busy Ratio] tab). Refer to 3.2.2 “Setting Sort of Busy Ratio” for Analysis Property dialog ([Sort of Busy Ratio] tab). When the RANK/pool is in the Ready mode Busy Ratio (High) ........ / Busy Ratio (Medium) ........ / Busy Ratio (Low) ........ / Busy Ratio (No information) ........ / When the RANK/pool is not in the Ready mode Attn. ........ Fault ........ An icon for the disk array which is not monitored by the SnapSAN Manager server is displayed in gray. 23 Chapter 3 Operation of Performance Optimization Function (GUI) (5) Detailed Display Area Lists detailed information of the component located one layer below the layer selected in the configuration display area. When the SnapSAN Manager server is selected Disk array list is displayed. When the disk array is selected RANK/pool list is displayed. When the RANK/pool is selected Logical disk list is displayed. Displayed items of the disk array, RANK, pool, and logical disk lists will be described below. (i) Disk array list Figure 3-3 shows an example of display of the disk array list. Table 3-2 provides descriptions of each display item. Figure 3-3 Example of Display of Disk Array List Table 3-2 Display Item Display Items of Disk Array List Description Disk Array Subsystem Displays the icon and nickname of the disk array. Monitoring Status Running ...... Indicates that the SnapSAN Manager server is monitoring the state. Stop state. ...... Indicates that the SnapSAN Manager server is stopping monitoring the Accumulate ...... Indicates that Busy Ratio information is being accumulated. Stop ...... Indicates that the accumulation of Busy Ratio information is stopping. Logging Status Logging Start Time Displays the time when accumulation of Busy Ratio information started. Logging End Time Displays the time of latest accumulation of Busy Ratio information. 24 Chapter 3 (ii) Operation of Performance Optimization Function (GUI) RANK list Figure 3-4 shows an example of display of the RANK list. Table 3-3 provides descriptions of each display item. Figure 3-4 Example of Display of RANK List Table 3-3 Display Item Display Items of RANK List Description Number Displays the icons and numbers of RANKs. Display format of the icon is the same as that of the Configuration Display Area. Busy Ratio [%] Displays the Busy Ratio of RANKs. For the RANK that does not have valid Busy Ratio information, a string of asterisks (***) is displayed. Note: When a logical disk in the RANK is moved, Busy Ratio information which has been accumulated is no longer related with Busy Ratio information which is to be accumulated after the movement. Therefore, immediately after a logical disk has been moved, there is no valid Busy Ratio information for the RANK. This state will be cancelled when Busy Ratio information is accumulated at the next interval. Completion Time Displays the time when the transfer of the last logical disk in the RANK has been completed. When logical disks are not moved, “Un-carrying” is displayed. RAID Displays the RAID type of the RANK. Status Ready ....... Indicates that the RANK is in the normal state. Attn ....... Indicates that an event (reduce, formatting, etc.) occurred in the RANK and attention is necessary. Fault ....... Indicates that a fault occurred in the RANK. When “fault” is displayed, logical disks in the RANK cannot be moved. PD Type Displays the type of physical disks configuring RANK. The same information as the PD Type displayed in the state monitoring screen of the SnapSAN Manager is displayed. 25 Chapter 3 Operation of Performance Optimization Function (GUI) (iii) Pool list Figure 3-5 shows an example of display of the pool list. Table 3-4 provides descriptions of each display item. Figure 3-5 Example of Display of Pool List Table 3-4 Display Item Display Items of Pool List Description Number Displays the icons and numbers of pools. Display format of the icon is the same as that of the Configuration Display Area. Pool Name Displays the name of pool. Busy Ratio [%] Displays the Busy Ratio of pools. For the pool that does not have valid Busy Ratio information, a string of asterisks (***) is displayed. Note: When a logical disk in the pool is moved, Busy Ratio information which has been accumulated until the movement is no longer related with Busy Ratio information which is to be accumulated after the movement. Therefore, immediately after the logical disk movement, there is no valid Busy Ratio information for the pool. This state will be cancelled when Busy Ratio information is accumulated at the next interval. Completion Time Displays the time when the logical disk movement in the relevant pool has been completed. When logical disks are not moved, “Un-carrying” is displayed. RAID Displays the RAID type of the pool. Status Ready ....... Indicates that the pool is in the normal state. Attn ....... Indicates that an event (reduce, formatting, etc.) occurred in the pool and attention is necessary. Fault ....... Indicates that a fault occurred in the pool. When “fault” is displayed, some logical disks in the pool cannot be moved. PD Type Displays the type of physical disks configuring the pool. The same information as the PD Type of the pool displayed in the state monitoring screen of the SnapSAN Manager is displayed. Partition Allocated Displays the allocation state of the pool. The same information as the partition allocation displayed in the state monitoring screen of the SnapSAN Manager is displayed. (When the partitioning function is installed) Node No. Displays the number of the node to which the pool belongs. (For disk arrays with node) If a failure occurs in the virtual capacity pool due to “fault (over capacity)”, the capacity of some virtual capacity logical disks belonging to the failed pool becomes insufficient (writing fails). In such a case, restore the virtual capacity pool and then the virtual capacity logical disks. 26 Chapter 3 Operation of Performance Optimization Function (GUI) For details, refer to “Thin Provisioning User’s Manual”. 27 Chapter 3 Operation of Performance Optimization Function (GUI) (iv) Logical disk list Figure 3-6 shows an example of display of the logical disk list. Table 3-5 provides descriptions of each display item. The order in which the [Number], [Type], and [LD Name] columns are displayed differs depending on the setting of the SnapSAN Manager client (underlined). Display in numerical order: [Number], [Type], [LD Name], [Status], ... are displayed in this order. Display in alphabetical order: [Type], [LD Name], [Number], [Status], ... are displayed in this order. Figure 3-6 Example of Display of Logical Disk List Table 3-5 Display Item Number Display Items of Logical Disk List Description Displays icons and numbers of logical disks. Similar to RANK/pools’ icons, logical disks’ icons are also displayed in the three stages expressed in different colors depending on Busy Ratio. When the logical disk is in the Ready mode Busy Ratio (High) ..... Busy Ratio (Medium) ..... Busy Ratio (Low) ..... Busy Ratio (No information) ..... When the logical disk is not in the Ready mode Attn ..... Fault ..... Type Displays the type of volume of the logical disk. Displays the same information of the logical disk type that is displayed on the SnapSAN Manager state monitoring screen. LD Name Displays nicknames of logical disks. Status Ready Moving Scheduled ..... Indicates the normal state. ..... Indicates that the logical disk is being moved. ..... Indicates that movement of applicable logical disk has been registered in schedule. Attn ..... Indicates that a sensitive event (formatting, etc.) occurred or a logical disk is in the not in use state by the power saving function. Fault (media error) ..... Indicates that a media fault occurred. Fault ..... Indicates that a RANK/pool fault occurred. In the case of virtual capacity logical disk, this indicates that the LD capacity threshold and LD capacity quota are exceeded. 28 Chapter 3 Operation of Performance Optimization Function (GUI) Display Item Description Busy Ratio [%] Displays the Busy Ratio of the logical disk. For the RANK that does not have valid Busy Ratio information, an asterisk (***) is displayed. Note: When a logical disk in the RANK/pool is moved, Busy Ratio information which has been accumulated is no longer related with Busy Ratio information which is to be accumulated after the movement. Therefore, immediately after a logical disk has been moved, there is no valid Busy Ratio information for the RANK/pool. This state will be cancelled when Busy Ratio information is accumulated at the next interval. RAID Displays the RAID type of the logical disk. Capacity [GB] The capacity of the logical disk is displayed in GB. Partition Name Displays the name of the partition to which the logical disk belongs. (When the partitioning function is installed) Node No. Displays the number of the node to which the logical disk belongs. (For disk arrays with node) RANK Displays the RANK number for which logical disks have been bound. For the multiple RANK types, all Ranks’ numbers are displayed in a row. (For other than disk arrays with pool) Pool No. Displays the pool number for which the logical disk has been bound. (For disk arrays with pool) Pool Name Displays the pool name for which the logical disk has been bound. (For disk arrays with pool) PD Type Displays the type of physical disks configuring the logical disk. The same information as the PD Type of the logical disk displayed in the state monitoring screen of the SnapSAN Manager is displayed. Snapshot Type Displays the snapshot type of the logical disk. The same information as the snapshot type of the logical disk displayed in the state monitoring screen of the SnapSAN Manager is displayed. (When the snapshot is installed) Cache Resident Displays the cache resident state of the logical disk. The same information as the logical disk resident displayed in the state monitoring screen of the SnapSAN Manager is displayed. Data Protection Displays whether a logical disk is protected or not. The same information as the logical disk resident displayed in the state monitoring screen of the SnapSAN Manager is displayed. (When the data retention function is installed) If a failure occurs in the virtual capacity pool due to fault(over capacity) or fault(over quota), a logical disk cannot be moved. In such a case, restore the virtual capacity logical disks and then move the logical disks. If writing fails in the virtual capacity logical disk due to the insufficient capacity of the pool including the virtual capacity logical disk or the LD capacity quota excess, restore it to the level where data consistency is ensured for example by restoring backup data. For details, refer to “Thin Provisioning User’s Manual”. 29 Chapter 3 Operation of Performance Optimization Function (GUI) (6) Work Disk for Optimization Display Area When you double-click a [Logical Disk] listed in the detailed display area, the list of Work Disks for Optimization which are the destination candidates is displayed in the Work Disk for Optimization Display Area. Only Work Disks for Optimization which satisfy the following requirements are listed: The capacity of the optimization logical disk is the same as that of the logical disk selected in the detailed display area. The optimization logical disk is bound for a different RANK/pool from the logical disk selected in the detailed display area. Figure 3-7 shows an example of display of detailed information of the Work Disk for Optimization. Table 3-6 provides descriptions of each display item. The order in which the [Number], [Type], and [LD Name] columns are displayed differs depending on the setting of the SnapSAN Manager client (underlined). Display in numerical order: [Number], [Type], [LD Name], [Status] ... are displayed in this order. Display in alphabetical order: [Type], [LD Name], [Number], [Status] ... are displayed in this order. Figure 3-7 Example of Display of Detailed Information of Work Disk for Optimization Table 3-6 Display Item Disk Array Subsystem in “Moved Material Logical Disk” RANK/Pool No. in “Moved Material Logical Disk” LD No. in “Moved Material Logical Disk” RANK/Pool %Busy in “Moved Material Logical Disk” Number Type LD Name Status Partition Name Node No. Display Items for Work Disk for Optimization Description Displays the disk array name for the logical disk to be moved selected in the Detailed Display Area. Displays the RANK/pool number for the logical disk to be moved selected in the Detailed Display Area. Displays the logical disk number for the logical disk to be moved selected in the Detailed Display Area. Displays the estimated Busy Ratio of the RANKs/pools after the logical disk to be moved selected in the Detailed Display Area have been moved. Displays icons and logical disk number of Work Disks for Optimization. Displays the volume type of each work disk for optimization. Displays nicknames of Work Disks for Optimization. Displays the state of Work Disks for Optimization. Detailed Information is the same as that of the logical disks. Displays the name of the partition where the Work Disk for Optimization belongs. (When the partitioning function is installed) Displays the number of the node to which the Work Disk for Optimization belongs. (For disk arrays with node) 30 Chapter 3 Display Item RANK RANK %Busy Pool No. Pool Name Pool %Busy RAID PD Type Operation of Performance Optimization Function (GUI) Description Displays the RANK numbers of Work Disks for Optimization. (For other than disk arrays with pool) When a moved material logical disk selected in the Detailed Display Area is moved to the Work Disks for Optimization, the estimated Busy Ratio of the RANKs for the Work Disks for Optimization is displayed. Note: If the RAID type of the Work Disk for Optimization is different from that of the moved material logical disk or if the RANK type is other than RAID1 and RAID5, the Busy Ratio after the disk movement cannot be estimated; therefore, a string of asterisks (***) is displayed. (For other than the disk arrays with pool) Displays the pool numbers of Work Disks for Optimization. (For disk arrays with pool) Displays the pool names of Work Disks for Optimization. (For disk arrays with pool) When a moved material logical disk selected in the Detailed Display Area is moved to the Work Disks for Optimization, the estimated Busy Ratio of the pools for the Work Disks for Optimization is displayed. Note: If the RAID type of the Work Disk for Optimization is different from that of the moved material logical disk, if the moved material logical disk is bound in the dynamic pool, or if the RAID type is RAID10 or RAID50, the Busy Ratio after the disk movement cannot be estimated; therefore, a string of asterisks (***) is displayed. (For disk arrays with pool) Displays the RAID type of Work Disks for Optimization. Displays the type of physical disks configuring the Work Disk for Optimization. The same information as the PD Type of the logical disk displayed in the state monitoring screen of the SnapSAN Manager is displayed. If the work disk for optimization is a virtual capacity logical disk, the LD capacity threshold or LD capacity quota cannot be set. It is also impossible to set the logical disk for which LD capacity threshold or LD capacity quota is set as a work disk for optimization. For details, refer to “Thin Provisioning User’s Manual”. 31 Chapter 3 Operation of Performance Optimization Function (GUI) (7) Movement Progress Information Display Area A list of progress information about movement of logical disks is displayed. Figure 3-8 shows an example of display of disk transfer progress information. Table 3-7 provides descriptions of each display item. The order in which the [LD No.] and [LD Name] columns are displayed differs depending on the SnapSAN Manager client setting (underlined). Display in numerical order: [Source RANK/Pool No.], [Source Pool Name], [Source LD No.], [Source LD Name], [Source Partition Name], [Destination RANK/Pool No.], [Destination Pool Name], [Destination LD No.], [Destination LD Name], [Destination Partition Name], and [Status]... are displayed in this order. Display in alphabetical order: [Source RANK/Pool No.], [Source Pool Name], [Source LD Name], [Source LD No.], [Source Partition Name], [Destination RANK/Pool No.], [Destination Pool Name], [Destination LD Name], [Destination LD No.], [Destination Partition Name], and [Status]... are displayed in this order. Figure 3-8 Example of Display of Movement Progress Information Table 3-7 Display Item Detailed Information Display Items for Movement Progress Information Description Disk Array Subsystem Displays the disk array name for the moved material logical disk. Source RANK/Pool No. Displays the RANK/pool number for the source logical disk. Source Pool Name Displays the pool number for the source logical disk. Source LD No. Displays the number of the source logical disk. Source LD Name Displays the volume type and nickname of the source logical disk. Source Partition Name Displays the name of the partition to which the source logical disk belongs. (When the partitioning function is installed) Destination RANK/Pool No. Displays the RANK/pool number for the destination work disk for optimization. Destination Pool Name Displays the pool name for the destination logical disk. Destination LD No. Displays the logical disk number for the destination Work Disk for Optimization. Destination LD Name Displays the volume type and nickname of the destination Work Disk for Optimization. Destination Partition Name Displays the name of the partition to which the destination logical disk belongs. (When the partitioning function is installed) 32 Chapter 3 Operation of Performance Optimization Function (GUI) Display Item Status Description Displays the movement status. Displayed contents are as follows: Moving ...Indicates that a disk is being moved. Complete ...Indicates that movement has been finished normally. Discontinue ...Indicates that movement is being canceled. Discontinuation ...Indicates that movement has canceled due to a cancellation request. Scheduled ...Indicates that movement schedule has been registered. Changing Schedule ...Indicates that registered information for the movement schedule is being changed. Schedule Canceled ...Indicates that registration of the movement schedule has been canceled. Schedule Failed ...Indicates that execution of the registered movement schedule has failed. Fault ...Indicates that abnormal termination of movement has occurred in midstream due to a fault. Displays the movement progress ratio in percentage. Progress [%] Speed of Movement By moving a logical disk, all data contained in the source logical disk is copied to the destination Work Disk for Optimization. This area displays the speed of moving the data. Displayed contents are as follows: auto ....... The movement speed is automatically adjusted according to the operating state of the disk array. high ....... A disk is moved at maximum data transfer speed. Start Time Displays the disk transfer start time. “****/**/** **:**” is displayed before the movement information is obtained from the disk array. However, if the status is “scheduled”, the disk transfer scheduled time is displayed. End Time Displays the disk transfer end time. A blank is displayed if the status is “Moving” or “Scheduled”. If the status is “Schedule canceled”, time of canceling the schedule is displayed, and if the status is “Interrupted” or “Fault”, time of interrupting movement is displayed. (8) Status Bar Displays the operating state of the AutoTier client. Table 3-8 provides descriptions of each display item. Table 3-8 Display Item Display Items for Status Bar Description Operating state Displays the current operating state. Displayed contents are as follows: Information acquiring ..... Indicates that disk array configuration information or Busy Ratio information is being collected from the SnapSAN Manager server. Working ..... Indicates that the AutoTier client is operating. Stop ..... Indicates that the AutoTier client has stopped due to a disconnection with the SnapSAN Manager server or a cancellation instruction provided on the Information acquiring dialog screen. When the client is connected to the SnapSAN Manager server, the operation can be resumed by selecting “Update to The Current Information” from the menu. Interval for updating logical disk transfer progress information Numerical values displayed next to the operating state are the interval for updating logical disk transfer progress information. This interval is for updating logical disk transfer progress information shown on the screen. The value is the same as the interval for checking transfer progress of a logical disk specified in the environment setting of the SnapSAN Manager server. Numerical values in 33 Chapter 3 Operation of Performance Optimization Function (GUI) the range from 5 seconds to 30 seconds are displayed. 34 Chapter 3 3.2 Operation of Performance Optimization Function (GUI) Operation on Screen 33..22..11 S Seettttiin ng gA An naallyyssiiss P Peerriio od d The Busy Ratios of RANKs/pools and logical disks are displayed on the screen. The displayed values are average values during the specified period. This period is called an analysis period. The time zone in which the disk array is used depends on the business system. The following is the examples. The time zone in which the disk array is used is limited to a specific time zone for a day. The business peak comes on weekends which increase the load on the disk array. The business peak comes at the end of the month which makes the load on the disk array highest. When the use of the disk array is limited to a specific time zone or period, or when the period during which it is expected that there will be a high load on the disk array, an analysis period must be adjusted according to such a time zone or period. This adjustment allows displaying appropriate Busy Ratios and appropriate analysis for the business system operations. This section describes the dialog for specifying an analysis period and the specifying procedures. (1) Displaying Analysis Property dialog ([Analysis Period] tab) Select [Setting] Analysis Property] menu on the main screen of the performance optimization function. On the displayed Analysis Property dialog box, select [Analysis Period] tab that displays an area for specifying an analysis period. A period within the time including past 1 month can be specified for an analysis period. The following shows the default values for an analysis period. Initial values for the analysis period Period to Calculate: Starting from one month before to the present Days of the Week to Calculate: All days of the week Time Zone to Calculate: 24 hours from 0:00 Figure 3-9 shows an example of displayed Analysis Property dialog ([Analysis Period] tab), and Table 3-9 provides descriptions of the areas in the dialog. 35 Chapter 3 Operation of Performance Optimization Function (GUI) “Period to Calculate” Specification Area “Time Zone to Calculate” Specification Area “Day of the Week to Calculate” Specification Area Figure 3-9 Example of Display of Analysis Property Dialog ([Analysis Period] Tab) Table 3-9 Area Descriptions of Areas in Analysis Property Dialog ([Analysis Period] Tab) Description “Period to Calculate” specification area Specifies the analysis period by day unit. Date and elapsed days can be used for the specification. Absolute Date Specifies the start day and end day of the analysis period in the Year/Month/Day format. Period to Calculate Specifies the analysis period in the format of “n days ago to now”. “Day of the Week to Calculate” specification area When specifying a specific day of the week as an analysis target day, activate the check box for the target day of the week. “Time Zone to Calculate” specification area When specifying a specific time zone (period of time) as an analysis target, you can specify the time zone (period of time) in the format of “x Hour y Min To n Hours” (n hours from x o’clock y). 36 Chapter 3 Operation of Performance Optimization Function (GUI) (2) Procedures for setting analysis period This section describes the procedures for specifying an analysis period on the Analysis Property dialog ([Analysis Period] tab). The specified analysis period can be saved by selecting [File] [Save Settings] menu on the main screen of the performance optimization function, for settings upon activating next time. (i) Specification of the period You can specify the period by selecting [Absolute Date] or [Period to Calculate]. The usage of [Absolute Date] and [Period to Calculate] is described below. Effectively select either one of them according to the purpose of analysis. Absolute Date Select this function to analyze a specific period in the past. Period to Calculate Select this function to analyze data in a specified period periodically such as daily, weekly or monthly. For example, if you set the period from six days ago to the present, you can perform weekly analysis of the week without changing settings. (ii) Specification of the days of the week Specify the analysis target days of the week. (iii)Specification of the time zone Specify the analysis target time zone. A time zone spanning over two days (e.g. 8 hours starting from 20:00) can be specified. (iv) Determination of the analysis period When you specify a period, days of the week and time zone and then click the [OK] button on the Analysis Property dialog screen, the specified analysis period is registered. Clicking the [Cancel] button will cancel the specified analysis period and restore the original analysis period. The analysis period is set under the power conditions of the period, the day(s) of the week, and the time zone that have been specified. The following is the examples of the analysis period setting. Example: Setting analysis period Analysis Period to be specified From 10:00 to 17:00 on Thursdays, Fridays and Saturdays for the past 20 days (Assume that the current date is January 31, 2002.) 37 Chapter 3 Operation of Performance Optimization Function (GUI) Specification on the Setup the Analysis Period dialog screen Period Absolute Date: Specify the start day and end day as follows: Opening - 2002 Year 01 Month 11 Day End - 2002 Year 01 Month 31 Day Period to Calculate: Specify from 20 days before to the present. Day of the Week to Calculate Activate check boxes of Thursday, Friday and Saturday. Time Zone to Calculate Specify 7 hours from 10:00. 38 Chapter 3 Operation of Performance Optimization Function (GUI) 33..22..22 S Seettttiin ng gS So orrtt o off B Bu ussyy R Raattiio o The signal color corresponding to the Busy Ratio is appended to the icon of a RANK/pool and logical disk. The color allows you to visually recognize the degree of the Busy Ratio so that the bottleneck can be detected easily. Furthermore, by specifying classes of Busy Ratios, reference level values for executing replacement are specified. Replacement plan is applicable to the RANKs/pools and logical disks that reached the caution zone or danger zone. For replacement plan, refer to 3.2.5 “Replacement Plan”. Explanation will be given below about Analysis Property dialog ([Sort of Busy Ratio] tab) screen and setting procedures. (1) Displaying Analysis Property dialog ([Sort of Busy Ratio] tab) Select [Setting] [Analysis Property] menu on the main screen of the performance optimization function. On the displayed Analysis Property dialog box, select [Sort of Busy Ratio] tab that displays an area for specifying the sort of busy ratio. Figure 3-10 shows an example display of Analysis Property dialog ([Sort of Busy Ratio] tab). Figure 3-10 Analysis Property Dialog ([Sort of Busy Ratio] Tab) The Busy Ratio range with the yellow signal color has spin buttons. Use these spin buttons to set the three stages of the Busy Ratio. As shown in Table 3-10, three signal colors are provided: red, yellow, and blue. 39 Chapter 3 Operation of Performance Optimization Function (GUI) Table 3-10 Signal Color Meaning Description of Signal Colors Description Red Danger zone The Busy Ratio has reached the Caution zone. Tuning is necessary. The RANKs/pools reaching danger zone are applicable to “Replacement Plan”. The default value ranges from 81 to 100%. Yellow Caution zone The Busy Ratio has not reached the danger zone yet, but attention is required. Carefully continue the monitoring. The RANKs/pools reaching caution zone are applicable to “Replacement Plan”. The default value ranges from 51 to 80%. Blue Safety zone The Busy Ratio is normal. No tuning is required. The default value ranges from 0 to 50%. (2) Procedures for setting Sort of Busy Ratio This section describes the procedures for specifying the Sort of Busy Ratio on the Analysis Property dialog ([Sort of Busy Ratio] tab). The Sort of Busy Ratio can be saved by selecting [File] [Save Settings] menu on the main screen of the performance optimization function, for settings upon activating next time. (i) Specification of the Busy Ratio range Use spin buttons provided for the Busy Ratio range with the yellow signal to specify the three stages of the Busy Ratio range. Specifying the upper limit value of the yellow zone automatically results in specifying the “limit value + 1” as the lower limit of red (danger zone). On the other hand, specifying the lower limit value of the yellow (caution zone) automatically results in specifying the “limit value 1” as the upper limit of blue (safety zone). (ii) Setting Busy Ratio zones Clicking [OK] button on the Setup the Busy Ratio dialog screen will activate the specified Busy Ratio zones. Clicking [Cancel] button will cancel the Busy Ratio zones and restore the original Busy Ratio zones. 40 Chapter 3 Operation of Performance Optimization Function (GUI) 33..22..33 S Seettttiin ng gF Fo olld deerr tto oS Stto orree D Daattaa For executing “Busy Ratio Graph” and “Replacement Effect Prediction” functions, the optimization log files recording the Busy Ratio information must be downloaded from the SnapSAN Manager server to SnapSAN Manager client, and must be stored in a folder to store data. The folder to store data for storing downloaded optimization log files can be created in an arbitrary folder. This section describes the dialog for setting the folder to store data and the setting procedures. (1) Displaying Analysis Property dialog ([Folder to Store Data] tab) Select [Setting] [Analysis Property] menu on the main screen of the performance optimization function. On the displayed Analysis Property dialog box, select [Folder to Store Data] tab that displays an area for specifying a folder to store data. Or when “Busy Ratio Graph” and “Replacement Effect Prediction” functions are displayed and the Confirmation of Overwriting dialog is displayed, clicking [Change Folder] button displays this dialog. Figure 3-11 shows an example of displayed Analysis Property dialog ([Folder to Store Data] tab), and Table 3-11 provides description of the tab in the dialog. Figure 3-11 Analysis Property Dialog ([Folder to Store Data] Tab) 41 Chapter 3 Operation of Performance Optimization Function (GUI) Table 3-11 Description of Analysis Property Dialog ([Folder to Store Data] Tab) Tab Folder to Store Data Description Specifies a folder to store data. (2) Setting Folder to Store Data Enter an arbitrary folder as a folder to store data, or click the [Browse] button and select a directory on the Browse for Folder dialog. After specifying a folder to store data, click [OK] button. After specifying a folder to store data, executing downloading operation downloads the performance optimization log file in the specified directory. When “Busy Ratio Graph” or “Replacement Effect Prediction” function is activated, the information is displayed on the basis of the performance optimization log file stored in this folder. 42 Chapter 3 Operation of Performance Optimization Function (GUI) 33..22..44 S Sh ho ow wiin ng g tth hee B Bu ussyy R Raattiio oG Grraap ph h The Busy Ratio of logical disks and RANKs/pools can be displayed using time-series graphs, as well as by the numeric values displayed on the Detailed Display Area. If you log into the system to which the partitioning function is installed as a partition user, only the resources of the partitions the user can manage can be displayed in graphs. This section describes the dialog for showing the Busy Ratio Graph and the displaying procedures. (1) Showing the Busy Ratio Graph For selecting the applicable items for displaying Busy Ratio in graph, display the Busy Ratio Graph dialog. Three procedures are provided for displaying Busy Ratio Graph dialog. Open the Busy Ratio Graph dialog by one of the following three procedures: Popup menu Select disk array or RANK/pool on the Configuration Display Area or Detailed Display Area, and display a popup menu by right clicking. Select [Busy Ratio Graph] on the popup menu. Menu Select disk array or RANK/pool on the Configuration Display Area or Detailed Display Area, and select [Operation] [Busy Ratio Graph]. Tool button Select disk array or RANK/pool on the Configuration Display Area or Detailed Display Area, and select [Busy Ratio Graph] on the toolbar. 43 Chapter 3 Operation of Performance Optimization Function (GUI) Figure 3-12 shows an example of displayed the Busy Ratio Graph dialog when selecting pool, and Table 3-12 provides descriptions of the areas in the dialog. “LD Selection” area (when pool is selected on Configuration display area or Detailed Display Area), or “Pool Selection” area (when disk array is selected on Configuration display area or Detailed Display Area) “Target Period” area Figure 3-12 Table 3-12 Busy Ratio Graph Dialog Descriptions of Busy Ratio Graph Dialog Area Description “RANK/Pool Selection” area (when disk array is selected on Configuration Display Area or Detailed Display Area) Displays a list of RANKs/pools included in selected disk array. For display items, refer to Table 3-3/3-4 “Display Items of RANK/Pool List”. “LD Selection” area (when RANK/pool is selected on Configuration Display Area or Detailed Display Area) Displays a list of LDs included in selected RANK/pool. For display items, refer to Table 3-5 “Display Items of Logical Disk List” (except “Snapshot Type” and “Cache Resident”). “Target Period” area Specifies start date and end date of a period for displaying the Busy Ratio Graph. The order in which the [Number], [Type], and [LD Name] columns are displayed in the LD Selection area differs depending on the setting of the SnapSAN Manager client (underlined). Display in numerical order: [Number], [Type], [LD Name], [Status]... are displayed in this order. Display in alphabetical order: [Type], [LD Name], [Number], [Status] ... are displayed in this order. 44 Chapter 3 (2) Operation of Performance Optimization Function (GUI) Specifying display items on Busy Ratio Graph On the Busy Ratio Graph dialog, select RANKs/pools or logical disks to be displayed on a Busy Ratio Graph, specify start date or end date, and then click the [Show Graph] button. Up to 8 RANKs/pools or 8 logical disks are selectable for displaying at the same time. (3) Downloading optimization log files that records Busy Ratio Clicking [Show Graph] button on the Busy Ratio Graph dialog displays Download Selection dialog. Figure 3-13 shows an example of Download Selection dialog. Table 3-13 describes the radio buttons on the Download Selection dialog. Figure 3-13 Table 3-13 Download Selection Dialog Descriptions of Download Selection Dialog Radio Button Description Show graph after downloading insufficient data. Downloads optimization log file recording Busy Ratios onto the SnapSAN Manager client. Show graph using data already downloaded. Displays Busy Ratio Graph without downloading optimization log file. Selecting [Show graph after downloading insufficient data.] and clicking [OK] button downloads the performance optimization log files accumulated on the SnapSAN Manager server onto the SnapSAN Manager client, and the optimization log files stored in a folder to store data is updated into a latest file. For the folder to store data, refer to 3.2.3 “Setting Folder to Store Data”. Selecting [Show graph using data already downloaded.] and clicking [OK] button displays Busy Ratio Graphs without downloading performance optimization log files form the SnapSAN Manager server. In this case, Busy Ratio Graphs are displayed for a log accumulation period of the optimization log files that have already been downloaded. If the optimization log files of the specified period have already been downloaded for showing the Busy Ratio Graph, the Confirmation of Overwriting dialog is displayed. Figure 3-14 shows the Confirmation of Overwriting dialog. 45 Chapter 3 Operation of Performance Optimization Function (GUI) Figure 3-14 Confirmation of Overwriting Dialog Clicking [OK] on the Confirmation of Overwriting dialog overwrites the existing data. Clicking [Change Folder] button allows changing the folders to store data to be downloading destination. For changing the folders to store data, refer to 3.2.3 “Setting Folder to Store Data”. When downloading is executed, the performance optimization log files stored in the folder to store data of the SnapSAN Manager client are updated and the data older than one month old is deleted. Upon attempting execution of download process, if a performance optimization log file storing Busy Ratios does not exist on the SnapSAN Manager server, the process results in an error without executing downloading. Meanwhile, upon attempting execution of Busy Ratio Graph without downloading performance optimization log file, the process results in an error without showing the Busy Ratio Graph if no data exists in the folder to store data of the SnapSAN Manager client. Clicking [Cancel] on the Downloading dialog during execution of download process interrupts the download process. And closing the main screen of performance optimization function interrupts the download process too. If a process is interrupted, the performance optimization log files must be downloaded again. (4) Showing the Busy Ratio Graph Clicking [OK] button on the Download Selection dialog displays the [Busy Ratio Graph] screen. The [Busy Ratio Graph] screen displays the graphs indicating fluctuations of Busy Ratio for specified logical disks or RANKs/pools. 46 Chapter 3 Operation of Performance Optimization Function (GUI) Figure 3-15 shows an example of the [Busy Ratio Graph] screen displayed when pools are selected. Table 3-14 describes the areas on the [Busy Ratio Graph] screen. Graph Display Area “Graph Scale” Setting Area Legend Display Area Figure 3-15 Busy Ratio Graph Screen 47 Chapter 3 Operation of Performance Optimization Function (GUI) Table 3-14 Description of Busy Ratio Graph Screen Area “Graph Scale” setting area Description Selects a time range of Busy Ratio Graph on screen. A range is specified by hours (3/6/12/24), days (1 to 31), or weeks (1 to 4). Setting is allowed within a period specified by the target period area on the Busy Ratio Graph dialog. Upon activation of the Busy Ratio Graph screen, all ranges specified for the target period are displayed on one screen. Fluctuations of Busy Ratios of RANKs/pools or logical disks are displayed in graphs. A maximum of 8 graph lines are displayed. Vertical axis Indicates Busy Ratio Horizontal axis Graph display area Indicates target period. (Period indicated by markings is variable by value of Graph scale setting area) Horizontal axis label Indicates graph display time. Display intervals by a label are as follows: 1-hour period : 20-minute interval 2-hour period : 30-minute interval 3-hour period or longer: Interval variable by value specified in Graph scale setting area Displays the items listed below: Number Indicates icons and numbers of RANKs/pools or logical disks Type Indicates logical disk type. Displayed only when Busy Ratio of logical disks are shown. LD Name Indicates logical disk name. Displayed only when Busy Ratio of logical disks are shown. Average Busy Ratio [%] Legend display area Indicates an average Busy Ratio within the target period. Note: When the configuration of the relevant RANK/pool is changed during the target period (including the logical disk movement), this ratio is calculated based on the information after the configuration is changed. However, if there is no data to be calculated during the target period, a string of asterisks (***) is displayed. Maximum Busy Ratio [%] Indicates a maximum Busy Ratio within the target period. Note: When the configuration of the relevant RANK/pool is changed during the target period (including the logical disk movement), this ratio is calculated based on the information after the configuration is changed. However, if there is no data to be calculated during the target period, a string of asterisks (***) is displayed. Maximum Busy Ratio Detection time Indicates time when a maximum Busy Ratio was detected. 48 Chapter 3 Operation of Performance Optimization Function (GUI) The order in which the [Number], [Type], and [LD Name] columns are displayed in the legend display area differs depending on the setting of the SnapSAN Manager client (underlined). Display in numerical order: [Number], [Type], [LD Name], [Average Busy Ratio [%]] ... are displayed in this order. Display in alphabetical order: [Type], [LD Name], [Number], [Average Busy Ratio [%]] ... are displayed in this order. Upon activation of the Busy Ratio Graph screen, the Busy Ratio Graphs all ranges specified for target periods on one screen. For changing graph scale, specify a range to be displayed on one screen (hours (3/6/12/24), days (1 to 31), or weeks (1 to 4)) and then click the [Apply] button. If system configuration is changed within a target period (including movement of logical disks), the graph lines become discontinuous. The average/maximum Busy Ratios after a configuration change are calculated on the basis of the system configuration after the changes. If configuration change is performed for two or more times, the average/maximum Busy Ratios are displayed on the basis of configuration after the latest change. However, the change occurs at the end of or after the target period, “***” is displayed for average/maximum Busy Ratios. 49 Chapter 3 Operation of Performance Optimization Function (GUI) 33..22..55 R Reep pllaacceem meen ntt P Pllaan n This function detects High Load RANK/pool and makes the most effective replacement plan. A list of replacement plans expecting higher effects of I/O distribution after moving is made for replacing source/destination logical disks. The replacement plan is applicable to the RANKs/pools reaching danger zone and critical zone specified on the Analysis Property dialog ([Sort of Busy Ratio] tab). However, a volume that cannot be replaced is excluded from the replacement plan. For description of [Sort of Busy Ratio] tab, refer to 3.2.2 “Setting Sort of Busy Ratio”. If you log into the system to which the partitioning function is installed as a partition user, a plan is applicable only to the resources of the partitions the user can manage. This section describes Replacement Plan dialog that makes replacement plan, and operating procedures. (1) Displaying Replacement Plan dialog Three procedures are provided for displaying the Replacement Plan dialog. Open a Replacement Plan dialog by one of the following three procedures: Popup menu Select Disk Array on the Configuration Display Area or Detailed Display Area, and display a popup menu by right clicking. Select Replacement Plan on the popup menu. Menu Select Disk Array on the Configuration Display Area or Detailed Display Area, and select [Operation] Replacement Plan. Tool button Select Disk Array on the Configuration Display Area or Detailed Display Area, and select Replacement Plan on the toolbar. 50 Chapter 3 Operation of Performance Optimization Function (GUI) On the Replacement Plan dialog, a list of replacement plans for source/destination logical disks, which can expect higher effects of I/O distribution after moving. Figure 3-16 shows an example of displayed Replacement Plan dialog, and Table 3-15 provides descriptions of the areas in the dialog. Replacement Plan Display Area Figure 3-16 51 Replacement Plan Dialog Chapter 3 Operation of Performance Optimization Function (GUI) Table 3-15 Description of Replacement Plan Dialog Area Description Disk Array Subsystem Nicknames of selected disk arrays are displayed. High Load RANK/Pool RANK/pool numbers of the bottleneck RANKs/pools are displayed. The applicable RANKs/pools to be displayed in the replacement plan display area can be changed by selecting RANKs/pools on a pull-down menu. RANK/pool numbers are listed in order of heavy-load. Replacement plan display area The candidate movement destination logical disks are listed in the order of effectiveness in I/O distribution. The following are items to be displayed. Recommendation Rating Ranking of effectiveness in I/O distribution after logical disk movement is displayed. Source LD No. Icon and number of source LD are displayed. Icons displayed are the same as those in Configuration Display Area. Source LD Name Source logical disk names are displayed. Source Partition Name (When the partitioning function is installed) The name of the partition to which the source logical disk belongs is displayed. Destination RANK (For other than disk arrays with pool) Icons and numbers of destination RANKs are displayed. RANK icons displayed are the same as those in Configuration Display Area and Detailed Display Area. Destination Pool No. (For disk arrays with pool) Icons and numbers of destination pools are displayed. Pool icons displayed are the same as those in Configuration Display Area and Detailed Display Area. Destination Pool Name (For disk arrays with pool) Destination pool name is displayed. Destination LD No. Icons and numbers of destination logical disks are displayed. Icons displayed are the same as those in Work Disk for Optimization Display Area. Destination LD Name The volume type and nickname of the destination logical disk are displayed. Destination Partition Name (When the partitioning function is installed) The name of the partition to which the source logical disk belongs is displayed. Source RANK %BUSY (For other than disk arrays with pool) Expected change of Busy Ratio of a source RANK is displayed. Destination RANK %Busy (For other than disk arrays with pool) Expected change of Busy Ratio of a destination RANK is displayed. Source Pool %Busy (For disk arrays with pool) Current Busy Ratio and expected Busy Ratio of a source pool after the transfer are displayed. Destination Pool %Busy (For disk arrays with pool) Current Busy Ratio and expected Busy Ratio of a destination pool after the transfer are displayed. 52 Chapter 3 Operation of Performance Optimization Function (GUI) The order in which the [Source LD No.], [Source LD Name], [Destination LD No.], and [Destination LD Name] columns are displayed differs depending on the setting of the SnapSAN Manager client (underlined). Display in numerical order: [Source LD No.], [Source LD Name], [Source Partition Name], [Destination RANK]/[Destination Pool No.], [Destination LD No.], [Destination LD Name], [Destination Partition Name], and [Source RANK %Busy] ... are displayed in this order. Display in alphabetical order: [Source LD Name], [Source LD No.], [Source Partition Name], [Destination RANK]/[Destination Pool No.], [Destination LD Name], [Destination LD No.], [Destination Partition Name], and [Source RANK %Busy] ... are displayed in this order. On the Replacement Plan dialog, select a line of a replacement plan on the Replacement plan display area and click [Start LD Movement] button or select [Start LD Movement] on right-click popup menu. This can start movement of the logical disks. For starting moving of logical disks, refer to 3.2.7 “Start LD Movement”. On the Replacement Plan dialog, select a line of a replacement plan on the Replacement plan display area and click [Replacement Effect Prediction] button or select [Replacement Effect Prediction] on right-click popup menu. This can estimate the effectiveness of replacement after logical disk movement. For the replacement effectiveness of replacement after logical disk movement, refer to 3.2.6 “Replacement Effect Prediction”. Replacement plan is unavailable in the following cases: Busy Ratio information is not stored in performance optimization log file. Busy Ratio information of an analysis period does not exist in performance optimization log file. The moved material logical disk is bound in the dynamic pool or the RAID type of logical disk is RAID10 or RAID50. A suggested replacement plan is invalid in the following cases: A source logical disk on high load RANK/pool has been moved. Movement schedule has been registered for a source logical disk on high load RANK/pool. 53 Chapter 3 Operation of Performance Optimization Function (GUI) 33..22..66 R Reep pllaacceem meen ntt E Effffeecctt P Prreed diiccttiio on n The performance optimization function is capable of estimating an effect of load distribution after logical disk movement. By executing this function, the changes of Busy Ratios for RANKs/pools to which source and destination logical disks belong are displayed in graphs. A volume that cannot be replaced is not displayed in a graph. If you log into the system to which the partitioning function is installed as a partition user, only the resources of the partitions the user can manage can be displayed in graphs. This section describes the dialog for displaying an effect of replacement and the displaying procedures. (1) Display Replacement Effect Prediction dialog For selecting the items for displaying graphs of replacement effect, the Graph Indicating Replacement Effect Prediction dialog must be displayed. Four procedures are provided for displaying the Displaying Replacement Effect Prediction graph dialog. Display the Replacement Effect Prediction dialog with one of the following procedures: Popup menu Select a work disk on Work Disk for Optimization Display Area, and display a popup menu by right clicking. Then select [Replacement Effect Prediction] on the popup menu. Menu Select a work disk on Work Disk for Optimization Display Area, and select [Operation] [Replacement Effect Prediction]. Tool button Select a work disk on Work Disk for Optimization Display Area, and select [Replacement Effect Prediction] on the toolbar. Replacement Plan dialog Click the [Replacement Effect Prediction] button on the Replacement plan dialog. Refer to 3.2.5 “Replacement Plan” for details on the Replacement Plan dialog. Figure 3-17 shows an example of displayed the Graph Indicating Replacement Effect Prediction dialog, and Table 3-16 provides descriptions of the areas in the dialog. 54 Chapter 3 Operation of Performance Optimization Function (GUI) “Target Period” area Figure 3-17 Table 3-16 Graph Indicating Replacement Effect Prediction Dialog Description of Graph Indicating Replacement Effect Prediction Dialog Area Description Specifies start date and end date of a period for displaying Replacement Effect Prediction graph. “Target Period” area (2) Specify period for Replacement Effect Prediction On the Graph Indicating Replacement Effect Prediction dialog, specify a period for Replacement Effect Prediction of logical disks. Specifying a period when a bottleneck occurred makes it easier to know the effect of replacing applicable logical disks. Specify a start date and end date, and then click the [Show Graph] button. (3) Download performance optimization log file containing Busy Ratios Clicking [Show Graph] button on the Graph Indicating Replacement Effect Prediction dialog displays the Download Selection dialog. Figure 3-18 shows an example of Download Selection dialog. Table 3-17 describes the radio buttons on the Download Selection dialog. Figure 3-18 55 Download Selection Dialog Chapter 3 Operation of Performance Optimization Function (GUI) Table 3-17 Description of Download Selection Dialog Radio Button Description Show graph after downloading insufficient data. Downloads optimization log file recording Busy Ratios onto the SnapSAN Manager client. Show graph using data already downloaded. Displays Busy Ratio Graph without downloading optimization log file. Selecting [Show graph after downloading insufficient data.] and clicking [OK] button downloads the performance optimization log files accumulated on the SnapSAN Manager server onto the SnapSAN Manager client, and the optimization log files stored in a folder to store data is updated into a latest file. For the folder to store data, refer to 3.2.3 “Setting Folder to Store Data”. Selecting [Show graph using data already downloaded.] and clicking [OK] button results in estimating replacement effect without downloading performance optimization log files form the SnapSAN Manager server. In this case, replacement effect is estimated for a log accumulation period of the optimization log files that have already been downloaded. If the optimization log files of the specified period have already been downloaded for estimating replacement effect, the Confirmation of Overwriting dialog is displayed. Figure 3-19 shows the Confirmation of Overwriting dialog. Figure 3-19 Confirmation of Overwriting Dialog Clicking [OK] on the Confirmation of Overwriting dialog overwrites the existing data. Click the [Change Folder] button allows changing the folders to store data to be downloading destination. For changing the folder to store data, refer to 3.2.3 “Setting Folder to Store Data”. When downloading is executed, the performance optimization log files stored in the folder to store data of the SnapSAN Manager client are updated and the data older than one month old is deleted. Upon attempting execution of download process, if a performance optimization log file storing Busy Ratios does not exist on the SnapSAN Manager server, the process results in an error without executing downloading. Meanwhile, upon attempting execution of Replacement Effect Prediction without downloading performance optimization log file, the process results in an error without Replacement Effect Prediction if no data exists in the folder to store data of the SnapSAN Manager client. 56 Chapter 3 Operation of Performance Optimization Function (GUI) Clicking [Cancel] on the Downloading dialog during execution of download process interrupts the download process. And closing the main screen of performance optimization function interrupts the download process. If a process is interrupted, the performance optimization log files must be downloaded again. (4) Display Replacement Effect Prediction Clicking [OK] button on the Download Selection dialog displays the Replacement Effect Prediction screen. The Replacement Effect Prediction screen displays the graphs indicating changes of Busy Ratios for specified source and destination RANKs/pools. Figure 3-20 shows an example of the Replacement Effect Prediction screen. Table 3-18 describes the areas on Replacement Effect Prediction screen. Graph Display Area “Graph Scale” Setting Area Legend Display Area Figure 3-20 Replacement Effect Prediction Screen 57 Chapter 3 Operation of Performance Optimization Function (GUI) Table 3-18 Description of Replacement Effect Prediction Screen Area “Graph Scale” setting area Description Selects a time range of Replacement Effect Prediction Graph on screen. A range is specified by hours (3/6/12/24), days (1 to 31), or weeks (1 to 4). Setting is allowed within a period specified by the target period area on the Graph Indicating Replacement Effect Prediction dialog. Upon activation of the Prediction of Replacement screen, all ranges specified for the target period are displayed on one screen. Changes of Busy Ratios of source and destination RANKs/pools before and after moving is displayed in graphs. Vertical axis Indicates Busy Ratio Horizontal axis Graph display area Indicates target period. (Period indicated by markings is variable by value of Graph scale setting area) Horizontal axis label Indicates graph display time. Display intervals by a label are as follows: 1-hour period : 20-minute interval 2-hour period : 30-minute interval 3-hour period or longer: Interval variable by value specified in Graph scale setting area Displays the items listed below: Number Indicates icon and number of RANK/pool. Pool Name (For disk arrays with pool) Indicates the pool name. Average Busy Ratio [%] Legend display area Indicates an average Busy Ratio within the target period. Note: When the configuration of the relevant RANK/pool is changed during the target period (including the logical disk movement), this ratio is calculated based on the information after the configuration is changed. However, if there is no data to be calculated during the target period, a string of asterisks (***) is displayed. Maximum Busy Ratio [%] Indicates a maximum Busy Ratio within the target period. Note: When the configuration of the relevant RANK/pool is changed during the target period (including the logical disk movement), this ratio is calculated based on the information after the configuration is changed. However, if there is no data to be calculated during the target period, a string of asterisks (***) is displayed. 58 Chapter 3 Operation of Performance Optimization Function (GUI) Upon activation of Replacement Effect Prediction screen, the graph displays all ranges specified for target periods on one screen. For changing graph scale, specify a range to be displayed on one screen (hours (3/6/12/24), days (1 to 31), or weeks (1 to 4)) and then click the [Apply] button. If system configuration is changed within a target period (including movement of logical disks), the graph lines become discontinuous. The average/maximum Busy Ratios after a configuration change are calculated on the basis of the system configuration after the changes. If configuration change is performed for two or more times, the average/maximum Busy Ratios are displayed on the basis of configuration after the latest change. However, the change occurs at the end of or after the target period, “***” is displayed for average/maximum Busy Ratios. 59 Chapter 3 Operation of Performance Optimization Function (GUI) 33..22..77 S Sttaarrtt L LD DM Mo ovveem meen ntt If a RANK/pool with Busy Ratio reaching a caution zone or a danger zone is detected, the logical disks on the RANK/pool must be moved to balance the I/O density. The tuning can be executed instantly or at a specified time and date by registering a schedule. Explanation will be made below about the procedures for logical disk movement. (1) From deciding logical disks to be moved to starting disk moving/registering disk LD movement schedule (i) Selecting a RANK/pool Select a RANK/pool to be tuned in the Configuration Display Area or in the detailed information display area. You can specify a RANK/pool in which the Busy Ratio has not reached the critical zone or attention zone yet as a tuning target. It is possible to perform tuning for precautions or perform a tuning operation when short-term I/O concentration has been detected by the performance monitoring function. RANK/Pool to Be Tuned Figure 3-21 Selecting a RANK/Pool to Be Tuned Figure 3-21 shows an example of selecting a RANK/pool to be tuned in the detailed information display area. Double-clicking the target RANK/pool will display logical disks bound for the RANK/pool in the Detailed Display Area. (ii) Selecting Moved Material Logical Disks/Selecting Work Disk for Optimization Among logical disks bound for the RANK/pool to be tuned, select a Moved Material Logical Disk. It is not always right to move a logical disk which has the highest Busy Ratio. Points to select a Moved Material Logical Disk are as follows: Points to consider the moved material logical disks After logical disks have been moved, the Busy Ratio of the destination RANK/pool (the RANK/pool for which Work Disks for Optimization are bound) should become nearly equal to that of the source RANK/pool. When there are multiple destination candidates (Work Disks for Optimization), select one that satisfies the above item and has the lowest Busy Ratio. 60 Chapter 3 Operation of Performance Optimization Function (GUI) Example 1: Example of correct transfer Busy Ratio of the source RANK/pool : 90% Busy Ratio of the moved material logical disk : 30% Busy Ratio of the destination RANK/pool : 25% Busy Ratio after the moved material logical disk: Busy Ratio of the source RANK/pool : 60% Busy Ratio of the destination RANK/pool : 55% Almost equally averaged (correct transfer). Example 2: Example of incorrect transfer Busy Ratio of the source RANK/pool : 90% Busy Ratio of the moved material logical disk : 45% Busy Ratio of the destination RANK/pool : 25% The destination RANK may have a Busy Ratio after the moved material logical disk: Busy Ratio of the source RANK/pool : 45% Busy Ratio of the destination RANK/pool : 70% bottleneck (incorrect transfer). When you double-click a logical disk in the detailed information display area, destination candidates are displayed in the Work Disk for Optimization Display Area. Then, based on the above-mentioned points, select a Moved Material Logical Disk and a destination Work Disk for Optimization. If the RAID type of the source logical disk and the destination Work Disk for Optimization is different, if the moved material logical disk is bound in the dynamic pool, or if the RAID type is RAID10 or RAID50, the Busy Ratio after movement cannot be expected. In addition, effect after movement depends on the RAID type of the pool of a Work Disk for Optimization, the type of the physical disk configuring a pool, the rotation speed, and the like. Therefore, if you select a destination Work Disk for Optimization, it is necessary to consider configuration in which the Work Disk for Optimization is placed in advance. For placement of a Work Disk for Optimization, refer to 2.3.2 “Placement of Work Disks for Optimization”. The logical disks displayed in gray cannot be selected. Gray display indicates that the logical disk movement is being executed, that a movement schedule has been registered, that the logical disk is a cache resident disk, that the state of the logical disk is attn.(formatting), that the state of the logical disk is fault, that the logical disk is multi-RANK type (other than disk arrays with pool), that it is a snapshot attribute and a disk other than the BV, that the logical disk is a System Volume, or that the data protection setting has already been set to the logical disk. Also, a reassignment plan prepared by the performance optimization function can be selected for moved material logical disk and work disk for optimization. For details, refer to 3.2.5 “Replacement Plan”. 61 Chapter 3 Operation of Performance Optimization Function (GUI) The Busy Ratio of the source RANK/pool is displayed in the “Before movement After movement” format. Double-clicking a logical disk will display destination candidate Work Disks for Optimization. The Busy Ratio of the destination RANK/pool is displayed in the “Before movement After movement” format. Figure 3-22 Selecting Moved Material Logical Disks/Selecting Work Disk for Optimization (iii) Start LD Movement/Register LD Movement Schedule After deciding a logical disk to be moved and work disk for optimization, start moving or register a movement schedule. Start of moving or registration of moving is specified on the Start LD Movement dialog. Four procedures are provided for displaying the Start LD Movement dialog. Display the Start LD Movement dialog with one of the following procedures: Popup menu Select a work disk for optimization of the movement target, on the Work Disk for Optimization Display Area, and display a popup menu by right clicking. Select [Start LD Movement] on the popup menu. Menu Select a work disk for optimization of the movement target, on the work disk for optimization display area, and select [Operation] [Start LD Movement]. Tool Bar button Select a destination Work Disk for Optimization from the Work Disk for Optimization Display Area and then click the [Start LD Movement] button on the tool bar. 62 Chapter 3 Operation of Performance Optimization Function (GUI) Replacement Plan dialog Click the [Start LD Movement] button on the Replacement Plan dialog. Refer to 3.2.5 “Replacement Plan” for details on Replacement Plan dialog. When the following conditions are met, the confirmation dialog is displayed. A work disk for optimization, which was bound on a node other than the node including a logical disk to be moved, was selected. A logical disk to be moved, which was bound in an encryption disk, and a work disk for optimization, which was bound in a non-encryption disk, was selected. Figure 3-23 Confirmation Dialog When you click the [OK] button on this dialog, the “Start LD Movement” dialog is displayed. Figure 3-24 shows an example of displayed Start LD Movement dialog, and Table 3-19 provides descriptions of the areas in the dialog. 63 Chapter 3 Operation of Performance Optimization Function (GUI) “Movement Speed” Area “LD capacity threshold / LD capacity quota” Area “Start Schedule” Area Figure 3-24 Table 3-19 Start LD Movement Dialog Description of Start LD Movement Dialog Area Description Select Moving speed between “auto” and “high”. The following describes the two speeds. auto “Movement Speed” area The disk array automatically adjusts movement speeds in accordance with the load state, minimizing the influence of moving operation to the business system. A recommended moving speed is used, and this is selected by default. high Data is copied in a maximum data transfer rate. Although this setting completes moving process in a shorter time than “auto”, it causes greater influences to the business system. This setting is specified in a specific case, such as a case where the system tuning takes precedence over business operations. This area is enabled when the source and destination logical disks are both virtual capacity logical disks and specifies whether the destination logical disk takes over the LD capacity threshold and LD capacity quota. Keep Setting “LD capacity threshold/LD capacity quota” area The destination logical disk takes over the LD capacity threshold and LD capacity quota specified to the source logical disk. Reset Setting The LD capacity threshold and LD capacity quota are not specified to the destination logical disk. Re-specify them as needed. * This area is not specifiable if a source or destination logical disk is not virtual capacity logical disk. If the destination logical disk is a virtual capacity logical disk, the LD capacity threshold and LD capacity quota are not 64 Chapter 3 Operation of Performance Optimization Function (GUI) Area Description specified when the logical disk has been moved. Re-specify them as needed. This area specifies whether to Start LD Movement immediately or at a specified time. Start Immediately Starts logical disk movement operation immediately. “Start Schedule” area Start at Specified Time Starts logical disk movement operation at a specified time. Moving start time and time of continuing re-execution can be specified. Starting time can be specified as late as 1 month later. When movement cannot be executed even after moving start time, movement is retried within the time set for time of continuing re-execution. Specifying up to 24 hours is allowed for continuing retries. To move a logical disk, specify a movement speed in the Start LD Movement dialog. To move a virtual capacity logical disk, specify the settings for [LD capacity threshold / LD capacity quota] in that dialog. Next, select [Start Immediately] of the [Start Schedule] area and then click the [OK] button. Click the [Yes] button when the confirmation dialog appears to start moving the logical disks. To specify a LD movement schedule of logical disks, specify a movement speed for a logical disk, or specify the LD capacity threshold and LD capacity quota settings for a virtual capacity logical disk. Next, select [Start at Specified Time] of the [Start Schedule] area and specify moving start time and time of continuing re-execution. Click the [OK] button displays the confirmation dialog. Then, click the [Yes] button to register the LD movement schedule. Note that logical disks cannot be moved in the following cases: * For other than disk arrays with pool The user role is monitor. The number of transfers has exceeded the maximum number of transfers simultaneously available in a disk array. (Maximum number: 8) A moved material logical disk is located in the same RANK as a Work Disk for Optimization. A moved material logical disk and a Work Disk for Optimization are different in capacity. A moved material logical disk is multi-RANK type. A specified source or destination logical disk is already in moving process. Movement schedule has already been registered to a specified source or destination. A source logical disk is a cache resident disk. A disk array is not being monitored by the SnapSAN Manager. A disk array, pool, and logical disk are in the fault state. A source logical disk is multi-RANK type. A source logical disk is formatting. * For disk arrays with pool 65 Chapter 3 Operation of Performance Optimization Function (GUI) The user role is monitor. The number of transfers has exceeded the maximum number of transfers simultaneously available in a disk array. (Maximum number: 8) A moved material logical disk is located in the same pool as a Work Disk for Optimization. A moved material logical disk and a Work Disk for Optimization are different in capacity. A specified source or destination logical disk is already in moving process. Movement schedule has already been registered to a specified source or destination. A source logical disk is a cache resident disk. A disk array is not being monitored by the SnapSAN Manager. A disk array, pool, and logical disk are in the fault state. A logical disk is a snapshot-related volume (except the BV (Note 1)). A source or destination logical disk is formatting (except ready(formatting) of the logical disk in a dynamic pool). A source logical disk is a System Volume. A source logical disk to which data protection setting has already been set. A source or destination logical disk is in the not in use state by the power saving function. A pool in which a specified source or destination logical disk has been bound is expanding. A source logical disk and a destination logical disk belong to different partitions, and the partition allocation of the pool in which the source logical disk or the destination logical disk is bound is Exclusive. A source logical disk and a destination logical disk belong to different partitions, and the destination logical disk is bound in a different node from that of the source logical disk. A logical disk (virtual capacity logical disk) is being released. (Note 2) Note 1: BV: base-volume (original volume which is the copy-source.) Note 2: For details about how to release the capacity, refer to the “Thin Provisioning User’s Manual”. LD movement schedule cannot be registered in the following cases: * For other than disk arrays with pool The user role is monitor. A moved material logical disk is located in the same RANK as a Work Disk for Optimization. A moved material logical disk and a Work Disk for Optimization are different in capacity. A moved material logical disk is multi-RANK type. Movement start time has already past the time on the server. Specified source or destination logical disks are already in moving process. Movement schedule has been registered for a specified source or destination logical disk. A source logical disk is a cache resident disk. A disk array is not being monitored by SnapSAN Manager. A disk array, RANK, and logical disk are in the fault state. A source logical disk is multi-RANK type. A source logical disk is formatting. 66 Chapter 3 Operation of Performance Optimization Function (GUI) * For disk arrays with pool The user role is monitor. A moved material logical disk is located in the same pool as a Work Disk for Optimization. A moved material logical disk and a Work Disk for Optimization are different in capacity. Movement start time has already past the time on the server. Specified source or destination logical disks are already in moving process. Movement schedule has been registered for a specified source or destination logical disk. A source logical disk is a cache resident disk. A disk array is not being monitored by SnapSAN Manager. A disk array, pool, and logical disk are in the fault state. A source or destination logical disk is formatting (except ready(formatting) of the logical disk in a dynamic pool). A logical disk is a snapshot-related volume (except the BV (Note 1)). A source logical disk is a System Volume. A source logical disk to which data protection setting has already been set. A source logical disk and a destination logical disk belong to different partitions, and the partition allocation of the pool in which the source logical disk or the destination logical disk is bound is Exclusive. A source logical disk and a destination logical disk belong to different partitions, and the destination logical disk is bound in a different node from that of the source logical disk. A logical disk (virtual capacity logical disk) is being released. (Note 2) Note 1: BV: base-volume (original volume which is the copy-source.) Note 2: For details about how to release the capacity, refer to the “Thin Provisioning User’s Manual”. If the partitioning function is available, when replacement is executed between a source logical disk and a Work Disk for Optimization that belong to different nodes, the cache segment to which each logical disk is assigned is replaced. 67 Chapter 3 Operation of Performance Optimization Function (GUI) When the thin provisioning function is available, the capacity of the pool including the destination logical disk might be insufficient if allocation to the destination logical disk occurs while the logical disk is being moved. As such, data may not be moved between logical disks when the destination logical disk is a virtual capacity logical disk. For details on the thin provisioning function, refer to “Thin Provisioning User’s Manual”. When the thin provisioning function is available, the LD capacity quota might be exceeded or the capacity of the pool including the source logical disk might be insufficient if allocation to the destination logical disk occurs while the logical disk is being moved without interrupting the operation. In such a case, the logical disk is successfully moved, but, after that, the data of the destination logical disk must be recovered. If the logical disk is moved with the “LD capacity threshold/LD capacity quota settings” cancelled, or if the logical disk is moved assuming that the destination logical disk is an actual capacity logical disk, the moved logical disk might not be “fault(over quota)” or “fault(over capacity)”. Identify a faulty logical disk by referring to the message output to the SnapSAN Manager operation log, and then recover the data in it. For details about how to recover data when “fault(over quota)” or “fault(over capacity)” occurs, refer to “Thin Provisioning User’s Manual”. When a logical disk bound in an encryption disk is to be moved to a non-encryption disk, a destination logical disk will be decrypted. 68 Chapter 3 Operation of Performance Optimization Function (GUI) (2) Viewing movement progress operation/register movement schedule Movement progress operation and register movement schedule can be viewed on the state field of Movement Progress Information Display Area on the main screen of performance optimization function. Figure 3-25 displays an example display of the moving progress information display area. Figure 3-25 Example of Movement Progress Information Display The display items can be selected among the choices displayed when selecting [View] [Movement Progress] menu on the main screen of performance optimization function. The following lists the selectable items: All of Movement Information Displays logical disks in current moving process and scheduled moving process. Movement Under Processing Displays only logical disks that are currently being moved. Scheduled Movement Displays only logical disks that are schedule to be moved. The Movement Progress Information is updated according to the interval time specified in the environment definition of the SnapSAN Manager. For the check interval, refer to Chapter 2 “Installation of Performance Optimization Function”. After completion of logical disk movement, the relation between the logical disk and the RANK/pool changes. In the case of virtual capacity logical disk, the LD capacity threshold and LD capacity quota settings may change. This configuration change is detected by the SnapSAN Manager simultaneously with the completion of the transfer and is reflected on the state monitoring screen of the SnapSAN Manager as well as on the performance optimization screen. 69 Chapter 3 Operation of Performance Optimization Function (GUI) (3) Exceptional Operations After the transfer of a logical disk has started or the movement schedule has registered, there is a possibility of canceling the movement, changing the speed and changing (canceling) the movement schedule for some reason. Canceling the movement A wrong logical disk has been moved. Changing the speed The transfer speed will be changed to “high” because the disk has to be moved as soon as possible. The speed setting will be changed to “auto” because the business system is greatly affected by the maximum speed. Changing (canceling) movement schedule Due to circumstances that do not allow executing a move at a scheduled time, movement start time must be changed or registered movement schedule must be canceled. As described above, interrupting disk movement, changing movement speed, and changing (canceling) movement schedule are unusual operations. For such exceptional operations, the screen allows interrupting disk movement, changing movement speed, and changing (canceling) movement schedule. However, pay extra attention in operations of interrupting disk movement, changing movement speed, and changing (canceling) movement schedule. These operations are allowed for users of operator role or higher only. The following describes the procedures for stopping movement, changing movement speed, and changing (canceling) movement schedule. Canceling LD movement (i) Select a logical disk to stop the movement Click the logical disk you want to stop its transfer from the Movement Progress Information Display Area. (ii) Displaying the Stop LD Movement dialog Three types of procedures are available for displaying the Stop LD Movement dialog. Use any one of them to display the Stop LD Movement dialog screen. Popup menu Perform right-clicking to display the popup menu, and then click [Stop LD Movement] from the popup menu. Menu Click [Operation] and then click [Stop LD Movement] from the menu. Tool Bar button Click the [Stop LD Movement] button on the tool bar. 70 Chapter 3 Operation of Performance Optimization Function (GUI) Figure 3-26 shows an example of Stop LD Movement dialog. When you want to cancel transfer, click the [OK] button on the Stop LD Movement dialog screen. Figure 3-26 Stop LD Movement Dialog (iii) Cancellation When you click the [OK] button on the Stop LD Movement dialog screen, the confirmation dialog screen appears. When you click [Yes] on this screen, the transfer is cancelled. If you click [No], the transfer is not cancelled. Changing speed (i) Select the logical disk of which transfer speed you want to change. Click the logical disk of which transfer speed you want to change in the Movement Progress Information Display Area. (ii) Displaying the Change LD Movement Speed dialog Three types of procedures are available for displaying the Change LD Movement Speed dialog screen. Use any one of them to display the Change LD Movement Speed dialog screen. Popup menu Perform right-clicking to display the popup menu, and then click [Change LD Movement Speed] from the popup menu. Menu Click [Operation] and then click [Change LD Movement Speed] from the menu. Tool Bar button Click the [Change LD Movement Speed] button on the tool bar. 71 Chapter 3 Operation of Performance Optimization Function (GUI) Figure 3-27 shows an example of Change LD Movement Speed dialog. Figure 3-27 Change LD Movement Speed Dialog (iii) Specifying movement speed after change Select auto or high in the movement speed change area. (iv) Executing change of moving speed Clicking [OK] button on the Change LD Movement Speed dialog displays a confirmation dialog. Clicking [Yes] on the confirmation dialog changes the moving speeds. Clicking [No] button cancels the change of moving speed. Change (cancel) of logical disk movement schedule (i) Select logical disks of movement schedule to be changed or canceled On the Movement Progress Information Display Area, click to select logical disks of movement schedule to be changed or canceled. (ii) Display Change LD Movement Schedule dialog Three procedures are provided for displaying the Change LD Movement Schedule dialog. Display the Change LD Movement Schedule dialog with one of the following procedures: Popup menu Display a popup menu, and select [Change LD Movement Schedule] on the popup menu. Menu Select [Operation] [Change LD Movement Schedule] on the menu. Tool Bar button Select [Change LD Movement Schedule] button on the toolbar. 72 Chapter 3 Operation of Performance Optimization Function (GUI) Figure 3-28 shows an example screen of Change LD Movement Schedule dialog. Figure 3-28 Change LD Movement Schedule Dialog (iii) Change (cancel) movement schedule For changing time of starting disk movement, or time of continuing re-execution Change the setting value and click the [Change Schedule] button. For canceling disk movement schedule Click the [Cancel Schedule] button. 73 Chapter 4 Operation of Performance Optimization Function (CLI) Chapter 4 Operation of Performance Optimization Function (CLI) This chapter explains how to operate a command provided by AutoTier. The command provided by AutoTier can be executed on the server on which SnapSAN Manager is operating. 4.1 Logical Disk Movement Command Logical disks can be moved by the command operation as well as the screen operation on the client screen of AutoTier previously explained. If a shell script or batch file is prepared beforehand, the movement of logical disks can be scheduled by using the command. Use the SnapSAN Managerprfctl command to move logical disks. For details on the SnapSAN Managerprfctl command syntax, refer to the “SnapSAN Manager Command Reference”. (1) Command specification Use the logical disk movement function (start_ldmv) of the SnapSAN Managerprfctl command to move logical disks. If a logical disk is to be moved by the command when a bottleneck is detected or preventive maintenance is performed, check information necessary on the client screen of AutoTier beforehand. Then specifying the information in the command options. The following information needs to be specified in the SnapSAN Managerprfctl command: Disk Array Subsystem Name of the Disk Array Subsystem containing the Moved Material Logical Disk. Specify the name in the -arrayname option. Source LD Logical disk on the RANK/pool that is a bottleneck in performance due to the concentration of I/O operations. The logical disk number or name should be specified. Specify the logical disk number in the -ldn option or the logical disk name in the -ldname option. Work Disk for Optimization Destination Work Disk for Optimization. The logical disk number or name should be specified. Specify the logical disk number in the -wkldn option or the logical disk name in the -wkldname option. LD movement speed Speed at which data is copied when a logical disk is moved. The speed can be specified by selecting 74 Chapter 4 Operation of Performance Optimization Function (CLI) auto or high in the same manner as for screen operation. The default is auto as the recommended speed. LD capacity threshold/LD capacity quota settings This command option specifies whether the destination logical disk takes over the LD capacity threshold and LD capacity quota set to the source logical disk when the source and destination logical disks are virtual capacity logical disks. You can specify whether to take over or cancel the settings. The settings are taken over by default. Predetermine the combination of a source logical disk and a Work Disk for Optimization so that the RANK/pool Busy Ratio will be leveled. To do so, use the client screen of AutoTier. Consider the business operation state when moving a logical disk and specify the optimum volume movement speed. The following shows examples of specifying the SnapSAN Managerprfctl command: Example 1: Move data between the logical disk 000ah and the Work Disk for Optimization 0010h. Select the default volume movement speed (auto). SnapSAN Managerprfctl start_ldmv -arrayname storage1 -ldn ah -wkldn 10h Example 2: Move data between the logical disk 000ah and the Work Disk for Optimization 0010h. Select the maximum data transfer rate (high) as the volume movement speed. SnapSAN Managerprfctl start_ldmv -arrayname storage1 -ldn ah -wkldn 10h -speed high Example 3: Specify a volume name to move data between the logical disk 000ah and the Work Disk for Optimization 0010h. Select the default volume movement speed (auto). SnapSAN Managerprfctl start_ldmv -arrayname storage1 -ldname NX:VOL000a -wkldname NX:WK0010 Example 4: Specify a volume name to move data between the logical disk 000ah and the Work Disk for Optimization 0010h. The volume name is specified with the volume format being omitted. Select the default volume movement speed (auto). 75 Chapter 4 Operation of Performance Optimization Function (CLI) SnapSAN Managerprfctl start_ldmv -arrayname storage1 -ldname VOL000a -wkldname WK0010 Example 5: Specify a volume name to move data between the logical disk 000ah and the Work Disk for Optimization 0010h, which are both virtual capacity logical disks. The volume name is specified with the volume format being omitted. Select the default volume movement speed (auto) and cancel the set LD capacity threshold and LD capacity quota at movement. SnapSAN Managerprfctl start_ldmv -arrayname storage1 -ldname VOL000a -wkldname WK0010 -capattr reset (2) Confirmation of movement The start_ldmv function of the SnapSAN Managerprfctl command starts moving a logical disk. This command does not wait until moving of the logical disk is completed. If having moved a logical disk by executing the command, confirm the start and completion of moving by the following methods: Start of movement Make sure of the message for the SnapSAN Managerprfctl command and the AutoTier message that is output to the SnapSAN Manager operation log. When the logical disk starts moving normally, the following messages are output: Message for the SnapSAN Managerprfctl command: SnapSAN Managerprfctl 001 Message output to the SnapSAN Manager operation log: SnapSAN Manager09002 Completion of movement Make sure of the AutoTier message that is output to the SnapSAN Manager operation log. Message output to the SnapSAN Manager operation log: SnapSAN Manager09003 When the moving terminates, the SnapSAN Manager09003 message is output whether it terminates normally or not. Therefore, you can confirm the completion of moving by this message. 76 Chapter 4 Operation of Performance Optimization Function (CLI) (3) Notes The SnapSAN Managerprfctl command is executable only on the server on which SnapSAN Manager is operating. Do not execute the command on an Application Server or while SnapSAN Manager is in stopped state. The SnapSAN Managerprfctl command is available with a client PC only when Telnet is connected. It is not available with Terminal Service. 77 Chapter 4 Operation of Performance Optimization Function (CLI) 4.2 Logical Disk Movement Speed Modification Command The LD movement speed can be changed by the command operation as well as the screen operation on the client screen of performance optimization function previously explained. If a shell script or batch file is prepared beforehand, the modification of LD movement speed can be scheduled by using the command. Use the SnapSAN Managerprfctl command to change the LD movement speed. For details on the SnapSAN Managerprfctl command synopsis, refer to the “SnapSAN Manager Command Reference”. (1) Command specification Use the LD movement speed modification function (chgspeed_ldmv) of the SnapSAN Managerprfctl command to change the LD movement speed. If you must quickly complete moving the data or reduce load on the business system due to LD movement, and therefore, change the LD movement speed by the command, check for necessary information on the client screen of performance optimization function beforehand. Then specify the information in the command options. The following information needs to be specified in the SnapSAN Managerprfctl command: Disk Array Name Name of the Disk Array Subsystem containing the Moved Material Logical Disk. Specify the name in the -arrayname option. Source LD A logical disk on the RANK/pool where data is being moved or scheduled to be moved. The logical disk number or name should be specified. Specify the logical disk number in the -ldn option or the logical disk name in the -ldname option. LD movement speed Speed at which data is copied when a logical disk is moved. The speed can be specified by selecting auto or high in the same manner as for screen operation. Before changing the LD movement speed, carefully consider the operation status when a logical disk is moved and specify the optimal speed. The following shows examples of specifying the SnapSAN Managerprfctl command: Example 1: LD movement is executed between the logical disk 000ah and the Work Disk for Optimization 0010h. The default LD movement speed (auto) is currently used. Change this LD movement speed from default (auto) to the maximum data transfer rate. 78 Chapter 4 Operation of Performance Optimization Function (CLI) SnapSAN Managerprfctl chgspeed_ldmv -arrayname storage1 -ldn ah –speed high Example 2: The schedule of the logical movement between the logical disk 000ah and the Work Disk for Optimization 0010h is registered. The LD movement speed for the registered schedule is the maximum data transfer rate (high). Specify a volume name to change the LD movement speed from the maximum data transfer rate to default (auto). SnapSAN Managerprfctl chgspeed_ldmv -arrayname storage1 -ldname VOL000ah -speed auto (2) Confirming change in LD movement speed The chgspeed_ldmv function of the SnapSAN Managerprfctl command changes the LD movement speed. If having changed the LD movement speed by executing the command, confirm that the LD movement speed has been changed by the following methods: Modification of LD movement speed The LD movement speed can be confirmed by the message for the SnapSAN Managerprfctl command and the message that is output to the SnapSAN Manager operation log. When data starts moving normally, the following messages are output: Message for the SnapSAN Managerprfctl command: SnapSAN Managerprfctl 001 Message output to the SnapSAN Manager operation log: SnapSAN Manager09004 (3) Notes The SnapSAN Managerprfctl command is executable only on the server on which SnapSAN Manager is operating. Do not execute the command on an Application Server or while SnapSAN Manager is in the stopped state. The SnapSAN Managerprfctl command is available with a client PC only when Telnet is connected. It is not available with Terminal Service. 79 Appendix A Appendix A Estimating Size of Files for AutoTier Function Estimating Size of Files for AutoTier Function For each disk array, an AutoTier log for up to 2 months is accumulated in a file. The capacity can be estimated by applying the number of disk array components (the number of RANKs/pools and logical disks (LDs)) and logging interval time to the following equations: The calculated capacity is assumed as a general case. The actual capacity differs from the calculated one depending on the disk array configuration change and I/O situation, etc. Therefore, reserve a disk capacity large enough for the calculated capacity. (1) AutoTier log file The disk capacity required when the AutoTier log is accumulated for 2 months can be calculated by using the following formula. Required disk capacity [bytes] = 80 + (80 + the number of RANKs/pools the number of LDs 4) (89280 28 + logging interval (min.)) (2) Calculation example of AutoTier log file The capacity for the AutoTier log file is calculated by assuming that the number of pools is 256, the number of logical disks is 4096, and the logging interval is 5 minutes for the target disk array. Required disk capacity [bytes] = 80 + (80 + 256 28 + 4096 4) (89280 5) = 421973072 [bytes] = (approx. 402.5 [MB]) (3) Index file for the AutoTier log file An index file (file name: OPTDFASTF) for the performance optimizing log file is also created in the same directory as the performance optimizing log file. The disk capacity required for the index file of the AutoTier log file can be calculated by using the following formula. Required disk capacity [bytes] = 80 + (disk array 644) + (the number of RANKs/pools in all disk arrays 77 20) Appendix A Estimating Size of Files for AutoTier Function (4) Calculation example of the index file for the AutoTier log file The capacity of the index file for the AutoTier log file is calculated by assuming that number of the target disk arrays is 3 and number of pools for each disk array is 256. Required disk capacity [bytes] = 80 + (3 644) + (256 = 17,372 [bytes] = (approx. 17.0 [KB]) 78 3 20) Appendix B Appendix B Licenses B.1 Apache log4j License Apache License Version 2.0, January 2004 http://www.apache.org/licenses/ TERMS AND CONDITIONS FOR USE, REPRODUCTION, AND DISTRIBUTION 1. Definitions. “License” shall mean the terms and conditions for use, reproduction, and distribution as defined by Sections 1 through 9 of this document. “Licensor” shall mean the copyright owner or entity authorized by the copyright owner that is granting the License. “Legal Entity” shall mean the union of the acting entity and all other entities that control, are controlled by, or are under common control with that entity. For the purposes of this definition, “control” means (i) the power, direct or indirect, to cause the direction or management of such entity, whether by contract or otherwise, or (ii) ownership of fifty percent (50%) or more of the outstanding shares or (iii) beneficial ownership of such entity. “You” (or “Your”) shall mean an individual or Legal Entity exercising permissions granted by this License. “Source” form shall mean the preferred form for making modifications, including but not limited to software source code, documentation source and configuration files. “Object” form shall mean any form resulting from mechanical transformation or translation of a Source form, including but not limited to compiled object code, generated documentation, and conversions to other media types. 79 Licenses Appendix B Licenses “Work” shall mean the work of authorship, whether in Source or Object form, made available under the License, as indicated by a copyright notice that is included in or attached to the work (an example is provided in the Appendix below). “Derivative Works” shall mean any work, whether in Source or Object form, that is based on (or derived from) the Work and for which the editorial revisions, annotations, elaborations, or other modifications represent, as a whole, an original work of authorship. For the purposes of this License, Derivative Works shall not include works that remain separable from, or merely link (or bind by name) to the interfaces of, the Work and Derivative Works thereof. “Contribution” shall mean any work of authorship, including the original version of the Work and any modifications or additions to that Work or Derivative Works thereof, that is intentionally submitted to Licensor for inclusion in the Work by the copyright owner or by an individual or Legal Entity authorized to submit on behalf of the copyright owner. For the purposes of this definition, “submitted” means any form of electronic, verbal, or written communication sent to the Licensor or its representatives, including but not limited to communication on electronic mailing lists, source code control systems, and issue tracking systems that are managed by, or on behalf of, the Licensor for the purpose of discussing and improving the Work, but excluding communication that is conspicuously marked or otherwise designated in writing by the copyright owner as “Not a Contribution.” “Contributor” shall mean Licensor and any individual or Legal Entity on behalf of whom a Contribution has been received by Licensor and subsequently incorporated within the Work. 2. Grant of Copyright License. Subject to the terms and conditions of this License, each Contributor hereby grants to You a perpetual, worldwide, non-exclusive, no-charge, royalty-free, irrevocable copyright license to reproduce, prepare Derivative Works of, publicly display, publicly perform, sublicense, and distribute the Work and such Derivative Works in Source or Object form. 3. Grant of Patent License. Subject to the terms and conditions of this License, each Contributor hereby grants to You a perpetual, worldwide, non-exclusive, no-charge, royalty-free, irrevocable 80 Appendix B (except as stated in this section) patent license to make, have made, use, offer to sell, sell, import, and otherwise transfer the Work, where such license applies only to those patent claims licensable by such Contributor that are necessarily infringed by their Contribution(s) alone or by combination of their Contribution(s) with the Work to which such Contribution(s) was submitted. If You institute patent litigation against any entity (including a cross-claim or counterclaim in a lawsuit) alleging that the Work or a Contribution incorporated within the Work constitutes direct or contributory patent infringement, then any patent licenses granted to You under this License for that Work shall terminate as of the date such litigation is filed. 4. Redistribution. You may reproduce and distribute copies of the Work or Derivative Works thereof in any medium, with or without modifications, and in Source or Object form, provided that You meet the following conditions: (a) You must give any other recipients of the Work or Derivative Works a copy of this License; and (b) You must cause any modified files to carry prominent notices stating that You changed the files; and (c) You must retain, in the Source form of any Derivative Works that You distribute, all copyright, patent, trademark, and attribution notices from the Source form of the Work, excluding those notices that do not pertain to any part of the Derivative Works; and (d) If the Work includes a “NOTICE” text file as part of its distribution, then any Derivative Works that You distribute must include a readable copy of the attribution notices contained within such NOTICE file, excluding those notices that do not pertain to any part of the Derivative Works, in at least one of the following places: within a NOTICE text file distributed as part of the Derivative Works; within the Source form or documentation, if provided along with the Derivative Works; or, within a display generated by the Derivative Works, if and wherever such third-party notices normally appear. The contents of the NOTICE file are for informational purposes only and 81 Licenses Appendix B Licenses do not modify the License. You may add Your own attribution notices within Derivative Works that You distribute, alongside or as an addendum to the NOTICE text from the Work, provided that such additional attribution notices cannot be construed as modifying the License. You may add Your own copyright statement to Your modifications and may provide additional or different license terms and conditions for use, reproduction, or distribution of Your modifications, or for any such Derivative Works as a whole, provided Your use, reproduction, and distribution of the Work otherwise complies with the conditions stated in this License. 5. Submission of Contributions. Unless You explicitly state otherwise, any Contribution intentionally submitted for inclusion in the Work by You to the Licensor shall be under the terms and conditions of this License, without any additional terms or conditions. Notwithstanding the above, nothing herein shall supersede or modify the terms of any separate license agreement you may have executed with Licensor regarding such Contributions. 6. Trademarks. This License does not grant permission to use the trade names, trademarks, service marks, or product names of the Licensor, except as required for reasonable and customary use in describing the origin of the Work and reproducing the content of the NOTICE file. 7. Disclaimer of Warranty. Unless required by applicable law or agreed to in writing, Licensor provides the Work (and each Contributor provides its Contributions) on an “AS IS” BASIS, WITHOUT WARRANTIES OR CONDITIONS OF ANY KIND, either express or implied, including, without limitation, any warranties or conditions of TITLE, NON-INFRINGEMENT, MERCHANTABILITY, or FITNESS FOR A PARTICULAR PURPOSE. You are solely responsible for determining the appropriateness of using or redistributing the Work and assume any risks associated with Your exercise of permissions under this License. 8. Limitation of Liability. In no event and under no legal theory, whether in tort (including negligence), contract, or otherwise, unless required by applicable law (such as deliberate and grossly negligent acts) or agreed to in writing, shall any Contributor be liable to You for damages, including any direct, indirect, special, 82 Appendix B incidental, or consequential damages of any character arising as a result of this License or out of the use or inability to use the Work (including but not limited to damages for loss of goodwill, work stoppage, computer failure or malfunction, or any and all other commercial damages or losses), even if such Contributor has been advised of the possibility of such damages. 9. Accepting Warranty or Additional Liability. While redistributing the Work or Derivative Works thereof, You may choose to offer, and charge a fee for, acceptance of support, warranty, indemnity, or other liability obligations and/or rights consistent with this License. However, in accepting such obligations, You may act only on Your own behalf and on Your sole responsibility, not on behalf of any other Contributor, and only if You agree to indemnify, defend, and hold each Contributor harmless for any liability incurred by, or claims asserted against, such Contributor by reason of your accepting any such warranty or additional liability. END OF TERMS AND CONDITIONS APPENDIX: How to apply the Apache License to your work. To apply the Apache License to your work, attach the following boilerplate notice, with the fields enclosed by brackets “[]” replaced with your own identifying information. (Don't include the brackets!) The text should be enclosed in the appropriate comment syntax for the file format. We also recommend that a file or class name and description of purpose be included on the same “printed page” as the copyright notice for easier identification within third-party archives. Copyright [yyyy] [name of copyright owner] Licensed under the Apache License, Version 2.0 (the “License”); you may not use this file except in compliance with the License. You may obtain a copy of the License at http://www.apache.org/licenses/LICENSE-2.0 Unless required by applicable law or agreed to in writing, software distributed under the License is distributed on an “AS IS” BASIS, 83 Licenses Appendix B Licenses WITHOUT WARRANTIES OR CONDITIONS OF ANY KIND, either express or implied. See the License for the specific language governing permissions and limitations under the License. 84 Appendix B Licenses B.2 Flex License The flex manual is placed under the same licensing conditions as the rest of flex: Copyright c 2001, 2002, 2003, 2004, 2005, 2006, 2007 The Flex Project. Copyright c 1990, 1997 The Regents of the University of California. All rights reserved. This code is derived from software contributed to Berkeley by Vern Paxson. The United States Government has rights in this work pursuant to contract no. DE-AC03-76SF00098 between the United States Department of Energy and the University of California. Redistribution and use in source and binary forms, with or without modification, are permitted provided that the following conditions are met: Redistributions of source code must retain the above copyright notice, this list of conditions and the following disclaimer. Redistributions in binary form must reproduce the above copyright notice, this list of conditions and the following disclaimer in the documentation and/or other materials provided with the distribution. Neither the name of the University nor the names of its contributors may be used to endorse or promote products derived from this software without specific prior written permission. THIS SOFTWARE IS PROVIDED “AS IS” AND WITHOUT ANY EXPRESS OR IMPLIED WARRANTIES, INCLUDING, WITHOUT LIMITATION, THE IMPLIED WARRANTIES OF MERCHANTABILITY AND FITNESS FOR A PARTICULAR PURPOSE. 85 Appendix B Licenses B.3 OpenSSL License This is a copy of the current LICENSE file inside the CVS repository. LICENSE ISSUES ============== The OpenSSL toolkit stays under a dual license, i.e. both the conditions of the OpenSSL License and the original SSLeay license apply to the toolkit. See below for the actual license texts. Actually both licenses are BSD-style Open Source licenses. In case of any license issues related to OpenSSL please contact [email protected]. OpenSSL License --------------- /* ==================================================================== * Copyright (c) 1998-2008 The OpenSSL Project. All rights reserved. * * Redistribution and use in source and binary forms, with or without * modification, are permitted provided that the following conditions * are met: * * 1. Redistributions of source code must retain the above copyright * notice, this list of conditions and the following disclaimer. * * 2. Redistributions in binary form must reproduce the above copyright * notice, this list of conditions and the following disclaimer in * the documentation and/or other materials provided with the * distribution. * * 3. All advertising materials mentioning features or use of this * software must display the following acknowledgment: * “This product includes software developed by the OpenSSL Project * for use in the OpenSSL Toolkit. (http://www.openssl.org/)” * * 4. The names “OpenSSL Toolkit” and “OpenSSL Project” must not be used to * endorse or promote products derived from this software without * prior written permission. For written permission, please contact 86 Appendix B * Licenses [email protected]. * * 5. Products derived from this software may not be called “OpenSSL” * nor may “OpenSSL” appear in their names without prior written * permission of the OpenSSL Project. * * 6. Redistributions of any form whatsoever must retain the following * acknowledgment: * “This product includes software developed by the OpenSSL Project * for use in the OpenSSL Toolkit (http://www.openssl.org/)” * * THIS SOFTWARE IS PROVIDED BY THE OpenSSL PROJECT “AS IS” AND ANY * EXPRESSED OR IMPLIED WARRANTIES, INCLUDING, BUT NOT LIMITED TO, THE * IMPLIED WARRANTIES OF MERCHANTABILITY AND FITNESS FOR A PARTICULAR * PURPOSE ARE DISCLAIMED. IN NO EVENT SHALL THE OpenSSL PROJECT OR * ITS CONTRIBUTORS BE LIABLE FOR ANY DIRECT, INDIRECT, INCIDENTAL, * SPECIAL, EXEMPLARY, OR CONSEQUENTIAL DAMAGES (INCLUDING, BUT * NOT LIMITED TO, PROCUREMENT OF SUBSTITUTE GOODS OR SERVICES; * LOSS OF USE, DATA, OR PROFITS; OR BUSINESS INTERRUPTION) * HOWEVER CAUSED AND ON ANY THEORY OF LIABILITY, WHETHER IN CONTRACT, * STRICT LIABILITY, OR TORT (INCLUDING NEGLIGENCE OR OTHERWISE) * ARISING IN ANY WAY OUT OF THE USE OF THIS SOFTWARE, EVEN IF ADVISED * OF THE POSSIBILITY OF SUCH DAMAGE. * ==================================================================== * * This product includes cryptographic software written by Eric Young * ([email protected]). This product includes software written by Tim * Hudson ([email protected]). * */ Original SSLeay License ----------------------- /* Copyright (C) 1995-1998 Eric Young ([email protected]) * All rights reserved. * * This package is an SSL implementation written * by Eric Young ([email protected]). * The implementation was written to conform with Netscapes SSL. * 87 Appendix B Licenses * This library is free for commercial and non-commercial use as long as * the following conditions are adhered to. The following conditions * apply to all code found in this distribution, be it the RC4, RSA, * lhash, DES, etc., code; not just the SSL code. The SSL documentation * included with this distribution is covered by the same copyright terms * except that the holder is Tim Hudson ([email protected]). * * Copyright remains Eric Young's, and as such any Copyright notices in * the code are not to be removed. * If this package is used in a product, Eric Young should be given attribution * as the author of the parts of the library used. * This can be in the form of a textual message at program startup or * in documentation (online or textual) provided with the package. * * Redistribution and use in source and binary forms, with or without * modification, are permitted provided that the following conditions * are met: * 1. Redistributions of source code must retain the copyright * notice, this list of conditions and the following disclaimer. * 2. Redistributions in binary form must reproduce the above copyright * notice, this list of conditions and the following disclaimer in the * documentation and/or other materials provided with the distribution. * 3. All advertising materials mentioning features or use of this software * must display the following acknowledgement: * “This product includes cryptographic software written by * Eric Young ([email protected])” * The word 'cryptographic' can be left out if the rouines from the library * being used are not cryptographic related :-). * 4. If you include any Windows specific code (or a derivative thereof) from * the apps directory (application code) you must include an acknowledgement: * “This product includes software written by Tim Hudson ([email protected])” * * THIS SOFTWARE IS PROVIDED BY ERIC YOUNG “AS IS” AND * ANY EXPRESS OR IMPLIED WARRANTIES, INCLUDING, BUT NOT LIMITED TO, THE * IMPLIED WARRANTIES OF MERCHANTABILITY AND FITNESS FOR A PARTICULAR PURPOSE * ARE DISCLAIMED. IN NO EVENT SHALL THE AUTHOR OR CONTRIBUTORS BE LIABLE * FOR ANY DIRECT, INDIRECT, INCIDENTAL, SPECIAL, EXEMPLARY, OR CONSEQUENTIAL * DAMAGES (INCLUDING, BUT NOT LIMITED TO, PROCUREMENT OF SUBSTITUTE GOODS * OR SERVICES; LOSS OF USE, DATA, OR PROFITS; OR BUSINESS INTERRUPTION) * HOWEVER CAUSED AND ON ANY THEORY OF LIABILITY, WHETHER IN CONTRACT, 88 Appendix B Licenses STRICT * LIABILITY, OR TORT (INCLUDING NEGLIGENCE OR OTHERWISE) ARISING IN ANY WAY * OUT OF THE USE OF THIS SOFTWARE, EVEN IF ADVISED OF THE POSSIBILITY OF * SUCH DAMAGE. * * The license and distribution terms for any publically available version or * derivative of this code cannot be changed. i.e. this code cannot simply be * copied and put under another distribution license * [including the GNU Public License.] */ 89 Index A I AccessControl ................................................................. 2 analysis period .............................................................. 11 analysis period display area .......................................... 22 Analysis Property dialog ([Analysis Period] tab) .. 33, 34 Analysis Property dialog ([Folder to Store Data] tab) . 39 Analysis Property dialog ([Sort of Busy Ratio] tab) ... 37, 38 installation ..................................................................... 17 installation of a disk array subsystem ........................... 20 iSM client ........................................................................ 1 L LD Administration function .......................................... 18 LD movement speed modification command ............... 75 logical disk ..............................................................11, 12 logical disk list .............................................................. 27 logical disk movement command .................................72 B BaseProduct .................................................................... 2 bottleneck detection support ......................................... 11 bottleneck location ........................................................ 11 busy ratio ....................................................................... 11 M menu bar ........................................................................ 22 movement destination logical disks .............................. 11 movement progress information display area ............... 31 multi-RANK type ....................................................13, 18 C cache resident disk ................................13, 59, 63, 64, 65 canceling LD Movement............................................... 68 capacity of a Work Disk for Optimization ................... 19 caution zone .................................................................. 38 change (cancel) of logical disk movement schedule .... 70 changing speed .............................................................. 69 completion of logical disk movement .......................... 67 configuration display area ............................................. 22 configuration of the disk array ...................................... 22 O operating environment .................................................. 17 operation example of performance optimization function ..................................................................................... 3 operation on screen ....................................................... 33 D P danger zone ................................................................... 38 destination logical disk .........................48, 52, 63, 64, 65 detailed display area...................................................... 24 disk array layer .............................................................. 23 disk array list ................................................................. 24 disk performance ............................................................. 1 display order of columns.......... 22, 27, 29, 31, 42, 47, 51 Download Selection dialog ........................................... 43 downloading optimization log files that records Busy Ratio .......................................................................... 43 partitioning function ...................................................... 14 performance analysis ....................................................... 1 performance optimization function ................................. 1 performance optimization log file .................................77 performance tuning ....................................................... 12 PerformanceMonitor ....................................................... 2 PerformanceOptimizer main screen .............................. 21 physical disk .................................................................. 11 physical disk type of a Work Disk for Optimization ....19 placement of Work Disks for Optimization .................. 19 pool ................................................................................ 23 pool layer ....................................................................... 23 pool list .......................................................................... 26 procedures for setting analysis period .......................... 35 procedures for setting sort of busy ratio ....................... 38 E environment setting ....................................................... 17 estimating size of files for performance optimization function ..................................................................... 79 R RAID type of a Work Disk for Optimization ............... 19 RANK ............................................................................ 23 90 RANK layer .................................................................. 23 RANK list ..................................................................... 25 ReallocationControl ........................................................ 2 register LD movement schedule ................................... 60 replacement effect prediction ................................. 11, 52 replacement effect prediction screen ...................... 55, 56 replacement plan ..................................................... 11, 48 replacement plan dialog .......................................... 48, 50 T tool bar ........................................................................... 22 tuning ............................................................................... 1 U utilization ratio of a disk array subsystem .................... 20 S V safety zone..................................................................... 38 setting analysis period ................................................... 33 setting folder to store data ...................................... 39, 40 setting sort of busy ratio ............................................... 37 setting Work Disks for Optimization............................ 18 showing the busy ratio graph ........................................ 41 sort of busy ratio ........................................................... 37 source logical disk ......................... 11, 48, 52, 63, 64, 65 start LD movement ................................................. 58, 60 status bar ....................................................................... 32 viewing movement progress operation/register movement schedule ................................................... 67 W Work Disk for Optimization ...................................12, 18 Work Disk for Optimization display area ..................... 29 91