1
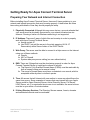
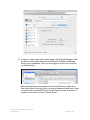
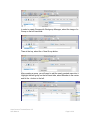
Aqua Connect Terminal Server 3.5 User Manual Table of Contents About Aqua Connect Terminal Server ................................................ 3 Features..................................................................................................................3 System Requirements...........................................................................................4 Hardware.......................................................................................................................... 4 Software ........................................................................................................................... 4 Getting Ready for Aqua Connect Terminal Server............................. 5 Preparing Your Network and Internet Connection .............................................5 Deciding How to Create and Manage Users and Groups ..................................6 Installing Aqua Connect Terminal Server ......................................... 10 Retrieving Installation Files and Keys...............................................................10 Installation............................................................................................................11 Uninstallation.......................................................................................................18 Establishing Connections to Aqua Connect Terminal Server ........ 19 Recommended RDP Client Software .................................................................19 Recommended VNC Client Software .................................................................19 Recommended X11 Client Software ..................................................................20 Recommended AAP Client Software .................................................................20 Client Connection Examples ..............................................................................21 Remote Desktop Connection for Mac ......................................................................... 21 Remote Desktop Connection for Windows ................................................................ 23 Chicken of the VNC (Mac) ............................................................................................ 25 Aqua Accelerated Protocol for Mac ............................................................................ 26 Aqua Accelerated Protocol for Windows ................................................................... 30 Aqua Connect Terminal Server AdminTool ...................................... 31 Introduction ................................................................................................................... 31 Default Administrator ................................................................................................... 31 Launch ACAdminTool .................................................................................................. 31 Administrator Credential .............................................................................................. 32 Setting Up Local Printing and Audio................................................. 33 Printing .................................................................................................................33 Audio ....................................................................................................................36 Optimization......................................................................................... 38 Aqua Connect Terminal Server 3.5 User Manual Page 2 of 38 About Aqua Connect Terminal Server Aqua Connect Terminal Server (ACTS) enables OS X server software and applications on that server to be accessed by diverse desktop hardware remotely. Aqua Connect uses terminal emulation technology to stream the complete Mac OS X desktop experience over the network to your end users. ACTS delivers the Macintosh® experience via OS X servers to diverse hardware and software platforms and mobile devices using graphically enhanced terminal emulation. Incorporating Microsoft’s Remote Desktop Protocol (RDP) and Remote Frame Buffer (RFB) protocol, Aqua Connect Terminal Server makes it possible for diverse workstations and RDP or RFB-enabled mobile devices to function as thin clients of a Mac OS X server. When running applications within ACTS, they are all running on the server and not the client. The server sends the screen information to the client and receives input only from the mouse and keyboard of the client. This product is protected by one or more Patents, including U.S. Patent No. 8,549,093. Features Below is a list of all the features that Aqua Connect Terminal Server 3.5.x offers. • • • • • • • • • • • Remote sound Remote printing User auditing CPU prioritization Active Directory integration Open Directory integration LDAP integration Apple’s Workgroup Manager integration User session logs Remote ACAdminTool monitoring Data loss prevention Aqua Connect Terminal Server 3.5 User Manual Page 3 of 38 System Requirements Hardware • • • • • • • • Intel based Xserve, Mac mini server or Mac Pro system 1 GB of memory minimum for Operating System 90 MB of memory per terminal server user without any significant applications running and running at 1024 x 768 screen resolution 500 MB of available disk space on system volume 150 MB of available disk space per memory per terminal server user without any significant applications running Free space for applications Free space for temporary storage of application operating data Extra memory for each active user based on applications and data usage Software • Apple Mac OS X Server software v.10.6 or higher • Aqua Connect Terminal Server 3.5 or higher • Apple Mac OS X Server Admin Tools Aqua Connect Terminal Server 3.5 User Manual Page 4 of 38 Getting Ready for Aqua Connect Terminal Server Preparing Your Network and Internet Connection Before installing Aqua Connect Terminal Server, there are 6 items pertaining to your network and internet connection that must be setup properly. Listed below are those items along with details of how they should properly be setup. 1. Physically Connected: Although this may seem obvious, we must reiterate that your server must be physically connected to your network infrastructure via ethernet. Running a server via Wireless networking is not supported. 2. IP Address: There are 2 ways of which this can be setup in order to properly work with Aqua Connect Terminal Server: a. Assign a static IP b. Use DHCP, but add the server to the static mapping (A.K.A. IP Reservation) within Server Admin of the DHCP Server 3. Web Proxy: The server must be able to connect to a https server on the Internet using one of these methods: a. Directly b. NAT or Firewall c. System wide proxy server setting (no user authentication) 4. DNS: There are 2 things that must be done/setup properly in order for Aqua Connect Terminal Server to install and continue to function: a. The Server’s Fully Qualified Domain Name (FQDN) must be resolvable by both a forward lookup and a reverse lookup. b. The server’s Domain Name must have a consistent zone record, which is acceptable either by direct or indirect queries. 5. Time: All servers that will interact with one another in some way should have the same time source. Some examples of servers that may interact with your Apple Server would be Open Directory Server, Active Directory Server, File Server, LDAP Server, etc. If a unanimous time source is not available, the server’s times must be in sync within a 3-minute window. 6. If Using Directory Services: The Directory Servers names, forests, domains and associated records must be resolvable. Aqua Connect Terminal Server 3.5 User Manual Page 5 of 38 Deciding How to Create and Manage Users and Groups When configuring and managing your Aqua Connect Terminal Server users there are many options that are available. Below you will find details about setting up and managing Local, Open Directory and Active Directory users and groups. If you are interested in other ways (i.e. LDAP), please feel free to contact us. 1. Local Users and Groups: Local Aqua Connect Terminal Server Users and Groups can be setup via System Preferences or Workgroup Manager but NOT Server Preferences. a. In order to create users within System Preferences, launch Finder and then launch System Preferences. Click on Accounts and Unlock it if necessary. Then add a new user by selecting the + button on the bottom left hand side. To group your System Preferences users, select the + button on the left hand side. From the drop down list, select add a new Group. After creating the group, you will see a list of all your local user accounts and can select which users you would like to apply to the newly created group. Aqua Connect Terminal Server 3.5 User Manual Page 6 of 38 b. In order to create Local Users within Apple’s WorkGroup Manager, Open the Server folder within Applications and launch WorkGroup Manager. Enter in your credentials. Once you are logged in, select Local from the top left hand side. After authenticating and connecting to the Local Directory, select the + New User button on the top. Now you may go ahead and add users. Keep in mind that ALL users MUST have Home Folders in order to be able to connect to the Aqua Connect Terminal Server. Aqua Connect Terminal Server 3.5 User Manual Page 7 of 38 In order to create Groups with Workgroup Manager, select the image of a Group on the left hand side. Then at the top, select the + New Group button. After creating a group, you will need to add the newly created users into it. Highlight the new group on the left hand side, select Member in the center and hit the + button to the left. Aqua Connect Terminal Server 3.5 User Manual Page 8 of 38 Once you have selected to + the group members, a side bar will pop out. Here is where you would highlight and then drag and drop the users you would like to add into the group. Note: Do not forget to be sure to save your changes before exiting. 2. Open Directory Users and Groups: Aqua Connect Terminal Server can be easily integrated into your Open Directory environment whether it is on the same server as ACTS or on an entirely separate server. Please see our Advanced User Manual for further instructions. 3. Active Directory Users and Groups: Aqua Connect Terminal Server can be easily integrated into your Active Directory environment. Please see our Advanced User Manual for further instructions. Aqua Connect Terminal Server 3.5 User Manual Page 9 of 38 Installing Aqua Connect Terminal Server Retrieving Installation Files and Keys Aqua Connect Installation Files can be retrieved from Aqua Connect’s website. Please contact your sales or support representative if you require the link to the download page. Aqua Connect Terminal Server License Keys can be obtained only through an authorized sales representative. Please contact them if you require assistance. During the installation process, no other applications should be running and no other users should be logged in. If you have previously installed Aqua Connect Terminal Server, use that version’s uninstall feature prior to installing the newer version. If Aqua Connect Terminal Server 3.5 detects a prior installation, you will now be given the option to either uninstall your previous version or copy over the new pieces to your old installation. Instructions on how to uninstall previous versions will be supplied at the end of this documentation. When the installation process is complete, the server will prompt you to restart. Failing to restart after the installation process will yield a very unstable system that may cause data corruption or even data loss. Once downloaded, open the disk image container by launching it. This will mount the disk image revealing the installer, “Aqua Connect Installer.” Double-click the installer to install Aqua Connect Terminal Server. The disk image also contains ACUninstaller, for uninstalling, and ACAdminTool for administering Aqua Connect Terminal Server. The Installer will install both of these. To uninstall, you can use either the ACUninstaller that was installed or the one on the disk image. You can copy the ACAdminTool from the disk image onto any Macintosh running Mac OS X Version 10.5 or Mac OS X Version 10.6. Aqua Connect Terminal Server 3.5 User Manual Page 10 of 38 Installation (Introduction Screen - Figure 1) The installer will display a welcome and introduction screen. The version number of the product that you will be installing can be found at the top of the screen. Proceed by pressing Next. Aqua Connect Terminal Server 3.5 User Manual Page 11 of 38 Next you will be presented with a screen giving you information about this version of Aqua Connect Terminal Server. Read through this information to see if it applies to you and then press Next. You should now see the Components panel which will allow you to choose which components of Aqua Connect Terminal Server you would like to install. By default, it will choose the Aqua Connect Terminal Server and the Aqua Connect Administration Tool. You can choose to install VNC & X11 support, allowing users to connect to your server via VNC or X11 protocols in addition to RDP, and Load Balancer Support, allowing your server to work with the Aqua Connect Terminal Server Load Balancer. (Components Panel - Figure 2) Aqua Connect Terminal Server 3.5 User Manual Page 12 of 38 The next screen will prompt you to enter in the license key you were given by your sales representative. Choose the region of your license key from the dropdown menu. Choices to choose from include: “Europe”, “United States” and “Other”. As a general rule, keys beginning with “AE” are located in Europe and keys beginning with “AC” are all other regions. If you choose “Other”, a box to enter in the Internet address of the licensing server will appear. This is used for customers within a closed network environment that have Aqua Connect’s License Manager installed. Double click on the “Enter your license key here” text and enter the license key. Please remember that all keys are case sensitive. If your key is invalid, you will see a small red ‘X’ ( ) in the client count field. Hover the mouse over the ‘X’ to see the reason for the error. If you wish to enter more than one license key, press the “+” button and enter another license key. If you wish to remove a license key, press the “–“ button. When all of your license keys and been entered and there are no errors, click the Next button to move on to the next screen. (See figure 3 below) (Entering in a License Key - Figure 3) Aqua Connect Terminal Server 3.5 User Manual Page 13 of 38 You will now see the Terminal Setup pane (Figure 4). This allows you to configure settings for the protocols your server uses for connections (ie, RDP and VNC). Under RDP settings, choose the port you would like to use. The default value entered, 3389, is the default port for RDP. If you change this, you will have to make certain that your clients use the new port number when connecting to the server. You can also choose whether to use bitmap caching on your server. Bitmap caching stores frequently used images on the client computer. This can reduce the amount of data the server must send to the client, but it can also adversely affect server performance and it may exacerbate performance issues on slower networks. Under VNC settings, you should choose the port you would like to use. The default value, 5900, is default port for VNC. It is more likely that you will need to change this than change the RDP port, as various Apple services such as screen-sharing and Apple Remote Desktop use VNC to send screen images. If you are using either of those two services, you must choose a different port for VNC. You must also choose a size and bit-depth for the VNC screen. This is the screen size and bit-depth that will be sent to all VNC users. When finished, press the Next button. (Terminal Setup - Figure 4) Aqua Connect Terminal Server 3.5 User Manual Page 14 of 38 The next panel (Figure 5) will allow you to set up your Aqua Connect Terminal Server Administrator account and set defaults for Aqua Connect Terminal Server users. First, set up your Aqua Connect Terminal Server Administrator. This is the name and password you will use in the Aqua Connect Terminal Server Admin Tool. By default, the name is set to “acadmin” and the password is set to “pass.” It is recommended that you change this. You can either do it at installation time, in the Installer, or later via the ACAdminTool. You can also choose a port to use, if the default one conflicts with a port the server is already using. Next, you can set up default settings for your users. You can choose to enable or disable users. By default, all users are enabled. This means that any user who has an account on the server may connect. If you have a large number of users with accounts—for example, if your server is bound to an Active Directory or Open Directory server—you may decide to make all users disabled by default and just enable the users you would like to allow to log in to the server. Note that if you disable all users by default, no users will be able to log in until you allow them. If you intend to use the ACAdminTool installed on the server to do this, make sure that you have access to the console screen (via ARD, screen-sharing, or physically) in order to run the ACAdminTool. If you don’t, you will not be able to log in via Aqua Connect Terminal Server in order to do so. You can also define whether users can use the clipboard to transfer data to and from the server, whether users can print to printers attached to their client computers, and whether their sessions should be terminated when they disconnect. When you have set this up, press the Next button. Aqua Connect Terminal Server 3.5 User Manual Page 15 of 38 (Administrator and User Defaults - Figure 5) The next panel will display the Software License Agreement. Please read the Software License Agreement as you are bound to it if you agree to it. Failing to read the agreement does not preclude you from the terms of the agreement. After reading the Software License Agreement, press the Next button. You will be prompted to either agree or not agree to the Software License Agreement. If you agree, press the Agree button. If you do not agree, press the Do Not Agree button and quit the Installer. After agreeing to the Software License Agreement, the installation of Aqua Connect Terminal Server will begin. You will probably be asked to enter your Mac OS X Server credentials. Enter your credentials in order to install Aqua Connect Terminal Server. When the installation has finished, you will see a panel telling you that the installation has finished (Figure 6). Press the Restart button to restart the server. After the server has restarted, you will be ready to connect to your server via Aqua Connect Terminal Server. Aqua Connect Terminal Server 3.5 User Manual Page 16 of 38 (Installation Result - Figure 6) Aqua Connect Terminal Server 3.5 User Manual Page 17 of 38 Uninstallation If you need to uninstall Aqua Connect Terminal Server, you use the ACUninstaller application. This application is installed in Server folder located in the Applications folder. And it is also available on the disk image with the Aqua Connect Installer. To uninstall, launch the ACUninstaller application (Figure 7). You will see two uninstall options: Minimal and Complete. The Minimal option will remove all Aqua Connect Terminal Server program files but will leave individual users settings. This can be useful if you have made extensive changes to user settings and wish to uninstall Aqua Connect Terminal Server before installing an up-to-date version. If you wish to completely remove Aqua Connect Terminal Server, choose a Complete uninstall. When you have made your choice, press the Uninstall button. ACUninstaller will disconnect all users before uninstalling Aqua Connect Terminal Server. Once all users have been disconnect, Aqua Connect Terminal Server will be removed from the server. If you wish to install a newer version of Aqua Connect Terminal Server, you may do so when it has finished. While not necessary, it is advised that you restart your server if possible to finish removing Aqua Connect Terminal Server. (Uninstallation - Figure 7) Aqua Connect Terminal Server 3.5 User Manual Page 18 of 38 Establishing Connections to Aqua Connect Terminal Server Since Aqua Connect Terminal Server supports multiple clients, the ideal thing to do first is to decide which protocol you would like to use to establish a connection. Aqua Connect Terminal Server supports RDP, VNC and X11, which all have their own benefits. Below is a list of all of the clients that Aqua Connect has tested. Recommended RDP Client Software Windows® Remote Desktop Connection for Windows Unix® rdesktop Mac® Remote Desktop Connection for Mac iPhone®/iPad® iTap RDP iRdesktop WinAdmin Wyse Pocket Cloud Recommended VNC Client Software Windows® TightVNC RealVNC Unix® KRDC X11VNC Linux Red Hat Linux VNC Any Linux-native VNC utility Mac® Chicken of the VNC Vine Viewer JollysFastVNC iPhone®/iPad® iTap VNC Aqua Connect Terminal Server 3.5 User Manual Page 19 of 38 Recommended X11 Client Software Windows® Xming Cygwin X-Win 32 Mac®/Unix®/Linux Xephyr (built into the operating system) Recommended AAP Client Software Windows® and Mac® clients are available directly from Aqua Connect at: http://www.aquaconnect.net/aqua-accelerated-protocol-client-downloads.php Note: Contact the developer of any program listed above for details about acquiring and installing the software. For other handheld devices, contact the manufacturer for a specific device to inquire whether that device is RDP, X11 or RFB-compatible or can be so configured. For the most up-to-date list of compatible clients, please visit our client compatibility list that is posted on the website (http://www.aquaconnect.net/client-softwarecompatibility.php). Aqua Connect Terminal Server 3.5 User Manual Page 20 of 38 Client Connection Examples Since Aqua Connect Terminal Server works with many types of different client software, we have included some examples of how to connect using the most widely used programs. Below you will find examples of how to use Remote Desktop Connection for Mac, Remote Desktop Connection for Windows and Chicken of the VNC. Remote Desktop Protocol Notes With the RDP Login Window, you can log in to your Aqua Connect user session without saving your credentials in the Remote Desktop Connection software. This provides greater security for customers who are concerned about saving their credentials in the client. If you would like to save your credentials in the Remote Desktop Connection (RDC), simply enter and save the correct credentials and the user will login without the RDP Login Window being prompted. If you hit "connect" on RDC with the wrong credentials saved in RDC or no credentials entered, then you will be prompted with the RDP Login Window which has the same appearance as the OS X login screen. Remote Desktop Connection for Mac Once installed, launch RDP simply by clicking on its icon. The initial display will prompt for the Computer to connect to. Enter the address of the Aqua Connect server. Click the Connect button. After clicking the Connect button, RDP will prompt for a User name and Password. You must enter values that are recognized by the Aqua Connect Terminal Server. Aqua Connect Terminal Server 3.5 User Manual Page 21 of 38 At this point a connection is established with the server and the remote desktop appears. Note: If your keyboard shortcuts do not seem to be working correctly, you will need to set them up in order to have them work. A detailed explanation on how can be found here: http://www.aquaconnect.net/keyboard-shortcuts-for-mac.php Aqua Connect Terminal Server 3.5 User Manual Page 22 of 38 Remote Desktop Connection for Windows Most Windows computers come with the Remote Desktop Connection already installed. At most, you may need to update the version to make it compatible with the Aqua Connect Terminal Server. You can find the program by going to the Start button, clicking on All Programs, Accessories, Communications and then Remote Desktop Connection. Launch RDC simply by clicking on its icon. The initial display will prompt for the Computer to connect to and the User name. Enter the address of the Aqua Connect server and User name. Click the Allow me to save credentials checkbox. This will force RDC to prompt for a user-name and password to use for login. Click Connect. Aqua Connect Terminal Server 3.5 User Manual Page 23 of 38 After clicking the Connect button, RDP will prompt for a User name and Password. You must enter values that are recognized by the Aqua Connect Terminal Server. It is recommended that you uncheck the Remember my password checkbox before clicking the OK button. At this point a connection is established with the server and the remote desktop appears. Note: If your keyboard shortcuts do not seem to be working correctly, you will need to set them up in order to have them work. A detailed explanation on how can be found here: http://www.aquaconnect.net/windows-keyboard-shortcuts.php Aqua Connect Terminal Server 3.5 User Manual Page 24 of 38 Chicken of the VNC (Mac) Once installed, launch Chicken of the VNC simply by clicking on its icon. The initial display will prompt for the Host to connect to. Enter the address of the Aqua Connect server. A Display value must also be entered. This value corresponds to the Port number to use. The default value is 0. Should Port 5900 be in use on the server, enter a value of 1. This will switch the VNC connection to Port 5901. Click the Connect button. Note: To enable your keyboard shortcuts to work, click on the Connection tab and click Connection Profiles. When the Profile Manager appears, click on the Modifiers tab. Change the Command Key to Meta (Option) and the Option Key to Alt (Command). Close the Profile Manager. Aqua Connect Terminal Server 3.5 User Manual Page 25 of 38 Aqua Accelerated Protocol Notes Since Aqua Accelerated Protocol was designed for use on several different platforms, users have a wide variety of choices for clients. For the most up-to-date list of versions available, please visit our AAP downloads page that is posted on the website: http://www.aquaconnect.net/aqua-accelerated-protocol-client-downloads.php For more detailed information about the AAP client, please check the AAP Manual available on our website. Aqua Accelerated Protocol for Mac Open up the client application. You will first see the login window that looks like this: Prior to putting in your username and password, you will need to adjust your preferences. The first time the AAP client is launched, the Preferences Pane will appear automatically. Aqua Connect Terminal Server 3.5 User Manual Page 26 of 38 First you will need to set your display resolution. Currently it offers 800x600, 1024x768, 1280x1024, 1680x1050, Other and Full Screen. Additional screen size choices will be added later. If you choose Other and put in a number that is not supported by AAP, the client will attempt to choose a supported sized that is as close as possible. By default, the client will support Remote Audio Playback. To improve performance, you may want to turn it off on the AAP client. Just muting the sound on your client hardware will not turn the sound off in the AAP client and will not provide any data savings. If you want the data savings that not supporting Remote Audio Playback will provide, you will need to toggle this switch to the off position. The Lossy Audio Compression toggle works for high bandwidth/low latency sessions. By default, it is turned on for low bandwidth sessions. If you toggle this off, you are requesting that your audio not be compressed and be exactly as the application sent it as long as you have enough bandwidth for it. Aqua Connect Terminal Server 3.5 User Manual Page 27 of 38 On the Server tab, you will find another set of choices. They look like this: It is here where you would put in the IP Address of your AAP Server and the port it will connect to. By default the AAP Server port is 310. On the Printing tab, you will be given the choice on how you would like your print jobs to be submitted to the printer. You can choose to either Ask Each Time you print or pick from a list of available printers which one you would like to default to. Aqua Connect Terminal Server 3.5 User Manual Page 28 of 38 Once you make your changes, close the Preferences section. It will automatically save your changes. Put in the User Name and Password of the user you wish to connect with. Please make sure that you are not logging into the user that is already logged on at the console (if there is a user) or the server will not log you in remotely. If you would like to save your User Name and Password, check the box. Hit Connect. After a few seconds, your session will appear. When you want to leave the session, you can either disconnect or log out. Aqua Connect Terminal Server 3.5 User Manual Page 29 of 38 Aqua Accelerated Protocol for Windows Open up the client application. You will first see the login window that looks like this: Prior to putting in your username and password, you will need to adjust your preferences. First you will need to set your display resolution. Currently, it offers 800x600, 1024x768, 1280x1024, Full Screen and Other. Additional screen size choices will be added later. If you choose Other and put in a number that is not supported by AAP, the client will attempt to choose a supported sized that is as close as possible. Next you would put in the IP Address of your AAP Server and the port it will connect to. By default the AAP Server port is 310. You can check the checkbox if you would like it to show your port. Put in the User Name and Password of the user you wish to connect with. Please make sure that you are not logging into the user that is already logged on at the console (if there is a user) or the server will not log you in remotely. Hit Connect. After a few seconds, your session will appear. When you want to leave the session, you can either disconnect or log out. Aqua Connect Terminal Server 3.5 User Manual Page 30 of 38 Aqua Connect Terminal Server AdminTool Introduction The Aqua Connect Terminal Server Administration Tool (ACAdminTool) is designed to monitor and manage various aspects of ACTS, including live sessions, users, user audit trails, ACAdminTool administrators, terminal settings, server information and group filters. Use ACAdminTool with standard Apple administration tools, such as Workgroup Manager, Directory Utility and Server Administrator. ACAdminTool will automatically alert the user whenever a more recent version of Aqua Connect Terminal Server is available. You are encouraged to visit Aqua Connect’s website at www.aquaconnect.net to download the latest version as well as find information about new features and options available in the product. Default Administrator During installation, you were given the option to specify the Aqua Connect Administrator account. If you did not change these parameters, the default administrator name is “acadmin” and the default administrator password is “pass.” Note: Aqua Connect Administrators cannot login to the server. It is not a user account. There is no overlap with system or network administrators. Its sole purpose is to prevent unauthorized use of the ACAdminTool application. If you did not change the Aqua Connect Administrator account at installation time, you should immediately add one or more new Administrator accounts and remove the default. This capability is offered within the Admins tab of ACAdminTool. Launch ACAdminTool From The Finder, open the Server folder in Applications. Launch the ACAdminTool application by double-clicking the icon. Aqua Connect Terminal Server 3.5 User Manual Page 31 of 38 Host Connection Once ACAdminTool is launched, the application requires a host address and the name and password of an authorized ACAdminTool administrator before the application is enabled for use. The host address must correspond to a server that has been installed with the Aqua Connect Terminal Server. Enter “localhost” if you are running from the console or via Aqua Connect Terminal Server. Otherwise, enter the name or address of the Aqua Connect Terminal Server you would like to administer. Administrator Credential When a connection has been established, ACAdminTool will ask you for a valid name and password of an Aqua Connect Administrator. Enter the name and password that you specified at installation time. If you did not specify anything, the account name is “acadmin” and the password is “pass”. At this point, ACAdminTool is available for use. Aqua Connect Terminal Server 3.5 User Manual Page 32 of 38 Setting Up Local Printing and Audio Printing Aqua Connect Terminal Server supports local printing for client computers using RDP. These printers will show up in your ACTS session and you will be able to print documents on the printer attached to your computer or on your personal network. Below you can see a typical connection from a Windows XP client to ACTS. Aqua Connect Terminal Server will set the location to be the connecting computer’s IP address. ACTS also will attempt to match the appropriate Mac OS X printer driver with your printer based upon information that your RDP client sends about your printer. In the above example, ACTS has found an Epson Stylus C82 printer driver. You can now print to it just like you would print to any other printer. Aqua Connect Terminal Server 3.5 User Manual Page 33 of 38 Setting the Printer Driver It is possible that Aqua Connect Terminal Server will not be able to find an appropriate printer driver for the printer. The reasons for this are: • • There is no printer driver installed for that printer. You must have a printer driver installed on the Mac OS X server that supports your printer. ACTS was unable to find the matching printer driver for your printer. Note: Please make sure that all users who will be printing are made part of the _lpadmin group in case they need to set up their printer drivers. Aqua Connect Terminal Server 3.5 User Manual Page 34 of 38 In the below example, ACTS was unable to find a printer driver for the HP Color LaserJet. You can tell that this is the case because the “Kind” of printer shows up as “Print Failure.” Attempts to print to this printer will generate an error message stating that Aqua Connect Terminal Server was unable to find an appropriate driver for this printer. To set the driver for this printer, open the printer’s print queue by clicking on “Open Print Queue.” When you see the print queue, choose the info button in the toolbar at the top of the window. Select the driver tab. Aqua Connect Terminal Server 3.5 User Manual Page 35 of 38 You can now choose a driver from the “Print Using” menu. Aqua Connect Terminal Server will remember to use the new printer driver the next time the user connects with that kind of printer attached, so it is only necessary to do this once. Audio Aqua Connect Terminal Server supports audio for client computers using RDP. By default, audio is turned on. If you would like to turn audio off, by doing so with the ACAdminTool it will only turn it off server wide. This means that if you uncheck the audio button, it will be turned off for all users connecting to that server. If you would like to turn audio off on a user basis this must be done on the client software. In Remote Desktop Connection for Mac within Preferences you will find a Sound tab. In order to turn the remote computer sound off, just select the “Do Not Play Sound” option. Aqua Connect Terminal Server 3.5 User Manual Page 36 of 38 In Remote Desktop Connection for Windows within Options you will find a Local Resources tab. In order to turn the remote computer sound off, just select the “Do Not Play” from the dropdown. Aqua Connect Terminal Server 3.5 User Manual Page 37 of 38 Optimization If you feel as though your Aqua Connect Terminal Server environment using RDP is not performing as it should, there are some steps you may take to optimize ACTS. Below is a list of different optimization options available for you to implement. Before applying all the optimization options, please test each one separately to see which will yield you the best results. 1. Session Background: If you are using an image for your session’s desktop background, this will slow your performance down. We suggest changing it to a solid color such as blue or gray to reduce the amount of data that will need to be sent to a client each time the screen is updated. To change the session background, choose Desktop within System Preferences in your session. 2. Screen Resolution: By reducing your screen resolution, it will reduce the amount of screen “real estate” that needs to be updated each time you are doing something. Although more data is not being sent when you use a larger screen size, reducing the size will make things seem faster. To reduce the resolution of your session, you will need to adjust the client software you are using. In most clients, this option can be found under Display within Preferences. 3. Display Colors: If the display color is of little importance, you may try reducing it to 16-bit color or less. In most clients, this option can be found under Display within Preferences. 4. Color Compression: Within the RDP subtab in the Terminal Options tab you will find a Color Compression slider that you may adjust. Slide it from left to right to find your desired color accuracy. The less accurate the color compression, the better your performance will be. 5. Bitmap Caching: Also within the RDP subtab in the Terminal Options tab you will find a check box to enable and disable Bitmap Caching. By default, Bitmap Caching is turned on. In some environments with very low bandwidth, we have seen an increase in performance by disabling Bitmap Caching. 6. Animation: In order to increase performance you may also want to try turning animation off for things like the Dock or minimizing applications. This can be done within System Preferences. If none of these optimization tactics have yielded the results you would like, you may want to try connecting via a VNC client as it compresses data differently. In addition, you may want to look into increasing your bandwidth. Aqua Connect Terminal Server 3.5 User Manual Page 38 of 38