1
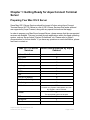
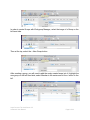
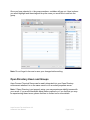
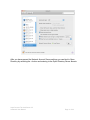
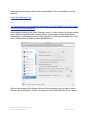
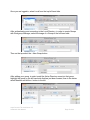
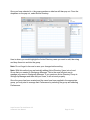
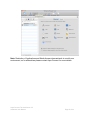
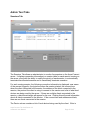
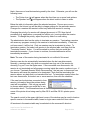
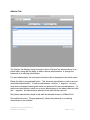
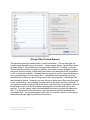
Aqua Connect Terminal Server 3.5
Advanced User Manual
Table of Contents
Chapter 1: Getting Ready for Aqua Connect Terminal Server ................... 3
Preparing Your Mac OS X Server ........................................................................3
Preparing Your Network and Internet Connection.............................................5
Chapter 2: Deciding How to Create and Manage Users and Groups ........ 6
Local Users and Groups ......................................................................................6
Via System Preferences................................................................................................6
Via Apple’s Workgroup Manager..................................................................................7
Open Directory Users and Groups ......................................................................9
Setting Up Open Directory on the Same Server as ACTS ........................................10
Setting Up Open Directory on a Different Server than ACTS ...................................10
Creating Managed Profiles with Open Directory.......................................................13
Active Directory Users and Groups ..................................................................16
Binding the Active Directory Server to the ACTS Server .........................................16
Creating Managed Profiles with Active Directory .....................................................19
Chapter 3: Aqua Connect Terminal Server AdminTool ............................ 23
Default Administrator .........................................................................................23
Launch ACAdminTool ........................................................................................23
Admin Tool Tabs.................................................................................................25
Sessions Tab ...............................................................................................................25
Users Tab.....................................................................................................................27
Admins Tab..................................................................................................................31
Terminal Tab................................................................................................................33
Server Tab....................................................................................................................35
Menu Options ......................................................................................................38
Remote Aqua Connect AdminTool....................................................................41
Chapter 4: Optimization ............................................................................... 42
Aqua Connect Terminal Server 3.5
Advanced User Manual
Page 2 of 42
Chapter 1: Getting Ready for Aqua Connect Terminal
Server
Preparing Your Mac OS X Server
Some Mac OS X Server Services should be turned off when using Aqua Connect
Terminal Server (ACTS). Below is a list of OS X Server Services that works with and
are supported by Aqua Connect, along with any special instructions that apply.
In order to prepare your Mac Snow Leopard Server, please ensure that the unsupported
services are disabled. This may be done through applications within the Apple operating
system, such as Server Admin, System Preferences, etc. Please refer to Apple’s
documentation for further details. If you have any questions or need clarification, please
feel free to contact us.
Mac OS 10.6 Server
Services Works with/Supported by Aqua
Connect Address Book Server Y AFP Client N AFP Server Y Airport N Auto Login Y Bonjour
Y DHCP Y DNS Y DVD & CD Sharing N Fast User Switching N Filesharing Y FileVault Y*
However, any System Administrator can view
any logged in user’s FileVault Firewall Y*
The appropriate ports must be open FTP Y iCal Server Y iChat Server Y Aqua Connect Terminal Server 3.5
Advanced User Manual
Page 3 of 42
IP Failover Y iPhone Configuration Utility N LDAP Integration Y Local Home Folders Y Mail Server Y Mobile Access Server N Mobile Me N MySQL Y NAT Y*
By enabling this, it may enable a firewall, so
make sure the appropriate ports are open NetBoot Client N NetBoot Server Y NFS Y Open Directory Server Y Podcast Producer N
Print Y
Push Notification Y
QuickTime Streaming Y
RADIUS Y
Remote Home Folders Y*
Cannot use AFP for Remote Home Folders.
Only NFS or SMB
Remote Login Y
Remote Management N
Scanner Sharing N
Screensharing Y*
However, cannot screen share ACTS users that
are logged in
Server Admin Y
SMB Y
Software Update Y
Speech Y*
Playback only
SSH
Y
Time Machine Backups N
Aqua Connect Terminal Server 3.5
Advanced User Manual
Page 4 of 42
Virtual Private Netwrok
Service Web Y
Web Hosting Y
Wiki Server Y
Workgroup Manager Y
Y*
Not all features will function in multi-user
environments
Xgrid N
Preparing Your Network and Internet Connection
Before installing Aqua Connect Terminal Server, there are 6 items pertaining to your
network and Internet connection that must be setup properly. Listed below are these 6
items along with details of how they should properly be setup.
1. Physically Connected: Although this may seem obvious, we must reiterate that
your server must be physically connected to your network infrastructure.
2. IP Address: There are 2 ways of which this can be setup in order to properly
work with Aqua Connect Terminal Server:
a. Assign a static IP
b. Use DHCP, but add the server to the static mapping (AKA IP Reservation)
within Server Admin of the DHCP Server.
3. Web Proxy: The server must be able to connect to a https server on the Internet
using one of these methods:
a. Directly
b. NAT or Firewall
c. System wide proxy server setting (no user authentication)
4. DNS: There are 2 things that must be done/setup properly in order for Aqua
Connect Terminal Server to install and continue to function:
a. The Server’s Fully Qualified Domain Name (FQDN) must be resolvable by
both a forward lookup and a reverse lookup.
b. The server’s Domain Name must have a consistent zone record, which is
acceptable either by direct or indirect queries.
5. Time: All servers that will interact with one another in some way should have the
same time source. Some examples of servers that may interact with your Apple
Server would be Open Directory Server, Active Directory Server, File Server,
LDAP Server, etc. If a unanimous time source is not available, the server’s times
must be in sync within a 3-minute window.
6. If Using Directory Services: The Directory Servers names, forests, domains
and associated records must be resolvable.
Aqua Connect Terminal Server 3.5
Advanced User Manual
Page 5 of 42
Chapter 2: Deciding How to Create and Manage Users
and Groups
When configuring and managing your Aqua Connect Terminal Server users, there are
many options that are available. Below you will find details about setting up and
managing Local, Open Directory and Active Directory users and groups. If you are
interested in other ways (i.e. LDAP), please feel free to contact us.
Local Users and Groups
Local Aqua Connect Terminal Server Users and Groups can be setup via System
Preferences or Workgroup Manager and NOT Server Preferences.
Via System Preferences
Launch System Preferences and click on Accounts. Add a new user by selecting the +
button on the bottom left hand side.
In order to group your System Preferences users, select the + button on the left hand
side. From the drop down list, select add a new Group. After creating the group, you will
Aqua Connect Terminal Server 3.5
Advanced User Manual
Page 6 of 42
see a list of all your local user accounts and can select which users you would like to
apply to the group that has just been created.
Via Apple’s Workgroup Manager
Open the Server folder within Applications and launch Workgroup Manager. Enter in
your credentials. Once you are logged in, select Local from the top left hand side.
After authenticating and connecting to the Local Directory, select the + New User button
on the top. Now you may go ahead and add users. Keep in mind that ALL users MUST
have Home Folders in order to be able to connect to the Aqua Connect Terminal
Server.
Aqua Connect Terminal Server 3.5
Advanced User Manual
Page 7 of 42
In order to create Groups with Workgroup Manager, select the image of a Group on the
left hand side.
Then at the top, select the + New Group button.
After creating a group, you will need to add the newly created users into it. Highlight the
new group on the left hand side, select Member in the center and hit the + button to the
left.
Aqua Connect Terminal Server 3.5
Advanced User Manual
Page 8 of 42
Once you have selected to + the group members, a sidebar will pop out. Here is where
you would highlight and then drag and drop the users you would like to add into the
group.
Note: Do not forget to be sure to save your changes before exiting.
Open Directory Users and Groups
Aqua Connect Terminal Server can be easily integrated into your Open Directory
environment whether it is on the same server or on an entirely separate server.
Note: If Open Directory is not properly setup, you may experience stability issues with
your server. If you would like details about these symptoms or if you feel that you may
be experiencing these issues, please feel free to contact us for more details.
Aqua Connect Terminal Server 3.5
Advanced User Manual
Page 9 of 42
Setting Up Open Directory on the Same Server as ACTS
As you would normally do (aside from ACTS), follow Apple’s instructions on how to set
Open Directory up on your server. The manual can be found at: http://www.apple.com/server/macosx/docs/Open_Directory_Admin_v10.6.pdf
Note: Chapter 5 in Apple’s Open Directory Guide will walk you through how to setup
your Open Directory environment.
Once your Open Directory environment is installed and set up on the same server as
you have installed or will be installing ACTS, there is no binding that is necessary.
Note: Again do NOT forget that ALL users MUST have Home Folders. If you choose to
use Remote Home Folders, remember that AFP will not work at the moment. NFS or
SMB will work and are recommended.
Setting Up Open Directory on a Different Server than ACTS
If you would like to have your Open Directory server on different hardware than ACTS,
you will need to bind the two. Before binding, please make sure that your Open
Directory Server has been installed and setup properly according to Apple’s
documentation. It can be found at: http://www.apple.com/server/macosx/docs/Open_Directory_Admin_v10.6.pdf
In order to bind the server that has or will have Aqua Connect Terminal Server installed
to the Open Directory Server, please open up System Preferences, authenticate if
necessary and select Login Options from the lower left hand side. Then next to Network
Account Server select the Edit button.
Aqua Connect Terminal Server 3.5
Advanced User Manual
Page 10 of 42
After you have opened the Network Account Server settings you can bind to Open
Directory by selecting the + button and entering in the Open Directory Server domain
Aqua Connect Terminal Server 3.5
Advanced User Manual
Page 11 of 42
or select Open Directory Utility, authenticate, check LDAP and bind.
Aqua Connect Terminal Server 3.5
Advanced User Manual
Page 12 of 42
Important Note: There are known issues unrelated to Aqua Connect Terminal Server
with using certain domain names with Directory Services.
Bad Examples include: Anything ending in .local or ending with any domain name that
is not properly resolvable.
Good Domain Name examples include: Anything that is NOT ending in .local like
.org, .private, .com, .net, .us, .uk, etc. and is properly resolvable.
In Addition: All servers that will interact with one another is some way should have the
same time source. In this case, your Apple Server (running ACTS) would need to have
the same time source as the Open Directory Server and Kerberos (if used). If no time
source is available then the server’s times must be in sync within a 3-minute window.
Creating Managed Profiles with Open Directory
With Apple’s Workgroup Manager you can create managed profiles, which will allow you
to manage what your users or groups of users can and cannot do in their session/OS.
In order to do this, launch Workgroup Manager (Applications/Server Folder) and enter in
your Server Admin credentials.
Then, if not already viewing Open Directory (LDAP), select it from the drop down.
Aqua Connect Terminal Server 3.5
Advanced User Manual
Page 13 of 42
If you would like to create managed profiles for an Open Directory Group/s, but have not
yet created them, select the Group icon.
Aqua Connect Terminal Server 3.5
Advanced User Manual
Page 14 of 42
Now that you are in the Open Directory Group field, select the + New Group button.
Once the group has been created you may now start adding users into it. To do this,
select the Members button and then select the + icon. Once the side bar pops out,
ensure you are viewing the OD (LDAP) users by selecting it from the drop down.
Aqua Connect Terminal Server 3.5
Advanced User Manual
Page 15 of 42
Now you may start dragging and dropping the desired users into the new created group.
Once the group has been created and the users have been applied to the appropriate
group, you may start to manage their Preferences by selecting the group and selecting
Preferences.
Note: Restriction of Applications and Media Access does not work in a multi-user
environment, so for alternatives please contact Aqua Connect for more details.
Active Directory Users and Groups
Aqua Connect Terminal Server can be easily integrated into your Active Directory
environment.
Note: If Active Directory is not properly setup you may experience stability issues with
your server. If you would like details about these symptoms or if you feel that you may
be experiencing these issues, please feel free to contact us for more details.
Binding the Active Directory Server to the ACTS Server
Before learning how to bind the Aqua Connect Terminal Server and the Active Directory
Server, please make sure that your Active Directory Server has been installed and
Aqua Connect Terminal Server 3.5
Advanced User Manual
Page 16 of 42
setup properly according to Microsoft’s documentation. This documentation can be
found at:
https://www.Microsoft.com
or
http://www.microsoft.com/downloads/details.aspx?familyid=84dfe61e-fb7b-4673-89b855bcc801b431&displaylang=en
After properly setting up the Active Directory server, in order to bind it to the server that
has or will have Aqua Connect Terminal Server, please open System Preferences,
authenticate if necessary and select Login Options from the lower left hand side. Then
next to Network Account Server select the Edit button.
After you have opened the Network Account Server settings, you can bind to Active
Directory by selecting the + button and entering in the Active Directory Server domain
Aqua Connect Terminal Server 3.5
Advanced User Manual
Page 17 of 42
or select Open Directory Utility, authenticate, check Active Directory and bind.
Aqua Connect Terminal Server 3.5
Advanced User Manual
Page 18 of 42
Important Note: There are known issues unrelated to Aqua Connect Terminal Server
with using certain domain names with Directory Services.
Bad Examples include: Anything ending in .local or ending with any domain name that
is not properly resolvable.
Good Domain Name examples include: Anything that is NOT ending in .local like
.org, .private, .com, .net, .us, .uk, etc. and is properly resolvable.
In Addition: All servers that will interact with one another is some way should have the
same time source. In this case, your Apple Server (running ACTS) would need to have
the same time source as the Active Directory Server and Kerberos (if used). If no time
source is available then the server’s times must be in sync within a 3-minute window.
NOTE: For your Active Directory users to authenticate properly, these fields must be
setup properly:
- UniqueID (should be 500 or above)
- PrimaryGroupID
- NFSHomeDirectory
- GeneratedUID
- UserShell
Creating Managed Profiles with Active Directory
With Apple’s Workgroup Manager, you can create managed profiles locally, which will
allow you to manage what your users or groups of users can and cannot do in their
session/OS.
In order to do this, launch Workgroup Manager (Applications/Server Folder) and enter in
your Server Admin credentials.
Aqua Connect Terminal Server 3.5
Advanced User Manual
Page 19 of 42
Once you are logged in, select Local from the top left hand side.
After authenticating and connecting to the Local Directory, in order to create Groups
with Workgroup Manager, select the image of a Group on the left hand side.
Then on the top select the + New Group button.
After adding your group, in order to add the Active Directory users into that group,
highlight the group on the left hand side that has just been created, then in the center
select Member and hit the + button to the left.
Aqua Connect Terminal Server 3.5
Advanced User Manual
Page 20 of 42
Once you have selected to + the group members a side bar will then pop out. From the
dropdown on the pop out, select Active Directory.
Here is where you would highlight the Active Directory users you want to add, then drag
and drop them into and into the group.
Note: Do not forget to be sure to save your changes before exiting.
Note: With this method you are basically adding Active Directory Users into a Local
Group that you created in Workgroup Manager. This is the most efficient way to
manage your users in Workgroup Manager. If you create an Active Directory Group in
Workgroup Manager and then add your users, it will not work properly.
Once the group has been created and the users have been applied to the appropriate
group, you may start to manage their Preferences by selecting the group and selecting
Preferences.
Aqua Connect Terminal Server 3.5
Advanced User Manual
Page 21 of 42
Note: Restriction of Applications and Media Access does not work in a multi-user
environment, so for alternatives please contact Aqua Connect for more details.
Aqua Connect Terminal Server 3.5
Advanced User Manual
Page 22 of 42
Chapter 3: Aqua Connect Terminal Server AdminTool
The Aqua Connect Terminal Server Administration Tool (ACAdminTool) is designed to
monitor and manage various aspects of the Aqua Connect Terminal Server, including
live sessions, users, user audit trails, ACAdminTool administrators, terminal settings,
server information and group filters. ACAdminTool can be used with standard Apple
administration tools, such as Workgroup Manager, Directory Utility and Server
Administrator.
ACAdminTool will automatically alert the user whenever a more recent version of Aqua
Connect Terminal Server is available. You are encouraged to visit Aqua Connect’s
website at www.aquaconnect.net to download the latest version as well as find
information about new features and options available in the product.
Default Administrator
During installation, a default administrator credential, identified by name and password,
is set up on the server. This administrator credential is specific only to ACAdminTool
and provides a means of restricting access to the ACAdminTool application.
Note: The default administrator cannot login to the server. It is not a user account.
There is no overlap with system or network administrators. Its sole purpose is to
prevent unauthorized use of the ACAdminTool application.
The default administrator name is “acadmin”.
The default administrator password is “pass”.
You should immediately add one or more new Credentials and remove the default.
This capability is offered within the Admins tab of ACAdminTool.
Launch ACAdminTool
From The Finder, open the Server folder in Applications.
Launch the ACAdminTool application by double-clicking the icon.
Aqua Connect Terminal Server 3.5
Advanced User Manual
Page 23 of 42
Host Connection
Once ACAdminTool is launched, the application requires a host address and the name
and password of an authorized ACAdminTool administrator before the application is
enabled for use.
The host address must correspond to a server that has been installed with the Aqua
Connect Terminal Server. Enter “localhost” if you are running from the console or via
Aqua Connect Terminal Server. Otherwise, enter the name or address of the Aqua
Connect Terminal Server you would like to administer.
Administrator Credential
When a connection has been established, ACAdminTool will ask you for a valid name
and password of an ACAdminTool administrator. Enter “acadmin” and “pass” for the
initial use of this application. At this point, ACAdminTool is available for use.
Aqua Connect Terminal Server 3.5
Advanced User Manual
Page 24 of 42
Admin Tool Tabs
Sessions Tab
The Sessions Tab allows an administrator to monitor live sessions on the Aqua Connect
server. It displays connection information in a session table for each session running on
the server, along with the ability to modify the priority of each session, to automatically
terminate disconnected sessions and to immediately terminate a session.
For each running session, the following connection information is displayed: user name
of the account logged in, the login time when the session started, the connect time
when the client connected to the session, the address of the client connected to the
session, the protocol the client is using to connect to the session and a list of what local
devices are being used by the server. If there are multiple clients connected to the
session, a disclosure triangle will appear for the row. Clicking this will reveal information
about all clients connected to the session. If the connect time and address are blank,
there are no clients connected to the session.
The Device column contains a list of local devices being used by the client. If this is
Aqua Connect Terminal Server 3.5
Advanced User Manual
Page 25 of 42
blank, there are no local devices being used by the client. Otherwise, you will see the
following icons:
• The Printer Icon ( ) will appear when the client has one or more local printers.
• The Speaker Icon ( ) will appear when the client is able to listen to audio.
Below the table is information about the selected sessions. Choose one or more
sessions in the list and you will be able to change settings for the particular session.
Changes for a session will remain in effect only while that session is running.
Changing the priority of a session will change the amount of CPU time that all
processes (e.g. applications, command-line utilities, etc.) running within the session
receive. To change the priority, adjust the priority slider to a new setting.
The administrator also has the option to terminate any session. Terminating a session
will cause any programs running in the session to terminate immediately. If data has
not been saved, it will be lost. Only one session may be terminated at a time. To
terminate a session, first select one session in the session table, and then click the
“Terminate Session” button. You will be asked to confirm that you would like to
terminate the session. If you choose to continue, the selected session will be
immediately terminated.
Note: The user of the session being terminated is not notified of this event.
Sessions can also be automatically terminated when the last user disconnects.
Normally, a session ends only when a connected user logs out of the session by
choosing “Log out” from the Apple menu. If the connected user disconnects, the
session is not terminated and all programs running inside the session continue to run. If
you choose “Terminate Session When Disconnecting”, the last user to disconnect from
the session will cause the session to be terminated. Note that like terminating the
session above, any data that is not saved will be lost. To terminate a session when the
last user disconnects, first select one or more sessions, then click the checkbox.
If the user has local printers connected to their
session, information about the printers being
used will be available. Click on pop-up menu
to choose which printer you would like to see
information about. The information shown is the kind of printer sent by the client, the
name of the printer driver being used by Mac OS X and Mac OS X’s printer queue
name.
The search control in the upper right hand corner of the window may be used to locate a
specific session in the session table, based on login name under the User column.
All sessions in the session table may be selected via the command-A shortcut.
Aqua Connect Terminal Server 3.5
Advanced User Manual
Page 26 of 42
Users Tab
The Users Tab displays basic information about user accounts in a user table, along
with the ability to toggle a user's "enabled" status, modify the default priority assigned to
a user when connecting to the server, toggle use of a local clipboard, toggle use of a
local printer and whether to automatically terminate a user's session when
disconnected.
For each user the following information is displayed: login name, real name and default
priority, as well as a checkbox to toggle the user’s “enabled” status. Below the user
table is an informational display. It is visible only if one or more Directory Service filter
groups have been chosen, either during the Aqua Connect installation, or from the
server tab and lists the titles of all groups in the filter.
Below the table is information about the selected users. Choose one or more users in
the list and you will be able to change settings for the particular user. Changes for a
user will remain in effect until reset by the administrator and can be adjusted at any
time.
Changing the priority of a user will change the amount of CPU time that all processes
Aqua Connect Terminal Server 3.5
Advanced User Manual
Page 27 of 42
(e.g. applications, command-line utilities, etc.) running within that user’s session
receive. To change the priority, adjust the priority slider to a new setting. The new
priority will be assigned to the selected users as the default priority each time they
connect to the server.
When enabled, the local clipboard can be used to cut, copy, and paste information
between the user session on the server and a local application on the client.
When enabled, the local printer can be used to print information from the user session
on the server.
Sessions can also be automatically terminated when the last user disconnects.
Normally, a session ends only when a connected user logs out of the session by
choosing “Log out” from the Apple menu. If the connected user disconnects, the
session is not terminated and all programs running inside the session continue to run. If
you choose “Terminate Session When Disconnecting”, the last user to disconnect from
the session will cause the session to be terminated. Any data that is not saved will be
lost. To terminate a session when the last user disconnects, first select one or more
users, then click the checkbox.
For each user, under the column titled “Enable” within the user table, is a checkbox.
This determines whether a user is given login privilege to the Aqua Connect server. To
use this feature, simply check or uncheck the box for the appropriate users. If enabled
(checked), the user is allowed to login. If disabled (not checked), login is denied. This
provides a mechanism to restrict user access to the server. This setting will remain in
effect until reset by the administrator, and can be adjusted at any time.
During installation, you can specify whether all users are initially enabled or disabled for
login to the server.
The search control in the upper right hand corner may be used to locate a specific user
in the user table, based on login name under the User column.
All users in the user table may be selected via the command-A shortcut.
Aqua Connect Terminal Server 3.5
Advanced User Manual
Page 28 of 42
Group Filter
Besides the “Enabled” checkbox on the user table, Aqua Connect offers a second
mechanism to restrict user access to the server via the concept of a set of Directory
Services groups. The group filter can be defined during the installation of the Aqua
Connect Terminal Server on the User Setup screen. This step, unlike previous
versions, can now be deferred until after installation. You can now choose to define or
modify a set of group filters at any point in time from the server tab in ACAdminTool.
Only users mapped to groups in the filter are allowed to login to the server. For more
details, refer to the Server Tab section.
If you created any groups within Workgroup Manager as mentioned in Chapter 2 for
your Local Users, Open Directory Users or Active Directory Users, they should appear
within the Group Filter section with the ACAdminTool. In order to easily manage and
view all the users within the ACAdminTool User’s Tab, it is suggested that you use the
Group Filtering feature to do so.
Enabled Display Filter
This control is located above the "Enabled" column of the user table. It is used to filter
the users displayed in the table. Three options are available: 1) both enabled and
disabled users, 2) enabled users only, 3) Disabled users only. Those users that match
the current value of this control are displayed in the user table. This value is
automatically saved and will be in effect when ACAdminTool is launched again. The
filter can be reset at any time.
Note: The Directory Service group filter takes precedence over the enabled filter. If the
group filter is in effect, the scope of authorized users is limited to users mapped to
groups in the filter. The “Enabled” checkbox on the user table can be used to further
restrict the scope of authorized users within the group filter.
User Audit Trail
One additional control, "Show Audit Trail", is available below the user table. When
clicked, a separate window is displayed with audit-trail information for each user
selected in the table.
NOTE: Some versions of Aqua Connect Terminal Server no longer support Audit Trails.
In addition, some versions may support Audit Trails, however it may be to a lesser
degree. For more details about what your version supports, please contact us.
ACAdminTool has the ability to report information about a user's activity on the server
Aqua Connect Terminal Server 3.5
Advanced User Manual
Page 29 of 42
over a period of time. This information currently includes date and time of login, logout,
disconnect and applications launched. Several features are offered from the toolbar on
the main audit trail window, including search and navigate through the audit trail data,
apply date range queries, manage custom queries (create, edit, save, delete and
rename), and apply custom queries to view a specific subset of records. Custom
queries can be designed to filter out unnecessary records so you can quickly examine
useful information. You also have the option to save records displayed in the audit trail
window to a separate file using the menu option File – Save as.
The toolbar on the main audit window allows you to perform several tasks. (See figure 1
below)
(Audit Trail Toolbar - Figure 1)
The toolbar currently offers six controls. Following is a brief description of each control
on the toolbar:
Query
Issue query to the server and display results in the audit trail window. This is a popup
menu that lists All records, Dates shown, and all custom query titles.
Query Editor
Create, modify, delete, rename and save custom queries.
Start Date
Specific to Dates shown query. First date to retrieve audit trail records from the server.
End Date
Specific to Dates shown query. Last date to retrieve audit trail records from the server.
Navigate
Once a search has been issued, you can use this control to navigate among the found
items. Navigation options include first item, previous item, next item and last item.
Search
This is a standard, case-insensitive search control that targets records in the audit
window. All found items are highlighted and a count is displayed at the bottom of the
window.
Aqua Connect Terminal Server 3.5
Advanced User Manual
Page 30 of 42
Admins Tab
The Admins Tab displays basic information about ACAdminTool administrators in an
admin table, along with the ability to add or remove administrators, or change the
password of an existing administrator.
For each administrator, the only basic information that is displayed is the admin name.
Below the table is a segmented button. This allows an administrator to add or remove
authorized administrators. To add an administrator, click the “+” segment. An input
drop-down will appear requiring the name and password for the new administrator. To
remove an administrator, select one or more administrators in the admin table and click
the “-“ segment. All administrators selected in the table will be removed.
Only those administrators listed in this table are allowed access to ACAdminTool.
One additional control, "Change password", allows the password of an existing
administrator to be modified.
Aqua Connect Terminal Server 3.5
Advanced User Manual
Page 31 of 42
The search control in the upper right-hand corner may be used to locate a specific
administrator in the admin table, based on name under the Name column.
All administrators in the admin table may be selected via the command-A shortcut.
Note: A default administrator, "acadmin", with the password "pass", is supplied during
installation. It is recommended that you add your own list of administrators, and remove
or modify the default as soon as possible.
Aqua Connect Terminal Server 3.5
Advanced User Manual
Page 32 of 42
Terminal Tab
The Terminal Tab displays settings for three connection protocols: VNC, RDP and X11.
An administrator is allowed to modify settings within each of these three protocols.
Note: Connection protocols within ACAdminTools are disabled for those protocols not
specified during installation of the Aqua Connect Terminal Server.
VNC
The VNC Tab displays and allows modification of the VNC server port, the bit depth of
the display and the default display resolution.
VNC Server Port
The VNC server port displays the value specified during installation. This value
can be modified at any time.
Bit Depth of Display
The bit depth of the display can be defined in terms of thousands or millions of
colors. This value can be modified at any time.
Size of Display
Options for the default display resolution are presented in a predefined dropdown menu. This value can be modified at any time. If a new size is selected,
only users that connect after the change will experience the new resolution.
RDP
The RDP Tab displays and allows modification of the RDP server port, and to
enable/disable the following settings: bitmap caching, support keyboard shortcuts for
cut, copy, paste and undo, optimization of screen updates and sound.
Support for Cut – Copy – Paste – Undo Keyboard Shortcuts
If this setting is enabled, the standard keyboard shortcuts for cut, copy, paste and
undo operations will be recognized. However, command-F1 will be disabled.
This addresses an issue with Microsoft’s Remote Desktop Client for the Mac and
is unnecessary if you are not using that software.
Allow Sound
If this setting is enabled, clients connected to the server will be able to use audio.
However, this will increase bandwidth usage.
Bitmap Caching
If this setting is enabled, the client computer will attempt to store frequently used
images to reduce the amount of data being transmitted. If you have a fast server
but limited bandwidth, this setting should be enabled. If your server is slower but
the connection is fast, this setting should be turned off.
Aqua Connect Terminal Server 3.5
Advanced User Manual
Page 33 of 42
Packet Compression
If this setting is enabled, all messages sent from the server will be compressed,
reducing the amount of data sent. If there are clients using low-bandwidth
connections (e.g, 10 Mbps), it is recommended that this be on.
Color Compression
If this setting is on, the range of colors seen by the client will be reduced,
resulting in less data being sent by the server to the client. Reducing this, along
with Packet Compression (above), can provide good performance in very lowbandwidth connection (e.g, 3-5 Mbps).
X11
The X11 Tab displays and allows modification of the X11 server port only.
Aqua Connect Terminal Server 3.5
Advanced User Manual
Page 34 of 42
Server Tab
The Server Tab supplies installation and licensing information including;
Aqua Connect Server Version:
Displays version of Aqua Connect Terminal Server
currently installed on the server.
Registered to:
User supplied name during installation, such as the
name of your company or server.
Registration Server:
The DNS of our registration server; for most users,
this will be licensing.aquaconnect.net.
Registration key:
The license key assigned to your installation of Aqua
Connect.
Date installed:
Date on which Aqua Connect was installed on the
server.
Days remaining:
The number of days left before the maintenance
contract expires.
Active Sessions:
The number of sessions currently running on the
server.
Maximum Sessions:
The maximum number of sessions allowed by your
license.
An informational alert is displayed on the Server Tab whenever ACAdminTool has
determined that your installed version is out-of-date, along with a link to our website
containing more information about the latest version.
Group Filter
Besides the “Enabled” checkbox on the user table, Aqua Connect offers a second
mechanism to restrict user access to the server via the concept of a set of Directory
Services groups. The Server Tab provides a button labeled “Group Filter”. Choose this
button to create, modify, preview or remove your group filter definition. The group filter
can be defined during the installation of the Aqua Connect Terminal Server on the User
Setup screen. This step, unlike previous versions, can now be deferred until after
installation. You can now choose to define or modify a set of group filters at any point in
time from the server tab in ACAdminTool. Only users mapped to groups in the filter are
allowed to login to the server.
Aqua Connect Terminal Server 3.5
Advanced User Manual
Page 35 of 42
The figure below shows an example of enabling three groups as a group filter definition:
(Group Filter Window)
ACAdminTools presents all groups from Directory Services in this display and allows
the user to enable or disable any set of these groups using the checkboxes under the
column labeled “Enable”. If a group filter is already in effect on the server, the
checkboxes will be checked for those groups in the filter. If you wish to completely
remove a group filter from the server, confirm that all checkboxes are unchecked.
Enable or disable the appropriate groups and choose Apply to continue. Once Apply
has been chosen, a drawer window opens with statistics about the current state of
group filters on the server, and a preview of results should the new group filter be
applied to the server. You are given the option to cancel the apply operation.
Aqua Connect Terminal Server 3.5
Advanced User Manual
Page 36 of 42
(Group Filter Preview Drawer)
The preview drawer lists several items of useful information. The top pane lists the
current group filter definition on the server. In the example above, a group filter has not
yet been defined. The middle pane lists group filter statistics if “Continue” is chosen.
This includes the number of groups in the filter, the number of users allowed to login to
the server and the number of audit trails and custom user settings that will be retained
or will no longer be available. Retained files correspond to current users that belong to
one or more groups in the new group filter. Unavailable files correspond to current
users that do not belong to any of the groups in the new group filter. Unavailable files
are retained by default. However, you may choose to delete these files using the check
boxes at the bottom. Once deleted, the information is lost and cannot be recovered. If
you decide to modify the group filter in the future such that some “unavailable” users will
be allowed to login, you should consider retaining their audit trails and custom user
settings. If you are unsure, retain the unavailable files when you apply the new group
filter. You can return to this option later, apply the same group filter and delete the
unavailable files. The preview drawer is also useful to view the results of a new group
filter without actually applying that filter to the server.
Aqua Connect Terminal Server 3.5
Advanced User Manual
Page 37 of 42
Menu Options
ACAdminTool currently offers 6 main menu options to perform various operations within
the application.
ACAdminTools
About ACAdminTools
This option presents a display with the logo, current version and copyright.
Quit ACAdminTools
This option terminates all running ACAdminTool applications.
File
New
This option launches a new ACAdminTool application. The original application remains
running.
Close
This option closes the window with focus. If the user audit trail window has focus, it will
be closed. If the main ACAdminTool window has focus, the application will be closed.
Save As
This option is enabled when a user audit trail window has focus and allows information
in the current audit window to be saved to a file on the client machine.
Page Setup and Print
These options allow any tab view or user audit trail window to be printed.
Aqua Connect Terminal Server 3.5
Advanced User Manual
Page 38 of 42
Edit
Undo and Redo
These options work in tandem with cut, copy, paste and delete operations.
Cut, Copy, Paste, Delete
These options are enabled when the Host field or Search field have focus. If the user
audit trail window is in focus, only the Copy option is enabled. All of these options are
disabled when any of the table views have focus on the Sessions, Users and Admins
tab.
Delete
The Delete option works only on the Admins tab, and can be used to delete an admin
that is highlighted in the admin table.
Select All
This option is enabled when any of the table views have focus on the Sessions, Users
and Admins tab. All rows are highlighted when this option is chosen.
Find
This option is enabled when the user audit trail window is in focus, and can be used to
search for specific characters in the audit trail.
Special Characters
This option is useful to specify characters not normally found on the keyboard. It
currently can only be used to insert special characters into the search field.
Aqua Connect Terminal Server 3.5
Advanced User Manual
Page 39 of 42
View
Refresh All Users
This option will update all users listed in the table view of the Users tab with the most
recent user data from the server. If the Sessions tab is in focus, this option will be
displayed as “Refresh All Sessions”, and session data will be updated. If the Admins
tab is in focus, this option will be displayed as “Refresh All Admins”, and admin data will
be updated.
Refresh User “aqua”
This option will update the single user highlighted in the table view of the Users tab with
the most recent data from the server. Individual row granularity is not offered for the
Sessions and Admins tabs.
Show Audit Trail for “aqua”
This option is enabled only when a single user (aqua) is highlighted in the table view of
the Users tab. If several users are highlighted, this option will be displayed as “Show
Audit Trail for Selected Users”. When chosen, audit trail windows are launched for each
selected user. Alternatively, the Show Audit Trail button will produce the same result.
Erase Audit Trail for
This option is enabled only when the audit trail window is in focus, and will be displayed
as “Erase Audit Trail for aqua1”. When chosen, that audit trail will be deleted from the
server. Note that this option can be applied to only one audit trail at a time.
Window
Minimize
This option can be used to minimize both the main ACAdminTool window and the user
audit trail window.
Aqua Connect Terminal Server 3.5
Advanced User Manual
Page 40 of 42
Zoom
This option can be used to expand the user audit trail window to full screen. It acts like
a toggle, and if chosen when the user audit trail window is full size, will return it to its
original size. This option is not enabled for the main ACAdminTool window.
Aqua Connect Administrator
This identifies the main ACAdminTool window. All open user audit trail windows will
also be listed in this section. Choosing one of these entries will expand that window if
minimized, or bring it to the front if it is hidden behind other windows. The window with
focus will be preceded by a check mark.
Remote Aqua Connect AdminTool
If you would like to use the Aqua Connect Admin Tool, but do not want to have to log on
to the server to do so, we now have a solution for you. This solution will allow you to use
the AC Admin Tool without using a user license in order to administer your Aqua
Connect Terminal Server (3.0 or higher) environment. All you will need to do is transfer
the admin tool program to your client hardware. You can either transfer it via your
network or load it on to a USB stick and transfer it that way. You can then use the tool
as you normally would on the server. Just remember to put the IP address of the server
you would like to administer in the host box and not use localhost. We will soon be
adjusting the Aqua Connect installer to allow you to install the AC Admin Tool on any
client without needing a license key.
Note: The Aqua Connect Admin Tool uses port 616, so this will need to be opened on
your firewall in order for the tool to work.
Aqua Connect Terminal Server 3.5
Advanced User Manual
Page 41 of 42
Chapter 4: Optimization
If you feel as though your Aqua Connect Terminal Server environment using RDP is not
performing as it should, there are some steps you may take to optimize ACTS. Below is
a list of different optimization options available for you to implement. Before applying all
the optimization options, please test each one separately to see which will yield you the
best results.
1. Session Background: If you are using an image for your session’s desktop
background, this will slow your performance down. We suggest changing it to a
solid color such as blue or gray to reduce the amount of data that will need to be
sent to a client each time the screen is updated. To change the session
background, choose Desktop within System Preferences in your session.
2. Screen Resolution: By reducing your screen resolution, it will reduce the amount
of screen “real estate” that needs to be updated each time you are doing
something. Although more data is not being sent when you use a larger screen
size, reducing the size will make things seem faster. To reduce the resolution of
your session, you will need to adjust the client software you are using. In most
clients, this option can be found under Display within Preferences.
3. Display Colors: If the display color is of little importance, you may try reducing it
to 16-bit color or less. In most clients, this option can be found under Display
within Preferences.
4. Color Compression: Within the RDP subtab in the Terminal Options tab you will
find a Color Compression slider that you may adjust. Slide it from left to right to
find your desired color accuracy. The less accurate the color compression, the
better your performance will be.
5. Bitmap Caching: Also within the RDP subtab in the Terminal Options tab you will
find a check box to enable and disable Bitmap Caching. By default, Bitmap
Caching is turned on. In some environments with very low bandwidth, we have
seen an increase in performance by disabling Bitmap Caching.
6. Animation: In order to increase performance you may also want to try turning
animation off for things like the Dock or minimizing applications. This can be
done within System Preferences.
If none of these optimization tactics have yielded the results you would like, you may
want to try connecting via a VNC client as it compresses data differently. In addition,
you may want to look into increasing your bandwidth.
Aqua Connect Terminal Server 3.5
Advanced User Manual
Page 42 of 42