1
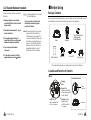
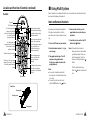
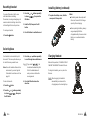
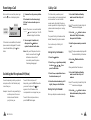
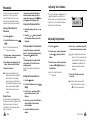
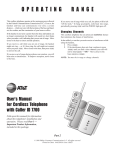
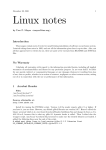
CALLER ID DIGITAL ENHANCED
CORDLESS TELEPHONE
CL-3399 ID
USER' S MANUAL
Congratulations
on purchasing our high quality product.
Please read the manual carefully to find out all features and how your telephone works, so you
can get the best out of your new phone.
Safety precautions
To reduce the risk of the electrical shock and injury, please follow these basic safety
precautions before using the phone.
1. Carefully read and observe the instructions in this manual.
2. Heed the warnings marked on the unit.
3. When cleaning, unplug the phone. Use a damp cloth. Do not use liquid or aerosol
cleaners.
4. Do not place objects on the line cord that may cause damage.
5. Do not use this phone in wet surroundings and environments where there is a risk
of explosion.
6. Avoid spilling any liquid on the phone.
7. Unplug this phone from the wall outlet and refer servicing to qualified service
personnel.
8. Take care for polarity of batteries, inser t the rechargeable batteries in accordance
with polarity symbols ( this instruction is found in the installing batteries section.)
9. Only use approved rechargeable batteries of the same type. Never use other
ordinary batteries or conventional alkaline batteries. Otherwise health risks and
personal injuries cannot be excluded.
10. Do not mix exhausted and full batteries. Exhausted batteries shall not be
removed to usually household waste and fire. Take care for nature!
11. Only use the power supply unit supplied , identified by the symbol on the
underside of the device.
12. Children don't recognise the risks of electrical appliances. Therefore use or keep
the phone only under supervision of adults or out of the reach from children.
13. Use the phone only in the described manner.
14. Do not use or stop the use if the phone is damaged.
15. The phone is designed for working with a temperature range from 5℃ to 45℃.
Ⅰ
■ Others
■ Table of Contents
Troubleshooting
Symptom
Check & Remedy
Check that the power adapter is properly connected.
Check that the telephone line cord is properly connected.
・ Check that the handset is fully charged.
・ Check that the handset batteries are installed properly.
Package C ontents
Check that the telephone line cord is properly connected.
・ Check that the power adapter is properly connected.
・
No operation
No d ial tone
Warning beep occurs
when making a call
The Handset seems to
have very s hort
battery life.
・
・
・
Check that the handsetbatteries are not in low status.
Clean the charge contacts.
・ Consistently s hort battery life may indicate that
replacement o f the batteries is necessary.
・
Specifications
30
Frequency Range
1.88~1.90GHz
Channels
120 Duplex channels
Carrier Power
≤250 mW (24 dBm )
Modulation
GFSK
Frequency Stability
≤±50 khZ
OperationTime
Ni-MH: Standby mode: 7 0 h o u r s , Talk mode: 7 hours
Charging time
24hours
Ambienttemperature
Normal: 15℃~35℃, Extreme: 5℃~45℃
Humidity
0%~90%
Weight
Base: 108g,Handset: 69g
Dimensions
Base:106×106×56 mm,Handset:124×5 1×28 mm
Power Supply
BaseInput:DC 9V, 300mA,
Handset Input: Ni-MH:1.2V X 3,600mA
Compliance
CTR06,CTR 22, EMC, CTR 37, C T R 3 8
O THERS
Before Using
Location and Function of Controls
1
1
LCD Window Icon D escriptions
3
Connecting Lines
4
Installing Batteries
4
Charging Handset
5
Using Handset Carrying Clip
6
Using Earmic (optional)
Choosing Dial Mode
6
7
8
Setting Time
8
Turning Handset On/Off
Basic Function
Making a Call
Receiving a Call
9
10
Switching theMicrophone off (Mute)
10
Adjusting Voice Volume
11
Adjusting Ring Volume
11
Last Number Redial
Caller ID
12
13
Caller ID on call waiting
14
Battery Level Indicator
14
14
Key Lock
Smart Dialing
Out of Range Indication
15
15
Registered Recall
16
Ⅱ
Tone Dialing S w itchover
16
Paging
16
■ Feature List
●
Advanced Menu Functions
●
●
Menu Navigation
Menu Map
Phonebook
Call by Call
Key Beep
Selecting Ring Type
Setting VIP Ring
Changing PIN
Setting Access Code
Registering a New Handset
Resetting Handset
Selecting Base
Call Barring
Releasing Handset
Caller ID Type
17
17
18
19
20
21
21
22
22
23
24
24
25
26
26
Using Multi System
●
●
●
●
●
●
●
●
●
●
●
●
●
●
●
●
Intercom Between Handsets
Call Transfer Between Handsets
27
28
●
Feature List
29
●
●
●
●
Others
Troubleshooting
Specifications
●
●
●
30
30
●
●
●
Ⅲ
Caller I D type selection ( FSK or DTMF )
Stores up to 10 incoming calls number, up t o 20 digits for each number
Stores up to 10 outgoing calls number, up to 24 digits for e ach number
Stores up to 10 numbers in phonebook memory, up to 24 digits for each
number
LCD displays calling and dialing number
Key lock setting
Call transfer of external calls (when using two or more handsets)
Internal calls
Ringer type selection
Setting VIP numbers with matching ringer
Ringer volume adjusting
Earpiece volume adjusting
New call indicator
Battery level indicator
In use indicator
Microphone mute function
Dialing mode selection
Real time clock (set time)
Redialing and preparation dialing functions
Smart dialing feature
Page on base unit to l o o k for the handset easily
Call by call function
Key tone selection
Barring number setting
Access code setting
Tone dialing switchover
Out of range indication
Registered recall
Supports GAP function
Caller I D on call waiting
F EATURE LIST
29
Call Transfer Between Handsets
You can transfer a call from one handset
to another.
Result : The paged handset is connected
to the o utside party.
1. During a telephone conversation,
press the INT button. Yourcaller will
be put on hold.
Or, to cancel the call transfer and
talk with the outside party again,
press the I N T button.
2. Enter the handset number(1~6)you
want to transfer to.
Note : When you transfer a call, you may
hang up before the transferred
station answers your paging. The
connection between the caller and
the station is completed when you
hang up. If the transferred station
does not answer the call within a
predetermined time, t h e call is
transferred back to your station.
3. The paged handset will ring. To
answer the call from you, the paged
handset should press anybutton.
4. You can speak to the handset
(Intercom).
5. To transfer the external call to the
paged handset, press the
button.
■ Before Using
Package Contents
Once you have unpacked your phone, check to make sure that you have all the parts
shown below. If anypieceismissingorbroken,please call yourdealer.
INT
C/R
1
4 GHI
7PQRS
ABC
3D E F
2
JKL
5
TUV
8
Three AAA batteries
(Rechargeable
Ni-MH batteries)
6MNO
9 WXYZ
0
Base
Handset
User'smanual
User's manual
Adapters*
Line cord*
Carrying clip
*The shape of the plugs vary according to each country's specification.
Location and Function of Controls
Base
Rear and bottom View
Charge
pins
Page button
Pages the handsets.
Also u sed to register
a new handset
In use indicator
lights steadily w hen
a call is inprogress.
28
U SING MULTI SYSTEM
Charge indicator
lights steadily
while t he handset
is charging
Phone
Line Jack
Power Jack
BEFORE U SING
1
Location and Function of Controls(continued)
■ Using Multi System
Handset
Up to 6 handsets can be used with a base. You can make an intercom call and transfer
an external call between the handsets.
Intercom Between Handsets
Ear piece
LCD window
Redials the last number
you dialed. When entering
a number, inserts a pause
between numbers.
Scrolls through menu
options. Also adjusts
volume. In Standby mode,
scrolls through the
phonebook entries.
Clears characters from the
display. Also used to go
back to the previous menu,
lets you switch to call
waiting caller during a
phone conversation.
Activates intercom
communications. During a
call, transfers a call to
another handset.
Makes, answers, or ends a
call.
When navigating menu
options, confirms the
menu or the option
selected.
Allows you to access menu
options. Also used to return
to Standby mode from any
menu.
In Standby mode, press to
lock keys on thephone.
Squeeze to turn thephone
on or off.
Microphone
If you have several handsets registered
to the base, two handsets can talk to
each other on an internal communication
call.
4. To answer t he call from you, the
paged handset's usershould press
any button.
1. Press the I NT button onyourhandset.
5. To end thecall,presseither the INT
button or the
button.
2. Enter the handset number (1~6) you
want to page.
Notes: If an external call comes in
during an intercom conversation,
3. The paged handset rings. The LCD
window on the paged handset
displays your handset number (the
paging handset).
Notes:
● If you enter a handset number that
does not exist, the handset sounds an
error tone.
● To cancel the intercom call, press
either the INT button or the
button.
youwillhear beeps. When you
hear the low beeps, finish the
intercom call by pressing the
button.
Then the external line rings.
Press t he button to answer the
call.
RearView
Carrying clip
Battery cover
Charge pins
2
B EFORE U SING
U SING MULTI SYSTEM
27
Releasing Handset
You can remove the registered handset
from the base if necessary.
1. P ress the
2. P ress the
tochoose
OK button.
button.
or
button repeatedly
, then p ress the
3.Enter the PIN,thenpressthe OK
button.
4. P ress the
tochoose
OK button.
or
buttonrepeatedly
, then press the
Result : The LCD w indow displays all
handsets currently registered to
the base.
LCD Window Icon Descriptions
5. If you want to select the handset to
release individually, enter the
number(s) of the handset(s).
Result : The selected handset(s) will be
removed from the base. The
LCD window displays
.
of the base u n i t , y o u c a n u s e t h e
handset with the base.
Key Lock icon
New call icon
This icon indicates that there i s a newcall. To view the caller,
access the Call Log menu. See page 13.
1. Press the
5. If you w ant to change the Caller ID
buttonrepeatedly
, then press the
This icon indicates that the line is engaged.
This icon indicates the keys are locked.
4. Press a nd hold the # button for
about 3 seconds, thenthe current
setting is displayed ( F S K or DTMF).
or
This icon is always displayed when your phone is on, and
shows the current signal strength. More bars indicate more
signal strength.
Line icon
There are two different Caller ID types
which are DTMF and FSK. This feature
allows y o u t o c h a n g e t h e C a l l e r I D t y p e .
2. Press the
to choose
OK button.
Signal strength icon
If the removed handset is
currently registered to another
base unit and is within the r ange
Caller ID Type
button.
:
When the selected handset
number(s) disappears in the LCD
window, press the OK button.
This area displays in-use
information such as the other
party's number, call duration,
menus, etc. In Standby mode, it
displays the handset number, and
the current time.
type, press the * button once. Then
the phone exit to standby mode.
6. If not, press the
button to exit.
Mute icon
This icon indicates that your phone's microphone is off
temporarily.
Battery status icon
This icon is displayed at all times when your phone is on,
and shows the l evel of your battery charge. The more bars,
the greater the c harge.
3. Enter the PIN, then press the OK
button. Then the LCD window
displays
.
26
Menu
BEFORE U SING
3
Connecting Lines
Call Barring
1. Connect one end of the phone line
cord to the phone line jack on the rear
of the base, and the other end to a
standard phone wall jack.
It is possible to set the phone to restrict
numbers thatcan be dialed.Calls
beginning with numbers you specified
can not be dialed in this feature.
6. Press the OK button tosave the
number.
You can set u p t o 4 different restricted
numbers containing up to 4 digits each.
1. Press the
button.
2. Press the
or
2. Connect the modular end of the power
adapter to the power jack of the base,
and plug the other end into a standard
AC wall outlet.
To A C wall outlet
To phone wall jack
Installing Battery
The rechargeable Ni-MH battery (AAA size ) 2. Insert new batteries as indicated,
comes with your phone. Install the battery
matching correct polarity (+, -).
before using your phone.
Note: Reversing the orientation may
1. Slide the battery cover in the direction
damage the handset.
of the arrow a nd pull it out.
If the feature is on, the message
displays when the restricted number is
dialed.
To activate a call barring number:
1. Press the
button.
2. Press the
or
to choose
OK button.
buttonrepeatedly
, then press the
3. Enter the PIN, then press the OK
button.
To deactivate a call barring number:
to choose
OK button.
button repeatedly
, then press the
3. Enter the PIN, then press the OK
button.
4. Press the OK button toaccess
.
5. Press the
or
button to choose
the cell number you want to
deactivate, and clear the number.
6. Press the OK button tosave the
selection.
4. Press the OK button to access
.
5. Enter the number you w ant to
restrict, u p to 4 digits.
4
B EFORE U SING
MENU
25
Resetting Handset
If you reset thehandset, all the userselectable features including
Phonebook, incoming and outgoing call
numbers and other settings return to the
initial setting at t he time of purchase.
To reset your handset:
1. Press the
Installing Battery(continued)
2. Press the
to choose
OK button.
or
button repeatedly
, then press the
3. To replace the battery cover, slide the
cover up until it snaps shut.
3. Enter the PIN, then press the OK
button.
Notes:
The battery needs tobereplaced if
it does not recover its full storage
capacity after recharging.
When replacing the battery, always
use good quality Ni-MH rechargeable battery. Never use other
battery or conventional alkaline
battery.
4. Press OK button to confirm the reset.
button.
Selecting Base
Your handset can be used with up to 4
base units. This menu optionallows you
to select the base you want to u se.
Note: To use the handset withmorethan
one baseunit,youmust register
the handset to each base unit. See
page 23.
To select a base unit:
1. Press the
button.
2. Press the
or
to choose
the OK button.
24
Menu
3. P ress the
or
button repeatedly
t o scroll through the available bases.
Result : If you select
, the
handset w ill automatically find
the first available baseunit
when you lose contactwhile
moving around.
4. P ress the OK button tosave t h e
selection.
Charging Handset
Beforeinitial operation, YOU SHOULD FULLY
CHARGE THE HANDSET for about 24 hours.
To charge the handset, you can place it on
the base.
INT
1
C/R
ABC
3 DEF
2
4 GHI
Result: Whencharging, the handset i s
automatically t urned on and t he
charging lamp on the base lights up.
7PQRS
JKL
5
TUV
8
6 MNO
9 WXYZ
0
buttonrepeatedly
, then press
B EFORE USING
5
Using Handset Carrying Clip
The supplied handset carrying clip
allows you to conveniently carry the
handset with you. It clips easily to your
belt, waistband,orshirtpocket.
If you want t o remove t he carrying clip:
Registering a New Handset
If youwanttoattach the carrying clip:
Attach the carrying clip to the back
of the handset. Make sure that the
carrying cliplocks into place.
The handset which comes with the base
unit was already registered as handset 1.
Each additional handset youpurchase
must be registered to the base unit.
5. Press and hold the Page button on
the base for more than 5 seconds,
then the
lamp starts toblinks.
Then release the button.
Note: A handset can be registered to up
to 4 different base units. And a
base c an be used with up to 6
handsets.
Insert a screw driver along the edge
of one of its arms and releasetheclip.
Then lift itoff.
Squeeze
this button.
To register a handset:
1. Press the
button.
2. Press the
or
to choose
OK button.
buttonrepeatedly
, then press the
3. Enter the PIN, then press the OK
Using Earmic (optional)
The earmic jack is located in the
middle right side of the handset
and is 2 . 5 m m standard plug.
Simply plug the earmic into the
jack and t h e earmic will be
activated.
Note:
When the earmic is plugged
into the e a r m i c j a c k , t h e
microphone on the handset will
be deactivated.
button.
Note : The PIN is preset to "0000" at the
factory. You can change the PIN.
For details, see page 22.
Earmic jack
4. Press the
or button repeatedly
to choose the base number you want,
then press the OK button.
6. Press the O K button.
Result : The L CD window prompts you
to enter AC.
7. Enter your phone's AC
(Authentication Code), and press
the OK button. The AC is "0000" .
Result : When the registration is
properly completed, the LCD
window displays the handset
number, and returns to Standby
mode.
Earphone
Microphone
Clip
Earmic plug
6
B EFORE USING
M ENU
23
Changing PIN
The PIN is required for the following
options: Registering a new handset,
Resetting a handset and the items under
. The PIN is preset t o "0000"
at the factory.
To change the PIN code:
1. Press the
2. Press the
to choose
button.
or
buttonrepeatedly
, then press
Turning Handset On/Off
3. Enter the current PIN, then press the
OK button.
Result : The LCD window does not
display the PIN you entered in
order to maintain secrecy. If you
enter a w rong PIN, your phone
returns to Standby mode.
4. Enter a four-digit PIN you want to
use, then press the OK button.
5. Enter the new PIN again to c onfirm
the number, then press the OK
button.
the OK button.
Setting Access Code
Some telephone s ystem requires an
access code (9, f or example) and listen
to a second dial tone before dialing an
outside number. You can set your phone
to insert one-digit access code
automatically when you use a p hone
number from your Call ID list.
1. Press the
button.
2. Press the
or
to choose
the OK button.
22
Menu
When you place the handset on the
charger to charge, the handset
automatically turns on. To turn the
handset on or off in Standby mode,
follow these steps:
1. To t u r n o n the handset when the
display is off, press the button.
Result: The first time you turn the phone
on, the LCD w indow displays the
handset number and the time.
The phone is i n Standby mode
and ready for use.
If the time on the display is not correct,
you can change the time.See " Setting
Time " onpage 8.
2. To turn the handset off, squeeze the
button until
appears.
Thenthedisplay is turned off.
Note : Nothing will appear in the LCD
window when battery power is
verylow. YOU SHOULD FULLY
CHARGE THE HANDSET BEFORE
USE.
:
3. Enter the one-digit access code
using the number keypad.
Note : When you dial a phone number in
the Call Log list, the number will
be dialed f ollowing the access
code and a preset pause time.
4. Press the OK button tosave the
selection.
buttonrepeatedly
, then press
B EFORE USING
7
Choosing Dial Mode
In order to provide compatibility with
other telephone systems, your phone
can be set to either pulse dialing(same
as rotary), or tone dialing (DTMF).
1. Press the
button.
2. Press the
to choose
or
button repeatedly
, then press the
OK button.
Result: The LCD window prompts you to
enter the PIN. The PINispreset
to " 0000 " at the factory.
Selecting Ring Type
3. Enter thePIN, then press the OK
button.
You can select y our own ringing sound.
6 ring types are available.
4. Press the
or button repeatedly
to choose the ring type you want.
4. Press the
button to choose
, then press the OK button.
1.Press the
button.
2.Press the
to choose
button.
or
Result: Each time you press the
button or button, the handset
sounds the ring you h ave
chosen.
Result: The current settingisdisplayed.
5. Press the
to choose
or
or
button repeatedly
.
6. Press the OK button to save the
selection.
2. Press the
to choose
OK button.
button.
or
buttonrepeatedly
, t hen press the
Result: The LCD window prompts you to
enter the PIN. The PIN is preset
to "0000" at the factory.
3. Enter the PIN, then press the OK
button.
4. Press the
to choose
OK button.
8
or
B EFORE USING
buttonrepeatedly
, thenpress the
3.Press the OK button to access
.
5. Press the O K button tosave the
selection.
Setting VIP Ring
Setting Time
1. Press the
buttonrepeatedly
, then press the OK
Result: The current setting i s displayed.
5. Enter the c urrent time using the
number keypad.
Notes:
● The time format is 24 hours. Select
from 00 to 23.
● If you want to correct a digit in the
middle while programming, use
or
button to move the cursor to the
incorrectnumber, then enter a correct
number.
This option allows you to instantly
identify callers you've assigned to the
phone's memory by generating a
distinctive ring. You can usethis feature
only when thecaller's service network
transmits the caller's information.
You can specify 2 callers and select a
VIP ring tone foreach caller among 6
different tones.
1.Press the
button.
2.Press the
to choose
button.
or
button repeatedly
, then press the OK
3. Press the
to choose
OK button.
or
button repeatedly
, t h e n press the
4. Press the
or
button to choose
the ringaddress you want, then
press the OK button.
5. Enter the phone number y ou want to
designate, then press the OK button.
6. Press the
or
button to scan
through t h e ring types available,
then press t he OK button t o s a v e t h e
selection.
6. Press the O K button tosave the
selection.
MENU
21
Call By Call (Continue)
3. Press the
or
buttontorecall
Phonebook entries.
■ Basic Function
Updating Your Call by Call Numbers
You c an delete or change the numbers.
4. Find the number y ou want using the
or button.
1. Press the
5. W h e n you find the desired entry,
press the OK button.
2. Press the
or
button repeatedly
to choose call by call , then press
Result: The selected phone number
displays after the preselected
Call by Callnumber.
6. Press the
number.
button to dial the
button.
the OK button.
3. Press the
or
button repeatedly
to choose the memory cell you want
to delete or change.
Result: The storednumberdisplays.
4. Using the C/R button, erase or
change the number, then press the
OK button.
Making a Call
1 . P i c k up the h andset and press the
button.
Result: You hear a dial tone.
2.Dialatelephonenumber.
Note : You can s tore up to 10 telephone
numbers in memory for automatic
dialing. F o r details, see page 18.
4 . To end the call, either press the
button or replace the handset on the
base.
For details, see page 12.
You can set your handset nottosound
the key tone each time you press a k ey.
1. Press the
button.
2. Press the
tochoose
OK button.
or
buttonrepeatedly
, then press the
Result : The displayshowsthecurrent
setting.
20
Menu
3. Press the
or
button repeatedly
to scroll through the key tone
options.
Result : You can choose from:
●
- Standard key tone.
●
- Two frequency t one.
- The key tone does not
●
sound.
4. Press the OK button tosave the
selection.
1. Enter a telephone number. Check the
number in the LCD window.
2615042
3.When the receiver answers, speak.
Note : To make a call to the last number
you dialed, use the Redial feature.
Key Beep
You can enter the desired phone number
in Standby mode, which allows you to
make corrections before dialing. Follow
these steps:
Notes:
● If you make a mistake while entering a
number,press the C/R button toclear
the l ast digit and correct the number.
If you squeeze the C/R button for more
than one second, all digits youhave
entered will be cleared and the phone
returns to the Standby mode.
● When you enter the first digit(s) o f t h e
phone number, if the Smart Dialing
feature is enabled and there are the
matching numbers in the phone's
●
memory, the number appears on the
display. For details, see page 15.
2. W h e n the number appears correctly,
press the
button.
B ASIC F UNCTION
9
Receiving a Call
When a call is received, the phone rings
and the
icon on the display blinks.
Blinks
Caller's
number
2615042
If the caller can b e identified, the caller's
phone number is displayed. If t he caller
cannot be identified, only the
icon
blinks.
Call by Call
1. To answer the call, press any button.
Or
If the handset is on the base,simply
lift it up. You do not need t o p r e s s a
button.
Result: The phone is connected and the
icon is steadily on. The LCD
window displays the talk time.
2. You can speak. To end the call,
either press the
button o r
replace the handset onthe base.
Note: After you lift the phone from the
base to receive the call, t h e
button does not work for 3
seconds to prevent the phone
from being disengaged.
Switching the Microphone Off (Mute)
You can temporarily s witch your phone's
microphone off, so that the other party
cannot hear you.
Example : You wish to say something to
another person in the room
but do not want the other
party to hear you.
10
BASIC F UNCTION
To switch the microphone off
temporarily, press the INT button w hile
you are on the phone. The
icon
appears in the LCD w indow. Your
correspondent can n o longer hear you.
To switch the microphone back on,
press the INT button again.
This feature lets y o u a d d a s p e c i a l
service number such as specialnetwork
service number. You can recall the
1. Press the O K button inStandby
mode to recall the call by call
numbers.
number easily, then attach the phone
number you want to call by entering the
phone number manually or accessing
Phonebook.
Result: The currently stored call by call
numbers are displayed.
The special Call by Call number w ill be
dialed, followed b y t he phone number.
You can store up to 3 Call by Call
numbers.
Storing Call by C all Numbers
1. P ress the
button.
2. P ress the
or
buttonrepeatedly
tochoose
, then
press the OK button.
3. P ress the
or
buttontochoose
the desired memory cell.
4.Enter the desired number (up to 10
digits), then press the OK button.
Dialing Call by Call Number
When you dial phone number manually:
2. Press the
or button to choose
the desired Call by Call number,
then press t he OK button.
3. Enter the phone number y ou want to
call.
Result: The phone number displays after
the selected Call by C allnumber.
4. Press the
number.
button to dial the
When you dial from Phonebook:
1. Press the O K button inStandby
mode to recall the call by call
numbers.
Result: The currently stored Call by Call
numbers are displayed.
2. Press the
or button to choose
the desired number, then press the
OK button.
M ENU
19
Adjusting Voice Volume
Phonebook
You can store frequently usedphone
numbers up to 10 in your phone's
internal Phonebook so that you can
easily make a call without having to
remember or enter the phone number.
Storing a Phone Number in
Phonebook
1. Press the
button.
2. Press the OK button to access
.
Result : The first phonebook entry
appears on display.
3. Press the
o r buttonrepeatedly
to find the entry you want.
4. Enter the desired number (up to 24
digits), thenpress the OK button.
5. Repeat if necessary.
Note: If you make a mistake while
entering a n umber, use the C/R
button tocorrect the mistake.
Each time youpress the button,
the last digit is cleared. To clear all
digits, press and hold the C/R
button.Then enter the correct
number.
Using a Pause
Apauseallowsto have adequate time
for the phone number to register with the
telephone company's system and
complete the call. A pause provides a
delay of 3 seconds.
18
Menu
If you want to insert a dialing pause
between numbers when you store a
number in memory, press the button
until appears at the pause entry.
Viewing the Phonebook Entries
1. In Standby mode, press the
button.
During a c onversation, the
button o r
button adjusts the level of the ear
piece volume. You can adjust the volume
from level 1 to 3. The selected volume i s
displayed in the LCD window.
or
2. Press the
or button repeatedly
until the phone number you want is
displayed.
Adjusting Ring Volume
Dialing a Number from Phonebook
1. Press the
Find out the number you want to dial.
Refer to " View the phonebook entries".
Then press the
button t o d i a l .
Or
In Standbymode,press and hold the
entry number (0-9) until the stored
number appears.
Result : The number is automatically
dialed.
Editing the Phonebook Entries
1. Press the
volume 3
button.
2. Press the O K button toaccess
.
2. Press the
to choose
button.
button.
or
3. Press the
or
to choose
the OK button.
button repeatedly
, then press the OK
button repeatedly
, t hen press
Result: The current ring level is
displayed.
4. Press the
or
button repeatedly
to choose the volume level you want.
Result: You can adjust the volume from
level 1 to 3. You can also turn t he
ringer OFF. Each time you press
the button or
button, the
handset sounds its selected
loudness.
5. Press the OK button tosave the
selection.
Note : Setting to turn theringer OFF.
When a call comes in, only the
icon in the window blinks.
3. Press the
or
button until the
phone number you want to edit
displays.
4. If necessary, press the C/R button to
clear the digit(s) then enter the
desired number.
5. Press the O K button tosave the
number.
BASIC F UNCTION
11
Last Number Redial
To dial the last number:
1. Press the
mode.
button in Standby
■ Advanced Menu Functions
To delete a specific number in the Redial
memory:
1. Press the
Menu Navigation
To access a menu option :
button.
1. To display menu items, press the
To return to Standby mode from any
menu:
Result: The LCD window displays the
last number you dialed.
2. Scroll to t h e n u m b e r y o u w a n t t o
2. Press the
3. When the number appears o n the
display,press the OK button.
2. To scan through menu options, press
the
or
button repeatedly.
Ifyoupressthe C/R button from any
menu (not in the number or text input
mode) the phone returns to t h e
previous screen.
Result : The display prompts you to
confirmthedeletion.
3. To select anoption, press the OK
button when the option y o u w a n t
appears in the LCD window.
To return to Standby mode from any
menu, press the
button o r the
button, or press and hold the C/R
4. Repeat if necessary.
button.
button to dial the
number.
Your phone keeps t he last 10 numbers
you have dialed and allows you to
retrieve the numbers.
To view and dial any of the last 10
numbers:
1. Press the
button in Standby mode.
2. If you wanttoscrollthrough t h e
memory, press the
or
button
until you find out the number you
want to call.
3. Press the
number
button to dial the
Notes:
● When no numbers are found,
is
displayed.
● When the redial m emory storage is full,
e ach time you dial a new number, the
oldest number stored in the redial
memory is automatically erased, and
the redial memory is updated.
● You can modify the displayed number
before pressing t he button by using
C / R button.
12
BASIC F UNCTION
delete by using the
or
button.
4. Press the OK button.
Result : You hear a beep and the phone
returns to Standby mode after
clearing the memory number.
To delete all numbers in the Redial
memory:
1. Press the
button.
2. Press the
or
button repeatedly
to choose
the OK button.
, then press
Result: The LCD window prompts you
to enter t h e P I N . T h e P I N is
preset to "0000" at the f actory.
3. Enter the PIN, then press the OK
button.
Result : The phone prompts you to
confirm t he deletion.
4. Press the OK button.
button.
Also, the phone will automatically
return to Standby mode from any menu
i f no button is p ressed for about 30
Menu Map
seconds.
1. Store Phone (see page 18)
2. Call Log (see page 13)
3. Call by Call (see page 19)
4. Key Beep (see page 20)
5. Ring
Ring Type (see page 21)
Ring Level (see page 11)
VIP Ring (see p age 21)
6. PIN Change * (see page 22)
7. Smart Dial ( s e e p a g e 1 5 )
8. Access Code (see page 22)
9. Register * (see page 23)
10. HS Reset* (see page 24)
11. Clr Redial* (see page 12) *
12. Clr Call Log * (see page 13)*
13. Select Base (see page 24)
14. Base Menu *
Call Bar (see page 25)
Dial Mode (see page 8)
Time Set (see page 8)
Release (see page 26)
* PIN is required to access these menus.
Note : If there are several handsets
registered to the base u n i t a n d i f
there is anyone who is using the
Base Menu or who registers the
handset to the base, you cannot
access the Base Menuunlessthe
one completes the base setup.
M ENU
17
Registered Recall
The C/R buttonisusedinconjunction
with special services such as Call
waiting (Call ID type II) which m a y b e
offered by your telephone company. You
Caller ID
To flash, simply press the C/R button
while the line is engaged.
When you receive a call, the caller's
phone number is shown on the screen, if
the caller's information is transmitted
Result: The display shows f .
from the network on which the c all was
made. The last 10 received calls are
stored in the Caller ID memory, and you
can use the list to make a call to any of
can local transfer a call to another
extension under PABX, using this feature.
the numbers.
Tone Dialing Switchover
To access certain services such as
voice mail or interactive telephone
system, it is necessary to use tone
dialing. Whenyour phone is se t t o t h e
pulse mode, DTMF dialing is available
temporarily.
Press the button while the phone is in
*
the pulse dial mode. Your phone is
converted to the tone dialmode
temporarily.
When you press the C/R button o r when
you hang up the call, the mode returns to
the pulse mode.
Paging
You can page the handset from the base
unit. Using thisfeature, you ca n locate
the lost handset.
Press the Page button on the b a s e unit.
Allhandsets registered to the b a s e will
ring for about 30 seconds.
16
BASIC F UNCTION
To stop paging, press the Page button
on the base or any button on the handset.
Note : If a call comes in while the
handset is being paged, the handset
stops paging and the bell will ring.
The Call ID icon
appears when there
are new calls in the memory. Once you
view the all the newcalls using t he Call
Log menu, the icon will disappear.
To review and d i a l any of the received
numbers:
1. Press the
2. Press the
button.
o r button t o choose,
then press the OK button.
Result: The LCD window shows the last
caller's number (up to 2 0 digits).
The time when the call w as
received is also displayed. If
there is no caller ID received,
is displayed.
3. Scroll the Caller ID numbers by
using the
o r buttonand choose
the desired number.
4. To dial theselected number, press
the
button.
To delete a specific number from the Call
Log:
1. Scroll to t h e number you w a n t t o
delete from the CallerIDmemory,
then press the OK button.
2. Press the O K button toconfirm the
deletion.
To delete all numbers in theCaller ID
memory:
1. Press the
button.
2. Press the
or button repeatedly
to choose
, then
press the OK button.
Result: The LCD window prompts you to
enter t he PIN. The PIN is preset
to "0000" at the factory.
3. Enter the PIN, then press the OK
button.
Result: The phone prompts y o u t o
confirm the deletion.
4. Press the O K button.
BASIC F UNCTION
13
Caller ID On Call Waiting
When you have subscribed to call
waiting service from your local
company, this telephone will indicate
the number of the second caller while
you are having a conversation with the
first caller.
Smart Dialing
When you are having a conversation
and a second call is received, press the
C/R button to answer the secondcaller.
When you finish the call, press the C/R
button to continue your conversation
with the first c aller.
Battery Level Indicator
The
icon iscontinuously displayed
at the top right corner of the LCD w indow.
The
icon shows the level of battery
power. The more bars you see, the more
power you have left.
When the battery is too weak for the
phone to operate, the handset will
automatically turn o ff. Place the handset
You can answer incoming calls or
intercom calls by using any buttons on
the phone. But when you hang up, the
phone returns to the lock mode. This
feature is useful to avoid pressing
buttons by mistake.
1. To turn the feature on, press the
14
BASIC F UNCTION
stored in your phone's memory (for
example, stored in the phonebook,
received or d ialed recently).
To place a call using the smart dial
feature:
on the base to charge the handset battery.
Full
Flat
:
Key Lock
If you turn thisfeature on, allbuttons
except for the
button will be locked
and willnotfunction.
With the Smart Dial feature,your phone
displays the full phonenumber when
you enter the first digit(s) o f t h e number
provided thatthe number is currently
button briefly and the
icon
appears in the LCD window.
2. To turn the feature off, press the
button briefly and the
icon
disappears from the LCD window.
Notes:
● If a power failure occurs, the Key Lock
feature is automatically cancelled.
button for more
● Do not hold the
than 3 seconds, or the handset will be
turned off.
1. In Standby mode, enter the first
digit(s) ofthedesiredphone number.
Result: The phone searches for the
matching phone number from
memory (in the order of
outgoing calls, Phonebook,
incoming calls), then displays
the first available number.
Numbers blink except for the
part of the number you entered.
2. If the number is not the one you want,
enter the remaining digits until you
see the desired number.
3. Press t he
button t o dial the
number displayed. O r press the C/R
button to exit this smart dial mode.
You can s elect to enable or disable the
Smart Dialing feature. To change the
setting:
1. Press t he
button.
2. Press t he
or
to choose
the OK button.
button repeatedly
, then press
Result: The current setting is displayed.
3. Press t he
to choose
or
or
button repeatedly
.
To enable this feature, select
.
4. Press t he OK button t o save the
selection.
Out of Range Indication
If the handset is too far from the
registered base, the handset cannot
properly engage the telephone line. T h e
icon at the top left of the LCD window
blinks to warn you and the signal
strength indication bars next to the
icon disappear.
This icon blinks
when the handset
is out o f range.
If you carry the h andset too far f r o m t h e
base unit during a call, the telephone
line mightbedisconnected and the
handset returns t o Standby mode.
Check if there is n oise or static. If so,
move the handset closer to the base
station.
:
BASIC F UNCTION
15