1
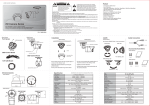
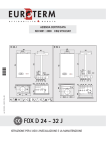
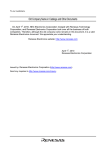
VHD-VFD/DN & VHD-VRD/DN
.
INSTALATION MANUAL
INFORMATION FOR USER
CAUTION
RISK OF ELECTRIC SHOCK
DO NOT OPEN
CAUTION :
TO REDUCE THE RISK OF ELECTRIC SHOCK,
DO NOT REMOVE COVER (OR BACK).
NO USER SERVICEABLE PARTS INSIDE.
REFER SERVICING TO QUALIFIED
SERVICE PERSONNEL.
The lightning flash with arrowhead symbol, within an equilateral
triangle is intended to alert the user to the presence of uninsulated
"dangerous voltage" within the product's enclosure that may be of
sufficient magnitude to constitute a risk of electric shock to persons.
The exclamation point within an equilateral triangle is intended to
alert the user to the presence of important operating and maintenance
(servicing) instructions in the literature accompanying the appliance.
Regulatory Notice
This device complies with the requirements set forth in EMC Directive : 2004/108/EC of CE Rules.
Operation is subject to the following two conditions :
(1)This device may not cause harmful interference, and
(2) this device must accept any interference received, including
interference that may cause undesired operation.
This equipment has been tested and found to comply with the limits for a Class A Digital Devices
pursuant to EMC Directive : 2004/108/EC of CE Rules. These limits are designed to provide
reasonable protection against harmful interference in a residential installation.
This equipment generates, uses, and can radiate radio frequency energy and, if not
installed and used in accordance with the instructions, may cause harmful interference
to radio communications.
Operation of this equipment in a residential area is likely to cause interference, in which
case the user will be required to correct the interference at his own expense.
WARNING - Changes or modifications not expressly approved by the
manufacturer could void the user's authority to operate the equipment.
CAUTION : To prevent electric shock and risk of fire hazards:
Do NOT use other than specified power source.
Do NOT expose the internal plastic model to rain or moisture.
CONTENTS
Precautions
4
Features
5
Model selection
7
Part names
8
3-Axis
9
Camera Setting
10
Installation
11
Accessories and others
12
Connection
13
Dimensions
Main Menu
14
15
Exposure
16
White Balance
18
Image
19
Intelligent
20
Special Function
22
Display
23
Specifications
24
Troubleshooting
27
PRECAUTIONS
Do not install the camera in extreme temperature conditions.
Do use the camera unless the temperature is within -10°C to 50 C.
Be especially careful to include ventilation in high temperatures.
Do not install or use the camera in an environment where the
humidity is high.
It can cause the image quality to be poor.
Do not install the camera under unstable lighting conditions.
Severe lighting change or flicker can cause the camera to work improperly.
Never use the camera close to a gas or oil leak.
It can cause malfunctions to occur.
Do not disassemble the camera.
There are no user-serviceable parts inside it.
Do not drop the camera or subject it to physical shocks.
It can cause malfunctions to occur.
Never keep the camera faced to a strong light directly.
It can damage the sensor.
Do not expose the plastic housed camera to rain or moisture.
If it gets wet, wipe it dry immediately. Liquids can contain minerals that
corrode the electronic components.
04
Note
If the camera is exposed to spotlight or object reflecting the strong light,
smear or blooming may occur.
Please check whether the power satisfies the normal specification before
connecting the camera.
FEATURES
VANDAL DOME HOUSING
This colour video camera is designed for use in security
systems.
· IP67 Rating, Aluminum Die-casting Rugged Vandal proof Camera
· Wall or Ceiling Mounting through 3-Axis camera bracket
· 1/3" Panasonic CMOS sensor
· Full HD Resolution
· DAY & NIGT
· WDR (Wide Dynamic Range)
· DNR (Digital Noise Reduction, 2D+3D)
· Privacy mask Function
· On Screen Display
· Intelligent motion detection
· HD-SDI/CVBS Output
05
· Multi Protocol(PELCO-D, PELCO-P)
FEATURES
PLASTIC DOME HOUSING
This colour video camera is designed for use in security systems.
· Wall or Ceiling Mounting through 3-Axis camera bracket
· Safety strap holds dome cover in place while making adjustments
· 1/3" Panasonic CMOS sensor
· Full HD Resolution
· DAY & NIGHT
· WDR (Wide Dynamic Range)
· DNR (Digital Noise Reduction, 2D+3D)
· Privacy mask Function
· On Screen Display
· Intelligent motion detection
· HD-SDI/CVBS Output
06
· Multi Protocol(PELCO-D, PELCO-P)
MODEL SELECTION
3PCS VANDAL HOUSING
Normal type
PLASTIC HOUSING
07
Normal type
PART NAMES
3PCS VANDAL HOUSING
Focus/Zoom Lever
I
Lock Screw
Camera Bracket
NORMAL TYPE
PLASTIC HOUSING
Focus/Zoom Lever
Lock Screw
Camera Bracket
08
NORMAL TYPE
3-AXIS
Set Camera DIRECTION (3-axis movement)
Ceiling Type
Wall Type
PAN SWIVEL 360°
TILT SWIVEL 360°
PCB
BRACKET
80°
PAN SWIVEL 360°
PCB BRACKET 80°
TILT SWIVEL 360°
hold the 4 points and swivel it.
PCB BRACKET 90°
09
PCB BRACKET 80°
CAMERA SETTING
Camera Setting
Lock Screw
Focus / Zoom
Lever Cover Open
Focus / Zoom Lever
Menu Operation
U
P
L
R
DOWN
GND(GRAY)
ADKEY(PINK)
DC12V
12VDC
CAUTION!!!
CVBS (YELLOW)
HDSDI (BLUE SKY)
485+(ORANGE)
485-(DARK BLUE)
D/N-IN(BLUE)
485+(ORANGE)
MD/OUT(PURPLE)
GND(GRAY)
ADKEY(PINK)
485-(DARK BLUE)
D/N-IN(BLUE)
MD/OUT(PURPLE)
GND(GRAY)
ADKEY(PINK)
Up button : Moves the cursor upwards. Use this button to select an item or adjust the parameters.
Down button : Moves the cursor downwards. Use this button to select an item or adjust the parameters.
Right button : Moves the cursor to the right. Use this button to select or adjust the parameters of
the selected item. The parameter changes each time this button is pressed.
Left button : Moves the cursor to the left. Use this button to select or adjust the parameters of the
selected item. The parameter changes each time this button is pressed.
10
Set button : Executes selections and displays a submenu for an item with the
mark.
INSTALLATION
Plastic Dome Camera
3 pcs Vandal Dome Camera
Surface Mount
bracket
Mount CAP
Mount Screw
Open
PISE
fe
With Rubber
Dome Base
Dome Cover
Machine Screw
With Rubber
Decoration Ring
Dome cover
L-Wrench
1. Dome Base Mounting
- Remove the protecting sheet from the rubber bottom and attach it on the base housing.
- Fix the base housing with the supplied 4pcs of screws (No.8-38 UNC) on the ceiling or wall.
2. Power Supply & Monitor Impedance (Power supply)
- Adaptor: DC12V/1A regulated Power Supply (DC12V Model)
- To avoid fire or shock hazard, must use a UL listed power supply. (Monitor Impedance, if available)
- Set the impedance switch to the 75Ω standard position unless other equipment is looped out of
the monitor.
4.Decoration Ring Mounting
- Firmly fix the decoration ring into place with the screws and by using the supplied L-wrench on the
base housing.
11
3. Camera Module Adjustment (Pan&Tilt Adjustment)
- Adjust the camera direction by turning the pan bracke t left or right, the tilt bracket up or down, then
fix the screws tight. (View Angle Adjustment)
- For a wider view angle move the zoom lever to wide, for a narrower view angle move it to tele.
- After accurate adjustment of focal length then adjust the focus lever to near or far for the sharpest
focus.
ACCESSORIES AND OTHERS
PLASTIC DOME TYPE
UP
LR
DOWN
Mount Screw
OSD key
User's Manual
3PCS VANDAL HOUSING
Security Tool
Mount Screw
L-wrench
UP
LR
DOWN
1
12
2
Mount Cap
OSD key
User's Manual
CONNECTION
DC 12V power Input Model
- Connect the video out jack to the video in jack monitor
- Connect the adapter to the power input connecter
- Use a DC12V and 1A adapter
DC12V
12VDC
CAUTION!!!
CVBS (YELLOW)
HDSDI (BLUE SKY)
485+(ORANGE)
485+(ORANGE)
485-(WHITE)
D/N-IN(BLUE)
MD/OUT(PURPLE)
GND(GRAY)
ADKEY(PINK)
13
485-(WHITE)
D/N-IN(BLUE)
MD/OUT(PURPLE)
GND(GRAY)
ADKEY(PINK)
DIMENSIONS (MM)
PLASTIC HOUSING
φ100.0
φ124.1
68.5
3PCS VANDAL HOUSING
80.0
83.5
119.0
80.0
46.0
14
Ø143.6
MAIN MENU
MAIN MENU
MENU
MODEL
D&N
EXPOSURE
WHITE BAL
IMAGE
INTELLIGENCE
SPECIAL FUNC
DISPLAY
EXIT
Functions can be set-up using the Menu Key or Pelco protocol.
The menu consists of the “Main Menu” and “Sub Menus”.
The main Menu displays 6 camera functions that can be selected.
Sub-Menus are displayed by pressing each main menu selection .
MODEL
15
Select model
· D&N / COLOR
EXPOSURE
EXPOSURE
MENU
MODEL
EXPOSURE
WHITE BAL
IMAGE
INTELLIGENCE
SPECIAL FUNC
DISPLAY
EXIT
EXPOSURE
BRIGHTNESS
LENS
SHUT SPEED
DSS
AGC
WDR/BLC
DAY&NIGHT
SMART IR
RETURN
lllllll11
DC
AUTO
OFF
OFF
OFF
OFF
16
· BRIGHTNESS: Adjust brightness level.
- 0 (dark) ~ 20 (bright) steps.
· LENS - MANUAL
· SHUT SPEED: Can be set to AUTO or MANUAL
- AUTO / 1/25,1/50,1/100,1/240,1/500,1/1000,
1/2000,1/4000,1/8000,1/16000,1/30000,1/60000 sec
· DSS: Select maximum DSS (Digital Slow Shutter).
- OFF / x2, x3, x4
·AGC: Select Auto Gain Control.
- OFF / ON
· WDR/BLC: Select WDR (Wide Dynamic Range) or BLC (Back Light Compensation).
- WDR
▷ WEIGHT: Adjust WDR level - 0 ~ 3.
· BLC
▷ AREA: Control BLC area according to lighting conditions.
▷ POS-X: Adjust the window X-Axis position.
▷ POS-Y: Adjust the window Y-Axis position.
▷ SIZ-X: Adjust the window X-Axis size.
▷ SIZ-Y: Adjust the window Y-Axis size.
* When WDR is ON, ACE and DEFOG functions do not turn on.
EXPOSURE
· DAY&NIGHT : Select Day&Night
1. D&N Model
- AUTO / DAY / NIGHT / EXT
▷ Delay : 0 ~ 255 second
▷ BURST : OFF / ON
▷ THRS : LOW / MIDDLE / HIGH
Select Day&Night change level. Higher level make the night mode
changed in lower illumination.
▷ GAP : LOW / MIDDLE / HIGH
Select the switchover delay time from Day to Night, and from
Night to Day.
17
2. COLOR Model
- AUTO / DAY / NIGHT / EXT
▷ Delay : 0 ~ 255 second
▷ BURST : OFF / ON
▷ THRS : LOW / MIDDLE / HIGH
▷ GAP : LOW / MIDDLE / HIGH
WHITE BALANCE
WHITE BALANCE
MENU
MODEL
EXPOSURE
WHITE BAL
IMAGE
INTELLIGENCE
SPECIAL FUNC
DISPLAY
EXIT
WHITE BAL
AWB
CHROMA
RETURN
AUTO
lllllll10
·AWB : Select WHITE BALANCE mode
- AUTO / PRESET / MANUAL / INDOOR / OUTDOOR
▷ AUTO : Automatically adjusts color according to the lighting.
▷ PRESET : It is a fixed white balance mode that can be automatically
readjusted by pressing PRESET.
▷ MANUAL : Change WB by changing "RED GAIN" and "BLUE GAIN"
in manual mode.
- RED GAIN : Adjust R gain value 0 ~ 20
- BLUE GAIN : Adjust B gain value 0 ~ 20
▷ INDOOR : Set color temperature to be Indoor light (3700°K)
▷ OUTDOOR : Set color temperature to be Outdoor light (5100°K)
18
·CHROMA : Adjust CHROMA gain value
- 0 ~ 20 steps
IMAGE
IMAGE
MENU
EXPOSURE
WHITE BAL
IMAGE
INTELLIGENCE
SPECIAL FUNC
DISPLAY
EXIT
IMAGE
SHARPNESS
MIRROR
FREEZE
E.ZOOM
HLC
ACE
DNR
D.COMPRESS
RETURN
5
OFF
OFF
X1
OFF
OFF
AUTO
OFF
20
19
·SHARPNESS: Adjust sharpness level.
- 0 ~ 10 steps
· MIRROR: Select a flip mode.
- OFF / H / V / H&V
▷H: Flips the picture horizontally on the screen.
▷ V: Flips the picture vertically on the screen.
▷ H&V: Flips the picture horizontally & vertically on the screen.
· Freeze : Select real or still mode.
- OFF / ON
· E.ZOOM: Select maximum digital zoom magnification.
- x1 ~ x12, x14, x15, x18, x21, x25, x32
· HLC: Select High Light Compensation.
If an extremely bright light is projected onto the camera, masking
is used on this portion to prevent partial saturation of the image.
- OFF / ON
▷ ON LEVEL: 0 ~ 20 steps
COLOUR: Black, White, Yellow, Cyan, Green, Magenta, Red, Blue
· ACE: Select Digital WDR (Wide Dynamic Range).
- OFF / ON
* When ACE is ON, WDR/BLC and DEFOG functions do not turn on.
· DNR: Select Digital Noise Reduction.
- AUTO / OFF / LOW / MIDDLE / HIGH
· D.COMPRESS: Video image data compression function. Please use
this function only with an IP camera model.
- OFF / ON
INTELLIGENT
INTELLIGENT
MENU
MODEL
EXPOSURE
WHITE BAL
IMAGE
INTELLIGENCE
SPECIAL FUNC
DISPLAY
EXIT
INTELLIGENT
PRIVACY
MOTION
RETURN
OFF
OFF
· PRIVACY: Hide an on screen area.
- OFF / ON
▷ MASK#: Select mask area number (0 ~ 31).
▷ MODE: Set-up masking areas (OFF / ON).
▷ X-POS: Adjust the mask X-Axis position.
▷ Y-POS: Adjust the mask Y-Axis position.
▷ X-SIZ: Adjust the mask X-Axis size.
▷ Y-SIZ: Adjust the mask Y-Axis size.
▷ COLOUR : Cyan, Green, Magenta, Red, Blue, Black, White, Yellow
▷ TRANS : Select mask transparency level (0 ~ 4) .
20
· MOTION DET: If there is subject movement on the screen, this
is detected as motion by the camera.
- OFF / ON: MD function disable or enable.
▷ RESOLUTION: Adjust resolution of MD (0 ~ 4 steps).
More sensitive at lower settings for resolution.
When setting is low, one object could be detected as several
objects. When setting is high, several objects could be
detected as one object.
▷ SENSITIVITY: Adjust sensitivity of MD (0 ~ 20 steps).
More sensitive to lower settings for sensitivity.
▷ AREA: Designate motion detection area (WHOLE / EACH).
▷AREA#: Setting 3 areas (0~2) for motion detection.
▷MODE: Limit and define areas of motion detection.
INTELLIGENT
▷X-POS: Adjust the mask X-Axis position.
▷Y-POS: Adjust the mask Y-Axis position.
▷X-SIZ: Adjust the mask X-Axis size.
▷Y-SIZ: Adjust the mask Y-Axis size.
▷TRANS: Adjust colour tone of out of selected areas.
▷ SMART ZOOM: Adjust SMART ZOOM of MD (OFF / ON).
▷IN/OUT: Working Zoom in/out; time setting. (0 ~ 8 sec).
▷DWELL: When the camera detects an object has effective motion,
Zoom in the object for a duration; time setting (0 ~ 8 sec).
▷WAIT: After zooming in, an object moves during the time duration set
with Zoom time. Do not zoom in on the object during a duration
time setting with Normal Time (0 ~ 8 sec).
▷ INTERVAL : Select the alarm interval time (0 ~ 255 sec).
▷ DWELL: Select the duration time for changing MD mode (0 ~ 255 sec).
▷ RETURN
21
21
* PG(Pattern Generator), PRIVACY MASK, MOTION AREA cannot work
simultaneously, PG has priority, second is PRIVACY MASK and
the bottom is MOTION AREA. For example) PG is ON while PRIVACY
MASK is working, PRIVACY MASK stops work and PG starts work.
SPECIAL FUNCTION
SPECIAL FUNCTION
MENU
EXPOSURE
WHITE BAL
IMAGE
INTELLIGENCE
SPECIAL FUNC
DISPLAY
EXIT
SPECIAL FUNC
SHADING DET
OFF
SHADING
OFF
DEFECT DET
OFF
DEFOG
OFF
SYSTEM
NTSC
HD FORMAT
1080P
PG
OFF
CVBS
ON
COMM
DEFAULT
ON
RETURN
· SHADING DET: Sets the shading calibration that the Lens will perform.
22
Only occurs if the entire screen is viewed in white light (OFF / ON).
· SHADING: Select Lens shading compensation (OFF / ON).
· DEFECT DET : Compensates for bad pixels that my appear. Occurs
when the whole screen is fully black, or if there is bad pixelation,
and it changes the THRS values until the screen is fixed (OFF / ON).
· DEFOG: Carry out defog function.
- OFF / ON
▷ LEVEL : Adjust amount of fog viewed on the display screen.
0 ~ 10
* When DEFOG is ON, ACE and WDR/BLC functions do not turn on.
· SYSTEM: Select NTSC or PAL (NTSC / PAL).
· HD FORMAT: Select Digital Output 1080P or 720P (1080P / 720P).
· PG: Select Colour pattern generator (OFF / ON).
· CVBS: Select Composite signal (OFF / ON).
· COMM: Set up the camera ID, baud rate, protocol.
▷ ID: Select the Camera ID.
- 1 ~ 255
▷ BAUD RATE: Select serial communication speed.
- 2400 / 4800 / 9600 / 19200 / 38400 / 57600 / 115200bps
▷ PROTOCOL: Select operating protocol.
- PELCO-D / PELCO-P / UPDATE
· DEFAULT : All the settings will be restored to their factory defaults.
DISPLAY
DISPLAY
DISPLAY
MENU
MODEL
EXPOSURE
WHITE BAL
IMAGE
INTELLIGENCE
SPECIAL FUNC
DISPLAY
EXIT
DISP SEL
SET TITLE
RETURN
· DISP SEL : Select display item.
- ID : OFF / ON
- TITLE : OFF / ON
- EZOOM : OFF / ON
· SET TITLE : Select camera title menu (Text edit)
23
i
SPECIFICATIONS
Model
Image Sensor
VHD-VFD/DN & VHD-VRD/DN
1/3" Panasonic CMOS
Total Pixels
2010(H) x 1108(V) = 2,227,080 (pixel)
Active pixels
1944(H) x 1092(V) = 2,122,848 (pixel)
Scanning system
Resolution
Progressive
Digital ; 1920x1080p(1080p/30fps) , 1280x720p(720p/60fps)
Analog : 700TVL
Min. illumination
Color : 1.0 lux , BW : 0.5lux
Color DSS : 0.002 lux , BW DSS : 0.001 lux
Video Output
HD-SDI
Analog : NTSC, PAL(without WDR)
S/N Ratio
more than 50dB (AGC off)
Function
MODEL
D&N / COLOR
EXPOSURE
BRIGHTNESS
0 ~ 20 steps
LENS
DC / Manual
SHUT SPEED
DSS
AGC
WDR/BLC
DAY&NIGHT
Auto / Manual ( 1/30(1/25) ~ 1/60000 )
Off / x2 / x3 / x4
Off / On
Off / WDR / BLC
Auto / Day / Night / Ext
SMART IR
WHITE BAL
Auto / Preset / Manual / Indoor / Outdoor
IMAGE
0 ~ 10 steps
Off / H / V / H&V
FREEZE
Off / On
24
SHARPNESS
MIRROR
SPECIFICATIONS
Model
VHD-VFD/DN & VHD-VRD/DN
E.ZOOM
x1 ~ x32
HLC
Off / On
ACE
DNR
D.COMPRESS
Off / On
Off / Low / Middle / High / Auto
OFF / ON
INTELLIGENCE
PRIVACY
Off / On (32 points)
MOTION
Off / On (4 points)
SPECIAL FUNC
SHADING DET
Off / On
SHADING
Off / On
DEFECT DET
Off / On
DEFOG
Off / On
SYSTEM
NTSC / PAL
HD FORMAT
1080P / 720P
PG
Off / On
CVBS
Off / On
COMM
ID (1 ~ 255)
BAUDRATE ( 2400 / 4800 / 9600 / 19200 / 38400 / 57600/115200 )
PROTOCOL (PELCO-P / PELCO-D / UPDATE)
DEFAULT
Language
OSD Text
ON / DONE
English
0~9,A~Z,a~z
Electrical
Power Source
DC12V TYPE : DC12V±10%
Power Consumption
DC12V TYPE : 250mA
DC12V±10%
25
350mA (DC12V±10%)
SPECIFICATIONS
Model
VHD-VFD/DN & VHD-VRD/DN
General
Video Output(HD-SDI)
DC JACK
BNC Connector
Operating Temperature
-10℃ ~ +50℃ (Humidity : 0%RH ~ 80%RH)
Storage Temperature)
-20℃ ~ +60℃ (Humidity : 0%RH ~ 90%RH)
26
Power Input
TROUBLESHOOTING
TROUBLESHOOTING
If there are problems in operation, refer to the possible solutions below.
If the problem persists, please contact the distributor you purchased this product from.
Possible Problems & Solutions
· Nothing appears on the screen.
-Check the power connections and power supply is functioning.
-Check the video signal line connections.
-Check, and make sure, that the lens mode is set to DC (VIDEO) when using a
VIDEO (DC) lens.
· The video image is not clear.
-Clean the lens with a soft lint free clean cloth.
-Adjust so the camera is not facing directly toward a bright light source.
-Move the camera if necessary.
-Re-adjust the back-focus of the camera.
· The screen is dark.
-Adjust the contrast feature of the monitor.
-If there’s an intermediate device, set the 75Ω /Hi-Z properly; check termination.
-Check if an auto iris lens is being used and adjust the brightness level.
· The MOTION DETECTION function is not working
-Check if “MOTION DETECTION” mode is turned on in OSD menu.
-Check if the MD Sensitivity is too low.
-Check the setting of the MD AREA.
· The WDR function is not working
-Check if the WDR Level is too low.
-Check if the AE Mode is set to MANUAL. The WDR doesn’t work in MANUAL
Exposure mode.
· Colours are not quite right.
-Check if the camera is facing directly into sunlight or fluorescent light.
-Check if an auto iris lens is being used.
-Check, if applicable, the connection of the lens connector cable.
28
27
· The Day & Night function doesn’t work.
- Check if the mode is set to something other than Auto mode.
- Check the Day < > Night LEVEL.
28
MEMO