1
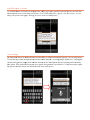
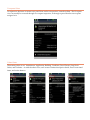
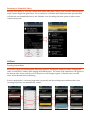
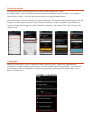
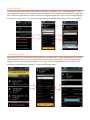
 Municity Android
User Guide
LAST UPDATED:
APRIL 2012
Prepared by: Software Consulting Associates 54 Elizabeth St. Red Hook, NY 12571 Phone: (845) 758‐0104 Fax: (845) 758‐0884 E‐Mail: support@sca‐corp.com Website: www.sca‐corp.com Contents
Basics ....................................................................................................................................................................... 5 Login ................................................................................................................................................................... 5 Change Date ....................................................................................................................................................... 6 View Schedule List ............................................................................................................................................ 6 View Inspection ................................................................................................................................................. 7 Inspection Status ............................................................................................................................................ 7 Add/Edit Notes or Results ........................................................................................................................... 8 Voice Editing .................................................................................................................................................. 8 Change Inspector ........................................................................................................................................... 9 Schedule Settings ........................................................................................................................................... 9 View Type..................................................................................................................................................... 10 View on Map ................................................................................................................................................ 10 Delete ............................................................................................................................................................ 11 Details ........................................................................................................................................................... 11 View Appointment .......................................................................................................................................... 12 Subject ........................................................................................................................................................... 12 Map View ......................................................................................................................................................... 13 Zoom Techniques ........................................................................................................................................ 14 Hold for Info ................................................................................................................................................ 14 Select on Map ............................................................................................................................................... 15 Views ................................................................................................................................................................. 16 Parcel View ................................................................................................................................................... 16 Permit View .................................................................................................................................................. 17 Complaint View ........................................................................................................................................... 17 Occupant View ............................................................................................................................................ 18 Other Views .................................................................................................................................................. 18 Returning to Schedule Views ........................................................................................................................ 19 Actions .................................................................................................................................................................. 19 Passing Inspections ......................................................................................................................................... 19 Failing Inspections .......................................................................................................................................... 20 Create New ....................................................................................................................................................... 20 Create Inspection ......................................................................................................................................... 21 Create Appointment ................................................................................................................................... 21 Create Complaint ........................................................................................................................................ 22 Create Violation ........................................................................................................................................... 23 Create Stop Work Order ............................................................................................................................. 23 Delete ................................................................................................................................................................ 24 Edit .................................................................................................................................................................... 24 Search .................................................................................................................................................................... 25 Text Search ....................................................................................................................................................... 25 Parcel By ....................................................................................................................................................... 25 Permit By ...................................................................................................................................................... 26 Application By ............................................................................................................................................. 26 Complaint By ............................................................................................................................................... 27 Map Search ....................................................................................................................................................... 27 Hold ............................................................................................................................................................... 27 Drag ............................................................................................................................................................... 28 Preferences ........................................................................................................................................................... 29 Filter Preferences ............................................................................................................................................. 29 View All Inspectors ..................................................................................................................................... 29 Map Preferences .............................................................................................................................................. 30 Satellite Mode .............................................................................................................................................. 30 Traffic Mode ................................................................................................................................................. 30 Zoom Controls ............................................................................................................................................. 31 Location Preferences ....................................................................................................................................... 31 Inspections Map ........................................................................................................................................... 31 Parcel Map .................................................................................................................................................... 32 Latitude, Longitude Center ........................................................................................................................ 32 Administrative Preferences ............................................................................................................................ 33 Enforced Range On ..................................................................................................................................... 33 Enforced Range Distance ........................................................................................................................... 33 Distance Units .............................................................................................................................................. 33 Show Distance .............................................................................................................................................. 34 View Preferences ............................................................................................................................................. 35 Theme ............................................................................................................................................................ 35 Server Preferences ........................................................................................................................................... 35 Server Address ............................................................................................................................................. 35 Server Port .................................................................................................................................................... 36 Communication Preferences .......................................................................................................................... 36 Timeout ......................................................................................................................................................... 36 Support Menus .................................................................................................................................................... 37 Lookup .............................................................................................................................................................. 37 Object Identifier ........................................................................................................................................... 37 Version .............................................................................................................................................................. 38 This document presents an overview of the many features of the Municity Android application. This manual should act as a reference, and not a complete summary of all features and functionality. Basics
This section covers the basic features that allow the user to login and navigate the application. Login
When the application is opened for the first time, the user must select their municipality to log in. Tap the top, drop‐down text field and chose tap to choose your municipality. In the fields directly below that, enter your Municity username and password and tap the Submit button. Consider checking the “Save Password” checkbox if you prefer not to enter the password each time. Note: saving your username and password will make your device less secure. We recommend having a device password as well. C
Change Da
ate
To change thee date, tap o
on the date in
n yellow at tthe top of thee screen. A date selecto
or dialog willl appear. M
Modify the date by eitherr using the u
up and down
n arrows or selecting thee number orr month and typing in yo
our desired selection, th
hen tap the “
“Set” button.. The date aand schedulee/map conten
nts will be cchanged ap
ppropriately
y. V
View Sched
dule List
W
When the Sch
hedule tab iss highlighted
d, the list bellow shows th
he inspectio
ons and appo
ointments fo
or the day. In
nspections an
nd Appointm
ment headerrs separate tthe two. Thee top line giv
ves the owneer name, folllowed by th
he location, iinspection ty
ype. The nam
me of the asssigned inspeector appearrs in parenth
hesis next to the in
nspection typ
pe. Tapping any of the items will op
pen them in their own detail screenss. View Inspection
Tapping on an inspection in the Schedule, or the corresponding letter tag on the Map will bring up the inspection overview screen. The view is broken into several functional pieces, most notably the Record Results (for editing inspection status) and Options (for editing inspection information). Inspection Status
Simply tap on the status dropdown to reveal the list or preloaded status options. Tap the desired status to enter. A
Add/Edit No
otes or Resu
ults
To add/edit N
Notes or Results on an in
nspection, sim
mply tap on
n the specificc field and ty
ype text or select the m
microphone iicon for voicce entry (see below). Note: editable fieelds have a “ppencil” icon n
next to them. An edit diialog and keyboard will app
pear, allowing
g the user to make text moodifications.
V
Voice Editing
g
A
An importantt feature of A
Android dev
vices is the a
ability to editt text fields tthrough the voice‐to‐tex
xt feature. To use this, ta
ap on the miicrophone keey located on
n the keypad
d. A voice p
prompt “Speeak now” wiill appear. A
At this point speak a simp
ple clear sen
ntence into th
he device m
microphone (ssee device m
manual for lo
ocation), th
hen pause. T
The Android
d will processs your speech and geneerate a text v
version. To aadd more tex
xt, repeat th
he process an
nd the devicce will add to
o the end of the current text. Change Inspector
Enabled users have the ability to reassign inspections. In the Options section of the inspection, tap the inspector drop‐down list to bring up the full list of inspectors. Tap on one of the name to select. Schedule Settings
The scheduling of the inspection can also be changed. Users can change the date, the start and end times, or make the inspection an all‐day event. Tap on the field to edit. View Type
Immediately below the date editing options are several larger buttons. The first of these identifies the source of inspection being viewed. For example, an inspection on a parcel would read “View Parcel”, permit inspections would read “View Permit”, and the same for Occupants or other inspection sources. Tap on this button to reveal more information about the inspection source’s content. View on Map
A View on Map button appears on the inspection screen if the inspection object has a location which can be displayed on the map. Clicking on the View on Map button takes the user to a map view of the specific item. Delete
Inspections that can be deleted will show a “Delete Inspection” button, followed by an “Are You Sure” warning. Details
The Details region of the inspection form contains read‐only descriptive details of the inspection. View Appointment
The Schedule list contains Appointments below Inspections. To review, edit or reschedule an Appointment, tap on it. Subject
Appointments differ from inspections in the fact that they are not status driven (approved, failed…). They have a specific Subject, which is editable. See the Inspection editing sections for more information on how to edit via keyboard or voice, change schedule dates or times, details and deleting. Map View
By tapping the Map tab from the schedule screen, the daily Schedule list can also be viewed by location on a Google map. The day inspections and appointments for the date in the yellow bar appear, scaled to an extent which ensures that all are visible on the map. Zo
oom Techn
niques
There are threee ways to z
zoom in and out on the m
map: doublee‐click, pinch
h, and use off the zoom ccontrol. To oom in, the u
user can dou
uble tap on tthe map. Th
he map will zzoom towarrds the locatiion of the taps. The zo
zo
oom can also
o be controllled by pinch
hing in and o
out. When th
the screen is touched, an
n zoom contrrol buttons ap
ppear at the bottom of th
he screen. Hold for Info
To reveal an iinformation panel aboutt items on th
he map, simp
ply tap and h
hold for app
proximately two n release. A detail panel will emerg
ge at the botttom of the sccreen with a description
n of the seeconds, then
ittem. You can
n also immeediately tap o
on this paneel to open thee inspection
n or appointm
ment. Select on Map
An inspection or appointment can be selected and opened two ways from the map. First, by tapping (but not holding) on the pin, the item will be selected and opened. Secondly, by holding on the item the information panel will appear (as shown above); by tapping on the resulting panel, the item can be opened. Views
There are much more information that can be viewed beyond inspections and appointments. Users can access this information through an inspection, or through the Search tools described later in this document. Parcel View
Parcel information can be accessed through parcel inspections (View Parcel) or direct access through text or map searches. For example, clicking on View Parcel in the inspection will take the uesr to the Parcel view. The Parcel and other views consist of a collection of descriptive details, followed by any related items (permits, inspections, complaints, application…), and a list of actions that can be taken on the current item. The Parcel view includes parcel detail information not editable through the Android Application. Below that are the View on Map, Parcel Owner buttons, a list of Inspection, Permit and Complaint history is generated. Any of these buttons can be tapped to continue on to details of the specific parcel‐related content. At the bottom is a collection of action buttons. Active parcels can have new inspections, appointments, complaints or stop work orders assigned to them. Permit View
The Permit view can be accessed through a permit inspection, through the list on a parcel or other object containing one or more permits or through a search. The view has details, a list of associated items, and possibly one action button for the creation of an inspection on the permit. Complaint View
Complaints follow the convention of other objects, and present details, lists of associated items (one inspection and one violation in our example), and any related action buttons (create and delete). Occupant View
Occupants are business or tenants on a parcel that can have inspections created on them. The Occupant view can usually be accessed through an occupant inspection, or through a parcel that has an occupant assigned to it. Other Views
There many other views: Amendment, Application, Building, Certificate, Parcel Owner, Stop Work Order, and Violation. As with the other views, each screen contains descriptive details, lists of associated items, and action buttons. Returning to Schedule Views
Because of the ability to view item content from within other item content, users can often find themselves many screens deep in the application. For convenience, a Schedule menu button has been provided that will take the user immediately back to the Schedule view, discarding the entire queue of other screens visited to that point. Actions
Passing Inspections
Inspections can be passed through the following sequence: selecting the inspection status, changing the status to PASSED (or similar), then tapping the Submit button. The status of the submission will appear at the bottom of the screen, and the color of the pin icon will change to green. If desired, users can add Notes and/or Results before submitting. In the example below, a recurring inspection was passed, and the resulting status indicates that a new recurring inspection was automatically created. Failing Inspections
To fail an inspection, open the inspection’s status list and selecting the “Failed” (or similar) status. Users can add notes and/or results describing the reason for failure. An example is shown below in Step 2. Once the status and results are set, tap the Submit button. Some inspections, such as recurring or fire safety inspections, will request additional information from the inspector. In the example, the user is asked if they would like to create a complaint. Once additional values are entered, the inspection will be failed and a status box will confirm. The color of the pin will change to red. Create New
Municity Android allows user to create new items for specific types. Inspections, Appointments, Complaints, Violations and Stop Work Orders can all be created within the application. Create buttons are commonly found at the bottom of screens, and in particular at the bottom of specific object views. Below is a Parcel View. Create Inspection
A new inspection can be created from the Parcel, Permit or Complaint views. After tapping the “Create New Inspection” button, a new inspection view will appear. Users can then select an inspector, type, date time. Inspection types differ for parcel, permit and complaint inspections. Notes can be entered through the keypad or voice‐to‐text. Once the data is entered, tap the Submit button and the inspection created. Create Appointment
Appointments can be created from the Schedule view, as shown below. Parcel appointments can also be created from the Parcel view; these appointments will have the parcel address (Location) automatically assigned to them, and will therefore appear on the map. The New Appointment form is similar to the Inspection, with differences on Subject, Location and Message fields. Create Complaint
The New Complaint feature is not a form but a process. A series of questions will be asked during the creation, including the complaint type, complaint description, inspection results and follow‐up date. The complaint is created and displayed, and a follow‐up inspection will be generated as well. Create Violation
The New Violation feature also follows a process, requesting Ordinance Code and Description information. Create Stop Work Order
Municity Android supports the creation of Stop Work Orders on parcels. After selecting the Create New Stop Work Order button, a list of Stop Work Order Types will be presented, then a request for the reason for the order. Note: if the type list is empty, then new stop work order types need to be entered in the Municity desktop version. Also note that a parcel with a stop work order will show a stop title and icon in the parcel header. Delete
All items that can be created, inspections, appointments, complaints, violations and stop work orders, can also be deleted. The item will have a “Delete” button at the bottom of its details. On selection, a warning will always be presented. On deletion, the application will return to the parent screen. Edit
Both inspections and appointments can be edited outside of the daily schedule. When viewing inspections or appointments within a parcel (or other) list, an Edit item button will appear. This will open an editable view of the item. Search
The Municity Android application has two powerful ways of searching for information: through the “Search By” text feature, or the map parcel search. Either way, the search functionality opens access to your Municity data to an entirely different way than the daily inspection list. Text Search
The text search can be access through the application menu settings. Tap the device menu button (may be a physical or digital button on the phone or tablet, see your device’s documentation), then find the Search button. Once tapped, the Search form will appear. Notice that there are several search types, allowing the user to search for information in different ways. Parcel By
To search for a parcel, use the Parcel by Legal Address, Owner Last Name or Section/Block/Lot search type. After entering a value and tapping the Search button, a list of matching parcels will appear. Select one to proceed to the chosen parcel. Permit By
To search for a permit, use the Permit by Number or Application Number search type. After entering a value, or partial value, and tapping the Search button, a list of permits with similar numbers will appear. Select one to proceed to the chosen permit. Application By
To search for an application, use the Application by Number search type. After entering a value, or partial value, and tapping the Search button, a list of applications with similar numbers will appear. Select one to proceed to the chosen application. C
Complaint By
B
To search for a complaintt, use the Co
omplaint by Number or Date search
h type. Afterr entering a v
value, or a mat, and tapp
ping the Searrch button, aa list of comp
plaints with similar num
mbers will date value in m/d/y form
ap
ppear. Selecct one to pro
oceed to the cchosen comp
plaint. M
Map Search
A
A valuable m
method to sea
arch for parccels is the ma
ap search feaature. The ffunctionality
y is availablee on any m
map used in tthe applicatiion. Hold
A
A parcel can b
be found on
n a map simp
ply by tappin
ng on the m ap area. Zoom to a cleaar region on the map, hold your fin
nger on a speecific location
n for approx
ximately two
o to three secconds beforee releasing. A lookup w
will occur and
d the closestt match parccel will be id
dentified with
h a pinpointt and a parceel descriptio
on panel. U
Users can tap
p on either th
he pinpoint o
or the panel to open the parcel inforrmation and
d proceed. D
Drag
In
n addition to
o the search for a parcel on the map,, the resultin
ng pinpoint ccan be manu
ually moved
d to another lo
ocation for a subsequentt search. Witth the search
h result pinp
point on the map, hold o
on the pinpo
oint and drag it to a neew location and release. After releasing, a searcch on the new
w location o
occurs and th
he results off the search appear in a parcel descrription panell. Preferences
In addition to the many operational features, users have the ability to configure the way they use their Municity Android application. These preferences could be either user or administrator level customizations. Filter Preferences
Filter preferences impact the volume of content viewed by users. View All Inspectors
This preference allows a user to filter their inspection and appointment lists down to only items assigned to them, or to view all inspectors’ schedules. Simply check or uncheck the preference and return to the schedule or map. Map Preferences
These preferences control the way the map is presented. Satellite Mode
This mode allows the user to switch between Google’s street map and satellite mode. Checking and unchecking the Satellite Mode checkbox performs the switch; the change is reflected when returning to the map. Note: Satellite Mode loads aerial images that will take longer to load. Traffic Mode
Traffic Mode turns on and off Google’s map traffic overlay, showing traffic congestion locations in red or yellow lines. This may be useful for inspections driving through high traffic municipalities. Zoom Controls
The zoom control appears at the bottom of the map when it is tapped. If it is preferred to not have this control appear when manipulating the map, simply go to Preferences and uncheck the Zoom Controls checkbox. Location Preferences
Location preferences modify how the inspector is presented and grouped on the map, and where the center of the municipality is located. Inspections Map
When checked, the inspector’s GPS location (if available) is plotted and grouped along with the inspections on the map. By default this option is unchecked. Parcel Map
When checked, the inspector’s GPS location (if available) is plotted and grouped along with the single parcel displayed via the View on Map feature. This gives the inspector a sense of direction from his or her current location. By default this option is checked. Latitude, Longitude Center
The Latitude and Longitude Center values are optional WGS84 lat/lng numbers used to define the center of the municipality. This is useful when there are no inspections to be plotted on the map; if the values remain at their default (0, 0), the empty inspection map will focus on the equator‐meridian point in the Atlantic Ocean off the coast of Africa. Administrative Preferences
The Administrative Preferences are only visible to Municity users with administrative rights. These preferences are currently used to configure inspection range enforcement. An administrator could log into the Application with their own log in, configure the range enforcement preferences, and then log out. The inspector, when logging in, would be bound to the preferences without the ability to change them. Enforced Range On
Range enforcement is a feature that, based on a specified distance, prevents an inspector from changing the status, notes or results of an inspection unless he or she is within the distance of the inspection location. In order to enable the feature, an administrator can check the Enforced Range On preference. Once this is done, inspection form Submit button will not enable unless the distance to the inspection is within the specified range distance. Enforced Range Distance
The Enforced Range Distance preference allows the administrator to adjust the required distance to inspection that is necessary for the inspection form to become editable. The value is in the units (feet, meters) defined by the Distance Units preference. Distance Units
The Distance Units preference defines the units of the Enforced Range Distance value, whether feet or meters. Show Distance
The Show Distance preference determines whether the distance to the inspection is shown on the inspection form. If checked, a distance to the inspection based on the inspector GPS and inspection location is shown. This distance must fall with the Enforced Range Distance before inspection status, notes and results can be saved. View Preferences
View preferences influence the overall look of the application. Note: these preferences can only be accessed at the application login page. Theme
The Theme changes the overall color schema of the application. Current choices are simply Light and Dark. The Light theme is often the best for viewing a device in outdoor light, Dark for viewing indoors. Server Preferences
Server preferences affect where the application accesses its Municity data. Note: these preferences can only be accessed at the application login page. Server Address
The Server Address defines the Municity Android application server that will be contacted. The application server subsequently handles all of the database connections. The production Municity Android application server is www.sca‐corp.com (or www.municitymobile.com), and handles all production communications. A test application server is available at test.sca‐corp.com as well. This test server is used for demonstrations and municipalities looking to experience Municity Android without impacting their production data. Server Port
The server port is also part of the application server reference. The value is currently 8080 for both production and test servers. Communication Preferences
Communication preferences change the interaction of the application with the Municity database. Note: these preferences can only be accessed at the application login page. Timeout
The Timeout value defines the maximum amount of time, in seconds, that the application will wait for a response to requests from the server. For example, a value of 30 means that the app will wait 30 seconds before giving up on login requests, access to parcels, inspections, maps, etc… Support Menus
The following items are included in the application to facilitate support. If you are in need of additional help with the Municity Android application you can call 845‐758‐0104 or email support@sca‐corp.com. Lookup
All objects (inspections, parcels, permits, complaints, etc…) have identification numbers. The Lookup tool allows the user to enter the identification number and immediately access the object. For example, the inspection below is found by entering its unique identification number. Object Identifier
The unique identifier for any object can be found at the bottom of the object’s view. Note that these numbers are assigned by the application and not the user. For this reason the Lookup tool is considered a support tool. Version
The version number of the Municity Android application can be found in the lower left of the login screen. This is for reference and support purposes. You can choose to “Allow automatic updating” in the Municity entry in the Google Play Store (formerly Android Market).