1
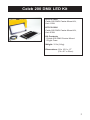
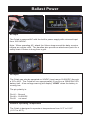
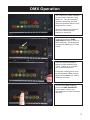
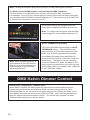
Operation Manual
Celeb® 200 DMX LED
Part No. 3100065 Rev A
09-25-2013
Celeb 200 DMX LED System
Celeb 200 Center Mount
CEL-200C-120U
Celeb 200 DMX Center Mount, Univ 120U
CEL-200C-230U
Celeb 200 DMX Center Mount, Univ 230U
Celeb 200 Yoke Mount
CEL-200Y-120U
Celeb 200 DMX Yoke Mount, Univ 120U
CEL-200Y-230U
Celeb 200 DMX Yoke Mount, Univ 230U
Celeb 200 Pole-Op
CEL-200P-120U
Celeb 200 DMX Pole-Op, Univ 120U
CEL-200P-230U
Celeb 200 DMX Pole-Op, Univ 230U
Included w/ all Celeb 200 Models
LVR-CE290-P
Celeb 200 Louver/HP 90° (Included)
GFR-CE2
Celeb 200 Gel Frame (Included)
2
Celeb 200 DMX LED Kit
KIT-C2-120U
Celeb 200 DMX Center Mount Kit,
Univ 120U
KIT-C2-230U
Celeb 200 DMX Center Mount Kit,
Univ 230U
Kit Contents:
1 Celeb 200 DMX Center Mount
1 Flight Case
Weight: 31 lb (14kg)
Dimensions: 29 x 10.5 x 17”
(74 x 27 x 43cm)
3
Celeb 200 DMX Control Panel
A B
C
D E
F
G
H
A) Kelvin Preset Buttons: Kelvin buttons come preset at the factory.
Factory defaults left to right are: 2700K, 3200K, 4000K, 5000K, 5500K.
User can also use these preset buttons to store custom Kelvin settings.
B) DMX ADDRESS – Use to set DMX address. The Celeb 200 automatically
assigns 2 channels. First Channel controls Dimming; Second Channel
controls Kelvin.
C) KELVIN / DIM: In KELVIN mode, an amber light appears to the left of
the button and Kelvin is displayed. Press the button again to change to
DIM mode. In DIM mode, a green light will appear to the left of the button
and Dim level is displayed.
D) Display: Provides Kelvin, Dim level and software revision data.
E) LOCK / RESET: In LOCK mode, an amber light is displayed to the left
of the button. In RESET mode, the indicator light is green. To reset to
factory presets, hold the LOCK / RESET button for 5 seconds.
F) On / Off: On = Green light displayed. Off = Amber light displayed.
G) Data: To update Software Revisions.
H) Kelvin / Dimmer Knob: Manually adjusts Kelvin or Dim levels.
Press the knob to toggle between fine and coarse adjustments.
Note: Each Celeb 200 DMX fixture has an “AUTO TERMINATE” feature.
The last fixture that does not have an XLR cable attached to the
DMX “Out” port will automatically terminate.
4
Ballast Power
AC Input
The Celeb is powered AC with the built-in power supply with universal input
from 100-240VAC.
Note: When operating AC, attach the Velcro strap around the baby receiver
lollipop as a strain relief. The handles also provide an attachment point for a
safety chain if fixture is hung from a grid.
DC Input
The Celeb can also be operated on 24VDC (input range 18-28VDC) through
a 3-Pin XLR. The Celeb will run approximately 2 hours on a 320W/24V/13A
battery belt. A low voltage warning will display “LPWR” when the battery is
running low.
The pin polarity is:
Pin #1 – Ground
Pin #2 + 18-28VDC
Pin #3 not used
Ambient Operating Temperature
The Celeb is designed to operate at temperatures from 14°F to 104°F
(-10°C to 40°C).
5
Start Up
When power is first applied to
the fixture, the alphanumeric
display shows the current
software version.
Press the On/Off button
to turn on the fixture.
The display will default to a
Kelvin setting of 5000.
Kelvin Selection
There are 5 Kelvin factory
preset buttons. Left to right
they display 2700K, 3200K,
4000K, 5000K and 5500K.
A green indicator will light to
the left of the active button.
Rotating the adjustment knob
will change the Kelvin.
Press the rotating knob once
to shift the Kelvin profile from
Coarse to Fine increments.
In the Coarse mode,
the fixture can be adjusted in
one rotation of the knob.
In Fine mode, it will require
8 rotations for full range of
adjustment.
6
Kelvin Custom Settings
In KELVIN mode, the Kelvin
can be fine tuned with the
adjustment knob to custom
settings between 2700K to
5500K.
The setting can be assigned
to any preset button by
holding down the desired
button for 5 seconds.
The Kelvin display will flash
once the setting is registered.
Note: When the power is
turned off or removed,
the fixture will remember
its last setting.
Dimming
Press the KELVIN / DIM
button. The indicator light to
the left of the button will turn
green.
Rotating the adjustment knob
will dim the light of the fixture.
Press the rotating knob once
to shift the Dim profile from
Coarse to Fine increments.
In the Coarse mode, the
fixture can be adjusted in
one rotation of the knob.
In Fine mode, it will require
8 rotations for full range of
adjustment.
7
Reset Factory Settings
To reset factory settings,
press and hold the LOCK /
RESET button for 5 seconds.
The indicator light will turn
green and the display will
flash 5000 and light output
will be at 100%.
Lock Mode
Press the LOCK / RESET
button to lock the Kelvin
and Dim settings. An amber
indicator will display in
LOCK mode.
In LOCK mode, controls
are disabled and LOCK
will appear in the display.
To unlock, press the
LOCK / RESET button again.
The indicator light will turn
green.
In LOCK mode, you can
toggle back and forth on
the KELVIN / DIM button
and review your Kelvin and
Dim settings.
Note: When the power is
removed, the fixture will
reset to unlock.
8
DMX Operation
The Celeb 200 DMX operates
on two DMX channels using
DMX512. The first channel
operates dimming; the 2nd
channel operates Kelvin color
temperature control.
Once an address is selected,
the fixture automatically
assigns 2 channels.
Press and hold the DMX
ADDRESS button to select a
DMX address. The displayed
number will flash while in edit
mode.
Turn the dimming knob to
select a valid address from
1-512. (Note: 0 or 513-999
are invalid addresses.)
Press the rotating knob once
to shift between Fine (single
digits) and Coarse (in 10th’s)
address selection.
To save the DMX channel,
press the DMX ADDRESS
button again. When set,
the displayed number will stop
flashing.
9
Note: All Kelvin indicator lights will turn green if a valid DMX signal is present.
If a fixture loses its DMX signal, it will hold its last DMX command.
For this reason, it is important to turn a fixture off using the DMX commands.
For example, if you try to turn off the lights by turning off the dimmer board, the lights
will remember their last DMX command and stay on. The fixtures require a DMX “Off”
or “Black-Out” command in order to turn off.
All manual controls are disabled once the
DMX cable is applied and DMX is turned on.
Note: To regain manual control with the DMX
cable plugged in, set the DMX address to “0”.
AUTO TERMINATE FEATURE
The Celeb 200 DMX fixtures have an AUTO
TERMINATE feature. The last fixture that
does not have an XLR cable attached to the
DMX “Out” port will automatically terminate.
Note: When operating fixtures at
great distances from the dimmer
board, it is recommended to use
Opto-Isolators to provide DMX
signal amplification.
Any theatrical lighting board with DMX512
protocol can be used to control the Celeb 200
DMX fixture. The fixtures can be jumpered
using the IN and OUT ports. As many as 100
fixtures can be jumpered on one chain as long
as the DMX cable run remains under 1000 feet
or 40 x 25ft DMX cables.
DMX Kelvin Dimmer Control
Kelvin Color Temperature – Dimmer level
When DMX is applied, the DMX signal will override the manual settings and the
Celeb Kelvin temperature will default to 5500K and dim setting will be at 100%.
Sliding the fader on the 1st channel will lower the light level. Sliding the fader on the
2nd channel will lower the Kelvin from 5500K to 2700K. (See chart on the following
page for approximate Kelvin dimmer levels.). The fixture may respond ± 4 slider
channels, depending on the dimmer board.
10
Celeb 200 DMX
Kelvin Color Temperature
Dimmer Level
Kelvin Color
Temperature
Dimmer
Level
5500K
100%
5000K
75%
4000K
50%
3200K
15%
2700K
0%
Note: The detailed DMX mapping for the Celeb 200 DMX fixture can be downloaded
from the Operation Manual posted on www.kinoflo.com.
IMPORTANT!
The dimmer board/light console should have its channel set to LINEAR light output
response. (LINEAR response is the default setting on most dimmer boards.)
DMX Cables
DMX Cables
The Celeb 200 DMX fixtures use five-pin XLR male and
female connectors to receive DMX signals from the Dimmer
Board and jumper the fixtures in a series. DMX pin-out
wiring follows the USITT DMX512 standard:
Pin 1: Shield
Pin 2: Data –
Pin 3: Date +
Pin 4: Spare –
Pin 5: Spare +
Note: Pin four and five in the fixture are connected internally
as Pin four to four and Pin five to five. Connecting Pin
four and five as the pass-thru allows secondary data to be
passed through other equipment.
Do not use Microphone Cables and other general purpose, two-core cables designed
for audio or signaling use. They are not suitable for DMX512. Problems due to
incorrect cabling may not be immediately apparent. Microphone Cables may appear
to work fine, but systems built with such cables may fail or be prone to random errors.
Cable must comply with EIA-485 (RS485).
11
Center Mount
MTP-LB
Mounted on
a baby stand
Mounted to pipe grid
The Celeb 200 Center Mount fixture includes a Lollipop w/ Baby Receiver
(16mm) (MTP-LB) which allows the fixture to be mounted directly onto a
baby stand or hung from a grid with a baby pipe clamp.
Note: The handles on the back of the fixture provide an attachment point
for a safety chain.
A 180° turn loosens the orientation of the mount.
A right turn tightens the mount.
The tension on the lock lever may be adjusted
by pulling the handle away from the mount.
This disengages the handle from the screw
mechanism and allows the lever to be reoriented.
You can also use a screwdriver to adjust the tension.
Pull back on handle and adjust screw.
Lollipops are interchangeable.
MTP-L
Kino 41 Lollipop w/ 3/8” Pin (10mm)
MTP-LB Kino 41 Lollipop w/ Baby Receiver (16mm)
MTP-LBS Kino 41 Lollipop w/ Baby Receiver Short
(16mm)
12
Baby Offset Arm
MTP-B41F Kino Offset w/
Baby Receiver (16mm)
The Kino Offset w/ Baby Receiver (MTP-B41F) allows fixtures to mount on the center
of a stand or it can also be under slung from a baby stand to use as an up light.
Yoke Mount
MTP-I40
MTP-I80
The yoke has a ½” hole to accept industry standard mounting hardware.
The Celeb 200 Yoke Mount fixture can hang from a grid by a baby pipe hanger using a Baby Receiver Assembly for Yoke (MTP-I40), sold separately. It can also hang
by a junior pipe hanger using a Junior Pin Assembly for Yoke (MTP-I80), also sold
separately.
Note: The yoke also provides an attachment point for a safety chain.
Warning: Use only M5 X 10mm screws (supplied) to assemble yoke.
Note that threads on the fixture are self-locking and may seem tight.
Replacement screws: Part No. 2020127
Recommended torque setting:
USA: 18 lb-in
Metric: 2 Nm
13
Pole-Op
The Celeb 200 Pole-Op fixtures include a yoke with an
attached junior pin. They can be hung from a grid with a
Junior pipe hanger.
Junior pin attached to Pole-Op Yoke
Operating Pole-Op
The Blue cup alters the Pan (left or right).
The White cup alters the Tilt (up or down).
Warning! Do not pull yoke to adjust
tilt. Turn the white knob counter
clockwise to angle the yoke 90°.
(ParaBeam shown for illustration
purposes only.)
Mount Options
Rope Hang
Accessory holders are also
designed to enable 4-point
rope hangs for specialty rigging
applications.
The Celeb 200 Mount w/ Pin
(MTP-CE) can be used as additional mount points, for example,
car rigs, etc.
MTP-CE
14
Applying Gel to Frame
Option 1 - The Gel Frame comes with gel clips. Cut the gel to size and use the clips to
fasten the gel to the frame.
Option 2 – Apply transfer tape directly to the Gel Frame. The clips are not necessary
when taping the gel.
Inserting Gel Frame and Louver
The Celeb includes spring loaded accessory holders and two channels to hold the
Gel Frame and Honeycomb Louver.
Place the long edge of the Gel Frame or Honeycomb Louver into the lower channel.
Press down on the left and right corners of the Gel Frame or Louver and slip the upper
edge into the upper channel of the fixture. To remove, reverse the procedure.
Note: Do not press down along the top center portion of the Gel Frame or Louver.
Doing so may deform the Gel Frame or Louver over repeated usage.
15
Inserting Barndoors
Position the barndoors
alongside the extruded
edge of the fixture. Align the
thumbscrews with the adjustable receptacle holes in the
fixture and insert into place.
Lock the barndoors by turning
the silver thumbscrew.
To remove, reverse the
procedure.
For replacement screws,
use M5 Metric size screws.
BRD-CE2
Note: To adjust the placement of the receptacle holes,
use a pointed tool (such as
a pen) to slide the holes
within the extruded edge.
Troubleshooting
Display Protection Condition
Description
Normal Condition
Cause/Solution
OCP
Over Current Protection
Shut down current 2.45A
in excess of 20%
2.04A @ 100% dim
Repair Service
Center
OVP
Over Voltage Protection
Shut down voltage @
excess 30V
Below 28V
Wrong Battery
or 24V Battery
w/ too high
Open Voltage
UVP
Under Voltage Protection
Shut down voltage @
below 17V
Excess 18V
Dead Battery
OTP
Over Temperature
Protection
Shut down temp @
120°C (LDM board side)
Below 120°C @
LED array
Cool Down
OPP
Open Protection
Open circuit
No open
Repair Service
Center
SCP
Short Circuit Protection
Short circuit
No short
Repair Service
Center
16
Troubleshooting continued
Can’t set the DMX address.
You must Press and Hold the DMX Address button for 3 seconds in order to
select an address. The display will flash while in edit mode. Select a valid
address from 1-512. (Note: 0 or 513 and higher are invalid addresses.)
Can’t operate the fixture manually with the DMX cable plugged in.
Two Options:
Set DMX address to “0” or disconnect cable and turn power off and on.
Accessories
BRD-CE2
Celeb 200 Barndoors (Set of 4)
GFR-CE2
Celeb 200 Gel Frame
LVR-CE290-P Celeb 200 Louver/HP 90°
LVR-CE260-P Celeb 200 Louver/HP 60°
Lollipops are interchangeable.
MTP-L
Kino 41 Lollipop w/ 3/8” Pin (10mm)
MTP-LB Kino 41 Lollipop w/ Baby Receiver (16mm)
MTP-LBS Kino 41 Lollipop w/ Baby Receiver Short
(16mm)
MTP-B41F
Kino Offset w/ Baby Receiver (16mm)
17
MTP-CE
Celeb 200 Mount w/ Pin
MTP-I80
Junior Pin Assembly for Yoke (28mm)
MTP-I40
Baby Receiver Assembly for Yoke (16mm)
KAS-CE2
Celeb 200 Flight Case
KAS-CE2-C Celeb 200 Travel Case
KAS-CE2-Y Celeb 200 Yoke Ship Case
STD-M30 Medium Duty Stand/Black, 30”
STD-M36 Medium Duty Stand/Black, 36”
18
7010032
Celeb 200 Yoke Assembly
7010038
Celeb 200 Pole-Op Assembly
Fixture Specifications
CEL-200C-120U
Celeb 200 DMX
Center Mount
Celeb 200 DMX Center Mount,
Univ 120U
AC Input Voltage: 100~240VAC 50/60Hz, 100W
Amperage VAC: 0.96A at 120VAC
DC Input Voltage: 18~28VDC, 100W
Amperage VDC: 4.0A at 24VDC
Kelvin Range: 2700K~5500K
Dimming Range: 100%~1%
Weight: 15 lb (6.8kg)
Dimensions: 24 x 14 x 5”
CEL-200C-230U
Celeb 200 DMX Center Mount,
Univ 230U
AC Input Voltage: 240~100VAC 50/60Hz, 100W
Amperage VAC: 0.54A at 230VAC
DC Input Voltage: 18~28VDC, 100W
Amperage VDC: 4.0A at 24VDC
Kelvin Range: 2700K~5500K
Dimming Range: 100%~1%
Weight: 15 lb (6.8kg)
Dimensions: 24 x 14 x 5”
CEL-200Y-120U
Celeb 200 DMX
Yoke Mount
Celeb 200 DMX Yoke Mount,
Univ 120U
AC Input Voltage: 100~240VAC 50/60Hz, 100W
Amperage VAC: 0.96A at 120VAC
DC Input Voltage: 18~28VDC, 100W
Amperage VDC: 4.0A at 24VDC
Kelvin Range: 2700K~5500K
Dimming Range: 100%~1%
Weight: 16 lb (7.3kg)
Dimensions: 28.5 x 16.5 x 5”
CEL-200Y-230U
Celeb 200 DMX Yoke Mount,
Univ 230U
AC Input Voltage: 240~100VAC 50/60Hz, 100W
Amperage VAC: 0.54A at 230VAC
DC Input Voltage: 18~28VDC, 100W
Amperage VDC: 4.0A at 24VDC
Kelvin Range: 2700K~5500K
Dimming Range: 100%~1%
Weight: 16 lb (7.3kg)
Dimensions: 28.5 x 16.5 x 5”
19
CEL-200P-120U
Celeb 200 DMX
Pole-Op
AC Input Voltage: 100~240VAC 50/60Hz, 100W
Amperage VAC: 0.96A at 120VAC
DC Input Voltage: 18~28VDC, 100W
Amperage VDC: 4.0A at 24VDC
Kelvin Range: 2700K~5500K
Dimming Range: 100%~1%
Weight: 17 lb (7.7kg)
Dimensions: 29 x 16.5 x 6”
(74 x 42 x 15.2cm)
CEL-200P-230U
Celeb 200 DMX Pole-Op, Univ 120U
Celeb 200 DMX Pole-Op, Univ 230U
AC Input Voltage: 240~100VAC 50/60Hz, 100W
Amperage VAC: 0.54A at 230VAC
DC Input Voltage: 18~28VDC, 100W
Amperage VDC: 4.0A at 24VDC
Kelvin Range: 2700K~5500K
Dimming Range: 100%~1%
Weight: 17 lb (7.7kg)
Dimensions: 29 x 16.5 x 6”
(74 x 42 x 15.2cm)
For latest Warranty information and Certifications,
see Kino Flo website at www.kinoflo.com.
Environmental: Disposal of Old Electrical & Electronic Equipment.
This symbol on the product or on its packaging indicates that this
product shall not be treated as household waste. This product is made
of recyclable materials and should be disposed of in accordance with
governmental regulations.
Kino Flo, Inc. 2840 N. Hollywood Way, Burbank, CA 91505, USA
Tel: 818 767-6528 website: www.kinoflo.com
20