1
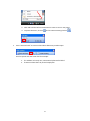
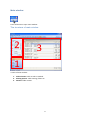
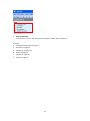
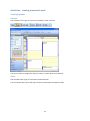
LawTime user manual Version 2.7 Heidi Hansar Copyright © 2010 Van Zoig Contents Starting LawTime ..................................................................................................................................... 5 LawTime small window ........................................................................................................................... 5 Timing ...................................................................................................................................................... 6 Starting the timer ................................................................................................................................ 6 Enter the data...................................................................................................................................... 6 More possibilities ................................................................................................................................ 7 Main window ........................................................................................................................................... 9 The structure of main window ............................................................................................................ 9 Work with tables ............................................................................................................................... 10 Activities – viewing measured work ...................................................................................................... 13 Viewing options ................................................................................................................................. 13 Calendar ........................................................................................................................................ 13 Table .............................................................................................................................................. 13 Filtering activities .............................................................................................................................. 15 Flag the activities ready to bill........................................................................................................... 17 Create a view ................................................................................................................................. 18 Bill status ....................................................................................................................................... 19 Customers.............................................................................................................................................. 19 Adding customers and viewing data ................................................................................................. 19 Customer data ................................................................................................................................... 20 General .......................................................................................................................................... 20 Details ............................................................................................................................................ 21 Cases .............................................................................................................................................. 22 Prices ............................................................................................................................................. 22 Invoices .......................................................................................................................................... 23 Documents .................................................................................................................................... 23 Case ....................................................................................................................................................... 23 Adding case and viewing data ........................................................................................................... 23 Case data ........................................................................................................................................... 24 General .......................................................................................................................................... 24 Details ............................................................................................................................................ 25 Prices ............................................................................................................................................. 25 Tasks .............................................................................................................................................. 25 2 Invoices .......................................................................................................................................... 25 Documents .................................................................................................................................... 25 Invoices .................................................................................................................................................. 26 Adding and viewing invoice data....................................................................................................... 26 Invoice window ................................................................................................................................. 26 Rows .................................................................................................................................................. 27 Adding billed work to invoice ............................................................................................................ 27 Invoice delivery.................................................................................................................................. 30 Invoice commands............................................................................................................................. 31 Payroll ................................................................................................................................................ 32 The structure of the table ............................................................................................................. 34 Payroll settings .............................................................................................................................. 35 Prices ..................................................................................................................................................... 35 Price on activity timing ...................................................................................................................... 35 Adding new price ............................................................................................................................... 35 Window for adding a new price .................................................................................................... 35 Subdivision of prices on customer and other windows .................................................................... 36 Prices in LawTime main window ....................................................................................................... 37 Price settings ..................................................................................................................................... 38 Administration ....................................................................................................................................... 39 Employees ......................................................................................................................................... 39 Adding a new employee and viewing data ................................................................................... 39 Employee data ............................................................................................................................... 39 Employee levels ................................................................................................................................. 40 Adding a new employee level and viewing data ........................................................................... 40 Employee level data ...................................................................................................................... 40 Privileges ........................................................................................................................................... 41 Privileges on two levels ................................................................................................................. 41 Various privileges .......................................................................................................................... 42 Colours of privileges ...................................................................................................................... 42 Divisions............................................................................................................................................. 43 Adding new division and viewing data .......................................................................................... 44 Activity type....................................................................................................................................... 44 Adding new activity type and viewing data................................................................................... 44 3 Activity type data........................................................................................................................... 44 Currencies.......................................................................................................................................... 45 Adding new currency and viewing data ........................................................................................ 45 Currency data ................................................................................................................................ 45 Options .................................................................................................................................................. 46 Database settings .............................................................................................................................. 47 4 Starting LawTime LawTime starts automatically when you start your computer. If you have closed LawTime manually, start the program by clicking LawTime icon LawTime small window LawTime small window… … has two main functions: 1. Clock-button starts new timer. 2. Leftmost button opens LawTime main window. Close ( If you close the program before saving data, the unsaved timers will remain active until you restart the program Right click on timer opens a menu ) button hides LawTime window. To display it again, click on LawTime icon 5 Timing Starting the timer Press the clock-button ... … and the timing begins … Click on timer opens a data entry window and timer stops Enter the data Enter/select relevant data about customer, case etc Do one of the following: - select from list - start typing in list box for quick search If the measured time and actual duration of the work are different, enter the number manually Field "Duration" specifies billable time. Gray area shows the duration as it will be shown on invoice (rounding rules applied) „End“ time is used only to display the duration in calendar, start time and duration will be used for billing To calculate “Duration”, based on start and end time, press button Enter the duration as “1h 30m”. You can also use “1.5h” or “90m” Price is automatically chosen according to selected employee, customer etc 6 Total is calculated automatically Comments are displayed on invoice specification Use comment templates to simplify data entry. List of comment templates come from settings (Settings -> Comment templates) and from comments used before Click on to view comments entered for this customer or case. To select a comment: 1) doubleclick on the row, 2) select a row and click “paste comment” or “paste date and comment” or 3) select a row and press “enter”. On invoice, comments with the same data will be added together as one row Set the language in customer or case settings to see the icon field When done, click To hide the window, click on To pause and/or continue timing click on (English) near comment button button More possibilities You can use more than one timer at the same time. This helps you to solve easily the situation when you’re in the middle of longlasting work, but one or several short-term works are done at the same time. Activating new timer will pause the others Vertical layout displays timers in a vertical view, showing also customer and case information (if data entered before) and pause-button Button options Button next to selection area opens a calendar to select the time and date Click on timer to hide the data entry window (timer will remain paused) To pause or/and continue timing, do one of the following: 1. Press on arrow next to timer, click pause. Do the same to exit pause. next to a selection area opens a menu with show all, open, new and refresh 7 2. Click and hold the left mouse-button on timer to start or exit pause. 3. To pause the timer, click on and to continue timing click on Press “Save and new” to save work and leave data entry window open Use this option with the same data for example: 1. If in addition to hourly rate, international phonecall is billed. 2. If same work was done by several employees. 8 . Main window Press left-button to open main window. The structure of main window 2 3 1 3 zones of main window: 1. Table selection. Click to select a module. 2. Viewing options. Table settings, filters etc. 3. Content. Table content. 9 Work with tables You can change the look of tables by: Sorting Click on column heading to sort the table. Click again on same field to reverse sort direction. Grouping The header of the table shows groups used. Drag a column header there to group by that column and display subtotals. You can group by more than one field. Autofilter Arrow-button in column header opens an autofilter menu. Click on a value to filter table data. Date column allows you to select year, months and day. 10 Choose colums to show in the table Click on Fields … … choose colums to be shown in the table: Save the table settings To save the table, click on View > Table settings > Save as new. Later, you can restore view settings by one click: 11 Output table data You can print, save in a file, send to mail recepient as PDF, copy to Excel etc. See also LawTime main window on page 9 Activities on page 13 Customers on page 19 Cases on page 23 Invoices on page 26 Prices on page 32 12 Activities – viewing measured work Viewing options Calendar Use calendar-look to get an overview of workday, week or month. You can use filters to display the data you need, or select dates from calendar. Table Use the table-look to get an overview of measured work. You can choose filters (from left-menu of the main window) to display the data. 13 You can also: print the table, save in a file, send to mail recepient as PDF, copy to Excel etc show and hide the table fields sort group in different levels (subtotals) save table settings to display them later use filters (similar to Excel AutoFilter) 14 Filtering activities Use the filter to view activities which correspond to selected criteria. For example, if you select a customer, then you will see activities only for this customer. But if on customer field all is selected, then you will see activities of all customers. Use Period list to select from most frequently used time ranges. Click Filter to apply your selections. Use autofilters for a quick filtration. Allow multiple choices help you to select different objects (e.g. in customer’s or other column) at a time. 15 Date column allows you to select 16 year, month and day: Flag the activities ready to bill “Flag” column in activities table is to: 1) mark activities ready for billing and 2) view the status of the bill. According to privileges a user can flag: 1) his/her own activities, 2) activities, where the user is a manager of the customer or the case, 3) all the activities. Use a column in the main window to flag the activities: To flag the activity ready to bill, click on “clear flag” . The colour of the flag turns green means that the activity is flagged “ready to bill”. Doubleclick marks the activity “not to bill” unmark the activity, click one more time on the flag - the flag is “empty” again. To select a group of activities “ready to bill”, click on the group header row: 17 , which . To Right click on selected rows opens a menu with options: Create a view To view or edit flagged activities, use the main window Activities section. To view activities with different billing statuses, create a view. For example: “”Bill needed” and “Bill empty”. The view “Bill needed” shows all the activities which are flagged “ready to bill”. This view gives you a quick overview of the customers and activities to bill. To create this view use filter (date, customer, case, comments) in the main window and sort the column named “Bill status”, checking “Bill needed”. The view “Bill empty” shows all activities which are waiting to be flagged for billing. To create this view, use filter (date, customer, case, comments) in the main window and filter the column named “Bill status”, checking “Empty”. 18 Bill status The activity is not flagged The activity is flagged „ready to bill“ Do not bill the activity The bill is being composed, but is unconfirmed The bill is composed, confirmed, but not received yet The bill is composed, confirmed, and received The bill is overdue Customers Adding customers and viewing data To find the customer data, do one of the following: 1. Subdivison “Customers” in main window. Click “New” to create new customer. 2. Click on -button next to customer selection any place in LawTime, to open or create a customer. 19 Customer data General Name – the name of the customer. Short name - is displayed e.g. in LawTime main window to view activities. VAT code – VAT code used for this customer. Division – select a division for this customer. Contract date - the date, when contract was signed. Contact number – customer’s contact number. Comments – add comments about this customer. Address – customer’s address. Active – when “active” is checked, the customer will be shown in selection lists. Export customer – tick the checkbox to mark customer as export customer. Mail settings – tick the checkbox (Newsletters; Christmas cards; Invoices by E-mail; No paper invoices) you need to consider when composing e-mail to this particular customer. 20 Details Details tab specifies data for this customer: Default activity type specifies activity type used in new activities for this customer. Language is default language for this customer. Language icon is shown in the right corner of comment field. Enter comment template texts according to language settings (see also on page 46). Currency is default currency, used on invoices for this customer. Invoice due days goes automatically on invoice, after entering the invoice date. VAT calculation – VAT % used on invoices for this customer. Invoice layout – determines how invoice parts are organized on paper. Invoice letterhead – controls invoice headers and footers: bank details, addresses, contact information, your company logo etc. Customer ID – customer ID in external system (e.g. accountancy). Postal address - enter customer’s postal address if it’s different from customers address. It displays automatically on invoice, after the customer is selected. 21 Cases List of customer’s cases (see also on page 23). Click on “New” to add a new case to the customer. To open case, click “Open” or doubleclick on case row. If “case required for activities” is checked, then case must always be selected when entering new activities for this customer. Prices List of customer’s prices (see also on page 32). 22 Invoices List of customer’s invoices (see also on page 26). Documents List of customer’s documents from SharePoint website. Case Adding case and viewing data To open case data, do one of the following: 1. Subdivison “Case” in main window. Click “New” to create new case. 2. Click -button next to case selection any place in LawTime to open or create new case. 3. Click on Customer data window subdivision ”cases”. 23 Case data General Case – the name of the case (required). Short name is displayed e.g. in LawTime main window to view activities (otherwise the name may take too much room in table). Customer connected to this case. Contact – the name of a company and/or person, who represents the customer. Employee – name of a person, connected to this case. Opposing side – opposing side of this case. Division - subdivisions, used to differentiate customers, cases, employees and invoices. Contract date – the date, when contract was signed. Contract number – the number of contract, connected to this case. When composing the invoice, after selecting customer, LawTime offers you a list on contract numbers to select. Comments – add comments to this case. Comments are shown in main and case window. Active – when Active is checked, the case will be shown in selection lists (e.g. when entering the data). 24 Details List of case details: Default activity type specifies activity type used in new activities for this case. Language is default language for this case. Currency is default currency, used on invoices for this case. Invoice due days goes automatically on invoice, after entering the invoice date. VAT calculation – VAT % used on invoices for this case. Invoice layout – determines how invoice parts are organized on paper. Invoice letterhead – controls invoice headers and footers: bank details, addresses, contact information, your company logo etc. Customer ID – customer ID in external system (e.g. accountancy). Postal address - enter customer’s postal address to display it automatically on invoice, after the customer is selected. Prices List of case’s prices. Tasks List of case’s tasks. Invoices List of case’s invoices. Documents List of case’s documents from SharePoint website. 25 Invoices Adding and viewing invoice data To open invoice data, do one of the folllowing: 1. Subdivison “Invoices” in main window. Click “New” to create new invoice. 2. Click on Customer data window subdivision ”invoices”. 3. Click on Case data window subdivision “invoices”. Invoice window Customer, who receives the invoice Case Postal address is filled automatically when customer (or case) is selected. You can also enter the address manually Currency. Select the currency before you add billed work on your invoice. In that case, if necessary, LawTime converts prices into new currency VAT calculation: "all 18%", "all 0%" või "services 0%, expenses 18%". If you choose the last, VAT % will be added according to activity type (service/expense) you entered. Use -button to enter different tax rate Confirmed: you see “DRAFT”on unconfirmed invoice. You can change data until the invoice is not confirmed. After the invoice is confirmed you can not edit it and you will no longer see the sign “DRAFT” Invoice No: after you select the date, invoice numbers appear (according to your settings) automatically from number series or you can add it manually Date: enter the date or select it from the calendar Due date: enter “due date” or click button to select number of due days 26 Contract enables you to select or enter the contract number. Data in popup menu comes from customer or case data Issued by: person’s name, whose signature will be used on invoice Division - subdivisions, used to differentiate customers, cases, employees and invoices Invoice settings – “invoice type” defines your invoice as “SIMPLE”, “credit” or “pro forma” Rows 4 types of rows are used on invoice (upper left-corner of the table ”Add row”): 1. “From saved activities” – data from measured or entered activities. 2. “New activity” – open a data entry window. A new row with the new activity will be added on invoice. 3. ”Text row” – simple text and/or manually entered sum. 4. “Extra text under invoice” – add more information. This row is seen in the bottom of invoice, under tax and total sum rows. “Hidden” means that the row is hidden from printout, specification and from sum calculation field: For example: use hidden rows if you have a fixed job payment and you have measured your work in LawTime. This enables you to add billed work on invoice, but the customer sees the sum according to your agreement. Adding billed work to invoice Click ”Add row” button: … and the pop-up menu opens with options: 27 Adding work: From saved activities 1. Click on ”From saved activities” opens a wizard. On the first page of the wizard you can select parameters to search for activities. Quick select offers a selection of defined periods: Date range enables you to choose year/month/day, i.e select a period you need information about. Tick in “Reset prices” cancelles all prices selected on timing and uses currently active prices for all activities. Click “Next” to continue. 2. Select fields according to which separate rows will be created on invoice. Seperate rows will always be used for different activity types and prices. Example: Select ”Case” to place activities for different cases on separate invoice rows. Leave “Case” empty to group activities for all cases to one row. 28 Click ”Next” to continue. 3. Invoice preview. You can unselect rows to be excluded and edit parameters before adding to invoice. When done, click “Finish”. Text row Click ”Text row” to fill the invoice manually. Add additional bottom text to invoice in “Extra text under invoice” area. You can set a default text row for new invoices (see also on page 46). 29 Invoice delivery To deliver invoice, do one of the following: 1. Print – click on print-button after entering data … … opens a ”Invoice print options” window. Choose invoice parts to print, and visual look of your invoice. Layout determines how different invoice parts are organized on paper. Letterhead controls invoice headers and footers: bank details, addresses, contact information, your company logo etc. Letterheads can be edited under LawTime settings (see also on page 46). Modifying invoice layout requires technical skills and tools, and cannot be done directly from LawTime. Contact LawTime distributor to make changes to invoice layouts. By default, letterhead and layout come from Customer (Customer window > Details) or language (Tools > Options > Invoice printing) data. Click ”OK” to open print preview. 2. Save as PDF … opens a ”Invoice print options” window. Select options, and click ”OK”. Choose a place to save the file. 30 3. Send to mail recepient as PDF or HTML – after entering data, click on Send to. 4. Send e-mail – LawTime opens your default e-mail client (e.g. Outlook) and starts composing new mail, PDF file attached to it. Make the changes you need and click ”Send”. To compose an e-mail with customer’s address already on it, click on the arrow of ”Send email” button . Click on address opens your default e-mail client and starts composing new e-mail with „To“-address filled. ”None” means there’s no e-mail address entered on customer’s data sheet. Invoice commands Shortcuts on “Invoices” main window: 31 To fasten your invoice making process, select a client in main the table and click on „Invoice command“ shortcut you need. Payroll Payroll enables to divide the sum of an invoice according to measured activity times, purchased services or/and account managers etc enabling clear and precise overview of employee turnover. Every user has an access to view or edit payrolls according to user privileges: 1) view personal payrolls, 2) view other people’s payrolls or 3) edit payrolls. To use Payroll, open the invoice and click on the tab: 32 Click on “Add row” opens a pop-up menu with options “Invoice expenses” and “Other expenses”: Add a row “Invoice expenses” to attach direct costs of the invoice to the payroll. These are the activities wich activity type (see also on page 44) is set as expense. Add a row “Other expenses” to add expenses manually Click on “Add employees” opens a pop-up menu with options “Worked on this invoice” and “Customer Manager”: To delete a row, mark rows and press Click button to print the table Click button to save the table to Excel button 33 The structure of the table The rows of the table At first there is one row header in the table – “Remainder”: You can add two more – “Expenses” and/or “Payrolls”: The sum of the invoice will be divided on the basis of “Expenses” and “Payrolls”. “Remainder” shows always the sum, which is left (undivided) from the total sum of the invoice. 34 The columns of the table There are ten columns in the table: confirmed, payroll date, employe, comments, duration, invoice sum, % of row, % of invoice, total, %. Type or add the data of values in columns. Please note! There are separate rows for “% of row” and “% of invoice”. Mark the “payroll date” manually if it is different from the invoice date. Payroll settings To save payroll settings go to Tools > Payroll. Prices You can add prices according to activity type, customer, case, employee, employee level or the combination of them. You can also use different currencies. Price on activity timing While entering data, LawTime offers most accurate price according to this case. For example, if there is no price to a case, LawTime offers you a price set to a customer. You can also choose an implied price (e.g. even if there is a price set to a customer, you can choose a prise set to bureau). You can also enter the price manually, i.e. it’s not mandatory to choose the price from database. Adding new price To add new price, do one of the following: 1. Subdivison “Prices” in LawTime main window. Click “New” to add data. 2. Add/open price data, by a click on -button in data entry window. 3. Click on Customer, Case, Employee data window subdivision ”prices”. Window for adding a new price You can add the following: total value currency parameters of price (used for customers, cases, employees, employee levels) 35 Make your selections and the ”Name”-field will be automatically filled by LawTime. If necessary, enter the Name manually. To see the price in all options, matching to these parameters, select ”all”. Combine price parameters. For example, you can make different prices, if: the customer is “The University of Tartu”, type of activity is “strategic planning” the customer is “The University of Tartu”, employee level is “lecturer” employee level is lawyer all parameters are marked as “all” (base rates of activity types) While entering data, LawTime offers a price closest to selected parameters. You can delete price only if there’s no work saved using this price. Untick ”Active” will remove the price from selections. Subdivision of prices on customer and other windows You can see overviews of currently active prices in customer, cases, employee, employee level and activity type windows. Prices in the table are sorted in ascending order from specific to general. General prices are displayed in grey colour. For example, you see base rates and employee level prices in grey colour, customer and case specific prices are displayed in black. To see only currently active prices, tick the ”Active” checkbox, untick to see all. Choose ”Activity type” you want information about (at first you will see activity type set in Tools > Options > Program settings > default activity type). 36 Prices in LawTime main window Prices in LawTime main window display the table of all prices. We recommend you to use customer, case etc window to view the specific price you’re interested in. To get the best overview of the table, use one of the following: Sort, group, filter (see also on page 10) Selection panel on the left-side of the main window. See also below. 37 Price settings Selections in the left-side panel of the main window: View - make a personal view using parameters you need Quick selections to return to base rates Filters to define prices: activity type, currency, customer, case, employee level, employee Active price: Tick the ”Active” checkbox ( ) to view only currently active prices. Untick the ”Active” checkbox ( ) to view only currently inactive prices. Mark the ”Active” checkbox grey to view all prices. ”Only applied strictly to selection” checkbox helps you to specify filter selections: 1) to view prices of specific customer/case/etc and also general prices 2) to view prices only of specific customer/case etc ”Display” shows the table according to selections 38 Administration Employees Adding a new employee and viewing data To add/open employee data, do one of the following: 1. LawTime main window, subdivision ”Administration” > “Employees”. Click “New” to add new employee. Click on employee name to open data. 2. To add/open employee data , click on choice “employee”. -button in any place LawTime offers a Employee data General General data of employee, user name, employee level etc. Tick in ”Active” checkbox shows employee in selections. By default, table shows only active employees. To see all employees, click on column ”Active” and then tick the checkbox ”All”. 39 Privileges Specific privileges of employee. Privileges set on employee window are superior to employee level privileges. Prices List of prices attached to employee. See also Employee levels on page 39 User privileges on page 41 Prices on page 32 Employee levels Adding a new employee level and viewing data Employee level represents a group or role of employees (e.g. attorney at law, accountant). To open employee level data, do one of the following: 1. LawTime main window, subdivision ”Administration” -> “Employee levels”. Click “New” to add new employee level. Click on employee level name to open data. 2. To add/open employee level data , click on choice “employee level”. -button in any place LawTime offers a Employee level data General Name, short name, comments. Privileges Employee level oriented privileges. These are default privileges for entire group of this employee level. Define specific privileges in employee window. Prices List of prices attached to employee levels. See also Employees on page 39 Prices on page 32 40 See user privileges below Privileges Privileges on two levels Privileges are either allowed or denied, employee cannot enter or change privileges. User privileges are set on two levels: Employee level oriented privileges. These are default privileges for entire group of this employee level. E.g. employee level Partner is allowed to view and edit other user’s activities. Specific privileges of employee. E.g. employee level Partner is allowed to view and edit other user’s activities, but you can untick the checkbox (in privilege window) and this particular Partner does not have this privilege anymore. 41 Various privileges List of all user privileges. Colours of privileges LawTime uses different colours for different privilege levels to simplify administration and give the best overview. Privileges, allowed on currently open unit (employee level or particular employee), are displayed in regular font style. 42 Privileges, allowed to particular employee level, are displayed in grey colour. These are inherited privileges. Privileges, changed after last saving, are displayed in bold black. Privileges, changed from inherited to different and then back to inherited, are displayed in bold grey colour. See also Employees on page 39 Employee levels on page 40 Divisions Divisions - subdivisions, used to differentiate customers, cases, employees and invoices. Title ”division” is changeable (e.g. department, area, team, subject field etc). To activate ”divisions” go Tools > Options > Divisions > tick in checkbox. You can also change the title here. You can see divisions in customer, case etc selections after activating it. Add divisions in LawTime main window table by clicking . 43 Adding new division and viewing data To add/open division data, do one of the following: 1. LawTime main window, subdivision ”Administration” > “divisions”. Click “New” to add new division. Click on division name to open data. 2. To add/open division data , click on “division”. -button in any place LawTime offers a choice Activity type Adding new activity type and viewing data Activity type is used to describe different jobs (wages, phonecall etc). To add/open activity type data, do one of the following: 1. LawTime main window, subdivision ”Administration” > “activity types”. Click “New” to add new activity type. Click on activity type name to open data. 2. To add/open activity type data , click on choice “activity type”. -button in any place LawTime offers a Activity type data General Name, short name, measurement, unit, comments, rounding on timing, rounding on invoices. 44 Accounting Type (service, expense, others), VAT, other parameters. Prices List of prices attached to activity type. Currencies Adding new currency and viewing data To add/open currency data, do one of the following: 1. LawTime main window, subdivision ”Administration” -> “currencies”. Click “New” to add new currency. Click on currency name to open data. 2. To add/open currency data , click on “currencies”. Currency data General Code, name, current rate, comments. Name the base currency and fix the rate to 1. 45 -button in any place LawTime offers a choice Options To open settings click ”Tools” > ”Options”. Fields you see on Settings window come from employee (level?) privileges. Regular user view in My Settings: My Settings: 1) User interface language 2) Timer functions 3) Main window display Program settings: 1) SQL based user authentication 2) Allow password saving 3) Enable tasks 4) Allow price on activity timing 46 5) Default currency 6) Default activity type 7) Error reporting – program error condition is created to test error reporting. WARNING: do not click ”Close program” on error window because LawTime will then be closed and unsaved changes will be lost Table printing – margins (mm), styles (editable) Invoice settings: 1) Invoice numbers (can be edited; take automatically from number series). Choose if the invoice number must be filled on printing, saving or confirming. 2) Invoice calculations – duration format, default VAt %, total rounding Comment templates - enter the template texts displayed in activity window’s comment field. Choose the language of texts Payroll – default texts on new payroll rows Divisions: 1) Tick the checkbox to use divisions 2) Title texts – language, singular, plural, short name. Invoice texts – default text rows for new invoices Invoice printing: 1) Language default 2) Layouts 3) Letterheads (header logo and footer texts) Database settings Click ”Tools” > ”Database settings” to open the window. Enter the name of a server and database Authentication – windows integrated or SQL server (user will be promted for password) After entering your settings, test the connection. Click “OK” to save the settings 47