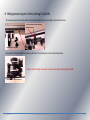
1
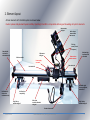
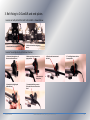
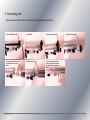
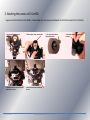
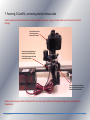
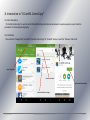
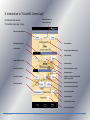
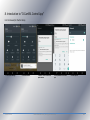
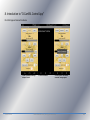
Mechatronics for Everyone
D-CamSRL User Manual
Version:
1.0
Date:
10/01/2015
Prepared by: engineer S. Bartkevičius
Please read this manual carefully. D-CamSRL is professional complex equipment and having no basic knowledge
might lead to incorrect operation or damage to device and its parts.
2015.04.24
MB Dukubu 2015, all rights reserved
1
Content
1.
2.
3.
4.
5.
6.
7.
Introduction and short description
Element layout
Belt fixing to D-CamSRL and end-plates
Connecting rails
Attaching the camera to D-CamSRL
Hiding excessive part of belt, locking D-CamSRL
Powering D-CamSRL, connecting shutter-release cable
8. Introduction to “D-CamSRL Controll App”
2015.04.24
3
4
5
6
7
8
9
10-14
MB Dukubu 2015, all rights reserved
2
1. Introduction and short description
D-CamSRL (V1.0) is an automated photo-film camera slider-rotator. D-CamSRL is a great device for your mobile photo and movie
laboratory. Sliding and rotation simultaneously enables covering wide angles (ex. making of 360°panoramas), precise and quick
camera positioning, object following and so on.
D-CamSRL is easily detachable from its rail, compact and light, convenient to pack if you are going on a trip. 0,5 and 1,0 m railbases can be extended up to 4 times simply adding additional rails to them.
D-CamSRL uses software “D-CamSRL Control” deployed on your Android device and communicates over Bluethooth.
For more product information, please refer to www.dukubu.lt.
Main D-CamSRL V1.0 characteristics:
vertically (90°) carried weight:
device weight (w/o rail):
standard rail length:
camera platform:
drives and power supply:
motion, speeds, modes:
rail end sensors:
control:
battery voltage:
shooting:
all strangulations:
legs for putting on the ground:
mounting on tripod:
fixing to rail:
2015.04.24
1,0 kg;
1,5 kg;
0,50 or 1,00 m; extension for up to 4x;
integrated, 1/4“ thread, tilt - 0-90°;
stepper-belt, 6 VDC battery;
sliding-step (0,11-50 mm/s); rotational-step (0,000625-0,1 rot/s);
yes, device slide stops, rotation goes on;
over Bluetooth, any Android smart-device;
shown in App;
from smart-device (manual/automatical every X s with Y s for exposure);
handles (no screw drivers needed);
yes, movable over the rail length, folding-up;
yes, 1/4“, movable over the rail length;
yes.
MB Dukubu 2015, all rights reserved
3
2. Element layout
All main elements of D-CamSRL system are shown below:
Caution: please study element layout carefully. Operating D-CamSRL is not possible without good knowledge of system’s elements.
Rotator motor
with gear
Quick-release
camera holder
with screws
Tilt fixing
screws (2 not in
this picture)
End-plate left.
Unscrew for
maintenance only
Slider motor
with gear
Rail base module
Power supply
connector
End switch right
End switch left
Belt holder left.
Unscrew for
maintenance only
Shutter release
cable connector
End-plate right.
Unscrew to add
rail module
Belt holder right.
Unscrew to tighten,
take-off belt
Belt fixer (not
compulsory)
Leg1. Fold-up,
movable along rail
Rail, tripod
connector. Movable
along rail
Leg2. Fold-up,
movable along rail
Shutter-release cable
2015.04.24
MB Dukubu 2015, all rights reserved
4
3. Belt fixing to D-CamSLR and end-plates
How to correctly attach the belt to D-CamSRL is shown below:
1. Have D-CamSRL mounted on rail
2. Put the belt on idlers and gear as
shown
How to fix end-plates to rail is shown below:
1. Screw end-plate right to rail.
Do not use excessive force!
2. Make sure fixing element is in
upper position
4. Place the belt onto external
belt-bed
5. Turn fixing element into its
lower position
3. Untighten beltfixing screw
6. Stretch the belt tightly and
hold with hand
2015.04.24
7. Screw the belt fixing screw to
fix the belt. Do not use excessive
force!
MB Dukubu 2015, all rights reserved
5
4. Connecting rails
Sequence to connect/disconnect rail elements is shown and explained below:
1. Unscrew belt holder right
2. Take off belt
3. Unscrew end-plate right
5. Screw provided special screws
into rail elements, use screwdriver
6. Push rails to connect
7. Slide rail connector to finish.
Screw using special screw driver
until tight. Do not use excessive
force!
2015.04.24
MB Dukubu 2015, all rights reserved
4. Take off end-plate right
6
5. Attaching the camera to D-CamSRL
Sequence to attach camera to D-CamSRL is shown below (use same sequence backwards to detach the camera from D-CamSRL):
1. Unscrew quick-release camera
holder screw
2. Slide out quick-release camera holder
5. Slide quick-camera release holder with
camera back to its nest
6. Fix quick-release camera holder with
its screw
2015.04.24
3. Turn quick-release camera
holder upside-down
MB Dukubu 2015, all rights reserved
4. Attach the camera by turning the 1/4”
screw to it
7
6. Hiding excessive part of belt, locking D-CamSRL
To fix excessive part (not used with shortened rail) to the rail work according to instructions below:
2. Fix the belt not to fallout with fixing
element and screw
1. Hide belt in the rail groove
Lock/unlock D-CamSRL while transporting with the rail or having rail in non-horizontal position:
Caution: do not forget to unscrew the lock screw before operating D-CamSRL.
1. Lock/Unlock D-CamSRL with screw
2015.04.24
MB Dukubu 2015, all rights reserved
8
7. Powering D-CamSRL, connecting shutter-release cable
Caution: please pay close attention when connecting. Connecting power supply to shutter-release jack can lead to electronics
damage.
Connect shutter-release
cable to your camera
(camera in OFF mode)
Connect power supply (battery or
adapter) to D-CamSRL here (left).
Fix jack tightly using special thread
at the end of connector.
Connect shutter-release cable here
(right). Fix jack tightly using special
thread at the end of connector.
Caution: please charge the battery fully before first use. Never keep the battery discharged for longer times, especially at low
temperatures.
2015.04.24
MB Dukubu 2015, all rights reserved
9
8. Introduction to “D-CamSRL Control App”
8.1. Short description
“D-CamSRL Control App” is used to control D-CamSRL sliding and rotational movements, respective speeds, as well as define
parameters for time-lapse photography.
8.2. Installation
Please refer to “Google Play” to install “D-CamSRL Control App” for “Android” devices: search for “dukubu” and install.
Open “Google Play”
Search for “dukubu”
Install D-CamSRL Control App
Select D-CamSRL Control App
2015.04.24
MB Dukubu 2015, all rights reserved
10
8. Introduction to “D-CamSRL Control App”
8.3. Main control window
“D-CamSRL Control App” screen:
Connect/disconnect to
chosen paired device
Choose from paired devices
Slide speed bar (steps/s)
Close application
Set to move left
Battery voltage (indication only)
Slide speed value
Rotate speed bar (steps/s)
Set to move right
Increase slide speed by 1 step/s
Set to rotate clock-wise
Rotate speed value
Press to run all actions
Configure to rotate in microstep mode
(1/8 of normal mode)
Set to rotate counter clock-wise
Take single snapshot
Increase rotate speed by 1 step/s
Press to stop all actions
Snapshot indicator
Set time-lapse cycle time
Set time-lapse still time
2015.04.24
MB Dukubu 2015, all rights reserved
11
8. Introduction to “D-CamSRL Control App”
8.4. Pair device (for the first time)
1. Go to “Quick Settings”
2015.04.24
2. Enable Bluetooth
3. Choose “HC-06” found in not
paired devices
4. Enter password “1234” and
pair
MB Dukubu 2015, all rights reserved
5. Check if paired
12
8. Introduction to “D-CamSRL Control App”
8.5. Start App and connect to device
1. Start “D-CamSRL Control App”
and press “Device”
2015.04.24
2. Select HC-06 device
3. Press “Connect” until “Device
connected” message appears
MB Dukubu 2015, all rights reserved
13
8. Introduction to “D-CamSRL Control App”
8.6. Run the device
-
set desired parameters for slide and rotation direction, slide and rotation speed, time-lapse cycle and still times;
press RUN/STOP for running and stopping D-CamSLR action or
press “Single snapshot” to take accidental snapshot, or start/stop recording when in video mode;
when in operation always press “STOP” before changing settings.
Caution: do not forget to unscrew the lock screw before operating D-CamSRL.
2015.04.24
MB Dukubu 2015, all rights reserved
14