1
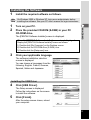
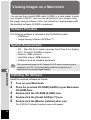
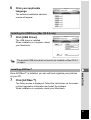
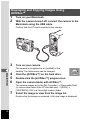
(PC Connection Manual)
Viewing Your Digital
Camera Images
On Your PC
Introduction
This booklet explains how to view the images you took with the
PENTAX Optio 33L on your PC. Keep this manual in a safe place.
Regarding copyrights
Images taken using the Optio 33L that are for anything other than personal
enjoyment cannot be used without permission according to the rights as
specified in the Copyright Act. Please take care, as there are even cases where
limitations are placed on taking pictures even for personal enjoyment during
demonstrations, industrial enterprise or as items for display. Images taken with
the purpose of obtaining copyrights also cannot be used outside the scope of
use of the copyright as laid out in the Copyright Act, and care should be taken
here also.
Regarding trademarks
• CompactFlash and CF are trademarks of SanDisk Corporation.
• PENTAX is a trademark of PENTAX Corporation.
• Optio is a trademark of PENTAX Corporation.
• All other brands or product names are trademarks of registered trademarks of
their respective companies.
• The USB driver uses software developed by inSilicon Corporation.
Copyright © 2002 inSilicon Corporation. All rights reserved.
• This product supports PRINT Image Matching II.
When used in combination, PRINT Image Matching II enabled digital still
cameras, printers and software help photographers to produce images more
faithful to their intentions.
Copyright 2001 Seiko Epson Corporation. All Rights Reserved.
PRINT Image Matching is a trademark of Seiko Epson Corporation.
The PC screenshots in this booklet may differ from your PC, depending on your
model.
2
Contents
Introduction..............................................................................................2
Contents ..................................................................................... 3
Viewing Images on a Windows PC
4
Software Provided ..................................................................... 4
System Requirements ............................................................... 4
Installing the Software............................................................... 5
Installing the USB Driver ..................................................................5
Installing ACDSee™.........................................................................7
Installing ACD photostitcher .............................................................7
Displaying and Copying Images Using ACDSee™ ................. 8
Panorama Image Stitching with ACD photostitcher............... 9
Disconnecting your Camera from your PC............................ 12
Windows 2000/Me ..........................................................................12
Windows XP ................................................................................... 13
Windows 98/98 SE .........................................................................13
Viewing Images on a Macintosh
14
Software Provided ................................................................... 14
System Requirements ............................................................. 14
Installing the Software............................................................. 14
Installing the USB Driver (Mac OS 8.6 only) ..................................15
Installing ACDSee™....................................................................... 15
Displaying and Copying Images Using ACDSee™ ............... 16
Disconnecting your Camera from your Macintosh............... 17
3
Viewing Images on a Windows PC
You can use the provided USB cable (I-USB2) or a card reader to
transfer your images to the PC, and you can edit and print your images
using the image viewing software. Here, the method for viewing images
with the provided software (S-SW8) is explained.
WINDOWS
Software Provided
The following software is included in the CD-ROM (S-SW8) provided.
• USB driver
• Image viewing software (ACDSee™)
• Panorama software (ACD photostitcher)
ACD photostitcher is only for the English version and the
Japanese version.
System Requirements
• OS:
Windows 98/98 SE/Me/2000
Windows XP Home Edition/Professional
• CPU: Pentium or higher recommended
• Memory: 64MB minimum
• Hard Disk space: 15MB minimum
• USB port must be standard equipment
To play movie pictures, you need DirectX 8.0 or higher and Media
Player (standard equipment with your OS), or QuickTime 3.0 or higher.
(Media Player alone is sufficient on Windows Me/XP)
You can download DirectX and QuickTime from the following websites.
www.microsoft.com/japan/directx
www.apple.co.jp/quicktime
• The software cannot be used on Windows 95/NT.
• We recommend using the AC Adapter D-AC5 when connecting your
camera to your PC. Your image data could be corrupted if your
batteries run out during image transfer.
4
Installing the Software
1
Install the required software as follows.
On Windows 2000 or Windows XP, login as an administrator before
installing the software. See your PC user's manual for login instructions.
Turn on your PC.
Place the provided CD-ROM (S-SW8) in your PC
CD-ROM drive.
The [PENTAX Software Installer] screen is displayed.
WINDOWS
1
2
When the [PENTAX Software Installer] screen is not displayed
Display the [PENTAX Software Installer] screen as follows:
1) Double-click [My Computer] on the Desktop screen.
2) Double-click the CD-ROM drive (S-SW8) icon.
3) Double-click the [Setup.exe] icon.
3
Click your applicable language.
The software installation selection
screen is displayed.
You can choose a languages from the
following: English, French, German,
Spanish, Italian and Japanese.
Installing the USB Driver
4
Click [USB Driver].
The Setup screen is displayed.
Follow the instructions on the screen
to install the software.
5
Click [Finish].
After the setup screen closes, reboot
your computer.
5
6
With the camera turned off, connect the camera to the
PC using the USB cable.
Confirm that the CF card is inserted in the camera.
WINDOWS
7
Turn on the camera.
The desktop screen will display [Found new hardware] (Windows XP)
or [New Hardware Found] (Windows 98/98SE/2000), and the USB
driver will be installed.
8
Double-click [My Computer] on the Desktop screen.
When the installation is complete, the camera is recognized as a
[Removable disk]. Open [My Computer] and confirm that [Removable
Disk] is displayed.
In Windows XP, if the CF card has a volume label, the volume label
name will be displayed instead of [Removable disk]. A new CF card
unformatted on the camera may show the manufacturer name or model
number.
6
Installing ACDSee™
Once ACDSee™ is installed, you can edit and manage your pictures on
your PC.
Follow steps 1 through 3 on page 5 to display the [PENTAX Software
Installer] screen.
4
Click [ACDSee™].
Installing ACD photostitcher
WINDOWS
The Setup screen is displayed. Follow the instructions on the screen to
input registration information and install the software. When installation
is complete, reboot your computer.
ACD photostitcher is only for the English version and the Japanese
version.
Once ACD photostitcher is installed, you can view the pictures you took
in Panorama Assist mode as panorama pictures on your PC.
Follow steps 1 through 3 on page 5 to display the [PENTAX Software
Installer] screen.
Confirm that ACDSee™ is installed before installing ACD photostitcher.
4
Click on [ACD photostitcher].
The Setup screen is displayed. Follow the instructions on the screen
to input registration information and install the software.
When installation is complete, the [PENTAX Software Installer]
screen is displayed again. Click [Exit] to exit the program.
7
Displaying and Copying Images Using
ACDSee™
1
2
Turn on your PC.
With the camera turned off, connect the camera to the
PC using the USB cable.
Confirm that the CF card is inserted in the camera.
WINDOWS
3
Turn on your camera.
ACDSee™ will start automatically, and display an image list. Proceed
to step 5.
4
If ACDSee™ does not start
automatically, double-click
the ACDSee™ icon on the
Desktop screen.
The camera is recognized as a
[Removable Disk] in [My Computer].
The camera images are in the [My
Computer] → [Removable Disk] (or
volume label name if the CF card has one) → [DCIM] → [XXXPENTX]
(XXX is a three-digit number) folder.
An image list is displayed.
5
Select an image to view from the image list.
Double-click the image you selected. A full-size image is displayed.
8
6
Copy images to your PC.
Select an image to copy from the image list, and copy it to the
destination folder. For details on copying procedures, see the user’s
manual for your PC.
You can copy images on Explorer as well, which is bundled with
Windows.
ACD photostitcher is only for the English version and the Japanese
version.
With ACDSee™ and ACD photostitcher installed, you can panorama
stitch the images you took in Panorama Assist mode.
The folder and image names displayed on the explanatory screenshots
will differ according to the setup of your PC.
1
2
WINDOWS
Panorama Image Stitching with ACD
photostitcher
Run ACDSee™.
Select the images for panorama stitching from the
image list.
Press the [Ctrl] key on the keyboard while clicking on pictures to
select multiple images.
After selecting the images, click the [ACD photostitcher] button on the
toolbar.
The [ACD photostitcher] button is not enabled if two or more images
are selected.
2 [ACD photostitcher] button
1 Select images
9
3
Correct the image positioning.
ACD photostitcher starts, and the selected images are displayed in
panorama format.
Move the mouse pointer onto the image. It changes into a e symbol.
Hold down the left mouse button and drag the images to adjust the
stitching position.
When the position is adjusted, click the [STITCH] button.
WINDOWS
2 Click the
[STITCH] button.
1 Click and drag to
adjust position
4
Select the stitching method.
You can choose the stitching method from [Big Plane] and [Cylinder].
Here, you will create a flat panorama. Click the [Big Plane] button.
A confirmation message is displayed. Click OK.
Click [Big Plane].
10
5
Trim the image.
Move the mouse pointer onto an image. It changes into a symbol.
Hold down the left mouse button and drag the dotted lines to adjust
the image trimming position.
When the position is adjusted, click the [Trimming] button.
1 Trim the image.
6
WINDOWS
2 Click the [Trimming]
button.
Save the image.
After confirming your trimming, click the [Save] button to save the
image. To cancel the trimming, click the [Cancel Trimming] button.
When you are done, close ACD photostitcher and ACDSee™.
Click the [Save] button.
[Cancel Trimming] button
11
Disconnecting your Camera from your PC
Windows 2000/Me
1
Double-click the [Unplug or
eject hardware icon] in the
task bar recognized area.
WINDOWS
The [Remove Hardware] screen will
appear.
2
Confirm that [Pentax USB
Disk Device] is selected and
click [Stop].
The [Stop Hardware Device] screen
will appear.
3
Confirm that [Pentax USB
Disk Device] is selected and
click [OK].
A message will appear.
4
5
12
Click [OK].
Turn off the camera and
disconnect the USB cable
from your camera and your PC.
Windows XP
Double-click the [Safely
Remove Hardware] icon in the
task bar recognized area.
2
Click [PENTAX USB DISK
Device] and click [Stop].
3
Click [PENTAX USB DISK
Device Drive] and click [OK].
4
When a message is displayed
permitting removal, turn the
camera off and disconnect the
USB cable from your camera
and PC.
WINDOWS
1
Windows 98/98 SE
There is no hot plug icon in Windows 98/98 SE. To disconnect the
camera, simply turn off the camera and disconnect the USB cable.
13
Viewing Images on a Macintosh
You can use the provided USB cable (I-USB2) or a card reader to send
your images to the PC, and you can edit and print your images using
the image viewing software. Here, the method for viewing images with
the provided software (S-SW8) is explained.
Software Provided
The following software is included in the CD-ROM provided.
• USB driver
• Image viewing software (ACDSee™)
System Requirements
•
•
•
•
•
OS: Mac OS 8.6 or higher (requires QuickTime 4.0 or higher)
CPU: PowerPC 266MHz or higher
Memory: 8MB minimum
Hard Disk space: 6MB minimum
USB port must be standard equipment
We recommend using the AC Adapter D-AC5 when connecting your
camera to your PC. Your image data could be corrupted if your
batteries run out during image transfer.
MACINTOSH
Installing the Software
Install the required software as follows.
1
2
Turn on your Macintosh.
3
4
5
Double-click the CD-ROM (S-SW8) icon.
Place the provided CD-ROM (S-SW8) in your Macintosh
CD-ROM drive.
Double-click the [Install ACDSee™] icon.
Double-click the [Master Installer] alias icon.
The [PENTAX Software Installer] screen will appear.
14
6
Click your applicable
language.
The software installation selection
screen will appear.
Installing the USB Driver (Mac OS 8.6 only)
7
Click [USB Driver].
The USB driver is installed.
When installation is complete, reboot
your Macintosh.
The provided USB driver does not need to be installed on Mac OS 9.0
or higher.
Installing ACDSee™
7
Click [ACDSee™].
The Setup screen is displayed. Follow the instructions on the screen
to input registration information and install the software.
When installation is complete, reboot your Macintosh.
MACINTOSH
Once ACDSee™ is installed, you can edit and organize your pictures
on your PC.
15
Displaying and Copying Images Using
ACDSee™
1
2
Turn on your Macintosh.
With the camera turned off, connect the camera to the
Macintosh using the USB cable.
Confirm that the CF card is inserted in the camera.
3
Turn on your camera.
The camera is recognized as an [untitled] on the
desktop. The folder name can be changed.
MACINTOSH
4
5
6
Click the [ACDSee™] on the hard drive.
Double-click the [ACDSee™] program icon.
Open the camera folder with ACDSee™.
The camera images are in the [My Computer] → [Removable Disk]
(or volume label name if the CF card has one) → [DCIM] →
[XXXPENTX] (XXX is a three-digit number) folder.
7
Select the image to view from the image list.
Double-click the image you selected. A full-size image is displayed.
16
8
Copy images to your Macintosh.
See your Macintosh user’s manual for how to copy or move files.
Please copy images to your Macintosh before editing them.
If the CF memory card has a volume label, the volume label name will
be displayed instead of “untitled”. A new CF card unformatted on the
camera may show the manufacturer name or model number.
Disconnecting your Camera from your
Macintosh
1
Drag [untitled] (or the volume label name on the CF
card) to your trash.
2
Disconnect the USB cable from your camera and your
Macintosh.
MACINTOSH
17
Memo
Memo
PENTAX Corporation
2-36-9,Maeno-cho, Itabashi-ku, Tokyo 174-8639,
JAPAN
(http://www.pentax.co.jp/)
PENTAX Europe GmbH (European Headquarters)
Julius-Vosseler-Strasse, 104, 22527 Hamburg,
GERMANY
(HQ - http://www.pentaxeurope.com)
(Germany - http://www.pentax.de)
PENTAX U.K. Limited
PENTAX House, Heron Drive, Langley, Slough, Berks
SL3 8PN, U.K.
(http://www.pentax.co.uk)
PENTAX France S.A.S.
12/14, rue Jean Poulmarch, 95106 Argenteuil Cedex,
FRANCE
PENTAX Benelux B.V.
(for Netherlands)
Spinveld 25, 4815 HR Breda, NETHERLANDS
(http://www.pentax.nl)
(for Belgium & Luxembourg)
Weiveldlaan 3-5, 1930 Zaventem, BELGIUM
(http://www.pentax.be)
PENTAX (Schweiz) AG
Widenholzstrasse 1 Postfach 367 8305 Dietlikon,
SWITZERLAND (http://www.pentax.ch)
PENTAX Scandinavia AB P.O. Box 650, 75127 Uppsala, SWEDEN
(http://www.pentax.se)
PENTAX U.S.A., Inc
35 Inverness Drive East, Englewood, Colorado 80112,
U.S.A.
(http://www.pentax.com)
PENTAX Canada Inc.
3131 Universal Drive, Mississauga, Ontario L4X 2E5,
CANADA
(http://www.pentaxcanada.ca)
http://www.digital.pentax.co.jp
• Printed on recycled paper
• Specifications and external dimensions are subject to change without notice.
57264
Copyright © PENTAX Corporation 2003
01-200302 Printed in Japan