1
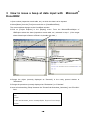
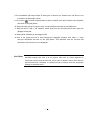
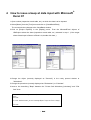
No.99MAM015B1
SERIES No.264
IT-005D
IT-012U
Input
Tool
SUPPLEMENT
Read this User's Manual thoroughly
before operating the instrument. After reading
retain it close at hand for future reference.
IMPORTANT
This user’s manual includes an application of the commercial software
(Microsoft® Excel) as a supplemental reference material for our product. Since
®
®
Microsoft Excel and Microsoft Windows are not Mitutoyo products, take note
that all troubles or questions about them will not be subjected to our support.
CONTENTS
1
How to assign the "Move to the right after input" macro to the toolbar with
®
Microsoft Excel 2002 ................................................................................................................2
2
How to assign the "Move to the right after input" macro to the toolbar with
®
Microsoft Excel 97 ....................................................................................................................5
®
3
How to issue a beep at data input with Microsoft Excel2002 .............................................................8
4
How to issue a beep at data input with Microsoft Excel97 ...............................................................10
®
- 1-
1
How to assign the "Move to the right after input"
macro to the toolbar with Microsoft ®Excel 2002
1.Initiate Excel 2002.
2.First create a macro. To do this, point to [Record Macro] in the [Tool] menu and execute
[Record New Macro].
3.The [Record Macro] dialog will appear. Do the following:
1)Enter "MoveRight" in the [Macro name] box. (This macro name can be specified optionally.
However, it should be the one that is identified when the macro is later assigned to the toolbar.)
2)Set the [Macro save destination] to [Personal macro book].
3)Click on the [OK] button.
The above operations will start the recording of the new macro.
4.Execute [Option] in the [Tool] menu.
5.When the [Option] dialog is displayed, click on the [Edit] tab and select the
[Move cell after
input] check box. (If this check box has already been checked, deselect it and then select it
again.)
6.Set the [Direction] to [Right] and click on the [OK] button.
7.Point to [Macro] in the [Tool] menu and click on the [Complete recording]
button. This
completes the recording of the new macro. The [Move to the right after input] macro has
been created.
8.To confirm the created macro, first execute [Refresh window] from the [Window] menu.
Then point to [Macro] in the [Tool] menu to execute [Macro]. Select "MoveRight" from the
opened [Macro] dialog and click on the [Edit] button. The macro is confirmed if the following
description has been made. (A date, etc., may be added before or after the command lines.)
Sub MoveRight()
Application.MoveAfterReturnDirection = xlToRight
End Sub
9.Create a toolbar and assign the macro to it. To do this, point to [Toolbar] in the [Display]
menu to execute [User Setup].
10.Click on the [Toolbar] tab in the [User Setup] dialog, and click on the [New] button.
11.Enter an appropriate name (for example, "ReturnDirection") in the [Toolbar name] field
and click on the [OK] button. The created bar area will be displayed.
- 2-
12.Click on the [Command] tab in the [User Setup] dialog. Click on [Macro] in the [Category]
13.Click on the dropped button icon with the right mouse button and point to
[Modify button
icon] in the short-cut menu that is displayed.Select an icon that it is appropriate for the "Move to
the right after input" function (for example, a colored arrow pointing to the right). If a suitable
icon for the function cannot be found in the displayed samples, execute [Edit Button Icon] to
edit the icon with the [Button Editor].
14.Click on the dropped button icon again with the right mouse button, click on [Name] from the
short-cut menu, and change "User Setup Button (&C)" to "Move to the right after input".
Execute [Register Macro] in the short-cut menu.
15.Select "MoveRight" and click on the [OK] button.
16.Click on the [Close] button in the [User Setup] dialog. This completes the creation of the
toolbar and the macro assignment. Since the created toolbar floats in the window, drag it to
an appropriate position on the toolbar. Hereafter, when this button is clicked on, the target cell
of input will move to the right after the Return key is pressed.
17.Exit Excel 2002. If "Save PERSONAL.XLS?" is displayed, always select [Yes].
* About other directions
If "move left", "move up", and "move down" macros are required, repeat the same procedure
using different macro names (step 3) and specifying the appropriate directions (step 6). Make
use of the toolbar and layout that has already been created.
- 3-
The personal macro book function of Excel 97 is used for the assignment method
described on this page. The personal macro book is saved under file name "Personal.xls"
CAUTIONS
in the XLStart folder in which Excel 97 was installed (usually, ¥MSOffice¥Excel¥XLStart).
This file will be automatically loaded when Excel 97 is initiated. Therefore, it is important
to note the following when initiating Excel 97.
1)If Excel is initiated by selecting an Excel data file from the [Open] dialog of the My
Computer, Explorer, or Office toolbar, the specified data file will be loaded and displayed
on the screen after the Personal.xls file is loaded. In this case the usual operations can
be performed.
2)If Excel is initiated from the [New] dialog of the Office toolbar, a new book named "Book1"
will be loaded and displayed on the screen after the Personal.xls file is loaded. In this
case the usual operations can be performed.
3)If Excel is initiated from "Microsoft Excel" in the start menu or from the Excel icon in the
desktop, the Personal.xls file will be loaded and displayed.If this is the case, input of data
to the worksheet will cause the Personal.xls file to be updated. Otherwise, if it is saved
under a
different file name, information about the macro will be also saved with it. To
avoid this, first execute [New] from the [File] menu and then open a new book named
"Book1".
It has recently been reported that Excel macro function viruses have been found. These
viruses are recognized to be very effective in infecting and damaging the Excel book
stored in the XLStart folder or other normal Excel data files. Excel macros should be used
carefully.
Note that damage caused by using the information on this page is the responsibility of the
user.
- 4-
2
How to assign the "Move to the right after input"
macro to the toolbar with Microsoft ®Excel 97
1.Initiate Excel 97.
2.First create a macro. To do this, point to [Record Macro] in the [Tool] menu and execute
[Record New Macro].
3.The [Record New Macro] dialog will appear. Do the following:
1)Enter "MoveRight" in the [Macro name] box. (This macro name can be specified optionally.
However, it should be the one that is identified when the macro is later assigned to the toolbar.)
2)Set the [Macro save destination] to [Personal macro book].
3)Click on the [OK] button.
The above operations will start the recording of the new macro.
4.Execute [Option] in the [Tool] menu.
5.When the [Option] dialog is displayed, click on the [Edit] tab and select the
[Move cell after
input] check box. (If this check box has already been checked, deselect it and then select it
again.)
6.Set the [Direction] to [Right] and click on the [OK] button.
7.Point to [Macro] in the [Tool] menu and click on the [Complete recording]
button. This
completes the recording of the new macro. The [Move to the right after input] macro has been
created.
8.To confirm the created macro, first execute [Refresh window] from the
[Window] menu. Then
point to [Macro] in the [Tool] menu to execute [Macro]. Select "PERSONAL.XLSlMoveRight"
from the opened [Macro] dialog and click on the [Edit] button. The macro is confirmed if the
following description has been made. (A date, etc., may be added before or after the
command lines.)
Sub MoveRight()
Application.MoveAfterReturnDirection = xlToRight
End Sub
9.Create a toolbar and assign the macro to it. To do this, point to [Toolbar] in the [Display] menu
to execute [User Setup].
10.Click on the [Toolbar] tab in the [User Setup] dialog, and click on the [New] button.
11.Enter an appropriate name (for example, "ReturnDirection") in the [Toolbar name] field and
- 5-
click on the [OK] button. The created bar area will be displayed.
12.Click on the [Command] tab in the [User Setup] dialog. Click on [Macro] in the [Category] list
box. Drag the [User Setup] icon in the [Command] list box on the right-hand side and drop it in
the newly created bar area.
13.Click on the dropped button icon with the right mouse button and point to
[Modify button
icon] in the short-cut menu that is displayed.Select an icon that it is appropriate for the "Move to
the right after input" function (for example, a colored arrow pointing to the right). If a suitable
icon for the function cannot be found in the displayed samples, execute [Edit Button Icon] to
edit the icon with the [Button Editor].
14.Click on the dropped button icon again with the right mouse button, click on [Name] from the
short-cut menu, and change "User Setup Button (&C)" to "Move to the right after input".
Execute [Register Macro] in the short-cut menu.
15.Select "PERSONAL.XLSlMoveRight" and click on the [OK] button.
16.Click on the [Close] button in the [User Setup] dialog. This completes the creation of the
toolbar and the macro assignment. Since the created toolbar floats in the window, drag it to
an appropriate position on the toolbar. Hereafter, when this button is clicked on, the target cell
of input will move to the right after the Return key is pressed.
17.Exit Excel 97. If "Save personal macro book?" is displayed, always select [Yes].
* About other directions
If "move left", "move up", and "move down" macros are required, repeat the same procedure
using different macro names (step 3) and specifying the appropriate directions (step 6). Make
use of the toolbar and layout that has already been created.
- 6-
The personal macro book function of Excel 97 is used for the assignment method
described on this page. The personal macro book is saved under file name "Personal.xls"
CAUTIONS
in the XLStart folder in which Excel 97 was installed (usually, ¥MSOffice¥Excel¥XLStart).
This file will be automatically loaded when Excel 97 is initiated. Therefore, it is important
to note the following when initiating Excel 97.
1)If Excel is initiated by selecting an Excel data file from the [Open] dialog of the My
Computer, Explorer, or Office toolbar, the specified data file will be loaded and displayed
on the screen after the Personal.xls file is loaded. In this case the usual operations can
be performed.
2)If Excel is initiated from the [New] dialog of the Office toolbar, a new book named "Book1"
will be loaded and displayed on the screen after the Personal.xls file is loaded. In this
case the usual operations can be performed.
3)If Excel is initiated from "Microsoft Excel" in the start menu or from the Excel icon in the
desktop, the Personal.xls file will be loaded and displayed.If this is the case, input of data
to the worksheet will cause the Personal.xls file to be updated. Otherwise, if it is saved
under a
different file name, information about the macro will be also saved with it. To
avoid this, first execute [New] from the [File] menu and then open a new book named
"Book1".
It has recently been reported that Excel macro function viruses have been found. These
viruses are recognized to be very effective in infecting and damaging the Excel book
stored in the XLStart folder or other normal Excel data files. Excel macros should be used
carefully.
Note that damage caused by using the information on this page is the responsibility of the
user.
- 7-
3 How to issue a beep at data input with
Excel2002
Microsoft®
1.Open a sheet (inspection record table, etc.) on which the data is to be inputted.
2.Select [Macro] from the [Tool] menu and click on [VisualBasicEditor].
The current window changes to the VisualBasic window.
3.Click on [Project Explorer] in the [Display] menu. From the MicrosoftExcelObject of
VBAProject select the sheet (inspection record table, etc.) selected in step 1. (If the target
sheet of data input is Sheet1 of Book1.xls, double click here.)
4.Change the object (currently displayed as "General") in the newly opened window to
"Worksheet".
5.Change the procedure (currently displayed as "Declaration") to "Calculate".
6.Insert a line describing "Beep" between the "Private Sub Worksheet_Calculate()" and "End Sub"
lines.
Private Sub Worksheet_Calculate()
beep
End Sub
Private Sub Worksheet_SelectionChange(ByVal Target As Excel.Range)
End Sub
- 8-
7.Exit VisualBasic (the target sheet of data input is returned to). 8.Select one cell which is not
included in the data input column.
9. Click on the
(function wizard) button to select "COUNT" from the [Function name (N)] field,
then click on the [OK] button.
10.Select the cells (range of cells) in which to input the data and click on the [OK] button.
11.With the cells in step 1 still selected, select [Cell] from the [Format] menu then select the
[Display format] tab.
12.Select [User definition] in the category field.
13.Click in the [Type] text box to clear (delete) the displayed contents, then enter ";;;" using
one-byte characters and click on the [OK] button. This operation sets the cell that was
selected in step 5 so that it is not displayed.
CAUTIONS • To apply the same format to multiple inspection sheets, create a sheet with the above
described settings and save it as an original. Each time an actual inspection is
performed, load this original sheet and save it under a different control name after the
inspection has been completed. If a different format is required, make the appropriate
settings as described above.
- 9-
4
How to issue a beep at data input with Microsoft®
Excel 97
1.Open a sheet (inspection record table, etc.) on which the data is to be inputted.
2.Select [Macro] from the [Tool] menu and click on [VisualBasicEditor].
The current window changes to the VisualBasic window.
3.Click on [Project Explorer] in the [Display] menu. From the MicrosoftExcel objects of
VBAProject select the sheet (inspection record table, etc.) selected in step 1. (If the target
sheet of data input is Sheet1 of Book1.xls, double click here.)
4.Change the object (currently displayed as "General") in the newly opened window to
"Worksheet".
5.Change the procedure (currently displayed as "Declaration") to "Calculate".
6.Insert a line describing "Beep" between the "Private Sub Worksheet_Calculate()" and "End
Sub" lines.
Private Sub Worksheet_Calculate()
beep
End Sub
Private Sub Worksheet_SelectionChange(ByVal Target As Excel.Range)
End Sub
- 10-
7.Exit VisualBasic (the target sheet of data input is returned to).
8.Select one cell which is not included in the data input column.
9. Click on the
(function wizard) button to select "COUNT" from the [Function name (N)] field,
then click on the [Next] button.
10.Select the cells (range of cells) in which to input the data and click on the [Finish (F)] button.
11.With the cells in step 1 still selected, select [Cell] from the [Format] menu then select the
[Display format] tab.
12.Select [User definition] in the category field.
13.Click in the [Type] text box to clear (delete) the displayed contents, then enter ";;;" using
one-byte characters and click on the [OK] button. This operation sets the cell that was
selected in step 5 so that it is not displayed.
CAUTIONS • To apply the same format to multiple inspection sheets, create a sheet with the above
described settings and save it as an original. Each time an actual inspection is
performed, load this original sheet and save it under a different control name after the
inspection has been completed. If a different format is required, make the appropriate
settings as described above.
- 11-
Mitutoyo Corporation
20-1, Sakado, 1-chome, Takatsu-ku, Kawasaki, Kanagawa 213-0012, Japan
Phone: 81 (044) 813-8230 Fax: 81 (044) 813-8231
URL: http://www.mitutoyo.co.jp