Transcript
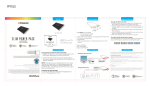
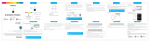
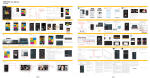
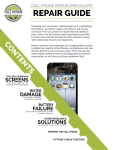
IN THE BOX
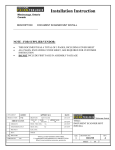
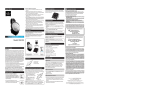
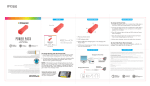
LOCATION OF CONTROLS
Front
1
2
3
4
Side
CHARGING THE EARBUDS
1. Plug the small end of the Micro USB charging cable into the Micro USB
charging port on the earbuds.
2. Plug the large end of the Micro USB charging cable into a USB port on
your computer or other USB charging device.
3. The LED charging indicator light is RED when charging. It will shut off
when the earbuds are fully charged.
Wireless Sport Earbuds
WIRELESS SPORT EARBUDS
{ WITH IN -LIN E MIC }
PB T91 | USER MAN UAL
W IR ELESS SPO R T EA R B U D S
{ W IT H IN - L IN E M IC }
PBT91 | USER MANUAL
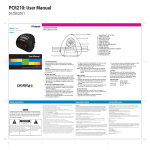
Questions?
Need some help?
Questions?
Need some help?
This manual will help you
enjoy your new product
Micro USB Charging Cable
This manual will help you
enjoy your new product
If you still have questions,
call our help line:
or visit us at:
1-877-768-8481
Click on “Product Support”
www.southerntelecom.com
If you still have questions,
call our help line:
or visit us at:
1-877-768-8481
Click on “Product Support”
www.southerntelecom.com
User Manual
USING THE EARBUDS
Powering ON/OFF
• Long press the [ ] button to turn ON and OFF.
• Check that your Bluetooth features are turned ON. If you have already
paired the earbuds with a Bluetooth enabled device, it will automatically
connect.
• If you are using the earbuds for the first time, go to the “PAIRING THE
EARBUDS” section of this User Manual, and pair the earbuds to your
desired Bluetooth device.
Adjusting the volume
• Long press the [ + ] button to increase the volume.
• Long press the [ - ] button to decrease the volume.
PLR IP Holdings, LLC, its licensees and affiliates, fully support all electronic waste initiatives. As responsible
stewards of the environment, and to avoid violating established laws, you should properly dispose of this product
in compliance with all applicable regulations, directives or other governances in the area where you reside. Please
check with local authorities or the retailer where you purchased this product to determine a location where you can
appropriately dispose of the product.
• Consult the dealer or an experienced radio/TV technician for help.
• Connect the equipment into an outlet on a circuit different from that to which the receiver is connected.
• Increase the separation between the equipment and receiver.
Answering/ending a call
• To answer a call, quick press the [ ] button.
• To end a call, quick press the [ ] button.
5
1. [ + ] button:
• Long press = increase volume
• Quick press = skip to previous song
• Double press = disconnect Bluetooth
2. [ ] button:
• Long press = power ON/OFF
• Quick press = play/pause; answer/end call
3. [ - ] button:
• Long press = decrease volume
• Quick press = skip to next song
4. LED indicator light
5. Micro USB charging port
PLAYING MUSIC
To enjoy wireless music on your Bluetooth earbuds, make sure you are
connected to a Bluetooth enabled device (see “PAIRING THE EARBUDS”).
Once connected, press PLAY on your Bluetooth device. When playback has
begun, control the music and volume with your connected device or the
buttons on the earbuds.
Play/Pause
• Quick press the [ ] button to pause the music.
• To resume music playback, quick press the [ ] button again.
Skipping Songs
• Quick press the [ + ] button to skip to the previous song.
• Quick press the [ - ] button to skip to the next song.
Adjusting the volume
• Long press the [ + ] button to increase the volume.
• Long press the [ - ] button to decrease the volume.
Micro USB
Charging Port
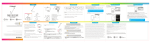
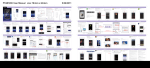
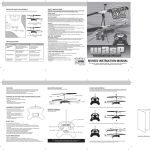
PAIRING THE EARBUDS
1. Long press the [ ] button until a tone is heard and the LED Bluetooth
indicator light quickly flashes BLUE.
2. Keep the earbuds and Bluetooth enabled device within 3 feet of each other
during the pairing process.
3. Set your Bluetooth enabled device to search for Bluetooth devices.
Computer
On
Discoverable:
Yes
1. Make sure your Bluetooth device supports A2DP profile.
2. Turn up the volume on your Bluetooth device.
3. You may have to unpair the earbuds, then re-pair to your device.
My Bluetooth device is not able to pair with the
Bluetooth earbuds.
1. Long press the [ ] button until a tone is heard and the LED Bluetooth
indicator light quickly flashes BLUE.
2. Keep your Bluetooth earbuds and Bluetooth enabled device within 3 feet
of each other during the pairing process.
3. Check that YOUR device’s Bluetooth feature is turned ON.
4. Try repeating the pairing process. See “PAIRING THE EARBUDS.”
5. Make sure the earbuds are fully charged.
Searching for devices
1 found
Stop
Paired Devices
On an iPhone
• Go to SETTINGS > BLUETOOTH (Make sure Bluetooth is turned ON)
Bluetooth
PBT91
4. When the Bluetooth enabled device finds the earbuds, select “PBT91”
from the list of found devices.
5. If required, enter the password 0000. Select OK or Yes to pair the two units.
6. After a successful registration, a tone will be heard and the LED Bluetooth
indicator light will flash BLUE slowly.
On an Android Phone
• Go to SETTINGS > BLUETOOTH > MENU > Search for devices
(Make sure Bluetooth is turned ON)
12:12 PM
Bluetooth settings
Bluetooth
NOTE: If you would like to connect the earbuds to another device, you must
unpair them from the currently paired device first. In your device’s Bluetooth
settings, select “PBT91”, then select “unpair”. When the earbuds have been
unpaired, they automatically go into pairing mode again.
Bluetooth
ON
Device name
PBT91
Paired
Visible
Make device visible
Search for devices
Now discoverable
Bluetooth devices
I can pair the Bluetooth earbuds with my Bluetooth
device, but I cannot hear any music.
*Empty *
3G
Bluetooth:
Add New Device
PBT91
TROUBLESHOOTING
Bluetooth: Enabled
Paired Devices:
Bluetooth
Devices
Make sure you charge the earbuds for at least 3 to 4
hours before using it for the first time.
On other Cell Phones/Devices
• Review the instruction manual that came with your phone/device.
On a Blackberry
• Go to SETTINGS/OPTIONS > BLUETOOTH
• Enable BLUETOOTH
If there are no paired devices in range when the earbuds are
turned on, it will go into pairing mode automatically. If a paired
device is in range, the earbuds will connect to it automatically.
12:12 PM
Micro USB
Charging Cable
PAIRING THE EARBUDS (cont’d)
PAIRING THE EARBUDS (cont’d)
1. Make sure the Bluetooth earbuds are turned ON before beginning the
pairing process.
2. Long press the [ ] button until a tone is heard and the LED Bluetooth
indicator light quickly flashes BLUE.
3. The earbuds are now in pairing mode.
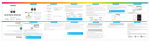
The screenshots above are typical of many Bluetooth enabled devices in
the market today, and are used to assist in the explanation of the
pairing process. Your Bluetooth enabled device’s interface and
interaction with the Bluetooth earbuds may slightly differ from the
illustrations above.
LEGAL
TROUBLESHOOTING (cont’d)
I cannot get the Bluetooth earbuds into pairing mode.
Scanning
Caution: Any changes or modifications not expressly approved could void the user's authority to operate the
equipment.
Note: This equipment has been tested and found to comply with the limits for a Class B digital device, pursuant to
part 15 of the FCC Rules. These limits are designed to provide reasonable protection against harmful interference in
a residential installation. This equipment generates, uses and can radiate radio frequency energy and, if not installed
and used in accordance with the instructions, may cause harmful interference to radio communications. However,
there is no guarantee that interference will not occur in a particular installation. If this equipment does cause
harmful interference to radio or television reception, which can be determined by turning the equipment off and on,
the user is encouraged to try to correct the interference by one or more of the following measures:
• Reorient or relocate the receiving antenna.
• Increase the separation between the equipment and receiver.
• Connect the equipment into an outlet on a circuit different from that to which the receiver is connected.
• Consult the dealer or an experienced radio/TV technician for help.
AIT, Inc.
ATTN: Customer Service (2nd Floor)
14-C 53rd Street
Brooklyn, NY 11232
IN NO EVENT WILL AIT, ITS MANUFACTURERS, DISTRIBUTORS OR PLR IP HOLDINGS, LLC BE
LIABLE FOR ANY INCIDENTAL, DIRECT, INDIRECT, SPECIAL, PUNITIVE OR CONSEQUENTIAL DAMAGES
(SUCH AS, BUT NOT LIMITED TO, DAMAGES FOR LOSS OF PROFITS, BUSINESS, SAVINGS, DATA OR
RECORDS) RELATED TO THIS PRODUCT. EXCEPT AS STATED HEREIN, NO OTHER WARRANTIES
SHALL APPLY.
Questions?
Need some help?
This manual will help you
enjoy your new product
If you still have questions,
call our help line:
or visit us at:
1-877-768-8481
Click on “Product Support”
www.southerntelecom.com
• Reorient or relocate the receiving antenna.
Note: This equipment has been tested and found to comply with the limits for a Class B digital device, pursuant to part 15 of the FCC
Rules. These limits are designed to provide reasonable protection against harmful interference in a residential installation. This
equipment generates, uses and can radiate radio frequency energy and, if not installed and used in accordance with the instructions,
may cause harmful interference to radio communications. However, there is no guarantee that interference will not occur in a
particular installation. If this equipment does cause harmful interference to radio or television reception, which can be determined by
turning the equipment off and on, the user is encouraged to try to correct the interference by one or more of the following measures:
Caution: Any changes or modifications not expressly approved could void the user's authority to operate the equipment.
![[PMP75] User Manual [FINAL] 20121212](http://vs1.manualzilla.com/store/data/005950946_1-9749e714ad96604218308e863819f9e2-150x150.png)


![[SNC201] User Guide [FINAL] 20100322](http://vs1.manualzilla.com/store/data/005791176_1-4af6210b4cf53bb5c7154a3e5e1071a5-150x150.png)