Transcript
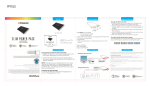
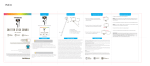
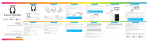
IN THE BOX
LOCATION OF CONTROLS
INSERTING THE BATTERY
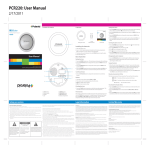
1. Slide the power switch on the Wireless Remote Shutter to the ON position.
2. The LED indicator light will flash BLUE. 3. Keep the remote and Bluetooth enabled device within 3 feet of each
other during the pairing process.
4. Set your Bluetooth enabled device to search for Bluetooth devices.
2
1
PAIRING THE SHUTTER STICK
3
4
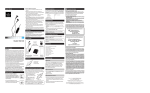
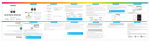
PAIRING THE SHUTTER STICK (cont’d)
PAIRING THE SHUTTER STICK (cont’d)
On a Blackberry
• Go to SETTINGS/OPTIONS > BLUETOOTH
• Enable BLUETOOTH
On other Cell Phones/Devices
• Review the instruction manual that came with your phone/device.
Bluetooth: Enabled
Paired Devices:
3G
Bluetooth
Bluetooth:
On
Discoverable:
Yes
*Empty *
Searching for devices
1 found
Stop
Paired Devices
If there are no paired devices in range when the Shutter Stick is
turned on, it will go into pairing mode automatically. If a paired
device is in range, the Monopod will connect to it automatically.
Shutter Stick
{ WITH WIR ELESS R EMOTE SH UTTER }
PCA3202 | USER MAN UAL
This manual will help you
enjoy your new product
2. Smartphone clamp mounting screw
5
SHUTTER STICK
3. Wheel to tighten screw
6
Wireless Remote Shutter
4. Knob to adjust base
7
If you still have questions,
call our help line:
or visit us at:
1-877-768-8481
Click on “Product Support”
www.southerntelecom.com
Questions?
Need some help?
This manual will help you
enjoy your new product
If you still have questions,
call our help line:
or visit us at:
1-877-768-8481
Click on “Product Support”
+
www.southerntelecom.com
User Manual
CR2032 Lithium Battery
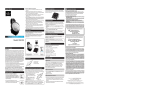
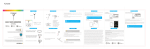
USING THE SHUTTER STICK
1. Attach the phone clamp to the mounting
screw by rotating the wheel until it is tight.
2. Put your smartphone in the phone clamp.
The spring clamp will keep your smartphone
securely in place.
3. Loosen the knob on the base to adjust
the angle of the smartphone clamp, then
tighten it to secure the clamp to the
base.
PLR IP Holdings, LLC, its licensees and affiliates, fully support all electronic waste initiatives. As responsible
stewards of the environment, and to avoid violating established laws, you should properly dispose of this product
in compliance with all applicable regulations, directives or other governances in the area where you reside. Please
check with local authorities or the retailer where you purchased this product to determine a location where you can
appropriately dispose of the product.
• Consult the dealer or an experienced radio/TV technician for help.
• Connect the equipment into an outlet on a circuit different from that to which the receiver is connected.
• Increase the separation between the equipment and receiver.
• Reorient or relocate the receiving antenna.
4. Enter the camera app on your smartphone.
5. In your smartphone’s camera app, switch the picture type to “Selfie”
(front facing camera).
NOTE: You can take “selfies,” take normal pictures, or record videos.
Choose the settings in your smartphone’s camera app.
8
Wireless Remote
Shutter
1. To insert the battery, push and slide out the battery door on the remote
control.
On an iPhone
• Go to SETTINGS > BLUETOOTH (Make sure Bluetooth is turned ON)
12:12 PM
Bluetooth
2. Insert the battery with the polarity “+” facing up.
PCA3202
5. When the Bluetooth enabled device finds the Shutter Stick, select
“PCA3202” from the list of found devices.
6. If required, enter the password 0000. Select OK or Yes to pair the two units.
7. After a successful registration, the LED indicator light will shut off.
On an Android Phone
• Go to SETTINGS > BLUETOOTH > MENU > Search for devices
(Make sure Bluetooth is turned ON)
12:12 PM
Bluetooth settings
ON
Bluetooth
NOTE: If you would like to connect the Shutter Stick to another device, you
must unpair the Shutter Stick from the currently paired device first. On your
device’s Bluetooth settings, select “PCA3202”, then select “unpair”. When the
Shutter Stick has been unpaired, turn it OFF and then ON again to enter pairing
mode again.
Bluetooth
Device name
Devices
PCA3202
3. Slide the battery door back into place.
5. LED indicator light
{ WITH WIRELESS REMOTE SHUTTER }
PCA3202 | USER MANUAL
Questions?
Need some help?
The battery for the Wireless Remote Shutter (1 CR2032 lithium battery) is
included.
1. Smartphone clamp
S HUTTER STICK
Add New Device
PCA3202
Paired
Visible
Make device visible
Now discoverable
Search for devices
6. [iOS] shutter button
Bluetooth devices
Scanning
The screenshots above are typical of many Bluetooth enabled devices in
the market today, and are used to assist in the explanation of the
pairing process. Your Bluetooth enabled device’s interface and
interaction with the Shutter Stick may slightly differ from the
illustrations above.
7. [Android] shutter button
8. ON/OFF switch
TROUBLESHOOTING
USING THE SHUTTER STICK (cont’d)
My Bluetooth device is not able to pair with the
Shutter Stick.
6. Extend the Shutter Stick to the desired
length.
7. Focus on yourself and press the appropriate
shutter button on the remote.
• Use the [iOS] button (1) if your smartphone
is an iPhone.
• Use the [Android] button (2) if your
smartphone uses the Android operating
system.
1
2
NOTE: On some Android phones, you may need to use the [iOS] shutter
button to take pictures or video. If the [Android] shutter button does not
work, then use the [iOS] shutter button.
IMPORTANT: If you are trying to take pictures and you see the volume
control bar on your phone, this is because the Shutter Stick uses the
volume frequency to take pictures. If this happens, open your
smartphone’s CAMERA APP settings, select “Volume Button Options”
and select “Capture.” Now the shutter button will take pictures.
1. Make sure the Wireless Remote Shutter is turned ON before beginning
the pairing process.
2. Keep the Wireless Remote Shutter and Bluetooth enabled device within 3
feet of each other during the pairing process.
3. The LED indicator light will flash BLUE.
4. Check that YOUR device’s Bluetooth feature is turned ON.
5. Try repeating the pairing process. See “Pairing the Shutter Stick.”
I cannot get the Shutter Stick into pairing
mode.
1. Make sure the Wireless Remote Shutter is turned ON before beginning the
pairing process.
2. The LED indicator light will flash BLUE.
3. The Shutter Stick is now in pairing mode.
The shutter button does not take pictures. I see the
volume control on the phone.
1. The Shutter Stick uses the volume frequency to take pictures. If this
happens, open your smartphone’s CAMERA APP settings, select “Volume
Button Options” and select “Capture.” Now the shutter button will take
pictures.
LIABILITY DISCLAIMER
IN NO EVENT, UNDER ANY CAUSE OF ACTION OF THEORY OF LIABILITY, SHALL SOUTHERN
TELECOM ITS DISTRIBUTORS OR SUPPLIERS BE LIABLE TO YOU OR ANY THIRD PARTY FOR ANY
INDIRECT, INCIDENTAL, CONSEQUENTIAL, SPECIAL, EXEMPLARY OR PUNITIVE DAMAGES, OF
ANY NATURE WHATSOEVER, ARISING OUT OF THE USE OF OR INABILITY TO USE ANY SOUTHERN TELECOM PRODUCT, INCLUDING, WITHOUT LIMITATION, PROPERTY DAMAGE, LOSS OF
VALUE OF THE SOUTHERN TELECOM PRODUCT OR ANY THIRD PARTY PRODUCTS THAT ARE
USED IN OR WITH THE SOUTHERN TELECOM PRODUCT, OR LOSS OF USE OF THE SOUTHERN
TELECOM PRODUCT OR ANY THIRD PARTY PRODUCTS THAT ARE USED IN OR WITH THE
SOUTHERN TELECOM PRODUCT, EVEN IF SOUTHERN TELECOM HAS BEEN ADVISED OF THE
POSSIBILITY OF SUCH DAMAGES. WITHOUT LIMITING THE FOREGOING, YOU UNDERSTAND AND
AGREE THAT SOUTHERN TELECOM HAS NO LIABILITY FOR ANY DAMAGE OR DESTRUCTION TO
CONSUMER ELECTRONICS DEVICES OR OTHER PERSONAL PROPERTY THAT ARE CONTAINED
INSIDE OR OUTSIDE THE SOUTHERN TELECOM PRODUCTS, INCLUDING, WITHOUT LIMITATION,
LAPTOPS, CELLULAR PHONES, OR OTHER HANDHELD DEVICES, OR ANY LOSS OF DATA
CONTAINED IN THE FOREGOING DEVICES. NOTWITHSTANDING ANY DAMAGES THAT YOU MIGHT
INCUR FOR ANY REASON WHATSOEVER (INCLUDING, WITHOUT LIMITATION, ALL DAMAGES
REFERENCED HEREIN AND ALL DIRECT OR GENERAL DAMAGES IN CONTRACT, TORT
(INCLUDING NEGLIGENCE) OR OTHERWISE), THE ENTIRE AGGREGATE LIABILITY OF SOUTHERN
TELECOM AND ANY OF ITS DISTRIBUTORS AND/OR SUPPLIERS SHALL BE LIMITED TO THE
AMOUNT ACTUALLY PAID BY YOU FOR THE SOUTHERN TELECOM PRODUCT GIVING RISE TO
LIABILITY. SOME STATES AND/OR JURISDICTIONS DO NOT ALLOW THE EXCLUSION OR
LIMITATION OF INCIDENTAL OR CONSEQUENTIAL DAMAGES, SO THE ABOVE LIMITATIONS OR
EXCLUSIONS MAY NOT APPLY TO YOU. THE LIMITATIONS OF LIABILITY SET FORTH ABOVE SHALL
APPLY TO THE MAXIMUM EXTENT PERMITTED UNDER APPLICABLE LAW.
LIMITED WARRANTY
This product as supplied and distributed new by AIT, Inc. (“AIT”) to the original consumer purchaser
is warranted by AIT against defects in material and workmanship for a period of six (6) months from
your date of purchase (“Warranty”).
In the unlikely event that this product is defective, or does not perform properly, you may within one year
from your original date of purchase return it to the authorized service center for repair or exchange.
TO OBTAIN WARRANTY SERVICE:
• Provide proof of the date of purchase within the package (Dated bill of sale).
• Prepay all shipping costs to the authorized service center, and remember to insure your return.
• Include a return shipping address (no P.O. Boxes), a telephone contact number, and the defective
unit within the package.
• Describe the defect or reason you are returning the product.
Your product will be repaired or replaced, at our option, for the same or similar model of equal value
if examination by the service center determines this product is defective. Products received damaged
as a result of shipping, will require you to file a claim with the carrier.
The shipping address of the authorized service center is:
AIT, Inc.
ATTN: Customer Service (2nd Floor)
14-C 53rd Street
Brooklyn, NY 11232
IN NO EVENT WILL AIT, ITS MANUFACTURERS, DISTRIBUTORS OR PLR IP HOLDINGS, LLC BE
LIABLE FOR ANY INCIDENTAL, DIRECT, INDIRECT, SPECIAL, PUNITIVE OR CONSEQUENTIAL DAMAGES
(SUCH AS, BUT NOT LIMITED TO, DAMAGES FOR LOSS OF PROFITS, BUSINESS, SAVINGS, DATA OR
RECORDS) RELATED TO THIS PRODUCT. EXCEPT AS STATED HEREIN, NO OTHER WARRANTIES
SHALL APPLY.
Questions?
Need some help?
This manual will help you
enjoy your new product
If you still have questions,
call our help line:
or visit us at:
1-877-768-8481
Click on “Product Support”
www.southerntelecom.com
Note: This equipment has been tested and found to comply with the limits for a Class B digital device, pursuant to part 15 of the FCC
Rules. These limits are designed to provide reasonable protection against harmful interference in a residential installation. This
equipment generates, uses and can radiate radio frequency energy and, if not installed and used in accordance with the instructions,
may cause harmful interference to radio communications. However, there is no guarantee that interference will not occur in a
particular installation. If this equipment does cause harmful interference to radio or television reception, which can be determined by
turning the equipment off and on, the user is encouraged to try to correct the interference by one or more of the following measures:
Caution: Any changes or modifications not expressly approved could void the user's authority to operate the equipment.
![[PMP75] User Manual [FINAL] 20121212](http://vs1.manualzilla.com/store/data/005950946_1-9749e714ad96604218308e863819f9e2-150x150.png)