1
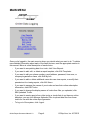
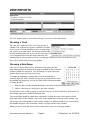
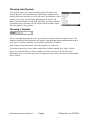
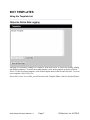
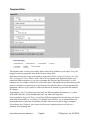
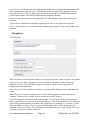
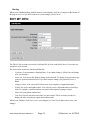
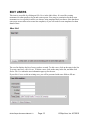
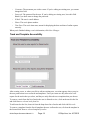
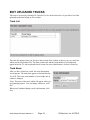
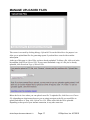
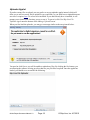
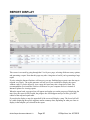
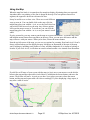
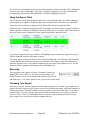
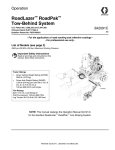
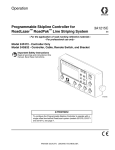
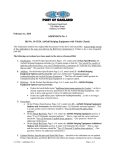
Skip-Line Data Logger
Online Report Generator
Online Report Generator Manual 1.0
Page 1
© Skip-Line, Inc. 4/7/2010
Table of Contents
Login Page...........................................................................................................................................4
Main Menu...........................................................................................................................................5
View Reports....................................................................................................................................... 6
Choosing a Truck............................................................................................................................6
Choosing a Date Range...................................................................................................................6
Choosing Jobs/Symbols.................................................................................................................. 7
Choosing a Template...................................................................................................................... 7
Edit Templates.....................................................................................................................................8
Using the Template List..................................................................................................................8
Template Editor...............................................................................................................................9
General Information................................................................................................................. 10
Paint Information......................................................................................................................10
Bead Tank Information............................................................................................................ 10
Other Information.....................................................................................................................11
Exceptions................................................................................................................................ 12
Saving.......................................................................................................................................12
Edit My Info...................................................................................................................................... 13
Edit Users...........................................................................................................................................13
User List........................................................................................................................................14
Truck and Template Accessibility................................................................................................ 15
Edit Trucks.........................................................................................................................................15
Truck List......................................................................................................................................16
Truck Information.........................................................................................................................16
Edit Uploaded Trucks........................................................................................................................17
Truck List......................................................................................................................................17
Truck Name...................................................................................................................................17
Manage Uploaded Files..................................................................................................................... 18
Uploader Applet............................................................................................................................19
Report Display...................................................................................................................................21
Using the Map...............................................................................................................................22
Using the Report Table................................................................................................................. 23
Exporting.......................................................................................................................................23
Tweaking Your Report..................................................................................................................24
Warranty, Warnings, and Disclaimer................................................................................................ 25
Online Report Generator Manual 1.0
Page 2
© Skip-Line, Inc. 4/7/2010
LOGIN PAGE
The login page is what you see when you first visit the data logger website. It is used to
acquire access to the rest of the logging system. Enter the username you were provided into
the User Name field, and your password into the Password field.
If you don't want to enter your password every time you initially visit the logger website,
you can click Remember me next time and you will no longer be asked to log in on every
visit. Use this option with caution, though—anyone with access to your computer would
have access to the logger website.
Once you've entered the correct username and password, click Login, and you will be taken
to the main menu.
Online Report Generator Manual 1.0
Page 3
© Skip-Line, Inc. 4/7/2010
MAIN MENU
Once you're logged in, the main menu is where you decide what you want to do. To obtain
more detailed information about each of the listed choices, read the appropriate section in
this manual. Below is a brief description of each choice.
•
If you want to see painting data for a truck, click View Reports.
•
If you want to add, edit, or delete a report template, click Edit Templates.
•
If you want to edit your phone number, e-mail address, password, time zone, or
company/organization name, click Edit My Info.
•
If you want to add or delete additional users who can view reports, or modify their
permissions for viewing reports, click Edit Users.
•
If you want to manage the names of your trucks and see their online subscription
information, click Edit Trucks.
•
If you want to change the display names of trucks from files you uploaded, click
Edit Uploaded Trucks.
•
If you want to create reports from older trucks or trucks that do not have an online
data plan, you can click Manage Uploaded Files to upload data files from these
trucks for use with the online report generator.
•
To log out of the system, click Logout.
Online Report Generator Manual 1.0
Page 4
© Skip-Line, Inc. 4/7/2010
VIEW REPORTS
The View Reports page is accessed by clicking View Reports in the Main Menu.
Choosing a Truck
The truck list is at the top of the View Reports page. It
contains a list of the trucks you have available to include
in your report. Click the checkbox next to each truck that
you want to see in your report. Trucks from uploaded files
are also included in this list. If you only have one truck (or
a set of uploaded files from one truck), that truck will
automatically be selected when you first view this page. When you check (or uncheck) a truck,
there will be a short delay as the page updates.
Choosing a Date Range
Once you've chosen which truck(s) to include in the report, the date
range displayed near the bottom of the page is updated so that it includes
all data available for each truck. You can change it so your report only
includes data from a specific period of time.
To change the beginning or ending date, click on the date that is
currently displayed, and a calendar will pop up, as pictured above. Once
the calendar has popped up, you can use either of the following methods
to change the date:
1. Erase the date currently displayed and type a new date in the format MM/DD/YYYY.
2. Choose a new date by clicking on a day in the calendar.
If you decide to enter a date by typing it, press the Enter key on your keyboard or click outside of
the calendar when you're finished editing the date.
You can navigate month by month in the calendar by clicking the arrows in the upper-left and
upper-right corner of the calendar. If you click on the month name at the top of the calendar, you
can also get a list of the months to more quickly change to a different month. If you want to make
the calendar disappear, click somewhere on the web page outside of the calendar.
When you select a new date, there will be a short pause as the rest of the page updates.
Online Report Generator Manual 1.0
Page 5
© Skip-Line, Inc. 4/7/2010
Choosing Jobs/Symbols
You can also restrict your report to include specific job names and
symbols that were selected on the truck's data logger computer while
painting. Below the truck list is a list of job names, and similarly a list of
symbols. If you only want to display painting data for specific job
names, click the checkboxes next to the job names you want to display.
If you don't select a job name, all jobs will be included with the report.
The same applies to the symbols.
Choosing a Template
There is one other important choice for you to make: you need to choose a template to use. The
template will define what information will appear in the table that appears underneath the map in
your report. To define a template, see the section entitled Edit Templates.
In the Template drop down menu, select the template you wish to use.
If you don't want a map on your report, uncheck the checkbox entitled Show Map on Report.
Once you've decided what you want to display, click Generate Report. If you'd like more
information on how to use the report once it's appeared on the screen, refer to the section entitled
Report Display.
Online Report Generator Manual 1.0
Page 6
© Skip-Line, Inc. 4/7/2010
EDIT TEMPLATES
Using the Template List
This page is accessed by clicking Edit Templates in the Main Menu. It is used for creating, editing,
and deleting templates. To delete an existing template, click on the template in the list and click
Delete. To edit an existing template, click on the template name in the list and click Edit. To create
a new template, click Create New.
If you click Create New or Edit, you will be sent to the Template Editor, which is described below.
Online Report Generator Manual 1.0
Page 7
© Skip-Line, Inc. 4/7/2010
Template Editor
The template editor is where you actually decide what will be included in your report. Give your
template a name by typing the name in the Template Name field.
In the next section, you are given the option to segment by Distance, Pattern Changes, Line Type,
Time, or Logger PC Entry. There is also a choice to not segment at all. Segmenting splits your
report into smaller segments, so you can see painting data for each 1000 foot interval, or each
complete day, for example, instead of over the entire report. This might help you determine specific
parts of a road that were painted out of specification. Note that the report is always automatically
segmented whenever a job, symbol, or other item that can be entered on your truck data monitor
PC changes.
Segmenting by Line Type allows you to get totals for different painted line patterns (e.g. yellow
solid-solid center line, yellow dashed center line, and white solid edge line).
If you segment by Logger PC Entry, you will get different segments based on the entry you choose
in the drop down menu (e.g. Job Name). For example, this will allow you to determine the total
painting data that occurred for each distinct job name chosen on your truck's logger computer.
If you choose Don't Segment, your report won't have any segments and you will only see a
summary of the painting data.
Online Report Generator Manual 1.0
Page 8
© Skip-Line, Inc. 4/7/2010
Below the segmenting options, you can choose the unit in which distances will be displayed. If you
would rather see your distances in miles rather than feet, for instance, you can choose to display
your distances in miles.
Next, you get to choose what items you want to see on your report. Each item is a checkbox. If you
click it, it will be checked and included in the report. If you click it again, it will be unchecked and
no longer included in the report. Below is a list explaining what each item will display:
General Information
Start Date/Time and End Date/Time: Will show the time when the painting began and ended.
Time Elapsed: The total time spent painting. Note that this may not be equal to the time that
occurred between the Start Date/Time and End Date/Time because you may have stopped painting
during some of the time in between.
Truck ID: The serial number of the bridge unit on your truck. It is a five-digit number.
Job Name: The job name that was set on the truck's PC during the painting. This is only displayed
on segments.
Symbol: The symbol that was set on the truck's PC during the painting. This is only displayed on
segments.
Travel Direction: The travel direction that was set on the truck's PC during the painting. This is
only displayed on segments.
Paint Type: The paint type that was set on the truck's PC during the painting. This is only displayed
on segments.
Mile Post: The mile post that was set on the truck's PC during the painting. This is only displayed
on segments.
Paint Information
Note: The following items are displayed for white, yellow, and black paint. The colors are omitted
from the descriptions.
Paint Batch: The paint batch for this color that was set on the truck's PC during the painting. This is
only displayed on segments.
Thickness: The wet thickness of the paint measured in mils (if your truck uses the English system)
or microns (if your truck is metric). Note that accuracy of this value depends on the accuracy of the
calibration numbers set in your skip timer system.
App Rate: The application rate of the paint measured in gallons per mile (if your truck uses the
English system) or liters per kilometer (if your truck is metric). Note that the accuracy of this value
depends on the accuracy of the calibration numbers set in your skip timer system.
Usage: The amount of paint used measured in gallons (if your truck uses the English system) or
liters (if your truck is metric).
Solid Distance: The distance of paint that was painted with a solid pattern, totaling up all guns that
paint this color, measured in feet (if your truck uses the English system) or meters (if your truck is
metric).
Online Report Generator Manual 1.0
Page 9
© Skip-Line, Inc. 4/7/2010
Skip Distance: The distance of paint that was painted with a skip pattern, totaling up all guns that
paint this color, measured in feet (if your truck uses the English system) or meters (if your truck is
metric).
Pump Cal #: The calibration number set on the skip timer for this pump.
Bead Tank Information
Note: The following items may appear multiple times for each bead tank you have.
Usage: The amount of beads used measured in pounds (if your truck uses the English system) or
kilograms (if your truck is metric).
Pounds Per Gallon: The bead application rate measured in pounds per gallon.
Pounds Per 100 Square Feet: The bead application rate measured in pounds per 100 sq. ft.
Pounds Per Mile: The bead application rate measured in pounds per mile.
Bead Type: The bead type that was set on the truck's PC during the painting. This is only displayed
on segments.
Bead Batch: The batch number that was set on the truck's PC during the painting. This is only
displayed on segments.
Bead Gun Type: The bead gun type that was set on the truck's PC during the painting. This is only
displayed on segments.
Other Information
Average Air Temperature: The average air temperature measured in degrees Fahrenheit (if your
truck uses the English system) or Celsius (if your truck is metric) while painting.
Average Road Temperature: The average temperature of the road measured in degrees Fahrenheit
(if your truck uses the English system) or Celsius (if your truck is metric) while painting.
Average Humidity: The relative humidity (in %) while painting.
Average Dew Point: The dew point measured in degrees Fahrenheit (if your truck uses the English
system) or Celsius (if your truck is metric) while painting.
Average Speed: The average speed of the truck while painting measured in miles per hour (if your
truck uses the English system) or kilometers per hour (if your truck is metric).
Odometer: The odometer reading on the skip timer when the segment ended measured in feet (if
your truck uses the English system) or meters (if your truck is metric). This is only displayed on
segments.
Traveled Distance: The distance the truck traveled while painting measured in feet (if your truck
uses the English system) or meters (if your truck is metric).
Start GPS Coordinates: The latitude and longitude of the truck when the segment began. This is
only displayed on segments.
End GPS Coordinates: The latitude and longitude of the truck when the segment ended. This is
only displayed on segments.
Distance Cal #: The calibration number set on the skip timer for measuring distances. This is only
displayed on segments.
Online Report Generator Manual 1.0
Page 10
© Skip-Line, Inc. 4/7/2010
Lane Distance: The distance traveled while painting on the left side added to the distance traveled
while painting on the right side. Note: This distance is only accurate for skip patterns if you are
using the skip timer. If you are flipping the start switch on and off for each individual skip, the
reported lane distance will be much smaller than the actual lane distance.
Comments: Any comments entered on the truck's PC in this segment. This is only displayed on
segments.
Segment Event: Explains the reason this segment ended. This is only displayed on segments.
Pattern: The pattern that was painted onto the road during this segment. This is only displayed on
segments.
Exceptions
Below all of the previous template options, you are given an option to show exceptions. Exceptions
make it easy to see where a quantity is out of specification--for instance, if the yellow paint
thickness is below 12 mils. Exceptions appear in reports as red lines (on the map) and red
backgrounds (in the data table).
Show Exceptions: If this checkbox is checked, exceptions will be displayed on the map and in the
report.
Below the Show Exceptions checkbox, there is a list of the exceptions currently added to the
template. To remove an exception, click on it in the list and click Remove.
To add an exception, scroll down to the section titled Create Exception. In the drop down menu,
choose which item you want to use in your exception (e.g. Yellow Mil Thickness). In the Minimum
Value field, type the minimum acceptable value for this item. For example, if you choose 12, then
if the mil thickness is below 12, an exception will be displayed. If you don't want to specify a
minimum value, leave it blank. The same applies for the Maximum Value field. Finally, click Add
Exception to add your exception to the list.
Online Report Generator Manual 1.0
Page 11
© Skip-Line, Inc. 4/7/2010
Saving
When you're finished making modifications to your template, click Save Template at the bottom of
the page to save it. If you don't want to save your changes, click Cancel.
EDIT MY INFO
The Edit My Info section is accessed by clicking Edit My Info on the Main Menu. It is used to set
options for your account.
The items on the screen are each described below.
•
Username: Your username is displayed here. You cannot change it. (Skip-Line can change
it for you, though.)
•
Password: You can use this field to change your password. To change your password, type
your new password into this field. If you don't want to change your password, leave it
blank.
•
Company Name: You can use this field to store your company or organization name.
•
E-Mail: Put your e-mail address here. You will only receive important notices from SkipLine (for example, a notification that your truck's subscription is going to expire).
•
Phone: Put your phone number here.
•
Time Zone: Specify the time zone where you are located. This is necessary in order to
display the time correctly on reports from online trucks.
When you're finished, click Save to save your changes or Cancel if you don't want to save your
changes.
Online Report Generator Manual 1.0
Page 12
© Skip-Line, Inc. 4/7/2010
EDIT USERS
This item is accessible by clicking on Edit Users in the Main Menu. It is used for creating
usernames for other people to log in and create reports. You can give permission for these extra
usernames to view reports for trucks you choose, using templates that you choose. Note that these
extra users are not allowed to create new templates, so you will need to create templates for them
ahead of time.
User List
The user list displays the list of users you have created. To edit a user, click on the entry in the list.
To create a new user, click Create. To delete a user, click on the entry in the list, and then click
Delete This User when the user information pops up for the user.
If you click Create or edit an existing user, you will be presented with some fields to fill out:
Online Report Generator Manual 1.0
Page 13
© Skip-Line, Inc. 4/7/2010
•
Username: The username you wish to create. If you're editing an existing user, you cannot
change this field.
•
Password: The password for the user. If you're editing an existing user, leave this field
blank if you don't want to change the password.
•
E-Mail: The user's e-mail address.
•
Phone: The user's phone number.
•
Time Zone: The user's time zone, meant for displaying the date and time of online reports
correctly.
When you're finished editing a user's information, click Save Changes.
Truck and Template Accessibility
After creating a user, or when you click to edit an existing user, a section appears where you give
the user permissions to access trucks and templates. Users you create are only allowed to view
reports for the trucks that you select, and they are only allowed to use templates that you choose.
To remove a truck from the list of trucks the user is allowed to view, click on the truck in the list
and click Remove selected truck from list.
To add a truck to the list, choose it from the drop-down list of trucks and click Add this truck.
To remove a template from the list of templates the user is allowed to use, click on the template in
the list and click Remove selected template from list.
Online Report Generator Manual 1.0
Page 14
© Skip-Line, Inc. 4/7/2010
To add a template to the list, choose it from the drop-down list of templates and click Add this
template.
EDIT TRUCKS
This item is accessed by clicking Edit Trucks on the Main Menu. It provides a list of the online
trucks that belong to your account.
Truck List
The truck list appears when you first go to this section of the website. It shows you every online
truck you have. The name of the truck, the serial number of its bridge unit, and its subscription
status all appear in the list. To view and edit information about a truck, click on its name in the list.
Truck Information
After you have clicked on a truck, the truck information
screen appears. The items that appear are described below:
•
Truck ID: This is the serial number of your bridge
unit. It cannot be changed.
•
Name: The name of the truck which will appear
when you are generating reports. You can change it
however you'd like.
•
Last Renewal: The date you last renewed your
truck's online subscription.
•
Next Renewal Date: The date your subscription is going to expire.
When you're finished editing a truck's information, click Save.
Online Report Generator Manual 1.0
Page 15
© Skip-Line, Inc. 4/7/2010
EDIT UPLOADED TRUCKS
This item is accessed by clicking Edit Uploaded Trucks on the Main Menu. It provides a list of the
uploaded trucks that belong to your account.
Truck List
The truck list appears when you first go to this section of the website. It shows you every truck for
which you have uploaded a file. The name of the truck and the serial number of its bridge unit
appear in the list. To edit an uploaded truck's name for easier identification, click on it in the list.
Truck Name
After you have clicked on a truck, the truck information
screen appears. The items that appear are described below:
Truck ID: This is the serial number of your bridge unit. It
cannot be changed.
Name: The name of the truck which will appear when you
are generating reports. You can change it however you'd
like.
When you're finished editing a truck's information, click
Save.
Online Report Generator Manual 1.0
Page 16
© Skip-Line, Inc. 4/7/2010
MANAGE UPLOADED FILES
This screen is accessed by clicking Manage Uploaded Files on the Main Menu. Its purpose is to
allow you to upload data files for generating reports if you don't have a truck with an online
subscription.
At the top of this page is a list of files you have already uploaded. To delete a file, click on it in the
list and then click Delete Selected File. If you want to download a copy of a file you've already
uploaded, click Download Copy of Selected File.
Below the list is a box where you can upload a new file. To upload a file, click Browse or Choose
File (depending on what internet browser you are using), navigate to the file you would like to
upload, and choose it. Then, click Upload New File. Please wait while the file is uploaded.
Depending on the speed of your internet connection, it may take some time.
Online Report Generator Manual 1.0
Page 17
© Skip-Line, Inc. 4/7/2010
Uploader Applet
If you have many files to upload, you may prefer to use our uploader applet instead, which will
allow you to select as many files to upload as you would like, so you don't have to upload them one
at a time. It requires Java 1.4 or later to be installed. If you don't already have it installed, it will
prompt you to install it the first time you try to use it. To get to it, click Use Skip-Line File
Uploader Applet near the bottom of the Manage Uploads screen.
When you first load the uploader, you may get a message similar to the one pictured below:
You need to click Run or you will be unable to upload any files. By clicking the Run button, you
are allowing the software to bring up a box that lets you pick files to upload. Once the applet has
loaded, you should see a screen like the following:
Online Report Generator Manual 1.0
Page 18
© Skip-Line, Inc. 4/7/2010
Click Add Files to List. A window will appear allowing you to select files to upload. Navigate to
where your files are stored (they may be stored in C:\SkipLine\Data). Click a file you'd like to
upload. To select multiple files, hold down the control key (or Apple key on a Mac) while clicking
the files. To select a range of files, click the first file, then hold down the shift key and click the last
file. This will select all the files in between as well. When you're finished, click Open.
Finally, click Upload Files and your files will be uploaded. A window will appear showing the
progress. When the upload is complete, a window will appear that shows the results of the upload.
When you're finished, click Back to Main Page.
Online Report Generator Manual 1.0
Page 19
© Skip-Line, Inc. 4/7/2010
REPORT DISPLAY
This screen is accessed by going through the View Reports page, selecting all the necessary options,
and generating a report. Note that this page may take a long time to load if you're generating a large
report.
If you're using the Internet Explorer web browser, you may find that large reports cause the map to
respond very slowly. The report generator will ask you if you would like to display the report
without a map. If you do choose to view a map, the report may take a long time to load. Our
recommendation is to install the Firefox web browser on your computer and use it instead of
Internet Explorer for viewing reports.
When the report loads, a progress bar will appear and update you on the progress of displaying the
map. Once the report is fully loaded, the progress bar will disappear and you will be given full
control of the map and report table.
If you asked to display a map, the upper half of the screen will display a map. The lower half will
be a table displaying the report's segments and/or summary data, depending on what you chose to
display in the template you selected for the report.
Online Report Generator Manual 1.0
Page 20
© Skip-Line, Inc. 4/7/2010
Using the Map
When the map first loads, it is zoomed out far enough to display all painting data you requested.
Anywhere there was painting, a blue line is drawn on the map. If an exception occurred on a
segment, the segment is drawn in red instead of blue.
It may be useful to see a closer view. There are several different
ways to zoom in. You can double click on the map, click the
magnifying glass icon with the + in it, or use the scroll wheel on
your mouse while hovered over the map. Any of these options
will cause the map to zoom in. To zoom out, you can click the
magnifying glass icon with the - in it, or use your mouse's scroll
wheel.
If you're zoomed in, you may want to pan the map to see more information. To pan the map, click
and hold the mouse button down anywhere on the map. Then, you can move the mouse and the
map will move with your mouse. When you're done, release the mouse button.
Near the top left corner of the map, you can see two options for zooming: Road and Aerial. Road is
always selected when you first display the map. It displays an illustration of the area of the map
you're looking at, including roads, bodies of water, and other landmarks. It is similar to looking at
an atlas. If you click Aerial, it will show an actual overhead satellite view instead of an illustration.
If you'd like to fill more of your screen with the map (or less), move your mouse over the divider
between the map and the report table (circled above), hold down the mouse button, and move the
mouse. The divider will move. As soon as you have it at a place you want, release the mouse
button, and the map and report table will resize accordingly. If you're displaying a large report, it
may take a while to resize.
Online Report Generator Manual 1.0
Page 21
© Skip-Line, Inc. 4/7/2010
If you click on a painted line on the map, the entire segment to which it belongs will be highlighted
in green on the map. Additionally, if you chose to display segments in your report template, the
corresponding segment in the data table below will also be highlighted in green.
Using the Report Table
There is always a report table displayed on the screen. It contains the data you asked to display in
your template. It is capable of displaying data from multiple trucks at the same time. Any online
trucks you select to display are displayed first, followed by trucks from uploaded files.
Under each truck, segments are displayed (if your template specified to show segments) and below
all the segments, a summary is displayed. Below the entire report, a summary total of data from all
the trucks in the report is displayed (if your report included more than one truck).
If you click a segment in the report table, it will highlight in green and if your report has a map, it
will also highlight in green on the map, centered.
Exceptions appear in the report table as cells with red backgrounds. If a cell has a red background,
it means that the data in that cell was out of specification. For example, if the mil thickness for a
particular segment was 11 mils, and the minimum you specified in your template was 14, the mil
thickness for that segment would appear with a red background.
Exporting
You can export your report to a variety of formats. Currently we
support PDF, Excel, and CSV. To export a report, choose your
desired format from the list of formats at the bottom of the screen,
and click Export. You will be asked to save your file after a short delay.
Tweaking Your Report
Sometimes, you may want to change one detail about your report. For instance, you might want to
generate the same report you just created, except with a different date range, a different template, or
a different job name. Instead of starting over from scratch, you can click Edit Report. You will be
returned to the View Reports page, and it will be filled in exactly how it was before you clicked
Generate Report. Then, you can change whatever item you want to change and click Generate
Report again to see a new report with your updated choices.
Online Report Generator Manual 1.0
Page 22
© Skip-Line, Inc. 4/7/2010
WARRANTY, WARNINGS, AND DISCLAIMER
The Skip-Line data logger is a useful tool for monitoring and recording pavement-markings
application rates. It is intended to assist the paint machine operator to recognize and compensate for
materials delivery “on-the fly”, and provide temporal and geographic records of areas painted.
Logger and Monitor calibration is determined by operator entry, based on comparison of known
values loaded from material stockpiles.
The primary source of application rate verification depends on regular comparison of actual
inventory quantities loaded and consumed against logger values displayed and recorded. Do
not continue reliance on this logger when significant discrepancies exist between inventory
consumption and logged quantities.
Improper calibration settings cause erroneous results. Calibration problems may stem from operator
error, electrical spikes, hard physical impacts, or component failure. Footage calibration values
may be affected by truck tire diameter, large payload variation, or integrity of motion sensors and
sensor plates.
All electronic equipment is subject to failure.
Some causes: non-compatibility of accessories or user-added software, extreme mechanical
vibration, electrical spikes, exposure to highly inductive (noisy) power sources, temperature
extremes, induced load-dump and welding currents, improper wiring, poor cable routing, insulation
chafing, stressed mounting, over-voltage applied, mechanical impacts.
On equipment with on-board hard drives, improper shutdown procedure can lead to intermittent
failure or loss of data.
Indiscriminate high-pressure washing can cause moisture intrusion and corrosion.
Most sensors, such as motion sensors, weigh scales, flow meters, and pump-stroke switches are
provided by third parties, and their performance is not under the control of Skip-Line, Inc.
Even space mission computer systems can fail. Software bugs can appear.
Skip-Line, Inc. will not be responsible or liable for any loss as a result of the use of this software,
including but not limited to: loss of time, money, compensation, opportunity reputation, nor due to
re-work. Verify your inventory use!
Software & Firmware are © 2006-2010.
Online Report Generator Manual 1.0
Page 23
© Skip-Line, Inc. 4/7/2010