1
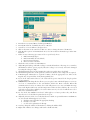
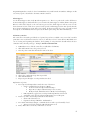
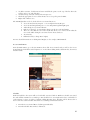
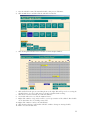
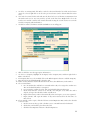
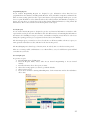
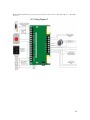
programming changes. Adding and removing Channels, Controllers and Points, as well as some administrative functions, are not possible on a GW. However, some Access Control administration functions are available on the GW, such as Adding/Editing Cards and Schedules. Activity View and Reports work the same as they do on the Server. In order to view pictures in Activity View on the GW, you must copy the Access Control Pictures folder from the Server to the GW and place it in C:\CBAS. ONLY 1 computer at a time can edit the Access Control Card database. So if editing is taking place on a GW, the DPU and all other Workstations will not be able to edit until the GW that is editing finishes. An error message will be displayed informing the user that editing is not possible at the present time. A GW is finished editing when the user either does a download, logs off, or there is no activity for 20 minutes. Adding and connecting a GW will be covered in this section, as well as copying the pictures folder. Setting up a GW (Graphic Workstation) In order to set up a GW, the Server and the GW must be able to communicate on a network basis. In other words, if you can see the GW in the Network Neighborhood window of the DPU, it is possible. It is also possible to connect a GW over the Internet. When connecting as a GW, the CBAS version on the GW must be the same (or nearly the same) as the Server, or the Server will refuse the connection. Version 1.6.X will not work with 2.0.X, which will not work with 2.1.X, etc. Before you can set up a GW, you will need the IP address of the Server and the GW, as well as the computer name of both. To get this info: In Windows 98, from the windows desktop, click on Start, Run, type winipcfg, and enter. In Windows 2000/XP, click on Start, Run, type command and hit Enter. At the prompt, type ipconfig and hit Enter. Write down the host name of the DPU and the IP address of both computers. Close the window. First, you must set up the DPU to accept the GW: 1. In Editor Mode, click on Database from the main menu, and then click on Add A GW. 2. The first window will ask you for a name for the GW. The default is “NEW GW”. Enter a name that describes the location or function of the GW computer. Click next. 3. Enter the IP address of the GW. Click finish. 4. If you go to Hardware View, TCP/IP Channel, Controllers, you will see the GW you created, with a status of LOST. 5. Close the database and reopen in real mode. Now go to the GW computer. 6. In CBAS, click on System on the main menu, then Close Database. 7. Once the database is closed, click on Database, Open Database, and Remote GW. 8. Enter the IP address of the DPU, and the name of the GW exactly as you entered it on the DPU. Click Connect and the database should open. 9. The GW Connection screen is shown below: 23