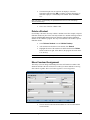
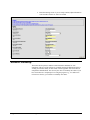
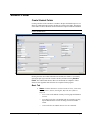
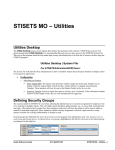
1
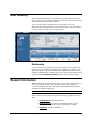
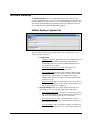
Summer-Fall 2008
STISETSWeb NM
User Manual
Information in this document is subject to change without notice. Student and school data used herein are fictitious
unless otherwise noted.
The contents of this document are the property of STI. This information is intended for users of the STI suite of products
only. Reproduction or redistribution of these materials to anyone other than STI customers or users of STI Software is
prohibited without prior written consent from STI.
© 2001-2008 Software Technology, Inc. All rights reserved.
Microsoft, Windows, Word and Internet Explorer are registered trademarks or trademarks of Microsoft Corporation in
the United States and other countries.
Other product and company names herein may be the trademarks of their respective owners.
Software Technology, Inc.
USA Technology and Research Park
307 University Boulevard North
Bldg. IV, Suite 400
Mobile, AL 36688
(800) 844-0884
This document was last modified on July 25, 2008. Any subsequent changes made to the STI applications described
herein will be discussed in the release notes that accompany each product’s update.
Contents
STISETSWeb – New Mexico
1
About STISETSWeb ................................................................................................................. 1
Accessing the Program/Logging In ........................................................................................... 2
Opening Screen.......................................................................................................................... 3
User Desktop ............................................................................................................................. 5
Relationship................................................................................................................. 5
Student Information ................................................................................................................... 5
Utilities Desktop ........................................................................................................................ 7
Utilities Desktop | System File .................................................................................... 7
Defining Security Groups............................................................................................ 8
Security Group Edit Commands.................................................................................. 9
Other Security Group Items......................................................................................... 9
Building Employee File ........................................................................................................... 10
Defining Codes ........................................................................................................................ 10
Location Codes.......................................................................................................... 10
District and State Codes ............................................................................................ 11
Managing Student Data (Student Maintenance) ...................................................................... 12
Create Student Folder ................................................................................................ 12
Caseload Assignment ................................................................................................ 12
Delete a Student......................................................................................................... 13
Mass Caseload Assignment ....................................................................................... 13
Archive Students ....................................................................................................... 14
Un-Archive Students ................................................................................................. 15
Critical Student Information...................................................................................... 15
Student Desktop....................................................................................................................... 16
Student Folder.......................................................................................................................... 17
Create Student Folder ................................................................................................ 17
Change Case Manager ............................................................................................................. 20
Process Management ............................................................................................................... 20
Selecting .................................................................................................................... 21
Working on Forms in the Process.............................................................................. 21
Creating an Amendment............................................................................................ 23
Printing Forms........................................................................................................... 24
Documents ............................................................................................................................... 24
STIOffice Integration............................................................................................................... 25
Reports Desktop....................................................................................................................... 25
Printing a Report ....................................................................................................... 25
STISETSWeb Query ............................................................................................................... 26
STISETSWeb Query Fields ...................................................................................... 27
STISETSWeb Query Filters ...................................................................................... 28
STISETSWeb Query (Caseload) ............................................................................... 29
Index
Summer-Fall 2008 STISETSWeb NM
31
STI_0725081435
Contents • iii
STISETSWeb – New Mexico
About STISETSWeb
STISETSWeb is a browser-based Special Education data tracking system that
provides the Special Education professional with a comprehensive method for
achieving and maintaining compliance with the Special Education process for
students. New Mexico state-specific forms are contained in this software. Since this
software is fully integrated with the information from the local school STIOffice
program, Special Education personnel may view Student and Guardian
Demographics, Entries/Withdrawals, Attendance, Discipline, Schedules and Grade
details.
The basic areas to address when getting started with STISETSWeb should follow
this order:
•
Employees
•
Users (Assign User Names, Passwords, and Security Groups)
•
Create Folders (Assign Case Managers to Students)
•
Change Case Manager (Only if a mistake was made in assigning
Case Managers)
•
Caseload Assignment (Assigning OT, PT, Speech Therapist, etc.,
access to student records)
STISETSWeb features pre-loaded reports that will track due dates for IEPs, as well
as Re-Evaluation reports to determine continued eligibility. Additionally, an
STISETS Query tool is included. The Query tool allows the user to build custom
reports filtered by Student, Folder and Form information. Reporting includes both
school- and district-wide listings.
The security model is robust enough to secure access not only to different schools
and their respective menu options, but access may also be locked down to the form
level. Because this program houses a district-wide database, teachers, service
providers, etc., may be given access to students in multiple schools. Therefore, when
an employee logs in to the program, his/her entire caseload will be available.
Since this document is intended to assist board office personnel as well as local
school personnel in implementation of STISETSWeb, certain sections may pertain to
specific employee duty assignments.
Summer-Fall 2008 STISETSWeb NM
STI_0725081435
STISETSWeb – New Mexico • 1
Accessing the Program/Logging In
To access STISETSWeb, users must log in the program using either Microsoft
Internet Explorer or the Mozilla Web browser.
•
Type the STISETSWeb URL in the address bar of your browser, or
double-click your shortcut icon if applicable. The login window will
appear.
•
Enter your User Name and Password and click OK.
•
If you enter an incorrect User Name or Password, you will see a
warning error appear with the message USER ERROR: Invalid user
name and/or password.
Your system administrator or manager will assign and manage all user names for
your district/school. You may have a password assigned or you may create your own
password. This is a district decision. By default, users with Manager rights will
manage security for all staff members in their schools only.
The version number of the program is listed in the upper right corner of the login
window.
2 • STISETSWeb – New Mexico
STI_0725081435
Summer-Fall 2008 STISETSWeb NM
Opening Screen
The opening screen displays menu options based on an employee’s level of access to
the program. The opening screen is divided into three sections.
The three sections of the screen are described as follows:
•
•
•
The Menu Tree on the left of the screen.
o
The Menu Tree houses the links you will click to access different
areas of the program.
o
The information shown here may differ from user to user, due to
program security restrictions.
The Selected Student portion at the top of the screen.
o
After a student has been selected, that student’s demographic
information will be displayed in this area.
o
You cannot edit this information in STISETSWeb
The User Desktop, in the center of the screen.
o
This will be your work area in STISETSWeb.
o
This will be the only area in which you will enter data.
Displayed in each of theses sections are three icons:
Summer-Fall 2008 STISETSWeb NM
•
min: Click the minimize button to reduce the selected section of the
screen.
•
res: Click the restore button to return the screen to its original view.
•
max: Click the maximize button to enlarge the User Desktop window
to its maximum size.
STI_0725081435
STISETSWeb – New Mexico • 3
Note: Pressing the F11 key on the keyboard will further maximize the screen
4 • STISETSWeb – New Mexico
•
min: Click the minimize button to reduce the selected section of the
screen.
•
res: Click the restore button to return the screen to its original view.
•
max: Click the maximize button to enlarge the User Desktop window
to its maximum size.
STI_0725081435
Summer-Fall 2008 STISETSWeb NM
User Desktop
In the STISETSWeb desktop, users will see their caseloads populating the Student
Number, Student Name, Relationship, LRE, Special Education Status, Exceptionality,
School, DOB, Gender, Race and Grade fields.
A user’s caseload consists of students who are associated by way of Case
Management, Special Education Service and/or Related Service. The caseload will
appear on the User Desktop after the user logs in to the program. Once the desktop is
in view, the user has several ways of viewing students.
Relationship
A user’s caseload is set up based on the relationship that user has to a student. For
example: If you are a student’s Case Manager, the designation Case Manager will
appear in the Relationship column for that student. Additional relationships may be
defined by an Administrator or Manager in the Utility Desktop. Relationships may be
assigned from the Caseload Assignment option, outlined in Utility Desktop.
Student Information
Student demographic information (Name, Number, School Name, SIS status, Date of
Birth, Age, Grade, Home Room, Entry/Withdrawal Date, Gender and Race) is
“owned” by STIOffice. This data is not editable within STISETSWeb and must be
modified in the STIOffice application.
Note: This information will not be displayed until a specific student is selected.
When a student is selected, the following data fields will pre-populate the student’s
folder:
Summer-Fall 2008 STISETSWeb NM
•
Student Name: Pulled from STIOffice.
•
Student Pictures (if available): Pulled from STIOffice. If your
school does not use pictures, this area will display as a large X.
•
Student ID: Pulled from STIOffice.
STI_0725081435
STISETSWeb – New Mexico • 5
6 • STISETSWeb – New Mexico
•
School Name and Code: Pulled from STIOffice.
•
SIS (Student Information System) Status: The student’s status in
STIOffice. If a student is marked Inactive or Withdrawn in STIOffice,
the SIS status will be Inactive.
•
Special Education Status: The status of the student within
STISETSWeb. This is set within the student folder in STISETSWeb.
•
Date of Birth: Pulled from STIOffice.
•
Age: Pulled from STIOffice.
•
Grade: Pulled from STIOffice.
•
Home Room Number: Home Room is set up in STIOffice. Home
Room teachers are not displayed in STISETSWeb.
•
Entry/Withdrawal Date: This will list the entry/withdrawal dates
entered in STIOffice.
•
Gender: Pulled from STIOffice.
•
Race: Pulled from STIOffice.
•
Exceptionality: Must first be set in the student folder within
STISETSWeb.
•
LEA Number: Pulled from STIOffice.
•
Lookup: The Lookup button provides quick access to your User
Desktop from anywhere in the program.
•
Record of Access: You will notice a Record of Access link at
the bottom of the selected student area. Simply click on this link to
view and add entries to the electronic record of access. You have the
ability to print the record of access here or from the Reports Desktop.
STISETSWeb is designed to enter automatic entries for anyone who
selects the student and is not the Case Manager for a child.
•
Services: The Services link provided in the bottom right corner
allows the user to view services provided for the selected student.
STI_0725081435
Summer-Fall 2008 STISETSWeb NM
Utilities Desktop
The Utility Desktop houses several options that enhance the operation of the
software. STISETSWeb has a System File option located under Utility Desktop. It is
recommended that only one user have access to the STISETSWeb System File. This
area of the program should be kept under high security and edited prior to the first
day of school or before using the STISETSWeb program.
Utilities Desktop | System File
The System File has three tabs for setting up the system: Configuration, Security
Settings and Office Integration.
•
•
Summer-Fall 2008 STISETSWeb NM
Configuration
o
Scheduled Time: The administrator must set a scheduled time each
day for the student STIOffice demographic data to update in
STISETSWeb. The time set must be AFTER STIDistrict (Daisi
import) uploads are complete.
o
Information NOW Webservices URL: Districts that have
InformationNOW will enter the appropriate URL.
o
Show Student SSN: The district must determine whether student
Social Security Numbers are to display within the student folder.
Check the Show Student SSN box to display Social Security
Numbers. These numbers will only be seen in the Student Folder
on the Services tab.
o
Inactivity Timeout: Inactivity logout time may be set here, up to 15
minutes. If the workstation remains inactive for this length of time,
the user will automatically be logged out.
Security Settings: This tab is used to maintain passwords on an
administrative level. The following options may be edited here:
o
Password Expiration Days: This allows for a password to expire in
a given number of days. In a typical setup, the system will require
that a user change his/her password every 30 to 90 days.
o
Remembered Passwords: This is a setting that allows several
previously used passwords to be remembered. Users cannot use a
password more than once.
o
Lock Out Minutes: This is the number of minutes for which a user
may attempt to sign on. If a user tries to log on unsuccessfully for
STI_0725081435
STISETSWeb – New Mexico • 7
this amount of time, the account will be locked. An administrator
will have to unlock the account.
o
•
Lock Out Threshold: This is the number of times a user may
attempt to log in with an incorrect password. If someone tries to
log in unsuccessfully this number of times, it will lock the account.
The administrator will then have to unlock the account.
Office Integration: This tab is a support tool provided to help
administrators manage each school’s Office Integration service. This
tab displays the school; school number; the date on which Office
Integration was last run; and the name of the computer hosting the
Office Integration service.
Defining Security Groups
The security model for STISETSWeb is very robust, allowing administrator to set
security assignment for employees who serve students in multiple schools. This will
enable speech therapists, gifted teachers, etc., to access their caseloads from one
login. After initial security groups have been assigned, supervisors will have the
option to add or remove rights as needed for individual employees. Since student-bystudent security assignment is allowed, supervisors have many options available for
securing confidentiality of student records.
Security groups are defined by the user’s level of access to the program. The
administrator may view Groups, Users in each Group and Group Set-Up. As shown
below, as a group is highlighted in the left box, the users in the selected group are
displayed in the right box.
Note: If users are not assigned security groups, they will have no options upon
logging into the program.
Security Groups are pre-installed in the software. These vary from state to state. The
most common groups are as follows:
8 • STISETSWeb – New Mexico
•
Managers: Employees assigned to this security group have full access
to the software for managing records in their school only. Managers
have full access over student records and managing the STISETSWeb
software in their school.
•
Teachers: This security group was designed for classroom teachers,
providing the ability to manage all students in the teacher’s caseload.
Whether employees serve in the capacity of case manager, related
service provider, Special Education teacher, psychometrist, etc., all
student records may be managed from one work area.
•
General Ed. Teachers: This group will be created if the Create Gen
Ed Teachers box was checked in the System File. This group has readonly rights by default.
•
Administrators: Administrators have full user access for all schools
in the district. Typically, board office personnel would be assigned this
security group.
•
Medicaid: Employees assigned to this security group have full access
to the Medicaid Desktop.
STI_0725081435
Summer-Fall 2008 STISETSWeb NM
•
State Users: Assignment of this Security Group allows view-only
access to the program. Typically, State Department representatives
would be assigned to this group.
Security Group Edit Commands
The following options may be helpful when working with security groups:
•
Insert: Insert new security role names and descriptions.
•
Change: Change the name and the description of security roles.
•
Delete: Delete a security role from the list.
•
Copy: Create a duplicate of the group selected. In creating a new
group, a user may look at the existing groups and determine which
group has rights that are most similar to the group to be created. In this
case, select a group and click the Copy button to copy the current
permissions from the model group. Then rename the new group.
•
Print: Print the effective permissions for a selected group. To view the
current rights for a group, select the group and click the Print button.
•
Members: Add or remove users from the highlighted security group
list, or view the current members of a selected group.
Other Security Group Items
Summer-Fall 2008 STISETSWeb NM
•
Effective Permissions: A tool for viewing individual user
permissions. No modifications to permissions are allowed from this
menu option.
•
Edit Permissions: A tool for locking down and editing permissions
for entire groups of users. This will allow the System Administrator to
edit the permissions of a particular group more precisely.
•
Object Types: Three different classifications of security in
STISETSWeb.
•
Groups: Group whose permissions are to be viewed. For more
information on this, please refer to the STISETSWeb User Manual,
available for download under Documentation | User Manuals on
the STI Support site at http://support.stik12.com/documentation/default.asp (user name and password
required).
STI_0725081435
STISETSWeb – New Mexico • 9
Building Employee File
Employee information may be entered in one of two ways. Begin by expanding the
Utilities Desktop. The options that are available are shown below.
•
Verify that the teacher does not exist in the system by Searching for
the employee before inserting a new record or Importing a teacher.
•
To import an employee, click Import. This will copy information from
the employee file that has been uploaded to the District database from
the local school STIOffice program. Since demographic information
will be automatically copied over, this option will save time.
•
After clicking Import, search for the employee by entering the Teacher
Number, Last Name or First Name.
•
Once the desired employee’s name has been highlighted, click OK.
•
To add new employees who do not exist in the local school employee
file, click the Insert button. After clicking Insert, complete the
appropriate information and click OK to save the information.
Defining Codes
Location Codes
Location Codes are used with Services. This will populate the drop-down list for
Service Locations.
•
10 • STISETSWeb – New Mexico
Click Insert or Change to access the following fields:
STI_0725081435
Summer-Fall 2008 STISETSWeb NM
•
o
Name: Title of the location.
o
Description: Any notes on this location.
o
Expiration (optional): The last date on which this location will be
used.
Click Delete to remove a selected location.
District and State Codes
To access this menu option, click the plus sign beside Code Desktop and then
select District Codes. Most of these codes are NOT editable because they are
defined by the state.
•
If the Insert, Change and Delete buttons do NOT appear next to the
codes listed for a selected category, that code category is locked.
•
If the Insert, Change and Delete buttons do appear next to the codes
listed for a selected category, that code category is editable.
•
When a code needs to be edited, the user should first modify the State
Code and then modify the District Code.
Example
To customize the selection list of Assessment names, select Utilities and then go to
the subcategory Code Desktop.
•
Select State Codes.
•
Select Eligibility Name of Assessment category.
•
Summer-Fall 2008 STISETSWeb NM
o
Click Insert and enter Code, Name and Description. Disregard the
Federal Codes.
o
Click OK to save changes.
Select District Codes and Eligibility Name of Assessment
category.
STI_0725081435
STISETSWeb – New Mexico • 11
o
Click Insert and enter Code, Name and Description. Then select
the code you previously entered into state codes from the State
Code drop-down box.
Managing Student Data (Student Maintenance)
Create Student Folder
Creating a Student Folder introduces a student to the Special Education process. As
forms are completed in the program, the dates are written to the folder. The purpose
of the folder is to house the most current information on Special Education students.
•
Assign Case Manager: By default, the person logged in is assigned
as the Case Manager. To change the default, click the blue plus icon
near the upper left corner of the Case Manager field.
•
After entering data in the appropriate field, click Search.
•
Highlight the name of the desired student and either double-click on the
name or click Import.
•
When you click on Import, you will receive a message that says These
student(s) have been found in SETS that may match the one you are
attempting to import. Do you still want to import? Click Yes to import
or click No to cancel the procedure.
Important Note: If a student record is not in STIDistrict Workstation, the record will
not be in STISETSWeb. Students already in STISETSWeb will NOT appear during
the Create a Student Folder process.
Caseload Assignment
The Caseload Assignment area is used to create the Special Education relationship(s)
between staff members and particular students. The student listed at the top of the
screen is the student with whom the user is working. A staff member may be
associated with a student in multiple ways. All assignments are performed here
except assignment of a Case Manager.
12 • STISETSWeb – New Mexico
•
Select the Caseload Assignment menu from the Utilities Desktop.
•
Make note of the student name displayed at the top of the screen. This
is the student to whom you are assigning teachers.
•
Click Insert.
STI_0725081435
Summer-Fall 2008 STISETSWeb NM
•
Click the blue plus icon to search for an employee. Select the
appropriate name and click OK to continue. Click the down arrow to
select this employee’s relationship to the student. Then click OK to
save.
Note: The types of relationships are pulled from the District Code field (StaffStudent Relationship).
•
This is one of the few editable codes.
Delete a Student
Occasionally it becomes necessary to delete a student record. For example, a Special
Education Folder may have been created by mistake for a student. Deleting a student
from the STISETSWeb database does not delete the student from the STIDistrict
database or the STIOffice program. The only record deleted is the student’s Special
Education Folder.
•
Select Delete a Student from the Utilities Desktop.
•
After the desired criteria have been entered, click Search.
•
Highlight the name of the student to be deleted and click the Delete
button on the lower right. After deletion, the program will return to the
User Desktop.
Note: Student records with any Completed forms cannot be deleted.
Mass Caseload Assignment
This utility is used to change relationships from one staff member to another. This
should be utilized at the start of school or at end of year when students are moving
from schools or grades. Mass Caseload Assignment is a two-step process:
•
Summer-Fall 2008 STISETSWeb NM
The user must first decide which students are to be moved from their
current teachers.
STI_0725081435
STISETSWeb – New Mexico • 13
•
The user should decide which teachers will receive these students.
•
It is easiest to read this area as though it were a sentence: Find all
students having ____teacher, with ____ relationship; or find all
grade__ students. Then assign them to ___ staff member with the new
relationship of _____.
To mass-move a caseload or relationship:
•
In Find Students, search: School, Grade, LRE, and /or Exceptionality
for the students to be moved.
•
Once you have fulfilled the search criteria, click the Search button.
•
There is one more search option, Assign To. Use this feature to define
the staff member to whom the selected students are to be assigned. The
relationship must be defined as well. DO NOT click Assign at this
point.
•
Select the student from the search box below. When the box beside the
appropriate student has been checked, click Assign.
•
Continue this process until all students have been moved to the
appropriate staff member.
Archive Students
This feature is provided to allow users to archive records of students who are no
longer receiving services in a district.
The Archival process is an End of Year procedure. The basic action performed
during this process is the selection of students followed by the mass-exiting of the
selected students.
•
•
14 • STISETSWeb – New Mexico
Archiving automatically changes the Exit Reason. Archiving does NOT
change the status of the student folder.
o
First search the students as previously explained.
o
Check the non-STIOffice checkbox to select students who are not
in the STIOffice program.
Click Search to continue.
STI_0725081435
Summer-Fall 2008 STISETSWeb NM
•
Continue to the Archive Students box. Select the Exit Reason and select
an Exit Date.
•
Check the box next to each applicable student’s name. Then click OK.
Un-Archive Students
This utility is used to reverse students’ Archived status. It is recommended that this
procedure be used only as the Special Education director has outlined within your
district. To un-archive a student:
•
First locate the students to un-archive.
•
Click in the checkbox to un-archive a student or click in the checkbox
to the right of Un-archive to select all students. To select multiple
checkboxes, hold down the Shift key on the keyboard as you click on
each box.
•
After all boxes have been selected, click the Un-Archive button to the
right of the search results field.
Critical Student Information
This tool should only be used by a System Administrator to change a student’s
existing Student Number or school in STISETSWeb to match that in STIOffice.
Student Numbers are entered as numeric combinations, with no alphabetical or
special characters permitted. These data elements may be changed: Student Number,
School, First Name, Last Name, Social Security Number, Phone Number, Date of
Birth, Gender and Ethnicity.
Summer-Fall 2008 STISETSWeb NM
•
Choose the appropriate student using Select a Student.
•
Go to Utilities Desktop | Change Student Number.
STI_0725081435
STISETSWeb – New Mexico • 15
•
Read the warning screen. If you are ready continue, adjust information
such as Student Number or School as needed.
Student Desktop
The Student Desktop houses student record information and dates for state
compliance. This area of the software is essentially the Special Education teacher’s
working environment. Many of these fields will auto-populate from forms that are
completed in STISETSWeb. The user may also have to manually enter dates. If you
have forms that were completed prior to using the program (e.g., if a student was
referred on 11/02/06), you will have to manually enter dates.
16 • STISETSWeb – New Mexico
STI_0725081435
Summer-Fall 2008 STISETSWeb NM
Student Folder
Create Student Folder
Creating a Student Folder introduces a student to the Special Education process. As
forms are completed in the program, the dates are written to the folder. The purpose
of the folder is to house the most current information on Special Education students.
Note: If a student record is not in STIDistrict Workstation, the student will not be
listed in STISETSWeb.
Housing the most current date information on students, this feature is accessed by
clicking the plus sign to the left of Student Desktop and then selecting Student
Folder. The student folder houses dates to be monitored for compliance. These
fields will auto-populate from forms that are completed in the program.
Basic Tab
•
Summer-Fall 2008 STISETSWeb NM
Status: Click the down arrow to select a status of Active, Contracted,
Delete, Inactive, In-State, Not Eligible, Referred, Out-of State or
Referred.
o
Active refers to all students currently receiving Special Education
services.
o
Active/Referred refers to all students who are currently receiving
Special Education Services but are being referred for another
reason.
o
Contracted refers to students who services are contracted.
STI_0725081435
STISETSWeb – New Mexico • 17
18 • STISETSWeb – New Mexico
o
Delete refers to students whose status is Delete.
o
Direct refers to all students whose services are provided directly in
the Special Education classroom.
o
Inactive refers to all students who have left the school/LEA.
o
In-Direct refers to students whose services are provided in the
general education classroom.
o
Not Assigned refers to students who have not been assigned a
status category.
o
Not Eligible refers to all students who have been determined not
eligible for Special Education services.
o
Referred refers to students who have been referred but not yet
determined eligible for Special Education services.
•
Service Level: Click the down arrow to select the appropriate Service
Level.
•
LRE: Click the down arrow to select the student’s Least Restrictive
Environment
•
Case Manager: The name of the teacher who will be responsible for
maintaining the student’s Special Education record will be displayed in
the field.
•
Exceptionalities: Click this link to enter the student’s exceptionality
or multiple exceptionalities.
•
Exceptionality Cause: From the drop-down arrow, select the
appropriate cause if the student’s Exceptionality is Visual Impaired,
Hearing Impaired, Deaf/Blind or MD.
•
IEP Begin Date: Enter the IEP Begin Date.
•
Re-Evaluation Date: Enter date.
•
Special Ed Exit Date: Enter date.
•
IEP End Date: After the IEP Begin Date has been entered, this date
will automatically populate.
•
Re-Evaluation Due Date: Enter date.
•
Special Ed Exit Reason: If the student has exited, please select the
appropriate reason.
•
Referral Code: Select the referral code from the drop-down list.
•
Hearing Impairment Level: Select the appropriate level of hearing
from the drop-down box.
•
Transition IEP Status: Select the appropriate IEP status from the
drop-down box.
•
Referral Date: Enter the student’s Date of Referral.
•
Vision Impairment Level: Select the appropriate of vision from the
drop-down box.
•
Special Education Transition: Select this checkbox if IEP has
addressed need of transition services.
•
Expected Graduation (MonthYear): Enter the appropriate date.
STI_0725081435
Summer-Fall 2008 STISETSWeb NM
•
Living Setting: From the drop-down box, select the appropriate
living setting.
•
Part B: This box will be checked by default, since the majority of the
students in Special Education are school-age students.
•
•
o
Parental Consent for Initial Eval: Enter date.
o
Initial Eligibility Determination: Enter date (alternately, the date
will be drawn from the Determination of Eligibility form.
Part C: This field will need to be checked if student is not of school
age.
o
90 Day Transition: Enter date of 90 Day Transition.
o
Eligibility Determination: Enter date.
o
Initial Placement: Enter date.
o
Non-Compliance: Select Non Compliance Code]
o
IEP Implementation: Enter date.
Other Services: Check any other services the student may be
receiving.
Testing Information Tab
•
General Testing: Enter testing data or information entered on the
Testing Discussion. The form will write to this field.
•
State Test: Type in testing data or information entered on the Testing
Discussion. The form will write to this field.
•
District Test: Type in testing data or information entered on the
Testing Discussion. The form will write to this field.
•
Other Test: Type in testing data or information entered on the Testing
Discussion. The form will write to this field.
Events Tab
•
Summer-Fall 2008 STISETSWeb NM
Once data has been entered on the student’s folder (or when the forms
have been completed), event dates will write to this tab and then
STIOffice Integration will populate to STIOffice under the User File
NMSP_2.
STI_0725081435
STISETSWeb – New Mexico • 19
Change Case Manager
This option allows the user to change a student’s Case Manager. Only users with
Administrative or
Manager rights will have this option.
•
After selecting this menu option, the user may search by School, Last
Name or First Name. Enter the desired criteria and click Search.
•
Once the desired employee name is highlighted, click Select.
Process Management
All state-defined processes are contained in the STISETSWeb software. A Process is
defined as a group of forms that should be completed within a specified period of
time. The Process Manager menu is the location of all processes, and therefore this
menu area is the teacher’s primary workplace within the program.
When a user with Teacher rights logs on, the user’s caseload will display on the
opening screen. From this opening screen, a user may begin selecting a student,
assigning the Process and working on forms. Below is a screen shot of all available
processes for New Mexico users.
20 • STISETSWeb – New Mexico
STI_0725081435
Summer-Fall 2008 STISETSWeb NM
Selecting
The Student Process Manager allows the user to view and manage all processes
assigned to a student. There are five buttons located on the left side of this screen.
The next screen displays the selected process. The buttons on the left are defined as
follows:
•
Insert: Allows the user to attach a new process to a student.
•
Delete: Allows the user to delete a process from a student’s file if no
forms have been completed in that
•
process.
•
Deactivate: Allows the user to deactivate a process. A user may
deactivate a process with open or completed forms, but the user should
be cautious when using this option: THIS PROCESS IS
IRREVERSIBLE. When a record is deactivated, the program notes the
deactivation in the Record of Access. Only users with Administrator or
Manager rights have the ability to deactivate a process.
•
Complete: Allows the user to finalize a process AFTER all required
forms have been completed. After a process has been completed, the
description of the Complete button changes to Re-Open.
•
Re-Open: Allows a user to return to forms/processes that have been
previously completed.
•
Forms: Allows a user to display all forms in the selected process.
•
After highlighting the IEP Process, click the Forms button at the
lower left to display all forms contained in this process.
Working on Forms in the Process
All forms required in the Process should be displayed on the screen as shown below.
A colored square icon displays to the left of each form. On the opening screen each
form has a white square beside it until the form is opened. As forms are modified,
the squares will change color. Rest the mouse cursor on any icon to display a
descriptive ToolTip. Icons are color-coded as follows:
•
Summer-Fall 2008 STISETSWeb NM
Green: Designates a form that is Open. The form is in draft status and
may be changed. Any form other than those sent home for signature
will print out with a Draft watermark until the form has been
completed.
STI_0725081435
STISETSWeb – New Mexico • 21
•
Red: Designates a Completed form. No changes are allowed except by
creating an amendment.
•
White: Designates Not required for process completion.
•
Blue: Designates Open (Amendment). This is a previously completed
form with an Amendment.
•
Purple: Designates a Completed Amendment.
To edit the forms of a particular student, highlight the correct process and click the
Forms button on the left of the screen. Then select the form that that you wish to
edit. The selected form will be displayed on the screen for editing on the IEP Section
A.
File Option
22 • STISETSWeb – New Mexico
•
Save Changes: Allows the user to save the changes made to a form.
Users may also use the Save button, located next to the Edit button.
•
Reseed Data: Allows the user to update data on a form. After a saved
form is re-opened, any additional information entered in the STIOffice
program will automatically transfer to the form from the Special
Education Folder.
•
Cancel Changes: Allows the user to cancel the changes made to a
form.
•
Complete Form: Allows the user to mark a form as complete. No
changes will be allowed after this option is selected. Required fields
must be completed before Complete Form is selected. Errors will
STI_0725081435
Summer-Fall 2008 STISETSWeb NM
prompt the user to enter required information before completing the
form and fields with errors will be highlighted for easy identification.
•
Print to PDF: Allows user to open form in a .PDF format for printing.
•
Print Process: Opens a screen allowing the user to print all or part of
the forms in a process.
Edit Option
•
Spell Check: Select this option for spell checking, or press F7.
•
Show Form Indicators: Allows visually impaired users to see the
status of each form in a process. This indicator is for visually impaired
users that have difficulty distinguishing the colored icons that identify
form status.
•
View Audit Trail: This feature allows access to the edited versions of
a form by date.
•
Exit Form: Allows the user to exit the form.
•
Add Form: As forms are needed throughout a process, they may be
added by selecting the Edit menu and then choosing this option.
•
Remove Form: Allows the user to delete the highlighted records.
•
Move Form: Allows the user to move a Completed form from an
incorrect process to the correct process. The user may move a form up
to 30 days from when the process was assigned.
•
Create Amendment: An Amendment may be created to adjust data
on a completed form. See the section below for more details.
•
Annotate Process: Allows a user to record commentary on the
forms and processes.
Creating an Amendment
To create an Amendment, follow these steps:
Summer-Fall 2008 STISETSWeb NM
•
From the Edit menu, select Create Amendment. Amendments are
created from Completed forms.
•
Creating an Amendment creates a draft copy of the original form for
editing. The LED icon to the left of the form remains blue until the
Amendment has been completed. The original form may be edited as
STI_0725081435
STISETSWeb – New Mexico • 23
much as needed. The original version of the form may be viewed by
selecting View Audit Trail from the Edit menu.
•
It is not necessary to insert a second instance of a form to modify an
existing IEP. The Create Amendment feature is used for this.
•
After making any necessary changes, you may complete the amended
form by selecting Complete Form, from the File menu.
Printing Forms
There are two options for printing the IEP. Select one of the following from the File
menu:
•
Print to PDF: This option allows the user to print a single selected
(highlighted) form. The example on the following page shows a sample
profile page in draft status. Note the Draft watermark. Once the form is
completed, this watermark will no longer display.
•
Print Process: Select this option to print ALL the forms in a process
or multiple SELECTED form(s) in a process. Multiple forms may be
selected by pressing the Ctrl key and then clicking on each desired
form to highlight it. Click OK to continue. A preview of the form will
be displayed onscreen. The process may then be printed by clicking the
printer icon at the top of the screen.
Documents
On the Documents screen, the user may Insert, Change, Delete or Download
documents that are required at the LEA/School level. These documents are saved in
the database on the district server.
24 • STISETSWeb – New Mexico
•
To add a document that is not already pre-installed with STISETSWeb,
click the Insert button on the Documents Page.
•
Click Change to change an existing document.
•
Click Delete to delete a document.
•
Click Download to download a document.
•
Fill out the appropriate text fields in order to have your file added and
uploaded. Click the Browse button.
STI_0725081435
Summer-Fall 2008 STISETSWeb NM
STIOffice Integration
A variety of non-Special Education information is available in STISETSWeb. This
up-to-the-minute data is drawn from STIDistrict and may be viewed by clicking the
menu under STIOffice Information on the left side of the screen under the Student
Desktop menu. The following types of data may be selected:
•
Attendance
•
Discipline
•
Entry/Withdrawal
•
Schedule
•
Grades
•
Guardian Information
All information drawn from STIOffice is read-only in STISETSWeb. Any changes
to this data must be made from within the STIOffice application. The STIDistrict
Enrollment program allows users to view real-time attendance, discipline and
entry/withdrawal information. An upload must occur in order for the remaining
pieces of student information to be updated (schedule, guardian information and
grades).
Reports Desktop
Only users with Manager or Administrative rights will have access to this menu. The
difference between this menu and the Reports menu under Student Desktop is that
this menu allows the user to generate a listing of all students in the entire school or
district, whereas the menu under Student Desktop restricts reporting to students on a
particular teacher’s caseload.
Printing a Report
Summer-Fall 2008 STISETSWeb NM
•
Highlight the desired report on the left side of the screen.
•
If appropriate, select Filter Options.
STI_0725081435
STISETSWeb – New Mexico • 25
•
The user may select to view only students with an Active status.
•
Click the down arrow to select the Output Format.
•
o
PDF brings up Acrobat Reader.
o
RTF brings up Microsoft Word.
o
XLS brings up an Excel spreadsheet.
Click Print to preview the report before printing.
STISETSWeb Query
This utility is designed to allow Administrators and Managers to build reports based
on school-wide or district-wide listings. While the query is being built, a display of
the report organization will appear at the bottom of the SETS Query screen. This
allows users to view the report layout.
SETS Query and SETS Query (Caseload) are designed to allow Administrators,
Managers and Teachers to build reports based on teacher caseloads, school-wide or
district-wide listings. SETS Query (Caseload) is designed to build user-defined
reports based ONLY on an employee’s caseload. An employee who has been
assigned a Security Role of Teacher will use this report option after login. Following
the steps in this guide will allow Administrators, Managers or Teachers to build
custom reports with selection of specific data elements. Administrators and
Managers may use this component by selecting the Report Desktop and then
choosing SETS Query. Teachers may use this component by selecting Report
Desktop and then choosing SETS Query (Caseload). While the query is being
built, a display of the report organization will appear at the bottom of the SETS
Query screen. This allows users to view the report layout.
•
School: Use the drop-down list to choose a particular school for which
to build a report. The All Schools option may also be used to build a
report for all schools in the database.
Note: Teachers will only have access to schools attended by their caseload students.
•
Report Title: If a preloaded query is used, the report name will
display here.
•
Xml, HTM, Txt: Choose the format in which the report will be
generated.
o
26 • STISETSWeb – New Mexico
Xml: Used primarily for trouble-shooting.
STI_0725081435
Summer-Fall 2008 STISETSWeb NM
o
HTM: This is the default format that generates “live” reports
(double-clicking on any student’s information from the report
preview screen brings up the child’s folder for editing/viewing).
o
Txt: Text format.
•
Counts Only: Check this box to generate a report listing totals only.
•
Active/Referred Only: Check this box to generate a report of active
and referred students only. If left unchecked, the report will include
inactive students also.
•
Archived: This will display only students who have been archived.
•
Run: Click this button to run the report.
•
Counts: Check this box to display counts at the bottom of the screen,
based on the criteria selected.
•
Report Name: This text box displays the name of a saved or loaded
report.
•
Load: Click here to load a previously saved report.
•
Save: Select this option to save the report.
•
Public: This will allow all users of STISETSWeb to use your saved
report
•
Private: This report will only be available to the user that created it.
•
New: Select this option to clear all fields, preparing the screen for a
new report.
STISETSWeb Query Fields
There are three headings that contain text fields and drop-down boxes that may be
applied to the report.
Summer-Fall 2008 STISETSWeb NM
•
Student Fields: Student Demographic fields. Select the checkbox to
include the information in the report. After selecting a checkbox, you
may filter further by clicking on the text next to the checkbox.
•
Folder Fields: Data from student Special Education folders. Select
the checkbox to include this information in the report. After selecting a
checkbox, you may filter further by clicking on the text next to the
checkbox.
•
Form Fields: Data from student forms.
STI_0725081435
STISETSWeb – New Mexico • 27
STISETSWeb Query Filters
•
Field Name: The name of the field to be filtered will display here.
•
Filter Value: Use the lower small box to type in the desired filter
value. Some fields will have associated codes that will appear in the
upper filter value box for selection.
•
Select Properties for Field: In the box at the left, highlight a
desired filter property.
o
None: No filters applied
o
Equal To: Use this property to search for an exact result.
o
Not Equal To: Use this property to find items not equal to the
specified filter value
Example: Use equal filters on the last name field to select all kids
whose last name is equal to Smith.
28 • STISETSWeb – New Mexico
o
Less Than: Use this filter to find students with fields less than
the specified filter value (such as date fields, age or grade).
o
Less Than or Equal To: Use this filter to find students with
fields less than or equal to the filter value (such as date fields, age
or grade).
o
Greater Than: Less Than: Use this filter to find students with
fields greater than the filter value (such as date fields, age or
grade).
o
Greater Than or Equal To: Use this filter to find students with
fields greater than or equal to the filter value (such as date fields,
age or grade).
STI_0725081435
Summer-Fall 2008 STISETSWeb NM
Example: Use less than and greater than filters to filter a certain
age, date, grade or a range of these fields.
o
Empty: Use this filter to find all students who have no
information in a particular field.
o
Not Empty: Use this filter to find all students who have data in
the selected field.
o
Is Contained Within: This filter may be used with age or grade.
o
Like: This may be used as an equal to filter by entering the exact
value sought in the filter value range. This may also be used to find
like filters.
o
Not Like: This may be used as a not equal to filter by entering the
exact value sought in the filter value range. This may also be used
to find unlike filters.
Example: Use the Like option on the last name field and place
%a% in the filter value box. This will give you a report of all
students with a last name that begins with an A.
o
Between: Use this filter along with a comma to separate age,
grade or a date range.
o
Sort by this Field: Select either No Sort, Ascending or
Descending.
STISETSWeb Query (Caseload)
Unlike the previous query, this query is designed to build user-defined reports based
ONLY on an employee’s caseload. An employee who has been assigned a security
role of Teacher will use this report option after login.
Summer-Fall 2008 STISETSWeb NM
STI_0725081435
STISETSWeb – New Mexico • 29
P
Printing a Report 25
Printing Forms 24
Process Management 20
Index
R
Relationship 5
Reports Desktop 25
S
Security Group Edit Commands 9
Selecting 21
STIOffice Integration 25
STISETSWeb - New Mexico 1
STISETSWeb Query 26
STISETSWeb Query (Caseload) 29
STISETSWeb Query Fields 27
STISETSWeb Query Filters 28
Student Desktop 16
Student Folder 17
Student Information 5
A
About STISETSWeb 1
Accessing the Program/Logging In 2
Archive Students 14
B
Building Employee File 10
U
C
Un-Archive Students 15
User Desktop 5
Utilities Desktop 7
Utilities Desktop | System File 7
Caseload Assignment 12
Change Case Manager 20
Create Student Folder 12, 17
Creating an Amendment 23
Critical Student Information 15
W
Working on Forms in the Process 21
D
Defining Codes 10
Defining Security Groups 8
Delete a Student 13
District and State Codes 11
Documents 24
L
Location Codes 10
M
Managing Student Data (Student Maintenance) 12
Mass Caseload Assignment 13
O
Opening Screen 3
Other Security Group Items 9
Summer-Fall 2008 STISETSWeb NM
STI_0725081435
Index • 31