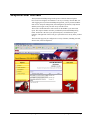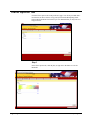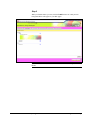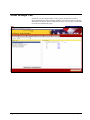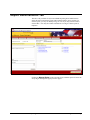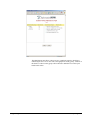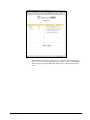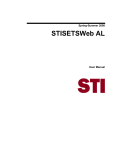
1
Fall 2006
STI InformationNOW
Reporting Portal
User Manual
Information in this document is subject to change without notice. Student and school data used herein are fictitious
unless otherwise noted.
The contents of this document are the property of STI. This information is intended for users of the STI suite of products
only. Reproduction or redistribution of these materials to anyone other than STI customers or users of STI Software is
prohibited without prior written consent from STI.
© 2005-2006 Software Technology, Inc. All rights reserved.
Microsoft, Windows, Word and Internet Explorer are registered trademarks or trademarks of Microsoft Corporation in
the United States and other countries.
Other product and company names herein may be the trademarks of their respective owners.
Software Technology, Inc.
4721 Morrison Drive, Suite 200
Mobile, AL 36609-3350
1-877-844-0884
This document was last modified on September 19, 2006. Any subsequent changes made to the STI applications
described herein will be discussed in the release notes that accompany each product’s update.
Contents
Accessing the Program
1
Logging On to InformationNOW Reporting Portal ................................................................... 1
Logging Out............................................................................................................................... 1
InformationNOW Reporting Portal Overview
2
Features...................................................................................................................................... 2
Graphical User Interface............................................................................................................ 3
Installation Requirements
4
Minimum System Requirements................................................................................................ 4
Setting Preferences
5
Preferences Screen..................................................................................................................... 5
User Information Tab ................................................................................................................ 5
Theme Options Tab ................................................................................................................... 6
Code Groups Tab....................................................................................................................... 8
Report Administration Tab ........................................................................................................ 9
Alert Administration Tab......................................................................................................... 11
Group Administration Tab....................................................................................................... 13
Managing Reports
15
Manage Reports Screen ........................................................................................................... 15
Selecting and Creating Report Instances ................................................................................. 15
Selecting the Sort Order of the Report Instances ..................................................................... 17
Managing Alerts
18
Alerts Inbox ............................................................................................................................. 18
Manage Alerts Screen.............................................................................................................. 19
Selecting and Creating Alert Instances .................................................................................... 20
Index
Fall 2006 STI InformationNOW Reporting Portal
21
0919061810
Contents • iii
Accessing the Program
Logging On to InformationNOW Reporting Portal
To access the features of the InformationNOW Reporting Portal system, you must
first log on to the program.
Choose your Location from the drop-down list and then enter your Logon ID and
Password. This should be the same ID and password you use in STIOffice or
STIDistrict. If you are a member of the Admin Group in STIDistrict, you will have
administrative security access to InformationNOW.
Click the Logon button when you are ready.
Logging Out
You may log out anytime during your session. To log out, simply click the logout
link located on the menu bar in the upper right corner of the screen.
Fall 2006 STI InformationNOW Reporting Portal
0919061810
Accessing the Program • 1
InformationNOW Reporting Portal
Overview
Features
The InformationNOW Reporting Portal provides instant access to the information
you need when you need it, without requiring multiple applications. Here are a few
of the features included with InformationNOW:
•
The ability to choose the report you need most from a list of preconfigured report templates. InformationNOW Reporting Portal
includes an easy-to-use report manager that lets you create customized
reports from the report templates.
•
The ability to monitor activity with the Alert Manager. With this tool,
you can spot trends, from attendance to grades, before potential
problems arise.
•
The ability to utilize STI applications automatically to access the
information you need.
2 • InformationNOW Reporting Portal Overview
0919061810
Fall 2006 STI InformationNOW Reporting Portal
Graphical User Interface
The InformationNOW Reporting Portal operates within the Internet Explorer
browser (IE 6.0 or higher) environment. It’s as easy as visiting a favorite Web site.
After logging on to InformationNOW Reporting Portal, you are presented with the
main screen. All report management, alert management, preferences, help features
and the system logout is only one click away from this screen.
The screen is divided into three main sections. In the middle is your most used
report. This report refreshes each time you launch InformationNOW Reporting
Portal. On the left is the list of your preferred reports, created from the report
templates. The right side of the screen gives you instant access to any alerts you have
set up.
The look of the page may be configured to a variety of themes, including seasonal,
school colors, mascots and photos.
Fall 2006 STI InformationNOW Reporting Portal
0919061810
InformationNOW Reporting Portal Overview • 3
Installation Requirements
Minimum System Requirements
The components required for installation of InformationNOW Reporting Portal are:
4 • Installation Requirements
•
Internet Explorer 6.0 or higher
•
IIS – Windows 2000 SP4 or higher
•
.NET – Framework 1.1
•
SQL – server reporting services SP1 or higher
•
MS reporting services
•
The InformationNOW Reporting Portal application
•
STI applications
0919061810
Fall 2006 STI InformationNOW Reporting Portal
Setting Preferences
Preferences Screen
When you click the preferences link from the home page, the preferences page
will display, as shown below. From this page you may set up user information, select
theme options, assign code groups, set up report and alert preferences or allow and
restrict access to reports and alerts. These features are available within the
corresponding tabs onscreen.
User Information Tab
Here you may personalize your interaction with InformationNOW Reporting Portal.
You may enter your birth date and your e-mail address, and you may also select the
home page photo that appears when you log on. Click the Browse button and search
your hard drive for the photo you wish to select.
After you’ve entered the information, click the Apply button. The next time you log
on, you will see your changes.
Fall 2006 STI InformationNOW Reporting Portal
0919061810
Setting Preferences • 5
Theme Options Tab
Click the Theme Options tab on the preferences page. You will be provided with a
list of themes to choose from to set up your InformationNOW Reporting Portal
background. Each theme also features a preview thumbnail that you may look at to
help you choose.
Step 1
In the Theme Options tab, click the plus (+) sign next to the theme to view the
thumbnail.
6 • Setting Preferences
0919061810
Fall 2006 STI InformationNOW Reporting Portal
Step 2
When you find the theme you want, click the Load link next to it and your new
background theme will appear on your Web pages.
Note: Contact STI Professional Services for information about adding custom
themes.
Fall 2006 STI InformationNOW Reporting Portal
0919061810
Setting Preferences • 7
Code Groups Tab
On this tab, you may assign available codes to groups. Groups may be used as
selection parameters for report and alert templates. You may also create new groups
and assign codes to them. In the example shown below, a new group was created and
two codes were added to the group:
8 • Setting Preferences
0919061810
Fall 2006 STI InformationNOW Reporting Portal
Report Administration Tab
This tab is only available for InformationNOW Reporting Portal administrators.
Select this tab to load custom reports and to manage rights to access reports. For
custom reports, you may use MS Reporting Services or you may choose to link to
custom URL’s. You may also enable or disable the viewing of custom reports as
templates.
Clicking on Manage Rights on the right side of any available report will cause the
Group Rights Management popup screen to appear.
Fall 2006 STI InformationNOW Reporting Portal
0919061810
Setting Preferences • 9
The Administrator may allow or deny access to a particular report by checking or
unchecking the Allow Access box next to the appropriate security group. All users in
the district or school security group will be allowed or denied access to this report
based on this action.
10 • Setting Preferences
0919061810
Fall 2006 STI InformationNOW Reporting Portal
Alert Administration Tab
This tab is only available for InformationNOW Reporting Portal administrators.
Select this tab to enable or disable the viewing of alert templates and to manage
rights to specific alerts. You may also set up a schedule for running the templates on
a system-wide basis.
Clicking on Manage Rights to the right of any alert will cause the Group Rights
Management popup screen to appear.
Fall 2006 STI InformationNOW Reporting Portal
0919061810
Setting Preferences • 11
The Administrator may allow or deny access to a particular alert by checking the
Allow Access box next to the appropriate security group. All users in the district or
school security group will be allowed or denied access to this alert based on this
action.
12 • Setting Preferences
0919061810
Fall 2006 STI InformationNOW Reporting Portal
Group Administration Tab
This tab is only available for InformationNOW Reporting Portal administrators.
Select this tab to restrict or allow access to InformationNOW Reporting Portal by
other security groups. The Admin District security group always has access to
InformationNOW.
Click the + sign in the District security groups to view a drop-down list of users in
that security group. Checking the check box next to a group will allow all member
of that group to have access to InformationNOW.
Click the + sign in the School security groups to view a drop-down list of teacher
groups for that school. School security groups are established by the teacher types in
the TEA table. Checking the box next to a group will allow all member of that group
to have access to InformationNOW. The Check All button to the right of the Allow
Access field will select all school security groups for access privileges.
Click the Apply button to save changes.
Clicking on the Manage Group link beside any group in either District security
groups or School security groups will cause the Manage Groups popup screen to be
displayed. Manage Groups allows the administrator to define parameters and set
display options for users in the selected security group.
Fall 2006 STI InformationNOW Reporting Portal
0919061810
Setting Preferences • 13
Parameters are set in pre-defined parameter groups. Click the + sign next to a
parameter group to see a drop-down list of parameters belonging to that group.
Checking the check box next to a group will allow that group access to that particular
parameter.
If Allow is not checked, the users in that group will see an Access Restricted message
next to each parameter on any report or alert that is run using those parameters. That
parameter will be unavailable to those users for filtering records.
Display Options set the field(s) a user is allowed to see on a report or alert. The
Administrator selects one of the following options from the drop-down list:
•
None: Prevents that item from displaying in reports or alerts for users
in that security group.
•
User Specified: Allows users to pick any available options when they
run an alert or report.
•
Other options: Allows only the chosen field to be displayed on the
report or alert for that security group.
Click the Apply button to save changes.
14 • Setting Preferences
0919061810
Fall 2006 STI InformationNOW Reporting Portal
Managing Reports
Manage Reports Screen
From the main screen of InformationNOW Reporting Portal, click the Manage
Reports link. The screen shown below will open.
On the left side you will see the list of Available Reports templates. These are
standard report templates that have been pre-loaded into InformationNOW Reporting
Portal. The templates are grouped for student reports or for teacher reports. Select
each group from the drop-down list. On the right side of the screen are the Loaded
Reports instances. After you load one of the Available Reports templates, you will
then rename the report with an instance name. For example, the Student Attendance
Listing report could be given the new instance name of Overall Attendance.
Selecting and Creating Report Instances
Follow the steps below to select and create Report Instances.
Step 1
In the Available Reports list, select the report you wish to configure.
Fall 2006 STI InformationNOW Reporting Portal
0919061810
Managing Reports • 15
Step 2
The report window opens. Enter the new Instance Name for your new report. The
Instance Name has a maximum length of 50 characters. Each report will have a
standard set of parameters that you may customize for your report instance. Each
report will also have a set of specific parameters that you may select for your new
report instance. These parameters are listed below the Instance Name.
Note: Not all parameters shown below are included for every report.
Step 3
Select the Export Type from the drop-down list and click the Preview button. From
the drop-down list, you may select a variety of formats including:
16 • Managing Reports
0919061810
•
Report Viewer
•
HTML 3.2 (1996 standard)
•
PDF (Adobe Acrobat’s Portable Document Format)
•
HTML OWC (Microsoft Office Web Components)
•
CSV (Comma Separated Value file format)
•
HTML 4.0 (1999 standard)
•
MHTML (MIME encapsulation of aggregate HTML documents)
•
Image
•
XML (Extensible Markup Language)
Fall 2006 STI InformationNOW Reporting Portal
Step 4
After you are satisfied with your report parameters, click the Save button and then
click Close. When you refresh the Manage Report screen (by pressing the F5 key),
you should see your new report instance on the loaded reports list.
Selecting the Sort Order of the Report Instances
To select the Sort Order of the reports that are listed on the home page of
InformationNOW Reporting Portal, simply assign the priority of your loaded reports
to 1, 2, 3, etc. When you navigate back to the home page, your reports will be listed
in the sort order you selected. The report assigned with the autoload value will
display in the center section of the home page. You may select up to 15 reports for
sorting.
Fall 2006 STI InformationNOW Reporting Portal
0919061810
Managing Reports • 17
Managing Alerts
Alerts Inbox
The Alerts Inbox is displayed on the right side of the home page. To set up and
manage the alerts that appear, click the Manage Alerts link.
18 • Managing Alerts
0919061810
Fall 2006 STI InformationNOW Reporting Portal
Manage Alerts Screen
From the main screen of InformationNOW Reporting Portal, click the Manage
Alerts link. The screen shown below will open.
On the left side, you will see the list of Available Alerts templates, grouped by
Student or by Teacher (whichever is selected in the Group drop-down list). On the
right side of the screen are the alert instances that have been loaded from the alert
templates. Here you may either Remove the alerts or enable/disable the alerts (by
checking or un-checking the Active box).
Fall 2006 STI InformationNOW Reporting Portal
0919061810
Managing Alerts • 19
Selecting and Creating Alert Instances
Step 1
In the Available Alerts list, select the alert to configure.
Step 2
The alert window will open. From this screen, you may create a new instance of the
alert by entering a new Instance Name. The Instance Name has a maximum length of
50 characters. You may set up the alert parameters by using the drop-down lists,
option buttons and checkboxes available below. When the parameters have been set,
test and run the alert.
Note: Not all parameters shown below are included for every Alert.
Step 3
Click the Save button and then click Close. When you refresh the Manage Alerts
screen (by pressing the F5 key), you should see your new alert instance on the
Loaded Alerts list.
20 • Managing Alerts
0919061810
Fall 2006 STI InformationNOW Reporting Portal
R
Report Administration Tab 9
Index
S
Selecting and Creating Alert Instances 20
Selecting and Creating Report Instances 15
Selecting the Sort Order of the Report Instances 17
Setting Preferences 5
T
Theme Options Tab 6
U
A
User Information Tab 5
Accessing the Program 1
Alert Administration Tab 11
Alerts Inbox 18
C
Code Groups Tab 8
F
Features 2
G
Graphical User Interface 3
Group Administration Tab 13
I
InformationNOW Reporting Portal Overview 2
Installation Requirements 4
L
Logging On to InformationNOW Reporting Portal 1
Logging Out 1
M
Manage Alerts Screen 19
Manage Reports Screen 15
Managing Alerts 18
Managing Reports 15
Minimum System Requirements 4
P
Preferences Screen 5
Fall 2006 STI InformationNOW Reporting Portal
0919061810
Index • 21