1
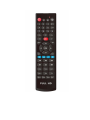
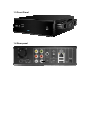
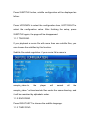
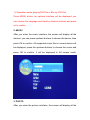
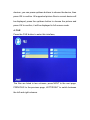
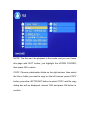
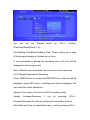
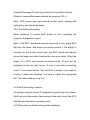
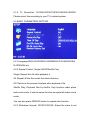
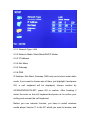
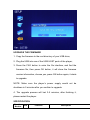
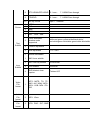
HD media player with HDMI 1.3 1080P+DVB-T + PVR + Lan
OEM, bulk wholesale from China
1. Introduction
1.1 Preface
Dear Customer, Thank you very much for purchasing our product.
In the digital era, this product is a great home entertainment partner.
With the outstanding design, you can enjoy movies and music, view
photos of precious moments, and watch & record DTV programs.
This player has the following functionality:
Video Recording: Supports one button recording and scheduled
recording, can easily record programs from DVB-T, and save as
MPEG-2 format;
Movie Playback: Supports MTS、M2TS、TS、TP、MKV、AVI、
WMV、MPG、 MOV、VOB、MP4、IFO、ISO, resolution up to 1080p
Audio Playback: Supports MPEG1 Layer2/ MPEG1 Layer3/
MPEG-2 LC-AAC/ MPEG-4 LC-AAC/ WMA/ AC3/ DTS/
DTS-HDMA/DTS-HDHR(5.1 core ,7.1 HDMI Pass through)/
TRUEHD(5.1 core, 7.1 HDMI Pass through)/ Blue ray LPCM(upto
7.1 channel)
Photo Playback: JPEG/ GIF/ BMP/ PNG
USB Host: Supports 2 USB host ports
Network Function: Ethernet & WLAN streaming playback
HDMI: High-Definition interface transmits the highest quality digital
and audio via a single cable, simplifies cabling and provides high
quality home theater experience.
DVB-T: Supports Digital Video Broadcasting Terrestrial(DVB-T)
reception, Electronic Program Guide(EPG)
We hope that this product will bring you a lot of enjoyment. We are
committed to apply multimedia technology in your work,
entertainment, family, daily life, car and everywhere! Welcome to
be with us. Thank you again for choosing our product.
1.2. REMOTE CONTROL
NO
1
NAME
POWER
2
3
TV-OUT
NUMERIC
BUTTONS
4
5
VOL+
DTV
6
VOL-
7
8
REC
COPY
9
UP
FUNCTION
Press to enter standby mode or wake up
Press to switch between
480p,720p,1080i,1080p,PAL,NTSC
Press to enter channel numbers or numeric input
when changing settings
Press to increase the VOL,and set parameters in
some menu.
Press to enter DTV mode
Press to decrease the VOL, and set parameters in
some menu.
Press to begin recording or to resume when
recording has been paused.
Press to copy the selected file
Press to move the highlight up while navigation
menus, Press to switch to the next channel while
watching TV
Press to move the highlight left while navigation
menus, decrease the VOL while watching TV; Press
to return to previous interface
Press to confirm
Press to move the highlight down while navigation
menus; Press to switch to the previous channel
while watching TV
Press to quit the current popup
Press to enter the file interface
Press to enter the movie interface
Press to fast rewind the current playback.
Press repeatedly to select speeds.
10
11
LEFT
OK
12
13
14
15
DOWN
EXIT
FILE
MOVIE
16
FR
17
PLAY/PAUSE
18
19
FF
STOP
20
MENU
21
22
TIMER
SUB-T
Press to show the related menu when you playback
movie or in DTV mode, and also for playback movie.
Press to enter the timer menu directly to add, edit
and delete recording schedules
Press to set subtitle options
EPG
Press to enter the Electronic Program Guide which
displays an on-screen list of programs for the
coming week when watching Digital Terrestrial TV
23
Press to begin play or pause the current playback
Press to fast forward the current playback.
Press repeatedly to select speeds.
Press to finish your current playback
24
REPEAT
25
ZOOM
Press to set repeat option
Press to zoom in/out pictures and movies when
playback
26
27
MUTE
HOME
Press to mute audio output, press again to resume
Press to show the main menu
28
29
SETUP
16:9
Press to enter the setup interface while non
playback, display the brightness/contrast/saturation
bar while playback
Switch between 16:9 and 4:3 display
30
CH+
31
32
CHDEL
33
34
35
36
37
38
RIGHT
INFO
MUSIC
PHOTO
PG.UP
PG.DN
39
GOTO
40
41
42
TTX
TRACK
EJECT
Press to switch to the next channel while watching
Press to switch to the previous channel while
watching
Press to delete the selected files
Press to move the highlight right while navigation
menus; increase the VOL while watching TV
Press to show the related information
Press to enter the music interface directly
Press to enter the photo interface directly
Press to view the previous chapter / file
Press to view the next chapter / file
Press to seek the time point you want to start with
when playback movie.
Press to
recall, i.e. switch between the last two viewed
channels while watching DVB-T TV.
Press to open Teletext OSD if it is available in the
broadcasted stream of DTV
Press to select an audio track
Press to open/close the external DVD-ROM
1.3.Front Panel
1.4 Rear panel
Choose the icons: MOVIE, MUSIC, PHOTO, TV, SETUP by press
the LEFT/RIGHT buttons, then press ok button to confirm. You can
also press the HOME button on the RC to enter this interface
directly.
1. MOVIE
After you enter the movie interface, the screen will display all the
devices, you can press up/down button to choose the device, then
press ok to confirm. All supported video files in current device will
be displayed, press the up/down buttons to choose the movie and
press ok to confirm, it will be displayed in full screen mode.
Some related operations:
1.1 SUBTITLE
Press SUBTITLE button, subtitle configuration will be displayed as
follow:
Press UP/DOWN to select the configuration item, LEFT/RIGHT to
select the configuration value. After finishing the setup, press
SUBTITLE again, the page will be disappeared.
1.1.1 TRACKNO.
If you playback a movie file with more than one subtitle files, you
can choose the subtitles by this function.
Subtitle file match regulation: if your movie file’s name is
sample_video.ts,
the
player
will
search
all
the
sample_video.*.srt/ssa/aas/sub files under the same directory, and
it will be searched by alphabetic order.
1.1.2 ENCODING
Press RIGHT/LEFT to choose the subtitle language.
1.1.3 TIME SYNC:
If you playback some movie files, the subtitle dose not synchronize
with the sound, you can adjust it by TIME SYNC. If the subtitle is
later than sound, just choose the Advance(S) x.x; reversely choose
the Delay(S) x.x .
1.1.4 SUBTITLE COLOR
Press RIGHT/LEFT to choose the subtitle color .
1.1.5 SUBTITLE SIZE
Press RIGHT/LEFT to choose the subtitle size.
1.1.6 Upward Offset
Press RIGHT/LEFT to locate the subtitle.
Note: Subtitle COLOR/SIZE, Upward Offset only function under the
the subtitle file is TXT. But Upward Offset is also function under
PGS inner subtitle.
1.2 GOTO
During playback the movie files, press GOTO button, a time bar will
be displayed to show the file’s total time, you can choose the new
time you want to playback by press LEFT/RIGHT button, then press
OK to confirm. Press GOTO button again, it will disappear.
1.3 INFO
When you playback movie files, press INFO button, the related
information to the files will be displayed on the screen, press again,
it will be disappeared.
1.4 Operation under playing DVD file or Blu ray DVD file
Press MENU button, an optional interface will be displayed, you
can choose the language and track by direction buttons and press
ok to confirm.
2. MUSIC
After you enter the music interface, the screen will display all the
devices, you can press up/down buttons to choose the device, then
press OK to confirm. All supported music files in current device will
be displayed, press the up/down buttons to choose the music and
press OK to confirm, it will be displayed in full screen mode.
3. PHOTO
After you enter the picture interface, the screen will display all the
devices, you can press up/down buttons to choose the device, then
press OK to confirm. All supported picture files in current device will
be displayed, press the up/down button to choose the picture and
press OK to confirm, it will be displayed in full screen mode.
4. FILE
Press the FILE button to enter this interface,
The files are listed in two columns, press NEXT to the next page,
PREVIOUS to the previous page, LEFT/RIGHT to switch between
the left and right columns.
NOTE: The files can’t be playback in this mode, and you can’t leave
this page with LEFT button, just highlight the UPPER FOLDER,
then press OK to return.
COPY: Choose a destination folder on the right column, then select
the file or folder you want to copy on the left column, press COPY
button, press the LEFT/RIGHT button to select COPY, and file copy
dialog box will be displayed, choose YES and press OK button to
confirm.
NOTE: You can also copy the files on the right column to the files
on the left.
DELETE
Select the files you want to delete either on right or left, press
DELETE button, and confirm it.
5. TV
After entering the TV mode, a TV main menu will be displayed as
follow:
5.1 Press MENU button when you watch program, four icons will be
displayed on the screen:
5.1.1 EPG
Select this icon, press ENTER to show the seven days program
information for the current channel.
5.1.2 RECORD
Select this icon, press OK it will display the record list, you can
view/add/delete the record tasks in this interface.
5.1.3 SEARCH
Select this icon, press OK to inter the search interface. It supports
two modes: Auto Search and Manual Search.
Auto Search: Users just need to set the region and subregion, then
press search, wait the player to scan all frequency.
Manual Search: If you knew the local frequency and the related
parameters, you can use this mode. Modify the setting value by
pressing CH+/- or PREVIEW/NEXT buttons.
5.1.4 RETURN
Select this icon, press OK to quit.
5.2 TV RECORDING
5.2.1 EPG Reservation Recording
Press EPG to show the TV programs, and choose the program you
want to record, then press OK. A dialogue box will be displayed as
follow,:
you
can
set
the
Repeat
mode
by
VOL+/-
buttons:
Once/Day/Week/Week (1-5).
Pre-Padding Time&Post-Padding Time: These setting are in case
of the program begins or finishes not on time.
If you succeeded in adding the recording task, a R icon will be
displayed on the program bar.
Note: Different recording tasks can not be set at the same time.
5.2.2 Manual Reservation Recording
Press TIMER button or choose the RECORD icon, a Rec list will be
displayed, press REC button, a dialogue box will be displayed. You
can make the follow operations:
Repeat: Four modes, the same as EPG recording mode.
Length:
Increase/Decrease
1
unit
by
pressing
VOL+/-,
Increase/Decrease 10 units by pressing Previous/Next buttons.
Start Date and Time: Increase/Decrease 1 unit by pressing VOL+/-,
Increase/Decrease 10 units by pressing Previous/Next buttons.
Channel: Increase/Decrease channel by pressing VOL+/-.
Note: EPG record task and manual record task’s starting and
ending time can’t be at the same.
5.2.3 One Button Recording
While watching TV, press REC button to start recording the
program, and again to stop it.
Note: If the EPG record and manual record are in use, press REC
will stop the tasks, and begin one button record, if the player is
carrying out one button record task, the EPG record and manual
record will begin only after finishing the one record task. When the
player is in EPG and manual recording mode, R icon will be
displayed on the top right corner, P icon in one button recording
mode. F icon means failure. The task NO. is unique, if you want to
modify or delete the schedule, you have to select the correspond
NO. The total schedule is up to 8.
5.2.4 Auto Recording Function
This player supports record TV programs by powering on by alarm,
it will turn on at the earliest time among all the start time of the EPG
and Manual reservation recording tasks.
5.2.5 Recording mode(Recording while watching)
This player supports three recording mode while watching TV
programs, after adding the EPG and Manual reservation recording
tasks:
Mode 1: Recording channel A, while watching channel A
Mode 2: Recording channel A, while watching channel B(channel
A&B should in the same frequency)
Mode 3: Recording channel A, while watching HD movie.
Note: Recording while watching can only supports EPG and
Manual reservation recording, does not support one button
recording. One button recording only supports mode 1.
5.3 SOME RELATED OPERATION
Press OK when you watch TV, it will display the channel list;
Press SUBTITLE to choose the subtitle you like, this is only
available if the channel has multi-subtitles;
Press TRACK to choose the audio you like, this is only available if
the channel has multi-tracks;
Press INFO to show the related information to the current channel.
6. SETUP
Related Operation Methods:
Four submenu1 in the setup menu, press UP/DOWN to choose the
submenu1, then press RIGHT to enter the submenu2. Press
UP/DOWN to choose the submenu2 you want, then use RIGHT
button to enter the submenu3, use UP/DOWN button to select the
setting value, press OK to confirm, LEFT to return.
6.1 AV SETTING
6.1.1 HD Audio Pass Through: ON/FF;
6.1.2 Audio Out: Analog/Digital
When you have selected the HD Audio Pass Through ON, you
have to select Digital in this menu.
6.1.3 Channel Out: : 2.0 channel/ 5.1channel. The 2.0 channel is
output by AV output, and the 5.1 channel is by SPDIF.
6.1.4 TV Standard: PAL Standard/NTSC Standard,
6.1.5 TV Ratio: 4:/3 Letterbox/4:3 Pan&Scan/16:9. If your TV is
standard CRT, please choose 4:3 Letterbox, if your TV is HD,
please choose 16:9.
6.1.6 TV Resolution: 576I50/576P50/720P50/1080I50/1080P50.
Please select this according to your TV’s related system.
6.2 BASIC PARAMETERS SETTING
6.2.1Language:ENGLISH/FRENCH/GERMANY/ITALIAN/RUSSIA
N /SPANISH etc.
6.2.2 Repeat Control: Single/ All/Off/Shuffle Play.
Single: Repeat this file after playback it.
All: Repeat all the files under the same directory.
Off: Return to the preview interface after playback a file.
Shuffle Play: Playback files by shuffle. Only function under photo
and music mode, it has the same function as repeat all under movie
mode.
You can also press REPEAT button to operate this function.
6.2.3 Slideshow Interval: 3S/10S/15S/25S. Select the value to set
the slideshow interval time.
6.2.4 Power Play: ON/OFF. Select ON it will display the files under
the root of the first USB disk auto; select OFF to cancel this
function.
6.2.5
Time
of
Day:
UP/DOWN/RIGHT/LEFT
modify
the
player’s
to
time.
Press
choose
year/month/day/hour/minute/second, then press VOL+/- to adjust
the value.
6.2.6 DVD Dir Auto Play: ON/OFF. When you set ON, if you have
saved a DVD file in HDD, you can playback it directly when you
select it.
6.2.7 BD Dir Auto Play: ON/OFF. When you set ON, if you have
saved a BD file in HDD, you can playback it directly when you
select it.
6.2.8 Restore Factory Set:: select this to restore the default setting.
6.3 NETWORK SETTING
6.3.1 Network Type: LAN
6.3.2 Network Mode: Static Mode/DHCP Model
6.3.3 IP Address
6.3.4 Net Mask
6.3.5 Gateway
6.3.6 DNS
IP Address, Net Mask, Gateway, DNS only can function under static
mode, if your want to choose one of them, just highlight it and press
OK, a soft keyboard will be displayed, choose number by
UP/DOWN/RIGHT/LEFT, press OK to confirm. After finishing it
select the enter on the soft keyboard and press ok to confirm your
setting and conceal the soft keyboard.
Before you use network function, you have to install windows
media player Version 11 in the PC which you want to browse, and
open the Media Sharing setting of the software.
The details:
1. System required
1.1
Operation system: Microsoft Windows XP Home Edition
Service Pack2 (SP2). Windows XP Professional SP2
Windows Vista
1.2
Processor: Above 1GHZ
1.3
RAM: Above 512M
1.4
Software Install: Windows media player11:
http://www.microsoft.com/windows/products/winfamily/media
player/default.mspx
2. Operate Windows Media Connect server
2.1
Install windows media player 11 in WinXP
2.2
Start->Run, input services.msc
2.3
Check the follow three services are in operation status:
Windows Media Player Network Sharing Service
SSDP Discovery Service
Universal Plug and Play Device Host
You can stop or resume these services at necessary time.
3. Firewall
3.1
If your firewall is the window’s default one, it won’t prevent the
UPNP service.
3.2
If you use other kinds of firewall, please make sure the follow
ports ser as permitting (or turn off the firewall).
Protocol
Transmission Control Protocol(TCP)
User Datagram Protocol(UDP)
Ports
2869,10243
1900,10280,10281,10282,10283,10284
4. How to share the source
4.1
Open windows media player 11
4.2
Select Media Library-> more option
4.3
Select the watch fold in Media Library, My Videos, My Music,
My Pictures in My Document are default sharing directory.
You can also add other directories to sharing directory under
watch folder.
4.4
Select Configure Sharing, the follow interface will be
displayed:
4.5
You can set the sharing name and classic on this interface,
and to be brief you can open all settings.
4.6
Return to the Windows Media Player11 interface, select
Media Sharing->Application Media Information Change
NOTE: Press EXIT to leave the setup menu; when you exit this
page, the system will remind you to save your changes or not,
remember to save them.
UPGRADE THE FIRMWARE
1. Copy the firmware to the root directory of your USB drive;
2. Plug the USB into one of the USB HOST ports of the player;
3. Press the FILE button to enter the file interface, and find the
firmware file, then press OK button, it will show the firmware
version information, choose yes, press OK button again, it starts
to upgrade.
NOTE: Make sure the player’s power supply would not be
shutdown in 5 minutes after you confirm to upgrade.
4. The upgrade process will last 3-5 minutes, after finishing it,
please restart the player.
SPECIFICATION
Function
Item
Module
Function
Description
1x 10/100baseT
Ethernet
DVB-T
LAN
1
TV Input
1
USB
1
2x USB2.0 Host
interface
1
CVBS
2
L/R stereo Audio
3
Spdif output
Optical/Coaxial
4
HDMI 1.3
HDMI 1.3a interface (support HD audio format)
1
7 function buttons and 1
power switch button
1
2
1
Power LED
Status LED
MPEG-1
2
MPEG-2
Up to 1920*1080P
3
MPEG-4
Up to 1920*1080P
4
WMV9
Up to 1920*1080P
5
VC-1
Up to 1920*1080P
6
H.264、AVC,
Up to 1920*1080P
1
MPEG1 Layer2
2
MPEG1 Layer3
3
MPEG-2 LC-AAC
4
MPEG-4 LC-AAC
5
6
7
WMA
AC3
DTS
AV
Button
LED
Video
Audio
10/100 Base-T,RJ45 with 2 LEDs
IEC
Supports upto 1.5TB portable HDD. One is at side
RCA Jack
Picture
Text
Subtitle
Inner
Subtitle
Video
File
format
Audio
File
format
Picture
File
format
8
DTS-HDMA/DTS-HDHR 5.1 core , 7.1 HDMI Pass through
9
TRUEHD
5.1 core , 7.1 HDMI Pass through
10
Blu ray LPCM
upto 7.1 channel
1
2
3
4
JPEG
GIF
BMP
PNG
1
SRT、ASS、SSA
2
Color selectable,
shadow mode
supported
3
Position adjustable
4
Size adjustable
5
subtitle switchable
1
MKV Inner subtitle
2
M2TS blu-ray subtitle
PGS format
3
DVB subtitle
DVBSUB
4
DVB teletext close
caption
Teletext /CC
1
MTS、M2TS、TS、TP、
MKV、AVI、WMV、MPG、
MOV、VOB、MP4、IFO、
ISO;
2
MP3、Wma
3
JPG、PNG、GIF、BMP
while-red-green-yellow-white/black-white/
red-white/green-white/blue-green/white-blue/white
TTF FONT
ACCESSORIES
1. User’s Manual
1PCS
2. Remote Control
1PCS
3. Batteries
2PCS
4. ADAPTER
1PCS
5. AV Cable
1PCS