1
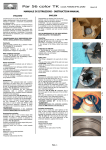
On/Off valve for Laser and
Diathermy exhaust
Rev 2005-09-26
Contents
Chapter
Description/function
Installation/adjustment
Adaptation
Pictures
Assembly instruction
Machine directive
Security
Parts list
Page 2
Page
3.
4.
5.
6.
7.
8.
9.
10.
Description On/Off valve
Description:
Medicvent On/Off valve regulates the suction for Laser/Diathermy smoke evacuation.
The valve mounts on the holder for the sterile filter (LP10), that makes it easy to mount
on pendels or OR tables (the holder is sold separately).
The valve connects to outlet for evacuation and a sterile filter fits in the holder.
For connection on Laser or Diathermy knife there are complete sets with pre filter at
Medicvent.
Function:
The valve opens and closes suction in the diathermy knife, this is regulated
automatically with a sensor on the cable to the diathermy system (autostart box).
On the autostart box front (page 6, pict 1) there are controls and indicators as explained
below.
LED, POWER ON. Lights up when the autostart box is connected to 230V.
LED, SUCTION ON. Lights up when the autostart box opens the valve.
Function selector, with positions ON-OFF-AUTO.
ON. Valve constantly open.
OFF. Valve constantly closed.
AUTO. Valve opens automatically when the diatermy knife is activated.
Control DELAY TIME. To adjust the time that the valve will be open after the
diathermy knife has been deactivated. Adjustable time is 2-20 sec and is
only adjustable when AUTO is selected.
The autostart box is constructed to work with every known diathermy apparatus. A
diathermy apparatus always consumes more current when the diathermy knife is
activated then one in idle. The autostart box measures the diathermy apparatus current
consumption and activates the On/Off valve when the current consumtion exceeds
adjusted value. The adjustment is done by a 20-turn potentiometer LEVEL on the
autostart box back panel. (page 6, pict 2)
Change of the LP10-filter(main filter):
The filter must be changed 4 times/year, when in continuous use the filter must be
changed more often.
To make it easy to remove the filter from the holder see page 6 pict 5.
Page 3
Installation/adjustment
Installation:
Install the valve and autostart box as described on page 7.
The T-piece on the filter holder can be mounted in different ways to make the mounting
vertical or horisontal (page 6, pict 4).
It is important that the tube from the filter and the cable from the diathermy knife is as
parallel as possible to make work with knife and evacuation smooth.
Adjustment of the autostart box:
Mount device for calibration to the diathermy apparatus or make a tissue damp with
sodium cloride solution and place it on the earth plate connected to the diathermy
apparatus.
1. Connect the autostart box to 230 V. Diatermy apparatus main switch must be in
off position. Only LED POWER ON shall be lit at this time. Check that the valve
can be regulated with the FUNCTION SELECTOR in ON and OFF position and
check that the LED SUCTION ON lights up when the valve opens. Leave
selector in OFF position.
2. Position the control DELAY TIME on shortest time (max. counter clockwise).
Position the FUNCTION SELECTOR in position AUTO, the valve must not open.
Check that the valve opens when LEVEL is adjusted to lowest value (max.
counter clockwise) and that the valve closes again when LEVEL is adjusted
some degrees clockwise (0-0,5 revolutions). Leave LEVEL in that position.
3. Activate mains on diathermy apparatus and let the apparatus get warm to
ensure that its current consumption has been stabilized. (1-2 min.) the LED
SUCTION ON shall now be lit, that indicates that the autostart box sensored that
the diatermy apparatus current consumption at idle overides set value on
LEVEL. Adjust LEVEL clockwise until SUCTION ON goes out. Adjust LEVEL
counter clockwise a little to lit SUCTION ON and then a little clockwise so
SUCTION ON goes out again. If SUCTION ON now will lit up, adjust LEVEL a
bit clockwise untill SUCTION ON goes out. Now let the diathermy apparatus be
in ON position at least 5 minutes in idle (do not activate the diathermy knife).
SUCTION ON must now be out and the valve closed. (This procedure is for
finding the diathermy apparatus highest idle current consumption because some
diathermy apparatus have a variable idle consumption). Then turn LEVEL one
revolution further clockwise to decrease unwanted openings of the valve if mains
or current consumtion will vary.
4. Activate the diathermy knife (on the tissue) on lowest power (usualy
coagulation). SUCTION ON must now be lit and the valve open. If SUCTION ON
does not lit up the LEVEL must be adjusted to a lower value, slightly counter
clockwise. Be sure to check that the valve opens and closes when the knife
activates and deactivates.
THE ADJUSTMENT OF THE AUTOSTART BOX IS NOW DONE. (Observe that the
adjustment can be faulty if the LEVEL is adjusted to fast or if DELAY TIME not is in its
lowest position counter clockwise while adjustment is done).
Page 4
Matching of the autostart box sensitivety
The autostart box is designed to work with diathermy apparatus with current
consumption up to 5 A. Sometimes current consumtion on different diathermy apparatus
may vary depending on make or model. That makes it necessary to adjust the autostart
box internally to make it work. This can be necessary in cases when the diathermy
apparatus current consumption is close to the autostart box limit value.
Description
Disconnect mains power 230V.
Take of the top half of the autostart box case by demounting four screws in bottom
corners.
Turn the box over. Picture 3 on page 6 shows the internal of the box and points out
actual measurings points. Connect to mains 230V.
OBSERVE! Parts of the apparatus is alive with 230V!
Follow the adjustment instructions on page 4 until point 3.
1. Connect the power meters negative probe to the voltage regulators heat sink and
the positive probe (0-10 V DC) to measuring point SIGNAL LEVEL. The power
meter shall now show a voltage that is equal to the diathermy apparatus
comsumption at idle. Adjust this to approximately 2 volt with the trimming
potentiometer GAIN. (Observe that the voltage can vary some because of
variation in power consumtion of the diathermy apparatus).
2. Activate the diathermy knife. The voltage SIGNAL LEVEL shall now increase
significantly as it relates to the power consumption in the diathermy apparatus
when active. (Observe that this voltage also may vary as of variations in power
consumption of the diathermy apparatus).
3. Check the voltage SIGNAL LEVEL a couple of times by means of changing
between idle and activated diathermy knife. Note the highest measured voltage at
idle and the lowest mesured voltage with activated diathermy knife. This
difference in voltage must be more than 200 mV. If the difference in voltage is less
than 200 mV shall the adjustment of GAIN be change until the differens in voltage
is more than 200 mV. (The autostart box functionality increases the bigger the
voltage difference is). After this adjustment may the voltage at idle be anything
else than 2 V. Idle voltage can be allowed to be between approximately 0,5 V and
6,5 V, the importance with this adjustment is to find a value for GAIN witch gives
enough difference between idle and active voltage.
4. Connect the power meters positive probe to measuring point TRESHOLD LEVEL.
This voltage is depending of adjustment of 20-rev potentiometer LEVEL on the
autostart box back panel. Adjust the voltage until it is between the two measured
voltages in point 1 and 2 above. (if highest voltage at idle is 2,1 V and lowest
voltage with activated diathermy knife är 3,5 V, adjust the voltage TRESHOLD
LEVEL to 2,8 V).
5. Check that the autostart box is working in the desired order, the magnet valve in
the box opens and closes when the diathermy knife activates.
6. Remount the top case of the box.
The matching of the autostart box sensitivity to the diathermy apparatus is finished.
Page 5
Pictures
Pict 1.
Pict 2.
LED POWER ON
Fuse
Connection
instrumental
Level
adjustment air.
LED SUCTION ON.
DELAY TIME
FUNcTION SELECTOR
Mains
230V.
Pict 3.
SIGNAL LEVEL pin 12.
TRESHOLD LEVEL pin 13.
Potentiometer Gain
Pict 4.
Pict 5.
Page 6
Connection to
Connection
On/Off valve. Diathermyapparatus.
Evac tube 40mm
On/Off valve
Art.no. 180001
Filter holder
Ar.tno. 142030
LP10 filter
Art.no. 142010
Adapter LP10/small
filter(pre filter)
Art.no. 142019
Mains
connector
230V
Diathermy apparatus
Parts marked with green colur is included in 180000 complete On/Off set.
Load
Level
Tube 4mm
Art.no.181006
Mains
Fuse
Autostart box
Art.no.180002
Adapter
art.no. 181003
Valve
In
Tube 6mm
Art.no. 181007
Connection instrumental air
Mounting
Page
7
Safety
On/Off valve
WARNING! Constitutes a risk for injury on ATT: Attention, reference.
patient and user.
N.B!
Constitutes a risk for damages to
equipment. Only use components
that MEDICVENT has delivered
and/or approved.
Safety On/Off valve
•
Only by MEDICVENT authorized personnel
are allowed to perform adjustments or repairs
on this equipment.
•
Only MEDICVENT original parts may be used
when repairing.
Tecnical
Autostart box
Power:
Air connection:
Connection valve:
Dimentions (h*b*d):
230V AC 1-phase ±10% max 5 A
Ø6 mm
Ø4 mm
65*98*208 mm
Length on mounted power cords.
Main power cord 240V:
2,0 m
Power cord to diathermy apparatus: 0,6 m
Cleaning:
Wiping with desinfection solution.
On/Off valve
Working pressure:
Dimentions (h*Ø):
Connection male:
Connection female:
Air connection:
40-80 psi
114*96 mm
38,5 mm
37,5 mm
Ø4 mm
Cleaning:
Wiping with desinfection solution.
Page 8
Declarations with respect to
EG machine directive.
Following is a translation from ”Deklaration avseende EG maskindirektiv” of 2000-01-03.
All products manufactured by Medicvent AB is in compliance with the EG machinery directive,
89/392/EEG.
Products included are:
Complete ON/Off valve -set no: 18 00 00
As well as accessories to the equipment above.
These products complies with the following harmonized standards:
DIN EN 1012-1,
DIN EN 1012-2,
DIN 292 T1,
DIN 292 T2,
DIN EN 294,
DIN EN 563,
DIN EN 60204-1,
DIN EN 50081-2,
DIN EN 50082-2.
and the EMC guidelines 89/336/EWG that include requirements for radio-frequency emissions,
EN 55011and EN 55014 and requirements for ESD (Electrostatic Discharge), IEC 801-1 to 4.
These standards and guidelines correspond to VDE 0843 part 1-4 and VDE 0875/N.
Umeå 2004-09-29
MEDICVENT AB
……………………….
Robert Lindkvist VD
Page 9
Parts list
Art. no.
Part
180001:
180002:
181010:
On/Off valve
Autostart box
Mounting kit*
* In mounting kit 181010 the following is included.
Connector instrumental air 181003, tube 5/6 mm (3m) 181007 and
tube 3/4 mm (3m) 181006.
Accessories:
181004
142030
Connector breathing air (when it´s not possible to use
instrumental air).
Filter holder LP10.
Medicvent
Pendelgatan 3
904 22 Umeå
Sweden
Phone: +46 90-12 75 00
Fax: +46 90-772361
E-mail: [email protected]
Web: www.medicvent.se
Page 10