1
Table of Contents
Introduction .....................................................................................................1
Project/File Naming Conventions ....................................................................1
Project Deliverables/Filenames .................................................................1
Automate!Test Deliverables ............................................................................ 2
Automate!Control Deliverables ....................................................................... 2
Automate!Change Deliverables ...................................................................... 2
Automate!Change for SAP Deliverables ......................................................... 2
Using Version Control .....................................................................................2
Contents & Layout for Guides .........................................................................2
Headers/footers..........................................................................................3
Title Page ...................................................................................................3
Front Matter................................................................................................3
Revision History Table .................................................................................... 3
Conventions .................................................................................................... 3
Other Conventions .......................................................................................... 4
Chapter layout............................................................................................5
Anchored Frames/Graphics .......................................................................7
Graphics File Naming Conventions............................................................7
Using SnagIt...............................................................................................8
SnagIt Procedures .......................................................................................... 9
Heading 1 ......................................................................................................12
Heading 2.................................................................................................12
Heading 3...................................................................................................... 12
Online Help ...................................................................................................15
Framemaker Preparation - General .........................................................15
Framemaker Preparation for Online Help ................................................15
Collapsing Text ............................................................................................. 16
Specifying Text for Collapsing....................................................................... 16
Webworks Tasks......................................................................................18
Preparing Documents for PDF ......................................................................25
Archiving Release Files ................................................................................25
Style Guide
1
Style Guide
2
Newmerix Documentation Processes &
Style Guide
Introduction
Use this style guide when creating Newmerix documentation. This guide includes:
X
Introduction
X
Project/File Naming Conventions
X
Contents & Layout for Guides
X
Online Help
Project/File Naming Conventions
When you are going to update the Framemaker files in a project, copy the source files from
the S drive (S:\Engineering\Product Documentation) to your hard drive.
Use the following guidelines when setting up a project for update:
X
When you go to copy existing files from the S drive to update documents for a new
release, make sure that the Framemaker book file name matches the name of the
expected output file. See Project Deliverables/Filenames
NOTE: I ran into a weird problem with a project. I generated a pdf of a book, then renamed
the pdf file to match the expected deliverable file name and suddenly the Table of
Contents links no longer worked. Once I renamed the Framemaker book file to match
the output file name then regenerated the pdf file, the problem disappeared. So best
practice is for the book file name to match the output file name.
X
Don't include release numbers in the Framemaker file names because if you do,
you'll have to rebuild the book when you copy the files for the next release. When a
book name changes, cross references may break.
X
Don't include chapter numbers in the file names. If you do and you later have to
rearrange the chapter numbers because a chapter was added/deleted, you'll have lots
of tweaking to do in the book list, chapter number numbering, and cross-references.
Project Deliverables/Filenames
Find out where the finished project files are to be kept and what the expected file names
should be. Make sure that the final files you create use the same names so the build includes
the files.
I didn't find out the expected names for A!Test until a few months on the project. When I
created the Framemaker folder and book file for the new release, I included the release
number in the file name, and called it User Guide instead of User Manual. So, when I pdf the
entire book, the default pdf name is the same as the book file - which in this case differs from
Style Guide
1
Newmerix Documentation Processes & Style Guide
Using Version Control
the expected output name. So every time I generate a pdf file, I have to be sure to rename it
so it matches the final file name - a real pain!
NOTE: Get set up to check the final files into their final destination so they are ready for the
product builds. Copies of all released documents should be put on http://intranet/docs/
Shared%20Documents/Forms/AllItems.aspx so anyone in the company can pick
them up when needed.
Automate!Test Deliverables
For example, the following shows the expected file names for the Automate!Test deliverable
files:
NOTE: Make a master list of the deliverables for all projects; including location of where they
need to be for the build.
Automate!Control Deliverables
add list
Automate!Change Deliverables
add list
Automate!Change for SAP Deliverables
File names:
X
ACSAP_Install_Guide.pdf
X
ASCAP User Guide.pdf
Content for the documentation is provided by Chet Hodgins.
Save the Framemaker surce files as rtf and send to Chet with change tracking turned on so
he can edit the document.
Using Version Control
Currently, the final files for a release are checked in/out using Visual Source Safe. A new tool
will be used shortly. Once the new tool is decided, this section should explain how to check
files in/out.
Style Guide
2
Newmerix Documentation Processes & Style Guide
Contents & Layout for Guides
Contents & Layout for Guides
The topics in this section include:
X
Headers/footers
X
Front Matter
X
Anchored Frames/Graphics
Headers/footers
X
Page numbers in footers do NOT alternate left/right but always appear on the right
side of the page.
X
Page numbers include chapter number, space, dash, space, page number
X
The Product name immediately followed by the manual name is on the left side of the
footer, with the manual title initial caps.
X
Footers are 9 pt Ariel
X
Headers do not appear on the first page of a chapter and are not used in the TOC
Title Page
The title page template file to be copied for your manual is at
\\Mail\newmerix\Engineering\Product Documentation\Doc_Standards&Procedures\Title &
Legal_Template.fm, You’ll have to edit the file and display the Master page to change the
book name to match your project.
Front Matter
The first chapter in each manual should contain an introduction to the guide, a revision history
table, description of the document set, conventions used in the manual, glossary, and how to
get help from tech support and how to contact Newmerix.
Audience
Briefly describe who the audience is and what they should know.
Before You Begin
Describe any prerequisites
Revision History Table
All User Guides and Install guides should have a 2 column Revision History table in the front
matter that identifies the revision number, and a brief description of what changed in that
release. Provide information that helps the user focus on new information.
Conventions
Use the following conventions:
Style Guide
3
Newmerix Documentation Processes & Style Guide
Item
Style Guide
Contents & Layout for Guides
Description
Test > Recording > New Test Script
Words separated by > with spaces on either side indicate
a sequence of menu and sub-menu commands. In a step,
say "Select" followed by the menu choices, then specify
where the items are found (for example, from the menu
bar).
NxParam("<PARAMETER FILE
MAPPING>")
Courier type indicates sample script code or literal text for
you to enter into a field. Courier Standard should be used
since some customers copy/paste code examples and
courier standard font is best for displaying code. Make
sure quote marks are straight ( " ) rather than angled
<option name>
Words enclosed in angle brackets < > and in italic font
indicate places where you are to substitute the
appropriate optional text.
Hyperlinks
Hot-linked references to other topics/sections are
underlined and are in blue font in the FrameMaker source
file
Press Enter
The word "Press" followed by a word in courier font
indicates a key on the keyboard to press.
Click OK
The word "click" followed by a word or words in BOLD
CAPS indicates a button in a dialog box to press.
Do not say "Click the OK button" or "Click on ...".
Options...
If a button name on a dialog box has three dots after the
name (...), it means that clicking the button will bring up a
secondary dialog box. If a button name is NOT followed
by three dots, clicking the button makes the action occur
immediately. A warning typically will display asking you to
confirm the action. You can click Cancel. Once you click
OK, the action can't be undone
Procedures with Numbered steps
X When documenting a procedure, always start with the action
Cautions/Warnings
Use the paragraph style called Important instead of
Caution or Warning
Log In/out
Use "log in" or "log out" rather than "log on" or l"og off"
user name
Use "user name" rather than "username" or "user-name"
followed by the result. The action will be the numbered step
and the result will be a separate paragraph with the
ListContinue1 style applied so it is indented the same as the
numbered step.
X Except when telling users to select a menu choice such as
Test > Recording > New Test Script, multiple actions should
be documented in separate steps, followed by the system
response.
4
Newmerix Documentation Processes & Style Guide
Contents & Layout for Guides
Other Conventions
X
Use present tense and active voice
X
Use Newmerix Corp. instead of Newmerix Corporation
X
Say "you" rather that "the user"
X
The headings for any procedural topics should start with "How To" so they can easily
be differentiated from introductory or background topics in the TOC of a guide or in the
online help.
Chapter layout
On the first page of a chapter, the chapter number should be on a separate line from the
chapter title.
Apply the chapnum style to the chapter number paragraph (see below for definitions).
Use the Chapter Title style for the chapter title (see below for definitions)
Style Guide
5
Newmerix Documentation Processes & Style Guide
Contents & Layout for Guides
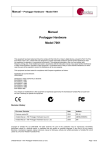
In the Master page, the top box for the chapter number/title should be laid out as follows (see
the figure below):
X
Set the top border at ½ inch.
X
Set the bottom border at 2 inches if the title is one line; set to 2.5 inches if the title is 2
lines long.
X
Set the bottom border to begin at 2.5 inches if the title is 2 lines long.
The box for the body text should be laid out as follows:
X
Set the top border at 2.5 inches if the chapter title is one line long or set at 3 inches if
the title is two lines long
NOTE: The figure below shows the layout for a one line chapter title
Style Guide
6
Newmerix Documentation Processes & Style Guide
Contents & Layout for Guides
The following figure shows sample output of this layout:
The following figure shows the layout with a 2 line title:
Anchored Frames/Graphics
Use the following guidelines for anchored frames and graphics:
X
All graphics should be inside anchored frames which are a separate paragraph with
Body Text style applied.
X
For screen captures/dialog boxes, the anchored frame should be inserted below the
current line and centered.
X
All graphics should be imported by reference rather than embedded in the document
X
For showing icons within a line of text, the anchored frame should be positioned "at
Insertion Point" and the distance above the baseline should be -4.286 pts.
Style Guide
7
Newmerix Documentation Processes & Style Guide
Contents & Layout for Guides
X
For a screen shot with callouts, group the graphic items together by selecting the
anchored frame, then Edit > Select All in Frame then select Graphics > Group.
Note: Need to add recommended font/size for callouts and maybe arrow styles
X
When creating a callout for a screen shot, the callout text must be inside a text frame.
In the Framemaker graphics tools palette, use the Place a Text Frame tool (the icon
on the left) to insert the text instead of the Draw a Text Line tool.
.
If the callout is not in a text frame, if the graphic is included in the online help, for some
reason Webworks doesn’t show the callouts. It’s an unexplained weirdness.
X
In most cases, screen captures are for print only and should be tagged as such using
the conditional text feature (highlight the paragraph containing the anchored frame,
then select Special > Conditional Text, then apply the appropriate conditional text
tag).
Graphics File Naming Conventions
X
If you create a screen capture that you will want to reuse for different purposes, save
the original screen capture and use the prefix "master" in the file name. Then when
you want to highlight different areas of the captured graphic, copy the master file, do
the edits, and save it with a new file (without "master" in the name).
X
The file names of graphics should describe the picture’s contents. Do NOT name a
graphic file "Figure #" in an attempt to associate it with a figure number in a chapter/
book because as soon as a new figure needs to be added, the figure titles and figure
numbers will be out of sequence. The file name should include words that would be in
a figure caption.
NOTE: Most documents do not (and in most cases should not) use figure captions.
Using SnagIt
Use SnagIt to take screen shots and save the file as jpeg.
When you want to discuss a specific area of the captured graphic, instead of creating callouts
using Framemaker, consider using the Spotlight & Magnify feature of SnagIt. You can use
this feature several ways:
X
Select an area to hightlight (such as an icon on the toolbar) and dim the background of
the items around the chosen icon - to make it more visible.
X
Select an area to hightlight, and magnify the item to make it more visible (and dim the
background too for more effect, if desired)
SnagIt has other features for adding callouts or highlighting an area, but the two ideas above
would have many uses in a procedure.
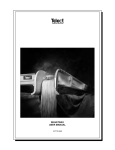
The following figure shows an icon in a toolbar that has been highlighted and the background
dimmed.
Style Guide
8
Newmerix Documentation Processes & Style Guide
Contents & Layout for Guides
The following figure shows an icon in a toolbar that has been highlighted, the icon has been
magnified, and the background has been dimmed.
The key in the 2nd technique is to make sure that the user can still see enough of the
surrounding area so they can stay oriented. This can be much more effective than adding lots
of callouts to a screen shot.
Once you edit a graphic to alter it as above, then save the file, you have limited ability to use
SnagIt to edit the altered graphic again. For example, you won’t be able to unmagnify the icon
in the above figure, but you could dim the background more.
Recommendations
If you create a screen capture that you will want to reuse for different purposes, save the
original screen capture and use the prefix "master" in the file name. Then when you want to
highlight different areas of the captured graphic, copy the master file, do the edits, and save it
with a new file (without "master" in the name). So for the two examples above, the master file
might be master-bpd_toolbar.jpg, the first altered file might be called full-screen.jpg (since it
highlights the full screen mode icon), and the 2nd altered file might be called publishdocument.jpg since it highlights the icon for publishing a document.
SnagIt Procedures
To create the captures shown above:
1. Copy the original screen capture file.
2. Open the copied file using SnagIt by selecting File > Open.
3. Browse to the file then select it.
4. In the Tasks window, click Spotlight and Magnify.
Style Guide
9
Newmerix Documentation Processes & Style Guide
Contents & Layout for Guides
5. Select the area of the graphic you want to highlight.
6. Click Continue to Spotlight and Magnify.
The Effects task window displays.
7. Select the desired effect. For example, dim the background of the surrounding area to
focus on the desired area (25% dim effect seems good, but make sure the
background items can still be seen well enough to provide orientation.
Style Guide
10
Newmerix Documentation Processes & Style Guide
Contents & Layout for Guides
Another choice would be to magnify the selection to make it easier to see. You could
do both. The same caution applies to both techniques.
NOTE: Before you save the file, you can use Edit > Undo multiple times in SnagIt to
undo a series of changes you made to a file.
8. Save the file, using a name that gives a clue about the files contents.
Remember, once you save the file, you have limited ability to edit the file.
Using the Template
The following shows the paragraph styles in the template and explains when to use them.
Style Guide
11
Newmerix Documentation Processes & Style Guide
Style Guide
Contents & Layout for Guides
12
Chapter Title
Heading 1
Body Text
chapnum
Chapter Title
Chapter TitleTOC
Chapter TitleTOC1
Chapter TitleTOC2
CompCode
Equation
Figure 1.
(EQ 1)
FigCapFirst
Footer
Footnote
Heading 1
Heading 1TOC
Heading 2
Heading 2 Collapse
Heading 2 CollapseTOC
Heading 2TOC
Heading 3
Heading 3 Collapse
Heading 3 CollapseTOC
Style Guide
13
Chapter Title
Heading 1
Heading 3TOC
Heading 4
Heading 4 Collapse
Heading 4TOC
IMPORTANT: Important
X
ListBull1
Z
ListBull2
ListContinue1
ListContinue2
1. ListNum1Start
2. ListNum1
a. ListNum2Start
b. ListNum2
NOTE: Note1
NOTE: Note2
NOTE: Note3
Preface Heading 1
Preface Heading 2
2. PrefaceChapter Title
X TableBullet
TableFootnote
TableHead
TableListContinue
1. TableNumberStart
2. TableNumber
TableText
Table 1: TableTitle
Style Guide
14
Chapter Title
Heading 1
Title
TOC Heading
Style
When Applied
Body Text
Use for all regular body text
chapnum
Use for the chapter number near the top of the first page
of a chapter
Chapter Title
Use for the Chapter Title, just below the chapter number
CompCode
Used for showing monospace font text
Heading 1
Heading 2
Heading 3
Heading 4
Heading 4
Collapse
Style Guide
Important
Use to indicate a caution or warning
ListBull1
Used for entries in a bulleted list excpet for the first and
last bullet item
ListBull2
Used for 2nd level bullet items, excpet for the last item in
the list
ListContinue1
Used for a paragraph directly below a ListBull1 list item
or level 1 numbered step.
ListContinue2
Used for a paragraph directly below a ListBull2 list item
or ListNum2 item
ListNum1Start
Used for the first item in a numbered list. Sets the
number to 1.
ListNum1
Used for a numbered list item - other than the first or last
item
ListNum2Start
Used for the first item in an alpha numbered list. Sets the
number to a.
ListNum2
Used for an alpha numbered list item - other than the first
or last item. WIll be numbered b. , c., etc
Note1
Used for a first level note (at same level as body text)
15
Chapter Title
Online Help
Style
Note2
When Applied
Used for note within a numbered list or other indented list
Note3
Online Help
Before creating an online help project, find out the file name and output type that is expected
for the final help file. Webworks doesn't allow you to change the project name. The name you
give to the project = the name that appears in the top of the help file.
Once you generate the help file, make sure the output name matches the expected
deliverable file name. For example, the expected compiled help file for Automate!Test is
A!T_Help.chm.
Framemaker Preparation - General Hints
Keep the following in mind when working with Framemaker:
X
When you do a search/replace, replacements don’t happen to hidden text unless you
sepcify Update All
X
Text in text frames can be conditional but text within a text line can’t be conditional
X
Change the view of the document to include only the version you want to print, pdf, or
convert to help and turn off unwanted condition indicators.
X
Spell check the document. This will catch double spaces and punctuation problems
caused by incorrectly tagged conditional text
NOTE: Page 404 in the Framemaker manual has lots of hints for doc preparation
Framemaker Preparation for Online Help
When creating an online help project, do the following in FrameMaker:
X
Edit the Framemaker files and identify print only and online only text, apply the context
tags to the content. Typically, screen shots of dialog boxes are not included in help
files. The lead-in text for the figure and any figure caption should also be designated
print only.
Print only text should be blue.
Online only should be green.
NOTE: If at the beginning of a section, you created cross-reference list of links to
topics within the section that you want to show in the pdf file, designate the list
as print only since Webworks will automatically generate and display links
after each heading level (if you follow the set up instructions in Webworks
Tasks).
X
Style Guide
When creating a Framemaker book file for the online help, do the following:
16
Chapter Title
Online Help
Z
Save the online book file in the same directory as the book that is to be printed. Be
sure to use the word "online" within the online book file name
Z
Edit the online book file and remove the file containing the front matter, TOC, and
index
NOTE: The online help book file will be pointing to the Framemaker source files.
Whenever you update the source files, you simply regenerate the help files in
Webworks and the changes to the Framemaker source files are incorporated
into the help file.
X
Follow each chapter title and Heading 1 for which there are subheadings with an
introductory sentence or paragraph.
X
Don’t stack headings next to each other. Follow each heading paragraph with bodytext content.
X
Determine places in the document where portions of text are for differnent levels of
expertise and would lend themselves to possibly being collapsible. See the next
section for more information.
X
When you make changes to a Framemaker source file then open Webworks, the
changes to the source file are NOT automatically read by Webworks. The ensure that
the updates are read by the Webworks project, you have to tell Webworks to read the
changes by using the Project menu (select either Scan Selected Document or Scan
all Documents) See page 53 in the Webworks manual.
Collapsing Text
Webworks allows you to designate text that is collapsible/expandable in the online help via an
arrow control. You can specify that the text is either shown or collapsed when the help is first
opened.
The Heading 2 Collapse, Heading 3 Collapse, and Heading 4 Collapse styles in our
Framemaker template can be used to designate entire sections where you want the user to
be able to expand or collapse the text within that section.
The Collapse, Collapse Indent, and Collapse Table styles can be used to identify the starting
point for collapsible text. Collapse = Body Text, Collapse Indent = indented list items, and
Collapse Table should be used to collapse text within a table cell (for example, a note within a
table cell).
This can be useful for several situations:
X
There is a lot of explanatory text that only pertains to a beginning level user. The user
wouldn’t want to see the text once they’re more advanced. You can set it up in the
Framemaker source file so the beginning level text will be hidden by default (in the
help) but will always be seen in the User Guide, or other pdf files. You can designate
that an entire section be collapsed using the Heading # Collapse styles, or use the
Collapse, Collapse Indent, and Collapse Table styles to specify a more discrete
portion of content to expand/collapse.
X
A procedure contains lots of high level steps (step 1, 2, 3, etc) and more detailed level
substeps (a, b, c, etc). An experienced user would only be interested in the numbered
level steps, so the substeps could be collapsed.
Style Guide
17
Chapter Title
X
Online Help
A complicated table contains lots of notes or other information that would lend itself to
be seen occasionally. Some of the table text could be collapsed.
Specifying Text for Collapsing
To specify text for collapsing/expanding in the online help:
NOTE: Page 174 in the Webworks for Frameker guide explains this process generically.
1. Determine the starting point of the section to be collapsed (the text that will become
the link to expand the text).
2. Apply the appropriate style to the paragraph (Heading # Collapse, Collapse, Collapse
Indent, or Collapse Table).
This tells Webworks where the starting point of the text to be collapsed occurs.
3. Identify the text that will become the drop-down content.
4. Put the cursor at the end of the content you identified in step 4.
5. Create a new marker called DropDownEnd.
a. Select Special / Marker from the menu bar.
The Marker dialog box displays.
b. From the Marker Type drop-down list, select Edit.
The Edit Customer Marker Type dialog box displays.
c. Type the new marker name "DropDownEnd" and click Add, then click Done.
The Edit Customer Marker Type dialog box closes.
6. Apply the new marker to the end point of the drop-down text section.
Style Guide
18
Chapter Title
Online Help
7. Repeat these steps for all text that you want to be a drop-down area.
Now you’re ready to do the Webworks part of the process. See Webworks Tasks for
more information.
Webworks Tasks
When creating a Webworks project, do the following:
1. Before creating an online help project, find out the file name and output type that is
expected for the final help file.
2. Specify the project file name that will appear in the help file. When you create the
project, the project name = the name that appears in the title bar of the online help.
The title can't be edited.
Z
The project name ought to be: "<product name> Online Help
Z
Do not include rev numbers in the project name.
Z
Also be sure to use the correct output type.
NOTE: The output type can be changed later using Project > Manage Format Targets.
3. Use the correct template file for the project. For a chm output, use the template at
S:\Engineering\Product Documentation\WebWorks\Template\A!Test template.wsp
4. Define how the conditional text should appear. Select Format > Condition to display
the Conditions and Variables dialog. Then specify which conditions to make visible.
For example, the Framemaker source files ought to tag most screen captures/dialog
boxes as print only - since most aren't needed in online help. Be sure that the print
only condition is not visible.
NOTE: The list of available conditions is taken directly from the conditions you defined
in the Framemaker source file.
Style Guide
19
Chapter Title
Online Help
5. Tell Webworks how you want to map the heading styles for the table of contents
generation and how you want the TOC for the help to appear. Use the following
specifications:
a. Select View > Style Designer, then click the Paragraph Styles tab.
b. Click the Options tab.
The Style Designer Paragraph Options window displays:
Style Guide
20
Chapter Title
Online Help
c. In the Paragraph Styles list, scroll down to and select the chapnum tag. Make sure
that Generate Output is disabled.
d. In the Paragraph Styles list, scroll down to and select the Chapter Title tag. Make
sure that Generate Output is enabled, page break priority = 1, and Table of
Contents Level is 1.
Also set Mini-TOC levels to 1. This will automatically generate a list of links to
heading 1 topics from the chapter title page, as shown below.
Style Guide
21
Chapter Title
Online Help
e. Then select Heading level 1 tag and set the page break priority to 1 and Table of
Contents Level to 2.
Also set Mini-TOC level to ALL. This will automatically generate a list of links to
heading 2 and 3 topics from the heading level 1 topic, as shown below. The links
will appear before any text in the heading 1 topic.
f.
Select Heading level 2 tag and set the page break priority to 1 and Table of
Contents Level to 3. Set mini-TOC level to 3.
g. Select Heading level 3 tag and set the page break priority to 2 and Table of Contents Level to 4. Set mini-TOC level to None.
6. Tell Webworks about any collapse tags you used so it knows what to do with the
collapse tags.
a. In the Style Designer Paragraph Options window, select the name of the first
collapse tag used in your book.
Style Guide
22
Chapter Title
Online Help
b. From the Dropdown option, select how you want the text to appear when online
help first opens: Start Open, or Start Closed. Typically, Start Closed is used.
c. Repeat these steps for each collapse style used in your book.
NOTE: When the project is compiled, in the online help, the link paragraph for the
collapsed text will have an arrow
at the end of it. Clicking the arrow will
expand the text. Clicking the collapse icon
will collapse the text.
7. Change the headings to align left.
a. With Paragraph Styles selected, click the Properties tab.
b. Click the Text property.
The Text properties page displays as shown below.
Style Guide
23
Chapter Title
Online Help
c. From the Paragraph Styles list, select Chapter Title.
d. In the Properties page, under Alignment, select Left from the Horizontal dropdown list.
e. From the Paragraph Styles list, select Heading 1.
f.
In the Properties page, under Alignment, select Left from the Horizontal dropdown list.
g. Repeat the process for Heading 2 and Heading 3.
8. Define the Page options by selecting View > Style Designer, then click the Page
Styles tab, then the Options tab.
The Style Designer Page Options window displays:
Style Guide
24
Chapter Title
Online Help
Then do the following:
a. Do not include the company information in the generated topic. To ensure this,
make sure that Company info displayed at top and Company info displayed at
bottom is disabled.
b. Specify that the navigation links show at the top and bottom of the page. Make
sure these items are enabled.
c. Define how the breadcrumbs will appear in the help.
Z
Specify that the breadcrumbs (topic path) be shown at the top and bottom of the
topic. To define this, make sure that Breadcrumbs show at top of page and
Breadcrumbs show at bottom of page is enabled. Make sure that Breadcrumbs
show at bottom of page is disabled.
d. Define the separator that will appear between the entries in the bread crumb trail.
To do this, click the Properties tab. Click Navigation. In the Breadcrumbs section,
use the drop-down list to select > as the Separator. See the figure below.
Style Guide
25
Chapter Title
Preparing Documents for PDF
9. Save the project.
10. Generate the help.
11. Once you generate the help file, make sure the output name matches the expected
deliverable file name. For example, the expected compiled help file for Automate!Test
is A!T_Help.chm. You will have to rename the compiled help because the project
name (therefore the default output name) will not match.
12. ADD INFO ABOUT WHERE TO STORE THE FILES. SUGGEST DIRECTORY
STRUCTURE
Preparing Documents for PDF
When preparing documents for conversion to pdf, keep the following in mind:
X
Make sure that comments or other items not meant to be in a print version are hidden.
X
Edit the TOC and Index files and make sure the line breaks are in a good place and no
extraneous text is included.
X
Archiving Release Files
When a release is ready, copy the final pdf files to the \\S: \newmerix\Engineering\Product
Documentation\Latest PDFs folder so whenever anyone needs a copy of the released file,
they can get it themselves.
Also, copy all the source files to the appropriate product folder in .\S:
\newmerix\Engineering\Product Documentation\
Style Guide
26