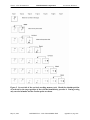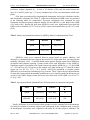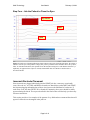
1
Grant #: 1 U01 HL68060-01A1
APPENDIX 9:
9A.
APPLES Manual of Operations
PI- Dement, William C.
SUBJECT RECURITEMENT AND RETENTION MATERIALS
SUBJECT INTRODUCTORY MATERIALS
A packet of materials will be given to each subject upon enrollment in the study containing the
Drowsy Driving Pamphlet (see Appendix 5K), the Subject Appointment Sheet (see Appendix
9B), the study abstract, the study overview, and an outline of subject encounters.
A.P.P.L.E.S. / Apnea Positive Pressure Long Term Efficacy Study
ABSTRACT
PI: William Dement, M.D., Ph.D.
Other Investigators: Clete A. Kushida, M.D., Ph.D.,
Christian Guilleminault, M.D., David White, M.D., Stuart Quan, M.D.,
Richard Simon, M.D., James Walsh, Ph.D.
Nasal continuous positive airway pressure (CPAP) therapy is in widespread use as the primary
treatment for the obstructive sleep apnea syndrome (OSAS), a sleep-related breathing disorder
affecting more than 15 million Americans. The therapeutic effectiveness of CPAP in providing
significant, stable and long-term neurocognitive or other functional benefits to patients with
OSAS has not been systematically investigated. This study is a randomized, blinded, shamcontrolled, multi-center trial of CPAP therapy. The principal aims of the study are:
•
To assess the long-term effectiveness of CPAP therapy on neurocognitive function, mood,
sleepiness and quality of life by administering both standard and novel tests of these indices
to OSAS subjects randomly assigned to either a treatment group receiving CPAP or a control
group receiving Sub-therapeutic (Sham) CPAP
•
To identify specific deficits in neurocognitive function associated with OSAS in a large,
heterogeneous population of OSAS subjects
•
To determine which deficits in neurocognitive function in OSAS subjects are reversible and
most sensitive to the effects of CPAP
•
To develop multivariate composite indices to assess the clinical effectiveness of CPAP in
improving neurocognitive function, mood, sleepiness and quality of life in OSAS patients
•
To use Functional Magnetic Resonance Imaging (fMRI) on a subset of OSAS subjects to
determine differences in the pattern of cortical activation before and after CPAP therapy and
to assess whether this pattern change is associated with improvement in the performance of
specific neurocognitive tasks
The primary endpoint of the study is the effect of 6 months of CPAP treatment on neurocognitive
function. A total of 1,100 subjects (550 per treatment group) will be enrolled from the patient
populations at five sites (Stanford University, Stanford, CA; University of Arizona, Tucson, AZ;
St. Mary’s Medical Center, Walla Walla, WA; St. Luke’s Hospital, Chesterfield, MO; and
Brigham and Women’s Hospital, Boston, MA). This study will advance our knowledge of the
major, most frequently debilitating, clinically relevant OSAS-associated conditions and by
scientifically establishing the effectiveness of CPAP therapy, should greatly improve access for
the countless victims of this disorder.
Appendix 9, Page 468
CONFIDENTIAL – NOT FOR DISTRIBUTION
May 25, 2004
Grant #: 1 U01 HL68060-01A1
APPLES Manual of Operations
PI- Dement, William C.
A.P.P.L.E.S. / Apnea Positive Pressure Long Term Efficacy Study
OVERVIEW
PI: William Dement, M.D., Ph.D.
Other Investigators: Clete A. Kushida, M.D., Ph.D.,
Christian Guilleminault, M.D., David White, M.D., Stuart Quan, M.D.,
Richard Simon, M.D., James Walsh, Ph.D.
The Apnea Positive Pressure Long-term Efficacy Study (APPLES) is a randomized, doubleblinded, sham-controlled, multi-center study that has been initiated by the National Heart, Lung
and Blood Institute (NHLBI) to assess the long-term effectiveness of nasal continuous positive
airway pressure (CPAP) therapy for the obstructive sleep apnea syndrome (OSAS). The
measures of CPAP effectiveness will include neurocognitive function, mood, sleepiness and
quality of life. The study was motivated by the fact that sleep-disordered breathing is
increasingly recognized within the general population, yet the therapeutic effectiveness of the
first-line therapy, CPAP, has not been systematically investigated. The APPLES grant
application was initially submitted to the NHLBI in October 2000, submitted as a revised
application in October 2001 and funded September 30, 2002. The DSMB, named by the
Director of the NHLBI on March 28, 2003, met May 28, 2003 to review this protocol.
The primary goal of the study is to test the hypothesis that CPAP therapy results in significant,
stable and long-term benefits to neurocognitive function, mood, sleepiness and quality of life in
patients with OSAS. This hypothesis will be evaluated by administering a comprehensive, yet
novel neurocognitive test battery, to assess established measures on a large group of OSAS
subjects assigned to either Active or Sub-therapeutic (Sham) CPAP therapy in a double-blinded
and randomized manner. Subjects will have a clinical evaluation, complete questionnaires
developed for both screening and data collection, participate in training sessions designed to
eliminate learning effects for the neurocognitive tests and have a polysomnogram combined with
the neurocognitive test battery at baseline, two months and six months. A four-month follow-up
appointment at the clinic will also be required. Participation in APPLES will last for
approximately seven months with an additional, optional follow-up period
If, as anticipated, we find that CPAP usage results in improved daily function for OSAS patients,
the most important benefit of the study includes advancing the knowledge that CPAP can
effectively treat the debilitating consequences of OSAS in the areas of neurocognitive function,
mood, sleepiness and quality of life. We further anticipate providing the necessary evidence to
symptomatic individuals and health care providers that CPAP has a lasting positive impact on the
nature of this sleep-related breathing disorder. Moreover, important clinical questions regarding
the relationship between duration of CPAP use and degree of improvement in outcome measures
may become apparent from these data.
May 25, 2004
CONFIDENTIAL – NOT FOR DISTRIBUTION
Appendix 9, Page 469
Grant #: 1 U01 HL68060-01A1
APPLES Manual of Operations
PI- Dement, William C.
A.P.P.L.E.S. / Apnea Positive Pressure Long Term Efficacy Study
SUBJECT ENCOUNTERS
Clinical Evaluation
This visit includes screening questionnaires and a clinical evaluation by a study physician
Training Session One and Two
These visits include neurocognitive test training and the administration of questionnaires and
psychological interviews used for screening
Diagnostic Appointment
This visit includes a diagnostic polysomnogram (overnight sleep study), questionnaires,
psychological interviews, Maintenance of Wakefulness Test (MWT) and the neurocognitive test
battery.
CPAP titration study
This visit includes a polysomnogram with CPAP Titration and the completion of questionnaires.
Two-month Post-CPAP Follow-up Appointment
This visit includes a follow-up polysomnogram, questionnaires, psychological interviews, MWT
and the neurocognitive test battery.
Four-month Post-CPAP Follow-up Visit
This visit includes questionnaires and a follow-up appointment with a study physician.
Six-month Post-CPAP Follow-up Appointment
This visit includes a follow-up polysomnogram, questionnaires, psychological interviews, MWT
and the neurocognitive test battery
Appendix 9, Page 470
CONFIDENTIAL – NOT FOR DISTRIBUTION
May 25, 2004
Grant #: 1 U01 HL68060-01A1
9B.
APPLES Manual of Operations
PI- Dement, William C.
SUBJECT APPOINTMENT SHEETS
A pnea
P ositive
P ressure
L ong-term
E fficacy
S tudy
Subject Appointment Sheet
Training Session One
What?
You have been scheduled to come in for your first training session.
When?______________________________________ (Day, Month, Date, Year)
How Long Will I Be There?
The testing process will last approximately 2 hours and is scheduled to begin at
____________ (TIME) and should end no later than ______________ (TIME).
Where Do I Go?
Name of Institution
Street Address
Suite Number/Floor Number
What Will Happen?
During this visit, you will practice the neurocognitive tests and complete any
screening questionnaires that were not administered during the clinical evaluation.
Psychological interviews may also be administered at this time by a
psychometrician and study staff will address any of your questions.
What Do I Need to Do to Prepare?
Please prepare a list of any medications that you did not go over with the physician
during your clinical evaluation. Be prepared to notify the staff of any changes to
your medications.
What Should I Bring?
Please bring your glasses/contacts/hearing aides.
Who to contact?
If you have any questions, please contact Name by phone (Phone Number)or email
(email address).
May 25, 2004
CONFIDENTIAL – NOT FOR DISTRIBUTION
Appendix 9, Page 471
Grant #: 1 U01 HL68060-01A1
APPLES Manual of Operations
A pnea
P ositive
P ressure
L ong-term
E fficacy
S tudy
PI- Dement, William C.
Subject Appointment Sheet
Training Session Two
What?
You have been scheduled to come in for your second training session.
When?_______________________________________ (Day, Month, Date, Year)
How Long Will I Be There?
The testing process will last approximately 1 hour and 15 minutes and is scheduled
to begin at ____________ (TIME) and should end no later than ______________
(TIME).
Where Do I Go?
Name of Institution
Street Address
Suite Number/Floor Number
What Will Happen?
During this visit, you will practice the neurocognitive tests and complete any
screening questionnaires that were not administered during the clinical evaluation.
Psychological interviews may also be administered at this time by a
psychometrician and study staff will address any of your questions.
What Do I Need to Do to Prepare?
Be prepared to notify the staff of any changes to your medications.
What Should I Bring?
Please bring your glasses/contacts/hearing aides.
Who to contact?
If you have any questions, please contact Name by phone (Phone Number)or email
(email address).
Appendix 9, Page 472
CONFIDENTIAL – NOT FOR DISTRIBUTION
May 25, 2004
Grant #: 1 U01 HL68060-01A1
APPLES Manual of Operations
A pnea
P ositive
P ressure
L ong-term
E fficacy
S tudy
PI- Dement, William C.
Subject Appointment Sheet
Diagnostic Sleep Study
What?
You have been scheduled to come in for your first overnight sleep study and testing
day.
When?______________________________________ (Day, Month, Date, Year)
How Long Will I Be There?
The testing process will begin at 8pm and will end no later than 5pm the following
day. Please arrive at 8pm to assure there is adequate time to apply the sensors
necessary for the study and to fill out the appropriate questionnaires.
Where Do I Go?
Name of Institution
Street Address
Suite Number/Floor Number
What Will Happen?
For the overnight study, sensors will be placed on your scalp, face, chest, and legs
to measure brain, eye, muscle and heart activity. Additionally, sensors will be
placed on your upper lip, neck, and finger and bands will be secured around your
chest and abdomen.
The sleep study will begin at approximately 10pm and will end at about 7am.
Some of the sensors will be removed at that time and others will be added. You
will have breakfast and then begin the day’s testing schedule. During the day, you
will perform a number of computer based tests and psychological interviews. The
schedule allows for several breaks, and lunch is provided.
What Do I Need to Do to Prepare?
Please fill out the sleep log you were given for 7 days before your appointment. Be
sure to get at least 7 hours of sleep for the 3 nights preceding your appointment.
Be prepared to notify the staff of any changes to your medications.
What Should I Bring?
Please bring your glasses/contacts/hearing aides and any medications that you
would normally take before bed, in the morning or during the day. We recommend
button down pajamas and a button down shirt for the daytime testing to
accommodate the sensors.
Who to contact?
If you have any questions, please contact
(Phone Number) or email
(Name) by phone
(email address).
May 25, 2004
Appendix 9, Page 473
CONFIDENTIAL – NOT FOR DISTRIBUTION
Grant #: 1 U01 HL68060-01A1
APPLES Manual of Operations
A pnea
P ositive
P ressure
L ong-term
E fficacy
S tudy
PI- Dement, William C.
Subject Appointment Sheet
CPAP Titration
What?
You have been scheduled to come in for an overnight sleep study to try CPAP.
When?_______________________________________ (Day, Month, Date, Year)
How Long Will I Be There?
The testing process will begin at 7:00pm and will end no later than 8am the
following day. Please arrive at 7pm to assure there is adequate time to apply the
sensors necessary for the study and to fill out the appropriate questionnaires.
Where Do I Go?
Name of Institution
Street Address
Suite Number/Floor Number
What Will Happen?
For the overnight study, sensors will be placed on your scalp, face, chest, and legs
to measure brain, eye, muscle and heart activity. Additionally, sensors will be
placed on your upper lip, neck, and finger and bands will be secured around your
chest and abdomen.
The sleep study will begin at approximately 10pm and will end at about 7am.
Before you go to sleep, the technologist will have you try CPAP and select a mask
that feels comfortable. You will spend the entire night wearing the CPAP so we can
determine the appropriate treatment level.
What Do I Need to Do to Prepare?
Please fill out the sleep log you were given for 7 days before your appointment. Be
sure to get at least 7 hours of sleep for the 3 nights preceding your appointment.
Be prepared to notify the staff of any changes to your medications.
What Should I Bring?
Please bring your glasses/contacts/hearing aides and any medications that you
would normally take before bed, in the morning or during the day. We recommend
button down pajamas and a button down shirt for the daytime testing to
accommodate the sensors.
Who to contact?
If you have any questions, please contact
(Phone Number) or email
Appendix 9, Page 474
CONFIDENTIAL – NOT FOR DISTRIBUTION
(Name) by phone
(email address).
May 25, 2004
Grant #: 1 U01 HL68060-01A1
APPLES Manual of Operations
A pnea
P ositive
P ressure
L ong-term
E fficacy
S tudy
PI- Dement, William C.
Subject Appointment Sheet
Two-Month Post-CPAP
Follow-up Appointment
What?
You have been scheduled to come in for an overnight sleep study and testing day.
When?_______________________________________ (Day, Month, Date, Year)
How Long Will I Be There?
The testing process will begin at 7pm and will end no later than 5pm the following
day. Please arrive at 7pm to assure there is adequate time to apply the sensors
necessary for the study and to fill out the appropriate questionnaires.
Where Do I Go?
Name of Institution
Street Address
Suite Number/Floor Number
What Will Happen?
For the overnight study, sensors will be placed on your scalp, face, chest, and legs
to measure brain, eye, muscle and heart activity. Additionally, sensors will be
placed on your upper lip, neck, and finger and bands will be secured around your
chest and abdomen.
The sleep study will begin at approximately 10pm and will end at about 7am.
Some of the sensors will be removed at that time and others will be added. You
will have breakfast and then begin the day’s testing schedule. During the day, you
will perform a number of computer based tests and psychological interviews. The
schedule allows for several breaks, and lunch is provided.
What Do I Need to Do to Prepare?
Please fill out the sleep log you were given for 7 days before your appointment. Be
sure to get at least 7 hours of sleep for the 3 nights preceding your appointment.
Be prepared to notify the staff of any changes to your medications.
What Should I Bring?
Please bring your glasses/contacts/hearing aides and any medications that you
would normally take before bed, in the morning or during the day. We recommend
button down pajamas and a button down shirt for the daytime testing to
accommodate the sensors.
Who to contact?
If you have any questions, please contact
(Phone Number) or email
(Name) by phone
(email address).
May 25, 2004
Appendix 9, Page 475
CONFIDENTIAL – NOT FOR DISTRIBUTION
Grant #: 1 U01 HL68060-01A1
APPLES Manual of Operations
A pnea
P ositive
P ressure
L ong-term
E fficacy
S tudy
PI- Dement, William C.
Subject Appointment Sheet
Four-Month Post-CPAP Follow-up
Appointment
What?
You have been scheduled to come in for your follow-up visit with a physician and
pscyhometrician.
When?_______________________________________ (Day, Month, Date, Year)
How Long Will I Be There?
The testing process will last approximately 2 hours and is scheduled to begin at
_____________ (TIME) and should end no later than _______________ (TIME)
that day.
Where Do I Go?
Name of Institution
Street Address
Suite Number/Floor Number
What Will Happen?
During this visit, you will meet with the doctor for a physical exam. Then you
complete some tests and questionnaires administered by a psychometrician.
What Do I Need to Do to Prepare?
Please fill out the sleep log you were given for 7 days before your appointment. Be
sure to get at least 7 hours of sleep for the 3 nights preceding your appointment.
Be prepared to notify the staff of any changes to your medications.
What Should I Bring?
Please bring your glasses/contacts/hearing aides.
Who to contact?
If you have any questions, please contact
(Phone Number) or email
Appendix 9, Page 476
CONFIDENTIAL – NOT FOR DISTRIBUTION
(Name) by phone
(email address).
May 25, 2004
Grant #: 1 U01 HL68060-01A1
APPLES Manual of Operations
A pnea
P ositive
P ressure
L ong-term
E fficacy
S tudy
PI- Dement, William C.
Subject Appointment Sheet
Six-Month Post-CPAP
Follow-up Appointment
What?
You have been scheduled to come in for your last overnight sleep study and testing
day.
When?_______________________________________ (Day, Month, Date, Year)
How Long Will I Be There?
The testing process will begin at 7pm and will end no later than 5pm the following
day. Please arrive at 7pm to assure there is adequate time to apply the sensors
necessary for the study and to fill out the appropriate questionnaires.
Where Do I Go?
Name of Institution
Street Address
Suite Number/Floor Number
What Will Happen?
For the overnight study, sensors will be placed on your scalp, face, chest, and legs
to measure brain, eye, muscle and heart activity. Additionally, sensors will be
placed on your upper lip, neck, and finger and bands will be secured around your
chest and abdomen.
The sleep study will begin at approximately 10pm and will end at about 7am.
Some of the sensors will be removed at that time and others will be added. You
will have breakfast and then begin the day’s testing schedule. During the day, you
will perform a number of computer based tests and psychological interviews. The
schedule allows for several breaks, and lunch is provided.
What Do I Need to Do to Prepare?
Please fill out the sleep log you were given for 7 days before your appointment. Be
sure to get at least 7 hours of sleep for the 3 nights preceding your appointment.
Be prepared to notify the staff of any changes to your medications.
What Should I Bring?
Please bring your glasses/contacts/hearing aides and any medications that you
would normally take before bed, in the morning or during the day. We recommend
button down pajamas and a button down shirt for the daytime testing to
accommodate the sensors.
Who to contact?
If you have any questions, please contact
(Phone Number) or email
(Name) by phone
(email address).
May 25, 2004
Appendix 9, Page 477
CONFIDENTIAL – NOT FOR DISTRIBUTION
Grant #: 1 U01 HL68060-01A1
APPLES Manual of Operations
PI- Dement, William C.
9C. WELCOME LETTER TO SUBJECT
Date:
Subject
Street Address
City, State Zip
Dear Mr./Mrs./Ms.
,
Thank you for agreeing to participate in the Apnea Positive Pressure Long-term Efficacy Study
(APPLES). The purpose of this study is to assess the long-term effectiveness of nasal continuous
positive airway pressure (CPAP) therapy for obstructive sleep apnea syndrome (OSAS). We will
measure the effectiveness of CPAP by exploring the following: neurocognitive function, mood,
sleepiness, and quality of life.
Participation in APPLES will last approximately seven months with an additional, optional
follow up period. Each subject is randomly assigned to receive either Active CPAP or Subtherapeutic CPAP.
Subjects will have a clinical evaluation and participate in two training sessions designed to allow
the subjects to practice for the neurocognitive tests. Further, each participant will have a
polysomnogram (sleep study) combined with the test battery at baseline, two months, and six
months. A four month follow-up appointment at the sleep disorders clinic will also be required.
Thank you again for your willingness to participate in this important study. If you have any
questions, please contact me at (phone number) .
Cordially,
Name
CC Coordinator
Institution
Appendix 9, Page 478
CONFIDENTIAL – NOT FOR DISTRIBUTION
May 25, 2004
Grant #: 1 U01 HL68060-01A1
9D.
APPLES Manual of Operations
PI- Dement, William C.
SAMPLE NOTIFICATION LETTER TO REFERRING PHYSICIAN
Date:
Dr.
Hospital
Department
Street Address
City, State Zip
Dear Dr.
,
Your patient,
, has recently enrolled in a research study we are conducting at the
(site)
to assess the long-term effectiveness of nasal continuous positive
airway pressure (CPAP) therapy for obstructive sleep apnea syndrome (OSAS). This letter is for
informational purposes only.
The Apnea Positive Pressure Long-term Efficacy Study (APPLES) is a randomized, doubleblind, sham-controlled, multi-center study funded by the National Heart, Lung, and Blood
Institute (NHLBI). The measures of CPAP effectiveness will include neurocognitive function,
mood, sleepiness, and quality of life.
Participation in APPLES will last approximately seven months with an additional, optional
follow up period. Subjects will be randomly assigned to receive either Active CPAP or Subtherapeutic CPAP. Specific inclusion and exclusion criteria were designed to minimize risk to
participants randomized to the sub-therapeutic CPAP group.
Subjects will have a clinical evaluation, complete questionnaires developed for both screening
and data collection, participate in training sessions designed to eliminate learning effects for the
neurocognitive tests, and have a polysomnogram (sleep study) combined with the neurocognitive
test battery at baseline, two months, and six months. A four month follow-up appointment at the
sleep disorders clinic will also be required.
If you have any questions, please contact me at (phone number) .
Cordially,
Name
Site Director
Institution
May 25, 2004
CONFIDENTIAL – NOT FOR DISTRIBUTION
Appendix 9, Page 479
Grant #: 1 U01 HL68060-01A1
9E.
APPLES Manual of Operations
PI- Dement, William C.
STUDY CONCLUSION LETTER TO SUBJECT
Date:
Subject
Street Address
City, State Zip
Dear Mr./Mrs./Ms.
,
Thank you for participating in the Apnea Positive Pressure Long-term Efficacy Study
(APPLES). Your participation has helped us to obtain important information about the
effectiveness of Continuous Positive Airway Pressure (CPAP). To briefly review what was
discussed during your exit interview, you were randomly assigned to receive Active (or Subtherapeutic) CPAP during the study. Although we are unable to provide a detailed analysis of
your results, your scores were normal (or unusual) with respect to neurocognitive function,
mood, sleepiness, and quality of life. Attached is a summary of your results.
In an effort to obtain more information about the long-term effectiveness of CPAP, we may
contact you in the future to complete the questionnaires utilized during the study. This follow-up
is completely voluntary and there is no risk involved.
From this point forward, you should contact your home health care company or primary care
physician if you have any problems with your new CPAP machine. However, please contact me
if you are having difficulty resolving a problem or have additional questions about the study.
You can reach me at the following number: (phone number).
We hope that your participation in APPLES was a positive experience. Without individuals like
yourself, this project would be impossible to complete. Thank you again for your devotion to the
study.
Cordially,
Name
CC Coordinator
Institution
Appendix 9, Page 480
CONFIDENTIAL – NOT FOR DISTRIBUTION
May 25, 2004
Grant #: 1 U01 HL68060-01A1
9F.
APPLES Manual of Operations
PI- Dement, William C.
STUDY CONCLUSION LETTER TO REFERRING PHYSICIAN
Date:
Dr.
Hospital
Department
Street Address
City, State Zip
Dear Dr.
,
Your patient,
, has completed his/her participation in (or withdrawn from) the
Apnea Positive Pressure Long-term Efficacy Study (APPLES) conducted at the
(site)
. This letter is for informational purposes only.
(Name)
was randomly assigned to receive Active (or Sub-therapeutic) CPAP during the
study and is now using a CPAP machine provided by (local DME company). Attached are
copies of the diagnostic sleep study and CPAP titration study for your file. While we are unable
to provide detailed individual results of our outcome measures,
Name
had normal (or
unusual) scores with respect to neurocognitive function, mood, sleepiness, and quality of life.
Attached is a brief summary of your patient’s results.
We may contact your patient in the future to complete the questionnaires utilized during the
study. This follow-up is completely voluntary and there is no risk involved.
Thank you for your allowing your patient to participate in our study. His (or Her) devotion to
the study protocol will help us to obtain important information about the effectiveness of CPAP.
If you have any further questions, please contact me at (phone number) .
Cordially,
Name
Site Director
Institution
May 25, 2004
CONFIDENTIAL – NOT FOR DISTRIBUTION
Appendix 9, Page 481
Grant #: 1 U01 HL68060-01A1
APPLES Manual of Operations
9G.
RECRUITMENT PAMPHLET CONTENT
9H
APPLES WEB SITE URLS
Appendix 9, Page 482
CONFIDENTIAL – NOT FOR DISTRIBUTION
PI- Dement, William C.
May 25, 2004
What is
Obstructive Sleep Apnea?
More than 15 million Americans have
been diagnosed with Obstructive Sleep
Apnea (OSA). Common symptoms of this
sleep disorder include loud snoring,
fatigue, daytime sleepiness, restless sleep,
and choking or gasping noises during
sleep. Additionally, individuals with OSA
often have a hard time concentrating,
experience reduced memory, and have
greater difficulty learning new tasks.
When we fall asleep at night all of our
muscles relax, including the muscles that
hold the throat open. For individuals that
sleep normally, the throat continues to
stay open so that air flows into and out of
the lungs. Individuals who have OSA
have the muscles in their airway relax to
the point that their breathing is briefly
obstructed. This cycle occurs over and
over during the night and results in poor
quality and non-refreshing sleep. In
addition, individuals with OSA may have
low oxygen levels, abnormal heart
rhythms, or abnormal blood pressure
during sleep. They may also suffer from
high
blood
pressure and
other
cardiovascular problems in the daytime.
How does CPAP work?
Continuous Positive Airway Pressure
(CPAP) is the most common treatment
for OSA. This therapy uses a mask,
which is worn over the nose and
connected to a machine through a
flexible hose. The CPAP machine
produces heated and humidified air,
which is blown gently into the back of
the throat. This air holds the throat open
during sleep, so the individual can
breathe normally.
What is APPLES?
The Apnea Positive Pressure Long-term
Efficacy Study (APPLES) is a research
project that measures the effectiveness of
CPAP treatment for OSA. The study
focuses on how CPAP affects memory,
learning, and the performance of mental
tasks, as well as evaluation of sleepiness,
mood, and quality-of-life. Five sleep
disorder centers across the nation are
taking part in the study. The site locations
are at the Stanford University Sleep
Disorders Clinic in Palo Alto, California;
University of Arizona in Tucson, Arizona;
St. Mary’s Medical Center in Walla Walla,
Washington; St. Luke’s Hospital in
Chesterfield, Missouri; and Brigham and
Women’s
Hospital
in
Boston,
Massachusetts.
Eligibility
Eligible participants include individuals
who have been recently diagnosed with
OSA or have the symptoms of the
disorder, but who have not yet been
treated for the disorder. A participant
must be willing and available to
participate in the study for seven
months. This involves two training
sessions, four or five overnight sleep
studies in the Sleep Laboratory, a day of
testing following three of the overnight
sleep studies, and two appointments
with a physician. Female participants
must not be pregnant or plan to become
pregnant in the next nine months.
Benefits
Some benefits for participating in this
research study include the opportunity
to learn more about OSA and how it
affects your memory, learning, and
performance of mental tasks, as well as
an evaluation of your sleepiness, mood,
and quality-of-life. You will also be
directly
contributing
to
highly
important medical research, since this is
the first and largest clinical trial in the
field of sleep. Additional benefits
include extra medical attention and up
to a $500 honorarium for your time and
effort involved in the completion of this
study.
For more information
ARE YOU TIRED OR FATIGUED?
DO YOU SNORE?
DO YOU AWAKEN FROM
SLEEP GASPING FOR AIR?
You have symptoms of
a sleep disorder called
Obstructive Sleep Apnea
and may be eligible
to participate in a study
examining the effectiveness of a
treatment for this sleep disorder.
WEB SITE URLS
Go to http://apples.stanford.edu/apples/Forms/
THIS IS THE ACTIVE APPLES TEAM WEB SITE
You may access the APPLES public web site at the following location:
http://apples.stanford.edu/public
You may access APPLES PDF files at the following location:
http://apples.stanford.edu
Use the following username and password to access the PDF files or the subject only
portion of the public web site
Username: applespdf
Password: internetUser123
(it will likely already be entered for you)
(password is case sensitive)
Grant #: 1 U01 HL68060-01A1
APPLES Manual of Operations
PI- Dement, William C.
APPENDIX 10: ADDITIONAL TEST MANUALS
10A.
SWMT MANUAL
SWMT Manual
General Overview of the SWMT
The SWMT
The SWMT (Sustained Attention and Working Memory Test) is a unique, highly automated
neurological assessment instrument developed by the San Francisco Brain Research Institute and
SAM Technology. It assesses mental acuity by combining measures of brain electrical activity
with measures of cognitive task performance. The SWMT measures a patient’s brain waves
(EEG) while he or she sits comfortably at a computer and performs a standardized battery of
working memory (WM) and resting tasks. Direct measurement of neural signals of WM, a
fundamental cognitive ability, can reveal information about how a patient’s level of mental effort
and alertness affects their cognitive performance. This additional information is diagnostically
important because subtle changes in brain function may not always be apparent in a patient’s
overt task performance. For instance, a patient might be able to temporarily compensate for a
minor impairment by trying harder. The analytical approach used in the SWMT thus operates on
the simple principle that behavioral and neurophysiological indices are more robust and
informative in combination than they are in isolation.
EEG Recording Equipment
EEG during SWMT performance is recorded using SAM Technology’s EEG recording
equipment, consisting of the SAM Technology Computer Interface Adaptor and tinyampsTM,
powered by a Powerex POWERBank Lithium Ion Battery. When the equipment arrives at your
site, connect the Computer Interface Adaptor to the USB port on the back of the computer, and
connect the tinyampsTM to the Adaptor. When not in use, store the tinyampsTM on the computer.
Prior to a neurocognitive test session, ensure that the battery is fully charged and connected to
the Adaptor. If the battery runs down during a session, the data will be lost. Therefore always
check the battery charge at the beginning of the test day. Plug the patient’s electrodes into the
electrode jack box and plug the jack box into the tinyampsTM, securing the jack box to the
tinyampsTM with velcro.
Working Memory Tasks
The SWMT contains two spatial working memory tasks that vary in difficulty. Both require the
patient to remember the position of a previous stimulus and to respond to the current stimulus
based on the remembered position of the prior stimulus. Difficulty is varied by having the patient
remember information over one or two trials.
Each WM task is presented in a block of 50 trials. In each trial a stimulus is displayed in one of
six positions about a central fixation point (Figure 1). The object of the task is to select a
“match” or “no-match” response for each stimulus based on the remembered position of an
earlier stimulus, the “target”.
May 25, 2004
CONFIDENTIAL – NOT FOR DISTRIBUTION
Appendix 10, Page 483
Grant #: 1 U01 HL68060-01A1
APPLES Manual of Operations
PI- Dement, William C.
Figure 1. Working memory stimulus and target positions.
Match or no-match responses are made on the mouse. The match key is the left mouse button.
The no-match key is the right mouse button. The patient should respond with the index and
middle fingers of the right hand, respectively. If the patient cannot use the right hand to make the
responses, the patient may use the left hand. The match and no-match keys remain the same. The
left mouse button always indicates a match response; the right mouse button always indicates a
no-match response (if the patient uses the left hand for responding, make a note in the Closing
Session Notes, described below).
One-back Working Memory Task
The one-back working memory task presents a sequence of stimuli positioned about a central
fixation point. The match or no-match decision for each stimulus is based on whether the
position of the stimulus in each trial is the same as the position of the target on the trial that
immediately preceded it, or “one trial back.”
Figure 2 shows seven trials of an example one-back task. For each new trial, the patient must
determine whether the position of the new stimulus matches or does not match the position of the
stimulus shown immediately before it, and must remember the position of the new stimulus since
it will become the target for the next trial. In trial 1 the patient must remember the position of
the stimulus; no response is necessary. In trial 2 the patient should press the left mouse key to
indicate that the stimulus matched the target in the preceding trial 1. In trial 3 the patient should
press the right mouse key to indicate that the stimulus did not match the target in the preceding
trial 2.
Appendix 10, Page 484
CONFIDENTIAL – NOT FOR DISTRIBUTION
May 25, 2004
Grant #: 1 U01 HL68060-01A1
APPLES Manual of Operations
PI- Dement, William C.
Figure 2. Seven trials of the one-back working memory task. Match the stimulus position
of each trial to the target position of the trial that immediately precedes it. During testing
only one trial stimulus and the fixation point are shown.
May 25, 2004
CONFIDENTIAL – NOT FOR DISTRIBUTION
Appendix 10, Page 485
Grant #: 1 U01 HL68060-01A1
APPLES Manual of Operations
PI- Dement, William C.
Two-back Working Memory Task
The two-back working memory task presents a sequence of stimuli positioned about a central
fixation point similar to the one-back working memory task. The match or no-match decision for
each stimulus is based on whether the stimulus in each trial is in the same position as the target
two trials earlier in the sequence, or “two trials back.”
Figure 3 shows seven trials of an example two-back task. For each trial, the patient must
determine whether the position of the new stimulus matches or does not match the position of the
stimulus (target) shown two trials before it, and must remember the position of the current
stimulus since it will become a target on a future trial. No responses are required on the first two
trials since there are no targets to match. The patient should respond to all subsequent trials. In
trial 3 in this example, the patient should press the left mouse key to indicate that the stimulus
matched the target two trials before it in trial 1. In trial 4 the patient should press the left mouse
key to indicate that the stimulus matched the target two trials before it in trial 2. In trial 5 the
patient should press the right mouse key to indicate that the stimulus did not match the target two
trials before it in trial 3.
Appendix 10, Page 486
CONFIDENTIAL – NOT FOR DISTRIBUTION
May 25, 2004
Grant #: 1 U01 HL68060-01A1
APPLES Manual of Operations
PI- Dement, William C.
Figure 3. Seven trials of the two-back working memory task. Match the stimulus position
of each trial to the target position of the trial two trials earlier. During testing only one
trial stimulus and the fixation point are shown.
Practice Sessions
The APPLES protocol specifies that each patient receive two practice sessions on the SWMT
(EEG is not recorded during the practice sessions). Both practice sessions must be completed
prior to the first neurocognitive testing day. In the first practice session, the patient will receive
automated instruction in task performance for each level of the WM task. Short task blocks are
presented after the instructions to confirm that the patient understands the task. If the patient
performs well on the short confirmation block (scoring over 87% once or over 70% twice in a
row) the program will automatically proceed to the full practice blocks. If the patient does not
May 25, 2004
CONFIDENTIAL – NOT FOR DISTRIBUTION
Appendix 10, Page 487
Grant #: 1 U01 HL68060-01A1
APPLES Manual of Operations
PI- Dement, William C.
perform well on the confirmation blocks, you must decide how to proceed. Try to ascertain the
reason for poor performance. For example, the patient may not be performing the task in a
continuous manner, responding to every trial based on the trial before it. Instead, the patient may
block the task into a series of couplets: remembering the position of the first trial, responding on
the second trial, then remembering the position of the 3rd trial and responding on the fourth trial.
Performance feedback is presented after each task block, showing the number of correct and
incorrect match and nonmatch responses, and showing the number of trials with no responses.
The feedback can be used to help diagnose a patient’s difficulty with the task. To help the patient
understand the task after the patient has failed to satisfy the minimum performance requirement,
you may repeat the automated instructions, reviewing each screen with the patient, or you may
verbally describe the task to the patient, using the supplied cue cards. You should then repeat the
short confirmation blocks to ensure the patient understands the task.
If after further instruction, the patient understands the task concept but still cannot perform the
task to criterion, you may proceed to the full task blocks. Be positive and encouraging with your
patient. Assure the patient that the tasks are designed to be difficult for most people to perform.
As long as the patient understands the concept of the task and is making his or her best effort
during the task, the data will be meaningful.
EEG Recording
On the neurocognitive test days, EEG is recorded during the SWMT from seven scalp, two
mastoid, and five facial electrodes. The seven scalp electrodes are F3, F4, FZ, CZ, P3, P4, and
POZ (POZ is located midway between PZ and OZ), referenced to linked-mastoid electrodes
(A1, A2, also called MA1 and MA2 within the SWMT program). Vertical eye movements are
recorded from Fp1, and Fp2 referenced to the mastoids. Horizontal eye movements are recorded
with a bipolar eye channel (called BPF9 in the SWMT program) created from electrodes located
1 cm directly lateral to the external canthus of each eye (LHEO and RHEO, located beside the
left and right eye respectively). The ground electrode is place at FPZ.
The electrodes used in the SWMT are plugged into the SWMT electrode jack box, which is worn
around the neck. The reference (A1, A2), ground, and horizontal eye electrodes are used in both
the MWT and the SWMT. Therefore, these electrodes must be unplugged from the Alice jack
box and plugged into the SWMT electrode box prior to each SWMT, and returned to the Alice
jack box after each SWMT session is complete.
During the EEG recording, it is important that the patient remain as still as possible to avoid
inducing artifacts in the data. The patient should keep their eyes on the fixation cross at the
center of the screen and should not move their eyes towards the location of the dots during the
tasks, nor should they look around the room during the resting, eyes open task. Explain to the
patient that the signals from the brain are very small in relation to the signal from eye
movements, or from head and body movements. It is often helpful to show the patient what clean
EEG looks like during the first biological signal calibration check (see below) compared with the
type of signal observed when they move their eyes around, tense their facial muscles, or make
body movements. Stress the importance of remaining still throughout the working memory and
resting tasks. The patient may move during the breaks between these tasks, but be sure the
patient is still prior to proceeding with the next task in the battery.
To maintain a constant stimulus size on the retina, the patient should sit a fixed distance from the
computer screen, between 60 and 70 cm. Measure the distance from the patient’s nasion to the
computer screen at the beginning of each session.
Appendix 10, Page 488
CONFIDENTIAL – NOT FOR DISTRIBUTION
May 25, 2004
Grant #: 1 U01 HL68060-01A1
APPLES Manual of Operations
PI- Dement, William C.
Test Administration
The SWMT is fully automated. The program (called CMRecorder on the SAM computers) will
guide you through each step of test administration. The steps are described in the Testing
Overview Section below. There is a shortcut on the SAM computer desktop for all programs
needed.
The program keeps track of the patient’s testing history, and automatically begins the testing
sequence at the appropriate point each time that the patient is tested. For example, if the patient
has completed the first practice session, the next time the patient is tested the program will
automatically begin with the second practice session. If a practice session is interrupted, the
program will resume from the point of interruption the next time the patient is tested.
Patient Information on Floppy Disks
In order for the program to keep track of the patient’s test history in a situation where the patient
can be tested on two separate computers, a floppy disk must be used to supply the program with
the most recent patient test history. You must use a single floppy disk per patient, one patient per
disk.
Insert the floppy disk into the computer when you start the CMRecorder program (note the
computer used on the case report form). The first time a new patient is tested, insert a blank
floppy disk, labeled with the subject’s unique identification code (supplied by the DCC). At the
end of the first practice session, the program will write a small file to the disk. The file will be
named according to the patient’s identification code. At the end of the session, remove the floppy
disk from the computer and store it with the patient’s case report form. When the patient returns
for the second practice session and subsequent test sessions, he or she can be tested on either
computer. You must insert the patient’s floppy disk into the computer when you launch the
program. The program will use the patient information on the disk to determine the appropriate
starting point for each session.
The patient file is updated on the floppy disk at the end of the session. If the session is
interrupted before it is finished (see below), the patient file on the floppy disk will not be updated
to reflect progress in that session. In order to resume testing the patient from the point of
interruption, you should test the patient on the same computer. If that is not possible, you can
manually copy the patient’s file onto the floppy disk, overwriting the prior version of the patient
file.
There are two methods to recover data from a damaged or lost floppy disk: 1) the patient file can
be copied onto a new blank disk from the computer on which the patient was last tested (keep
note of the computer used for testing on the patient’s case form) or 2) the next time the patient is
tested, run the patient on the computer last used for that patient, inserting a blank floppy disk
when launching the program. Enter the patient’s identification code when prompted. The
computer will use the subject file on the computer to initiate the test sequence at the appropriate
point. At the end of the session, the program will copy the updated patient file onto the disk.
For more information on copying subject files to floppy disks see page XX of the APPLES
SWMT manual.
Note that the floppy disk does not contain the patient’s test data. The data are stored on the
computer and will be backed up onto CD.
Interrupting Test Sessions
The SWMT program will automatically present full practice and test sessions. In ideal
circumstances, you will not need to interrupt a task. However, if you must, for unavoidable
circumstances interrupt a session, there are two methods available. Many of the dialog boxes
that appear throughout a session contain a Cancel button that allows the user to exit the program
May 25, 2004
CONFIDENTIAL – NOT FOR DISTRIBUTION
Appendix 10, Page 489
Grant #: 1 U01 HL68060-01A1
APPLES Manual of Operations
PI- Dement, William C.
immediately. At other times, for example in the middle of a WM test, the ESC key on the upper
left corner of the keyboard can be used to interrupt the test and exit the program.
The program will resume from the point it was interrupted the next time the patient is tested on
that computer. As mentioned above, if a session is interrupted, the patient file on the floppy disk
is not updated. You should resume testing that patient on the same computer. The patient file on
the floppy disk will be updated at the end of the session.
During neurocognitive test sessions, if the program is interrupted at any point during the task
battery (which includes the 1-back WM test, the 2-back WM test, resting eyes closed and resting
eyes open segments) the program will resume at the beginning of the battery since all four task
segments are saved to a single file.
Daily Back Ups
To protect against data loss in the event of computer failure, copy data collected at the end of
every test day onto CD. SAM Technology has provided an easy to use program, CD_Backup, to
quickly and easily copy SWMT test data onto CD.
Insert a blank CD into the computer’s CD drive. Launch the CD_backup program. Name the
CD according to the date and computer name (up to 16 characters, e.g., Stan1_01_10_03 for a
CD created on Jan 10, 2003, containing data from the Stanford1 computer). The program will
automatically copy the most recent patient files, up to 150 MB, onto the CD. The CD back takes
only a few minutes.
Once the program has finished writing the data to CD, and the CD has been ejected, label the CD
with a permanent marker, and store the CD in a safe location.
You must use a blank CD each time you back up data. Do not try to overwrite data, or write
additional data to a CD once the CD wizard has ejected the CD. To do so will make the CD
unreliable. Use one CD per computer, per test day. Since the back up program automatically
copies 150 MB worth of data, and each test file is small (~ 1MB), each CD will end up
containing data from that test day, as well as from several prior test days. This redundancy
provides additional protection from data loss in the event a CD becomes lost or damaged.
Once you start the CD_Backup program, do not interrupt the back up process. XP may become
unstable, and fail to recognize the CD drive or to eject your CD. The computer may need to be
rebooted if this happens. Since the CD_Backup takes only a few minutes, it is best to wait until
the back up is complete then create a new CD rather than interrupting the back up process.
Sending Data to SAM Technology
Once per week you should mail one of the back up CDs to SAM Technology.
SWMT Step by step instructions
SWMT Practice Session 1
(Note: EEG is not recorded during practice)
1. Launch CMRecorder from desktop shortcut. Note the computer used on the patient’s case
form report.
2. Label a blank floppy disk with the patient code (supplied by the DCC) and insert the floppy
into drive A. You will be told that the disk is empty, and that a new subject record will be
Appendix 10, Page 490
CONFIDENTIAL – NOT FOR DISTRIBUTION
May 25, 2004
Grant #: 1 U01 HL68060-01A1
APPLES Manual of Operations
PI- Dement, William C.
created on the disk. You will be told to hit cancel if this is returning subject. (Note: Cancel
will exit the program). Press OK.
3. The “Select Subject” dialog will appear. Type the patient code in the Subject ID box, press
OK. You will be asked if you would like to create a new record for the subject on the
computer. You will only receive this message the very first time a new patient is tested. Press
Yes (if you respond ‘No’, the “insert floppy dialog” will appear again since the program will
assume you want to test a different subject).
4. You will be asked if you want to enter the patient’s medical information. Since this
information will be obtained elsewhere by study physicians, answer No.
5. The session code dialog box will appear. The session code is irrelevant for practice sessions;
press OK.
6. A brief patient demographic questionnaire will appear. Have the patient answer the questions
(gender, year of birth, handedness, education level, history of head injury, and history of loss
of consciousness).
7. You will be asked to press OK to begin system self-calibration.
8. A “day-specific” questionnaire will appear asking the patient to indicate the time they went
to sleep the previous night, the time they awoke that morning, caffeine consumption in past
12 hours, and alcohol consumption in past 24 hours. This questionnaire will appear the first
time a patient is tested each day.
9. The experimenter will then be asked to provide some information about the recording. In
practice sessions, this is limited to the patient’s viewing distance (measure the distance from
nasion to screen, must be between 60-70 cm).
10. The automated instructions for the 1-back task will then be presented, followed by short
(about 1.5 min) confirmation block(s). To proceed to the full practice blocks (step 11), the
subject must meet the performance criteria: >87% once, or >70% on two short blocks in a
row.
a. If the patient scores 14/16 correct or better (>87%), the program will automatically
proceed to the full task blocks (step 11). If not, the patient will be instructed that he or she
must exceed a score of 70% twice in a row to complete this training. Another short task
block will then be presented.
b. If patient scores 12/16 or 13/16 on these two blocks (>70%), the program will proceed to
step 11.
c. If the patient scored <70% on the last two blocks, a message will appear:
Your performance this time was XX%. Please discuss this task with the experimenter. If
the experimenter decides that you now understand the tasks and are ready to continue the
short practice, press Yes. If the experimenter decides that you ought to repeat the
instructions or skip ahead in the training, press No. Continue with the short practice?
Yes/No.
Do not respond to this dialog box until you have determined why the patient is
performing poorly, and have decided upon your next step:
i.
May 25, 2004
If you think the patient would benefit from repeated viewing of the automated
instructions, you may repeat the automated instructions: respond No to the dialog
CONFIDENTIAL – NOT FOR DISTRIBUTION
Appendix 10, Page 491
Grant #: 1 U01 HL68060-01A1
APPLES Manual of Operations
PI- Dement, William C.
above. You will then be asked if you wish to repeat the instructions, or to skip
ahead in the task. Press Yes to repeat the instruction. Go through the automated
instructions with the patient, making sure he or she understands each screen. After
the instructions are complete, the program will present the short confirmation
blocks, applying the same performance criteria.
ii.
The subject may understand the task better if you verbally describe the task using
cue cards. Once you have explained the task, press Yes to the above dialog to
continue with the short practice blocks. The same performance criteria will be
applied.
iii.
If, after repeated instruction, the patient arrives back at this point, you may decide
to proceed to the full task blocks if you believe there is nothing further you can do
to improve the patient’s performance. Press No to the above dialog asking if you
would like to continue the short practice blocks, then press No to the next dialog,
which asks if you would like to repeat the instructions.
You must indicate that you have overridden the performance criteria on the case report
form, and in the closing session notes (see #14).
11. Two full (50 trial) blocks of the 1-back task (about 4 minutes each) will be presented after
performance criteria are met, or after you override the performance criteria. There are no
performance criteria for the full task blocks, but you should monitor the performance
feedback provided at the end of each block to be certain the patient does not forget the task.
Enter the percent correct and average RT on the case report form.
12. The program will then present the automated instructions for the 2-back task, followed by the
short confirmation blocks. The same performance criteria are applied as described in #10,
and you should follow the same procedures if the patient has difficulty understanding the
tasks.
13. Two full blocks of 2-back task will be presented after performance criteria are met, or after
you override the performance criteria. No performance criteria are applied to the full task
blocks, but you should monitor performance and note accuracy and reaction time on the case
report form.
14. At the end of the tasks, the “Closing session notes” text box will appear instructing you to
enter notes on any problems encountered. Since the patient is now finished, you should have
the patient move away from the computer while you enter a description of any problems the
patient had learning the tasks. If you had to override the performance criteria you must note
that here, and describe why you think the patient could not meet the criteria. Similar
information should be noted on the case report form.
15. You will be asked if the subject will be recorded again that day. Answer No.
16. Another dialog will appear, the “End of day data details” questionnaire, asking you to
provide details about the subject, the recording, or the test environment that will be relevant
for data interpretation. Unlike other questionnaires in the program, you cannot modify text
once you have entered it here, you can only append additional comments. This dialog will list
prior comments, along with their dates, in the deactivated text box. Since the dialog box has a
limited capacity, make only brief notes here, such as “Patient understands 2-back but
Appendix 10, Page 492
CONFIDENTIAL – NOT FOR DISTRIBUTION
May 25, 2004
Grant #: 1 U01 HL68060-01A1
APPLES Manual of Operations
PI- Dement, William C.
performs poorly” or “despite instruction patient does not understand 2-back”. You will have
entered more detailed information about such problems in the closing session notes.
17. You will be told that the session is complete and the program will exit.
18. Remove patient floppy and store along with the patient’s case report form.
May 25, 2004
CONFIDENTIAL – NOT FOR DISTRIBUTION
Appendix 10, Page 493
Grant #: 1 U01 HL68060-01A1
APPLES Manual of Operations
PI- Dement, William C.
SWMT Practice Session 2
1. Launch CMRecorder from desktop shortcut. Note the computer used on the patient’s case
form report.
2. Insert the patient’s floppy disk. Make note of the computer used on the case report form.
3. The Select Subject dialog will appear, showing the patient’s identification code. If the code is
incorrect, you have the wrong floppy for that patient. If you cannot find the correct floppy for
the subject, or the patient’s floppy is damaged, see page XX of the APPLES SWMT manual.
4. You will be asked if you wish to edit the patient’s demographic information. Respond No,
unless you know that there is a mistake that needs to be corrected (this is password
controlled, see the manual for your password).
5. The session code dialog box will appear. Session code is irrelevant for practice sessions, so
press OK to proceed.
6. The Subject Day-specific questionnaire will appear (time went to sleep, time woke up, recent
caffeine and alcohol consumption).
7. Enter the nasion-to-screen distance.
8. The program will present one 50 trial block of 1-back task, and two 50 trial blocks of 2-back
task with performance feedback after each. Monitor performance to be certain that the patient
remembers how to perform the tasks, and note the accuracy and reaction time for each block
on the case report form.
9. When the Closing session notes text box appears, the subject may leave and you should
describe any problems encountered during the session (make similar notes on the case report
form).
10. You will be asked if the subject will be recorded again that day. Answer Yes or No.
11. If you answer, No, the “End of day data details” questionnaire will appear, asking you to
provide details about the subject, the recording, or the test environment that will be relevant
for data interpretation. You will not need to enter any information here if you have described
the problems in the closing session notes. Press OK.
12. You will be told that session is complete and the program will exit.
13. Remove the patient’s floppy and store along with the patient’s case report form.
SWMT test sessions on neurocognitive testing days
1. Plug a fully charged battery into the Adaptor, and ensure the Adaptor is connected to the
TINYAMPS (see page xx of the SWMT manual for more information on the recording
hardware).
2. Plug all the patients’ electrodes into the electrode jack box, moving the reference (A1 & A2),
ground, and horizontal eye electrodes from the Alice jack box to the SAM jack box. Securely
plug the jack box into the tinyampsTM, velcroing the tinyampsTM to the jack box.
3. Start the CMRecorder program.
4. Insert the patient’s floppy disk, make note of the computer used on the case report form.
Appendix 10, Page 494
CONFIDENTIAL – NOT FOR DISTRIBUTION
May 25, 2004
Grant #: 1 U01 HL68060-01A1
APPLES Manual of Operations
PI- Dement, William C.
5. Ensure the patient code is correct in the subject selection dialog (if not, you have the wrong
floppy; see page xx of the SWMT manual if you cannot locate the patient’s floppy and need
to create a new one).
6. Answer No to the edit subject demographic information dialog.
7. The Select Session Code dialog will appear. The program automatically generates the code,
and updates the session number. You do not need to change anything here.
8. The program will automatically check the hardware connections, calibrate the amplifier
gains, and check the subject impedances. If there are any problems, informative warning
messages will appear (see page xx in the manual for troubleshooting hardware problems).
9. The subject will be asked to complete the Subject Day-specific questionnaire (time to sleep,
time woke up, recent caffeine and alcohol consumption). This questionnaire appears in the
first session of day only.
10. If impedance problems were detected during the hardware check, warning messages will
occur at this point. You will be guided to correct the impedance of the problematic electrodes
(see page XX of the manual for impedance troubleshooting issues).
11. The EEG traces will then appear. Perform the biological calibration / signal check – (evaluate
the EEG while patient blinks and moves eyes to ensure electrodes are plugged in correctly
and signal quality is good). The first time a new patient is recorded, use this opportunity to
show the patient the difference between clean EEG data, and data that contains eye
movement, head movement and body movement artifact. Stress the need for the patient to
remain still during the recording, and to keep their eyes on the central fixation dot during the
tasks.
12. Enter the information about the recording – the distance, in cm, between the patient’s nasion
and the computer monitor, and a description of any problems with hardware set up or
electrodes (if you had to modify the acceptable impedance limits to proceed with an electrode
with high impedance, note that here and on the case report form).
13. A short (~1.5 min) 1-back warmup & data quality assurance (QA) check will occur during
the first session of day only. If problems with data quality are detected during this task, the
task will be interrupted and warning messages will occur (see page xx of the manual for the
type of warning messages that may occur, and suggestions on how to correct the problems).
The warning messages will be followed by this dialog:
Poor signal quality detected; the task must be repeated. Do you want to disable QA for
the remainder of the session? If you can correct the problem, do so now. Then press No
and the task will repeat. If you cannot fix the problem but are sure that the EEG is of
sufficiently good quality, press Yes and the task will repeat without QA.
Only press Yes to disable QA if you have tried and failed to correct the problem, and you
must proceed to stay on schedule. If you choose to proceed without QA, you must note this
on the case report form, and in response to the question asking about problems with hardware
or set up, which will occur before the task is presented again. If you disable QA, the task will
be presented again but it will not be interrupted if problems are detected. However, you will
receive warning messages at the end of the task describing the types of problems detected.
Examine these messages to ensure that no new problems have arisen that you could fix.
14. The impedances will be checked again prior to the next task. If impedances are fine, no
warning messages will occur, and the user will be asked to allow traces to settle before
May 25, 2004
CONFIDENTIAL – NOT FOR DISTRIBUTION
Appendix 10, Page 495
Grant #: 1 U01 HL68060-01A1
APPLES Manual of Operations
PI- Dement, William C.
continuing. Wait until EEG traces appear straight and evenly across the screen before hitting
OK.
15. A short (~1.5 min) 2-back warm-up & QA check will occur. This short task is presented prior
to every session of the day to assess data quality. As described in #13, the task will be
interrupted if problems are detected, and informative messages will be presented to help you
correct the problem. You will be asked if you wish to repeat the task with or without quality
assurance. Only choose to repeat the task without QA if you cannot fix the problem. Make
note of this on the case report form.
Note: The first session of the day contains a warm-up, 1-back task and a warm-up 2-back task,
both of which will be interrupted if data problems are detected. If you choose to override QA
interruption in the first task (the 1-back warm up task), the 2-back warm-up task will also be
presented with QA interrupt disabled. The remaining 3 test sessions of the day contain only
the short 2-back QA task. You must disable the QA interrupt for this task in each session if a
problem persists throughout the day.
16. After completing the QA tasks, allow the EEG traces to settle before pressing OK.
17. The task battery will then be presented: 50 trial 1 back, performance feedback; 50 trial 2
back, performance feedback, EC, EO (11 minutes). Make note of accuracy and reaction time
for each task on the case report form.
18. At the end of the task battery, a brief subjective questionnaire is presented (patient asked to
rate alertness, anxiety, motivation, energy, difficulty paying attention and difficulty
remembering things. Space for other comments is provided).
19. The Closing Session Notes dialog will then appear– describe any problems encountered
(make sure to note here if impedance limits were modified, if you disabled QA interrupt, or if
any other problems occurred). NOTE: the data have not yet been saved. Do not
disconnect the patient from the tinyampsTM yet. Use the “End of Day data details”
questionnaire (#23) to describe any problems with the recording, or with the patient, that you
do not want the patient to see.
20. The final impedances will be read and the file will be closed and saved to disk.
21. If problems with data quality were detected during the task battery you will receive
informative warning messages and be asked to repeat the tasks. You will not have time to
repeat the tasks so answer No. Make note of the warning message received on the case
report form, and in the “End of Day” notes (see #23).
Be prepared to correct the problem prior to the next session. If you have time prior to the next
test session, you can use CMEEG_Viewer to examine the data to assess the problem.
Consult the CMEEG Viewer manual).
22. You will be instructed to disconnect the patient from the recording equipment. The patient
can now move away from the computer. (Remember to plug the reference, ground, and
horizontal eye electrodes back into the Alice jack box).
23. You will be asked if the subject will be recorded again that day. If you answer No, the end of
day dialog will appear. Enter information about the session that you do not want the subject
to see. Be brief when entering information in the end of day questionnaire, since this dialog
may fill up over time. Regardless of whether the subject will be recorded again that day, you
may enter No to access the “End of Day” dialog box; it will not affect the sequence of events
Appendix 10, Page 496
CONFIDENTIAL – NOT FOR DISTRIBUTION
May 25, 2004
Grant #: 1 U01 HL68060-01A1
APPLES Manual of Operations
PI- Dement, William C.
in subsequent sessions. Subsequent sessions will occur identically to the first one, except
where noted above (i.e., steps 9 and 13 will not occur.
24. After the last session of the day, remove the patient’s floppy disk and store it with the case
report form.
25. Disconnect the battery from the Adaptor. Recharge the battery (note, batteries should not be
charged for more than 4 hours, see page XX in the APPLES SWMT manual).
26. Copy the data onto CD: insert a blank CD disk into the disk drive. Launch the CD_Backup
program. Name the CD according to the date and the computer. When the CD back up
process is complete (in about 2-3 minutes) store the CD in a safe place. Mail one back up
CDs per week to SAM Technology. See page XX of the APPLES SWMT manual for more
information on CD back ups.
May 25, 2004
CONFIDENTIAL – NOT FOR DISTRIBUTION
Appendix 10, Page 497
Grant #: 1 U01 HL68060-01A1
10B.
APPLES Manual of Operations
PI- Dement, William C.
COGSCREEN MANUAL
Attached
Appendix 10, Page 498
CONFIDENTIAL – NOT FOR DISTRIBUTION
May 25, 2004
CogScreen-APPLES Edition: Operations Manual
CogScreen-APPLES Edition is a computer-administered and scored cognitive test battery
designed to assess specific neurocognitive changes associated with sleep apnea and the
treatment of apnea by CPAP therapy. The CogScreen subtests included in the APPLES
edition were selected to provide a sensitive and repeatable measure of attention, shortterm memory, visual-perceptual functions, working memory, and executive functions.
Several of the measures were selected because they are analogues of conventional (noncomputerized) tests that have been shown to be sensitive to either OSAS or to CPAP
therapy. Results from CogScreen subtests are expected to play a role in achieving three
of the aims of the APPLES (APNEA POSITIVE PRESSURE LONG-TERM EFFICACY
STUDY) project:
•
To assess the long-term effectiveness of CPAP therapy on neurocognitive function,
mood, sleepiness, and quality of life by administering tests of these indices to subjects
randomly assigned to active or sham CPAP
•
To identify specific neurocognitive deficits associated with OSAS in a large,
heterogeneous subject population
•
To determine which deficits in neurocognitive function in OSAS subjects are reversible
and most sensitive to the effects of CPAP
Historical Background
CogScreen was initially designed to meet the needs of the Federal Aviation Administration
(FAA) for a neuropsychological instrument that could detect subtle changes in cognitive
functioning: “changes which left unnoticed may result in poor pilot judgment or slow
reaction time in critical operational situations” (Engelberg, Gibbons, & Doege, 1986, p.
1589). The Aeromedical Edition of CogScreen (CogScreen-AE) meets the FAA’s
requirement for a sensitive and specific neurocognitive test battery for use in the medical
recertification evaluation of pilots with known or suspected neurological and/or psychiatric
conditions.
The initial validation sample for CogScreen was a large U.S. aviator normative sample
consisting of 584 commercial aviators. Validity studies have demonstrated expected
relationships among CogScreen measures and analogous paper-and-pencil
neuropsychological tests. Factor analytic studies have demonstrated that CogScreen
measures generate expected and meaningful cognitive constructs. Criterion-related
studies have demonstrated high levels of sensitivity and specificity in comparison to
conventional (i.e., non-computerized) neuropsychological instruments.
Construct validity was evaluated by comparing CogScreen performance with performance
on analogous paper-and-pencil cognitive and neuropsychological tests. For example, the
CogScreen Symbol Digit Coding measure and the conventional Symbol Digit Modalities
Test correlated .80 (p < .001). Similarly, Pathfinder Combined correlated .73 (p < .001)
CogScreen - APPLES Manual
1 of 35
with Part B of the Trail Making Test (Horst & Kay, 1991).
CogScreen test batteries have been used in a wide range of biomedical research
applications. Versions of CogScreen have been used to study the effects of
antihypertensive drugs on the orthostatic reflex with and without hypoxia (Kay, Eberle,
Kaufman, & Hordinsky, 1995). The FAA’s Civil Aeromedical Institute has used
CogScreen-AE to examine the effects of low-dose alcohol on cognitive performance and
to evaluate the influence of age on cognition and pilot flight performance (DeLarocca &
Schroeder, 1992). In the latter study, CogScreen-AE was found to be significantly
correlated with flight performance skills in a 727 simulator. For the past 10 years,
researchers have been utilizing CogScreen subtests in a wide range of applications.
CogScreen test batteries have been used in studies of sleep apnea (Kay et al., 1990),
diabetes (Zawadzki, Tatman, Grimes, Sobel, & Kay, 1991), and in a study of Eosinophilia
Myalgia Syndrome (Clauw, Morris, Starbuck, Epstein, & Kay, 1993). Keyboard version of
the test have been used to track changes in cognitive functioning during balloon trial
occlusion of the internal carotid artery (Spector, Kay, Geyer, Deveikas, & Sullivan, 1991).
The test has also been used by researchers investigating the effects of HIV seropositivity
on the cognitive functioning of military aviators (Mapou, Kay, Rundell, & Temoshok, 1993)
and in a nonpilot HIV population (Mapou et. al, 1995). Moore (1994) continues to use
CogScreen in a longitudinal study of repatriated Vietnamese Prisoners of War. The
United States Air Force (USAF) Enhanced Flight Screening (N-EFS) program (King &
Flynn, in press) features the use of CogScreen. All USAF pilot candidates take
CogScreen-AE before receiving any military flying training. Their performance is archived
for comparison purposes in the event that any individual sustains a head injury or other
neurological insult.
Description of CogScreen-APPLES Edition
CogScreen-APPLES Edition consists of a series of computerized cognitive tasks, each
self-contained and presented with instructions and a practice segment. The CogScreenAPPLES subtests are described in Table 1.
CogScreen testing software takes advantage of the many benefits offered by
computerization, including improved standardization of administration and scoring,
superior timing recording, and the presentation of dynamic and multiple test stimuli. The
program automatically generates 12 alternate test forms, which are designed for repeated
administration to the same individual. The program administers each test item and
automatically records the response to the item and the speed of the response. The
APPLES Edition software generates two reports; (1) a text-based log of test items,
individual item responses, and basic summary statistics; and (2) an Excel spreadsheet
consisting of subject and session identifiers and summary statistics for each of the
CogScreen-APPLES subtests.
CogScreen-APPLES Edition was designed for Windows-based personal computers
running the Windows-XP Professional operating system. To accomplish “near” real-time
testing in a Windows environment CogScreen places considerable demands on the
CogScreen - APPLES Manual
2 of 35
Table 1
Descriptions of CogScreen-Apples Subtests
____________________________________________________________________________________________
Subtest
Description
____________________________________________________________________________________________
Visual Sequence Comparison (VSC)
Comparison of two simultaneously presented series of letters
and numbers.
Symbol Digit Coding (SDC)
Substitution of digits for symbols using a key, followed by
immediate and delayed recall of symbol-digit pairs.
Pathfinder (PF)
Visual sequencing and scanning task that requires respondents
to sequence numbers, letters, and an alternating set of
numbers and letters.
Shifting Attention (SAT)
Rule-acquisition and rule-application test requiring mental
flexibility and conceptual reasoning.
____________________________________________________________________________________________
CogScreen - APPLES Manual
3 of 35
operating system and hardware. CogScreen-APPLES Edition also requires a CRT
monitor (17” to 19”) and a light pen. The light pen serves as the primary response input
device. The light pen reduces the potential advantage of having prior computer and
keyboard experience. Furthermore, the light pen allows the respondent to maintain focus
on the screen at all times.
Description of CogScreen-APPLES Edition Test Measures
In general, each CogScreen subtest generates measures that represent response speed,
response accuracy, and response thruput (number of correct responses per minute).
Several subtests generate additional (“process”) measures that capture important
qualitative and process-oriented performance characteristics.
1. Speed Measures (see Table 2)
Speed is presented in terms of the median reaction time on correct trials of CogScreen
tasks. By limiting speed measures to correct trials, the influence of lapses (long
responses) and unintended (brief) responses is minimized. However, research with
normal respondents has demonstrated no significant difference between median reaction
times generated from correct trials and all trials. The median, rather than the mean, is
used because the median reduces the impact of outlier response times.
Timing accuracy is a key feature of CogScreen. The software employs timing routines
capable of better than one millisecond timing accuracy. However, within the Windows
(multitasking) environment time intervals need to be protected from internal and external
“events” that can distort real time. CogScreen constantly monitors all event timing and is
designed to terminate testing if timing delays are detected. In addition, prior to each
administration of CogScreen-APPLES a System Performance test critically evaluates the
ability of the computer and operating system to meet the timing and video display
requirements of CogScreen.
Speed scores on CogScreen are expressed only to the 100th of a second (i.e., .01
seconds). The limitation in timing resolution is a function of the video monitor’s retrace rate
which is approximately 17 msec. To maximize timing accuracy CogScreen links the
timing of response to the video retrace location.
2. Accuracy Measures (see Table 3)
Accuracy is presented as the percentage of correct responses relative to the total number
of items that were administered:
Accuracy = (Number of Correct Responses/ Total Number of Items) x 100
The total number of items includes correct responses, incorrect responses, and lapses
(i.e., failures to respond within time limits). Scores on CogScreen accuracy measures tend
to be high (i.e., above 90%), except on Shifting Attention Discovery, and on the Symbol
Digit Coding Immediate and Delayed Recall measures. To maintain high levels of
accuracy, most normal respondents slow their response speed to these tasks.
CogScreen - APPLES Manual
4 of 35
Table 2
CogScreen-Apples Speed Measures
__________________________________________________________________________________________
Abbreviation
Name
__________________________________________________________________________________________
VSCRTC
Visual Sequence Comparison Speed
PFNMRT
PFNTOTAL
PFCMRT
PFCTOTAL
Pathfinder Number Speed
Pathfinder Number Total Time
Pathfinder Combined Speed
Pathfinder Combined Total Time
SATADRTC
SATACRTC
SATINRTC
SATDIRTC
Shifting Attention Arrow Direction Speed
Shifting Attention Arrow Color Speed
Shifting Attention Instruction Speed
Shifting Attention Discovery Speed
SDCRTC
Symbol Digit Coding Median Item Response Speed
__________________________________________________________________________________________
CogScreen - APPLES Manual
5 of 35
Table 3
CogScreen-APPLES Accuracy Measures
__________________________________________________________________________________________
Abbreviation
Name
__________________________________________________________________________________________
VSCACC
Visual Sequence Comparison Accuracy
SDCACC
Symbol Digit Coding Accuracy
PFNACC
PFLACC
PFCACC
Pathfinder Number Accuracy
Pathfinder Letter Accuracy
Pathfinder Combined Accuracy
SATADACC
Shifting Attention Arrow Direction Accuracy
SATACACC
Shifting Attention Arrow Color Accuracy
SATINACC
Shifting Attention Instruction Condition Accuracy
SATDIACC
Shifting Attention Discovery Condition Accuracy
__________________________________________________________________________________________
CogScreen - APPLES Manual
6 of 35
3. Thruput Measures (see Table 4)
Thruput measures, a term coined by Thorne (D. Thorne, personal communication,
December, 1991), are derived scores that express response efficiency and reflect the
number of correct responses-per-minute. The thruput formula selected for CogScreen is
the formula most frequently used by performance psychologists (D. Thorne, personal
communication, May, 1991). The formula used in CogScreen for calculation of thruput
measures is:
Thruput = ([Accuracy/100] x 60 seconds)/Median Response Time Correct Trials
The following is an example taken from the Manikin subtest: where Manikin
Accuracy = 80%, Manikin Speed = 2.40 sec.
Manikin Thruput = ([MAN Accuracy/100] x 60) / MAN Speed
Manikin Thruput = ([80 /100 x 60] ) / 2.40
Manikin Thruput = 20
It should be noted that the same Manikin Thruput score (i.e., 20 correct responses/minute)
could have been obtained by responding with 100% accuracy with an average speed of
3.00 seconds/correct response. As with other summary scores, thruput measures provide
less specific information than individual speed and accuracy scores. Nevertheless, thruput
appears to provide a useful measure of the efficiency of mental processing.
4. Process Measures (see Table 5; Additional Measures)
This category of measures contains various response error, qualitative, and processoriented measures that cannot be classified as speed, accuracy, or thruput (Kaplan,
1988). The process measures in the CogScreen-APPLES battery come from three
subtests: Pathfinder Number, Pathfinder Combined, and Shifting Attention Discovery
Condition. Each Pathfinder subtest generates a coordination score (Pathfinder Number
Coordination and Pathfinder Combined Coordination) that reflect dominant-hand
coordination and/or steadiness. Three process scores are obtained from the Shifting
Attention Discovery task and reflect the number of rules (category shifts) completed
(Shifting Attention Discovery Rule Shifts Completed), the number of times the respondent
failed to maintain set after correctly identifying the active rule (Shifting Attention Discovery
Failures to Maintain Set), and the number of perseverative errors (Shifting Attention
Discovery Perseverative Errors).
CogScreen-APPLES Subtests
The following is a brief overview of the five CogScreen-APPLES subtests.
1. Visual Sequence Comparison (VSC)
Table 6 provides an overview of Visual Sequence Comparison (VSC). VSC
simultaneously presents the respondent with two alphanumeric strings, one on the right
and the other on the left half of the screen. The respondent selects [SAME] or
[DIFFERENT] for each pair, indicating whether the same characters are presented in the
same order for both sequences. The strings vary in length from four to eight items. For
each pair, the strings may differ by one or two items. Half of the 20 sequence pairs
CogScreen - APPLES Manual
7 of 35
Table 4
CogScreen-APPLES Thruput Measures
__________________________________________________________________________________________
Abbreviation
Name
__________________________________________________________________________________________
VSCPUT
Visual Sequence Comparison Thruput
SDCPUT
SDCCOR
Symbol Digit Coding Thruput
Symbol Digit Coding Correct
PFNPUT
PFLPUT
PFCPUT
Pathfinder Number Thruput
Pathfinder Letter Thruput
Pathfinder Combined Thruput
SATADPUT
Shifting Attention Arrow Direction Thruput
SATACPUT
Shifting Attention Arrow Color Thruput
SATINPUT
Shifting Attention Instruction Thruput
SATDIPUT
Shifting Attention Discovery Thruput
__________________________________________________________________________________________
CogScreen - APPLES Manual
8 of 35
Table 5
CogScreen-APPLES Additional Measures
__________________________________________________________________________________________
Abbreviation
Name
__________________________________________________________________________________________
PFNCOOR
Pathfinder Number Coordination
PFLCOOR
Pathfinder Letter Coordination
PFCCOOR
Pathfinder Combined Coordination
SATDIRUL
Shifting Attention Discovery Rule Shifts Completed
SATDIFAI
Shifting Attention Discovery Failures to Maintain Set
SATDINON
Shifting Attention Discovery Nonconceptual Responses
SATDIPER
Shifting Attention Discovery Perseverative Errors
__________________________________________________________________________________________
CogScreen - APPLES Manual
9 of 35
Table 6
Overview of Visual Sequence Comparison (VSC)
__________________________________________________________________________________________
Characteristic
Description
__________________________________________________________________________________________
Description of task
Comparison of two simultaneously presented series of letters and
numbers.
Abilities measured
Visual attention, working memory, verbal-sequential processing, and
visual-perceptual speed.
Subtest measures
VSCACC
Visual Sequence Comparison Accuracy. The percentage of correct
responses.
VSCRTC
Visual Sequence Comparison Speed. The median response time for
correct responses in seconds.
VSCPUT
Visual Sequence Comparison Thruput. The number of correct responses
per minute derived from the subtest speed and accuracy scores.
__________________________________________________________________________________________
CogScreen - APPLES Manual
10 of 35
present the same sequence, and half present a different sequence. Performance
measures include the speed (VSC Speed; VSCRTC) and accuracy (VSC Accuracy;
VSCACC) of responses, and the number of problems correctly completed per minute
(VSC Thruput; VSCPUT). Mental functions addressed by this test include visual attention,
working memory, verbal-sequential processing, and visual-perceptual speed.
2. Symbol Digit Coding (SDC)
Table 7 provides an overview of Symbol Digit Coding (SDC). SDC is a computer analogue
of the conventional symbol-substitution task found in the WAIS-R Digit Symbol subtest
(Wechsler, 1981) and the Symbol Digit Modalities Test. Nine symbol-digit pairs are
displayed continuously throughout the test near the top of the screen. The respondent is
instructed to remember the symbol-digit pairs for a subsequent memory test. In the center
of the screen, a line of symbols in random order is presented with blank spaces directly
beneath each symbol. The respondent selects the associated digit for each symbol. As
each row is completed, a new row appears. Performance measures include response
speed (SDC Speed; SDCRTC), response accuracy (SDC Accuracy; SDCACC) the
number of items completed correctly per minute (SDC Thruput; SDCPUT). This subtest
measures attention, visual scanning, working memory, and speed of information
processing.
3. SDC Delayed Recall Task
SDC Delayed Recall Task presents a 20-minute delayed recall trial of the symbol-digit
pairs. After the 90-second trial of the SDC task, nine symbols are presented in random
order. The respondent’s task is to recall the corresponding digits. A measure of recall
accuracy (SDC Delayed Recall Accuracy; SDCDRACC) is the only score for this task.
This task provides a measure of short-term visual paired-associate memory.
4. Pathfinder (PF)
Table 8 provides an overview of Pathfinder (PF). PF was adapted from the Trail Making
Test. After viewing a number or letter displayed in the center of the screen, the
respondent’s task is to select one of the four quadrants containing the next character in a
previously specified sequence. Three of the four characters are updated following each
response. There are two different sequencing rules. PF Number requires number
sequencing and PF Combined requires sequencing an alternating series of numbers and
letters. The performance measures for each task include: (a) the median response time to
complete each sequential step (PF Number Speed [PFNMRT]and PF Combined Speed
[PFCMRT]);
(b) response accuracy (PF Number Accuracy [PFNACC]and PF Combined Accuracy
[PFCACC]); (c) thruput (PF Number Thruput [PFNPUT] and PF Combined Thruput
[PFCPUT]); and (d) coordination measures indicating the respondent’s proximity to the
center of the target numbers and letters (PF Number Coordination [PFNCOOR] and PF
Combined Coordination [PFCCOOR]). PF measures number and letter sequencing skills,
the ability to systematically apply an organizing principle, immediate memory, motor
coordination, visual scanning, and the ability to shift mental set.
CogScreen - APPLES Manual
11 of 35
Table 7
Overview of Symbol Digit Coding (SDC)
__________________________________________________________________________________________
Characteristic
Description
__________________________________________________________________________________________
Description of task
Substitution of digits for symbols using a key, followed by testing of
immediate and delayed recall of symbol-digit pairs.
Abilities measured
Attention, visual scanning, working memory, speed of information
processing, and immediate and delayed visual paired-associate memory.
Subtest measures
SDCACC
Symbol Digit Coding Accuracy. The percentage of correct responses on
the coding task.
SDCPUT
Symbol Digit Coding Thruput. The number of correct responses per
minute derived from the number of correct responses made during the 90second trial.
SDCCOR
Symbol Digit Coding Correct. Total number of correct responses.
__________________________________________________________________________________________
CogScreen - APPLES Manual
12 of 35
Table 8
Overview of Pathfinder (PF)
__________________________________________________________________________________________
Characteristic
Description
__________________________________________________________________________________________
Description of task
Visual sequencing and scanning task that requires respondents to sequence
numbers, letters, and an alternating sequence of numbers and letters.
Abilities measured
Number and letter sequencing skills, ability to systematically apply an
organizing principle, immediate memory, motor coordination, visual
scanning, and ability to shift mental set.
Subtest measures
PFNACC
Pathfinder Number Accuracy. The percentage of correct responses.
PFNMRT
Pathfinder Number Speed. The median response time for correct
responses in seconds.
PFNPUT
Pathfinder Number Thruput. The number of correct responses per minute
derived from the subtest speed and accuracy scores.
PFNCOOR
Pathfinder Number Coordination. The mean deviation from the center of
target in the number sequencing task.
Pathfinder Combined Accuracy. The percentage of correct responses.
PFCACC
PFCMRT
Pathfinder Combined Speed. The median response time for correct
responses in seconds.
PFCPUT
Pathfinder Combined Thruput. The number of correct responses per
minute derived from the subtest speed and accuracy scores.
PFCCOOR
Pathfinder Combined Coordination. The mean deviation from the center
of target in the alternating number/letter task.
__________________________________________________________________________________________
CogScreen - APPLES Manual
13 of 35
5. Shifting Attention Test (SAT)
Table 9 provides an overview of Shifting Attention Test (SAT). SAT requires respondents
to alter their responses depending upon changing rules. SAT begins by training the
respondent to select from among four response boxes, each of which contains an arrow,
according to one of three easily learned rules: The first rule requires the respondent to
select a box based on the color of its border; the second rule requires the respondent to
select a box based on the direction of the arrow; and the third rule requires the respondent
to match the color of the arrow. After learning the three response conditions, the
respondent begins the fourth condition, SAT Instruction. In this condition, the respondent
is presented with an instruction identifying the active rule before the presentation of each
subsequent stimulus. In the fifth condition, SAT Discovery, the respondent’s task is to
discover and then apply the active response rule, which changes after a variable number
of correct responses. The respondent uses trial-and-error to ascertain the active rule. For
all SAT tasks, measures of response accuracy, speed, and thruput are generated. In
addition, for the SAT Discovery task, the subtest records the number of rule shifts
completed (SAT Discovery Rule Shifts Completed; SATDIRUL), failures to maintain set
(SAT Discovery Failures to Maintain Set; SATDIFAI), and perseverative errors (SAT
Discovery Perseverative Errors; SATDIPER). SAT is a test of concept formation (attribute
identification), mental flexibility, sustained attention, deductive reasoning (rule-learning),
vulnerability to response interference, working memory, application of novel rules, visual
scanning, choice visual reaction time, and perseverative tendencies.
CogScreen-APPLES Materials
The CogScreen-APPLES materials consist of operating manual, light pen, light pen
interface box and cables, and software.
Appropriate Populations
Reliable administration of CogScreen-APPLES requires respondents to have at least
eighth-grade reading level ability and normal or corrected vision sufficient for reading onscreen instructions and accurate viewing of the visual stimulus items. Color vision does
not appear to be a necessary condition for completion of CogScreen-APPLES. Hearing
must be sufficient for the respondent to hear the lightpen feeback tones and the Shifting
Attention Test feedback tones. Test administrators need to ensure that a respondent’s
difficulties on CogScreen-APPLES are due to cognitive deficits and are not due to
problems with vision, motor coordination, hearing adequacy, or educational limitations.
Professional Requirements
The administration of CogScreen-APPLES does not require formal training in
neuropsychology or clinical psychology. Testing may be accomplished by a trained person
with a background in the fundamentals of test administration. The test administrator needs
to study, and be familiar with, the administration procedures outlined in this manual. As
with all psychological tests, the training of test administrators and the administration of
CogScreen - APPLES Manual
14 of 35
Table 9
Overview of Shifting Attention Test (SAT)
__________________________________________________________________________________________
Characteristic
Description
__________________________________________________________________________________________
Description of task
Respondent learns three response rules, each of which is practiced in
isolation. Rules are then rapidly changed so that a given rule is active for
a single trial. In the final task, the respondent uses deductive reasoning to
identify the rule and then applies the rule until feedback indicates that the
rule has changed.
Abilities measured
Concept formation (attribute identification), mental flexibility, sustained
attention, deductive reasoning (rule-learning), vulnerability to response
interference, working memory, application of novel rules, visual scanning,
choice visual reaction time, and perseverative tendencies.
Subtest measures
SATADACC
Shifting Attention Arrow Direction Accuracy. The percentage of correct
responses.
SATADRTC
Shifting Attention Arrow Direction Speed. The median response time for
correct responses in seconds.
SATADPUT
Shifting Attention Arrow Direction Thruput. The number of correct
responses per minute derived from the subtest speed and accuracy scores.
SATACACC
Shifting Attention Arrow Color Accuracy. The percentage of correct
responses.
SATACRTC
Shifting Attention Arrow Color Speed. The median response time for
correct responses in seconds.
__________________________________________________________________________________________
CogScreen - APPLES Manual
15 of 35
Table 9 (continued)
__________________________________________________________________________________________
Characteristic
Description
__________________________________________________________________________________________
SATACPUT
Shifting Attention Arrow Color Thruput. The number of correct
responses per minute derived from the subtest speed and accuracy scores.
SATINACC
Shifting Attention Instruction Accuracy. The percentage of correct
responses.
SATINRTC
Shifting Attention Instruction Speed. The median response time for
correct responses in seconds.
SATINPUT
Shifting Attention Instruction Thruput. The number of correct responses
per minute derived from the subtest speed and accuracy scores.
SATDIACC
Shifting Attention Discovery Accuracy. The percentage of correct
responses.
SATDIRTC
Shifting Attention Discovery Speed. The median response time for
correct responses in seconds.
SATDIPUT
Shifting Attention Discovery Thruput. The number of correct responses
per minute derived from the subtest speed and accuracy scores.
SATDIRUL
Shifting Attention Discovery Rule Shifts Completed. Number of rule
sequences completed (4-6 consecutive correct responses).
SATDIFAI
Shifting Attention Discovery Failures to Maintain Set. Number of failures
to apply rules in a consistent manner after two consecutive correct
responses.
SATDINON
Shifting Attention Discovery Nonconceptual Responses. Number of
responses that do not match any of the three response rules.
SATDIPER
Shifting Attention Discovery Perseverative Errors. Number of
perseverative errors as defined by repeated incorrect responses after
feedback indicates that a rule is incorrect.
__________________________________________________________________________________________
CogScreen - APPLES Manual
16 of 35
CogScreen-APPLES is the responsibility of a qualified professional.
Interpretation of CogScreen-APPLES Edition requires professional training in
Neuropsychology (cf. Standards for Educational and Psychological Testing, American
Psychological Association & National Council on Measurement in Education, 1985).
Interpretations regarding the presence of abnormal cognitive functioning may be made by
psychologists who are not clinical neuropsychologists. However, more specific
neuropsychological interpretations, such as inferences regarding brain dysfunction,
require a background in clinical neuropsychology and a foundation in cognitive
psychology.
Test Security
Test security is vitally important for CogScreen. In fact, aviation safety could be seriously
compromised if CogScreen is misused. For example, an unethical user might allow a pilot
to practice taking CogScreen to assist him or her in passing the test. To avoid
compromising test security, the user needs to protect the software and access to the
computer and the CogScreen program. CogScreen-APPLES Edition is licensed to each
site only for the purpose of testing subjects enrolled in the APPLES Study (Grant #: 1 U01
HL68060-01A1).
Installation
Prior to installing CogScreen-APPLES Edition follow the instructions for installation of the
USB light pen. After calibrating the light pen, install the CogScreen-APPLES software.
1. Light Pen Hardware Installation
Your light pen kit includes the following components:
l
Disk containing light pen setup and driver software
l
Fastpoint Universal Light Pen
l
Fastpoint PXL-2000 USB light pen interface
1
extension cable and adapter for the light pen
l
display adapter cable
l
USB cable
l
light pen holder – for mounting to side of monitor
l
Fastpoint user’s guide
l
FTG Data Systems applications guide
Please refer to Figure 1 and follow the setup directions in the Fastpoint user’s guide.
Monitor Connection
Begin by turning off the power to your monitor and computer. If the monitor is on top of
your computer, remove it and place it to the side of the computer at desk level. The
monitor must be at desk height for administration of CogScreen.
1.
Turn the computer around so that the back panel faces you.
2.
Locate the outlet on the computer into which the monitor cable is plugged.
CogScreen - APPLES Manual
17 of 35
Light Pen Pointing Devices from FastPoint Technologies, Inc. -- How to Connect the PX...
Page 1 of 1
Light Pen Interface Types
External Interface Interconnection
Internal Interface Interconnection
FastPoint Technologies, Inc. · 8381 Katella Avenue · Stanton, CA
Tel: 714-484-6300
Fax: 714-995-3989
Email: [email protected]
90680
Back to Top
CogScreen - APPLES Manual
http://www.fastpoint.com/connect/usbconnect.html
18 of 35
1/17/2003
3.
Remove the display adapter cable from its package (it has three square
connectors; one labeled VID. FROM COMPUTER, one labeled VID. TO MONITOR, and
one labeled External Interface).
4.
Disconnect the monitor cable from the computer’s back panel.
5.
Plug the cable connector from the monitor into the connection labeled VID.
TO MONITOR.
6.
Plug the display adapter cable connector (labeled VID. FROM COMPUTER)
into the outlet in the back of the computer where the monitor cable was previously
connected.
7.
Plug the display adapter cable connector (labeled External Interface) into the
light pen interface outlet.
8.
Secure the connection by tightening the connector screws.
Light Pen Connection
1.
Remove the light pen from its package.
2.
Plug the extension (cream-colored) cable’s RJ-11 (telephone jack) into the
front of the light pen interface and the other end into the extension jack. Plug the light
pen’s RJ-11 (telephone jack) into the open end of the extension jack.
When positioning the light pen holder, you should consider the physical configuration of
your system, the length of the light pen cord, and your planned use of the light pen. The
right-front side of your monitor may be a convenient area for placement of the light pen
holder. However, you should position the holder in a location that works best for your use
of the light pen. When you decide where the light pen holder should be positioned, peel off
the backing from the adhesive pad, affix the pad to the light pen holder, and then firmly
press the light pen holder in the desired location.
2. Light Pen Software Installation
The light pen software will install the drivers needed to use the light pen with Windows
applications, including CogScreen-APPLES Edition.
The manufacturer’s current light pen driver is for Windows 2000 but will work with
Windows XP. During the course of the study we will probably update the lightpen driver.
The current version of the light pen software is 2000B.
Run the program on the Light Pen Driver Disk. This is a self-extracting program that will
create a Folder on the PC and install the software. Follow the prompts. Microsoft will
display a warning that the Driver is not approved for Windows XP. This message can be
ignored.
Once installed, the Power light on the Light Pen Interface will flash green informing you
that the light pen is installed. You can now use the light pen in place of your mouse or
other pointing device.
CogScreen - APPLES Manual
19 of 35
3. CogScreen-APPLES Edition Software Installation
1.
2.
3.
4.
5.
6.
7.
8.
Set your video display to 1024 x 768 (right click on the desktop, choose Properties,
Settings, Screen Area and move the cursor to the 1024 x 768 setting
Insert the CogScreen disk. If the auto-run feature is active the installation process
will begin automatically, otherwise;
Open Windows Explorer, find the CD drive where the Install file is located
and double-click on the CogScreen Setup icon.
Carefully read and follow all on-screen instructions.
The new PC’s being used in the APPLES projects should install the software
seamlessly. Older systems may require resetting (or restarting) the PC several
times, depending upon how recently you have updated your operating system and
Window’s Explorer software. For example, if necessary, CogScreen installer will
automatically install and update MDAC
(Microsoft Data Access).
After the software is installed you will be instructed to folded a sheet of 8.5 x 11
inch paper in half (to the dimensions of 8.5” x 5.5”) and hold the paper up to the
screen. You will use the arrow keys (initially the down arrow and right arrow) to
size the border on the screen to a box equal in size to the folded sheet of paper.
You will be notified that CogScreen installation is complete. The computer should
be restarted. This may occur automatically, or you will need to restart manually
[Start-Shut Down-Restart].
Activate the license:
a) double click on the CogScreen icon
b) leave admin as the UserName
c) type in cogscreen as the password
d) click okay
e) click on the Tools tab at the top of the screen
f) click on Order Tests
g) in the lower left hand box of the window that appeared is a Transaction Code
h) e-mail the transaction code (e.g., avd8 85rb 94rr mn10) exactly as it appears –
don’t mistake a zero for an O (compare upper and lower case symbols) to
[email protected]
i) a License Key will be returned to you by e-mail.
j) to enter the License Key follow the same steps as above (#7) and then type in the
License Key – exactly as it appears in the e-mail – in the License Key location in
the lower right portion of the window.
k) you will be asked for Company Name – enter the name of your site.
l) cancel out of the Order Tests window
m) click the File tab and Login Again
Set the Admin Settings:
a) repeat steps 7a through 7e
b) click Admin Settings
c) click Add User
d) enter full name of User
e) enter a user name – remember it is Case Sensitive
CogScreen - APPLES Manual
20 of 35
f) select Security Level – is this user going to be administering the test battery? If
yes Select Examiner - if the same person will be accessing reports and having
access to Admin Settings then you will ALSO have to repeat the process a second
time using a different User Name.
g) enter Password – 6 characters minimum – Case Sensitive
NOTE: When you log in as an Examiner you can administer the tests
When you log in as Professional you can create the Excel file and change
Admin Settings
A person who performs both of these roles will have 2 UserNames – they
can use the same Password for both names
NOW YOU'RE ALMOST READY TO RUN COGSCREEN
CogScreen won’t run if other applications (e.g., word processors, spreadsheets, etc.) are
running.
CogScreen won’t run if certain type of “Processes” are running – in the background.
Processes that conflict with CogScreen are Virus Detection software, System Update
programs, Instant Messenger, some Firewall Programs, some Calendar / Reminder
programs, etc.
You can find most of these problems on your “task bar” – the little icons in the lower right
hand corner of your desktop (next to the time display).
To turn off these applications right click on the application with the mouse and choose
to close, exit or shutdown the application.
If after turning off these applications CogScreen still indicates that "applications are
running", you may need to open the Task Manager (Ctrl-Alt-Del) and turn off Processes
that aren't necessary to the running of the Operating System. Windows typically doesn't
allow you to turn off system critical components. You simply click on the process you want
to terminate and then hit Delete.
READY TO START THE TESTING PROGRAM
1)
2)
3)
4)
5)
6)
7)
Double click on the CogScreen Icon
Enter an “Examiner” Username and an “Examiner” Password (case sensitive)
Click OK
The Select Examinee screen appears
Enter Examinee’s full name – the database is case sensitive!
Enter Date of Birth – after the first 2 digits the cursor moves to the next field
If it’s a new examinee you’ll see an Examinee Not Found message – good
- But, if it’s an old Examinee you’ll be shown the number of the next Session
- But, if it’s an old Examinee and you receive the Examinee Not Found
message, you’ve misspelled the name, incorrectly entered the birthdate, or
you’re not accessing the Database (maybe you’re on a different computer) –
correct errors and re-start the case
CogScreen - APPLES Manual
21 of 35
8)
9)
The next screen is the Demographics Screen. The name, Date of Birth, Age,
and test date are already displayed. Check the Session Number and make sure
that the session number shown is the correct session for this visit. Enter years
of completed education, sex, and APPLES ID number (an ID number is
required)
Start Test screen is displayed – to begin testing click on the Start Tests button
The screen will turn black for a moment ant then you will see the Light Pen Quick Check
screen. This screen verifies the light pen calibration and if necessary runs a fresh
calibration. Press the light pen tip to the center of the small square in the middle of the
screen. Proceed with calibration if the calibration test is initiated.
The next screen is the System Performance Test, click Next to begin. You will see a small
box traveling diagonally across the screen and you may hear various clicking or beeping
noises. At the bottom of the screen the Max time: and Average time: are displayed. For
the APPLES project computers these numbers are expected to be under 20. A score less
than 50 (msec) is passing.
The screen will show whether or not the system passed.
If the system doesn’t pass. Press Alt-F1 and first retry the System Performance
Test F8. If it fails a second time press Alt-F1 and then the Esc key to end the
session. Something is malfunctioning in the computer…seek technical assistance.
The next test is the sound test. If your headphones or speakers have a volume
adjustment you can set the volume to a comfortable level at this time – otherwise you’re
going to have to set the volume outside of the CogScreen program. (i.e., play some
sounds with a different Windows program and adjust the volume using the volume icon in
the lower right-hand task bar).
Prior to testing an Introductory series of screens are presented.
These give the examinee a chance to interact with the lightpen.
COGNITIVE TESTING BEGINS NOW
The following subtests are administered in the order shown below:
(1) Numeric Pathfinder
(2) Combined Pathfinder
(3) Symbol Digit Coding
(4) Visual Sequence Comparison
(5) Shifting Attention Test
a. Border Color Condition
b. Arrow Direction Condition
c. Arrow Color Condition
d. Instruction Condition
e. Discovery Condition
CogScreen - APPLES Manual
22 of 35
(6) Symbol Digit Coding Delayed Recall
If the subject repeats test instructions more than two times a notice will appear:
CONTACT THE TEST EXAMINER.
To proceed with testing the Examiner types in Alt-F1. After the completion of APPLES
training sessions the Examiner will always select option 2 (Run the Exercise).
When the TESTING IS COMPLETED screen notice appears the subject has completed
the battery.
The screen will not respond to button presses.
If the examinee didn’t complete some of the subtests the screen will indicate that testing
was not complete and the number of incomplete tests. If this occurs during the APPLES
project it is probably necessary to have the subject complete the incomplete subtests.
Exiting the Test Session
The examiner types in the following word: m a i n
and then presses: [Enter]
The screen will go blank and then the Examiner’s Observations screen will appear.
Examiner’s Observations
1) Check boxes that apply for problematic behaviors observed during the test session.
2) If computer or software failures occurred (e.g., power outage) indicate in the
appropriate field.
3) Describe the examinee’s mood during the testing.
4) Provide other pertinent observations.
Click Next
Exit CogScreen
If the entire test battery was not completed two options will appear:
1) Examinee will return to complete remaining subtests later.
2) Examinee requires no further testing.
If the first option is chosen the CogScreen results may not be available until the subject
completes the entire test battery.
Accessing CogScreen-APPLES Data
1) Login in using a Professional level Username and Password.
2) Examinees are listed in the box on the left.
CogScreen - APPLES Manual
23 of 35
3) To view demographics click on the Examinee’s name and the session (s) completed by
the subject will appear. Incomplete sessions appear as a clear page – Completed
sessions as a filled page.
4) Demographics may be edited directly on the Demographics screen on the right side.
5) To create an Excel spreadsheet click the Reports tab and the Spreadsheet option.
The Excel Spreadsheet is named: CogScreenPL.xls and is located in the
CogScreen\Reports folder (e.g., C:\Program Files\CogScreen\Reports\ )
Whenever the spreadsheet is run it will create a spreadsheet containing all current
subjects in the CogScreen-APPLES database.
In addition, for purposes of “Source Data”, CogScreen –APPLES edition generates a datetime stamped text file that contains all item and response information for each test
session. This text file can only be linked to the subject by using the date / time
information. The subject’s name is NOT written to this unencrypted file. The text file is
located in the following folder:
C:\Program Files\CogScreen\Reports\
The file extension for these files is .dat
The first four characters of the file name are the year, e.g., 2003
The next two characters of the file name is the month, e.g., 01
The next two characters of the file name are the day of the month, e.g., 19
The last four characters of the file name are the time that testing began, e.g., 1318 (1:18
pm)
For this example the data file name is: 200301191318.dat
General Instructions for Test Administration
CogScreen-APPLES Edition is designed to be largely self-administered. However, some
interaction between the respondent and the test administrator is necessary.
Double-click on the CogScreen icon on the Windows Desktop. Log on as an Examiner.
Enter the Username and the corresponding password. If you have correctly logged on as
an Examiner the Select Examinee screen will appear.
Enter the subject’s name and date of birth. The program will check the database to
determine if the subject has been previously tested and the number of the last completed
test session.
Provide the respondent with an understanding of the purpose and nature of the test. Next,
obtain the information from the subject necessary to complete the demographic screen.
Check to make sure that the displayed session number is the intended session number for
this examination. Start the test.
For the first test administration it is necessary to describe and demonstrate the use of the
light pen. Use of the light pen usually requires minimal training. Instruct the respondent to
CogScreen - APPLES Manual
24 of 35
hold the light pen in the same manner as a pen or pencil. Inform the respondent that the
tip of the light pen is to be tapped with the tip perpendicular to the face of the monitor and
not at an angle. It is important that there is an adequate amount of slack in the light pen
cord so that the cord is not taut. These conditions will allow the user to comfortably
operate the pen. The functioning of the light pen is also dependent upon the examiner
keeping the monitor screen and the tip of the light pen clean. Instructions for cleaning the
light pen can be found in the light pen manual.
It is recommended that the test administrator remain with the respondent throughout the
initial training session. This allows the administrator to determine if the respondent is
having any difficulty reading the text, operating the light pen, or following instructions. The
examiner should feel free to provide explanation and demonstrations as needed during
the training session.
For subsequent sessions the respondent will generally take the tests independently, once
the examiner has initiated the test session. However, it is important to remain nearby to
answer questions that may arise, to deal with equipment-related problems, or to assist the
respondent if the Contact the Test Administrator! prompt appears.
Except during the Training Sessions, it is important to refrain from coaching the
respondent or providing feedback on response accuracy, other than that which is provided
automatically by the program (note that feedback is provided only during practice
segments). In answering questions, the test administrator should be careful not to distract
the respondent during response intervals that are being timed. Comments to respondents
are best made between subtests or between the practice and test segments.
Respondents may also want to know if they should focus more on speed or accuracy
during certain subtests. Respond by encouraging performance that is “as fast as possible
without making mistakes.”
Discontinuing Testing
Rarely, an examinee becomes incapable of continuing with the test battery. If this
happens, simultaneously press <Alt>+<F1>. This can’t be done when a test is actually
running. However, during the test instructions and upon completion of practice items it is
possible to halt testing.
Generally this feature is active when there is a [NEXT] box appearing in the lower right
hand corner of the screen.
Press Alt-F1
You will see the following message:
Test Examiner:
For the subtest [Current Subtest]
Please enter one of the following options
F1 - To skip the subtest for now
CogScreen - APPLES Manual
25 of 35
F8 - To restart the subtest from the beginning now
F10 - To remove the subtest from this session’s test battery
Esc – To end this session
Of these options it is unlikely that you will use any of them except for <Esc>. The Testing
Completed message (and number of missing tests) will be displayed. Exit from
CogScreen by typing <m a i n> and then the [Enter] key. Proceed to complete the
Observations Screen and indicate the reason why the session was terminated. On the
second Observation screen indicate whether the subject will be returning to complete the
session.
Contact the Test Examiner
This message will appear whenever the respondent fails two consecutive attempts to
complete a practice session at the minimum required level of proficiency or requests to
repeat instructions more than once. At this point, the test will not proceed without the
intervention of the administrator. To proceed with the test, the administrator removes the
Contact the Test Administrator! message by simultaneously pressing the <Alt> +<F1>
keys.
The following menu appears:
Please enter one of the following options:
1 - To repeat instructions.
2 - To run exercise.
3 - To skip exercise.
Only during the training sessions will you choose to Repeat Instructions (and Practice
items). In fact, during training it is appropriate to select option 1 until the subject passes
the practice criteria. If a determination is made that the respondent has failed to
comprehend test instructions, read the instructions aloud to the respondent and/or offer
further explanation of the task. It is important that the administrator NOT teach test-taking
strategies (other than those presented in the test instructions). During instructions and
practice, it is permissible to explain where to look on the screen, what to look for, and how
responses are made for a particular subtest.
If the respondent is still not capable of performing the subtest, then the subtest will still
need to be run. Select option 2. The examiner should notify the Site Director and a
decision will have to be made if the subject meets study enrollment criteria.
During the APPLES project Option 3 will NOT be used.
Following completion of the training sessions, you will always choose to Run Exercise
(Option 2) even if the subject is unable to pass the Practice criteria.
Testing Environment
The administrator needs to be sensitive to the human factors involved in computerized
CogScreen - APPLES Manual
26 of 35
testing and to specific factors involved in the use of a light pen. Place the monitor directly
on the surface of a desk or table. The height of the monitor, when placed on top of a
computer case, makes it difficult for the respondent to comfortably use the light pen. Also,
respondents with bifocal lenses typically find it more difficult to read the screen when the
monitor is placed on top of the computer. By placing the monitor directly on the table top,
the computer case is removed from the respondent’s direct view and access.
Respondents who are uncomfortable with computers will feel less threatened when facing
the monitor by itself. During the standardization of CogScreen, computers were placed
either on the floor or to one side of the monitor.
The table or desk used for the monitor should be deep enough to allow the respondent to
rest his or her arms or elbows on the desk while taking the test. This reduces the fatigue
that can occur when operating a light pen without an arm rest. In addition, the respondent
needs to be able to position the monitor at a comfortable distance for reading. As
previously stated, the light pen cord needs to have adequate slack to prevent the cord
from pulling during the test.
The respondent does not need access to the keyboard during CogScreen and therefore
the keyboard should be placed out of reach (e.g., to the side of the monitor or further back
on the desk).
Other test environment requirements are common to cognitive testing in general. The
chair should be comfortable and should allow the respondent to sit close enough to the
desk to allow easy access to the monitor. The room should be free from visual and
auditory distractions. Observe the respondent from behind to further prevent distracting
the respondent. The feedback tones can be played through speakers or headphones. If
more than one subject is taking the test in a room the use of headphones is a necessity.
The volume on the speakers or headphones should be set to a comfortable level for the
examinee.
Other Menu Items and Options
In the Professional mode the following tabs are available.
Delete Session
Delete Subject
Reports
Spreadsheet
Tools
Admin Settings (for obtaining passwords, etc.)
Screen Calibration – for use if you change monitors
Order Tests – for licensing
Switch Edition – N/A for APPLES project (provides access to other CogScreen
tests and test batteries)
Help
CogScreen Manual – N/A for APPLES Edition
CogScreen - APPLES Manual
27 of 35
Contact Information – how to reach CogScreen
About
Validation of CogScreen-APPLES Subtests
With few exceptions, CogScreen subtests are based upon well established and
extensively validated tests from the fields of cognitive psychology and neuropsychology.
The existing literature on these tests supports the validity of these measures (Gazzaniga,
1994; Kane & Kay, 1992). When the underlying cognitive construct of an analogous pair of
tasks is assessed through different performance measures, the unique variance added by
computerization may suppress the validity coefficients. The conventional
neuropsychological tests being compared to CogScreen subtests were not administered in
a computerized format. The following sections present each CogScreen-APPLES subtest
in terms of the subtest’s historical background, relationship to existing computer or
analogue tests, and construct validity.
(1) Visual Sequence Comparison (VSC). VSC is a test of simultaneous letter and
number sequence comparison that is fairly unique to CogScreen. VSC Thruput
was most highly correlated with WAIS-R Digit Symbol (r = .46). VSC Thruput
performance also significantly correlated with CVLT Short Delay and Long Delay
(r = .22 and .21, respectively), and Part A and Part B of the TMT (r = -.33 and -.35,
respectively). VSC Speed correlated with CVLT Hits on the delayed recognition
trial (r = -.25) and the SRT (r = .19).
(2) Symbol Digit Coding (SDC). SDC is related to the WAIS-R Digit Symbol subtest
and the SDMT. These are popular neuropsychological measures that have
consistently been shown to be among the tests most sensitive to the presence of
brain dysfunction (cf. Lezak, 1995). The correlation between SDC Thruput and the
WAIS-R Digit Symbol subtest was .67. SDC Thruput was also correlated with
Comprehension (r = .19) and Block Design (r = .30). SDC Thruput correlated
significantly with performance on numerous neuropsychological tests, including
immediate and delayed recall of the CFT (r = .20 and .23, respectively), Parts A
and B of the TMT (r = -.37 and -.44, respectively), PASAT Series 2 (r = .27), CVLT
indexes (r = .17 through .32), and TPT indexes (r = -.20 through -.27).
(3) Symbol Digit Coding Delayed Recall (SDCDR). The paired-associate nature of the
SDC subtest lends itself to testing of unintentional or incidental learning of symboldigit pairs. An incidental memory procedure is described by Kaplan, Fein, Morris,
and Delis (1991). However, because CogScreen is a repeatable test, the
respondent is explicitly instructed that immediate and delayed recall of symboldigit pairs will be tested. SDC Delayed Recall Accuracy correlated with WAIS-R
Digit Symbol (r = .23). Support for this test as a measure of visual memory comes
from its significant correlations with immediate- and long-delay recall indexes of
the Complex Figure Test (r = .26 through .28). Significant correlations were also
found between SDC Recall Accuracy and California Verbal Learning Test indexes
(r = .22 through .24) and Tactual Performance Test indexes (r = .17 through .25).
CogScreen - APPLES Manual
28 of 35
(4) Pathfinder (PF). PF is analogous to the Trail Making Test, a popular and wellvalidated neuropsychological test (cf. Lezak, 1995). PF Combined Speed
correlated significantly with Part A (r = .38) and Part B (r = .51) of the TMT. PF
Combined correlated with a number of WAIS-R subtests including Arithmetic
(Thruput; r = .25), Digit Span (Thruput; r = .24), Vocabulary (Thruput; r = .25),
Picture Arrangement (Accuracy; r = .27), and Digit Symbol (Speed; r = -.38). PF
Combined also correlated with performance on a number of neuropsychological
tests, including SRT (Thruput; r = -.25), and indexes of the CVLT (Speed and
Thruput; r = .17 through .20). PF Number Speed and PF Letter Speed also
significantly correlated with Parts A and B of the TMT, though not as strongly (r =
.17 through r = .21, respectively). PF Number Speed correlated with WAIS-R Digit
Symbol (r = -.22), Picture Arrangement (r = .21), PASAT Series 1 (r = .17), and
CVLT List B (r = -.21).
(5) SAT was designed to be a measure of executive function and shares design
characteristics with the WCST, the Stroop Test (cf. Lezak, 1995), and the BCT.
These tests have been extensively validated as measures of executive functions
that include concept formation, rule-learning, attribute identification, and
application of novel rules in a systematic manner (Perrine, 1993). The rule
application phase of SAT is encompassed in the Arrow Direction, Arrow Color,
and Instruction Conditions. Measures derived from these tasks were highly
correlated with the WAIS-R Digit Symbol subtest (r = -.39 through -.49), and had
lower, though still significant, correlations with the WAIS-R Information subtest (r =
.22 through .26). Thruput measures for these SAT tasks were also correlated with
BCT-III and BCT-IV (r = -.17 through -.27); TPT (r = -.19 through -.26); and Parts
A and B of the TMT (r = -.20 through -.42). SAT Discovery Accuracy had
marginally significant correlations with several WAIS-R subtests, including Picture
Completion (r = .16), Block Design (r = .22), and Object Assembly (r = .19). SAT
Discovery Thruput correlated with Information (r = -.22) and Picture Arrangement
(r = .18). SAT Discovery correlated strongly with a number of neuropsychological
tests considered to be measures of executive functions, including the copy trial of
the CFT (Accuracy; r = .20), TPT measures (Thruput; r = .17 through -.24), and
Part A and B of the TMT (Thruput; r = -.20 and -.32, respectively). As anticipated,
SAT Discovery Accuracy correlated significantly with indexes derived from the
WCST, including Categories Completed (r = -.19), Perseverative Responses (r = .17), Non-Perseverative Errors (r = -.28), Trials to Complete First Category (r = .26).
Summary of convergent and discriminant validity
In summary, CogScreen-APPLES measures were only minimally correlated with
measures of intelligence from the WAIS-R. The correlations between CogScreen and
WAIS-R subtests were highest for analogous tasks, such as between WAIS-R Digit
Symbol and SDC. The correlations between CogScreen measures and conventional
neuropsychological tests demonstrate CogScreen’s ability to assess specific cognitive
functions. For example, conventional neuropsychological measures that assess rate of
information processing and sustained attention (e.g., PASAT) were well correlated with
several CogScreen measures designed to assess these same functions, including PF
CogScreen - APPLES Manual
29 of 35
Combined, and SDC. Tests of visuospatial processing and visual memory (e.g., CFT and
TMT) were correlated with CogScreen measures such as VSC. Indexes from the WCST
and BCT, which assess ability to form abstract concepts and to shift and maintain set,
were correlated with SAT Discovery.
Subtest Interpretation Guidelines
1. Visual Sequence Comparison
Visual Sequence Comparison appears to measure speed and accuracy of visualperceptual processing. The test was performed very poorly by individuals referred
because of aviation performance problems. The test correlates with WAIS-R Digit Symbol
and Parts A and B of the TMT.
2. Symbol Digit Coding
Performance on CogScreen Symbol Digit Coding may be interpreted in the same manner
as one would interpret the WAIS-R Digit Symbol or the SDMT. As with the conventional
paper-and-pencil versions of this task, SDC measures attention, working memory, and
information-processing speed. SDC Thruput correlated significantly with the WAIS-R Digit
Symbol subtest, Part B of the TMT, and with immediate recall indexes from the CVLT. The
motor requirements of CogScreen SDC appear to be minimal for normal respondents.
Performance on SDC Thruput correlated .18 with dominant-hand finger tapping. SDC also
generates a measure of associative memory, SDC Delayed Recall Accuracy. This
measure correlates with performance on conventional neuropsychological measures of
verbal and visual memory, as well as with the incidental memory indexes from the TPT.
SDC Speed and SDC Thruput loaded on the Visual Perceptual and Spatial Processing
factor.
3. Pathfinder
Like the TMT, Pathfinder measures visual scanning, number and letter sequencing, motor
functioning, and the ability to systematically apply a novel organizing principle. This
interpretation is supported by factor analytic studies and construct validity studies. PF
Number, Letter, and Combined Speed loaded with SAT Arrow Direction Speed to form a
visual scanning and sequencing factor. PF Speed measures also had high correlations
with Parts A and B of the TMT and other measures of attention, including WAIS-R Digit
Symbol, the PASAT, subtest IV of the BCT, the SSPT, and the SRT. Aviators with
performance problems scored much worse than neurologic patients and normal aviators
on PF Letter and Combined Speed In cases where performance on the PF Combined
measures is poor and performance on PF Number is relatively normal, the result may be
interpreted as indicating a deficit in the systematic application of a novel sequencing rule
or principle. In addition to measures of speed and accuracy, Pathfinder provides
coordination scores that are based on how close the subject presses the light pen to the
center of the target number or letter. In most cases, the two coordination scores (i.e., PF
Number Coordination, and PF Combined Coordination) will be equivalent. The mean
coordination score for each PF task was approximately 1.4 in the U.S. pilot normative
sample. If the respondent shows a marked difference in coordination across forms, it
suggests the possibility that motor functioning was perturbed by the cognitive demands of
CogScreen - APPLES Manual
30 of 35
that particular form.
4. Shifting Attention Test
The Shifting Attention Test was designed to incorporate features of a number of different
tests of executive function into a single computerized measure. The first three tasks, SAT
Border Color, SAT Arrow Direction, and SAT Arrow Color, are primarily measures of visual
scanning, perceptual speed, and reaction time. Reaction times are so short and the
number of trials so few on the Border Color task, that the response speeds are considered
unreliable. Consequently, measures are not derived from the Border Color task. Errors are
rarely made on any of these three conditions, except by respondents who have failed to
read the instructions. Performance on the SAT Arrow Direction, Arrow Color, and
Instruction measures should be interpreted as indicating an individual’s ability to learn and
apply rules in a systematic manner. These SAT measures correlated with WAIS-R Digit
Symbol, the PASAT, subtest IV of the BCT, the SSPT, the SRT, portions of the TPT, and
the TMT. These measures were also correlated with several indexes from the WCST,
including the percent of conceptual responses, the number of nonperseverative errors,
and the number of trials needed to complete the first category. Individuals with brain
dysfunction have been found to perform poorly on the SAT Arrow Color Speed and SAT
Instruction Speed.
Performance on the SAT Discovery task should be interpreted as reflecting the individual’s
ability to form concepts or identify attributes. Performance on SAT Discovery Rule Shifts
Completed correlated with general intelligence as well as with scores on the copy trial of
the CFT, subtests III and V from the BCT, the TPT, and the TMT. SAT Discovery
Accuracy was also strongly correlated with performance on the WCST. Furthermore, SAT
Discovery Accuracy was one of the measures that entered into the discriminant function
equation that identified the presence of brain dysfunction.
5. Shifting Attention was ranked as highly aviation-relevant by pilots in the Phase C study.
Pilots referred because of poor aviation performance obtained low scores on measures of
concept formation (SAT Discovery Rule Shifts Completed, SAT Arrow Color Speed, and
SAT Instruction Speed). Poor performance on the SAT Arrow Direction Thruput was one
of the factors in the Russian study that discriminated optimal pilots from nonoptimal pilots.
It is interesting to note that factor analysis showed SAT Arrow Direction measures to form
a visual scanning factor along with PF Letter, PF Number, and PF Combined measures.
REFERENCES
American Psychological Association. (1992). Ethical principles of psychologists and code
of conduct. American Psychologist, 47, 1597-1611.
American Psychological Association, & National Council on Measurement in Education.
(1985). Standards for educational and psychological testing. Washington, DC: Author.
Chidester, T. R., Helmreich, R. L., Gregorich, S. E., & Geis, C. E. (1991). Pilot personality
and crew coordination: Implications for training and selection. The International Journal of
Aviation Psychology, 1, 25-44.
Clauw, D., Morris, S., Starbuck, V., Epstein, S., & Kay, G. (1993). Neuropsychological
function in the Eosiniphilia Myalgia Syndrome. Journal of Arthritis and Rheumatology, 36,
CogScreen - APPLES Manual
31 of 35
98.
Costa, P. T., Jr., & McCrae, R. R. (1992). Revised NEO Personality Inventory (NEO PI- R)
and NEO Five-Factor Inventory professional manual. Odessa, FL: Psychological
Assessment Resources.
Damos, D., & Gibb, G. D. (1986). Development of a computer-based naval aviation
selection test battery (Technical report for the Naval Aerospace Medical Research
Laboratory). Pensacola, FL: Author.
Damos, D. L. (1987). Some considerations in the design of a computerized human
information processing battery (Technical report [NAMRL Monograph 35] for the Naval
Aerospace Medical Research Laboratory). Pensacola, FL: Author.
DeFilippis, N. A., & McCampbell, E. (1979). The Booklet Category Test, Odessa, FL:
Psychological Assessment Resources.
DeLarocca, P. S., & Schroeder, D. S. (1992, May). Studies on mandatory retirement age
for pilots. Paper presented at the 63rd annual scientific meeting of the Aerospace Medical
Association, Miami Beach, FL.
Delis, D. C., Kramer, J., Kaplan, E., & Ober, B.A. (1987). California Verbal Learning Test
manual. San Antonio, TX: The Psychological Corporation.
Engelberg, A. L., Gibbons, H. L., & Doege, T. C. (1986). A review of the medical
standards for civilian airmen: Synopsis of a two-year study. Journal of the American
Medical Association, 255, 1589-1599.
Federal Aviation Administration. (1987). Request for Proposals: Cognitive Function
Evaluation in Medical Certification of Airmen (Solicitation No. DTFA-02-86-R-00111).
Folstein, M. F., Folstein, S. E., & McHugh, P. R. (1975). ÒMini-Mental StateÓ: A practical
method for grading the cognitive state of outpatients for the clinician. The Journal of
Psychiatric Research, 12, 189-198.
Gazzaniga, M. S. (1994). Cognitive neuroscience. Cambridge, MA: MIT Press.
Gronwall, D. M. A. (1977). Paced Auditory Serial-Addition Task: A measure of recovery
from concussion. Perceptual and Motor Skills, 44, 367-373.
Heaton, R. K., Chelune, G. J., Talley, J. L., Kay,
G. G., & Curtiss, G. (1993). Wisconsin Card Sorting Test manual: Revised and expanded.
Odessa, FL: Psychological Assessment Resources.
Heaton, R. K., Grant, I., & Matthews, C. G. (1991). Comprehensive norms for an
expanded Halstead-Reitan Battery: Demographic corrections, research findings, and
clinical applications. Odessa, FL: Psychological Assessment Resources.
Hoddes, E., Zarcone, V., Smythe, H., Phillips, R., & Dement, W. (1973). Quantification of
sleepiness: A new approach. Psychophysiology, 10, 431-436.
Horst, R. L., & Kay, G. G. (1988). Report on comparative studies of cognitive tests
(Technical Report submitted to the Federal Aviation Administration, Civil Aeromedical
Institute [Contract No. DTFA-02-87-C-87069]). Oklahoma City, OK.
Horst, R. L., & Kay, G. G. (1991). Phase B final report: Cognitive function evaluation in
medical certification of airmen: Development and validation of a prototype test battery.
(Technical Report submitted to Federal Aviation Administration, Civil Aeromedical Institute
[Contract No. FAA/933-014-90] Oklahoma City, OK.
Imhoff, D. L., & Levine, J. M. (1986). Perceptual-motor and cognitive performance task
battery for pilot selection. Brooks AFB, TX: Air Force Human Resources Laboratory.
Jackson, D. N., III, Barton, C. F., & Blokker, H. C. (1992). UserÕs manual for the
CogScreen - APPLES Manual
32 of 35
Multidimensional Aptitude Battery (MAB) software program. London, Ontario, Canada:
Sigma Assessment Systems.
Kane, R., & Kay, G. G. (1992). Computerized assessment in neuropsychology: A review
of tests and test batteries. Neuropsychology Review, 3, 1-117.
Kaplan, E. (1988). A process approach to neuropsychological assessment. In T. Boll & B.
K. Bryant (Eds.), Clinical neuropsychology and brain function: Research, measurement,
and practice. Washington, DC: American Psychological Association.
Kaplan, E., Fein, D., Morris, R., & Delis, D.C. (1991) WAIS-R as a neuropsychological
instrument: Manual. San Antonio, TX: The Psychological Corporation.
Kaufman, A. S., & Kaufman, N. L. (1990). Kaufman Brief Intelligence Test. Circle Pines,
MN: AGS.
Kay, G. G., Eberle, C. E., Kaufman, E., & Hordinsky, J. (1995). Report on CogScreen
results for study of antihypertensive medication, hypoxia, and orthostatic stress on
cognition. Unpublished manuscript.
Kay, G. G., Hordinsky, J. R., & Pakull, B. (1992, May). Neuropsychological assessment of
aviators: A comparison of traditional and computer-based approaches. Paper presented at
the 63rd annual scientific meeting of the Aerospace Medical Association, Miami Beach,
FL.
Kay, G. G., & Horst, R. (1989, August). Comparison of computer-based performance
assessment tests with traditional neuropsychological measures in detecting brain
dysfunction. Proceedings of the annual Medical Defense Bioscience Review. U.S. Army
Medical Research and Development Command, Columbia, MD.
Kay, G. G., Horst, R., Pakull, B., & Hordinsky, J. (1991, May). Automated cognitive
function assessment of civilian pilots. Paper presented at the 62nd annual scientific
meeting of the Aerospace Medical Association, Cleveland, OH.
Kay, G. G., & Horst, R. L. (1988). Methods for evaluating cognitive function: A review of
mental status tests, neuropsychological procedures, and performance-based approaches
(Technical Report submitted to the Federal Aviation Administration, Civil Aeronautical
Medical Institute, [Contract No. DTFA-02-87-87069] Oklahoma City, OK.
Kay, G. G., Starbuck, V. N., Heritage, L., Anderson, D., Yeh, R., & Potolicchio, S. J.
(1990). The role of sleep apnea induced hypoxia on cognitive performance (Technical
Report submitted to the United States Army Natick Research, Development and
Engineering Center). Natick, MA: Author.
Kay, G., Strongin, G., Hordinsky, J., & Pakull, B. (1993, May). Georgetown/Russian
collaborative project: Development of aviator norms for CogScreen. Paper presented at
the 64th annual scientific meeting of the Aerospace Medical Association, Toronto,
Canada.
King, R. E., & Flynn, C. F. (in press). Defining and measuring the Òright stuff:Ó
Neuropsychiatrically enhanced flight screening (N-EFS). Aviation, Space, and
Environmental Medicine.
Krupp, L. B., Masur, D. M., & Kaufman, L. D. (1993). Neurocognitive dysfunction in the
Eosinophilia-Myalgia Syndrome. Neurology, 43, 931-936.
Larrabee, G. J., Kane, R. L., Schuck, J. R., & Francis, D. J. (1985). Construct validity of
various memory testing procedures. Journal of Clinical and Experimental
Neuropsychology, 7, 239-250.
Lezak, M. D. (1995). Neuropsychological assessment (3rd ed.). New York: Oxford
CogScreen - APPLES Manual
33 of 35
University Press.
Mapou, R. L., Kay, G. G., Rundell, J. R., & Temoshok, L. (1993). Measuring performance
decrements in aviation personnel infected with the human immunodeficiency virus.
Aviation, Space, and Environmental Medicine, 64, 158-164.
Mapou, R. L., Law, W., Kay G. G., Clasby S. G., Roller, T. L., & Temoshok, L. (1995,
February). Performance on conventional and computerized reaction time measures in
HIV-1-infected individuals. Paper presented at the 23rd annual meeting of the
International Neuropsychological Society, Seattle, WA.
Mierendorf, S. M., Bloch, D. A., McGuire, J. L., Lambert, R. E. (1993). Early and late
neuropsychiatric manifestations of Eosinophilia Myalgia Syndrome. Journal of Arthritis and
Rheumatology, 35, 345.
Moore, J. L. (1994, July). Twenty-year follow-up evaluation of Vietnam POWÕs using the
Halstead-Reitan Neuropsychological Test Battery. Paper presented at the 4th annual
Navy Neurosciences Seminar, Portsmith, VA.
Norusis, M. J. (1993). SPSS for Windowsª advanced statistics (Version 6.0). [Computer
Software]. Chicago: SPSS.
Parsons, O. A., & Farr, S. P. (1981). The neuropsychology of alcohol and drug use. In S.
B. Filskov & T. J. Boll (Eds.), Handbook of Clinical Neuropsychology, (pp. 320-365). New
York: Wiley.
Pashler, H. (1994). Dual-task interference in simple tasks: Data and theory. Psychological
Bulletin, 116, 220-244.
Perrine, K. (1993). Differential aspects of conceptual processing in the Category Test and
Wisconsin Card Sorting Test. Journal of Clinical and Experimental Neuropsychology, 15,
461- 473.
Reitan, R. M., & Wolfson, D. (1985). The Halstead-Reitan Neuropsychological Test
Battery. Tucson, AZ: Neuropsychology Press.
Sivan, A. B. (1992). Benton Visual Retention Test manual (5th ed.) San Antonio, TX: The
Psychological Corporation.
Smith, A. (1973). Symbol Digit Modalities Test manual. Los Angeles: Western
Psychological Services.
Spector, J., Kay, G. G., Geyer, C. A., Deveikas, J. P., & Sullivan, R.A. (1991).
Neuropsychological screening during trial balloon occlusion of the internal carotid artery
[Abstract]. Archives of Clinical Neuropsychology, 6, 229.
Spreen, O., & Strauss, E. (1991). A compendium of neuropsychological tests:
Administration, norms, and commentary. New York: Oxford.
Stevens, J. (1992). Applied multivariate statistics for the social sciences. Hillsdale, NJ:
Erlbaum.
Thomas, J. R., & Schrot, J. (1988). Naval Medical Research Institute Performance
Assessment Battery (NMRI PAB): Documentation (NMRI 88-7). Bethesda, MD: Naval
Medical Research Institute.
Wechsler, D. (1981). Wechsler Adult Intelligence Scale-Revised. New York: The
Psychological Corporation.
Winer, B. J. (1971). Statistical principles in experimental design. New York: McGraw-Hill.
Yakimovich, N., & Strongin, G. (1993). Results of factor analysis of Russian normative
data. Unpublished manuscript, Russian State Research Institute for Civil Aviation,
Moscow, Russia.
CogScreen - APPLES Manual
34 of 35
Yakimovich, N. V., Strongin, G. L., Govorushenko, V. V., Schroeder, D., & Kay, G. G.
(1994, May). CogScreen as a predictor of flight performance in Russian pilots. Paper
presented at the 65th annual meeting of the Aerospace Medical Association, San Antonio,
TX.
Zawadzki, J. K., Tatman, J. E., Grimes, P. D., Sobel, D. O., & Kay, G. G. (1991, June).
Cognitive function improves with reduction of hyperglycemia in non-insulin dependent
diabetes mellitus (NIDDM). Paper presented at 14th International Diabetes Federation
Congress, Washington, DC.
CogScreen - APPLES Manual
35 of 35
Grant #: 1 U01 HL68060-01A1
10C.
APPLES Manual of Operations
PI- Dement, William C.
PVT MANUAL
Attached
May 25, 2004
CONFIDENTIAL – NOT FOR DISTRIBUTION
Appendix 10, Page 535
A pnea
P ositive
P ressure
L ong-term
E fficacy
S tudy
APPLES
PVT
Manual
Page 1 of 10
Table of Contents
INITIALIZING THE PVT FOR THE APPLES STUDY
…………………….3
USING THE PVT-192 UNIT FOR THE APPLES STUDY
…………………….5
DOWNLOADING THE PVT-192 FOR THE APPLES STUDY …………………….7
CLEARING MEMORY IN THE PVT-192
…………………….8
CHECKING PVT DATA
…………………….9
PVT NOTES
…………………...10
NOTE – The information contained in this manual is not intended to replace
information supplied by AMI for the PVT-192 unit, PVT COMM and PVT REACT
software. Full information on the operation of the PVT-192 unit and software is
available in the documentation supplied by AMI. Please consult your
documentation and online help files for more information.
Page 2 of 10
INITIALIZING THE PVT FOR THE APPLES STUDY
Launch PVTCOMM For Windows – During set-up, the program should place 2 icons on your
desktop, the PVTCOMM icon and the PVT REACT icon.
Click on PVT from the menu bar.
NOTE – On some Windows platforms and on some screen resolutions the boxes that open
may or may not size properly. If you open PVTCOMM and click Initialize and the Time/Date
screen opens and you can’t see the whole box (see example), you need to position your
cursor over the bottom left of the box. The cursor arrow will turn into a double-headed
arrow. Left click your mouse and drag the corner of the box to enlarge it. You may need
to do this on several of the text/message boxes during initialization.
Select Initialize - The Current Time and Date should be coming from your PC's system. Look on
the lower right corner of the task bar to make sure the time is right. If you need to reset the time
or the date, highlight the incorrect value with your cursor (left click and hold, and drag over the
entry). Enter the correct value. TAB to advance to the next field. When the date/time are
correct, click the Set Current Time button. If the current time and date are correct when
initializing, click on the Continue button.
Form 1 will open.
Study Name - This is an 8 place maximum value, either digits or letters. The first two digits
should identify your site and be unique. For instance Stanford and St. Louis could not both use
ST. Next should be an underscore mark _ followed by APPLE. Note you cannot use APPLES,
as this would be 9 characters long. Site ID’s are as follows:
Stanford = SU_APPLE
University of Arizona = UA_APPLE
St. Louis = SL_APPLE
Brigham & Women’s = BW_APPLE
Walla Walla = SM_APPLE
Page 3 of 10
Experimenter’s Initials – 3 characters maximum. As this will be the default value whenever the
PVT is used, I’d recommend using the initials of whoever will give the PVT the majority of the
time. You do have the opportunity to change it during set up for each individual PVT session in
case someone else administers it. If the experimenter doesn’t have a middle name, use an
underscore for the middle initial.
Trial Seconds Length – Set this value to 600. If it’s currently at a different value, you can use
the up/down arrows to set, or use the cursor to highlight the value and type in 600.
Mood – Fatigue
Subject Initials – 3 characters maximum. Again, if no middle initial, use an underscore.
Subject ID Number – 4 characters maximum. Enter 0001. This will be the default value
whenever the PVT is used. You will have the opportunity to enter the actual ID during each
subjects PVT. This should be the last 4 digits of the official subject ID.
Trial Number – This is a multi-digit value. This field will be updated every time you use the PVT.
The initial value during setup should be 31. This stands for year 3, visit 1.
ISI Minimum (ms) – this is the minimum inter-stimulus time. This should be set to 2000 ms
(2 seconds).
ISI Maximum (ms) - this is the maximum inter-stimulus time. This should be set to 10000 ms
(10 seconds).
Hand – as the vast majority of subjects will be right handed, set the default to right. You will have
the opportunity to change it during the individual subject trials.
Task – Set this as Visual
When finished, click on OK.
A message box appears stating, “Ensure PVT is in Supervisory Mode”.
Make sure the PVT is in supervisory mode then click enter.
After the initialization you will get a message box stating, “Initialization Finished”, and the PVT
unit will beep. Click OK.
At this point you can exit from the PVTCOMM program.
Page 4 of 10
USING THE PVT-192 UNIT FOR THE APPLES STUDY
The face of the PVT unit has a small window on top for the stimulus presentation. A larger
window below this for displaying alpha / numeric data. On the bottom of the face are 2 small
black buttons. The one on the left moves the cursor in the display window from left to right. The
button on the right is the enter button. Once you have moved the cursor to the correct location
with the left button, press the right button to enter. We have placed labels below each of the
black buttons, Select on the left, and Enter on the right. This helps to avoid any confusion.
When not in use it is best to leave the unit plugged into the charger. The PVT units loose their
battery charge fairly rapidly. Next to the charger port is the serial cable port. A serial cable
attaches from this port to a free serial COM port on your computer. During software installation
you will set up which COM port you will use for the PVT.
There are 2 primary modes of use in the PVT, subject and supervisory. Separate passwords are
needed for each mode. The Supervisory password is preset by the manufacturer and is standard
for every PVT-192 unit. This number is 31267. The subject password can be changed if needed.
The default password is 123.
To put the unit into supervisory mode:
Make sure the serial cable is attached to both the computer and the PVT unit.
Turn the power switch to on. The unit will self test then bring up the Select screen on the display.
Press the left button to cycle between Test and Setup. When Setup is highlighted, press the right
button. The Access screen is now displayed, with the numbers 0-9, Q, E, and R. Q = quit, E =
erase, and R = return. Use the left button to cycle through the numbers, highlight 3 and press the
right button. The number 3 now appears on the first line next to Access. Now cycle through the
numbers highlighting the rest of the supervisory code in the proper order. After you enter the last
number, cycle the cursor to Q and press the right button. If you make a mistake and enter the
wrong number, cycle the cursor to E and press the right button to erase the last number. The unit
should now display Supervisory Mode on the display.
To put the unit into subject mode:
The unit should not be attached to the serial cable.
Turn the power switch on. The unit will self test then bring up the Select screen on the display.
Press the left button to cycle between Test and Setup. When Setup is highlighted, press the right
button. The Access screen is now displayed, with the numbers 0-9, Q, E, and R. Q = quit, E =
erase, and R = return. Enter the appropriate code; we have left ours at 123. A Select Setup
screen appears in the display with 3 choices, Param (parameter), Clock, and Ret (return). Select
Param and enter.
Study [NAME] appears on the first line of the display, with the letters A thru J, +QE on the second
line. + advances to the next line of letters, Q = quit, and E = erase. [NAME] represents the
name of the current study in the unit. If you have initialized the unit with the APPLES study, it will
ready XX APPLE with XX the 2 letters of your site. If it comes up with any other study name, the
APPLES data has not been sent to the unit. You can set it up manually through the unit, but it’s
faster just to use the PVTCOMM program to do it. Cycle the cursor to Q and press enter. The
Mood scale name should appear. We have it listed as Fatigue?. Cycle the cursor to Q and enter.
E Initials appear. This is the experimenter initials. If the initials are not correct, use the cursor to
cycle through the alphabet to select them. The + sign will bring up the next line of alphabet
characters. S Initials are now displayed. This is subject initials. You will need to use the cursor
to cycle through the alphabet characters to select the 3 initials, then Q to quit. Subject X is now
displayed. Cycle the cursor thru the numbers to select the correct subject numbers and enter.
Trial _ now appears. For this study, the first digit is the year, and the second digit is the patient
visit. 1 will be the initial PVT during the diagnostic visit; 2 will be during the 2 month follow-up;
and 3 will be for the PVT during the 6 month follow-up. Cycle thru the numbers to select the
appropriate trial number and enter. The next screens list the minimum interval, maximum
Page 5 of 10
interval, and trial length. These values should have been transmitted during the initialization.
Minimum should be 2000 ms, Maximum should be 10,000 ms, and Trial Length should be 600
seconds. If these are correct, just Q through them. If these values are not correct, cycle through
the numbers to select the correct values and enter them. Task Code should be left at Vis for
visual. Handedness is set to Right as default. If you have a left-handed subject just cycle the
cursor to Left and enter. The Select Test Setup menu appears again. Cycle to Test and enter. If
it is a real test, select Real. If it’s a practice session, select Demo.
For both the Real and Practice sessions the subject must complete the Fatigue scale. The
scale appears at the beginning and end of the session. If it is not completed, the data file
will be corrupted and unusable. Have the subject use the left button to move the cursor.
The cursor only moves from left to right. When the cursor gets to the far right it will
recycle back to left side of the screen. Have them cycle the cursor to the appropriate
location and press enter.
The screen will read Ready to test… followed by …press any key to start. Have the subject press
either button to start the test. At the end of the test, 1 minute for demo and 10 minutes for the
real test, the unit will beep and the fatigue scale will appear again. The subject must complete
the scale.
During the practice session, only the RIGHT button is active. Left-handed patients will
have to use their right hand during practice and their left hand during the actual test.
Page 6 of 10
DOWNLOADING THE PVT-192 FOR THE APPLES STUDY
The PVT-192 units can safely store about 40 ten minute PVT’s. Once data has been recorded,
it’s stored internally on EEPROMS, so even if the batteries go dead the data is safe. You will
want to download the PVT after each subject in order to make sure you have valid data. The
data will also remain on the PVT unit until it is physically erased.
During the software installation a folder is created in your Program Files called AMI. Another
folder is created inside the AMI folder called PVT. This contains all the PVT files as well as
several example files. The folder contains both the PVTCOMM and REACT programs. It will be
best to make another folder inside the PVT folder to hold the APPLES data. Following the
instructions for your specific version of Windows, within the PVT folder, create a new folder called
APPLES. This is especially crucial if you use the PVT for any other research. If you do make a
separate APPLES folder in the PVT folder you will need to initialize an *.pvt file in order to write
data. Creating the *.pvt file will take place the first time you download an APPLES subject. After
that it will be automatic.
Open the PVTCOMM program. Turn on the PVT unit and make sure the serial cable is attached
to both the PVT and the computer. Place the PVT in Supervisory Mode (see previous section).
From the menu bar, select PVT and Download. A message box asks to make sure the PVT is in
Supervisory Mode. Click OK. Next you will get a Current Memory Status message box stating,
“PVT XX Percent Free. Approximately XX 10 minute tests remain.” Click OK. NOTE – The
more tests stored on the PVT, the longer the download will require. When the download is
finished, a message box stating Download Finished appears, and the PVT unit will beep. Click
OK in the message box.
A Save As box appears. Navigate to the APPLES folder, if necessary change the name of the
*.pvt file to APPLES.pvt and Click Save.
Each time the PVT downloads, all the tests stored on the machine are downloaded to the file,
even if the file already has a copy of the test. If a test is accidentally recorded with the same
subject, trial numbers as an exiting file, you will get a message during analysis about duplicate
tests. You will need to temporarily change the name of one of the tests in order to see the data
for both trials.
If you have a fast P.C. the download, even with 25-30 PVT trials will go pretty slow. If you have
an older P.C., the download will take up to 20 minutes. So once you have the original data
downloaded, saved, and a backup copy saved, its best to erase PVT trials from the PVT unit.
Page 7 of 10
CLEARING MEMORY IN THE PVT-192
PVT memory fills up rapidly when doing 10-minute trials. The more trials in the unit, the slower
the download will be. PVT trials that are downloaded to the P.C. remain on the PVT unit until
specifically erased. Make sure PVT trials have been downloaded and saved to the P.C., and that
a current backup of those files exists before clearing the PVT unit.
To clear the PVT unit, launch the PVTCOMM software, and make sure the serial cable is
attached to both the PVT unit and the computer. Make sure the PVT is in the Supervisory Mode.
From the PVT menu bar, select PVT and Clear. A message box appears to make sure the PVT
is in the Supervisory Mode. Click OK. A message box stating Getting Memory Free appears.
Next, a message box stating PVT XX Percent Free. Approximately XX 10 minute tests remain.
Click OK. A message box appears stating “Implementing this operation will cause the data within
the PVT to be PERMANENTLY Erased. Please verify that your data has been retrieved befor
(sic) proceding.” If you are sure you have already downloaded and saved the data, press OK.
After clearing, a message box stating PVT Clearing Finished appears. Click OK.
Page 8 of 10
CHECKING PVT DATA
Launch the REACT PVT software. On the menu bar click on the Load and Parse PVT files. If the
Open File Box is not set for APPLES, navigate to it. After you get to the APPLES folder the first
time, it will be the default value the next time unless you are using the PVT for various other
research/clinical trials. In the file box click on the file APPLES.pvt and click open. In the Files
Loaded box in the top left corner you can click on the down arrow and the complete list of
subjects and trials will display. Click on the subject and trial number you wish to view. Click on
detailed and then click on Analyze. A display like the following will appear:
Make sure the Subject ID, Trial No., Date_Time fields are correct. Also verify that the Subj.
Initials match those of the subject.
If you notice that the field labeled Wrong key R’s has a value greater than 0, this means that the
subject was trying to use the wrong button on the PVT. If the subject is left handed, make sure
that during PVT set-up you have selected the left-handed option. Otherwise, be sure and
reinforce to the subject that they are to press only the right button. If you notice that False Starts
[c] or False Starts [e] have values significantly higher than 0 it means the subject is trying to
anticipate the PVT stimulus. Make sure to reinforce to the subject not to try and “beat” the PVT.
Let them know that in humans a reaction time less than 100 ms is impossible. Key Held > 3 s
means that the subject has held the button down instead of quickly pressing and releasing it. It
can be an indicator that they have fallen asleep.
Page 9 of 10
PVT NOTES
========================================================================
If during PVT initialization, download, clearing, etc., you attempt to put the PVT into Supervisory
Mode and you get a “Initialization Aborted”, etc., it means that communication between the PVT
device and the computer could not be established. There can be issues between the PVT
COMM software, the PVT device, and the specific computer and operating system. Try turning
off the PVT device, closing the PVT COMM program, and unhooking the serial cable from the
PVT. Follow these steps to re-establish communication.
1.
Launch the PVT COMM software
2.
Plug the serial cable into the PVT unit
3.
Turn on the PVT unit
4.
Select the function you want from the PVT COMM Menu
=========================================================================
We have had one instance of a possible PVT malfunction. Normally during a 10-minute session
there will be 120 to 150 separate stimuli presented. Because of the random number generator
used to set the firing sequence it is conceivable to have more or less stimuli. In one instance the
device generated approximately 300 stimuli with each one less than 3 seconds apart. In theory
this could be possible, but highly unlikely. It also significantly skewed the data analysis. We
chose, in this instance, to delete this session and repeat it.
=========================================================================
Make sure the PVT is adequately charged up before giving it to a subject. Otherwise, in the
middle of a session the device may begin to beep and flash a low battery warning.
=========================================================================
Make sure the subject has physically turned off all cell phones and pagers. If staff members will
be standing in the background or even out in the hall, make sure they also have removed cell
phones and pagers. We have had several PVT sessions ruined when the subject’s cell phone
started ringing during the session.
=========================================================================
10 minutes is a lot longer than it seems. Be sure the subjects know that it might seem like the
test will never end. Make sure they are comfortable before getting started. If they try and fidget
and move around during the trial, it will skew their results. Try having them rest the PVT on the
edge of a table at a 45-degree angle while holding it. This has worked best for us.
=========================================================================
If you have accidentally set up the PVT with a subject number and trial number that has already
been used, when you attempt to Load and Parse PVT files you will get a message box titled
“Enter RTF name” with the message, “Duplicate [subject,trial] pair in PVT file [X,Y]. Enter name
for RTF file. X and Y are the subject number and trial number. The easiest way out of this is to
assign a subject number your center will never have – take their subject number and add 1000 to
it. This will let you parse the data. Make note of this new number. Permanently fixing the
problem will involve going into the actual data file with a text editor program. That is beyond the
scope of this document. Contact the DCC for advice.
=========================================================================
If you attempt to Load and Parse PVT files and get a “Run Time Error” – a subject has not
entered a value for the fatigue scale and the unit was shut down. The program is attempting to
append data that has errors. There is no fix for this. Luckily, you have backed-up the data.
Please contact the DCC for advice on how to reload the backed up data and append the new
PVT trial to this data.
Page 10 of 10
Grant #: 1 U01 HL68060-01A1
10D.
APPLES Manual of Operations
PI- Dement, William C.
QWB-SA MANUAL
User’s Manual for
The Quality of Well Being
Self-Administered Scale (QWB-SA)
William J. Sieber, Ph.D.
Erik J. Groessl, Ph.D.
Kristin M. David, M.P.H.
Theodore G. Ganiats, M.D.
Robert M. Kaplan, Ph.D.
Health Outcomes Assessment Program
University of California San Diego
© 2002
Appendix 10, Page 536
CONFIDENTIAL – NOT FOR DISTRIBUTION
May 25, 2004
Grant #: 1 U01 HL68060-01A1
APPLES Manual of Operations
PI- Dement, William C.
Table of Contents
I.
Introduction
II.
The General Health Policy Model and The Quality of Well-Being Scale (QWB)
III.
Development of the Quality of Well-Being Scale Self-Administered (QWB-SA)
A. Development of the questionnaire
B. Derivation of preference weights
IV.
Psychometric properties of the QWB-SA
V.
Use of the QWB-SA
A. Modes of Administration
1. Self-Administered
• Interviewer
3. On-line
B. Scoring
VI.
References
VII.
Appendix A: QWB-SA preference weights
May 25, 2004
CONFIDENTIAL – NOT FOR DISTRIBUTION
Appendix 10, Page 537
Grant #: 1 U01 HL68060-01A1
I.
APPLES Manual of Operations
PI- Dement, William C.
Introduction
Measuring health outcomes has become an important objective for health care professionals in
research, clinical care, health care finance, and public policy. One of the main purposes of measuring
health outcomes is to document levels of patients’ health status and changes in health status over time.
Depending on the need of the assessor, health status can be measured in many ways. It can be assessed
by using endpoints of mortality or disease diagnosis, or by using intermediate outcomes such as blood
pressure, cholesterol, or Body Mass Index. Intermediate outcomes are often easier to measure and do not
rely upon patient self-report, but may not directly affect health care consumers. Outcomes can be
disease-specific or generic, or one can attempt to measure outcomes such as symptoms, function, and
mortality, which more directly affect the quality of life of health care consumers.
Another issue in the assessment of health is whether to use a disease-specific instrument or a
more comprehensive measure of health-related quality of life (HRQoL). Disease-specific measures are
often perceived as being more sensitive to subtle changes in the disease of interest, but may miss changes
in other areas of health or functioning. Given the unpredictable impact interventions can have on multiple
body systems, it is essential to assess health in ways that can capture a patient’s overall functioning and
well-being.
Health-related quality of life (HRQoL) is a concept used to describe a comprehensive picture of
how a person’s health affects their overall well-being. The metric that has become a standard measure of
HRQOL in medical cost-effectiveness research is the Quality Adjusted Life Year (QALY) (Gold et al.,
1996). QALYs integrate HRQoL with the duration of life to provide a single comprehensive expression
of health outcome.
The Quality of Well-Being (QWB) scale was developed in the 1970’s as a comprehensive
measure of health-related quality of life (Kaplan, Bush, & Berry, 1975). The QWB is one of the few
instruments that can help calculate QALYs as an expression of health outcome. It has been extensively
validated and its psychometric properties are well established (Kaplan, Anderson, and Ganiats, 1993).
However, the widespread use of this instrument has been low in part due to the length and difficulty in its
administration. Thus, the Quality of Well-Being Scale-Self Administered (QWB-SA) was created
(Kaplan, Ganiats, and Sieber, 1996). The QWB-SA was developed in response to previously identified
limitations of the QWB, and is easier to administer in most research and clinical assessment protocols
than the interviewer-administered QWB.
This manual is designed to serve as a guide to the administration, scoring, and
interpretation of the QWB-SA. Psychometric properties are reported and validation studies are
described. In addition, initial normative data are provided to assist the user of the QWB-SA in
interpreting scores. References are also provided.
II.
The General Health Policy Model and The Quality of Well-Being Scale (QWB)
The assessment of health-related quality of life has developed significantly since the
1970’s. Among the instruments that assess overall HRQOL, only a few can be used for costutility analysis. Cost-utility analysis is defined as cost-effectiveness analysis (CEA) that uses
QALYs as the outcome. QALYs have been identified as the preferred outcome metric by Gold
et al. (1996) in hopes of standardizing CEAs in medicine and healthcare. As mentioned above,
QALYs incorporate both quality of life and mortality into one score which allows for
comparisons across diseases and populations. In the past, CEAs have used a variety of outcomes,
thus often making comparisons difficult. Standardization of outcomes, definitions, and methods
of CEA is an important step for integrating findings.
The Quality of Well-being (QWB) scale was the first instrument specifically designed to
measure quality of life for the estimation of QALYs. The QWB is a preference-weighted
measure combining three scales of functioning with a measure of symptoms and problems to
Appendix 10, Page 538
CONFIDENTIAL – NOT FOR DISTRIBUTION
May 25, 2004
Grant #: 1 U01 HL68060-01A1
APPLES Manual of Operations
PI- Dement, William C.
produce a point-in-time expression of well-being that runs from 0 (for death) to 1.0 (for
asymptomatic full function). Most HRQoL measures focus on functioning; the QWB and QWBSA have a functioning component complemented by a strong symptom component. Prior work b
our group demonstrated that on any particular day, nearly 80% of the general population is
optimally functional. However, fewer than half of the population experience no symptoms.
Symptoms or problems may be severe, such as serious joint pain, or minor such as taking
medication or following a prescribed diet for health reasons.
The QWB was developed using theory from the General Health Policy Model (Kaplan,
1993b, 1993c; Kaplan & Anderson, 1996; Kaplan, Anderson & Ganiats, 1993). This model
includes several components, including mortality (death) and morbidity (health-related quality of
life). In several papers, Kaplan and colleagues have suggested that diseases and disabilities are
important for two reasons: first, illness may cause life expectancy to be shortened, and second,
illness may make life less desirable at times prior to death. Thus in assessing the impact of a
health intervention, one must measure both a possible decrease in mortality as well as an
improvement in health. In addition to mortality and morbidity, the General Health Policy Model
incorporates preference for observed health states (utility) and duration of stay in health states
(prognosis).
Utility studies looking at how people value health have been conducted to place the
observable states of health and functioning onto a preference continuum for the desirability of
various conditions, giving a "quality" rating between 0 for death and 1.0 for completely well. A
Quality-Adjusted Life Year (QALY) is defined as the equivalent of a completely well year of
life, or a year of life free of any symptoms, problems, or health-related disabilities. Consider, for
example, a person who has a set of symptoms and is in a state of functioning that is rated by
community peers as 0.5 on a 0.0 to 1.0 scale. If the person remains in that state for one year, he
or she would have lost the equivalent of 1/2 of one year of life. Thus, a person limited in
activities who requires a cane or walker to get around the community would be hypothetically
rated at 0.50. If he or she remained in that state for an entire year, the individual would lose the
equivalent of one-half year of life. However, a person who has the flu may also be rated as 0.50.
In this case, the illness might only last three days and the total loss in QALYs might be 3/365 X
0.50 which is equal to 0.004 QALYs. This may not appear as significant an outcome as the more
disabled person. But suppose that 5,000 people in a community get the flu. The well years lost
would then be 5,000 x .004 which is equal to 20 years of perfect health in one person. The
quality-adjusted life expectancy is the current life expectancy adjusted for diminished quality of
life associated with dysfunctional states and the duration of stay in each state.
By administering the QWB before and after a treatment or intervention program,
the intervention can be described in terms of the quality adjusted life years that it produces
or saves. When costs are examined (using standardized methods), every intervention can
be given a cost/QALY value. This value delineates how much it costs, on average, to
produce an extra QALY for each subject in a given study.
Several studies have demonstrated that the QWB is responsive to clinical change in a
variety of patient populations. For example, QWB scores have been shown to be associated with
health improvements in patients with cystic fibrosis (Orenstein et al, 1989), chronic sinusitis
(Hodgkin, 1994), and cochlear implant (Harris, et al., 1995).
In addition, the QWB is
responsive to medications expected to have a minor effect, such as oral gold treatment for
patients with arthritis (Bombardier, et al., 1986) or medications that have a larger effect, such as
AZT for patients with HIV infection (Kaplan, Anderson, Wu, et al., 1989). Other applications of
the QWB include chronic obstructive pulmonary disease (Kaplan, et al., 1984), AIDS (Kaplan, et
al., 1989), diabetes mellitus (Kaplan, et al., 1987), atrial fibrillation (Ganiats, et al., 1992), lung
transplantation (Squier, et al., 1994), cancer (Kaplan, 1993a), depression (Kaplan, 1997),
May 25, 2004
CONFIDENTIAL – NOT FOR DISTRIBUTION
Appendix 10, Page 539
Grant #: 1 U01 HL68060-01A1
APPLES Manual of Operations
PI- Dement, William C.
schizophrenia (Patterson et al, 1996), fibromyalgia (Kaplan, Schmidt, and Cronan, 2000),
osteoarthritis (Groessl, Kaplan, and Cronan, 2000), and several other conditions (Kaplan,
1993b). Further, the method has been used for health resource allocation modeling and served as
the basis for the innovative experiment on rationing of health care by the state of Oregon (Kaplan
1993b, 1993c).
III.
The Quality of Well-Being Scale Self-Administered (QWB-SA)
III . A .
Development of the questionnaire
One of the major criticisms of the QWB is that it is more expensive and difficult to
administer than most other generic measures. The QWB questionnaire is long and complex,
employing branching and probing questions, thus requiring a trained interviewer. The demand
for rapid health status assessment is exemplified by the current widespread use of the SF-36,
though the SF-36 cannot be used to produce QALYs. What is needed is a clinically useful, selfadministered instrument that is sensitive to changes at the higher levels of functioning, and that
produces QALYs for important cost-effectiveness analyses. A self-administered version of the
QWB, known as the QWB-SA, was developed to meet this need.
There are several improvements seen in the QWB-SA. First, several items assessing
mental health are now included. Second, the assessment of symptoms follows a clinically useful
Review of Systems model, rather than clustering symptoms based on preference weights. Third,
additional symptoms not included in the interview format of the QWB are in the symptom
assessment portion of the QWB-SA. And fourth, the administration of the questionnaire no
longer requires a trained interviewer and can be completed in less than 10 minutes.
The period assessed by the QWB-SA is shorter than in the QWB. The QWB asked patients
about symptoms and function “over the past 6 days” prior to the day of administration, whereas
the QWB-SA questions refer to the 3 days prior to the day of administration. This change was
designed to reduce respondents’ recall bias without decreasing the instrument’s ability to assess
over a period of time. In addition, assessing 3 days rather than 6 days results in a more rapid
administration.
The impact on the overall quality of life score of using only the last 3 days was examined
by dropping information from Day 4, 5, 6 and recalculating QWB scores based only on the past
3 days. No significant differences in scores were found.
The development of the QWB-SA has gone through several stages. First, a list of
symptoms and health-related problems was developed. The current version of the intervieweradministered QWB uses a list of 26 symptom clusters; these clusters are based on the preference
weights assigned to each symptom. Despite having similar preference weights, some of the
symptoms within a given group were clinically heterogeneous or unrelated. Therefore, the
endorsement of a symptom cluster did not specifically identify the health problem experienced;
the endorsement of an item on the QWB-SA does suggest symptoms that are clinically related.
In addition to limitations related to the groupings of the symptoms on the QWB, the
symptom list did not adequately assess psychological symptoms. There were a number of
clusters that addressed some of the common symptoms of anxiety and depression, but more were
needed as these problems are often expressed in different ways. Thus, the symptom checklist of
the QWB-SA was expanded to 58 symptom complexes including at least 12 symptoms that are
typically considered “psychological.” Most items focus on one problem related to one body
system.
Appendix 10, Page 540
CONFIDENTIAL – NOT FOR DISTRIBUTION
May 25, 2004
Grant #: 1 U01 HL68060-01A1
APPLES Manual of Operations
PI- Dement, William C.
The expansion of the symptom checklist for the QWB-SA involved conducting several
focus groups comprised of physicians. Input on which symptoms would be important to be aware
of led to structuring symptoms along a medical Review of Systems. The different symptoms
selected thus reflect different important aspects of health, are understood by physicians as
distinct signs/predictors of various disease conditions, and cover different degrees of severity. A
total of 58 different symptoms emerged. The assessment of symptoms in the QWB-SA reflects a
broad array of symptoms, and has been organized to closely resemble how a clinician might
conduct an assessment of a patient’s symptoms, again potentially increasing the clinical utility of
the QWB-SA.
The format for the QWB-SA includes five sections. The first part assesses the
presence/absence of 19 chronic symptoms or problems (e.g., blindness, speech problems). The
question format does not assess each of the previous 3 days (as in the rest of the questionnaire)
with the expectation is that these chronic conditions do not vary much over the 3-day assessment
period. These chronic symptoms are followed by 25 acute (or more transient) physical
symptoms (e.g. headache, coughing, pain), and 14 mental health symptoms and behaviors (e.g.,
sadness, anxiety, irritation). The remaining sections of the QWB-SA are similar to the QWB and
include assessment of a person’s mobility (including use of transportation), physical activity
(e.g., walking and bending over), and social activity including completion of role expectations
(e.g., work, school, or home).
III . B. Derivation of preference weights
A unique aspect of the QWB-SA is that a person’s score reflects a societal perspective on
the value of that person’s level of functioning and well-being. Preference weights (i.e., societal
value of various health states) used with the QWB-SA were derived from a community sample.
Preference weights have been found to be quite consistent across groups (Balaban, et al. 1986;
EuroQol Group, 1990; Froberg and Kane, 1989c). While the community sample used for the
development of the QWB-SA preference weights was geographically homogeneous, the age and
gender distributions were similar to the census statistics for the U.S. population in 1990.
A total of 435 English-speaking adults were drawn from several primary care clinics as
well as two college campuses in San Diego. The final sample included 239 females (56%) and
191 males between the ages of 18 and 85 (mean age = 38 years). Distribution by age, gender, and
ethnicity approximated those reported in the 1990 U.S. census.
Each item included on the QWB-SA was described as a health state to be rated on a 0 to
100 scale. Subjects were asked to use “0” as an anchor for death/worst possible health state and
“100” for optimum health (no dysfunction or symptoms). Subjects were provided two examples
to assess their understanding of the task: one that described the maximum dysfunction in the
areas of mobility, physical activity, social role activity, while the other example listed no
dysfunction or symptoms. Due to the very large number of items to be rated and the burden
created by having each subject rate each possible health state, each subject completed a
randomly selected subsample of 12 items. Ratings for QWB-SA items included one symptom
and a level of impairment for either a mobility, physical activity, or social activity item. Subjects
rated each symptom separately and in combination with multiple levels of one of the functional
scales (i.e., mobility, physical activity, social activity). Once all subjects provided ratings,
preference weights were estimated using an adaptation of Multiattribute Utility Scaling method
(Anderson and Zelinski, 1990). The method assumes an additive model, such that an item’s
weight is calculated with the following formula:
item weight = 1.0 – ( mean rating/100)
May 25, 2004
CONFIDENTIAL – NOT FOR DISTRIBUTION
Appendix 10, Page 541
Grant #: 1 U01 HL68060-01A1
APPLES Manual of Operations
PI- Dement, William C.
Once preference weights were calculated for all symptom items, weights for mobility, physical
activity, and social activity were calculated by subtraction. That is, once the weight for a
symptom (i.e., shortness of breath) was established, the mean rating for a health state with both a
symptom and a functional item (e.g., confined to bed) was subtracted from the symptom alone to
determine the preference weight assigned each item from the functional scale. In this manner,
new preference weights were derived for the QWB-SA and are presented in Appendix A. Item
preference weights are higher on the QWB-SA than weights originally calculated for the QWB
more than 20 years ago (Kaplan et al, 1978). Thus, the lowest total score for a living subject on
the QWB-SA is .09, whereas for the QWB, it is .33. This results in a greater distribution of
scores that approaches a normal curve as compared to the truncated distribution evident with the
QWB. Current research is documenting the distribution of QWB-SA scores approaches
normality to a greater degree than the HUI and EuroQoL and has fewer ceiling effects (Ganiats,
Barrett-Connor, Sieber, 1999 Barcelona ISQoL)
IV.
Psychometric Properties of the QWB-SA
The initial published report of the psychometric properties of the QWB-SA included a
test of the impact of mode of administration on overall scores as well as test-retest reliability
(Kaplan, Sieber, and Ganiats, 1997). Using the same preferences weights in the scoring
algorithm for both the interviewer-administered QWB and the QWB-SA, a 2 x 2 (Mode x Time)
factorial design allowed for two types of comparison: to detect differences between the two
modes of administration using the same scoring algorithm, and to assess the stability of scores on
each instrument over a 4 week time period. Each of 218 English-speaking adults recruited from
primary care clinics were assigned to one of four groups that differed in mode of administration
at each time point: 1) interviewer-interviewer, 2) interviewer-SA, 3) SA-SA and 4) SAinterviewer. As Table 1 suggests, the two measures yielded nearly identical scores at both the
baseline and the one-month evaluations (with all main effects and interactions in the model being
non-significant), implying that the different modes of administration produce equivalent results.
These results also demonstrated that both the QWB and QWB-SA scores remain stable over a
one-month time period for relatively healthy adults not under-going any health intervention or
change: r = .60 for the QWB, and r = .77 for the QWB-SA.
Table 1. Means and Standard Deviations for QWB by Mode of Administration
Mode
Baseline
1 Month
QWB
.708 (.119)
.707 (.108)
QWB-SA
.701 (.101)
.700 (.110)
The same analysis was then performed on the QWB-SA using the new preference
weights derived specifically for the QWB-SA. (Note: All QWB-SA scores reported in this
manual hereafter reflect the use of the preference weights to be used in future administrations
of the QWB-SA.) The same data from respondents reported in Kaplan, Sieber, and Ganiats,
(1997) was used, though the QWB-SA total scores were calculated using the newly constructed
Appendix 10, Page 542
CONFIDENTIAL – NOT FOR DISTRIBUTION
May 25, 2004
Grant #: 1 U01 HL68060-01A1
APPLES Manual of Operations
PI- Dement, William C.
preference weights (Appendix A). A total of 118 females (54%) and 100 males between the
ages of 18 and 85 (mean age = 50 years) completed one of the two instruments at both time
points.
First, data were analyzed by comparing both instruments' total scores at both the baseline
and one-month evaluations (See Table 2). (Interviewer-administered QWB scores are presented
in the following tables for comparison.) Test-retest correlations were computed for each
instrument and showed greater temporal stability for the QWB-SA (r=.80) than for the QWB
(.60; both p<001). Results did show that QWB-SA scores were significantly lower than the
QWB scores at baseline (F(1,217)=18.06; p<001) and at one month follow-up (F(1,217)=4.00,
p<05).
Table 2. Means (and standard deviations) for QWB by Mode of Administration & Time
Mode
Baseline
1 Month
QWB
.709(.112)
.699 (.112)
QWB-SA
.634 (.159)
.663 (.149)
QWB-SA scores were compared between groups based on gender, ethnicity, and
education. A substantial literature suggests that women live longer than men, yet report greater
morbidity (Wingard, 1984). A sensitive health status measure should capture these differences
in function and symptom reporting. Current results reflect such differences on the QWB-SA.
Significant negative correlations were found between age and the QWB-SA (r= -.23) and QWB
(r = -.20; both r's p<05). Given men in this sample were older (mean age 52.7) than the women
(mean age was 45; F(1, 217) = 22.4, p<001), ANCOVAs performed to examine gender
differences on each measure including age as a covariate. Table 3 shows the age-adjusted means
for men and women on both instruments; no differences were found by gender on the interviewer
version of the QWB, though women did score lower than men on the QWB -SA (F(1,217)=
13.96, p< 001).
Table 3. Age-adjusted Means (Standard Error of Measurement) by instrument and gender
Mode
Males
Females
p<
QWB
.716 (.011)
.697 (.009)
ns
QWB-SA
.692 (.016)
.614 (.014)
.001
Finally, differences in scores between ethnic groups were also examined for each instrument.
Given the low number of minority subjects who participated in this validation study, scores for
all non-Hispanic Caucasians were compared to the mean for all other subjects combined. The
May 25, 2004
CONFIDENTIAL – NOT FOR DISTRIBUTION
Appendix 10, Page 543
Grant #: 1 U01 HL68060-01A1
APPLES Manual of Operations
PI- Dement, William C.
age- and gender-adjusted means in Table 4 show no differences between these two groups on
either the QWB or QWB-SA, though this analysis has limited power due to a small sample size.
Table 4. Age-adjusted means (Standard Error of Measurement) by instrument and ethnicity
Caucasian
Non-Caucasian
N = 169
N = 45
QWB
.724 (.015)
.695 (.026)
ns
QWB-SA
.641 (.017)
.614 (.033)
ns
Mode
p<
Similar analyses on QWB-SA scores showed no statistically significant differences by
educational level (adjusted by age and gender; see Table 5). However, the limited sample size
in this study may have limited the statistical power to detect differences seen in Tables 4 & 5.
More research is clearly needed to understand the possible influence these socio-demographic
variables have on QWB-SA scores.
Table 5. Age-adjusted means (Standard Error of Measurement) by instrument and education
Education
n
QWB-SA total
HS graduate or less
17
.590 (.038)
some college
46
.661 (.021)
college degree
19
.635 (.033)
some graduate school or
graduate degree
19
.638 (.035)
Finally, each subject rated his/her overall health (i.e., 5-point scale from "poor" to
"excellent") at the end of each administration of the QWB-SA. This rating was used as the
independent variable in a one way ANOVA with linear contrasts, with QWB-SA scores serving
as the dependent variable. Table 6 shows the significant linear trend that emerged (F(1, 152)=62;
p<.001), thus providing convergent validity for overall QWB-SA score and self-rating of health
status.
Appendix 10, Page 544
CONFIDENTIAL – NOT FOR DISTRIBUTION
May 25, 2004
Grant #: 1 U01 HL68060-01A1
APPLES Manual of Operations
PI- Dement, William C.
Table 6. QWB-SA and (SEM) score by self-rating of health
Self-rated health
n
QWB-SA total
Poor
11
.448 (.032)
Fair
32
.536 (.017)
Good
33
.639 (.020)
Very good
54
.696 (.025)
Excellent
23
.758 (.032)
Ongoing research has been demonstrating sensitivity of the QWB-SA to headache status
in migraineurs (Sieber, David, Adams, Kaplan, and Ganiats, 2000), depression severity (Pyne,
Sieber, David, Kaplan, Rapaport, and Williams, 2001), expected differences in a variety of
medical conditions (Frosch, Sieber, Wiesman, Kaplan, 2000) and responsiveness to cataract
surgery (Kaplan, Rosen, and Sieber , 2000). Additional studies that have reported on the use of
the QWB-SA can be found in the reference list at the end of this manual.
V.
Use of the QWB-SA
V.A.
Modes of Administration
The QWB-SA is designed to be self-administered. The instructions below pertain to the
scannable form used by UCSD and can be accessed by researchers for a nominal fee.
V.A.1 Self-Administered
Although the QWB-SA contains brief instructions at the top of the form, we highly
recommend that researchers review the instructions with their participants. This facilitates
accurate, consistent, and complete responses to the questions. Following are directions to
investigators for instructing participants in self-administration of the QWB-SA.
General Instructions:
•
•
May 25, 2004
The QWB-SA form (as designed, produced, and distributed by the UCSD Health
Outcomes Assessment Program) can be completed using either a black or blue ball
point pen; use of a #2 pencil is discouraged and use of felt tip ink pens are not
permissible.
Circles provided for a patient’s response to any item on the QWB-SA should be
filled in completely. Putting check marks or lines through the circles is not
acceptable.
CONFIDENTIAL – NOT FOR DISTRIBUTION
Appendix 10, Page 545
Grant #: 1 U01 HL68060-01A1
APPLES Manual of Operations
correct:
•
•
•
•
incorrect:
PI- Dement, William C.
x
The “Today’s Date” field should be filled out “Month/Day/Year.” For example,
February 5, 2001 should be entered in the date field as “02/05/01.”
The “Participant” field (at the bottom of each side) should have the subject's
identification number left justified.
The “Protocol Number” field (at the bottom of the back side) is a free field that can
be determined by the researcher or data manager. If the questionnaires are to be
scanned at any point, entries in the “Protocol Number” field should be left justified.
The “Investigator Number” field (at the bottom of the back side) allows for the
opportunity of identifying the person collecting the data or the site from which data
is being collected. Entry of such an identifier should be left justified.
Specific Instructions:
Questions 1a-1k are a list of chronic symptoms as well as commonly used health aids.
For these questions the subject simply fills in the circle corresponding to “Y” (for yes) if s/he
currently experiences the symptom or uses the health aid listed, or “N” (for no) if the subject is
not currently experiencing the symptom or using the health aid listed.
For questions 2-8, the QWB-SA scale queries subjects on their functional health status,
including the presence of certain physical symptoms (Q2) and mental health symptoms (Q3), the
subject’s ability to perform self-care activities (Q5), limitations in mobility (Q6), physical
activity (Q7), or usual activities (Q8). These questions refer to a three-day time period that
corresponds to the three days directly preceding the day the questionnaire is completed. For
example, if a participant were completing the QWB-SA on Thursday, February 5, 2001, s/he
would answer questions about Wednesday, 02/04/01 (“Yesterday” on the QWB-SA form),
Tuesday, 02/03/01 (“2 Days ago”), and Monday, 02/02/01 (“3 Days ago”). It is important that
the subject understand the specific days s/he is being asked about. If the subject did not
experience a particular symptom in the past 3 days, s/he would fill in the circle corresponding to
“No Days.” Symptoms are reported for each of the 3 days separately. For example, if the
subject experienced the symptom 2 days ago but not yesterday or three days ago, s/he would fill
in only the circle corresponding with 2 days ago; if the subject experienced the symptom on all
of the past 3 days s/he would fill in a circles for each of the 3 days separately.
Question 4 asks if the subject had any symptoms that were not mentioned on the QWB-SA.
If the subject experienced symptoms that were not mentioned, s/he would fill in the circle
corresponding to “Yes” and then write in the particular symptom(s) along with which of
the past 3 days s/he experienced them.
Question 8c asks if the subject changed any plans or activities due to their health not already
reported. If s/he did have to change plans/activities, s/he should write a description of the
limitation(s) in the box provided.
Questions 9a-c instructs the subject to rate their overall health state in 3 different ways. First,
on a 5 point scale from “poor” to “excellent.” Second, a respondent compares current
health to health of one year previous, and third to rate their health overall over the past 3
days on a 0 – 100 scale. Finally, Question 10 provides space for the respondent to
provide information regarding gender, age, ethnicity, and education level.
Appendix 10, Page 546
CONFIDENTIAL – NOT FOR DISTRIBUTION
May 25, 2004
Grant #: 1 U01 HL68060-01A1
V.A.2.
APPLES Manual of Operations
PI- Dement, William C.
Interviewer
The QWB-SA can be administered by telephone or in a face-to-face interview, though the
psychometric properties of the QWB-SA administered by these methods have not been
specifically studied. If an investigator finds it necessary to administer a QWB-SA by telephone
or via an interviewer, the questions should be read exactly as they appear on the questionnaire.
Caution in interpreting such data needs to be exercised.
Proxy
Assessment by proxy is not recommended for the QWB-SA but may be the only option
for a subject who cannot comprehend all of the questions or cannot adequately communicate
responses to the questions. For example, this option may be considered with subjects who are
cognitively impaired (e.g., brain injury, dementia). The User is warned however that problems
abound with data on subjective health states gathered by proxy. Psychometric properties of the
QWB-SA administered by proxy have not been evaluated. Investigators may consider using the
responses of a proxy to the QWB-SA in cases where a patient cannot respond on their own.
However, given many of the symptoms assessed are subjective and personal in nature, and the
impact of the use of a proxy lacks adequate psychometric testing, caution should be used when
interpreting such data.
V.A.3.
On-line
A web-based version of the QWB-SA is being developed and soon will be available on
the Internet. Access codes and passwords providing access to the web-based QWB-SA will be
available to researchers through the UCSD Health Outcomes Assessment Program. Identifying
information will not be necessary and security measures are being implemented. Response data
will be scored before being stored in a downloadable format and data for each research project
will be stored separately. More information will be available in Summer 2002.
V.B.
Scoring
Scoring algorithms are available to all individuals and entities signing a QWB-SA
copyright agreement. The QWB-SA may be used free of charge by non-profit organizations that
provide evidence of their non-profit status and agree to provide a copy of relevant, nonidentifiable project data with UCSD. For-profit organizations are required to sign a usage
contract in addition to the copyright agreement. Fees for usage are dependent on volume, length
of intended usage, mode of administration, and other factors, but are usually quite affordable.
The UCSD Health Outcomes Assessment Program provides complete data services for
the administration, scoring, cleaning, and interpretation of the QWB-SA and other health
outcome measures. (A computer software-scoring program is also available for a fee, under
certain circumstances and pre-arranged with HOAP personnel.)
For more information, or to complete a copyright agreement and begin using the QWB-SA,
please contact the UCSD Health Outcomes Assessment Program at 9500 Gilman Dr.
#0994, La Jolla, CA 92093-0994, or call 858-622-1771.
May 25, 2004
CONFIDENTIAL – NOT FOR DISTRIBUTION
Appendix 10, Page 547
Grant #: 1 U01 HL68060-01A1
VI.
APPLES Manual of Operations
PI- Dement, William C.
References
1. Kaplan RM, & Anderson JP. The general health policy model: An integrated approach. In B. Spilker
(ed.), Quality of Life and Pharmacoeconomics in Clinical Trials. New York: Raven, 1996, pp
309-322.
2. Kaplan RM, Anderson JP, & Ganiats TG. The Quality of Well-being Scale: rationale for a single
quality of life index. In S.R. Walker & R.M. Rosser (eds) Quality of life assessment: Key issues
in trhe 1990s. London: Kluwer Academic Publishers, 1993, 65-94.
3. Kaplan RM, Ganiats TG, and Sieber WJ. The Quality of Well-Being SelfAdministered. 1996
Copyrighted material.
4. Ware JE, Snow KK, Kosinski M, and Gandek B. SF-36 health survey: Manual and interpretation
guide. 1993, Nimrod press: Boston.
5. Anderson JP, Bush JW, and Berry CC.Classifying function for health outcome and quality of life
evaluation. Med Care 1986; 24: 454-469.
6. Schwartz JE, and Stone AA (1998). Strategies for analyzing ecological momentary assessment data.
Health Psych 1998; 17(l): 6-16.
7. Stone AA, Broderick JE, Porter LS, and Kaell AT. The experience of rheumatoid arthritis pain and
fatigue: Examining monetary reports and correlates over one week. Arthritis Care Res, 1997;
10(3): 185-193.
8. Salovey P, Sieber WJ, Jobe JB, and Willis GB. The recall of physical pain. In Schwarz N& Sudman S
(Eds.) Autobiographical Memory and the Validity of Retrospective Reports. New York:
Springer-Verlag. 1992.
9. Salovey P, Sieber WJ, Smith AF, Jobe JB, and Willis GB. Reporting chronic pain episodes on health
surveys. National Center for Health Statistics. Vital Health Statistics, 1992: 6(6).
10. Sieber WJ, David K, Browner D, and Ganiats TG. Influence of mood on ratings of general health.
1998, Unpublished manuscript, UCSD.
11. Anderson JP, Kaplan RM, & DeBon M. Comparison of responses to similar questions in health
surveys. In Fowler F (ed.), Health Survey Research Methods. Washington, D.C.: National Center
For Health Statistics, 1989: 13-2 1.
12. Feeny D, Furlong W, Boyle M, and Torrance GW. Multi-attribute health status classification systems:
Health Utilities Index. Pharmacoeconomics, 1995; 7(6): 503-520.
13. Torrance GW, Feeny DH, Furlong WJ, Barr RD, Zhang Y, and Yang Q. Multiattribute utility function
for a comprehensive health status classification system: Health Utilities Index Mark 2. Med Care,
1996; 34 (7); 702-722.
14. Torrance GW, Furlong W, Feeny D, and Boyle M. Multi-attribute preference functions: Health
Utilities Index. Pharmacoeconomics, 1995; 7 (6): 503-520.
15. Hurst NP, Kind P, Ruta D, Hunter M, and Stubbings A. Measuring health-related quality of life in
rheumatoid arthritis: Validity, responsiveness and reliability of EuroQol (EQ-5D). Brit J Rheum,
1997; 36(5): 551-559.
16. Kind P. The performance characteristics of EQ-51): A measure of health-related quality of life for use
in technology assessment. Intl J Tech Assmt Health Care, 1997; 13: 81.
17. Kind P, Dolan P, Gudex C, and Williams A. Variations in population health status: Results form a
United Kingdom national questionnaire survey. Brit MedJ, 1998; 316(7): 736-741.
18. Fanshel S and Bush JW. A health sttaus index and its application to health services outcomes.
Operations Res, 1970; 18 (6): 1021-1066.
19. Anderson JP, Bush JW, Berry CC. Internal Consistency Analysis: a method for studying the accuracy
of function assessment for health outcome and quality of life evaluation. J Clin Epi, 1988; 41(2):
127-37.
20. Kaplan RM, Bush JW, and Berry CC. Health status: Types of validity for an Index of Well-being.
Health Serv Res, 1976; 478-507.
Appendix 10, Page 548
CONFIDENTIAL – NOT FOR DISTRIBUTION
May 25, 2004
Grant #: 1 U01 HL68060-01A1
APPLES Manual of Operations
PI- Dement, William C.
21. Kaplan RM, Sieber WJ, and Ganiats TG. The quality of well-being scale: Comparison of the
interviewer- administered version with a self-administered questionnaire. Psych Health, 1997; 12:
783-791.
22. Anderson NH and Zalinski J . Functional measurement approach to self-estimation in multiattribute
evaluation. In Anderson NH (Ed.) Contribution to infonnation integration theory. Lawrence
Erlbaum Associates, Inc: Hillsdale N.J., 1990.
23. Kaplan RM, Feeny D & Revicki DA. Methods for assessing relative importance in preference based
outcome measures. Qual Life Res, 1993; 2: 467-475.
24. Kaplan RM, Anderson JP, and Wingard DL. Gender differences in health-related quality of life.
Health Psych, 1991; 10(2): 86-93.
25. Kaplan GA, Pamuk E, Lynch JW, Cohen RD, and Balfour JL. Income inequality and mortality in the
United States: Analysis of mortality and potential pathways. Brit Med J, 1996; 312: 999-1003.
26. Sieber, W.J., David, K , Adams, J., Kaplan, R.M. and. Ganiats, T.G. (2000). Assessing the Impact of
migraine on health-related quality of life: An additional use of the Quality of Well-Being Scale Self-Administered (QWB-SA). Headache, 40(8), 662-671.
27. Pyne JM, Sieber WJ, David K, Kaplan RM, Rapaport M, and Williams DK. Use of the Quality of
Well-Being Self-Administered version (QWB-SA) in assessing health-related quality of life in
depressed patients. . Unpublished manuscript submitted for review, 1999.
28. Frosch D, Sieber WJ, Wiesman M, Kaplan R. Validity of the Quality of Well-Being
Self-Administered as a generic measure for patients with arthritis. Poster presented at the Meeting
of Society of Behavioral Medicine, 1999.
29. Kaplan RM, Sieber WJ, and Rosen P. Comparison of the QWB-SA and VF-14 in documenting
effectiveness of cataract surgery. Unpublished manuscript submitted for review, 1999.
May 25, 2004
CONFIDENTIAL – NOT FOR DISTRIBUTION
Appendix 10, Page 549
Grant #: 1 U01 HL68060-01A1
APPLES Manual of Operations
PI- Dement, William C.
VIII. Appendix A: QWB-SA preference weights
Preference weights for each item on the QWB-SA (in order of presentation on questionnaire)
Symptoms (CPX)
blindness, or severely impaired vision in both eyes
.523
blindness or severely impaired vision in only one eye
.358
speech problems such as stuttering, or being unable to speak clearly
.358
missing or paralyzed hands, feet, arms or legs
.423
missing or paralyzed fingers or toes
.297
any deformity of the face, fingers, hand/arm, foot /leg, or back
.408
general fatigue, tiredness or weakness
.256
a problem with unwanted weight gain or weight loss
.233
a problem with being under or over weight
.225
problems chewing your food adequately
.204
any hearing loss or deafness
.274
any noticeable skin problems (i.e., bad acne, large burns or scars)
.187
eczema or burning/itching rash
.187
health aides used:
dentures
.153
eye glasses or contact lenses
.066
hearing aide
.148
any problems with your vision not corrected with glasses or contact lenses
.293
any eye pain, irritation, discharge, or excessive sensitivity to light
.389
a headache
.189
dizziness, earache or ringing in your ears
.299
Appendix 10, Page 550
CONFIDENTIAL – NOT FOR DISTRIBUTION
May 25, 2004
Grant #: 1 U01 HL68060-01A1
APPLES Manual of Operations
PI- Dement, William C.
difficulty hearing or discharge or bleeding from an ear
.350
stuffy or runny nose or bleeding om the nose
.178
a sore throat, difficulty swallowing, or hoarse voice?
.204
a tooth ache or jaw pain
.298
sore or bleeding lips, tongue, or gums
.271
coughing or wheezing
.386
shortness of breath or difficulty breathing
.208
chest pain, pressure, palpitations, fast or skipped heart beat or other
discomfort in the chest
.343
an upset stomach, abdominal pain, nausea, heart burn or vomiting
.260
difficulty with bowel movements, diarrhea, constipation, rectal bleeding,
.278
black tar-like stools, or any pain or discomfort in the rectal area
pain, burning, or blood in urine
.424
loss of bladder control, frequent night-time urination or difficulty with
urination
.259
genital pain, itching, burning, or abnormal discharge, or pelvic cramping
or abnormal bleeding (does not include normal menstruation).
.369
broken arm, wrist, foot, leg, or other broken bone (other than in back)
.365
pain, stiffness, cramps, weakness or numbness in the neck or back
.318
pain, stiffness, cramps, weakness or numbness in the hips or sides
.365
pain, stiffness, cramps, weakness or numbness in any of the joints or
muscles of the hand, feet, arms or legs
.318
swelling of ankles, hands, feet, or abdomen
.306
fever, chills, or sweats
.320
loss of consciousness, fainting, or seizures
.517
difficulty with your balance, standing or walking
.377
May 25, 2004
CONFIDENTIAL – NOT FOR DISTRIBUTION
Appendix 10, Page 551
Grant #: 1 U01 HL68060-01A1
APPLES Manual of Operations
PI- Dement, William C.
trouble falling asleep or staying asleep
.296
spells of feeling nervous or shaky
.286
spells of feeling upset, downhearted, or blue
.327
excessive worry or anxiety
.324
feelings that you had little or no control over events in your life
.430
feelings of being lonely or isolated
.311
feelings of frustration, irritation or close to losing your temper
.378
a hangover
.297
any decrease of sexual interest or per ormance
.307
Confusion, difficulty understanding the written or spoken word, or
significant memory loss
.559
thoughts or images you could not get out of your mind
.255
take any medication including over-the-counter remedies (aspirin/Tylenol,
allergy medications, insulin, hormones, estrogen, thyroid, prednisone)
.160
to stay on a medically prescribed diet for health reasons
.201
a loss of appetite or over-eatin
.223
Mobility
spend any part of the day or night as a patient in a hospital,
nursing home, or rehabilitation center
.089
either not drive a motor vehicle or not use public transportation
because of your health or need help from another person to use
.031
Physical Activity
have trouble climbing stairs or inclines or walking off the curb
.072
avoid or have trouble walking, or walk more slowly than
other people your age
Appendix 10, Page 552
.072
CONFIDENTIAL – NOT FOR DISTRIBUTION
May 25, 2004
Grant #: 1 U01 HL68060-01A1
APPLES Manual of Operations
PI- Dement, William C.
limp 0 use a cane, crutches or walker
.072
avoid or have trouble bending over, stooping or kneeling
.072
have any trouble lifting or carrying everyday objects such as books, a
briefcase or groceries.
.072
have any other limitations in physical movements
.072
spend all or most of the day in a bed, chair or couch
.163
spend all or most of the day in a wheelchair
.102
If in wheelchair, someone else controlled its movement
.163
Social & Self-care activity
need help with your personal care needs, such as eating, dressing, bathing,
or getting around our home
.096
avoid, need help with, or were limited in doing some of your usual
activities, such as work, school, or housekeeping?
May 25, 2004
CONFIDENTIAL – NOT FOR DISTRIBUTION
.054
Appendix 10, Page 553
Grant #: 1 U01 HL68060-01A1
10E.
APPLES Manual of Operations
PI- Dement, William C.
ADMINISTRATION MANAUL
Attached
Appendix 10, Page 554
CONFIDENTIAL – NOT FOR DISTRIBUTION
May 25, 2004
APPLES
Administration
Manual
A pnea
P ositive
P ressure
L ong-term
E fficacy
S tudy
Revised 10/03
A pnea
P ositive
P ressure
L ong-term
E fficacy
S tudy
Instructions
for Administering
Questionnaires
Subject Verbal Instructions: To assure that questionnaires are administered
uniformly at each clinical center, verbal instructions have been provided in the
Administration Manual for each form. Given the diverse collection of questionnaires,
the time frame that should be used when answering questions should be stressed.
Upon Completion of Questionnaire: When the subject has completed a selfadministered questionnaire, review the responses to confirm that all questions were
answered completely with no ambiguous responses. For invalid responses (see
examples below for examples) return the form to him or her to correct the error. Have
the subject initial all revised responses. If a subject refuses to respond to a question,
write ‘Refused’ on the form by the blank question and include your initials.
Common Errors:
occur.
The examples below illustrate a few common errors that may
No response marked or incomplete response
3. If there is a specific time at which you have to get up in the morning, to what extent
are you dependent on being woken up by an alarm clock? (Check one circle)
Not at all dependent
Fairly dependent
Slightly dependent
Very dependent
6.
What time did you last eat?
3:
am
pm
Too many responses marked
3. If there is a specific time at which you have to get up in the morning, to what extent
are you dependent on being woken up by an alarm clock? (Check one circle)
Not at all dependent
Fairly dependent
Slightly dependent
Very dependent
Free response
3. If there is a specific time at which you have to get up in the morning, to what extent
are you dependent on being woken up by an alarm clock? (Check one circle)
Not at all dependent
Fairly dependent
Slightly dependent
Very dependent
Somewhat dependent
Ambiguous mark
3. If there is a specific time at which you have to get up in the morning, to what extent
are you dependent on being woken up by an alarm clock? (Check one circle)
Not at all dependent
Fairly dependent
Slightly dependent
Very dependent
Rev. 7/03
A pnea
P ositive
P ressure
L ong-term
E fficacy
S tudy
Beck Depression Inventory
Scoring Instructions
Purpose: To assess mood state across and between subjects at each administration of
the test.
Approximate Test Duration: 10 minutes
Administered: Self-administered the morning after the diagnostic PSG, the Twomonth Post-CPAP PSG and the Six-month Post-CPAP PSG. A certified APPLES staff
member should be available to present directions and answer questions while the
subject completes the questionnaire. It is also administered during the Four-month
Post-CPAP Follow-up Visit under the supervision of a certified APPLES staff member.
Sample Subject Verbal Instructions: This questionnaire consists of 21 groups of
statements. After reading each group of statements carefully, check the number (0,
1, 2, or 3) next to the one statement in each group which best describes the way you’ve
been feeling in the past week, including today. If several statements within a group
seem to apply equally well, check each one. Be sure to read all the statements in each
group before marking your choice.
Staff Instructions: When completed, review the response to assure that all
questions were answered.
Scoring Instructions: The total score is obtained by adding the highest score circled
for each of the 21 items. The maximum score is 63.
Item 19 (weight loss) was designed to assess anorexic symptoms. If the patient
responds affirmatively to the supplementary question, “Are you trying to lose weight
by eating less?” The score on that group is not added to the total score.
Scale:
1-10:
11-16:
17-20:
21-30:
31-40:
Over 40:
These ups and downs are considered normal
Mild mood disturbance
Borderline clinical depression
Moderate depression
Severe depression
Extreme depression
Safety Instructions:
If the subject’s score on Item 9 (the suicide item) is 1 or greater alert the CC
Coordinator immediately. The CC Coordinator will in turn notify the physicianobserver to make a contact with the subject as soon as possible.
Rev. 10/03
A pnea
P ositive
P ressure
L ong-term
E fficacy
S tudy
BQ Administration
Instructions
Purpose: The purpose of the BQ is to collect recent information about the subject's
sleep habits prior to bedtime, such as a description of the day's events (including
unusual daytime occurrences and general feelings), information on the previous
night's sleep, naps, last meal, and physical complaints that may disturb sleep.
Approximate Test Duration: 5 minutes
Administered: Self-administered under the supervision of the Night PSG
Technologist the evening before the Diagnostic PSG, CPAP Titration and prior to the
Two- and Six-month Post-CPAP Follow-up PSGs.
Sample Subject Verbal Instructions: Please complete each question as thoroughly
as possible and to the best of your knowledge. Mark only one answer for each
question.
Staff Instructions: When completed, review the response to assure that only one
answer was selected for each question and that all questions were answered.
Rev. 10/03
A pnea
P ositive
P ressure
L ong-term
E fficacy
S tudy
BSRT Administration
Instructions
Purpose: The purpose of the BSRT is to measure learning and memory before and
after treatment for OSAS with either Active or Sub-therapeutic CPAP. The BSRT is the
primary outcome measure for the learning and memory domain.
Approximate Test Duration: 30 minutes
Administered: Once per test battery at baseline, two months and six months
Sample Subject Verbal Instructions:
Tell the subject: “This test is to see how quickly you can learn a list of words. I am
going to read you a list of 12 words. I want you to listen carefully because when I stop,
I want you to tell me as many of the words as you can recall. The words do not have to
be in any particular order. When you have given me all the words that you can recall, I
will tell you the words that you didn't give me from the list; then I want you to give me
the entire list all over again. We do this 6 times, and each time I want you to try to give
me all 12 words.”
Staff Instructions:
Read one word every two seconds, going from top to bottom. Skip words that are
answered correctly.
If the subject recalls 12/12 words on 3 consecutive trials (36 correct in a row), the test
is over, perfect score.
The test has a maximum of 6 trials.
For mistaken words, inform the subject, note the extra words, but don't divulge the
whole list.
After the last trial tell the subject: “Try to remember these words. In a little while I'll
ask you to recall the words.”
Thirty minutes after the end of the last trial tell the subject: “Remember the list of
words you memorized previously? Please tell me as many as you can recall.”
Extra Forms:
If you need an alternate list of words, there is a BSRT Alternate form in the Misc. Items
Rev. 10/03
A pnea
P ositive
P ressure
L ong-term
E fficacy
S tudy
CogScreen Administration
Instructions
Purpose: To assess attention and psychomotor function, learning and memory and
executive and frontal-lobe function
Approximate Test Duration: 35 minutes
Administered: Once per test battery at baseline, two months and six months by a
certified staff member.
Staff Instructions: Be sure subject is comfortable and the computer station is
ergonomic. Refer to the CogScreen manual for further instruction on test
administration, data back up and data transmission
Data Entry
Following the CogScreen test battery the examiner should enter observations if
necessary and then exit CogScreen. To access the data, the following steps should be
followed:
1.
2.
3.
4.
5.
6.
7.
Rev. 8/03
Login using a professional lever username and password
Examinees are listed in the box on the left
To view demographics, click on the examinee's name/birthdate/session
combination.
To create an Excel spreadsheet, click the reports tab and the spreadsheet option
The Excel spreadsheet is named: CogScreenPL.xls and is located in the
CogScreen\Reports folder (e.g., C:\Program Files\CogScreen\Reports\)
Whenever the spreadsheet is run, it creates a spreadsheet containing all current
subjects in the CogScreen-APPLES database.
See the CogScreen manual for additional details (Appendix 10B)
A pnea
P ositive
P ressure
L ong-term
E fficacy
S tudy
CPAP Habituation
Instructions
Starting a Subject on CPAP:
Tonight you will be trying CPAP for the first time; therefore we will spend a few minutes
right now practicing so you will feel more comfortable with the process. We will also be
selecting a mask. As you may know, CPAP stands for Continuous Posititive Airway
Pressure. Basically, the machine takes regular room air, not oxygen, and delivers it to
your airway with an increased pressure. The air pressure acts like a splint to keep your
airway open while you sleep. This helps to normalize your breathing.
We’ll start by having you hold the mask in place, but during the night a headgear is
used to keep the mask in place. The mask must have a good seal to work properly, so
when we turn the pressure on you may need to adjust the mask slightly to eliminate
any leaks.
It is very important that you keep your mouth closed while wearing the mask. If your
mouth is open CPAP becomes ineffective because the air pressure goes in through your
nose and out your mouth.
I am going to turn on the air pressure now, so just relax and breath normally through
your nose.
Dealing with Claustrophobia:
If you are feeling a little overwhelmed it’s okay, some people feel uncomfortable when
trying CPAP for the first time, but the feeling will typically go away. Sitting up straight
can make it easier to breath. We will also try another mask to find one that is more
comfortable.
Try to relax and hold the mask in place without the air pressure turned on to get used
to the feel of the mask. You may find it more comfortable to breath through your
mouth until we turn the pressure back on.
Let me know when you are ready, and I will turn the air pressure back on. You may
want to read or watch television while you practice to take your mind off the mask and
allow your body to become accustomed to breathing against the air pressure naturally.
Rev. 4/03
A pnea
P ositive
P ressure
L ong-term
E fficacy
S tudy
CSQ Administration
& Scoring Instructions
Purpose: To obtain information about the subject’s demographics and social history.
This information will be helpful to the physician whether the patient becomes a
participant in the study or not, yet can also be used to screen patients in the event that
they are eligible for participation in APPLES.
Approximate Test Duration: 5 minutes
Administered: Every patient at each CC will complete a brief information sheet in the
waiting area prior to any clinical visit prior to seeing the physician. The CSQ is part of
the routine history that is obtained from every patient.
Subject Verbal Instructions: Please complete each question as thoroughly as
possible and to the best of your knowledge. Mark only one answer for each question.
Staff Instructions: Prior to the assignment of the final subject identification number,
a screening identification number will be issued by the CC. The CC Coordinator will
develop a method to consecutively number the Clinical Screening Questionnaire
(CSQ) forms based on Section 3.5.1 of the MOP. The forms may either be numbered
before they are given to the patients or once the completed forms have been collected.
This screening identification number will be similar in format to the final subject
identification number. Once a screening identification number has been assigned, this
number should be immediately linked to the subject's name at the CC. This
information should be stored in two secure locations (e.g., in a password protected
computer file and in a locked file cabinet). The screening identification number should
initially be used on all study documents until the final subject identification number has
been assigned by the DCC. Once the final subject identification number has been
assigned, it will be included on all future study documents
APPLES Scoring Rules: The physician will review the responses and request more
information regarding any Yes answer for questions 4, 6, 7, 8, 9, 10, 11, or 13 or No
answer for question 5 or 12. Question 16 on the H&P Eligibility Form indicates whether
the physician felt based on the CSQ whether the subject is eligible for participation.
Rev. 10/03
A pnea
P ositive
P ressure
L ong-term
E fficacy
S tudy
ESS Administration
& Scoring Instructions
Purpose: To obtain a measure of the subject's perceived level of sleepiness in various
situations. This information can be used during the clinical evaluation to determine if
the subject may be experiencing a clinically significant level of sleepiness.
Approximate Test Duration: 5 minutes
Administered: Self-administered during or following the clinical evaluation (e.g., in
the waiting area), the evening before the Diagnostic Appointment, CPAP Titration,
Two-month Post-CPAP Follow-up Appointment, Six-month Post-CPAP Follow-up
Appointment and at the Four-month Post-CPAP Follow-up Appointment. A certified
APPLES staff member should be available to present directions and answer questions
while the subject completes the questionnaire.
Sample Subject Verbal Instructions: Please select one answer for each of the
questions regarding how likely are you to doze off or fall asleep (in contrast to just
feeling tired) in various situations? Please respond considering your usual way of life
in recent times. Even if you have not done some of these activities recently, try to
work out how they would have affected you.
Staff Instructions: A total score of 10 or greater will be used to suggest clinically
significant sleepiness.
Scoring Instructions:
The Epworth Sleepiness Scale is scored by adding the value in the circle that
corresponds to the subjects response. Only one value should be selected for each
question. The scores may range from 0-24.
Safety Instructions:
A total score of 18 or greater or an endorsement of 3 on the drowsy driving
question will result in the CC Coordinator being notified. In turn, the CC
Coordinator will alert the physician-observer to contact the subject for further
analysis.
Rev. 10/03
A pnea
P ositive
P ressure
L ong-term
E fficacy
S tudy
FS Administration
Instructions
Purpose: To obtain information regarding the subject’s current level of alertness
Approximate Test Duration: 2.5 minutes
Administered: Self-administered under the supervision of the Daytime PSG
Technologist or other assigned APPLES staff member four times during the
neurocognitive test battery following the Diagnostic PSG, the Two-month Post-CPAP
Follow-up PSG and the Six-month Post-CPAP Follow-up PSG (prior to each MWT
session [1000, 1200, 1400, 1600])
Sample Subject Verbal Instructions: After sitting quietly for a minute or two,
review the list and check the circle that best matches your current degree of
sleepiness. Mark only one answer.
Staff Instructions:
answer was selected.
Rev. 10/03
When completed, review the form to assure that only one
A pnea
P ositive
P ressure
L ong-term
E fficacy
S tudy
History and Physical (H&P)
Instruction Sheet
General Features of the History and Physical
Rev. 6/03
1.
Each patient at the site will complete the CSQ in the
waiting area.
2.
The H&P form (or equivalent form) should be utilized
during the clinical evaluation.
3.
If a subject is identified with a probably OSAS
diagnosis, review the CSQ and complete the H&P
eligibility checklist to evaluate whether the subject is
eligible.
4.
If the subject meets initial eligibility criteria, APPLES
should be explained to the subject. This task may be
performed by an appointed APPLES staff member.
5.
If the subject is willing to participate, informed
consent should be administered by a trained APPLES
staff member.
6.
Once the subject is enrolled in the study, the MMSE,
ESS, MEQ, JLO and SHQ are administered to the
subject.
The study physician may assign the
administration of these items to a trained APPLES
staff member.
7.
For scores above an “acceptable” level, the study
physician will be notified.
A pnea
P ositive
P ressure
L ong-term
E fficacy
S tudy
HAM-D Administration
Instructions
Purpose: The HAM-D will be used to monitor depressive symptomatology across and
between subjects at each administration of the test battery.
Approximate Test Duration: 30 minutes
Administered: Administered by a psychological technician (or other trained
technologist) during Training Session One or Training Session Two for the initial
administration and during the Psych 1 time slot of the neurocognitive testing day for
the Two- and Six-month Post-CPAP Follow-up Appointments.
Staff Instructions: Test must be administered by a qualified staff member who has
been certified to administer the test by the Quality Control / Quality Assurance
Supervisor. All interviews must be audiotaped.
See the HAM-D training videos and HAM-D Structured Interview Guide Grid-HAMD-17
for further instruction on administration and scoring.
Scoring Instructions: A total HAM-D score of 24 or greater will result in the subject's
exclusion from the study.
Safety Instructions:
The CC Coordinator must be immediately notified if a subject has an overall
score of 24 or greater or scores a 1 or higher on the suicide module (module 3).
The CC Coordinator will in turn notify the physician-observer to make a contact with
the subject as soon as possible
Rev. 10/03
A pnea
P ositive
P ressure
L ong-term
E fficacy
S tudy
JLO Administration
& Scoring Instructions
Purpose: To evaluate the subject's spatial perception and orientation.
Approximate Test Duration: 5 minutes
Administered: During or after the clinical evaluation
Testing Environment: The test booklet is placed flat on a table in front of the patient
with the booklet opened so that the stimulus items in the upper half are positioned at
an angle of about 45 degrees with respect to the surface of the table. Generally, the
booklet should be placed so that the entire response-choice display and stimulus field
lie within the area of preserved vision, but the subject is allowed to hold the booklet to
their best advantage.
Staff Instructions: The examiner should begin with practice item A, point to the
lines on the upper stimulus page, and say: “See these two lines? Which two lines down
here (pointing to the response card) are in exactly the same position and point in the
same direction as the two lines up here?” “Tell me the number or the lines.” If the
patient supplies the correct answer, say “That’s right,” and proceed with practice item
B. If the subject is aphasic or otherwise shows a tendency to misstate the number
while pointing to the correct response-choices, say instead: “Show me these lines
down here. Point to them.”
If the subject does not understand the task, continue by using your hand to cover the
line in position 6 and, pointing to the other line (in position 1), say “Let us just look at
this line. Which line down here (pointing to the response-choice display) points in the
same direction as this one (pointing to the stimulus line) and is also in the same
position? That is, it’s on the same side of the page as this line up here.” Record the
response on the record sheet where it is labeled A’. Correct the subject if he or she still
supplies the wrong answer and proceed, using these extended instructions, by
covering the other line (in position 1) and pointing to the line in position 6. After
demonstrating the line in position 6, again supply the correct answers if it is not given
on the second trial (a’). Continue with practice item B. If the patient again gives the
wrong answers for this practice item, follow up wit the extended instructions using
single lines (trial b’).
Continue with this cycle of instructions until the patient gives two correct responses on
the practice items on the first trial. A correct response means identifying both
response choices for the pair of stimulus lines. If this criterion is not met with at least
two practice items, discontinue the test. (See discussion below in the section on
Scoring)
Rev. 7/03
Page 1 of 2
A pnea
P ositive
P ressure
L ong-term
E fficacy
S tudy
JLO Administration
& Scoring Instructions
Staff Instructions Continued: After the five practice items have been presented,
and with the test booklet opened to the page labeled “Test Items,’ say to the subject:
“Now we are going to do more of these, except now the lines which you see up here
(pointing to the upper page) will be shorter, because part of the line has been erased.
Tell me (show me) which two lines down here are pointing in the same direction as the
lines up here.”
Do not supply the subject with knowledge of his or her results on any of the individual
test items. However, general statements can be made to provide encouragement and
sustain motivation.
If, after 30 seconds, a subject has not given his or her response choice, the subject
should be encouraged to make a best guess regardless of how certain he or she is
about it. There is no time limit for responding. The patient’s actual response choice
should be entered on the Record Form (not just “right” or “wrong”). Spontaneous
corrections by the subject are accepted.
Scoring Instrutions: After entering the subject’s two response choices and
examining the correct answers given to the right of the item on the Record Form, circle
any errors. At the completion of the test, tally the number of completely correct items
and record it (total of 30 possible points).
Subjects who fail to meet the pretest criterion on the practice items, i.e., Completely
correct response choices on the first administration of any two practice items, receive
a score of 0.
Subjects will not be eliminated based on the results of the JLO, but it will alert
investigators that this individual may have difficulties with the SWMT.
Breakdown of Scores:
20 and above - Normal
19-20 - Borderline - low normal performance / mildly defective spacial perception
17-18 - Moderately defective spacial perception
16 or below - Severely defective spacial perception
Corrected Scores:
Age
Men
16-49
+0
50-64
+1
65-74
+3
Rev. 7/03
Women
+1
+3
+5
Page 2 of 2
A pnea
P ositive
P ressure
L ong-term
E fficacy
S tudy
Medication Update Form
Instructions
Purpose: To monitor the subject’s medications
Approximate Test Duration: 5 minutes
Administered: At every scheduled subject visit
Sample Subject Verbal Instructions: As you know, medications (prescription and
non-prescription) temporarily alter your body’s chemistry which may impact your
mood, alertness, or overall quality of life. Because we are assessing these same
factors, it is essential that we have a current list of all of the medication you are taking even if you don’t think it is relevant to the study. Once all of your medications are
noted, you will be asked to review this list at every visit to confirm that you are still
taking the medication or to update the list with new dosage/frequency information. If
you have any questions about how to fill out this form, please ask an APPLES staff
member for assistance.
Staff Instructions: For new subjects, use the Physician Verified Medications form to
list the subjects medications (prescription and non-prescription) on the medication
form. When the subject comes in for a scheduled visit, have them review the form and
update the information. The same form will be used to monitor the subjects
medications until they are no longer an active subject.
Rev. 10/03
A pnea
P ositive
P ressure
L ong-term
E fficacy
S tudy
MEQ Administration
and Scoring Instructions
Purpose: To obtain information regarding the subject’s time of day preferences
Approximate Test Duration: 10 minutes
Administered: Self-administered during or following the clinical evaluation (e.g., in
the waiting area) or during Training Session One. A certified APPLES staff member
should be available to present directions and answer questions while the subject
completes the questionnaire.
Sample Subject Verbal Instructions: Please complete each question as thoroughly
as possible and to the best of your knowledge. Mark only one answer for each question
unless indicated otherwise.
Staff Instructions: When completed, review the response to assure that only one
answer was selected for each question and that all questions were answered. In
extreme cases, this information may be used by the study physician to eliminate a
subject from participating due to the requirement for a standardized time for
administering the neurocognitive tests and MWT.
Scoring Instructions: On the time scale questions, if the response is exactly
between 2 scores, use the score on the right.
For Question 17, use the last time
marked on the right.
Rating Scale: (for informational purposes only, no exclusion criteria)
70-86
Definitely morning type
59-69
Moderately morning type
42-58
Neither type
31-41
Moderately evening type
16-30
Definitely evening type
Rev. 10/03
A pnea
P ositive
P ressure
L ong-term
E fficacy
S tudy
MINI Administration
Instructions
Purpose: A screening tool for the psychiatric assessment of our subjects. Any subject
with an Axis I psychiatric diagnosis other than depression, dysthymia or mild anxiety
(social phobia or generalized anxiety disorder) will be excluded from participation in
the study. For more information, see Section 6.1.2 of the protocol.
Approximate Test Duration: 40 minute interview for first administration, 10-25
minute interview for the second and third administration (depending on whether
depression or anxiety symptoms are endorsed)
Administered: Administered during Training Session One or Training Session Two for
the initial administration and during the Psych 1 or Psych 2 time slot of the
neurocognitive testing day for the Two- and Six-month Post-CPAP Follow-up
Appointments (Table 11). The entire MINI (Modules A-P) will be administered at
baseline. Only certain modules will be readministered at two and six months (Modules
A-C, G and O).
Verbal Instructions:
This interview will be more structured than the others. I will be asking you very
precise questions about psychological problems that call for a ‘yes’ or ‘no’ answer.
Staff Instructions:
Test must be administered by a trained psychological technician (or other trained staff
member) who has been certified to administer the test by the Quality Control / Quality
Assurance Supervisor. Refer to the General Instructions on page 3 of the MINI for
further instruction on administration and scoring.
Safety Instructions:
The CC Coordinator must be immediately notified if a subject has a low,
medium or high suicide risk on the suicide module (module C). The CC
Coordinator will in turn notify the physician-observer to make a contact with the
subject as soon as possible
Rev. 8/03
A pnea
P ositive
P ressure
L ong-term
E fficacy
S tudy
MMSE Administration
& Scoring Instructions
Purpose: To assess the ability of the subject to understand and follow spoken
and written instructions.
Approximate Test Duration: 10 minutes
Administration: During or after the clinical evaluation
Staff Instructions: The test must be administered by a trained psychological
technician (or other trained staff member) who has been certified to administer the
test by the Quality Control / Quality Assurance Supervisor. Use the form titled MMSE
for questions 8, 10, and 11. Fold the page with the order “Close your eyes” and the
interlocking pentagrams in half. Only show the subject the side relevant to the current
question. For question 11, the side with the pentagrams should be placed on the table
in front of the subject but the subject is allowed to hold the page to their best
advantage.
Serial 7s and WORLD are not considered equivalent items. Both items should be
administered and the higher of the two scores should be used. WORLD should be
spelled forward (and corrected) prior to spelling it backward.
In the event the “country” and “where are you” orientation-to-place questions must
be modified. The name of the county (province) where the person lives should be
asked rather than the name of the county where the test site is given. The name of the
street where the individual lives should be asked rather than the name of the floor
where the testing takes place.
Scoring Instructions:
Each question has a score written beside the response line in parentheses. The MMSE
score is the total of the individual scores on all 11 questions. As explained above, the
Serial 7 and WORLD should both be administered and the higher score recorded. The
maximum score is 30 points. A total score of 26 or less will exclude the subject from
participation in APPLES.
Rev. 8/03
A pnea
P ositive
P ressure
L ong-term
E fficacy
S tudy
MQ Administration
Instructions
Purpose: To collect detailed information about the subject's subjective perception of
the previous night's sleep.
Approximate Test Duration: 5 minutes
Administered: Self-administered under the supervision of the Night or Day PSG
Technologist the morning after the Diagnostic PSG, CPAP Titration and prior to the
Two- and Six-month Post-CPAP Follow-up PSGs.
Sample Subject Verbal Instructions: Please complete each question as thoroughly
as possible and to the best of your knowledge. Mark only one answer for each
question.
Staff Instructions: When completed, review the response to assure that only one
answer was selected for each question and that all questions were answered.
Rev. 10/03
A pnea
P ositive
P ressure
L ong-term
E fficacy
S tudy
MWT Administration
& Scoring Instructions
Purpose: To measure the subject's ability to remain awake during soporific
circumstances.
Test Duration: 20 minutes
Administration: Four times during the daytime test battery of the diagnostic PSG,
the 2-Month Post-CPAP PSG and the 6-Month Post-CPAP PSG at 1000, 1200, 1400, and
1600 hours.
Testing Environment: The subject should be seated comfortably in bed supported
by a reading pillow. The room should be dimly lit (50 lux) and the subject should be
wearing comfortable street clothes.
PSG BioCal Procedure (to be done with the subject's room lights on before every
trial):
Relax, look straight ahead with your eyes open (20-30 sec)
Close your eyes (20-30 sec)
Without moving your head, look left
Look right
Look left
Look right
Without moving your head, look up
Look down
Look up
Look down
Look up
Look down
Blink 3 times
Grit your teeth
The technologist will then go into the subject's room, set the light level to 50 lux, and
give the subject verbal instructions.
Subject Verbal Instructions: “Please sit still and remain awake for as long as
possible. Look directly ahead of you (and do not look directly at the light (to be used if
a night light visible to the patient is used as the light source)). Relax with eyes open
and try to remain awake. During the test I may come in and turn the light level up.
Continue to keep your eyes open and try to remain awake until I tell you that the test is
over.” (Subjects should be disallowed from using extraordinary measures such as
slapping the face or singing. If such behaviors occur, the technologist should remind
the subject by intercom to “Please sit still.” Prior to the test it is permissible to tell
subject “The test will last approximately 20 minutes.” It is not permissible to tell the
subjects the purpose of the test, that the test measures how long they can stay awake,
etc.)
Rev. 9/03
A pnea
P ositive
P ressure
L ong-term
E fficacy
S tudy
MWT Administration
& Scoring Instructions
Subject Verbal Instructions: “Please sit still and remain awake for as long as
possible. Look directly ahead of you (and do not look directly at the light (to be used if
a night light visible to the patient is used as the light source)). Relax with eyes open
and try to remain awake. During the test I may come in and turn the light level up.
Continue to keep your eyes open and try to remain awake until I tell you that the test is
over.” (Subjects should be disallowed from using extraordinary measures such as
slapping the face or singing. If such behaviors occur, the technologist should remind
the subject by intercom to “Please sit still.” Prior to the test it is permissible to tell
subject “The test will last approximately 20 minutes.” It is not permissible to tell the
subjects the purpose of the test, that the test measures how long they can stay awake,
etc.)
Staff Instructions:
The test will be ended after 20 minutes whether or not the subject has fallen asleep.
Sleep onset is defined as three consecutive, unambiguous, 30-second epochs of any
stage of sleep.
·
If the sleep onset criterion is reached before the 20-minute mark, the technologist will
turn on the room lights and state to the subject: “Please open your eyes and try to
remain awake.” The technologist will continue to monitor the PSG until the full 20
minutes have passed, awakening the subject (repeatedly if necessary) if any further
sleep is detected. Sleep in this case is defined as 5-10 continuous seconds of any
stage of sleep, or a single epoch containing more than 15 seconds of sleep. All
subsequent awakenings during the test should be done over the intercom, using the
phrase “Please open your eyes and try to remain awake.”
·
The technologist will record the start time, the sleep-onset time, and the stop time of
the test.
Rev. 9/03
A pnea
P ositive
P ressure
L ong-term
E fficacy
S tudy
PASAT Administration
Instructions
Purpose: To assess capacity and rate of information processing and sustained
and divided attention
Approximate Test Duration: 20 minutes
Administered: Once per test battery at baseline, two months and six months
Subject Verbal Instructions(on tape):
Tell the subject: “I am going to ask you to add together pairs of singledigit numbers. You will hear a tape-recorded list of numbers read one after the
other. I will ask you to add the numbers in pairs and give your answers out
loud. Although this is really a concentration task, and not a test to see how well
you can add, it might help to do a little adding before I explain the task in more
detail. Please add the following pairs of numbers together as fast as you can
and give your answers out loud: 3,8 (11); 4,9 (13); 7,8 (15); 8,6 (14); 8,9
(17); 5,7 (12); 6,5 (11); 6.9 (15); 4,7 (11); 7,6 (13). Good.”
“The task that I want you to do involves adding together pairs of
numbers, just like you have done, except that the numbers will be read as a list,
one after the other. Let me give you an example with a short easy list.
Suppose I gave you the following: 1,2,3,4. Here is what you would do. After
hearing the first two numbers on the list, which were 1,2, you would add these
together and give your answer, 1+2=3. The next number on the list is 3, so
when you heard it, you would add this number to the number right before it on
the list, which was 2, and give your answer 2+3 =5. Are you following so far?
The last number you heard is 4 (Remember the list is 1,2,3,4), so you would
add 4 to the number right before it, which was 3, and give your answer, 3+4=7.
The important thing to remember is that you must add each number on the list
to the number right before it on the list, and not to the answer you have just
given. You can forget your answers as soon as you have said them. All you
have to remember is the last digit that you have heard and add it to the next
digit that you hear. O.K.? Let's try that short list again, only this time you say
the answers. Ready? 1,2, (3), 3, (5), 4, (7). Now let's try another, longer
practice list of numbers. This time, the numbers on the list won't be in any
particular order. Ready? 4,6, (10), 1, (7), 8, (9), 8, (16), 4, (12), 3, (7), 8,
(11), 2, (10), 7, (9). Good.”
Page 1 of 3
Rev. 8/03
A pnea
P ositive
P ressure
L ong-term
E fficacy
S tudy
PASAT Administration
Instructions
Subject Verbal Instructions Continued:
If the subject has difficulty understanding the oral instruction, then
provide a written demonstration. Say: “That sounds complicated. Let me
show you what I mean.” Write down a list of five numbers: 5, 3, 7, 4, 2 “You
see, you add the 5 and the 3 together, and say 8, then you have to forget the 8
and remember the 3. When the 7 comes along you add it to the 3, and say 10,
and you have to remember the 7. All right, what do you say after 4?” Continue
until the subject understands what he or she is to do Say: “It's very easy when
all the numbers are written down for you. Try it with me saying some numbers
to you.” See above list. Discontinue if the subject is unable to get at least the
first three answers from the unpaced practice list correct, after two trials.
“Remember, I said the numbers would be tape-recorded? The task is not
easy and no one is expected to get all of the answers right. The hard part is
keeping up with the speed of the recording. However, if you can't answer in
time, don't worry; just wait until you hear two more numbers, add them
together and go on from there. O.K.? Any questions? I'll play a practice list of
numbers and get you to give the answers.” Play to the end of the first practice
list.
“You see what I meant about the task measuring how well you can
concentrate. It doesn't have anything to do with how smart you are. Now we'll
try the first real trial. This trial is just the same as the practice trial you've just
done, except that it is six times as long, so it goes on for almost two and a half
minutes. Don't worry if you make adding mistakes or miss some answers. This
is a difficult task. I want to see not only how long you can keep going without
stopping, but also how quickly you can pick up again if you do stop. No one is
expected to get all the answers. After this trial, we will take a break and then do
another trial at a faster speed.
Page 2 of 3
Rev. 8/03
A pnea
P ositive
P ressure
L ong-term
E fficacy
S tudy
PASAT Administration
Instructions
Staff Instructions:
Play the verbal instructions on the audiotape. The tape volume should be well
above threshold and adjusted to a comfortable listening level for each subject.
Play the first trial (at the rate of 2.4 seconds). Record whether each response
was correct or incorrect on the PASAT Form. Encourage the subject to continue
if necessary. Once the trial is finished, stop the tape.
Allow at least 60 seconds before playing the next trial.
Warn the subject before each trial that it will be faster than the previous one.
For retests, do not repeat instructions, written demonstration, or unpaced
practice trial unless the subject demonstrates on the paced practice trial that he
or she has forgotten what to do. Record this information.
PASAT Log:
The PASAT tape should be discarded after a maximum of 100 tapes. Fill out the
PASAT Log each time the test is administered to track when the tape must be
replaced. Replacement tapes should copied from the original PASAT Tape using
a high quality tape and dubbing system. The original tape should only be used
for creating copies and should be stored in a safe place. We have received
permission from the University of Victoria Canada to copy the PASAT tapes.
PASAT Form: We have received permission from the University of Victoria
Canada to photocopy the PASAT Forms received with the tape.
Page 3 of 3
Rev. 8/03
A pnea
P ositive
P ressure
L ong-term
E fficacy
S tudy
POMS Administration
Instructions
Purpose: To assess mood state across and between subjects at each administration of
the test
Approximate Test Duration: 5 minutes
Administered: Self-administered the morning after the diagnostic PSG, the Twomonth Post-CPAP PSG and the Six-month Post-CPAP PSG. A certified APPLES staff
member should be available to present directions and answer questions while the
subject completes the questionnaire. It is also administered during the Four-month
Post-CPAP Follow-up Visit under the supervision of a certified APPLES staff member.
Sample Subject Verbal Instructions: On this form there is a list of words that
describe feelings people have. Please read each one carefully. Then fill in one circle
under the answer to the right which best describes how you have been feeling during
the past week including today. Please complete each question as thoroughly as
possible and to the best of your knowledge.
Staff Instructions: When completed, review the response to assure that only one
answer was selected for each question and that all questions were answered. Refer to
the POMS manual for further instruction on administration and scoring.
POMS Forms: An original form must be used for every administration due to
copyright issues. Forms can be ordered from http://www.mhs.com/.
Rev. 10/03
A pnea
P ositive
P ressure
L ong-term
E fficacy
S tudy
PSG Biocalibrations
The PSG tech will coach the subject through the following recommended
biocalibrations, identifying instruction in the tech notes. Each CC may use the
biocalibrations standard for their site.
Relax and look forward with your Eyes Open trying not to blink
With out moving your head, look left
With out moving your head, look right
With out moving your head, look left
With out moving your head, look right
With out moving your head, look up
With out moving your head, look down
With out moving your head, look up
With out moving your head, look down
Blink five times
Grit your teeth
Count out loud from one to five
Flex your right foot
Relax
Flex your right foot
Relax
Flex your left foot
Relax
Flex your left foot
Relax
Breath normally for 30 seconds
Breath through your nose for 30 seconds
Breath through your mouth for 30 seconds
Take a deep breath in and hold it for 10 seconds
Inhale and make a noise as you exhale (sigh or snore)
Relax with your eyes closed for 30 seconds
Rev. 4/03
A pnea
P ositive
P ressure
L ong-term
E fficacy
S tudy
APPLES
PVT
Manual
Page 1 of 10
Table of Contents
INITIALIZING THE PVT FOR THE APPLES STUDY
…………………….3
USING THE PVT-192 UNIT FOR THE APPLES STUDY
…………………….5
DOWNLOADING THE PVT-192 FOR THE APPLES STUDY …………………….7
CLEARING MEMORY IN THE PVT-192
…………………….8
CHECKING PVT DATA
…………………….9
PVT NOTES
…………………...10
NOTE – The information contained in this manual is not intended to replace
information supplied by AMI for the PVT-192 unit, PVT COMM and PVT REACT
software. Full information on operation of the PVT-192 unit and software is
available in the documentation supplied by AMI. Please consult your
documentation and online help files for more information.
Page 2 of 10
INITIALIZING THE PVT FOR THE APPLES STUDY
Launch PVTCOMM For Windows – During set-up, the program should place 2 icons on your
desktop, the PVTCOMM icon and the PVT REACT icon.
Click on PVT from the menu bar.
NOTE – On some Windows platforms and on some screen resolutions the boxes that open
may or may not size properly. If you open PVTCOMM and click Initialize and the Time/Date
screen opens and you can’t see the whole box (see example), you need to position your
cursor over the bottom left of the box. The cursor arrow will turn into a double-headed
arrow. Left click your mouse and drag the corner of the box to enlarge it. You may need
to do this on several of the text/message boxes during initialization.
Select Initialize - The Current Time and Date should be coming from your PC's system. Look on
the lower right corner of the task bar to make sure the time is right. If you need to reset the time
or the date, highlight the incorrect value with your cursor (left click and hold, and drag over the
entry). Enter the correct value. TAB to advance to the next field. When the date/time are
correct, click the Set Current Time button. If the current time and date are correct when
initializing, click on the Continue button.
Form 1 will open.
Study Name - This is an 8 place maximum value, either digits or letters. The first two digits
should identify your site using the coding system below. Next should be an underscore mark _
followed by APPLE. Note you cannot use APPLES, as this would be 9 characters long.
Stanford = SU_APPLE
University of Arizona = UA_APPLE
St. Louis = SL_APPLE
Brigham & Women’s = BW_APPLE
Walla Walla = WW_APPLE
Page 3 of 10
Experimenter’s Initials – 3 characters maximum. As this will be the default value whenever the
PVT is used, I’d recommend using the initials of whoever will give the PVT the majority of the
time. You do have the opportunity to change it during set up for each individual PVT session in
case someone else administers it. If the experimenter doesn’t have a middle name, use an
underscore for the middle initial.
Trial Seconds Length – Set this value to 600. If it’s currently at a different value, you can use
the up/down arrows to set, or use the cursor to highlight the value and type in 600.
Mood – fatigue
Subject Initials – Leave this section blank.
Subject ID Number – 4 characters maximum. Enter 0001. This will be the default value
whenever the PVT is used. You will have the opportunity to enter the actual ID during each
subjects PVT. This should be the last 4 digits of the official subject ID.
Trial Number – Enter 1. This number will increment by 1 each time the *_APPLE PVT is used,
but it’s changeable during individual subject set-up. You’ll want to be careful because it won’t
know the difference between subject 1, subject 2, and so on. This is a value you will need to set
each time you run a subject.
ISI Minimum (ms) – this is the minimum inter-stimulus time. This should be set to 1000 ms (1
second).
ISI Maximum (ms) - this is the maximum inter-stimulus time. This should be set to 7000 ms (7
seconds).
Hand – as the vast majority of subjects will be right handed, set the default to right. You will have
the opportunity to change it during the individual subject trials.
Task – Set this as Visual
When finished, click on OK.
A message box appears stating, “Ensure PVT is in Supervisory Mode”.
Make sure the PVT is in supervisory mode (see page 5) then click enter.
After the initialization you will get a message box stating, “Initialization Finished”, and the PVT
unit will beep. Click OK.
At this point you can exit from the PVTCOMM program.
Page 4 of 10
USING THE PVT-192 UNIT FOR THE APPLES STUDY
The face of the PVT unit has a small window on top for the stimulus presentation. A larger
window below this for displaying alpha / numeric data. On the bottom of the face are 2 small
black buttons. The one on the left moves the cursor in the display window from left to right. The
button on the right is the enter button. Once you have moved the cursor to the correct location
with the left button, press the right button to enter. We have placed labels below each of the
black buttons, Select on the left, and Enter on the right. This helps to avoid any confusion.
When not in use it is best to leave the unit plugged into the charger. The PVT units loose their
battery charge fairly rapidly. Next to the charger port is the serial cable port. A serial cable
attaches from this port to a free serial COM port on your computer. During software installation
you will set up which COM port you will use for the PVT.
There are 2 primary modes of use in the PVT, subject and supervisory. Separate passwords are
needed for each mode. The Supervisory password is preset by the manufacturer and is standard
for every PVT-192 unit. This number is 31267. The subject password can be changed if needed.
The default password is 123.
To put the unit into supervisory mode:
Make sure the serial cable is attached to both the computer and the PVT unit.
Turn the power switch to on. The unit will self test then bring up the Select screen on the display.
Press the left button to cycle between Test and Setup. When Setup is highlighted, press the right
button. The Access screen is now displayed, with the numbers 0-9, Q, E, and R. Q = quit, E =
erase, and R = return. Use the left button to cycle through the numbers, highlight 3 and press the
right button. The number 3 now appears on the first line next to Access. Now cycle through the
numbers highlighting the rest of the supervisory code in the proper order. After you enter the last
number, cycle the cursor to Q and press the right button. If you make a mistake and enter the
wrong number, cycle the cursor to E and press the right button to erase the last number. The unit
should now display Supervisory Mode on the display.
To put the unit into subject mode:
The unit should not be attached to the serial cable.
Turn the power switch on. The unit will self test then bring up the Select screen on the display.
Press the left button to cycle between Test and Setup. When Setup is highlighted, press the right
button. The Access screen is now displayed, with the numbers 0-9, Q, E, and R. Q = quit, E =
erase, and R = return. Enter the appropriate code; we have left ours at 123. A Select Setup
screen appears in the display with 3 choices, Param (parameter), Clock, and Ret (return). Select
Param and enter.
Study [NAME] appears on the first line of the display, with the letters A thru J, +QE on the second
line. + advances to the next line of letters, Q = quit, and E = erase. [NAME] represents the
name of the current study in the unit. If you have initialized the unit with the APPLES study, it will
ready XX APPLE with XX the 2 letters of your site. If it comes up with any other study name, the
APPLES data has not been sent to the unit. You can set it up manually through the unit, but it’s
faster just to use the PVTCOMM program to do it. Cycle the cursor to Q and press enter. The
Mood scale name should appear. We have it listed as Fatigue?. Cycle the cursor to Q and enter.
E Initials appear. This is the experimenter initials. If the initials are not correct, use the cursor to
cycle through the alphabet to select them. The + sign will bring up the next line of alphabet
characters. S Initials are now displayed. This is subject initials. You will need to use the cursor
to cycle through the alphabet characters to select the 3 initials, then Q to quit. Subject X is now
displayed. Cycle the cursor thru the numbers to select the correct subject numbers and enter.
Trial X now appears. Cycle thru the numbers to select the appropriate trial number and enter.
The next screens list the minimum interval, maximum interval, and trial length. Just Q through
them. Task Code should be left at Vis for visual. Handedness is set to Right as default. If you
have a left-handed subject just cycle the cursor to Left and enter. The Select Test Setup menu
Page 5 of 10
appears again. Cycle to Test and enter. If it is a real test, select Real. If it’s a practice session,
select Demo.
For both the Real and Practice sessions the subject must complete the Fatigue scale. The
scale appears at the beginning and end of the session. If it is not completed, the data file
will be corrupted and unusable. Have the subject use the left button to move the cursor.
The cursor only moves from left to right. When the cursor gets to the far right it will
recycle back to left side of the screen. Have them cycle the cursor to the appropriate
location and press enter.
The screen will read Ready to test… followed by …press any key to start. Have the subject press
either button to start the test. At the end of the test, 1 minute for demo and 10 minutes for the
real test, the unit will beep and the fatigue scale will appear again. The subject must complete
the scale.
During the practice session, only the RIGHT button is active. Left-handed patients will
have to use their right hand during practice and their left hand during the actual test.
Page 6 of 10
DOWNLOADING THE PVT-192 FOR THE APPLES STUDY
The PVT-192 units can safely store about 40 ten minute PVT’s. Once data has been recorded,
it’s stored internally on EEPROMS, so even if the batteries go dead the data is safe. You will
want to download the PVT after each subject in order to make sure you have valid data. The
data will also remain on the PVT unit until it is physically erased.
During the software installation a folder is created in your Program Files called AMI. Another
folder is created inside the AMI folder called PVT. This contains all the PVT files as well as
several example files. The folder contains both the PVTCOMM and REACT programs. It will be
best to make another folder inside the PVT folder to hold the APPLES data. Following the
instructions for your specific version of Windows, within the PVT folder, create a new folder called
APPLES. This is especially crucial if you use the PVT for any other research. If you do make a
separate APPLES folder in the PVT folder you will need to initialize an *.pvt file in order to write
data. Creating the *.pvt file will take place the first time you download an APPLES subject. After
that it will be automatic.
Open the PVTCOMM program. Turn on the PVT unit and make sure the serial cable is attached
to both the PVT and the computer. Place the PVT in Supervisory Mode (see previous section).
From the menu bar, select PVT and Download. A message box asks to make sure the PVT is in
Supervisory Mode. Click OK. Next you will get a Current Memory Status message box stating,
“PVT XX Percent Free. Approximately XX 10 minute tests remain.” Click OK. NOTE – The
more tests stored on the PVT, the longer the download will require. When the download is
finished, a message box stating Download Finished appears, and the PVT unit will beep. Click
OK in the message box.
A Save As box appears. Navigate to the APPLES folder, if necessary change the name of the
*.pvt file to APPLES.pvt and Click Save.
Each time the PVT downloads, all the tests stored on the machine are downloaded to the file,
even if the file already has a copy of the test. If a test is accidentally recorded with the same
subject, trial numbers as an exiting file, you will get a message during analysis about duplicate
tests. You will need to temporarily change the name of one of the tests in order to see the data
for both trials.
If you have a fast P.C. the download, even with 25-30 PVT trials will go pretty slow. If you have
an older P.C., the download will take up to 20 minutes. So once you have the original data
downloaded, saved, and a backup copy saved, its best to erase PVT trials from the PVT unit.
Page 7 of 10
CLEARING MEMORY IN THE PVT-192
PVT memory fills up rapidly when doing 10-minute trials. The more trials in the unit, the slower
the download will be. PVT trials that are downloaded to the P.C. remain on the PVT unit until
specifically erased. Make sure PVT trials have been downloaded and saved to the P.C., and that
a current backup of those files exists before clearing the PVT unit.
To clear the PVT unit, launch the PVTCOMM software, and make sure the serial cable is
attached to both the PVT unit and the computer. Make sure the PVT is in the Supervisory Mode.
From the PVT menu bar, select PVT and Clear. A message box appears to make sure the PVT
is in the Supervisory Mode. Click OK. A message box stating Getting Memory Free appears.
Next, a message box stating PVT XX Percent Free. Approximately XX 10 minute tests remain.
Click OK. A message box appears stating “Implementing this operation will cause the data within
the PVT to be PERMANENTLY Erased. Please verify that your data has been retrieved befor
(sic) proceding.” If you are sure you have already downloaded and saved the data, press OK.
After clearing, a message box stating PVT Clearing Finished appears. Click OK.
Page 8 of 10
CHECKING PVT DATA
Launch the REACT PVT software. On the menu bar click on the Load and Parse PVT files. If the
Open File Box is not set for APPLES, navigate to it. After you get to the APPLES folder the first
time, it will be the default value the next time unless you are using the PVT for various other
research/clinical trials. In the file box click on the file APPLES.pvt and click open. In the Files
Loaded box in the top left corner you can click on the down arrow and the complete list of
subjects and trials will display. Click on the subject and trial number you wish to view. Click on
detailed and then click on Analyze. A display like the following will appear:
Make sure the Subject ID, Trial No., Date_Time fields are correct. Also verify that the Subj.
Initials match those of the subject.
If you notice that the field labeled Wrong key R’s has a value greater than 0, this means that the
subject was trying to use the wrong button on the PVT. If the subject is left handed, make sure
that during PVT set-up you have selected the left-handed option. Otherwise, be sure and
reinforce to the subject that they are to press only the right button. If you notice that False Starts
[c] or False Starts [e] have values significantly higher than 0 it means the subject is trying to
anticipate the PVT stimulus. Make sure to reinforce to the subject not to try and “beat” the PVT.
Let them know that in humans a reaction time less than 100 ms is impossible. Key Held > 3 s
means that the subject has held the button down instead of quickly pressing and releasing it. It
can be an indicator that they have fallen asleep.
Page 9 of 10
PVT NOTES
========================================================================
If during PVT initialization, download, clearing, etc., you attempt to put the PVT into Supervisory
Mode and you get a “Initialization Aborted”, etc., it means that communication between the PVT
device and the computer could not be established. There can be issues between the PVT
COMM software, the PVT device, and the specific computer and operating system. Try turning
off the PVT device, closing the PVT COMM program, and unhooking the serial cable from the
PVT. Follow these steps to re-establish communication.
1.
Launch the PVT COMM software
2.
Plug the serial cable into the PVT unit
3.
Turn on the PVT unit
4.
Select the function you want from the PVT COMM Menu
=========================================================================
We have had one instance of a possible PVT malfunction. Normally during a 10-minute session
there will be 120 to 150 separate stimuli presented. Because of the random number generator
used to set the firing sequence it is conceivable to have more or less stimuli. In one instance the
device generated approximately 300 stimuli with each one less than 3 seconds apart. In theory
this could be possible, but highly unlikely. It also significantly skewed the data analysis. We
chose, in this instance, to delete this session and repeat it.
=========================================================================
Make sure the PVT is adequately charged up before giving it to a subject. Otherwise, in the
middle of a session the device may begin to beep and flash a low battery warning.
=========================================================================
Make sure the subject has physically turned off all cell phones and pagers. If staff members will
be standing in the background or even out in the hall, make sure they also have removed cell
phones and pagers. We have had several PVT sessions ruined when the subject’s cell phone
started ringing during the session.
=========================================================================
10 minutes is a lot longer than it seems. Be sure the subjects know that it might seem like the
test will never end. Make sure they are comfortable before getting started. If they try and fidget
and move around during the trial, it will skew their results. Try having them rest the PVT on the
edge of a table at a 45-degree angle while holding it. This has worked best for us.
=========================================================================
If you have accidentally set up the PVT with a subject number and trial number that has already
been used, when you attempt to Load and Parse PVT files you will get a message box titled
“Enter RTF name” with the message, “Duplicate [subject,trial] pair in PVT file [X,Y]. Enter name
for RTF file. X and Y are the subject number and trial number. The easiest way out of this is to
assign a subject number your center will never have – take their subject number and add 1000 to
it. This will let you parse the data. Make note of this new number. Permanently fixing the
problem will involve going into the actual data file with a text editor program. That is beyond the
scope of this document. Contact the DCC for advice.
=========================================================================
If you attempt to Load and Parse PVT files and get a “Run Time Error” – a subject has not
entered a value for the fatigue scale and the unit was shut down. The program is attempting to
append data that has errors. There is no fix for this. Luckily, you have backed-up the data.
Please contact the DCC for advice on how to reload the backed up data and append the new
PVT trial to this data.
Page 10 of 10
PVT Verbal Instructions
[DEMO] [At this point, the PVT should already be initialized, set up for
the correct patient and as a Demo, not a real test, and at the first Fatigue
Scale.]
This next test is called the PVT. This test measures your reaction time and
ability to concentrate.
[Show the patient device, letting them hold it. Point to the large display
window showing the Fatigue Scale]
The very first part of the test asks how fatigued, or tired, you are. The scale
will appear in the large display window on the PVT device. The scale goes
from No, meaning you are not tired at all, full of energy, ready to go, on the
left side; to Yes, meaning you are very tired, ready to fall asleep, on the right
side. The small black buttons on the bottom of the PVT device are used to
move the cursor and select how tired you are. The button on the left moves
the cursor from left to right. The cursor only moves in one direction. When
the cursor gets all the way to the right side of the screen it will reappear on
the left side. When you get the cursor to the area that best indicates how
tired you are, press the right button. [Have the patient move the cursor,
using the left button, to their desired level of fatigue, then have them press
the right button.]
During these practice sessions the test will last for only 1 minute. This is
just to get you used to holding the device, and when to push the buttons.
None of the practice information is saved. These sessions are just so you
can learn how to do the test. Do not worry if you make mistakes while
learning to do the test.
Now you can see that the display shows that the PVT is ready to begin the
test. During the practice sessions, only the right button is active. [LEFT
HANDED USER] Since you are left handed, please use your right hand
during these practice sessions. During the actual tests, you will be able to
use your left hand.
The PVT device has a small display window near the top of the unit that will
suddenly start counting upwards from 0. The numbers count upwards very
very rapidly. They count so fast that all you will probably see is a red blur.
[Point to the stimulus presentation window.] As soon as you see the red blur
of numbers start, I want you to press the right button with your thumb. Do
not press the button until you see the numbers start. Do not try and
anticipate when the numbers will start. They will appear at random times,
sometimes close together, sometimes several seconds apart. Only press the
button once for each time the numbers start. I will stay here in the room
with you to answer any questions you may have during the practice session.
When you are ready to begin, using your thumb, press either of the black
buttons.
[Let subject do the PVT]
[After the beep sounds to indicate end of test]
Good, that beep means that the test is over. As you can see, the fatigue
question is back in the display window. The question always appears at the
start and end of every test. It is the same question as at the start of the test.
Please answer the question as to how tired you are now, after the test.
[After subject has finished the fatigue question, take the PVT device from
them, make sure they have pushed the enter button on the fatigue scale, and
turn the unit to off. For instructions on downloading data, please refer to the
PVT manual.] OK, we’re done with this practice test. Let’s move on to
practicing some other tests.
[ACTUAL TEST] [At this point, the PVT should already be initialized,
set up for the correct patient, set for a Real test, and at the first Fatigue
Scale.]
This next test is called the PVT. This test measures your reaction time and
ability to concentrate.
[Show the patient device, letting them hold it. Point to the large display
window showing the Fatigue Scale]
Remember from when we practiced this test, that at the beginning and end of
the test there is a question asking how tired or fatigued you are? The scale
appears in the large display window on the PVT device. The scale goes
from No, meaning you are not tired at all, full of energy, ready to go, on the
left side; to Yes, meaning you are very tired, ready to fall asleep, on the right
side. The small black buttons on the bottom of the PVT device are used to
move the cursor and select how tired you are. The button on the left moves
the cursor from left to right. Remember, the cursor only moves in one
direction. When the cursor gets all the way to the right side of the screen it
will reappear on the left side. When you get the cursor to the area that best
indicates how tired you are, press the right button. [Have the patient move
the cursor, using the left button, to their desired level of fatigue, then have
them press the right button.]
During this session the test will last for 10 minutes. 10 minutes may not
seem like a long time, but concentrating that long during the test may make
it seem like it goes on for a very long time.
Now you can see that the display shows that the PVT is ready to begin the
test. During the practice sessions, only the right button is active. [LEFT
HANDED USER] Since you are left handed, please use your left hand
during this test.
Remember that the numbers will appear in this little window and start
counting rapidly upwards from 0. The numbers count upwards so fast, that
all you will probably see is a red blur. [Point to the stimulus presentation
window.] As soon as you see the numbers start to count, I want you to press
the right [left] button with your thumb. Do not press the button until you see
the numbers start. Do not try and anticipate when the numbers will start.
They will appear at random times, sometimes close together, sometimes
several seconds apart. Only press the button once for each time the numbers
start. I will be outside the room while you are doing the test. When you are
ready to begin, using your thumb, press either of the black buttons.
[Let subject do the PVT]
[After the beep sounds to indicate end of test, re-enter the room]
Good, remember that beep means that the test is over. As you can see, the
fatigue question is back in the display. It is the same question as at the start
of the test. Please answer the question as to how tired you are now, after the
test.
[After subject has finished the fatigue question, take the PVT device from
them, make sure they have pushed the enter button on the fatigue scale, and
turn the unit to off. For instructions on downloading data, please refer to the
PVT manual.] OK, we’re done with this test. Let’s move on to the next test.
PVT File Structure
AMI stores the individual patient files as *.rtf files. If needed you can use a txt editor to
open it and make corrections if someone enters it as a wrong trial number, examiner, etc.
I’d recommend the following file structure for the DCC.
<Program Files
<AMI
<PVT
<APPLES
< SM_APPLE
<logfile.txt
<apples.pvt
<apples.log
<SM000101.rtf
<SM000102.rtf
<………
<SU_APPLE
<logfile.txt
<apples.pvt
<apples.log
<SU000101.rtf
<SU000102.rtf
<………
<SL_APPLE
<logfile.txt
<apples.pvt
<apples.log
<SL000101.rtf
<SL000102.rtf
<………
<BW_APPLE
<logfile.txt
<apples.pvt
<apples.log
<BW000101.rtf
<BW000102.rtf
<………
<UA_APPLE
<logfile.txt
<apples.pvt
<apples.log
<UA000101.rtf
<UA000102.rtf
<………
A pnea
P ositive
P ressure
L ong-term
E fficacy
S tudy
QWB-SA Administration
Instructions
Purpose: To assess the subject’s overall quality of life and to perform the subsequent
cost-effectiveness analyses
Approximate Test Duration: 15 minutes
Administered: Self-administered the morning after the diagnostic PSG, the Twomonth Post-CPAP PSG and the Six-month Post-CPAP PSG. A certified APPLES staff
member should be available to present directions and answer questions while the
subject completes the questionnaire. It is also administered during the Four-month
Post-CPAP Follow-up Visit under the supervision of a certified APPLES staff member.
Sample Subject Verbal Instructions: This survey asks about health problems that
you have experienced in the last 3 days, not including today. Please answer all
questions by filling in the appropriate circle.
Staff Instructions: When completed, review the response to assure that only one
answer was selected for each question and that all questions were answered. See the
QWB-SA Administration Manual for further instruction on administration and scoring.
QWB-SA Form: We have received permission from Robert Kaplan to photocopy the
QWB-SA Forms.
Rev. 10/03
A pnea
P ositive
P ressure
L ong-term
E fficacy
S tudy
SAQLI Administration
Instructions
Purpose: To assess any differences in quality of life measures across and between
subjects. This questionnaire includes items that are important to patients with OSAS
and has been designated as an outcome measure for other OSAS clinical trials.
Approximate Test Duration: 20 minutes
Administered: By a certified staff member during the neurocognitive testing day for
the Diagnostic Appointment, Two-month Post-CPAP Follow-up Appointment and Sixmonth Post-CPAP Follow-up Appointment. For the Four-month Post-CPAP Follow-up
Visit, a trained APPLES staff member should administer the interview either prior to or
following the clinical evaluation.
Sample Subject Verbal Instructions: This questionnaire has been designed to find
out how you have been doing and feeling over the last 4 weeks. You will be questioned
about the impact that sleep apnea and/or snoring may have had on your daily
activities, your emotional functioning, and your social interactions, and about any
symptoms they might have caused.
Staff Instructions: A sheet with the three different colored response cards will be
provided to each clinical center.
The test must be administered by a qualified staff member who has been certified to
administer the test by the Quality Control / Quality Assurance Supervisor.
Rev. 10/03
A pnea
P ositive
P ressure
L ong-term
E fficacy
S tudy
SHQ Administration
Instructions
Purpose: To obtain additional information regarding the subject's sleep quality, sleep
duration, as well as the presence of any clinically significant sleep symptoms that could
indicate the existence of a sleep disorder besides OSAS. The Sleep Disorders
Exclusion List (Appendix 4C of MOP) reviews the sleep disorders that result in an
immediate exclusion of the subject.
Approximate Test Duration: 20 minutes
Administered: Self-administered during or following the clinical evaluation (e.g., in
the waiting area) or during Training Session One. A certified APPLES staff member
should be available to present directions and answer questions while the subject
completes the questionnaire.
Sample Subject Verbal Instructions: Please complete each question as thoroughly
as possible and to the best of your knowledge. Mark only one answer for each
question.
Staff Instructions: When completed, review the response to assure that only one
answer was selected for each question, that no fractions or decimals were used, and
that all questions were answered.
Rev.10/03
A pnea
P ositive
P ressure
L ong-term
E fficacy
S tudy
Sleep Log
Instructions
Purpose: To attain information about the subject's sleep schedule and to serve as a
reminder to participants that they should follow the study staff's instructions during
the week before each visit
Approximate Test Duration: 10 minutes per day
Administration: Subject will be asked to complete a one-week sleep log (SL) prior to
the Diagnostic Appointment, the CPAP titration, the Two-month Post-CPAP Follow-up
Appointment, the Four-month Post-CPAP Follow-up Visit and the Six-month Post-CPAP
Follow-up Appointment.
Samlpe Subject Verbal Instructions: To control for factors unrelated to OSAS that
may impact your performance it is important to have accurate information regarding
your sleep patterns for the week before your overnight sleep study. Please complete
this sleep log every morning and evening for 7 days before your sleep study. The last
night recorded will be the evening you spend in the lab and the sleep log will be
collected the next morning. Please review the form and let me know if you have any
questions.
Staff Instructions: Study staff will call each subject 7-10 days prior to each visit to
remind him or her to complete the SL. We will attempt to control night-to-night
variability by having the PSG technologist give each subject standardized instructions.
However, there will be no intervention to modify sleep times. Each subject will be
required to spend at least 7 hours in bed for the three nights prior to each follow-up
session.
The evening of the subject comes in for a sleep study, a staff member should review
the sleep log to verify that the subject spent the appropriate time in bed for the three
previous evenings. If the subject fails to meet this criterion, a study physician (CC
Director or other physician associated with the study) will determine if the laboratory
visit should be rescheduled, while with study staff will attempt to identify the
adherence problem and discuss strategies to avoid the problem for all future visits.
The morning after the study the sleep log is collected after the subject completes the
section regarding the previous evening.
Rev. 10/03
A pnea
P ositive
P ressure
L ong-term
E fficacy
S tudy
SSS Administration
Instructions
Purpose: To obtain information regarding the subject’s current level of sleepiness
Approximate Test Duration: 2.5 minutes
Administered: Self-administered under the supervision of the Daytime PSG
Technologist or other assigned APPLES staff member four times during the
neurocognitive test battery following the Diagnostic PSG, the Two-month Post-CPAP
Follow-up PSG and the Six-month Post-CPAP Follow-up PSG (prior to each MWT
session [1000, 1200, 1400, 1600])
Sample Subject Verbal Instructions: After sitting quietly for a minute or two,
review the list and check the circle that best matches your current degree of
sleepiness. Mark only one answer.
Staff Instructions:
answer was selected.
Rev. 10/03
When completed, review the form to assure that only one
A pnea
P ositive
P ressure
L ong-term
E fficacy
S tudy
SWMT Administration
Instructions
Purpose: To measure executive and frontal-lobe function before and after treatment
for OSAS with either Active or Sub-therapeutic CPAP. The SWMT is the primary
outcome measure for executive and frontal-lobe function.
Approximate Test Duration: 25 minutes
Administered: Three times during the daytime test battery of the diagnostic PSG,
the Two-month Post-CPAP PSG and the Six-month Post-CPAP PSG at for 10:25, 12:25,
14:25 and 16:25 hours
Staff Instructions: Be sure subject is comfortable and the computer station is
ergonomic. Be sure that you have the proper disk and a fully charged battery.
Refer to the SWMT manual for further instruction on test administration, data back up
and data transmission
Rev. 8/03
SWMT ADMINISTRATION INSTRUCTIONS
March 31, 2003
TRAINING SESSION ONE
1. Prior to subject arrival, label a floppy disk with the subject identification number, and insert floppy
disk into SWMT computer. Make note of the computer used on the subject’s case report form.
2. When subject arrives, briefly describe the SWMT tasks before launching the program:
As you know, you will be asked to perform a number of tasks each day that you
come to the lab/clinic for this study. Today I am going to show you how to do
those tasks, then have you practice them. The tasks that I am about to show
you now are concentration and memory tasks. You’ll have to concentrate on
each of these tasks for about 4 minutes at a time to remember where dots are
appearing on the computer screen.
The program will show you detailed instructions on how to do the tasks, but
first, we have to enter a little bit of information that will be important for us to
analyze the data later.
3. Launch CMRecorder from desktop shortcut. You will be asked to insert the subject’s floppy disk, press
OK. You will be told that the disk is empty, and that a new subject record will be created on the disk.
Press OK.
4. The “Select Subject” dialog will appear. Type subject identification number in the Subject ID box,
press OK. You will be asked if you would like to create a new record for the subject on the computer.
Press Yes.
5. You will be asked if you want to enter the patient’s medical information. Press No.
6. The session code dialog box will appear. The session code is irrelevant for practice sessions; press OK.
7. Allow the patient to complete the demographic questionnaire. If your patient has trouble reading the
questions, you may read the questions aloud to the patient. You may also type in the answers if the patient
has trouble typing.
8. Press OK to begin system self-calibration.
9. Allow the patient to complete the “day-specific” questionnaire, helping as necessary.
10. You will then be asked to provide some information about the recording – the viewing distance from the
patient’s nasion to the computer screen. Measure the distance between the nasion and the computer
monitor, be sure the subject is between 60 and 70 cm from the monitor. Enter the measured distance in
the dialog box. Explain the reason for this to the patient:
We want everyone in the study to see the task in the same way, so we want you to be
within a certain distance from the monitor. Is this a comfortable distance for you?
The patient should be seated 60-70 cm from the screen monitor and should be able to comfortably reach
the mouse. You may have to move the monitor back on the table to achieve these goals.
11. The task instructions will then appear. It may be helpful for you to give the patient a brief overview of the
task before the patient reads the instructions:
In this task, you will see a series of dots on the computer screen, one at a time. You have
to remember the position of each dot and compare it to the position of the previous dot.
This task is called the one back task because you have to compare the position of the dot
you are seeing with the one that occurred one trial back. The program has detailed
instructions on how to do the task and I will be here to answer any questions you have as
you go through the instructions.
Page 1 of 10
SWMT ADMINISTRATION INSTRUCTIONS
March 31, 2003
12. Allow the patient to read the task instructions. You may want to ask the patient to read the instructions
aloud to be sure that he or she is reading them. Answer any questions the patient has. If the patient has
trouble understanding the instructions, use the cue cards or any other strategy (such as doing the task with
the patient) to help the patient understand the task requirements. Be encouraging if the patient has
problems, tell the patient that the tasks are designed to be difficult for most people to do, that they do
require a lot of concentration, and that it is important that they try their best.
13. After the patient completes the detailed instructions, short (~1.5 minute) trial blocks will be presented
until the patient passes the performance criteria. Make note of the accuracy and reaction time (only the
top numbers on the behavioral summary screen) on the case report form at the end of each task. Tell the
patient to allow you time to write these numbers down, before pressing the button to continue. You may
want to have the patient read the numbers to you, if you are sitting too far from the monitor to see them.
14. Once the patient passes the performance criteria, a message will appear saying “You did well. Your
performance that time was xx%”. This will be followed by two full (4 minutes each) task blocks. Tell the
patient:
Now that you understand how to do this task, you will do a couple of longer blocks for
further practice. Each of these blocks lasts about 4 minutes, so you will have to keep
concentrating. At the end of each task, I have to write down your performance scores, so
be sure not to press the button to continue until I tell you I am ready. You may begin when
you are ready.
15. After the two 1-back practice blocks are completed, the instructions for the 2-back task will appear. You
may want to give the patient a brief overview of the task:
Now that you’ve learned how to do the 1-back task, you are going to learn how to do
another task that is similar, but a little more challenging. This task is called the 2-back
task. In the 2-back task, you have to compare the position of the dot you are currently
seeing to the position of a dot two trials previously. So you have to remember the
positions of two dots at a time. The program has detailed instructions on how to do the
task and I will be here to answer any questions you have as you go through them.
16. Have the patient read the task instructions aloud. Answer any questions the patient has. If the patient has
trouble understanding the instructions, use the cue cards or any other strategy (such as doing the task with
the patient) to help the patient understand the task requirements. Be encouraging if the patient has
problems, tell the patient that the tasks are designed to be difficult for most people to do, that they do
require a lot of concentration, and that it is important that they try their best.
17. After the patient completes the detailed instructions, short (~1.5 minute) trial blocks will be presented
until the patient passes the performance criteria. Make note of the accuracy and reaction time (only the
top numbers on the behavioral summary screen) on the case report form at the end of each task.
18. Once the patient passes the performance criteria, a message will appear saying “You did well. Your
performance that time was xx%”. This will be followed by two full task blocks (4 minutes each). Tell the
patient:
Now that you know how to do the 2-back task, you will do a couple of longer blocks of this
task for practice. Again, each of these blocks will last about 4 minutes. Be sure to allow
me time to write down your scores before you continue at the end of each task. You may
begin when you are ready.
In the rare event that a patient cannot pass the performance criteria (i.e. has performed 4-6 short blocks,
you have discussed the instructions with the patient, and you believe that the patient will not be able to do
better, you may chose to proceed with the full task blocks. Encourage the patient to keep trying by saying:
This task is designed to be very challenging. What matters most is that you do your best
on the task. We are now going to move on to the full practice blocks. You will do 2 blocks
Page 2 of 10
SWMT ADMINISTRATION INSTRUCTIONS
March 31, 2003
of this task, each will take about 4 minutes. Remember to try your best. If you ever get
confused during the task, stop responding and mentally start over – remember the
position of the dot you are currently seeing, and the position of the next dot, then start
responding again, comparing the position of that dot to the one two trials back.
19. After the tasks are completed, the closing session notes dialog will appear. The subject can now move
away from the computer, you may wish to give the subject a break while you briefly describe any
difficulties the subject encountered during the session (eg. any problems the patient had understanding the
tasks, any interruptions or special circumstances that occurred during the session) in the closing session
notes dialog. Make similar comments on the case report form.
20. Answer No to the query “Will the subject be recorded again today?” If you had to bypass the performance
criteria, make a brief note of this in the End of Day questionnaire (and on the case report form).
Otherwise press OK and the program will exit.
21. Store the floppy disk with the patient’s case report form in the subject source binder.
Page 3 of 10
SWMT ADMINISTRATION INSTRUCTIONS
March 31, 2003
TRAINING SESSION TWO
1. Prior to subject arrival, insert the patient’s floppy disk into SWMT computer. Make note of the
computer used on the subject’s case report form.
2. When subject arrives, remind the subject of the tasks before launching the program:
Do you remember the 1-back and 2-back tasks, where you had to remember
the position of the dot on each trial and compare it to the dot in the
previous trial or to the one two trials before? I am going to give you more
practice on these tasks, so that you will be an expert on them. You will do
one block of the 1-back task and two blocks of the 2-back task. Do you
remember how to do the tasks? Do you want to review the instructions?
If the patient wants to review the instructions, use the cue cards to explain the tasks. You
cannot present the detailed instructions within the program again.
3. Launch CMRecorder from desktop shortcut. You will be asked to insert the subject’s floppy disk, press
OK.
4. Examine the subject identification number in the Subject ID box to ensure you have the correct floppy.
Press OK.
5. You will be asked if you want to review the patient’s demographic information. Press No.
6. The session code dialog box will appear. The session code is irrelevant for practice sessions; press OK.
7. Press OK to begin system self-calibration.
8. Allow the patient to complete the “day-specific” questionnaire, helping as necessary.
9. Measure the distance between the patient’s nasion and the center of the computer screen, enter the
measured distance in the dialog box.
10. Have the patient read aloud the introductory screen prior to the 1-back task. Ask the patient if he
remembers how to do that task, or if he has any questions, review the instructions, using cue cards, if
necessary. Tell the patient he can begin when ready, and remind the patient to allow you time to write
down the performance scores at the end of the task. If the patient scores much worse than he did on the
last practice session, try to determine the reason for this:
The last time you did this task, your performance was a bit better. Why do you think your
score was lower this time? Can you tell me how you were doing the task? (try to determine
the cause of the problem, perhaps the patient did a 2-back instead of a 1-back, or forgot that they
had to respond to every stimulus). Let’s just review to make sure you remember what you
are supposed to be doing during the task (review the task instructions with the cue cards).
When you feel the patient is ready to proceed, remind the patient how to do the 2-back (the 1back task will not be repeated, so make a note to review the task instructions with the patient
prior to the warm-up 1-back on the first session of the test day).
11. Have the patient read aloud the introductory screen prior to the 2-back task. Ask the patient if he
remembers how to do that task, or if he has any questions. Review the instructions, using cue cards, if
necessary. Tell the patient he can begin when ready, and remind the patient to allow you time to write
down the performance scores at the end of the task. If the patient scores much worse than he did on the
last practice session, try to determine the reason for this, as discussed above for the 1-back task. Proceed
to the next 2-back task when ready.
Page 4 of 10
SWMT ADMINISTRATION INSTRUCTIONS
March 31, 2003
12. When the Closing session notes text box appears, the subject may move away from the computer and you
should describe any problems encountered during the session (make similar notes on the case report
form).
13. You will be asked if the subject will be recorded again that day. Answer No.
14. You may make a brief note of any unusual occurrences in the “End of day” questionnaire if wish,
otherwise press OK and the program will exit.
15. Remove the patient’s floppy disk and store along with the patient’s case report form in the subject source
binder.
Page 5 of 10
SWMT ADMINISTRATION INSTRUCTIONS
March 31, 2003
TEST DAYS
Session One
1. Prior to subject arrival in the test room, plug a fully charged battery into the Adaptor, and ensure the
Adaptor is connected to the tinyamps.
2. Insert the patient’s floppy disk, make note of the computer used on the case report form.
3. When the subject arrives, move the reference (A1 & A2), and ground electrodes from the Alice jack
box and plug them into the SWMT jack box. Securely plug the SWMT jack box into the tinyamps,
and velcro the tinyamps to the jack box. Ensure the jackbox and tinyamps are positioned comfortably
for the patient, and that all the electrode wires are bundled out of the patient’s way. Tell the patient:
Do you remember the 1-back and 2-back tasks? Today when you do these tasks, we are going
to record your brain waves at the same time. It will take a couple of minutes for the program to
check all the connections.
4. Launch the CMRecorder program from the shortcut on the desktop.
5. Ensure the correct subject identification number appears in the subject selection dialog.
6. Answer No to the edit subject demographic information query.
7. The Select Session Code dialog will appear. Do not update the session number. The first session of
the first test day should be session 1.
8. The program will automatically check the hardware connections, calibrate the amplifier gains, and
check the subject impedances. If any hardware problems are detected, informative warning messages
will appear. You will be warned of any impedance problems detected after the Subject Day-specific
questionnaire.
9. Have the patient complete the Subject Day-specific questionnaire.
10. If impedance problems were detected during the hardware check, warning messages will occur. You
may wish to tell the subject:
It seems that some electrodes do not have a very good connection. The electrodes need to
be securely attached to the head, with gel in between your scalp and the electrode. Poor
connections can occur if hair is in the way, or if the electrode is not sitting flat against the
head. I am going to try to fix the problem.
11. The EEG traces will then appear. Perform the biological calibration / signal check – (evaluate the
EEG while patient blinks and moves eyes to ensure electrodes are plugged in correctly and signal
quality is good). Since this is the first time the patient will see their EEG during this task, use this
opportunity to stress how important it is that the patient remain still during the test. After you have
completed the biocalibration steps, but before you press Yes to continue, tell the patient:
These traces are the signals that are coming from your head. If you blink, you can see
these big bumps in the electrodes over your eyes and the front of your head. The signals
that come from the brain are much, much smaller than this (if alpha is recognizable in the
traces you may want to point that out to your subject as an example of activity from the brain). If
you move, or grit your teeth, or scratch at an electrode, you can see how much this
disturbs the traces. That is why it is very important for you to sit as still as possible while
you are doing the tasks. When you move your eyes around, big disturbances occur on the
electrodes beside your eyes (indicate the disturbances on BPF9, Fp1 and Fp2 when the patient
moves the eyes). So it is important that you always keep your eyes on the stimulus in the
middle of the screen – that stimulus will also remind you of which task you are doing. In
the 1-back task, the stimulus will be the number 1, in the 2-back task it will be the number
2. In both tasks, it is important to keep your eyes on that number in the middle of the
screen. Do not move your eyes to look at the dots during the task. You can blink normally.
Page 6 of 10
SWMT ADMINISTRATION INSTRUCTIONS
March 31, 2003
After you do the 1-back and 2-back tasks, we will record your EEG while you sit quietly
with your eyes open and closed. In the eyes open task, there will be a cross in the middle
of the screen. It is important that you keep your eyes on the cross in the middle of the
screen, so that big disturbances do not occur on the electrodes around your eyes. You
can blink normally, but do not look away from the cross.
12. Measure the distance between the patient’s nasion and the center of the computer monitor and enter
the number in the dialog box.
13. Make note of any problems with hardware set up or electrodes (if you had to modify the acceptable
impedance limits to proceed with an electrode with high impedance, note that here and on the case
report form).
14. Tell the subject: You will now do a short warm-up block of the 1-back task. Do you remember
how to do this task (review instructions if patient had problems with the task in the second practice
session). It is important that you sit as still as possible during the task because the program
will monitor the quality of the EEG data, and if large artifacts are seen, like the kind I just
showed you when you moved around, the task will be interrupted. When the task ends, I have
to write down the performance scores, so please wait until I tell you that I’m ready before you
continue on after the task.
15. Have the subject read aloud the task instructions to be sure that he or she reads them. If the task is
interrupted due to poor data quality, tell the subject what might be the cause (subject movement or
muscle tension, sweat artifact if the room is too warm, hardware problems – see the SWMT manual
for possible reasons for the types of error messages that may occur here). Fix the problem and the task
will be repeated. If the task is interrupted again, and you cannot fix the problem, you may have to
disable QA, the task will be repeated but it will not be interrupted if problems are detected. You will
be warned about the problems at the end of the task. See the SWMT manual for more information.
16. At the end of the task, the impedances will be measured again. The EEG traces will appear. You will
be asked to wait until the traces settle before hitting OK. Make sure the subject does not hit OK until
the traces have settled into relatively straight lines across the screen.
17. Tell the subject: You will now do a short warm-up block of the 2-back task. Again, it is
important that you sit as still as possible during the task because the program will monitor the
quality of the EEG data and will interrupt the task if large disturbances occur. When the task is
finished please wait until I write down the performance scores before you continue.
18. The impedances will be checked again prior to the next task. If impedances are fine, no warning
messages will occur, and the user will be asked to allow traces to settle before continuing. Make sure
the patient does not press OK until the EEG traces appear straight and evenly across the screen.
19. Tell the subject: The full task battery will now be presented. You will do one 4 minute block of
the 1-back task, then a 4 minute block of the 2-back task. After that you will be asked to rest
quietly with your eyes open then with your eyes closed. Altogether, the task battery lasts
about 12 minutes. Please read the instruction screens to me at the beginning of each task,
before you start it. When the task is finished please wait until I write down the performance
scores before you continue. Remember to sit as still as possible during the tasks, and to keep
your eyes on the stimulus in the center of the screen.
If the subject falls asleep during the tasks, wake the subject up by reminding him or her to respond to
every stimulus. If the subject closes his or her eyes during the eyes open task, remind the subject to
keep the eyes open.
20. Have the subject complete the subjective questionnaire at the end of the task battery.
Page 7 of 10
SWMT ADMINISTRATION INSTRUCTIONS
March 31, 2003
21. The Closing Session Notes dialog will then appear– describe any problems encountered (note here if
impedance limits were modified, if you disabled QA interrupt, or if any other problems occurred).
NOTE: the data have not yet been saved. Do not disconnect the patient from the tinyamps yet. Use
the “End of Day data” questionnaire (#25) to write any notes about the recording, or the patient, that
you do not want the patient to see.
22. The final impedances will be read and the file will be closed and saved to disk.
23. If problems with data quality were detected during the task battery you will receive informative
warning messages and be asked to repeat the tasks. Do not repeat the tasks, but make note of the
warning message on the case report form, and in the “End of Day” questionnaire, that you can bring
up by responding No to the query will the subject be recorded again today (see #25).
24. You will be instructed to disconnect the patient from the recording equipment. The patient can now
move away from the computer. (Remember to unplug the reference and ground electrodes from the
SWMT jack box and plug them back into the Alice jack box).
25. You will be asked if the subject will be recorded again that day. If you answer No, the end of day
questionnaire will appear. Briefly note the occurrence of any data quality warning messages, or any
problems that the subject had with the tasks, that you did not already mention in the closing session
notes. Regardless of whether the subject will be recorded again that day, you may enter No to access
the “End of Day” dialog box; it will not affect the sequence of events in subsequent sessions.
26. Leave the floppy disk in the computer until the end of the test day, and leave the battery connected.
Sessions 2-4
1. When the subject arrives, move the reference (A1 & A2), and ground electrodes from the Alice jack
box and plug them into the SWMT jack box. Securely plug the SWMT jack box into the tinyamps
amplifier, velcroing the tinyamps to the jack box, and ensuring the jackbox and tinyamps are
positioned comfortably for the patient, and that all the electrode wires are bundled out of the patient’s
way.
2. Launch the CMRecorder program from the shortcut on the desktop.
3. Ensure the correct subject identification number appears in the subject selection dialog.
4. Answer No to the edit subject demographic information query.
5. The Select Session Code dialog will appear. Do not update the session number unless the last session
was skipped.
6.
Wait while the program checks the hardware connections, calibrates the amplifier gains, and checks
the impedances.
7. Perform the biological calibration / signal check to ensure all electrodes are properly connected.
8. Measure the distance between the patient’s nasion and the center of the computer monitor and enter
the number in the dialog box.
9. Make note of any problems with hardware set up or electrodes (if you had to modify the acceptable
impedance limits to proceed with an electrode with high impedance, note that here and on the case
report form).
10. Tell the subject: You will now do a short warm-up block of the 2-back task. Remember to sit still
during the task because the program will monitor the quality of the EEG data, and will
interrupt the task if artifacts are detected. When the task ends, I have to write down the
performance scores, so please wait until I tell you that I’m ready before you continue on after
Page 8 of 10
SWMT ADMINISTRATION INSTRUCTIONS
March 31, 2003
the task. (if the patient becomes impatient at having to do the warm-up task in later sessions, after
having done a couple of task blocks already in the day, explain to the patient that the warm-up is
important for the program to be sure that the brain signals are being recorded properly while the
subject does the task).
11. At the end of the task, the impedances will be measured again. The EEG traces will appear. You will
be asked to wait until the traces settle before hitting OK. Make sure the subject does not hit OK until
the traces have settled into relatively straight lines across the screen.
12. Tell the subject: The full 12 minute task battery will now be presented. Please read the
instruction screens to me at the beginning of each task (after a couple of sessions, this might
become too annoying for the subject, so you could ask the subject just to tell you which task he or
she is doing – i.e 1-back, or eyes open, so that the subject doesn’t just breeze by the instructions and
forget which task is being presented). After each task, please give me time to write down the
performance scores before you continue. Remember to try not to move around during the
tasks, and keep your eyes on the stimulus in the center of the screen. You may begin when
you are ready.
If the subject nods off during the tasks, remind the subject to respond to every stimulus. If the subject
closes his or her eyes during the eyes open task, remind the subject to keep the eyes open. If at any
time during the test day, the subject becomes restless or bored, be encouraging and motivating. Tell
the subject it is important that they do the best they can on each task.
13. Have the subject complete the subjective questionnaire at the end of the task battery.
14. The Closing Session Notes dialog will then appear– describe any problems encountered (make sure to
note here if impedance limits were modified, if you disabled QA interrupt, or if any other problems
occurred). Do not disconnect the patient from the tinyamps yet.
15. The final impedances will be read and the file will be closed and saved to disk.
16. If problems with data quality were detected during the task battery you will receive informative
warning messages and be asked to repeat the tasks. Do not repeat the tasks, but make note of the
warning message on the case report form, and in the “End of Day” questionnaire, that you can bring
up by responding No to the query will the subject be recorded again today (see #25) (it is fine to
respond No to that query even if the subject will be recorded again that day).
17. You will be instructed to disconnect the patient from the recording equipment. The patient can now
move away from the computer. (Remember to unplug the reference and ground electrodes from the
SWMT jack box and plug them back into the Alice jack box).
18. You will be asked if the subject will be recorded again that day. If you answer No, the end of day
dialog will appear. Briefly note the occurrence of any data quality warning messages, or any problems
that the subject had with the tasks. Regardless of whether the subject will be recorded again that day,
you may enter No to access the “End of Day” dialog box; it will not affect the sequence of events in
subsequent sessions.
19. Leave the floppy disk in the computer until the end of the test day.
20. At the end of session 4 remove the floppy disk and store it with the case report form in the subject’s
source binder.
21. Disconnect the battery from the Adaptor and ensure the battery gets recharged prior to the next use.
22. Insert a blank CD disk into the disk drive. Launch the CD_Backup program. Name the CD according
to the date and the computer. When the CD back up process is complete (in about 2-3 minutes) store
the CD in a safe place. Mail one of the back up CDs per week to SAM Technology in the mailers and
envelopes provided.
Page 9 of 10
SWMT ADMINISTRATION INSTRUCTIONS
March 31, 2003
(note: these instructions cover routine test administration. If problems are encountered, see the SWMT
manual for more detailed information).
Page 10 of 10
A pnea
P ositive
P ressure
L ong-term
E fficacy
S tudy
WASI Administration
Instructions
Purpose: To estimate intelligence level
Approximate Test Duration: 30 minutes
Administered: A psychological technician or other trained technologist should
administer this test either during Training Session One, Training Session Two or during
the Psych 1 time slot from 11:05-11:35 am during the diagnostic neurocognitive
testing day
Staff Instructions: Test must be administered by a qualified staff member who has
been certified to administer the test by the Quality Control / Quality Assurance
Supervisor.
See the WASI Administration Manual for further instruction on
administration and scoring.
WASI Forms: An original form must be used for every administration due to
copyright issues. Forms, manuals and kits can be ordered from
http://www.psychcorp.com.au/wasi.html.
Rev. 8/03
Grant #: 1 U01 HL68060-01A1
10F.
APPLES Manual of Operations
PI- Dement, William C.
CENTRAL SCORING GUIDE
Attached
May 25, 2004
CONFIDENTIAL – NOT FOR DISTRIBUTION
Appendix 10, Page 585
Sleep Heart Health Study
Sleep Reading Center
Case Western Reserve University
Cleveland, Ohio 44106
READING CENTER MANUAL OF
OPERATIONS
SHHSII/Manuals/Srcmop2002
Rev. May 10, 2002
SRC Manual of Operations
1
Table of Contents
Page Number
Dedication/Acknowledgements
3
1. Objectives
4
2. Structure
4
3. Certification and QA
3.1 Certification of Chief Polysomnologist
3.2 Certification of Scorers
5
4. Quality Assurance and Quality Control
4.1 Weekly QA Exercises at the SRC
4.2 Tracking of QA/QC Data
4.3 Outlier Checks
4.3.1 Study-by-study outlier review
4.3.2 Batch outlier review
4.4 External Review of Scoring Reliability
6
5. Data Processing
5.1 Study Receipt
5.2 Offline Automatic Analysis
5.3 Preliminary Review
5.4 Feedback of Data to the Sites
5.5 Assignment of Studies to Scorers
5.6 Quality Grades (QS Form)
5.7 Scored Sleep Data
5.8 Archival of Data
8
6. Scoring Procedures
6.1 Overview of Scoring
6.2 Scoring Rules
6.2.1 Rules for assigning epoch-specific sleep score
6.2.2 Sleep onset
6.2.3 EEG arousal
6.2.4 Rules for assigning sleep stages when arousal
is present in the epoch
6.2.5 Episodic events in sleep
6.2.6 Rules for assigning sleep stages
6.2.7 Scoring respiratory events
6.2.8 Dealing with ambiguous respiratory events
11
15
16
17
22
23
7. QS Form - Scoring Notes
23
SHHSII/Manuals/Srcmop2002
Rev. May 10, 2002
SRC Manual of Operations
13
14
14
2
Dedication
This manual is dedicated to the memory of Kathleen Fisher, who served as Chief
Polysomnologist for the SHHS Reading Center during its formative period. Kathleen’s skills in
polysomnography and quest for excellence were invaluable in the development of a dedicated
Reading Center staff. Her input was also invaluable for the development of detailed methods for
dealing with the tremendous amount of polysomnographic data that needed to be processed and
analyzed. Kathleen embodied an enthusiasm for research, especially related to the goals of
understanding the health impact of sleep-disordered breathing. The Reading Center staff was
privileged to have benefited from her generosity, kindness and intelligence.
Acknowledgments
We are deeply indebted to the classic work of Drs. Rechtschaffen and Kales, whose manual of
sleep scoring has stood the test of time. We also acknowledge the helpful input of the SHHS
Polysomnography Subcommittee (Drs. William Bonekat, Daniel Gottlieb, Conrad Iber, James
Kiley, Stuart Quan, David Rapoport, Mark Sanders, and Philip Smith).
Reading Center Staff and Authors
(*Current staff)
Jean Arnold*, Kathleen Fisher, Guang Shen Liao, Rawan Nawabit*, Susan Redline*, Thomas
Rosenbalm, Carl Rosenberg*, Joanna Romaniuk*, Nancy Scott*, Sinziana Seicean*, Kingman
Strohl*, and Susan Surovec*.
A Note to Users
The procedures and scoring rules developed and/or adapted for the Sleep Heart Health Study
were done for the purposes of obtaining consistent (reliable), objective data for large numbers of
individuals studied with the same equipment in unattended settings for the purposes of
developing a large and versatile research database. Records were scored without knowledge of
the demographic or clinical history of participants and without any attempt to diagnose clinical
disorders. A summary of the ability of these procedures, implemented early in our study, to
achieve reliable data can be found in Sleep 21: 749- 758. 1998. Some of the scoring rules are
specific to the use of Compumedics software and may need to be modified when using different
systems. The recording montage used included: C3/A2 and C4/A1 EEGs; right and left
electrooculograms (EOGs); a bipolar submental electromyogram (EMG); thoracic and abdominal
excursions (inductive plethysmography bands, not summed); “airflow” (detected by a nasal-oral
thermocouple [thermistor used after 2001]), oximetry, ECG and heart rate (using a bipolar ECG
lead); body position; and ambient light (on/off, by a light sensor secured to the recording
garment).
SHHSII/Manuals/Srcmop2002
Rev. May 10, 2002
SRC Manual of Operations
3
READING CENTER MANUAL OF OPERATIONS
1. OBJECTIVES
The Sleep Reading Center (SRC) for the SHHS will:
·
Provide centralized training for aspects of SHHS related to the performance of
polysomnograms (PSGs).
·
Provide ongoing technical support for the performance of sleep studies, providing
“second line” advice regarding troubleshooting of problem studies (after consultation
with local resources), and acting as a liaison with the equipment supplier to identify
equipment problems and solutions.
·
Provide timely review (for quality and medical alerts) and scoring of all records,
generating reports needed for participant feedback and data files for central
(Coordinating Center - CC) processing.
·
Provide complete scoring of all sleep studies, with generation of reports that summarize
key sleep and respiratory data.
·
Participate in on-going quality assurance efforts to maintain high levels of scoring
accuracy and technical performance of tests at the field sites. These include assistance in
trouble-shooting site-specific and study–wide problems, perform site visits, report
generation, lead regular conference calls with technicians and members of a
Polysomnography SubCommittee.
·
Produce and archive a clean, edited data set of raw and scored poylsomnographs.
·
Maintain a data dictionary relevant to polysomongraph variables.
·
Assess comparability of signals collected for SHHS-2 as compared to SHHS-1.
2. STRUCTURE
The Sleep Reading Center (SRC) will be directed by Susan Redline, MD, MPH. She will hire
and assist in the training of an Administrative Assistant, a Chief Polysomnologist, and PSG
scorers, and be ultimately responsible for all goals specified above.
Physician investigators will assist in the development of scoring procedures. They will
participate in weekly staff meetings that discuss issues with scoring and quality control.
SHHSII/Manuals/Srcmop2002
Rev. May 10, 2002
SRC Manual of Operations
4
The Chief Polysomonologist (CP) will be directly responsible for training and certifying scorers
and centrally trained field research assistants. S/he will participate in the development of
teaching materials for training and for procedures for certifying scorers and assuring high levels
of accuracy and reproducibility of scoring procedures. S/he will review each PSG record within
72 hours of its receipt at the SRC, identifying medical alerts for priority scoring, and providing
feedback on the quality of studies received to field site technicians, and assist in identifying
equipment problems. S/he will triage studies for formal scoring to the scorers, monitoring their
performance, and providing support for interpreting ambiguous studies. S/he will implement ongoing procedures for assuring accuracy and reproducibility of scored procedures.
Three to five scorers will be charged with the responsibility of directly scoring all records. They
will be charged with the task of scoring 2-3 records/day and participating in scoring QA
procedures.
3. CERTIFICATION AND QA
3.1. Certification of the Chief Polysomnologist.
The CP will be an experienced polysomnologist (>5 years experience in scoring). She will be
required to:
·
·
·
Demonstrate a complete understanding of scoring rules and ability to articulate reasons for
assigning epoch by epoch codes for sleep staging and respiratory events scoring.
Demonstrate a level of agreement (within 10% for summary respiratory disturbance index
(RDI) and sleep stages and 15% level of agreement for arousal index) with a second
experienced polysomnologist (each scoring the same 10 records “blinded”).
Demonstrate a 5% level of agreement (with-in scorer reliability) by scoring the same 10
records, at least one week apart.
3.2. Certification of Scorers.
Each scorer will be required to demonstrate a complete understanding of scoring rules and ability
to articulate reasons for assigning epoch by epoch codes for sleep and respiratory scoring. This
will be judged by review of several records with the CP or a physician-investigator.
Each novice scorer will be required to score 50 records under the supervision of a certified
scorer. Ten of these records will be selected from a standardized score set. Data from these 10
records must show a 10% level of agreement with the CP or a senior scorer for respiratory events
and sleep stages and a 15% level of agreement for arousals.
The CP (or designee) will review (epoch by epoch) the first 10 records scored by each novice
scorer after certification. After that she will check score a randomly chosen 20% of the first 100
records.
SHHSII/Manuals/Srcmop2002
Rev. May 10, 2002
SRC Manual of Operations
5
4. QUALITY ASSURANCE AND QUALITY CONTROL.
4.1. Weekly QA Exercises at the SRC
Weekly scorers’ staff meetings will be conducted at the SRC, with dedication of between 1.5 to 3
hours of time per week for the scorers to meet and discuss scoring issues. The weekly exercises
will be organized by the Chief Polysomnologist, with topics that will reflect ongoing needs as
identified by the staff or by the CC/PSG Committee. These exercises will include:
·
·
·
·
scoring of randomly chosen epochs;
scoring of problem records/epochs;
discussions of any problematic rules/examples identified during scoring
rotating “paired” scoring exercises
Exercises will include individual scoring with follow-up discussion of any discrepancies in
assigned scores. A discussion, with participation of SRC investigators, will establish a
“consensus” score for discrepant records. Results of any discrepancies between scorers and the
Chief Polysomnologist or between any scorers will be reviewed at weekly meetings with
investigators. The results of the deliberations will be kept on file. This will include copies of
ambiguous records and a summary of any arbitration.
Examples of organized meetings include:
·
QA Exercises: At least monthly, individual scorers will score the same 50 epochs from a
selected study. Most studies for QA scoring will be chosen randomly; however, scorers also
will identify problematic studies that may show useful training/teaching points during QA
exercises. Scoring of such designated studies will be recorded on an epoch by epoch basis.
Differences in any epoch or event assignment between scorers will be discussed during the
weekly QA meeting. Results of this discussion will be noted on the separate form (group
consensus). When a group consensus cannot be reached, the epoch or event will be
designated “indeterminate”. Data will be entered into a database and summarized quarterly
for internal QA tracking.
·
Scoring Exercises: On the weeks when no QA exercise is performed, 30-60 minutes of paired
scoring (one scorer scoring, one watching) or team scoring (with group members acting as a
single unit) will be done. Noted differences will be discussed after the scoring exercise.
Scorers will rotate roles, partners, and teams so that all interactions occur over any given
time period.
·
Studies which pose difficulties in scoring or present interesting problems will be reviewed by
the entire SRC staff during weekly meetings. Minutes from these meetings and printed
copies of problem epochs will be maintained.
SHHSII/Manuals/Srcmop2002
Rev. May 10, 2002
SRC Manual of Operations
6
4.2. Tracking of QA/QC Data
The Chief Polysomnologist will track two types of data: data from the actual scored SHHS-2
records and data generated during QA exercises. Using actual scored SHHS-2 data, the overall
mean RDI, sleep stage values and arousal indexes will be tracked for each scorer. If average
values differ by > 15 % for any given scorer, those records will be reviewed by the Chief
Polysomnologist. The SRC Director will determine whether re-training and re-standardization
are required. Using data from the QA exercises, levels of agreement will be determined among
scorers and trends tracked over time. Any scorer identified to deviate excessively (>10% from
the consensus statement) on 3 consecutive exercises will be “re-trained.” “Re-training” will be
considered successful if review of at least 5 additional studies demonstrates no deviation from
scoring protocol, and the subsequent QA exercises show no deviations in performance compared
to scoring assignments made by the other scorers.
At monthly QA meetings, the statistics summarizing inter-and intra-scorer variability will be
reviewed by the SRC staff. They will identify any explanations for differences. If differences
between scorers can not be explained by real differences in the studies assigned to any given
scorer in any given time period, scorers noted to score differently will score together,
concentrating on the areas where differences were noted. The Chief Polysomnologist will review
consecutive records and reinstruct the scorer. Subsequent scoring will be monitored until
conformity is demonstrated.
4.3. Outlier Checks
4.3.1 Study-by-study outlier review
After each study is scored and an initial report is generated, the scorer will use a computer
program to identify extreme outliers. These entries will be reviewed and the results of this
review will be noted on a PSG scoring form. New reports will be generated if any editing of the
record is required.
4.3.2 Batch outlier review
On a weekly basis, prior to sending reports to sites, the reports will be subjected to a secondary
review for outliers. Any records with outliers so identified will be checked (QS form/log book)
to ascertain that this record was previously identified as containing an outlier, with adequate
documentation of the problem.
On a monthly basis, scored PSG data will be imported into a permanent SAS file. Prior to
importing these data, it will be subjected to a third check for outliers.
4.4. External Review of Scoring Reliability
The Coordinating Center and Polysomnography (PSG) Committee will establish methods for
tracking scoring reliability and drift. This includes re-processing of records for reliability
exercises and generation of summary data for each scorer. The overall mean for: RDI, sleep stage
percentage, and arousal indexes will be calculated for each scorer over discrete time periods
SHHSII/Manuals/Srcmop2002
Rev. May 10, 2002
SRC Manual of Operations
7
(monthly to quarterly) and reported to the PSG Subcommittee/Coordinating Center (CC). Intraand inter-reader differences in the summary data for RDI, sleep stages, and arousal indices will
be determined. The same mean values will be calculated for each site in the same periods of the
time. The PSG Subcommittee/CC will monitor intra- and inter-reader reliability to determine the
threshold for requiring remediation, including retraining or removing a reader.
The PSG Committee, in conjunction with the Coordinating Center (CC) may design a formal
reliability study of scoring. For example, a sample of previously read PSG studies will be
assigned a new “dummy” identification number and be assigned to the scorers for repeat scoring.
Scoring of these studies will be integrated into the normal work flow to minimize their likelihood
of being identified as a special study. Studies will be assigned to a different reader to define
inter-reader reliability. Studies will be also assigned to the same reader at defined time periods
to define intra-reader reliability.
Site visits, coordinated by the CC, will occur as directed by the Steering Committee.
5. Data Processing
5.1. Study Receipt
Upon receipt of studies at the Reading Center all zip cartridges will be scanned for viruses. The
Study Receipt form will be completed, including the following information: Field Center ID,
Participant ID, Alpha Code, Study Date, Zip cartridge number, date received, Monitor/Headbox
ID, and Technician ID. If there is a discrepancy between the data contained the Signal
Verification Form and the Compumedics Sleep Study recorded file, an e-mail will be sent to the
Site Coordinator requesting clarification. If any site is noted to have a significant number of
discrepancies in the data submitted, the Coordinator at the site will be contacted by the SRC to
request they identify source and report action taken to correct. The data from the study receipt
form will be entered into the Receipts table database.
The Signal Verification (SV) Form and Sleep Study Evaluation (SE) form for studies that have
been evaluated at the site and determined to be Failed will be sent to the SRC along with the
weekly zip cartridges. This data will also be entered into the Receipts table database when
received, indicating study was Not Sent and coded with a reason for the failure.
5.2. Offline Automatic Analysis
This Compumedics program must be run prior to review of studies and final scoring to allow
visualization of signals and graphic screens. Automatic sleep staging and respiratory scores are
generated during the process. These data will not be used as final scores. (Offline Analysis
detailed procedures are located in Appendix).
SHHSII/Manuals/Srcmop2002
Rev. May 10, 2002
SRC Manual of Operations
8
5.3. Preliminary Review
After offline analysis of the record, the CP will then review each study to determine if overall
quality is sufficient to be scored (passed/failed), and identify any potential medical alerts
(defined as preliminary RDI >45).
In addition, the CP will note any signal quality issues,
possible monitor malfunctions, and recommendations for electrode replacements on the Receipt
form.
Minimal criteria for study acceptability: The record must contain at least 4 hours of scorable
EEG, oximetry and respiratory data (either airflow, thoracic or abdomen) between (edited) lights
off and lights on (Total Recording Time). Recorded time after final awakening will not
contribute to this time. Two continuous blocks of scorable data, each at least 2 hours long are
required to consider study acceptable for scoring.
5.4. Feedback of Data to the Sites
After preliminary review by the CP is completed, the pass/fail status of the record is entered into
the Receipts table database along with any comments and feedback notes regarding quality of the
study and equipment troubleshooting. On a weekly basis the following reports are e-mailed to
the site coordinator:
Record of Receipts - Lists Participant ID, Study Date, Date Received at SRC,
Zip Cartridge Number, Monitor ID, Headbox ID, Tech ID, and Pass/Fail Status.
Preliminary Study Quality Report - Contains Participant ID, Study Date, Tech ID,
Pass/Fail status and Comments from the CP regarding study quality and/or reasons
for failure.
The site coordinator is to verify that all information on the Record of Receipts is accurate and
notify the SRC of any changes or corrections to be made. The Preliminary Study Quality Report
should be made available to the field site technicians and quality issues reviewed and discussed.
Failed studies are removed from the zip cartridges prior to scorer assignment and archived to
CDs for troubleshooting exercises and review.
5.5. Assignment of Studies to Scorers
Potential Medical Alerts - Studies identified as potential medical alerts will be triaged for
immediate full scoring (within 48 hours of assignment to scorer). Once fully scored and
determined to meet criteria for Medical Alerts (final RDI > 50, time in desaturation of <70% for
>10% TST, or average heart rate > 150 BPM or <30 BPM for 2 minutes), a physician
investigator will be asked to review the study. If the medical alert is ascertained, it will be
logged into a Medical Alert Log and the site will receive the Participant Feedback Sleep Report
and quality grades (QS form) with the regular weekly reports.
All remaining studies are scored based on date received. Bi-monthly review of scored studies
by site by scorer is done to maintain equal distribution of studies from all sites among the
scorers.
SHHSII/Manuals/Srcmop2002
Rev. May 10, 2002
SRC Manual of Operations
9
5.6.
Quality Grades (QS Form; Sleep Quality Form)
The quality of each signal and overall study quality will be assessed at the time of scoring of the
record. The Scorer will code each channel of information according to the duration of i)
scorable signals; ii) duration of artifact free signals during sleep, and iii) an overall QA grade to
each study. The total duration of the study (from the edited lights off to the lights on) and the
total duration of sleep will also be indicated. Scoring notes regarding staging, event
identification, outliers, and specific physiologic signal issues are also recorded on the QS form.
(See Appendix for sample form and more detailed description of criteria for grades and scoring
notes.)
All data contained in the QS form (quality grades and scoring notes) will be entered in the QS
table database which contains only passed scored studies.
5.7. Scored Sleep Data
After full scoring, the scorer will generate:
·
SHHS Participant Feedback Report using WORD (rtf format), that contains summary
sleep data. Data will be displayed in two parts (top/bottom of form), including the RDI
(the number of apneas and hypopneas per hour of the sleep associated with a
desaturation > 3%), a summary of the desaturation profile, time in REM/Non-REM
sleep, stage distributions and the arousal index. The top half of the report will be used in
the Participant Feedback Letters, and the bottom half (containing stage distribution and
arousal indices) can be used in communications with local physicians.
·
SAS report containing >760 variables.
·
Completed QS form containing all quality grades and scoring notes.
The Sleep Data Summary Report and QS Report are e-mailed to each site on Mondays following
the week scored (generally within 12 weeks of receipt of the SRC, except for studies which are
triaged as possible Medical Alerts, which will be returned within one to two weeks of receipt).
5.8. Archival of Data
After QS data has been entered and weekly reports are sent to sites, the complete study folder
containing the raw data file, scored files, sleep study report, and the SAS report is placed in a site
directory for the creation of CDs. When sufficient studies have been scored for a particular site
(15-20 studies), they will be archived onto CDs (in triplicate). Copy A will be retained at the
SRC, Copy B will be sent to the site along with zip cartridges that can now be reused, and Copy
C will be sent to the Cordinating Center.
The summary scored data (>760 SHHS variables) are output as individual .txt files. After outlier
checks, studies are imported on a monthly basis into a SAS file. This file is sent periodically to
the CC for merging with the main SHHS dataset.
SHHSII/Manuals/Srcmop2002
Rev. May 10, 2002
SRC Manual of Operations
10
6.
SCORING PROCEDURES
6.1. Overview of Scoring.
The Compumedics software system will be used to process all the records. Scorers will review
the record using a computer monitor in two passes. First, computer generated scoring of
respiratory events during the “offline” processing will be deleted. Then during the first pass,
sleep stages and arousals will be marked manually on a (30 s. timebase) epoch by epoch basis.
During the second pass, respiratory signals will be displayed (2 or 5 min. timebase), respiratory
events will be manually marked, and oxygen saturation data edited.
During manual scoring, the following are primary “events” that are identified:
Sleep stages will be identified for each 30 second epoch using Rechtshaffen and Kales criteria
(Rechtshaffen A, Kales A. A Manual of Standardized Terminology Techniques And Scoring
System for Sleep Stages in Human Subjects. Washington, DC: US Government Printing Office,
1968).
Arousals will be characterized by the ASDA (now American Academy of Sleep Medicine)
criteria (The Atlas Task Force, EEG Arousals: Scoring Rules and Examples. Sleep 1992:
15:173-84).
Obstructive Apneas will be identified if the amplitude (peak to trough) of the airflow signal is
flat or nearly flat. This is noted when amplitude of airflow decreases below at least 75% of the
amplitude of “baseline” breathing, i.e. to < 25% of the baseline, (identified during a period of
regular breathing with stable oxygen levels), and if this change lasts for > 10 s. Obstructive
apneas cannot be designated in areas of the study where thermistry is missing or uninterpretable.
Hypopneas will be identified if the amplitude of any respiratory signal decreases by at least
(approximately) 30% of the amplitude of “baseline”, i.e. to < 70% of baseline, (identified during
a period of regular breathing with stable oxygen levels), if this change lasts for > 10 s.
Central Apneas will be noted if no displacement is seen on either the chest or abdominal
inductance channels. Otherwise, events will be noted as “obstructive”. Central events cannot be
designated if either or both band data are missing or uninterpretable.
Computer analysis will link data from varying channels to identify desaturation levels, sleep
summary data, and various Respiratory Disturbance Indices (RDIs). The following describe how
these data are used:
The desaturation associated with any respiratory event will be based on the nadir desaturation
reached within a user defined amount of the time (usually within 30 sec) of the end of the event.
The magnitude of the desaturation for an event is the difference between the greatest saturation
level observed during the event and this minimum. The scorer will manually check events to
assure that the appropriate desaturation is identified and modify the time lag as needed.
Arousals will be associated with respiratory events if they begin within 3 s. of the termination of
the respiratory event.
SHHSII/Manuals/Srcmop2002
Rev. May 10, 2002
SRC Manual of Operations
11
RDI (Respiratory Disturbance Index) is defined as the number of respiratory events (apneas and
hypopneas) per hour of the sleep. Events will be included in different indices according to level
of associated desaturation and/or arousal:
·
·
·
·
All events (regardless of desaturation or arousal)
Summary RDI values, based on events associated with > 2%, > 3%, > 4%, and
> 5% desaturation levels.
Summary RDI values based on events associated with > 2%, 3%, 4%, and 5% desaturation
levels or associated arousal.
Summary RDI values based on events associated with arousal regardless of desaturation.
Time in apnea or hypopnea:
· Percent sleep time in apnea (obstructive or central, with at least a 3% desaturation +/arousal).
· Percent sleep time in hypopnea (with at least a 3% desaturation +/- arousal).
Oxygen Desaturation Profile:
· Percent sleep time in desaturation (<95%, <90%, <85%, <80%, <75%).
· Number of desaturations/hour of sleep (unlinked with respiratory events) of 2%, 3%, 4%,
5%.
Sleep Architecture:
· Time and percent of sleep time in each sleep stage (combine Stages 3 and 4).
· Arousal index.
· Number/hour of upward stage (from deeper to lighter) shifts; wake shifts.
· Sleep efficiency.(sleep time/time in bed – lights off to end of study)
· Sleep latency (lights off to sleep onset); REM latency I (defined as time from onset of sleep
to first REM).
Heart Rate data:
· Maximum, minimum and mean heart rate noted during sleep, associated with respiratory
events and associated with the arousals (in REM and Non-REM separately).
Following manual scoring of the computer record, the scorer also completes the QS Form to
indicate whether unusual patterns describing breathing or EEG are noted or if problems were
encountered during the scoring process that could reduce the reliability of the scored data. These
include:
·
·
·
·
·
·
·
Abnormal Awake EEG
Alpha intrusion
Abnormal Eye Movements
Periodicity
Periodic large breaths
Sleep staging/arousal unreliable
Apneas vs. hypopneas unreliable
SHHSII/Manuals/Srcmop2002
Rev. May 10, 2002
SRC Manual of Operations
12
Summary of Scoring Process
Each study will be manually scored in the two passes:
During the first pass:
· Review the “lights” channel and manually set time of “lights off” and “lights on.”
· The EEG, EMG and EOG signals from each study will be reviewed on an epoch by epoch
(30 s.) basis (screen). Each epoch will be assigned a sleep stage. Periods of EEG change that
meet the criteria for arousal will be marked.
During second pass:
· Respiratory data (airflow/abdominal/chest/saturation) will be reviewed on 5 minute pages.
The saturation channel will be edited for artifact and respiratory events will be marked
manually according to the rules stated below.
Finally, the following will be done:
· The QS Form will be completed, indicating unusual patterns, reliability problems, and
signal/study QA grades.
· The outlier program will be run, to identify implausable values.
· Participant Feedback Sleep Reports will be generated.
· The raw and scored files and summary reports will be saved, to the scoring hard drive.
6.2. SCORING RULES
Scoring sleep stages
Scoring sleep stages is based on the guidelines specified by Rechtshaffen and Kales. When
guidelines were adopted from other sources, the source is marked in parenthesis. M.C. & A.R
refers to Section 7, Chapter 73: Monitoring and Staging Human Sleep, written by M.A.
Carskadon and A. Rechtschaffen, in Principles and Practice of Sleep Medicine ed. by M.H.
Kryger, T.Roth and W. Dement; W.B. Saunders Co, 1989 (1st edition).
Locally introduced rules, based on discussions among the SRC staff and outside consultations are indicated by an (*).
6.2.1 Rules for assigning epoch-specific sleep score:
Epoch-by-epoch approach: The polygraph record is divided into consecutive segments of equal
size (30 s., each termed an “epoch”). Each epoch has assigned a single sleep stage score. The
epoch duration is maintained for the duration of the recording.
·
·
·
·
When more than one stage is present in an epoch, that epoch is assigned a single stage score
reflecting the stage that occupied the greatest portion of the epoch.
When two stages of sleep are evenly distributed on the epoch, and one of these stages was
the same stage as in the preceding epoch, then that epoch will be assigned the same sleep
stage as the preceding epoch (*).
Portions of two epochs may not be combined to create a new epoch.
When an arousal of <15 sec. occurs within an epoch, the time “in arousal” is not counted
when determining the predominant sleep stage time in that epoch.
SHHSII/Manuals/Srcmop2002
Rev. May 10, 2002
SRC Manual of Operations
13
6.2.2 Sleep onset
Sleep onset is defined by three consecutive epochs of stage 1 or one epoch of any other sleep
stage.
Caution in interpreting reports: The Compmedics software report identifies sleep onset as three
consecutive epochs of sleep regardless of the stage. This may rarely cause a discrepancy
between the identity of sleep onset, sleep time, and sleep latency as defined using the
conventional approach used by the scorers (sleep onset as 3 epochs of stage 1 or one epoch of
any other sleep stages) versus the output of computer generated reports .
6.2.3 EEG arousal
Scoring arousals is based on “A Preliminary Report from the Sleep Disorders Atlas Task Force
of the American Sleep Disorders Association” Sleep, vol. 15, no 2, 1992. (ASDA criteria)
The scoring of EEG arousals is independent from the scoring of sleep stages (i.e. an arousal can
be scored in an epoch of recording which would be classified as wake by R & K criteria). An
arousal can proceed to the wake stage (by R & K criteria) or can be followed by a return to sleep.
Definition of Arousal:
An EEG arousal is an abrupt shift in EEG frequency, which may include alpha and/or theta
waves and/or delta waves and/or frequencies greater than 16 Hz lasting at least 3 s., and starting
after at least 10 continuous seconds of sleep. (See ArFigures 1a and 1b).
Artifacts, K complexes and delta waves are included in meeting the 3 s. duration criteria only
when they occur within the EEG frequency shift (change in frequency must be visible before
these waveforms). A "K" complex or spindle occurring immediately prior to the EEG shift or
following is not included in the arousal duration. (See ArFigures 2a, 2b, 2c)
Parts of the EEG totally obscured by EMG artifact are considered an arousal if the change in
background EEG in addition to the area obscured by EMG is at least > 3 sec.
Alpha activity of less than 3 s. duration in Non-REM sleep at a rate greater than one burst per 10
s. is not scored as an EEG arousal. Three seconds of alpha sleep is not scored as an arousal
unless a 10 s. episode of alpha free sleep precedes this.
If both central EEGs are equivalent and interpretable, the arousal (EEG frequency shift) must be
observed in both channels. If observed in only one of two equivalent channels, the change in
EEG is assumed to be artifact and not an arousal.
Arousals lasting > 15 s. and containing awake EEG within an epoch cause the epoch to be
classified as AWAKE.
TIPS for Arousals Generally:
· When unsure if change in background EEG represents an abrupt change, look at a 60
sec epoch and note if there is a discrete change from background EEG.
· Note whether changes were evident on both EEG channels.
SHHSII/Manuals/Srcmop2002
Rev. May 10, 2002
SRC Manual of Operations
14
·
·
·
Be careful to distinguish an increase in EEG frequency from EMG artifact (esp. in
delta sleep). (ArFigures 3a and 3b).
Isolated bursts of delta activity or sawtooth-like waves do not constitute an arousal.
In contrast, slow waves intermixed with fast activity that differs from background do
qualify as arousals. (ArFigures 4a, 4b and 4c.)
Occasionally, EEG acceleration is superimposed on slower waves. The slowing may
be an artifact secondary to movement or burst of delta waves. If there is evidence of
embedded EEG acceleration for > 3 sec., mark as an arousal. (ArFigures 5a and 5b)
Arousals in REM
In stage REM, an EEG frequency shift must be accompanied by a simultaneous increase in
amplitude of the chin EMG (lasting over 0.5 s.). An arousal starts when a definite change in
background EEG is visualized. The increase in the chin EMG can occur anytime during the
arousal (can be at the end) and is not a marker for the beginning of the arousal However,
increased EMG activity without a change in background EEG does not constitute an arousal
(ArRFigures 1a and 1b)
TIPS for Arousals in REM:
· If the level of REM EMG appears to be fluctuating, then the increase in EMG in the
area of a putative arousal needs to be more than the background level of fluctuations,
to identify this as a REM arousal.
· A long period of alpha activity before an EMG increase may mark the beginning of
the arousal if the alpha activity represents the change in the background pattern.
Potential Problems:
Some studies with high RDIs have many arousals that may appear to last > 15
sec. within given epochs. If all such epochs were classified as AWAKE, then the
respiratory events would not be included in the RDI and the RDI will be underestimated.
When faced with this situation, the scorer may attempt to keep the duration of the arousal
to as short as feasible (e.g., corresponding to the length of the waking EEG in that
epoch.) This will maximize the number of epochs containing arousals that are captured
as "sleep".
6.2.4 Rules for assigning sleep stages when arousal is present in the epoch
The following rules were established to maximize the amount of sleep identified and thus the
number of respiratory events recorded (*):
Brief arousals (e.g. arousals < 15s. long) do not automatically require a change in sleep stage.
The epoch is staged according to the sleep stage in the remaining parts of the epoch (not
including the arousal).
If an arousal or an area of increased EMG causing artifact in the EEG channels is followed by
Stage wake (W), then the arousal is considered part of the record scored as a stage Wake. If this
part is > 15 s. long, then epoch is scored as a Stage Wake.
SHHSII/Manuals/Srcmop2002
Rev. May 10, 2002
SRC Manual of Operations
15
In Deep Sleep (unequivocal Stage 3/4), when fast frequency waves are visualized as “riding” on
the top of the delta waves, and there are no frequencies characteristic of Stage Wake (*):
·
·
If there is any reason to suspect that the fast frequencies are result of artifact (like a sudden
increase in EMG bleeding into EEG), an arousal is not scored.
When the fast frequencies are not the result of artifact, an arousal is scored. Deep Sleep is
scored when delta waves persist despite the faster frequencies riding on top, independent of
the length of the arousal.
Note for Delta Sleep: When an arousal includes bursts of Delta waves: these waves are not used
for meeting Deep Sleep criteria (e.g. Deep Sleep is scored only if there is > 20 % of the epoch
covered by delta waves outside of the arousal).
6.2.5 Episodic events in sleep
Sleep spindles: clearly visible, rhythmic bursts of activity 12-14 Hz, duration at least 0.5 s. (one
should be able to count 6 or 7 distinctive waves within a half-second period); the amplitude
variability appears sinusoidal. (EpFigures 1a and 1b)
Sleep spindle activity occurs in adults with a frequency of about three to eight bursts per minute
in Stage 2 sleep. These are absent in wakefulness and Stage 1. Spindles may be rarely observed
in Stage REM and 3-4. Spindle rate appears to be a fairly stable individual characteristic. In the
elderly and in individuals with various medical conditions, sleep spindles tend to lose their
classic morphology and may have a slightly slower frequency, lower amplitude, and shorter
duration.
Medication effects can introduce beta range activity that may be confused with spindles.
Tips to alert to the presence of drug effects mimicking spindles are two or more of the following:
(EpFigures 2a and 2b)
· Increased beta activity (spindle like) in well defined REM sleep and wakefulness.
· Increased spindle duration (often > 1 sec.)
· Increased frequency of spindles per epoch (>5/epoch).
· Spindle like activity with amplitude variability that is NOT sinusoidal.
· Fast frequencies (often > 13 Hz).
·
·
When identifying atypical “spindle activity,” review previous epochs to ascertain if stage
was properly scored.
When atypical spindle like activity is observed, then such activity cannot be used to
distinguish Stage 2 from other sleep stages. This may lead to some underscoring of Stage 2
from 1.
K-complex: EEG waveforms having a well-outlined negative sharp wave, immediately followed
by a positive component. Total duration of the K complex should exceed 0.5 s. Waves of 12-14
Hz (sleep spindles) may or may not constitute part of K complex. K complexes can occur as a
response to sudden auditory stimuli. K complexes may be reflected on the EOG channels. When
in doubt about whether a particular polyphasic wave is a “true” K complex, record is scanned for
clear Stage 2 sleep. Questionable K complexes are only designated as K complexes if their
morphology closely matches those seen in unequivocal Stage 2 sleep. (EpFigures 3a-d)
SHHSII/Manuals/Srcmop2002
Rev. May 10, 2002
SRC Manual of Operations
16
Caution!
On the Compumedics system used in SHHS 1, with correct electrode placements, the first,
negative part of K complex should be downgoing and subsequent positive component up (as
seen with some traditional polygraphs). If the K complex is reflected on the EOG channels, it
will usually appear to be in the opposite phase as that seen on the EEG channel. Sometimes K
complexes on EEG are in the same phase as on EOG channels (EEG tracing is upside down).
This may be caused by erroneous electrode placement (switching the reference with the C3 or C 4
electrode). If this happens on the channel used for scoring sleep stages, the computer will not
recognize K complexes during automatic analysis.
Hypersynchrony: bursts of high voltage delta (< 4 Hz) or theta (4 - 7 Hz) waves lasting 2-3 s.
with a comb-like morphology with a positive polarity (points upgoing). Hypersynchrony is not
considered an arousal. May need to be distinguished from seizure discharges. (EpFigures 4a-e)
In children, this actually may be exaggerated. It is relatively more common during the transition
from wakefulness to sleep.
Seizures: This is manifest by an abrupt change in background EEG. This usually requires a
wider sampling of areas of the brain than is provided with our montage. Two patterns are
commonly seen: 1) High voltage, rhythmic activity in the 2-6 Hz range, or 2) Diffuse sustained
beta activity. A seizure is often accompanied by prominent muscle artifact. A seizure is usually
followed by low to moderate voltage irregular slowing. On the 10 s. screen, characteristic
‘spikes and wave’ pattern may be seen. If a possible seizure is identified, a physician
investigator will be immediately asked to review the study. (EpFigure 5)
6.2.6 Rules for assigning sleep stages
EEG frequencies are divided into following bandwidths:
b (beta) > 13 Hz
13 Hz > a (alpha) > 8 Hz
8 Hz > q (theta) > 4 Hz
4 Hz > d (delta)
An alpha wave is any wave that has the frequency in alpha range.
Alpha rhythm (also known as posterior background rhythm) has the following characteristics:
1. Is seen in the relaxed waking state with the eyes closed.
2. Attenuates with eye opening, anxiety or mental activity such as mental calculations
3. Slows in drowsiness (occasionally <8 Hz) and then disappears in sleep.
The slowing may be so brief as to be unnoticed.
4. Generated by occipital lobes and has a broad reflection to temporal
and mastoid areas.
An illustration of the differences in alpha with open and closed eyes is show in (SsFigure 1)
SHHSII/Manuals/Srcmop2002
Rev. May 10, 2002
SRC Manual of Operations
17
Stage W - Waking State
Stage W, when eyes are open, is defined by low voltage, mixed frequency EEG in the alpha and
beta ranges (> 8 Hz). When eyes are closed, wake is defined by the presence of the alpha rhythm.
There is usually (but not necessarily), a relatively high tonic EMG. Waking shows frequent eye
movements and eye blinks. Some subjects may have virtually continuous alpha activity, others
may show little or no alpha activity in the waking record.
Stage 1 sleep
Stage 1 sleep occurs most often in transition from wakefulness to other sleep stages.
Stage 1 is defined by a background of relatively low voltage, mixed frequency EEG activity with
noticeable activity in the 2-7 Hz range with no clearly defined K complexes or sleep spindles.
Faster frequencies are mostly lower voltage (amplitude). High voltage (50-75 mV) 2-7 Hz
activity tends to occur in irregularly spaced bursts mostly during the later portions of the stage.
There are slow eye movements, each of several seconds duration, usually most prominent during
early portions of the stage. No rapid eye movements or blinks are present. During the latter
portion of the stage, vertex sharp waves, occasionally as high as 200 mV, are often seen in
conjunction with high amplitude 2-7 Hz activity. The amount of alpha activity combined with
low voltage activity comprises less than half of the epoch. Finally, the tonic EMG level may be
lower than observed during relaxed wakefulness. (SsFigure 2)
Traces of low voltage activity at 12-14 Hz may begin to appear as the transition to Stage 2
approaches, but this activity is not defined as a sleep spindles until the rhythmic bursts are
clearly visible for at least 0.5 s.
Intervals of > 3 minutes between K complexes or spindles (and which do not meet criteria for
REM of delta sleep or Wake ) are staged as Stage 1 (“3 minute rule”.)
Stage 2 sleep
Stage 2 is defined by a background similar to Stage 1 sleep with the presence of the K complexes
and/or sleep spindles. It is impossible to define the difference between Stage 1 and Stage 2 sleep
on the basis of background activity alone. Bursts of other polymorphic high voltage slow waves,
which do not have the precise morphology of K complex, are also frequently seen. Delta waves:
high amplitude ( > 75 mV), slow (£ 4 Hz; duration 0.5 s. and longer) activity occupy no more
than 19% of the epoch. At the beginning of the Stage 2, slow eye movements may infrequently,
and only briefly, persist after the appearance of sleep spindles and K complexes. (SsFigures 3a-c)
Relatively long periods may intervene between K complexes and/or sleep spindles without a
background change in the EEG. Regardless of the presence of the arousal:
·
·
If there is <3 minutes of the low voltage, mixed frequency EEG between sleep spindles
and/or K complexes, this portion of the record is scored as Stage 2.
Otherwise if > 3 minutes, this portion of the record is scored Stage 1.
K complexes may be imbedded within an arousal and nonetheless consitiute evidence of Stage 2.
(SsFigure 4)
SHHSII/Manuals/Srcmop2002
Rev. May 10, 2002
SRC Manual of Operations
18
Deep Sleep (Stage 3 and 4)
In SHHS, no attempt is made to distinguish Stage 3 from Stage 4 which are combined into a
single category: Deep Sleep.
Deep Sleep is scored when 20% or more of the epoch consists of delta waves which are < 2 Hz
(duration 0.5 s.) and have an amplitude greater than 75 mV. The 20% criteria refers specifically
to the time occupied by the high amplitude, slow waves, and does not include intervening waves
of higher frequency and lower amplitude or K complexes. To fulfill the criteria for Deep Sleep,
one should be able to find at least 5-6 high voltage delta waves in the 30 s. sleep epoch. Delta
waves embedded in increased frequency activity (an arousal) do not contribute to the calculation
of time in delta sleep.
Sleep spindles and K complexes may or may not be present in Deep Sleep. Eye movements do
not occur in Deep Sleep, although the EOG may refect the high voltage slow wave activity. The
EMG is tonically active, although the tracing may achieve very low levels, indistinguishable
from that of REM sleep.
Note: In the Compumedics software Stages 2, 3/4 are assigned based on the amount of the
“delta-H” waves. K complexes and all the waves from the delta range (< 2 Hz) are considered
by the computer algorithm in the count of these waves. The computer based calculation of delta
sleep can be used to help determine % of slow waves when there are K complexes or events or
other artifact. When any ambiguity exists, the scorer must quantify the percentage of time delta
waves occupy within the epoch. Any questionable areas should be re-measured, subtracting
time occupied by K complexes and other waveforms.
An attempt should be made to distinguish between spontaneous K complexes and delta waves,
although this distinction is not always easy. When a K complex distinction is in doubt,
comparison should be done with the K complex in unambiguous Stage 2.
Stage REM sleep
Stage REM is defined by a background of relatively low voltage, mixed frequency EEG with
accompanying episodes of REMs (Rapid Eye Movements). The EEG pattern resembles Stage 1,
except that vertex sharp waves are not readily noticeable. Bursts of characteristic “sawtooth”
waves may appear, appearing as notched waves in the theta range. Alpha activity is usually more
prominent than in Stage 1 and its frequency is 1-2 Hz slower than the alpha rhythm in
wakefulness. The EMG reaches its lowest levels (it cannot be higher than the level during the
preceding stage). Phasic twitches and intermittent increases of EMG activity may be observed
but intervening baseline must remain low. Phasic twitch (EMG) defined as: short (no longer
than .10 sec burst of EMG activity superimposed on supressed muscle tone which physically
manifests as a twitch (contraction) of a muscle or jerk of a limb. In REM such muscle
contractions may be isolated or become repetitive, but they remain distinctive. Periods of the
relatively low voltage, mixed frequency EEG and EMG at Stage REM level but without eye
movements may follow unambiguous stage REM and is considered Stage REM unless criteria for
a state change are met. (SsFigures 5a-d)
SHHSII/Manuals/Srcmop2002
Rev. May 10, 2002
SRC Manual of Operations
19
The EOG shows bursts of rapid eye movements; often the density of such bursts increase as sleep
progresses. Thus, earlier Stage REM episodes usually contain fewer REMs than later episodes.
Rarely delta waves may be observed in an epoch that is within a period of REM. If occurring
within period of REM, a low EMG, continue to score as REM. Large sawtooth waves also may
be confused with hypersyncrony (SsFigure 6a and 6b)
Note: Excessive beta activity may be observed in REM and should not be confused with
spindles. Medications (benzodiazepine or barbiturate ingestion) may induce excessive beta
activity in both REM and Non-REM sleep. This beta activity can mimic sleep spindles. Their
frequencies often are faster than those seen with the true sleep spindles (see above Stage 2 sleep
section for guidance on identifying spindles). Rarely, sleep spindles can be seen in REM in
subjects with substantial sleep deprivation.
Start of the Stage REM:
At the start of Stage REM, K complexes, sleep spindles and delta waves end, characteristic
sawtooth waves can appear. EMG levels tend to be the lowest after eye movements begin. The
fall in EMG may not coincide with the EEG changes.
·
·
If the EMG drops before the last sleep spindle, K complex or delta wave: Score Stage REM
from the point the last sleep spindle, K complex or delta wave was seen.
Otherwise: Score Stage REM from the point where EMG drops. The period of the record
before the EMG drop is scored according to the rules for NREM sleep.
Periods of elevated sustained EMG during Stage REM sleep:
When EMG is elevated above the REM level for longer than .5 sec, then this portion of the
record is scored as a Non-REM sleep or WAKE. If phasic twiches or sawtooth waves are seen,
but intervening EMG is low, the epoch remains REM.
WAKE-REM Transition:
When one epoch or more of Stage Wake slows into a low voltage, mixed EEG pattern before
REMs or sawtooth waves begin: Score Stage 1 until the EMG drops to REM level and Stage
REM afterwards. (*) (SsFigure 7)
When Stage Wake (> 15s.) interrupts Stage REM (i.e., REM-> WAKE ): (*) (SsFigure 8)
If the EEG background of the epochs between the intervening waking epoch and the appearance
of REMs (eye movements) is ambiguous (i.e. the EEG background is compatible with either
REM or Non-REM sleep), then
· Score as Stage 1 if the EMG is elevated.
· Score as Stage REM when EMG is at the Stage REM level.
However, if a sleep spindle or K-complex appears prior to the appearance of REMs, then the
waking epochs are considered the end of the Stage REM.
SHHSII/Manuals/Srcmop2002
Rev. May 10, 2002
SRC Manual of Operations
20
When arousals (< 15 sec) interrupt REM:
The occurrence of an arousal in REM does not automatically change sleep state. However, if the
EMG increases after the arousal, REM is considered terminated by the arousal. The following
epoch is non REM.
Note: Often a single K complex may be seen in REM after an arousal, with subsequent REMs.
This per se does not change REM state. In particular, K complexes do not change REM state if
intervening eye movements are seen following the K complex or the interval between the first K
complex and the subsequent K complex is > 3 minutes (Example ). In contrast, a K complex
occurring after a period of wake interrupting REM does change the state (beginning with Stage 2
at the first K complex, and Stage 1 between the end of wake and the next K complex.)
End of the Stage REM
Stage REM is scored until a clear evidence of sleep stage change is visualized:
·
·
·
Appearance of K complexes or sleep spindles without presence of eye movements or
sawtooth waves between them, or at intervals of < 3 minutes.
Transition to Stage Wake
Sustained, increased EMG
When K complexes or unquestionable sleep spindles are seen in the Stage REM:
An isolated K complex may be seen in REM. When K complexes or unquestionable sleep
spindles (as compared to Stage 2) are present in stage REM, then an interval between two K
complexes or sleep spindles is scored as Stage 2 only if there are no REMs (eye movements) or
sawtooth waves in this interval and it is less than 3 min. long. Otherwise the interval is scored as
Stage REM. (SsFigure 9)
Scoring REM when there are problems with REM related atonia or the EMG is difficult to
interpret.
Identification of the Stage REM is may be difficult when there are prolonged bursts of elevated
EMG seen during eye movements or the EMG increases with snoring. In such cases:
EMG increases clearly related to snoring (changing with breathing) may be ignored, as
long as intervening EMG is low.
The portion of the record with unquestionable Stage REM should be reviewed to provide
a visual reference of the characteristic Stage REM EEG pattern. Stage REM is scored
when EEG pattern changes to the pattern characteristic for Stage REM regardless of the
level of the EMG. When EEG is consistent with Stage REM, and there is no evidence of
wake (blinking), no evidence of Stage 1 (vertex waves, slow rolling eye movements), or
the presence of REMs, then score stage Stage REM from the last K complex, sleep
spindles or delta wave. Distinguishing between Stage 1 and Stage REM is unreliable and
noted as such on the PSG scoring notes form.
SHHSII/Manuals/Srcmop2002
Rev. May 10, 2002
SRC Manual of Operations
21
6.2.7 Scoring respiratory events
SHHS will identify the following categories of discrete breathing events: obstructive apneas,
central apneas, and hypopneas. Additionally, periodic breathing and periodic large breaths will
be identified. No attempt will be made to distinguish mixed apneas from obstructive apneas. This
decision was based on previous data that indicated mixed events cannot be reliably identified.
Central hypopneas and increased upper airway resistance (RERAs) will not be identified because
of controversies in the defining these events and the probable need to use invasive monitoring to
identify these accurately. (ResFigure 1 shows a period of normal, regular breathing)
Obstructive Apneas are identified when the amplitude (peak to trough) of the airflow signal
decreases to a flat or almost flat signal (showing a 75% reduction of the amplitude of “baseline”
breathing) if this change lasts for > 10 s. Baseline breathing is defined as a period of regular
breathing with stable oxygen levels. (ResFigures 2a-b)
Hypopneas are identified if the amplitude of the any respiratory signal is reduced by 30% of the
amplitude of “baseline” (identified during a period of regular breathing with stable oxygen
levels), if this change lasts for > 10 s and for >2 breaths. (ResFigure 3c-e) Sometimes more
subtle changes in breathing are observed (not clearly reduced by 30% or more from baseline.
These require at least a 2% desaturation.
Distinguishing Between Hypopneas and Apneas. This distinction only can be made for
events in which airflow is interpretable. (If airflow is uninterpretable, the event-based on
inductance data is considered by default to be a hypopnea.) Apneas are marked if > 50%
of the event shows absent or nearly absent airflow on the thermister channel (and this
reduction is 75% the amplitude of the surrounding breaths). (ResFigures 4f-g)
Variation in signal amplitude on airflow, thoracic and abdominal channels: In some
studies, information appears qualitatively different from different channels. Scoring will
be done from the channel that correlates the best with the changes in the oxygen
saturation. If there are no changes in O2 saturation, scoring will be done from the
channel that shows the clearest amplitude variation. In cases where the thermister varies
from the inductance channels, and the inductance channels appear mostly artifact free,
the inductance channels will be used for event identification and classification. For
example, sometimes the airflow channels will suggest prolonged periods of “no flow”,
but changes in inductance and oxygen saturation suggest that breathing is occurring.
When in doubt, use data from the inductance and saturation channels to identify/classify
events. (ResFigures 5h-i)
A Central apnea event is scored if NO displacement is noted on both chest and the abdominal
inductance channels. Otherwise, events are noted as “obstructive.” (ResFigures 6a-b)
Distinguishing Between Central and Obstructive Events. ” Only events in which there is
clear data from both the abdominal and chest signals can be distinguished as “central” or
“obstructive”. (Events where one or both of these channels are missing or contain artifact
are considered “obstructive”).
Often determining whether an event is central or obstructive is influenced by where the
event is noted to begin and end. Sometimes, small efforts are seen following a
SHHSII/Manuals/Srcmop2002
Rev. May 10, 2002
SRC Manual of Operations
22
completely flat area, followed by a large (”breaking”) breath. If a single small breath is
seen at the beginning or the end of the period of flat signal, the event will be marked as
“central.” (This recognizes that shortening the event slightly would make it a central
event.) However, if 2 or more consecutive small breaths are seen in the period in
question, the event is marked as “obstructive.” Many of these events would be noted as
“mixed” by non-SHHS scorers. (ResFigures 6c-d)
Determining whether an event is central or obstructive in areas of periodic breathing can
be difficult because of uncertainties in deciding when to start and end such events. Often,
these areas contain breaths that gradually increase and decrease, sometimes decreasing to
an imperceptible level. Marking “longer” events in these areas would result in
identifying “obstructive” events; “shorter” events are more likely to appear “central.”
When it is unclear as to when to start an event, look for evidence of paradoxical
breathing. Change in phase angle between thoracic and abdomen is an indicator of upper
airway obstruction (such events will be designated as obstructive). When still unclear,
the event duration will be marked using the airflow channel. Identify the areas where
airflow stops and starts, then assess whether the period is also associated with effort on
either channel/band. Then, the inductance channels will be visualized to decide whether
during this period, any effort occurred. If any effort was visualized, the event will be
considered “obstructive”, otherwise, “central.” (ResFigures 6e-f).
Duration criteria: The beginning of an Apnea/Hypopnea is marked at the end of the last
“normal” breath; the end of the event is identified as the beginning of the first breath that
exceeds the amplitude of the first reduced breath used to mark the beginning of the event.
Duration is based on a “trough to trough” marking.
6.2.8 Dealing with ambiguous respiratory events:
If changes in amplitude are reduced by < 30%, but a > 10 s. period of a clearly discernible
reduction in the amplitude of respiratory signals from baseline is observed, then score events
when: (ResFigures 7a-b)
· they occur as part of a series of events (that do meet the 30% reduction criteria)
· they are associated with desaturations of at least 2%
Apneas/hypopneas immediately following large breaths or movements are not scored, unless
they are part of the cycle (there are other respiratory events before and following). Such
isolated events may be “sighs” or artifact. When such an event is noted after a
movement/large breath and appears to “trigger” a series of events, the first respiratory event
is not scored (unless apneas/hypopneas were scored before the movement/large breath).
(ResFigure 7c)
Determining whether to score one long event or two short events (i.e., after an initial
decrease in amplitude of a breathing signal, there is some increase, but not to baseline, and
then a fall again): In these cases, the oxygen saturation channel will be checked to determine
whether one or more than one event should be marked. If the event is punctuated by a clear
decrease in oxygen saturation followed by a rise or a stabilization, and then a decrease again,
two events are marked; otherwise if the event is characterized by one steady progressive fall
in desaturation, than one event is scored. (ResFigure 7d)
SHHSII/Manuals/Srcmop2002
Rev. May 10, 2002
SRC Manual of Operations
23
Periods of hyperventilation followed by long periods of hypoventilation: If periods of
hypoventilation have clearly visible beginnings and endings (i.e., are “discrete”) and are
associated with at least 2% desaturation, score as hypopneas regardless of their length (they
can last up to a few min.). (Note: This is commonly observed in REM.) (ResFigure 7e-i)
7. QS FORM - SCORING NOTES
The following are coded on the QS Form during the scoring of each study:
Lights are considered to have been calibrated appropriately if, at any time during the study, there
is a clear transition (on recorded lights) from lights on to lights off. Otherwise, lights are
considered not appropriate (including a light channel showing: no change throughout the study,
reversed calibration and/or constant fluctuation from “on” to “off” throughout the study.) On
studies with clear, but multiple, light transitions "lights off" will be marked at the first "off"
transition that is maintained for at least 30 minutes. Light calibration will be considered reliable,
but sleep latency will be unreliable. This method will be employed for all studies with the only
exception being when onset of sleep occurs prior to the light change, in which "lights off" will be
set at the onset of sleep.
Sleep latency will be considered reliable when a change in lights status (on/off) shows a clear
transition (even if reversed- off to on) prior to the onset of sleep.
Turning lights off manually. The Compumedics software uses the lights off data to
determine time in bed. However, when sleep latency is unreliable, it may be difficult to
determine when “lights off” happened (or when the participant went to bed.) In these
cases, Lights off will be manually marked when the first epoch of sleep occurs.
Sometimes even this is complicated by periods of presumed napping that may occur prior
to bedtime. Therefore, if periods of 20 minutes or less of sleep occur more than 20
minutes prior to a longer period of sleep, this initial sleep period is considered a nap and
not included in sleep/bed time (i.e., “lights off” are marked at the onset of the longer
sleep period.)
Position changing during study: This sensor will be considered to have been calibrated
appropriately if changes in position are visualized during the recording.
QA Grade Review
The QA grades of the signal and study are assigned at the time of scoring. It is recognized that
the scorer, who spends a longer time with each study, may disagree with the preliminary pass/fail
review of the Chief Polysomnologist. This will be re-reviewed with the Chief Polysomnologist
and final determination made. Unusual signals, questions not addressed in manual of operations
will be addressed at weekly scoring meeting.
SHHSII/Manuals/Srcmop2002
Rev. May 10, 2002
SRC Manual of Operations
24
Studies with limited sleep data
The following codes and guidelines are used to maximize the use of the respiratory data even
when the sleep data are limited. These codes also provide a means for subsetting analyses
according to the perceived levels of reliability of the scored data. Some studies will undergo only
limited scoring (sleep-wake), as described below.
Limited Scoring:
Study is scored sleep - wake only when the technical quality of the EEG does not allow
distinction between sleep stages, but allows a differentiation between sleep and wake. The time
considered sleep will be marked as Stage 2. No arousals will be scored for these studies.
Respiratory events will be scored as usual. Scoring a study “sleep-wake” requires approval by the
CP. Any study scored sleep - wake only will be given grade Fair regardless of the hours of
scorable signal.
Arousals are not scored when the technical quality of the EEG does not allow differentiation of
background changes in EEG from discrete periods of EEG acceleration.
Studies may still be of sufficient quality to stage sleep.
Scoring Limitations or Unreliability
Was the study scored with the minimal problems? The following boxes are checked when the
scorer is unsure approximately 20% of the time (1 in 5) about classifying epochs/events when
making a decision regarding each of the following
· Wake - Sleep unreliable: when the amount of the quality or clarity of the EEG makes
distinguishing the transition from Stage Wake to sleep uncertain.
· Stage 1/Stage 2 unreliable: when K-complexes and sleep spindles do not have show their
classical morphology and distinction between Stage 1 and Stage 2 is doubtful
(characteristic for the studies with low voltage EEG).
· Stage 2/Deep Sleep unreliable: when distinction between Stage 2 and Deep Sleep is
unreliable because of EEG artifact (usually due to the respiratory artifact on the EEG).
· REM/NonREM unreliable: when identification of Stage REM is unreliable (usually due
to poor or missing EMG or when both EOGs are absent).
· Arousals unreliable: when the technical quality of the study does not allow one to
distinguish discrete increases in EEG frequency from background changes in EEG. EEG
still may be of sufficient quality to score stages. Studies with the physiological alpha
intrusion will have arousals scored regardless of difficulty, Checking the “arousal
unreliable” box requires approval by the CP.
· Arousals in REM unreliable: when EMG is artifactual or absent during all or REM
portion of the study.
· Respiratory events/RDI unreliable: when due to the technical quality of the respiratory
signals, distinctions between hypopneas and normal breaths are equivocal in over 20 %
of scored events ; also when the quality of the oximetry signal raises doubts about actual
magnitude of desaturation linked with over 20 % of respiratory events (unstable baseline).
· Apnea/hypopnea unreliable – when airflow signal is artifactual or absent for over 20 % of
scored respiratory events.
SHHSII/Manuals/Srcmop2002
Rev. May 10, 2002
SRC Manual of Operations
25
Unusual occurrences during sleep
The following patterns are also noted on the QS form:
·
Abnormal Awake EEG: when the waking EEG background rhythm consists of waves in the
theta range. This should be distinguished from presence of theta waves as a result of
excessive sleepiness, which will disappear after some period of sleep, and may indicate a
neurological disorder or toxicity. (QSFigure 1)
·
Physiologic alpha intrusion - when alpha rhythm is present in more than 40% of Non-REM
sleep, Alpha delta sleep (QSFigure 2)
·
Alpha artifact-when alpha range activity is seen throughout all periods of sleep, does not
vary with eye closure, may be evident on non-cerebral channels (i.e., EOG)
TIP:
Alpha artifact was more likely than alpha intrusion when the activity in
question:
· Occurs across most sleep stages, and does not vary by sleep state;
· The activity is fairly similar in amplitide throughout the study
· Often is superimposed on top of the EEG signal
Alpha intrusion is more likely when:
· Varied by sleep stage
· Displayed a fluctuating amplitude
·
Abnormal Eye Movements: presence of the rhythmical lateral eye movements in Non-REM
sleep, or asymmetrical or disconjugate movements. (QSFigure 3)
·
Periodic breathing: when the airflow or inductance channels are increasing and decreasing at
least 50 % from the maximum, in a periodic (cyclic waxing and waning or "sinusoidal")
manner, for a consecutive period of at least 10 min. Examples of this pattern will be printed
and attached to the scoring form. Periodicity is noted independently from scoring apneas and
hypopneas. (QSFigures 4a-g)
·
Cheynne Stokes Breathing (only in SHHS2 data) (CSB): Will be marked when there is a
cyclic waxing and waning pattern on the inductance channels for at least 5 min and there is
no obstructive events during this time (i.e., occurring in the absence of cessation of the
airflow signal and no paradoxing on inductance channels). (QSFigure 5)
NOTE: Records containing CSB occurring for > 10 minutes will also be coded as
containing Periodic breathing. Periodic Breathing is not CSB when all periodic breaths
are associated with apneas or obstruction.
·
Periodic large breaths: when very large breaths (one or two) occur periodically (mostly on
the inductance channels) between runs of fairly normal breaths for a duration of at least 10
minutes. Examples of this pattern will be printed and attached to the scoring form.
(QSFigures 6a-c )
Before the QS form is marked for the presence of abnormal events, such events will be reviewed
with the CP and physician investigator (abnormal awake EEG, alpha intrusion) or other scorers
SHHSII/Manuals/Srcmop2002
Rev. May 10, 2002
SRC Manual of Operations
26
(periodicity and periodic large breaths). Any study with abnormal events or problems with
scoring will be discussed at the weekly QA meetings.
Any problems with the staging or marking arousals will be marked on the QS scoring notes form
by checking appropriate boxes and/or by placing notes in the Notes section. All studies so
marked will be reviewed with a physician investigator or other scorers.
Was any data lost?
Some studies do not contain usable signals for the entire recording time or include only a portion
of the sleep period.
·
·
·
Recording started after sleep onset - first epoch of the study is any sleep stage.
Recording ended before participant awoke - the last epoch of the study is any stage of
sleep; or when an arousal is seen in the last few epochs of the study and there is a
question if the participant actually awoke or would have returned to sleep (i.e., lack of
sustained activity indicating “out of bed.”).
Loss of the data at the beginning, end or during study - indicates a loss of the data due to
poor technical quality of the signals for >30 minutes.
Medical Alert:
Will be checked "yes" if any criteria for medical alert as listed below are met:
· Heart rate > 150 bpm for > 2 min
· Heart rate < 30 bpm for > 2 min.
· Oxygen Saturation < 75% for >10% TST.
· RDI > 50.
Study-by-Study Outlier Identification
The Outlier program will be run after each study is scored and a report generated. The presence
of the following potential outliers will be identified immediately after each study is scored and a
report is generated
· 0 % of the any sleep stage
· 90 % of any Non-REM sleep stage
· >60 % of Stage REM
· RDI3P = 0 or RDI3P > 160
· Obstructive apnea index > 80
· Central apnea index > 40
· Minimum desaturation < 40 %
· AI (Arousal Index ) < 3
· Apnea or hypopnea duration < 10 s.
· Oxygen saturation =0.
If any of the outliers will be found, the scorer will review the study and identify the source. Any
errors in scoring or editing will be corrected. New Short and Full reports will be generated and
SHHSII/Manuals/Srcmop2002
Rev. May 10, 2002
SRC Manual of Operations
27
saved. The identification of outliers and the results of the review process (with corrections) will
be noted on the QS Form.
Were respiratory events/RDI reliable: "No" will be checked when, due to the technical quality of
the respiratory signals, over 20 % of scored events distinctions are equivocal; also when quality
of the oximetry signal raises doubts about the actual magnitude of desaturation linked with over
20 % of respiratory events (unstable baseline).
Was apnea/hypopnea distinction reliable: "No" will be checked when airflow signal is bad or
missing for over 20 % of scored respiratory events.
Summary of Procedures to Follow With Problematic Signals:
EMG artifactual (does not show discernible amplitude variations): may result in difficulty
distinguishing REM from non-REM and identify REM- associated arousals. Indicate limitations
in boxes 32d, 34b.
EEG artifactual: may result in unreliable or impossible staging and/or arousal identification.
Indicate limitations and approaches in boxes 31, 32 (a-d), 22, 34 (a,b,).
Airflow signal poor: Results in all respiratory events defaulting to hypopneas (none qualify as
apnea). Indicate limitations in box 36.
· Exception to identifying central events when airflow is poor: An exception
occurs when both inductance channels (thoracic and abdomen) are flat for >
10 s. Then the event will be marked as a central apnea.
Thoracic or/and abdominal channel poor: Results in events defaulting to “obstructive” (none
qualify as “central”). Indicate in box 35 if indicated.
Situations when staging or scoring respiratory events are impossible during some portion of the
study: If this occurs at the beginning or end of the study, this period will be scored as stage
Wake and edited lights will be set as “On” during this period (sleep latency will be unreliable if
it is on the beginning). This action may result in artificially shortened sleep time. The
appropriate box will be checked on PSG scoring form.
If periods of data loss occurs in the middle of the study:
· if periods are < 30 min. long:
- on the O2sat signal: period will be marked as a O2 sat artifact
- on airflow and both inductance channels: no respiratory events will be
scored during this period
- on both EEGs: period will be scored as a stage Wake
· if periods are > 30 min. long then period of unscorable data will be marked as Stage Wake
and on the PSG scoring form appropriate box (“Intervening period of bad EEG” or
“Intervening period of bad Resp/Oximetry”) will be checked. This action may result in
artificially shortened sleep time.
SHHSII/Manuals/Srcmop2002
Rev. May 10, 2002
SRC Manual of Operations
28
APPENDIX CONTENTS
QS FORM
FIGURES (Examples of Signals)
Arousal Examples
ArFigures 1a and 1b - Sample Arousals
ArFigures 2a, 2b, 2c - Sample Artifacts, K complexes, spindles, EEG shifts
ArFigures 3a and 3b -Increase in EEG frequency from EMG artifact
ArFigures 4a-c - Burst of delta activity or sawtooth-like waves - not arousals
ArFigures 5a and 5b - EEG acceleration superimposed on slower waves
ArRFigures 1a and 1b - Arousals in REM, EMG activity
Episodic Event Examples
EpFigures 1a and 1b - Sleep spindle activity
EpFigures 2a and 2b - Drug effects mimicking spindles
EpFigures 3a-d - Examples of K complexes
EpFigures 4a-e - Hypersynchrony
EpFigure 5 - Seizures
Sleep Stages
SsFigure 1 - Alpha example with eyes open and closed
SsFigure 2- Stage 1
SsFigures 3a-c - Stage 2
SsFigure 4 - K complexes imbedded within an arousal
SsFigures 5a-d - Rem sleep examples
SsFigures 6a and 6b - Delta waves in REM
SsFigure 7 - Wake-REM transition
SsFigure 8 - Stage Wake interruption of Stage REM
SSFigure 9 - Isolated K complexes in REM
Respiratory Events
ResFigure 1 - Normal breathing
ResFigures 2a-b - Obstructive Apneas
ResFigures 4-f-g - Distinguishing between Hypopneas & Apneas
ResFigures 5h-I - Variation in signal amplitude on airflow, thoracic, abdominal
ResFigures 6a-b - Central Apneas
ResFigures 6c-d - Distinguishing between Centrals and Obstructives
ResFigures 6e-f - Central or Obstructive in areas of periodic breathing
ResFigures 7a-b - Ambiguous respiratory event - amplitude changes
ResFigure 7c - Apneas/Hypopneas immediately following large breaths
ResFigure 7d - Score one long event or two short events
ResFigure 7e-I - Periods of hyperventilation follwed by hypoventilation
SHHSII/Manuals/Srcmop2002
Rev. May 10, 2002
SRC Manual of Operations
29
Grant #: 1 U01 HL68060-01A1
10G.
APPLES Manual of Operations
PI- Dement, William C.
BLOOD PRESSURE PROTOCOL
Attached
Appendix 10, Page 586
CONFIDENTIAL – NOT FOR DISTRIBUTION
May 25, 2004
Apnea Positive Pressure Long-term Efficacy Study (APPLES)
APPLES Blood Pressure Protocol
Overview
Blood pressure (BP) measurements are obtained using a conventional mercury or aneroid
sphygmomanometer. The design and operation of this meter are based upon the combined
principles of compression of the brachial artery under an elastic, inflatable cuff, and direct
registration of pressure levels by a mercury or aneroid manometer. As the observer inflates the
cuff, he or she listens for the first (systolic) and the last (diastolic) Korotkoff sounds, reads the
mercury level in the column at each level, deflates the cuff, and records the values. The level of
BP is subject to both biologic and observer variations, the latter due to errors in measurement.
The purpose of a specific protocol for the measurement of BP is to minimize error in
measurement.
Blood pressure measurements are performed in the evening (prior to the hookup of the PSG
electrodes) and in the morning (prior to the neurocognitive test battery) for the Diagnostic
Appointment, CPAP Titration, Two-Month Post-CPAP Follow-Up Appointment, and Six-Month
Post-CPAP Follow-Up Appointment. Blood pressure measurements are also obtained during the
initial Clinical Evaluation and the clinical evaluation at the Four-Month Post-CPAP Follow-Up
Visit. Following this BP protocol will provide data that are comparable between different study
visits and different Clinical Centers (CCs).
Methods
Equipment
•
Professional mercury or aneroid sphygmomanometer
•
Standard stethoscope
•
BP cuffs in three sizes:
• 1 regular adult cuff
• 1 large adult cuff
• 1 thigh cuff
Protocol for Determining Cuff Size (Optional)
The selection of the proper cuff size is important for obtaining the correct blood pressure
measurement. If there is any doubt regarding the proper cuff to utilize, the subject’s arm should
be measured to determine the appropriate cuff size. The instructions for measuring the subject’s
arm are as follows:
• Ask participant to bare the upper arm.
• Instruct participant to stand holding forearm horizontal to the floor.
• Measure arm length from the acromion (bony extremity of the shoulder girdle) to the
olecranon (tip of the elbow), using a metric tape.
• Mark the midpoint on the dorsal surface of the arm.
• Tell participant to relax arm along side of the body.
Rev. 1/04
page 1 of 6
Apnea Positive Pressure Long-term Efficacy Study (APPLES)
•
•
•
Draw the tape snugly around the arm at the midpoint mark. Keep the tape horizontal and
avoid indenting the skin.
Use the criteria below for determining cuff size. Round up to nearest cm.
Record the proper cuff size on the Blood Pressure Form.
Arm Circumference (cm)
22.6 to 30.0
30.1 to 37.5
37.6 to 43.7
Cuff’s Bladder Size (cm)
12.0 (Regular Adult)
15.0 (Large Adult)
17.5 (Thigh)
Protocol for Applying the BP Cuff
•
•
•
•
•
Place the appropriate cuff around the upper right arm so that the midpoint of the length of the
bladder lies over the brachial artery, and the mid-height of the cuff is at heart level.
• If a thigh size cuff is required by measurement, but the participant is short, use the thigh
size and touch the cuff with the bell of the stethoscope.
Place the lower edge of the cuff, with its tubing connections, about 1 inch above the natural
crease across the inner aspect of the elbow.
Wrap the cuff snugly about the arm, with the palm of the participant’s hand turned upward.
Secure the wrapped cuff firmly by applying pressure to the locking fabric fastener over the
area where it is applied to the cuff.
Do not wrap the cuff too tightly around the arm. Observer should be able to insert the first
joint of two fingers under the cuff. The cuff should be snug but not tight.
Protocol for Determining the Maximal Inflation Level (Optional)
If there is any doubt regarding the maximal inflation level, this procedure should be followed to
determine the pressure to which the cuff should be inflated for systolic blood pressure
measurement. This measurement assures that the cuff pressure at the start of the reading exceeds
the systolic blood pressure and thus allows the first Korotkoff sound to be heard. The procedure
for determining the maximal inflation level is as follows:
•
Attach the cuff tubing to the sphygmomanometer.
•
Palpate the radial pulse.
•
Inflate the cuff until the radial pulse is no longer felt (palpated systolic) by inflating rapidly
to 70 mm Hg, then inflating by 10 mm Hg increments until the radial pulse is no longer
palpable.
•
Deflate the cuff quickly and completely.
•
For subsequent auscultatory blood pressure measurements, begin by inflating the cuff to 30
mm Hg above this palpated systolic pressure.
Rev. 1/04
page 2 of 6
Apnea Positive Pressure Long-term Efficacy Study (APPLES)
Protocol for the Rest Period
The participant should be allowed to rest for five minutes prior to measuring his or her blood
pressure. Instruct the participant on correct posture, with his or her back supported, both feet flat
on the floor and arm resting on the table. The participant should also be instructed not to talk
until after the BP measurements are completed. The room should be free of excessive noise.
Protocol for the First BP Measurement
•
Use the above procedures to measure the cuff size and determine the maximal inflation level,
if necessary.
•
Connect the cuff to the sphygmomanometer.
•
Place the earpieces of the stethoscope, with the tips turned forward, into the ears.
•
Apply the bell of the stethoscope over the brachial artery with light pressure, insuring skin
contact at all points. The bell should be placed just below, but not touching the cuff or
tubing. The brachial artery is usually found at the crease of the arm, slightly toward the
body.
•
Close the thumb valve and squeezing the bulb to inflate the cuff at a rapid but smooth,
continuous rate to the maximal inflation level.
NOTE: The eyes of the technician should be level with the mid-range of the manometer
scale and focused at the level to which the pressure will be raised.
•
Open the thumb valve slightly and maintain a constant rate of deflation at approximately 2
mm per second to allow the cuff to deflate, listening throughout the entire range of deflation
from the maximum pressure past the systolic reading (the pressure where the first regular
sound is heard) to 10 mm Hg below the level of the diastolic reading (that is, 10 mm Hg
below the level where the last regular sound is heard).
NOTE: At least two beats must be heard to identify systolic BP. Diastolic BP is the point at
which the last sound is heard.
•
Record the measurements on the Health Log and inform the participant of the readings.
Protocol for the Second BP Measurement
•
Ask the participant to hold his/her arm as close to vertical as possible for a full 5 seconds.
Examiner may assist if needed.
•
Wait at least 25 seconds before proceeding with second readings.
•
Repeat the steps shown above for the first reading.
•
Remove the cuff and store the equipment safely once BP is obtained.
Rev. 1/04
page 3 of 6
Apnea Positive Pressure Long-term Efficacy Study (APPLES)
Guidelines for Blood Pressure Readings
•
All readings are made to the nearest even digit, rounding up.
•
Any reading which appears to fall exactly between markings on the column should be read to
the next higher marking i.e., 2, 4, 6, 8 or 0.
•
All readings are made at the top of the meniscus, or rounded surface of the mercury column.
•
When the pressure is released quickly from a high level, a vacuum is formed above the
mercury and the meniscus is distorted. Allow a few moments for it to reappear before
reading the manometer.
•
If sounds are heard immediately after the cuff is inflated, start the procedure over, including
the 30 second rest period (5 seconds vertical).
•
Keep stethoscope in ears during the entire time the two readings are being taken.
Criteria for Systolic and Diastolic Blood Pressure
To correctly identify the 1st-phase (systolic) and 5th-phase (diastolic) Korotkoff values, listen
carefully via the stethoscope while reading and interpreting the mercury column.
•
The systolic value is the pressure level where the first of two or more sounds are heard in
appropriate rhythm.
•
The diastolic value can be identified as the pressure level where the last of these rhythmic
sounds is heard.
•
The mercury should be made to drop at 2 mm Hg per second, from the maximum
pressure until 10 mm Hg below that of the last regular sound heard. The control of the
deflation rate is essential for accurate readings and depends on handling of the bulb and
its control valve.
NOTE: A single sound heard in isolation (i.e., not in rhythmic sequence) before the first
of the rhythmic sounds (systolic) or following the last of the rhythmic sounds (diastolic)
does not alter the interpretation of the blood pressure.
Rev. 1/04
page 4 of 6
Apnea Positive Pressure Long-term Efficacy Study (APPLES)
BP Alerts
Two seated BP readings are obtained for each APPLES participant. The BP ranges have been
defined for APPLES and are as follows:
Systolic BP ≥ 190 or
Diastolic BP ≥ 120
Immediate Alert: Requires an IMMEDIATE physician consultation, completion of the
Safety Concern Form (SCF), and the subsequent notification of the CC Coordinator within
24 hours. The CC Coordinator will ensure that the study physician, primary care physician,
Physician-Observer, CC Director, and APPLES participant are notified by the appropriate
individuals. It is the responsibility of the Physician-Observer to assess the risk level for the
subject, determine whether an Adverse Event Report (AER) should be completed, and
determine whether the subject should continue participation in the study. The Project
Director or the DCC can be consulted if questions arise.
Systolic BP = 180 – 189 or
Diastolic BP = 110 – 119
Alert: Requires the completion of the SCF and the subsequent notification of the CC
Coordinator within 24 hours. The CC Coordinator will ensure that a study physician contacts
the primary care physician to report the results and advise a consultation within the week.
Additionally, the CC Coordinator will confirm that the Physician-Observer, CC Director and
APPLES participant are notified. It is the responsibility of the Physician-Observer to assess
the risk level for the subject, determine whether an Adverse Event Report (AER) should be
completed, and determine whether the subject should continue participation in the study.
The Project Director or the DCC can be consulted if questions arise.
Systolic BP = 140 – 179 or
Diastolic BP = 90 – 109
Minor Alert: Requires the completion of the SCF and the subsequent notification of the CC
Coordinator within 24 hours. The CC Coordinator will ensure that the subject is instructed to
follow-up with their primary care physician within a month. Additonally, the CC
Coordinator will confirm that the Physician-Observer and CC Director are notified.
Rev. 1/04
page 5 of 6
Apnea Positive Pressure Long-term Efficacy Study (APPLES)
References
1. The Seventh Report of the Joint National Committee on Prevention, Detection, Evaluation,
and Treatment of High Blood Pressure: the JNC 7 report.
JAMA. 2003 May
21;289(19):2560-72. Epub 2003 May 14. Erratum in: JAMA. 2003 Jul 9;290(2):197.
2. The sixth report of the Joint National Committee on prevention, detection, evaluation, and
treatment of high blood pressure. Arch Intern Med. 1997 Nov 24;157(21):2413-46. Erratum
in: Arch Intern Med 1998 Mar 23;158(6):573.
3. The 1988 report of the Joint National Committee on Detection, Evaluation, and Treatment of
High Blood Pressure. Arch Intern Med. 1988 May;148(5):1023-38.
4. Working Group on Hypertension in the Elderly, Statement on Hypertension in the Elderly.
JAMA, 1986, 256, No. l, pp. 70-74.
5. Labarthe DR, Palmer M. Measurement of Blood Pressure: A Manual for Training and
Certification. Adapted for the Systolic Hypertension in the Elderly Program (SHEP). June 5,
1985.
6. Borhani N, LaBaw F, Dunkle S. Blood pressure measurement in an ambulatory setting. In:
Ambulatory Blood Pressure Monitoring. New York: Springer-Verlog, 1984: 75-81.
7. Frohlich EC, Grim C, Labarthe DR, et al. Recommendations for human blood pressure
determination by sphygmomanometers. Hypertension 1988; 11: pp. 209A-222A.
8. Atherosclerosis Risk in Communities Study (ARIC) Protocol, Manual 2: Cohort Component
Procedures, Version 2.0 1/88. ARIC Coordinating Center, Suite 203 NCNC Plaza, 137 E.
Franklin St, Chapel Hill, NC 27514.
9. Sleep Heart Health Study (SHHS) Manual of Operations. SHHS Coordinating Center, Johns
Hopkins University (September 1999 – present): Baltimore, Maryland.
Rev. 1/04
page 6 of 6
Grant #: 1 U01 HL68060-01A1
APPLES Manual of Operations
PI- Dement, William C.
10H. ENCORE SMARTCARD PROGRAMMING
Attached
May 25, 2004
CONFIDENTIAL – NOT FOR DISTRIBUTION
Appendix 10, Page 587
Grant #: 1 U01 HL68060-01A1
10I.
APPLES Manual of Operations
PI- Dement, William C.
GUIDE TO ASSESSING SWMT ELECTRODE PLACEMENT
Attached
Appendix 10, Page 588
CONFIDENTIAL – NOT FOR DISTRIBUTION
May 25, 2004
SAM Technology
Confidential
February 6, 2004
APPLES
Guide to Assessing Electrode Placement in the SWMT
Electrode Jack Box
Page 1 of 16
SAM Technology
Confidential
February 6, 2004
Table of Contents
Guide to Assessing Electrode Placement in the SWMT Electrode Jack Box ................................. 3
The Electrode Montage ............................................................................................................... 3
Using the BioCalibration (Signal Check) to Determine Correct Electrode Placement............... 4
Correct Electrode Connections ................................................................................................... 4
Step One – Ask the Patient to Blink ....................................................................................... 4
Step Two – Ask the Patient to Look Left ............................................................................... 6
Step Three – Ask the Patient to Look Right ........................................................................... 7
Step Four – Ask the Patient to Close the Eyes ....................................................................... 8
Incorrect Electrode Placement .................................................................................................... 8
Ground Electrode Mismapped with a Reference Electrode.................................................... 9
FP1 Mismapped with a Reference Electrode........................................................................ 10
RHEO Mismapped with a Reference Electrode ................................................................... 11
GND mismapped with RHEO .............................................................................................. 12
FP2 Mismapped with RHEO ................................................................................................ 13
Mismapping Scalp EEG Channels........................................................................................ 14
Tap Test to Confirm Proper Electrode Connections ................................................................. 15
Page 2 of 16
SAM Technology
Confidential
February 6, 2004
Guide to Assessing Electrode Placement in the SWMT
Electrode Jack Box
Since electrodes are placed on each patient’s head and plugged into the jack box individually, there is
room for error in electrode placement. Since some electrodes are moved between the SWMT jack
box and the Alice jack box before and after each SWMT session, the possibility of making such
errors increases. An error at this step could render the data from that session useless. Therefore it is
extremely important that the SWMT technician pay close attention when plugging the electrodes into
the jack box. This guide is intended to provide some practical hints on determining whether
electrodes are plugged in correctly during the Signal Check/Bio Cal step of the SWMT.
The Electrode Montage
To understand the EEG traces that you see during the bio cal, it is important to know where the
electrodes are placed on the head. Figure 1 shows the positions of the scalp electrodes used in the
SWMT and the MWT.
The electrodes used in the SWMT include F3, F4, FZ, CZ, P3, P4, and POZ. The electrodes FP1 and
FP2 are located on the forehead, above the eyes. All these electrodes are referenced to the averaged
activity on A1 and A2, electrodes placed on the mastoid bones behind the right and left ear. The
ground electrode is placed in the middle of the forehead, at FPZ. The horizontal eye electrodes
(RHEO, LHEO; not shown) are placed 1 cm lateral and 1 cm below each eye. LHEO is referenced to
RHEO forming the bipolar channel, BPF9.
Figure 1 demonstrates the location of the electrodes on the head. Electrodes are named according to
the underlying brain area: FP = frontopolar, F = frontal, C = central, P = parietal, PO = parietooccipital and O = Occipital. Even numbers (2,4) refer to locations over the right hemisphere and odd
numbers (1,3) refer to locations over the left hemisphere. Midline locations are denoted with “Z”.
FP1
F3
FPZ
FP2
F4
FZ
CZ
C3
C4
A1
P3
P4
POZ
O1
O2
Figure 1: Diagram of the electrode positions.
Page 3 of 16
SAM Technology
Confidential
February 6, 2004
Using the BioCalibration (Signal Check) to Determine Correct
Electrode Placement
At the beginning of each SWMT session, after the SWMT program checks the electrode impedances
and calibrates the channel gains, the EEG traces are displayed, and the technician is instructed to have
the subject blink, look left, look right, then close the eyes. The eye acts like a battery: the cornea is
positive relative to the retina. Changes in the distribution of this charge relative to the EEG electrodes
will result in large, predictable potential differences across the head. Incorrect electrode placement
may produce large eye artifacts in unexpected channels. Such occurrences should alert you to
connection errors in the SWMT jack box.
This section first demonstrates the predictable eye blink and eye movement signals you should see
with a relaxed subject, with electrodes properly placed on the head and plugged into the appropriate
jacks in the SWMT jack box. Then some examples of mismappings in the jack box are provided to
show the pattern of activity associated with these errors. Finally, a simple electrode tap test is
described that will allow you to be certain of proper electrode mapping. This test should be performed
for all SWMT electrodes during the first biocal of the day to ensure that all electrodes are placed in
the proper positions. It should be repeated during each subsequent SWMT for the subset electrodes
that have been unplugged from the SWMT jack box since the prior session. This procedure is
explained in more detail in the last section of this document.
Correct Electrode Connections
Step One - Ask the Patient to Blink
During a blink, the eyeballs roll upward, producing a large positive deflection on electrodes
above the eye, as noted in Figure 2. The amplitude of the blink artifact decreases rapidly with
distance from the eye. Therefore, when you ask the patient to blink, you should see large blink
artifacts on FP1 and FP2. There should be similar, but smaller artifacts on the frontal channels
(F3, FZ, and F4). The blink artifact on CZ should be even smaller. Blink artifacts will be the
smallest and least visible on the parietal channels (P3, P4, POZ). If the blink is small, the blink
artifact may not be visible at all on these channels.
Because blink amplitude decreases with distance from the eyes, the eye blink artifact on
more posterior channels will never be larger than the blink artifact on more anterior
channels, unless the electrodes are mismapped in the jack box. So in this step, make sure that
the amplitude of the blink artifact decreases regularly from frontal to central to parietal. The
magnitude of the blink artifact should be roughly equal on the three frontal channels since they
are located roughly the same distance from the eyes. Similarly, the magnitude of the blink artifact
on P3 and P4 should be roughly equal to each other (and much smaller than the blink on the
frontal channels).
Also note that with correct electrode placement, there should be very little activity on the
horizontal eye channel, BPF9 when the patient blinks. If the horizontal eye electrodes are
placed properly on the face (1 cm lateral and 1 cm below each eye), the blink will produce the
same activity on both channels. Since the left eye electrode is referred to the right eye electrode,
the blink is canceled and will not appear on the BPF9 trace (remember that the traces that appear
on the screen show the difference in electrical potential between the active electrode and the
Page 4 of 16
SAM Technology
Confidential
February 6, 2004
reference electrode. If both detect the same activity, it is subtracted out. For BPF9, LHEO is the
active channel, RHEO the reference channel. All other EEG channels are referred to linkedmastoids). If one of the horizontal eye electrodes is slightly higher than the other eye electrode, a
blink artifact will be visible on BPF9. This occurs because the electrode closer to the eye will
pick up a larger blink signal than the other and thus the blink artifact will not be fully subtracted
out. The polarity of this artifact will depend on which electrode is closer to the eye. In this
situation, the signal on BPF9 could look similar to the blink artifact on an EEG channel (i.e., a
small positive deflection), or it may be inverted (i.e, a downward, or negative deflection). It
would be visible after every blink (small artifacts that appear inconsistently on BPF9 during
blinks may reflect lateral eye movement). Try to place the two eye electrodes the same distance
below the eye to avoid picking up blinks on the BPF9 channel.
BPF9 shows an artifact at the time
of the first blink. If such an artifact is
visible with every blink, check for
proper electrode placement. This
example here shows proper
placement and connections. See
Figure 9 for an example of improper
connections.
Blinks produce large upward (positive)
deflections on FP1 and FP2. Four blinks can
be seen in this figure. Ignore the big red bar,
it is not meaningful.
Blink artifact on
EEG channels.
Look for
decrease in
amplitude from
front to back of
head.
Figure 2. First step of the BioCalibration (Signal Check) with correct electrode placement. Subject is
asked to blink. Large positive deflections are seen on the electrodes above the eyes (FP1 and FP2; ignore
the red bars that appear on FP1 and FP2 on all these figures, they are irrelevant). This blink artifact
propagates across the head, decreasing rapidly with distance. So the frontal channels (F3, F4, FZ) will show
a clear blink artifact, of the same shape but smaller in size than that seen on FP1 and FP2. The artifact will
be even smaller on CZ. It will be smaller still on the parietal (P3, P4) and parieto-occipital channel (POZ).
In some cases (eg. for small blinks) the blink artifact may not be visible on these channels.
Page 5 of 16
SAM Technology
Confidential
February 6, 2004
Step Two – Ask the Patient to Look Left
When the eyes are directed towards the left, the electrode beside the left eye will pick up a
positive deflection, the electrode beside the right eye will pick up a negative deflection. This
results in a large positive signal on the BPF9 channel (positive – negative = larger positive). The
amplitude and sharpness of the eye artifact depends on speed and magnitude of the eye
movement. The eye artifact from horizontal eye movements is largely limited to the BFP9
channel.
Patient looks to the left.
Figure 3. Second step of the BioCalibration (Signal Check) with correct electrode placement. Patient is
asked to look to the left. A positive deflection appears on BPF9. Very little artifact should appear on the
FP1 and FP2 channels unless the patient looks slightly upward or downward while looking to the left, in
which case small deflections will appear on these channels. The scalp EEG channels do not show much
horizontal eye movement artifact.
Page 6 of 16
SAM Technology
Confidential
February 6, 2004
Step Three – Ask the Patient to Look Right
Patient looks to the right.
Figure 4. Third step of the BioCalibration (Signal Check) with correct electrode placement. Patient is
asked to look to the right. A negative deflection should appear on BPF9. The eye movement artifact should
be restricted to BPF9.
Page 7 of 16
SAM Technology
Confidential
February 6, 2004
Step Four – Ask the Patient to Close the Eyes
Eye Closure
Alpha
Alpha
Figure 5. Fourth step of the BioCalibration (Signal Check) with correct electrode placement –the subject is
asked to close the eyes. This produces a large, slow positive potential on the electrodes above the eye (FP1,
FP2). As with the blink artifact, this spreads across the head, decreasing in size with distance from the eye.
Alpha may be apparent if the subject is relaxed, and the EEG does not contain too much muscle or
movement artifact.
Incorrect Electrode Placement
Since electrodes are plugged individually into the SWMT jack box, errors may occasionally
occur. Since the A1, A2, GND, and RHEO electrodes are shared between the MWT and SWMT,
the frequent plugging and unplugging of these wires increases the likelihood of such errors. If
such errors occur, the data will have to be discarded. Fortunately, these errors should be readily
apparent during the biocal. The tap test described in the final section will also help you detect any
incorrect connections.
This section provides a few examples of the patterns of eye blink and movement artifacts that will
appear if electrodes are mismapped in the jack box.
Page 8 of 16
SAM Technology
Confidential
February 6, 2004
Ground Electrode Mismapped with a Reference Electrode
If the ground electrode (usually placed at FPZ) is mismapped with a reference electrode (A1 or
A2) the error should be obvious during the first step of the biocal, when the patient is asked to
blink: Large inverted blink artifacts will be apparent in the EEG channels, with larger amplitudes
over more posterior regions.
Ground electrode
plugged into one
of the reference
electrode jacks
(A1 or A2).
Inverted blinks will
appear on all
channels, larger
towards the back
of the head.
Figure 6. GND mismapped to A1 or A2. Inverted blinks will appear on all EEG channels. Amplitude of
the inverted blink will increase with distance from the eye.
This pattern of inverted blink artifact occurs because activity from the ground electrode (which is
located on the forehead, and thus picks up blinks of similar amplitude to that seen on FP1 and
FP2) is averaged with activity from one of the mastoid locations. This averaged activity, which
will be equal to roughly half the amplitude of a typical blink, will then be subtracted from the
activity at each electrode. Thus blinks on FP1 and FP2 will be smaller than usual, although this
may not be obvious during the biocal. However, subtracting this blink from the EEG channels
will produce an obvious inverted blink across the head, with larger amplitudes apparent at the
back of the head. The difference in the amplitude of the inverted blink artifact across the head
occurs because the posterior channels normally do not pick up much blink signal, therefore, very
little of the blink artifact on the reference channel is canceled out.
Page 9 of 16
SAM Technology
Confidential
February 6, 2004
FP1 Mismapped with a Reference Electrode
If FP1 (or FP2) is mismapped with A1 (or A2), a similar inverted blink artifact will appear across
the head when the subject is asked to blink. The notable difference between these two situations
occurs on channel FP1. Since, in this case, A1 is plugged into the FP1 jack, the FP1 trace shows
the difference in the signal between the activity detected at the left mastoid (i.e at A1) and the
reference signal, which with this mismapping, is the average of the activity at the right mastoid
(A2) and at the FP1 location on the head (i.e., a large blink). The result is an inverted blink on the
FP1 trace.
Figure 7. FP1 mismapped with A1. The pattern of eye blink artifact is similar to that produced when
ground is mismapped with a reference electrode (A1 or A2); however, a diagnostic difference appears in
the FP1 trace (compare with FP1 in Figure 6).
Page 10 of 16
SAM Technology
Confidential
February 6, 2004
RHEO Mismapped with a Reference Electrode
If the lower right eye electrode (RHEO) and a reference electrode (A1 or A2) are mismapped, the
error will not be obvious when you ask the subject to blink, but will be very noticeable when you
ask the subject to look left or right (Figure 8). With proper connections, horizontal eye
movements produce deflections on the BPF9 channel only (see Figures 3 and 4). When a
horizontal eye electrode is mismapped with a reference electrode, the eye movement signal, since
it is now on the reference channel, will be injected into all the EEG channels:
RHEO electrode
plugged into one of
the reference
electrode jacks (A1
or A2). Large eye
movement artifacts
will appear on all
EEG channels when
the subject looks left
or right.
Figure 8. RHEO switched with A2. The patient is asked to look left then right. Large eye movement
artifacts are visible in all EEG channels. Normally, with correct connections, EEG channels will not show
horizontal eye movement artifacts (compare with Figures 3 and 4). Note that analogous results will appear
if LHEO is mismapped with a reference electrode.
Page 11 of 16
SAM Technology
Confidential
February 6, 2004
GND mismapped with RHEO
If the lower right eye electrode (RHEO) and the ground electrode are mismapped, the error will
be apparent on the BPF9 channel only. In this situation, inverted blinks will appear on BPF9.
Mismapping LHEO and ground will produce clear positive blink potentials on BPF9.
RHEO electrode and
GND electrode
mismapped.
Inverted blinks
appear on BFP9.
Figure 9. GND and RHEO mismapped. Inverted blinks appear on the BPF9 channel when the subject is
asked to blink. If GND and LHEO were mismapped, clear positive blinks would appear on the BPF9 trace.
NOTE: The pattern shown above will also appear if the upper eye electrode used in the
MWT (placed 1 cm lateral and 1 cm above the eye) is placed in the RHEO jack.
Inverted (or positive) blinks should not appear on the BPF9 channel. If you see such activity
during the biocal, check to be sure that the electrodes in LHEO and RHEO are both placed 1 cm
below and 1 cm lateral to the outer canthus of each eye.
Page 12 of 16
SAM Technology
Confidential
February 6, 2004
FP2 Mismapped with RHEO
If FP2 and RHEO are mismapped, inverted blinks will appear on BPF9, similar to the pattern
observed when GND and RHEO were mismapped. However in this case, FP2 will not show the
expected blink artifact. In this situation, the FP2 trace shows a small inverted blink (compare FP2
in Figures 9 and 10).
RHEO and FP2
mismapped. Large
inverted blinks
appear on BFP9;
small inverted blinks
on FP2.
Figure 10. FP2 switched with RHEO. Large inverted blink artifacts appear on BPF9, smaller inverted
blink artifacts appear on FP2.
Page 13 of 16
SAM Technology
Confidential
February 6, 2004
Mismapping Scalp EEG Channels
If scalp EEG channels are mismapped, looking at the EEG traces when subjects blink will alert
you to errors if they occur in the anterior-posterior direction (eg. F3 and P3) but errors in leftright placement (eg F3-F4) will not be detectable. The tap test will alert you to errors in this
dimension. In the example below, you should be able to see that F3 and P3 have been mismapped
because the amplitude of the blink on the F3 trace is much smaller than expected (remember, it
should be roughly the same as that seen on FZ and F4). Additionally, the amplitude of the blink
on P3 is larger than expected – remember, blink artifacts on posterior channels should be smaller
than those on more anterior channels, and in this example, the blink on P3 is larger than that on
Cz. Compare this figure to the correct mapping shown in Figure 2).
F3 and P3
mismapped. Blinks
on F3 are unusually
small, and blinks on
P3 are unusually
large.
Figure 11. F3 and P3 incorrectly mapped. Note that the amplitude of the blink is not decreasing regularly
from the front to the back of the head. The blink on F3 is unusually small, that on P3 is unusually large.
Page 14 of 16
SAM Technology
Confidential
February 6, 2004
Tap Test to Confirm Proper Electrode Connections
The best way to confirm that all electrodes are plugged in properly is to do a simple tap test.
While looking at the EEG traces during the Signal Check/biocal stage, locate and lightly tap each
individual electrode on the head, being careful not to touch the wires of any other electrode. You
should see a corresponding disturbance isolated to the channel that you are tapping. Figure 12
shows an example of tapping on electrode CZ. Tapping on either mastoid electrode will produce
large disturbances in all the channels except BPF9 (Figure 13). Tapping on either the RHEO or
LHEO electrode will produce disturbances on BPF9 only. Tapping on the ground electrode
should not produce disturbances in any of the EEG traces. Do the tap test for all SWMT
electrodes (LHEO, RHEO, FP1, FP2, F3, F4, FZ, CZ, P3, P4, POZ, A1 and A2) during the first
session of the day. For subsequent sessions, do the tap test for those electrodes that have been
switched (RHEO, A1, A2, and any others that were disconnected between sessions). Since
tapping the ground electrode will not produce disturbances on the EEG traces, visually check to
ensure that the FPZ electrode is plugged into the GND jack.
Figure 12. Tapping on CZ. The disturbance should appear only on the CZ trace.
Page 15 of 16
SAM Technology
Confidential
February 6, 2004
Tapping on either mastoid electrode produces large disturbances in all EEG channels except the
bipolar horizontal eye channel (BPF9).
Figure 13. Tapping on A1 or A2. All channels referenced to A1 and A2 will show the same large
disturbance. Note that BPF9 does not show the tap artifact. LHEO is referenced to RHEO to form this
bipolar channel, so the disturbance on the mastoid electrodes will not affect this channel.
Page 16 of 16
APPENDIX 10 J APPLES Blood Protocol
APPLES Blood Protocol
For APPLES participants, 8.5-10.0 ml of blood is collected the morning after the Diagnostic Appointment
following a night of fasting (at least 8 hours). There should be at least 2 hours between the blood draw
and the first neurocognitive test (SWMT). The sera is frozen and saved for safety purposes in the event
that a baseline blood sample is required for testing. The sera is stored in 5 1-ml aliquots until the subject
has completed participation in APPLES. Once the Exit Interview has been completed, the aliquots are
destroyed unless the subject is involved in the additional protocol studies and has signed a consent stating
that these aliquots can be utilized by the additional protocol investigators.
1. Training and Certification Requirements
Nurses or phlebotomists that are trained and certified by the local laboratory/hospital will perform the
blood draw.
2. Blood Collection Supplies
Prior to venipuncture two trays are prepared for each participant. One tray holds the Vacutainer tube
used in the blood collection (blood collection tray), while the other tray holds the 5 plastic aliquot
tubes (sample tray). Each tube should be prelabeled with the subject identification number and date.
The aliquot tubes should also be numbered #1-5. A black Sharpie pen is recommended for all
labeling.
Blood Collection Tray
It is recommended that the blood collection tray be made of hard plastic that can be easily cleaned. A
tray with individual compartments is useful for organizing supplies. The supplies should include at
least the following:
-
A plastic Vacutainer tube holder
Three Vacutainer glass red-top tubes (1 labeled, 2 back up)
Vacutainer Luer adapters (not necessary if the needles include the adapter)
Sterile, disposable 21 or 22 gauge butterfly or eclipse needles
Sterile alcohol swabs
A tourniquet
Gauze sponges
Paper tape
Bandages ("Band Aids")
Approximately 8.5-10.0 ml of blood is drawn from each participant using one glass red-top
Vacutainer tube. Back up Vacutainer tubes should be accessible. After drawing the blood, the tube
should sit at room temperature for 30 minutes to allow for clotting.
Rev. 1/04
page 1 of 6
Apnea Positive Pressure Long-term Efficacy Study (APPLES)
Sample Tray
The tray itself should accommodate tubes from 10-16 mm in diameter.
The technicians need the following supplies for each sample tray:
- Five 1.5-ml polypropylene microsample tubes
- Glass or plastic transfer pipettes
The aliquot tubes are labeled with the subject identification number, date, and aliquot #1-5. Once 30
minutes has elapsed, the Vacutainer tube is centrifuged and the sera is transferred to 5 1-ml aliquot tubes,
frozen and stored on site until required for testing or the subject has completed his or her participation in
the study. Once the subject has completed participation in APPLES (completed Exit Interview), the 5
sera aliquots may be destroyed unless the subject is unless the subject is involved in the additional
protocol studies and has signed a consent stating that these aliquots can be utilized by the additional
protocol investigators.
3. Blood Work/ EKG Summary Form
All information on the Blood Work/ EKG Summary Form (e.g., ID Number, date, and staff ID)
should be completed by APPLES staff during the blood collection process.
4. Specimen Collection
Prepare for specimen collection in the following manner.
Early morning, prior to drawing blood from the participants:
1. Check to make sure the blood collection tray and sample tray are properly equipped.
2. Check that the Vacutainer tube is properly labeled with the appropriate subject identification
number and date.
3. Check that each sample aliquot tube is labeled with the appropriate subject identification number,
date, and aliquot number.
4. Perform quality control (QC) check on temporary freezer temperature (if utilized, -20°C ± 10°C)
and record on the Blood Work/ EKG Summary Form.
5. Perform QC check on final freezer temperature (-70°C ± 10°C) and record on the Blood Work/
EKG Summary Form.
At participant arrival:
1. Check that the subject identification number on the tubes matches the subject identification
number on the Blood Work/EKG Summary Form.
5. Venipunctures
Precautions for Handling Blood Specimens and Guidelines
NOTE: Please view laboratory OSHA manual and CLEA manual for specific guidelines and
recommendations.
Rev. 1/04
page 2 of 6
Apnea Positive Pressure Long-term Efficacy Study (APPLES)
Handle all specimens as potentially infectious for laboratory workers. Transmissions of the infectious
agents associated with hepatitis and the acquired immunodeficiency syndrome (AIDS) via
"needlestick" skin punctures have been documented. Where feasible, wear disposable plastic gloves
when collecting and processing specimens. Alternatively, wash hands thoroughly with disinfectant
soap prior to leaving the work area. Cover skin cuts or abrasions. If the phlebotomist accidentally
sustains a contaminated needle stick, clean the wound thoroughly with soap and water and notify an
APPLES study physician. Store needles in a locked cabinet when the clinic is closed. Use OSHA
approved cleaning solution to clean up any spills of blood, plasma, or serum. Use this solution to
clean up all laboratory work surfaces at the completion of work activities. Dispose of all needles and
tubing in puncture-resistant containers for safe disposal. Do not perform any pipetting by mouth;
especially of any blood, serum, or plasma. Avoid creating potentially infectious aerosols by careful
pipetting and centrifugation. Place all used Vacutainer tubes and blood products in biohazard
containers for disposal.
Participant Preparation
Prior to the blood draw, the subject is asked whether he/she has a bleeding disorder. If such a disorder
is present, ask the subject whether he/she has had blood drawn previously and if so, whether he/she
had any problems with excessive bleeding or bruising at the venipuncture site. If the participant has a
history of venipuncture problems, the participant’s blood should be drawn only if approved by a
physician.
The subject should also be asked whether he/she has experienced syncopy (fainting) with blood
draws. If so, extra care should be taken. It may be necessary to contact the CC Coordinator.
Standardize blood drawing to the sitting position. It is difficult to standardize the length of time that a
subject is in the sitting position prior to venipuncture; however, it is recommended that the participant
should be in the sitting position 5 minutes prior to venipuncture to the extent that it is feasible.
Perform venipuncture with a 21 or 22 gauge butterfly or eclipse needle with 12 inches of plastic
tubing between the venipuncture site and the blood collection tubes. The participant should be given
enough time to feel comfortable both before and after the blood collection. In many cases the most
memorable part of the experience for participants will be the contact with the technicians who draw
the blood and their general attitude and competence.
Once blood is drawn, fill in date, time, and the phlebotomist’s initials on the Blood Work/EKG
Summary Form. The blood draw should be completed at least 2 hours prior to the neurocognitive
testing (SWMT at 10:25 AM).
HANDLING PARTICIPANTS WHO ARE EXTREMELY APPREHENSIVE ABOUT HAVING
BLOOD DRAWN.
If the participant is nervous or excited, the technician briefly describes the procedure, e.g., "I am
going to be drawing about 2 teaspoons of blood. This blood will be stored as a safety precaution”.
Do not under any circumstances force the participant to have blood drawn. It may help to explain to
the participant that the blood drawing is designed to be as nearly painless as possible. It may also be
helpful to have the participant relax in the blood drawing chair just so the phlebotomist can check the
veins in the participant’s arms, without actually drawing blood.
Rev. 1/04
page 3 of 6
Apnea Positive Pressure Long-term Efficacy Study (APPLES)
Venipuncture Procedure
With jacket or sweater removed, have the participant sit upright with the sleeves rolled up to expose
the antecubital fossa (elbow). Use a tourniquet to increase venous filling. This makes the veins more
prominent and easier to enter.
PRECAUTIONS WHEN USING A TOURNIQUET.
The tourniquet should be on the arm for the shortest time possible. Never leave the tourniquet on for
longer than two (2) minutes. To do so may result in hemoconcentration or a variation in blood test
values. If the patient has a skin problem, put the tourniquet over the participant’s shirt or use a piece
of gauze or paper tissue so as not to pinch the skin.
Assemble the butterfly-Vacutainer set.
1.
2.
3.
4.
5.
6.
Attach the adaptor to the Vacutainer holder.
Attach the butterfly (or eclipse) needle set to the adaptor.
Place the red top tube in the Vacutainer holder being careful not to break the vacuum.
Wrap the tourniquet around the arm 3 to 4 inches (7.5 to 10.0 cm} above the venipuncture site.
Tuck the end of the tourniquet under the last round.
If a velcro tourniquet is used, adhere the ends to each other.
Identify vein.
Palpate and trace the path of veins several times with the index finger. Arteries should be avoided
because they pulsate, are more elastic, and have a thicker wall. In addition, thrombosed veins should
be avoided because they lack resilience, feel cord-like, and roll easily. If superficial veins are not
readily apparent, have the participant close his fist. Lowering the extremity over the arm of the chair
will allow the veins to fill to capacity. Identify the best available vein.
Cleanse the venipuncture site.
1. Remove alcohol prep from its sterile package.
2. Cleanse the vein site with the alcohol prep using a circular motion from the center to the
periphery.
3. Allow the area to dry to prevent possible hemolysis of the specimen and a burning sensation to
the patient when the venipuncture is performed.
4. If venipuncture becomes difficult, the vein may need to be touched again with your hand. If this
happens, the site is cleansed again with alcohol.
Perform venipuncture.
1. Grasp the participant’s arm firmly, using your thumb to draw the skin taut. This anchors the vein.
The thumb should be 1 or 2 inches (2.5 or 5.0 cm) below the venipuncture site.
2. With the needle bevel upward, enter the vein in a smooth continuous motion.
3. Make sure the participant’s arm is in a flat or downward position while maintaining the tube
below the site when the needle is in the vein. It may be helpful to have the participant make a fist
with the opposite hand and place it under the elbow for support.
4. Grasp the flange of the needle holder and push the tube forward until the butt end of the needle
punctures the stopper, exposing the full lumen of the needle.
Rev. 1/04
page 4 of 6
Apnea Positive Pressure Long-term Efficacy Study (APPLES)
5. Remove the tourniquet after tube 1 fills. Once the draw has started, do not change the position of
the tube until it is withdrawn from the needle.
6. Keep a constant, slight forward pressure (in the direction of the adapter) on the end of the tube.
This prevents release of the shutoff valve and stopping of blood flow. Do not vary pressure nor
reintroduce pressure after completion of the draw.
7. Fill the Vacutainer tube as completely as possible; i.e., until the vacuum is exhausted and blood
flow ceases.
8. When the blood flow ceases, remove the tube from the holder.
If a blood sample is not forthcoming, the following manipulations may be helpful.
1. If there is a sucking sound, turn needle slightly or lift the holder in an effort to move the bevel
away from the wall of the vein.
2. If no blood appears, move needle slightly in hope of entering vein. Do not probe. If not
successful, release tourniquet and remove needle. A second attempt can be made on the other
arm.
3. Loosen the tourniquet. It may have been applied too tightly, thereby stopping the blood flow.
Reapply the tourniquet, taking care that it is not applied too tightly. If the tourniquet is a velcro
type, quickly release and press back together. Be sure, however, that the tourniquet remains on
for no longer than two minutes at a time.
4. The same technician should not attempt a venipuncture more than twice. To remove the needle,
lightly place clean gauze over venipuncture site. Remove the needle quickly and immediately
apply pressure to the site with a gauze pad. Discard needle with its cap into a sharps container.
Have the participant hold the gauze pad firmly for one to two minutes to prevent a hematoma.
5. If blood flow stops before collecting tube #1, the participant may need to be restuck.
Bandaging the arm.
1. Under normal conditions:
a. Slip the gauze pad down over the site, continuing mild pressure.
b. Apply an adhesive or gauze bandage over the venipuncture site after making sure that blood
flow has stopped.
2. If the participant continues to bleed:
a. Apply pressure to the site with a gauze pad. Keep the arm elevated until the bleeding stops.
b. Wrap a gauze bandage tightly around the arm over the pad.
c. Tell the participant to leave the bandage on for at least 15 minutes.
PRECAUTIONS - WHEN A PARTICIPANT FEELS FAINT OR LOOKS FAINT FOLLOWING
THE BLOOD DRAWING.
1.
2.
3.
4.
Have the subject remain in the chair, if necessary have him/her sit with head between knees.
Take an ampule of smelling salts, crush it, and wave it under the subject’s nose for a few seconds.
Provide the subject with a basin if he/she feels nauseous.
Have the subject stay seated until normal coloring returns to the subject’s face and he/she feels
better.
5. Place a cold wet cloth on the back of the subject’s neck.
6. If the subject faints, use smelling salt to revive.
7. If the subject continues to feel sick, take a blood pressure and pulse reading. Contact an APPLES
study physician, who will advise you on further action.
Rev. 1/04
page 5 of 6
Apnea Positive Pressure Long-term Efficacy Study (APPLES)
Blood Mixing During Venipuncture
To invert tubes, hold the tube horizontal to the floor. Slowly tip the stopper end down while watching
the air bubble rise to the butt. (1st inversion) When the bubble reaches the butt, the tube should be at
approximately a 22-degree angle to the floor with the center of the tube at the fulcrum. Now, lower
the butt end while watching the bubble float to the stopper. Again, the tube should be at a 22-degree
angle to the floor with the center of the tube at the fulcrum. (2nd inversion) Lower the stopper end
again when the bubble reaches the stopper. This is the third inversion. Invert each tube eight times.
Eight inversions should take 6-13 seconds.
6. Blood Processing
At the conclusion of venipuncture, the Vacutainer tube is incubated at room temperature for 30
minutes (set a timer).
As soon as possible after the 30 minutes timer goes off, (not longer than 45 minutes after blood
collection), spin the tube #at 3,000 x g for 10 minutes. Record centrifuge start and stop time on the
Blood Work/EKG Summary Form. Refer to centrifuge operating manual for specific operating and
balancing instructions. Centrifuge revolutions per minute may vary from center to center depending
on rotating radius of the centrifuge.
Red-top Vacutainer Tube
1. Remove the red top Vacutainer tube from the centrifuge and place it in the test tube rack.
2. Remove the stopper from the tube. Use a transfer pipette to aliquot the serum equally into the five
aliquot tubes.
3. Seal the aliquiot tubes. Samples must be placed into at least a -20°C ± 10°C freezer within 90
minutes from venipuncture time. The samples must be transferred into the final freezer (-70)
within 72 hours. Record the location (rack #) and time that the samples are placed in the freezer
(temporarily in the notes section) on the Blood Work/EKG Summary Form.
4. Replace the stopper on the red top blood collection tube and discard it in a biohazard waste
container.
7. Quality Control (QC)
Venipuncture and Equipment Records
One method of QC used by APPLES is the frequent recording of the equipment performance. This is
most easily kept as a log sheet with the frequent records, as described below. The other aspect of
quality control is the record of the venipuncture which is part of each participant’s records. It also
shows the number of attempts it takes to get a good venipuncture and the staff ID number of the
technician who performs it. This record provides needed assurance that the blood was drawn in a
standardized manner and that the equipment was functioning properly.
A temperature log should be kept on all freezers for QC purposes.
Rev. 1/04
page 6 of 6
APPENDIX 11
11A
SUBJECT INFORMATION SUMMARY SHEET (SISS)
11B
EMERGENCY CONTACT INFORMATION FORM
11C
ENCORE SUMMARY FORM
11D
PROTOCOL DEVIATION VIOLATION FORM
11E
INTRODUCING AN APPLES SUBJECT TO CPAP
11F
CPAP SET-UP INSTRUCTIONS
11G
HANDLING POTENTIALLY UNBLINDING QUESTIONS
Apnea
Positive
Pressure
Long-term
E fficacy
S tudy
Subject Information
Summary Sheet
Staff
/
Date
/
Name
/
Date of Birth
/
(MM/DD/YYYY)
Gender
0
Male
Ethnicity
0
American Indian/Eskimo/Aleutian
Asian/Pacific Islander
Black
Hispanic
White
Other ethnicity
1
2
3
4
5
1
Female
Weight
lbs.
or
Kg.
Height
ft/in. or
cm.
/
Enrollment Date
/
(MM/DD/YYYY)
Coded Initials
Consent Obtained
0
Yes
1
No
Final ID#
Staple copy of CSQ, Subject Identification Form (printed once a new subject
is created), and Consent Form to this sheet. These documents must be stored
in a secure location (e.g., Locked file cabinet).
Keyed In: Initials
Rev. 10/03
Date
/
/
A pnea
P ositive
P ressure
L ong-term
E fficacy
S tudy
Emergency Contact
Information
ID#
Staff
/
Date
Time
:
/
am pm
Person to notify in case of an emergency (relative or friend):
Name:
Address:
City, State:
Phone:
Allergies to medications and/or drugs (please check off)
Latex
Aspirin
Solvents (Acetone / Collodion)
Environmental Allergies
Tape
Other
Rev. 8/03
Encore Summary
Report
A pnea
P ositive
P ressure
L ong-term
E fficacy
S tudy
1. Date range (mm/dd/yyyy)
/
Staff
/
Date
/
to
3. Percent days with device usage
/
/
percent
minutes
hours
5. Maximum usage (1 day)
hours
minutes
6. Average usage (all days)
hours
minutes
7. Average usage (days used)
hours
minutes
8. Minimum usage (1 day)
hours
minutes
9. Percent of days with usage < 4 hours
percent
10. Notes/Comments:
Keyed In: Initials
Rev. 2/04
/
days
2. Number of days in range
4. Cumulative usage
ID#
Date
/
/
Protocol Deviation /
Violation Form
A pnea
P ositive
P ressure
L ong-term
E fficacy
S tudy
ID#
Staff
/
Date
1. Type of Event
Protocol Deviation
Protocol Violation
2. Cause of Event
Staff
Other
Subject
3. Description of Event (provide additional detail if appropriate)
Deviations:
Test not administered
Delay in testing schedule >30 min.
Scheduled visit outside allowed range
Transposing CRFs between subjects
Other
Violations
Unblinding of subject
Unblinding of staff
Consistent failure to submit reports to DCC
Consistent failure to maintain data flow
Failure to meet recruitment and randomization goals
Other
4. Assessment / Outcome
Rev. 2/04
/
Introducing an APPLES Subject to CPAP
Below is a list of items that should be discussed with the subject while introducing them
to CPAP. This is not a script, so it does not need to be read verbatim. You may present
the material in any order as long as each item is covered.
•
•
•
•
•
•
•
•
•
•
•
•
•
•
Tonight you will be trying CPAP for the first time; therefore, we will spend a
few minutes right now practicing so you will feel more comfortable with the
process. We will also be selecting a mask.
As you may know, CPAP stands for Continuous Positive Airway Pressure. It
consists of four basic parts: an air pump, a humidifier that warms and moistens
the air, a mask that fits over your nose with straps that hold the mask in place,
and a hose that connects the mask to the pump.
The pump pulls in regular room air and gently blows the air through the hose,
into your nose, and down your throat. The air that enters your nose is filtered
room air, not concentrated oxygen.
The air pressure acts like a splint to keep your airway open while you sleep.
This helps to normalize your breathing.
You will probably not be able to tell whether you are assigned to the real CPAP
group (Active CPAP) or to the ineffective CPAP group (Sub-therapeutic CPAP).
We’ll start by having you hold the mask in place, but during the night straps will
keep the mask in place.
The mask must have a good seal to work properly, so when we turn the pressure
on you may need to adjust the mask slightly so that no air leaks from the area
between the mask and your face.
It is very important that you keep your mouth closed while wearing the mask. If
your mouth is open the air leaks out your mouth and can be uncomfortable.
Do you have any questions?
I am going to turn on the air pressure now, so just relax and breathe normally,
inhaling and exhaling through your nose.
The air you feel coming out of the front of the mask is from a valve that allows
exhaled air to escape.
Let’s try another mask style and you can decide which you prefer.
During the night, I may come into the room to adjust the headgear or add a
chinstrap, if necessary.
If you find that air is persistently leaking from your mouth or that you are
frequently awakening with a dry mouth and throat despite using the attached
humidifier, notify our team, and we will provide you with a chinstrap that can
help keep your mouth closed during the night.
Dealing with Claustrophobia:
• If you are feeling a little overwhelmed it’s okay. Some people feel
uncomfortable when trying CPAP for the first time or first few times, but the
feeling will typically go away. Sitting up straight can make it easier to breath.
We will also try another mask to find one that is more comfortable.
• Try to relax and hold the mask in place without the air pressure turned on to get
used to the feel of the mask. You may find it more comfortable to breath
through your mouth until we turn the pressure back on.
• Let me know when you are ready, and I will turn the air pressure back on. You
may want to read or watch television while you practice to take your mind off
the mask and allow your body to become accustomed to breathing against the air
pressure naturally.
• It may feel funny or uncomfortable when you open your mouth to talk or cough;
although, you will become accustomed to this sensation over time. For now, if
you want to open your mouth to talk, cough, etc., tipping the mask up away from
the nose will make it more comfortable.
APPLES
Active/Sham CPAP Set-up Instructions
1.
Show CPAP equipment unassembled.
2.
Demonstrate by assembling filters/cover, water chamber/heater, and
power cords/inter-connect cord.
3.
Have subject perform a return demonstration to be certain he/she
knows how to assemble and disassemble the CPAP equipment.
4.
Demonstrate how to turn on and adjust the heater. Have the subject
return demonstrate.
5.
Explain that the water level in the chamber will vary from subject to
subject.
The use of water may be related to heater setting,
breathing rate, room temperature and humidity, etc.
6.
Express importance of refilling the water chamber daily and cleaning
the chamber regularly.
7.
Go over how to clean mask, tubing, humidifier, and filters. Provide
handout explaining maintenance and cleaning of CPAP equipment.
8.
Explain that both C-Flex and the ramp feature have been disabled for
the duration of the study. Explain that all units, active and sham,
have the investigational use sticker.
9.
Mask fit. Fit optimal size/type mask to patient. Have PAP running
while fitting mask. Preferably have subject lying supine while fitting
mask. Explain importance of having the headgear straps adjusted
evenly, they should not pull the straps too tight. Show that you can
cut off blue tabs on headgear.
10. Smart Cards.
Demonstrate how the card fits in the machine.
Demonstrate how to remove a used card and insert a new card.
Incorporate some type of tracking system on card folders or
envelope so the subject knows which card to insert and when.
11. Reinforce that they need to use the equipment at least 4 hours a
week.
12. If subject plans to travel by air while in the study, offer to provide a
letter stating that he/she is part of a research study and must use
the equipment every night.
5/25/2004
Handling Potentially Unblinding Questions
for APPLES Subjects on Sub-therapeutic CPAP
1) Why is there a large air leak at the end of my mask? Can anything be done about it?
The purpose of the air export slot is to release CO2 gas that can build up in the mask during
normal breathing. It is important not to cover the slot during the night with either a body part or
a pillow. If you were to cover up that leak, CO2 could build up and be potentially harmful.
2) That air leak is very loud. Can we make it less noisy?
Unfortunately, there is nothing that can be done about the volume of escaping air. You will find
that after a few nights of adjustment the noise that you hear will become part of your normal
bedtime routine and you may even find it to be comforting! Some CPAP patients liken the
sound to a white noise machine that is difficult to sleep without. Please give it a couple of
night’s adjustment. If the sound is still disturbing to you or your partner, we recommend using
everyday drugstore variety earplugs.
3) I thought I'd stop snoring after using this machine. Why am I still snoring?
Although some people do stop snoring after CPAP use, everyone reacts differently to CPAP.
Some people don’t experience any reduction in snoring with CPAP and that’s perfectly normal.
Just because snoring continues does not mean you are not getting a better nights sleep!
4) I believe I'm getting no benefit from using my machine. I think I'm on SHAM.
Numerous CPAP users, even in a standard hospital setting, see a very small improvement in their
day-to-day lives. Recognizing benefits is sometimes overlooked because improvement from
CPAP therapy is a gradual process. You may have been missing sleep for 5, 10, or even 15
years; therefore, you’re not going to make up that huge sleep debt in a week or even in several
months! Through continual use of CPAP, many users do experience benefits, but are not
actually aware of them because it’s such a gradual process. Your improvement can best be
measured by cognitive testing which is done in our lab during your next visit.
5) Why doesn't the water level in my humidifier go down?
Humidity from CPAP use is affected in many different ways which include altitude, room
temperature, body temperature, apnea severity, and sometimes even mask types. All CPAP
settings are preset according to study guidelines and although we will be happy to check your
machine for a possible malfunction, it is most likely working properly. Continue to fill the
reservoir each night, or you can even try CPAP without the humidifier (do not turn on the heat).
Not everyone likes the humidifier and it is not absolutely necessary to use it.
6) When I turn the temperature up on my humidifier, the unit automatically stops heating
after a few minutes. Why is that?
The humidifiers are preset to heat to a certain temperature in order to help with CPAP use during
sleep onset. Should your CPAP machine stop heating there is nothing to worry about. In other
words, it may not be necessary to use the heater all night long. If the heater turns off
automatically, the CPAP machine has reached its optimum operating temperature.
7) Why is my insurance company not being billed for my home CPAP machine?
Due to the fact that you are participating in a clinical research study, the billing may be
staggered. Rest assured that we will confirm your billing is handled appropriately.
8) I now notice that I have a permanent dent forming on my forehead from wearing my
CPAP mask. I don't like having that. Is my mask too tight?
The mark is not permanent and will go away after a week or two; although, we can try loosening
your mask. Can you come by our sleep lab for an adjustment? (Other options: spacer, nasal
pillow, simplicity mask?)
9) I am experiencing headaches from using my CPAP machine. When I take the mask off,
my headache goes away. Will I ever get used to this?
It sounds like your mask may need to be readjusted. (Patients may be covering CO2 release,
CO2 may be building up in mask). Come by our sleep lab and we will readjust it for you.
10) After starting CPAP I developed a very bad cold, so bad that I had to go see my doctor.
This may have been a coincidence, but might it be possible for CPAP use to cause an
extremely bad cold w/nasal congestion?
Rhinitis is a common occurrence in CPAP use when patients first begin therapy. This is often
caused by the nasal passage being dried out. To alleviate symptoms of nasal dryness, the
humidifier may be turned up or a nasal spray may be utilized (e.g., Flonase or Atrovent). Severe
nasal drip can also occur. (In this instance the patient may need to discontinue CPAP use for a
few days to allow the cold to clear up).
11) What can I do about this sore on the bridge of my nose? How can I make it go away?
It is important to treat pressure sores immediately once they develop. If possible, it is best to
temporarily discontinue use of CPAP therapy while treating the sore with a first aid ointment
allowing it a chance to heal. However, after approximately one week, you will need to resume
using your CPAP machine, even if the sore is not completely healed. Loosen your mask straps
and apply mole skin to the sore, and begin CPAP use as before.
12) Why am I not getting enough air?
Although you may feel as though you are not getting enough air you may simply be getting used
to the therapy. (If the subject is on Active CPAP, pressure can be adjusted accordingly at the
scheduled appointments).
13) How can I fix the leaks around my mask?
The headgear can be adjusted to eliminate any leaks. If you are unable to get a good seal, you
may need to change mask size or style. If you'd like, we could set up a time when you could
come by our sleep lab to check that your mask is fitting properly. (Loosen or tighten straps,
change mask).
14) My mouth is dry in the mornings – what can I do about that?
It may be helpful to drink a few sips of water each time you get up during the night. Also, chin
straps may be helpful. It is very important to keep your mouth closed while using CPAP. If your
mouth is open, you may notice that your mouth and throat feel dry in the morning. Using a
chinstrap can help keep your mouth closed. Another option is to try increasing the temperature
on your heated humidifier.
15) Why don't I feel any difference in pressure when I woke up in the sleep lab?
While you were sleeping I adjusted the CPAP pressure both up and down to find your optimal
pressure. The pressure that you woke up with is the best setting for you. Everyone is different.
Different people need different pressures. Also, it may be that the pressure you started with was
the optimal therapeutic pressure for you.
16) When will I find out results?
You will find out whether you qualified for the study about a week or two after your diagnostic
sleep study and you will receive the specifics of your diagnosis at the end of your participation.
If you come back for a 2nd sleep study, you have a Respiratory Disturbance Index high enough
to participate in our project, which is considered clinically significant.
17) Can I have a copy of these data?
In short, you will receive a copy of your sleep study report at the end of your participation in our
research study. Further, any relevant data will be passed on to your doctor or an appropriate
physician should you choose to continue CPAP therapy at the end of the study.
18) Can I have a copy of my CDs?
We would be happy to give you a copy of the CDs made during your visit. Unfortunately to
view the files you would need specialized Alice 4 software.
General response that may be included when answering questions:
If you would like, we can pass your concerns on to a study physician and he/she can contact you
to address any topics you may want to discuss.
General response related to CPAP problems:
Unfortunately, we are limited by the approved tools that we can use during this study. However,
we have several different masks types and sizes that you may find more comfortable with the
symptoms you are experiencing. Once you have completed your participation in this study our
staff physician will be more than happy to address your concerns and try different methods that
may not have been approved for usage during the study.