1
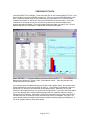
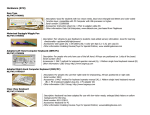
USING THE PVT-192 UNIT FOR THE APPLES STUDY
The face of the PVT unit has a small window on top for the stimulus presentation. A larger
window below this for displaying alpha / numeric data. On the bottom of the face are 2 small
black buttons. The one on the left moves the cursor in the display window from left to right. The
button on the right is the enter button. Once you have moved the cursor to the correct location
with the left button, press the right button to enter. We have placed labels below each of the
black buttons, Select on the left, and Enter on the right. This helps to avoid any confusion.
When not in use it is best to leave the unit plugged into the charger. The PVT units loose their
battery charge fairly rapidly. Next to the charger port is the serial cable port. A serial cable
attaches from this port to a free serial COM port on your computer. During software installation
you will set up which COM port you will use for the PVT.
There are 2 primary modes of use in the PVT, subject and supervisory. Separate passwords are
needed for each mode. The Supervisory password is preset by the manufacturer and is standard
for every PVT-192 unit. This number is 31267. The subject password can be changed if needed.
The default password is 123.
To put the unit into supervisory mode:
Make sure the serial cable is attached to both the computer and the PVT unit.
Turn the power switch to on. The unit will self test then bring up the Select screen on the display.
Press the left button to cycle between Test and Setup. When Setup is highlighted, press the right
button. The Access screen is now displayed, with the numbers 0-9, Q, E, and R. Q = quit, E =
erase, and R = return. Use the left button to cycle through the numbers, highlight 3 and press the
right button. The number 3 now appears on the first line next to Access. Now cycle through the
numbers highlighting the rest of the supervisory code in the proper order. After you enter the last
number, cycle the cursor to Q and press the right button. If you make a mistake and enter the
wrong number, cycle the cursor to E and press the right button to erase the last number. The unit
should now display Supervisory Mode on the display.
To put the unit into subject mode:
The unit should not be attached to the serial cable.
Turn the power switch on. The unit will self test then bring up the Select screen on the display.
Press the left button to cycle between Test and Setup. When Setup is highlighted, press the right
button. The Access screen is now displayed, with the numbers 0-9, Q, E, and R. Q = quit, E =
erase, and R = return. Enter the appropriate code; we have left ours at 123. A Select Setup
screen appears in the display with 3 choices, Param (parameter), Clock, and Ret (return). Select
Param and enter.
Study [NAME] appears on the first line of the display, with the letters A thru J, +QE on the second
line. + advances to the next line of letters, Q = quit, and E = erase. [NAME] represents the
name of the current study in the unit. If you have initialized the unit with the APPLES study, it will
ready XX APPLE with XX the 2 letters of your site. If it comes up with any other study name, the
APPLES data has not been sent to the unit. You can set it up manually through the unit, but it’s
faster just to use the PVTCOMM program to do it. Cycle the cursor to Q and press enter. The
Mood scale name should appear. We have it listed as Fatigue?. Cycle the cursor to Q and enter.
E Initials appear. This is the experimenter initials. If the initials are not correct, use the cursor to
cycle through the alphabet to select them. The + sign will bring up the next line of alphabet
characters. S Initials are now displayed. This is subject initials. You will need to use the cursor
to cycle through the alphabet characters to select the 3 initials, then Q to quit. Subject X is now
displayed. Cycle the cursor thru the numbers to select the correct subject numbers and enter.
Trial _ now appears. For this study, the first digit is the year, and the second digit is the patient
visit. 1 will be the initial PVT during the diagnostic visit; 2 will be during the 2 month follow-up;
and 3 will be for the PVT during the 6 month follow-up. Cycle thru the numbers to select the
appropriate trial number and enter. The next screens list the minimum interval, maximum
Page 5 of 10