1
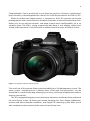
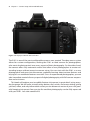
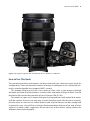
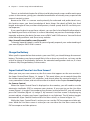
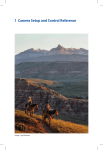
Camera Control Reference
•
•
•
•
•
11
Copyright and Artist Name for image metadata: Page 419
Image file naming system: Page 414
Eye detection sensor: Page 432
Button function configuration (takes some time): Page 296
Connection to your smart phone or tablet: Page 459
Now that you have configured your camera’s initial functions, let’s examine the various
buttons, dials, and switches on the camera and briefly discuss the functionality of each
one.
Camera Control Reference
This camera control reference is designed to help you locate and understand the purpose
of each of the buttons, dials, and levers on the camera.
Many (if not most) of the buttons on the camera can be configured to offer alternate
functionality. In fact, the E-M1 is the most configurable camera I have used in over 40 years
of photography. You can truly customize this camera to work the way you prefer, for both
external controls and internal functions.
If you have a problem locating one of these buttons, please refer to the External
Control Location section in the beginning of this book.
Let’s examine each of the external camera controls in alphabetical order. We will examine each of the internal functions in later chapters.
Buttons
AEL/AFL button: The AEL/AFL button is fully programmable and can accept
tasks listed in the Appendix. You can find instructions for how to assign a task
to the AEL/AFL button on page 299. Its factory default task is AEL/AFL, which
locks autoexposure (AEL) and autofocus (AFL) when you press the button, and unlocks it
when you press it again.
AF/Metering mode button: This button allows you to control the type of
light meter and autofocus the camera will use. Press the button and turn the
Front Dial to control the metering type. Press the button and turn the Rear
Dial to control the autofocus modes. There is a limited amount of programmability for
these two buttons, tied in with the Lever functions in the Custom Menu, as described on
page 319.
Arrow pad buttons: The Arrow pad buttons are normally used to scroll
through camera menus, pictures, and various screens. The Arrow pad has four
buttons, including one each for up, down, left, and right. As you read through
the instructions for configuring many of the camera functions in this book, you will often
read “scroll to the right,” or some other direction. This is a reference to using the Arrow pad