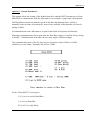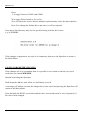
1
MM-FILE
CAD COMPATIBLE DATA TRANSFER SOFTWARE
by
MICROMAT®
Welcome
Welcome to the MICROMAT® MM-FILE® software system. The features and
operating instructions included in this manual are for your convenience and will assist you
to transfer CAD compatible data from disk into your drilling machine.
About MM-FILE
MM-FILE software, from Micromat, provides the link between printed circuit board CAD
data and the Micromat PCB drilling system. MM-FILE runs on an industry standard PC
(personal computer) and is therefore capable of reading CAD data on MS-DOS format
floppy disks. This accounts for the majority of the presently available CAD PCB data.
MM-FILE will accept CAD drilling data in MICROMAT, ASCII and EIA formats and
transfer it to Micromat drilling machines via an RS232 serial link or to any other system
fitted with a serial connection.
MM-FILE software also allows Micromat format drilling and routing files to be
transferred via the serial link to the PC for disk storage.
MM-FILE software is protected by a security key which must be connected to one of the
parallel printer ports of the PC. The parallel ports are the 25 way SOCKETS on the rear of
the computer. The 25 and 9 way PLUGS are for RS232 connections. If in doubt then
please consult the hardware manual which came with your computer system.
A paper tape reader punch may be connected to the PC to allow the preparation of punched
tapes for machines other than the Micromat, or to accept tapes from CAD systems which
are unable to provide valid data on floppy disks.
Micromat
1
MM-FILE V1
IMPORTANT
The CAD data to be transferred MUST be drill data, PHOTO-PLOT data files (Gerber) are
NOT acceptable in any format whatsoever, because, although some may be found to be
satisfactory, there can be no guarantee that accurate drill data is contained in this type of
file.
SYSTEM REQUIREMENTS
Micromat RS232 software, (version 5.19 or later), must be fitted to the Micromat drilling
machine control system in order for the Micromat system to be compatible with MM-FILE.
The operation of the Micromat interface circuit is controlled by the LOAD and SAVE
commands on the Micromat control panel.
The term "RS232" refers to one of the electronics industry’s most misunderstood standards
and the user must consult the manual of any other equipment which may be connected to
ensure full compatibility, although in most interconnection applications a pin to pin 25 way
cable will be suitable.
The signals available on the RS232 connector are described later to enable the user to
connect the interface to other equipment such as a paper tape reader/punch.
MM-FILE requires an MS-DOS computer (IBM or compatible) with at least 512K of
memory, MS-DOS or PC-DOS version 3, or higher, and a minimum of one floppy disk
drive. A system which has a colour screen and includes a hard disk is recommended.
2
Micromat International
MM-FILE V1
INSTALLATION
HARD DISK SYSTEMS
Switch on your computer normally, put the MM-FILE diskette in drive A or B, and at the
C:> prompt type:
a:install a c
or b:install b c
and press ENTER.
The MM-FILE programs will be copied into a directory named C:\MICROMAT and the
program may be run by typing ‘MMF’ from the hard disk root directory.
Put the original disk somewhere safe!
FLOPPY DISK SYSTEMS
If you are using a single or twin floppy disk system, prepare a bootable DOS disk on your
system by using the DOS ‘FORMAT /S’ command and then simply copy to it all the files
from the supplied MM-FILE disk by using the DOS ‘COPY *.*’ command.
Drill programs can be saved on drives A or B, and a supply of blank, formatted disks should
be available for this purpose.
To run the program, simply put the disk in drive A, switch the computer on and MM-FILE
will start automatically.
For single floppy drive systems, once MM-FILE has loaded, remove the disk and replace it
with a formatted disk on which to save data or a disk containing the CAD drill file for
transfer to the Micromat.
In the case of a twin disk system, option 3 from the main menu will allow the active data
disk to be changed so that drive B: can be used for data and the MM-FILE program disk can
remain in drive A:
Backup copies of your drill programs can be made simply by copying your data disks using
the DOS command ‘DISKCOPY’.
Micromat International
3
MM-FILE V1
OPERATION
Start the MM-FILE program by entering MMF on a hard disk system or by starting the
computer with the MM-FILE disk in drive A:
Option 1 - MACHINE (MICROMAT) TO DISK (PC)
The MAIN MENU will be displayed.
Select option 1 from the menu, ‘Machine to Disk’, by pressing the 1 key.
Enter a filename for the program to be saved to disk.
If you choose a filename which already exists you will be offered a chance to change it to
prevent overwriting it and loosing any previously saved data.
4
Micromat International
MM-FILE V1
If no extension to the name is entered, then the ‘.MMM’ extension will be used as the
default. This identifies the file as Micromat format drill data.
This 3 character extension can be used to help identify the correct file at a later date.
When instructed, as shown on the following screen, ensure that the correct drilling machine
is connected to the PC or is selected on the switch box if fitted (T-switch) and press the
SAVE button on the Micromat for at least one second until the bleeper has stopped and the
RS232 input software will be activated.
(A short press of less than 1 second on the Micromat SAVE button will access the cassette
software as normal.)
The PC screen will show the data format and number of commands being received and the
END light on the Micromat will show completion of the data transfer.
After the file has been saved to disk, the system will allow the entry of manufacturing data.
This data is stored with the drill data as a Tool Size Data file and is available when next the
job is loaded into the drilling machine.
Micromat International
5
MM-FILE V1
Option 2 - DISK (PC) to MACHINE (MICROMAT).
Select option 2 from the MAIN MENU, ‘Disk to Machine' - Press the 2 key.
A list of the available files on the DATA DRIVE will be displayed.
Identify the required file and highlight it by using the arrow keys on the PC keyboard.
Select the file by pressing the Spacebar and the following screen will be shown.
6
Micromat International
MM-FILE V1
If the installation is fitted with a switch box (T-switch) in the serial line from the PC,
ensure that the correct machine has been selected and press the LOAD button on the
Micromat for at least one second until the bleeper has stopped and the RS232 output
software will be activated. (A short press of less than 1 second on the Micromat LOAD
button will access the cassette software as normal.) Then press the ENTER key.
The PC screen will show the data format and the number of commands being output.
Reading of the drill program by the Micromat will stop when a Micromat end of program
command, an "M30" or "$" code is read or if the RESET button is pressed. Normally the
END light will show transfer completion and the program can be inspected, modified or run
as normal on the Micromat.
After the job has been loaded into the drilling machine the Tool Size Data file, if one exists,
will be displayed on the screen and if a printer is fitted to the system then this data may be
printed by simply using the computer’s built in Print Screen function.
Drill files may be concatenated (joined together) by pressing HOLD on the Micromat, after
loading the first program, and loading further programs via MM-FILE. Each successive
file will be appended to any already transferred.
Micromat International
7
MM-FILE V1
Option 3 - Tool Size Data Files
This option allows you to create or amend a Tool Size Data file to give the operator help in
allocating tool sizes the next time the job is run.
Amending may be necessary if a customer’s job is updated and saved to disk with it’s
original job number or name and the drill information has been changed.
If no Tool Size Data file exists you will be given the option to CREATE one:
Pressing Y and then ENTER will allow you to enter a new data file which should be given
the same name as the drill data file. The Tool Size Data file will be stored with the entered
name followed by an extension of ‘.TSD’ to avoid confusion with other files
Enter the relevant data for each tool size as prompted on the following screen.
8
Micromat International
MM-FILE V1
Up to 15 different sets of tool data may be entered, and the numbers you enter should
reflect the numbers required by the drilling machine.
To leave data entry before all 15 sizes have been entered, press the Escape (Esc) key and
the cursor will move to the Blank Size section of the screen. This is simply for information
needed for the board manufacture and is not used by any of the MM-FILE software.
Either pressing Escape (Esc) or completing the line with the Enter key will move the
cursor to the Notes section where anything you feel you should remember next time the job
is run may be entered. The line may be completed or simply left blank by pressing Enter.
After the Notes section is completed, the Tool Size Data file will be saved to disk along
with the drilling file.
If a Data File does exist you will be given the option to AMEND it:
Answer ‘Y’ to change things (‘N’ will leave it all as it is.)
‘AMEND TOOL NO?’
To change tool number data just enter the tool number without the T and type the new data,
followed by enter.
If Feed or Speed data are to remain the same then you must re-enter the original numbers.
If you do not need to modify any tool data then just press Enter to move on.
Micromat International
9
MM-FILE V1
‘AMEND BLANK SIZE (Y/N)?’
‘Y’ will allow you to over-type the old data and ‘N’ or just ‘ENTER’ will move you to:
‘AMEND NOTE NUMBER?’
Hit the Enter key to leave the notes as they are, or enter a number from 1 to 4 to change
whichever line.
The selected line will be cleared and new information entered.
‘ALL FINISHED (Y/N)?’
‘Y’ returns to the MAIN MENU and ‘N’ will allow you to start again.
Please note that this data is for operator information only and is not transferred into the
drilling machinewith the actual drill coordinate data.
10
Micromat International
MM-FILE V1
Option S - System Parameters
This option allows the setting of the default data drive and the RS232 parameters to allow
MM-FILE to communicate with the Micromat or, for example, a paper tape reader/punch.
The Baud Rate controls the transfer speed of the data and although faster (9600) is
normally better in terms of productivity, most of the available reader/punches will need a
setting of 4800.
If communication with a Micromat is required, then 9600 will operate satisfactorily.
Micromat communications also require that the Data Bits setting is 8 and the Parity setting
is NONE. Communication with other devices may require different settings.
The communication port of the PC may also be selected as either COM1 or COM2,
whichever you are using. Normally this will be COM1.
At the "Setup RS232" screen press:
1,2,3,4 or 9 to set the Baud Rate.
7 or 8 to set Data Bits.
N, O or E to set the Parity.
Micromat International
11
MM-FILE V1
Press:
C to toggle between COM1 and COM2.
W to toggle Wessel mode to Yes or No.
(Yes will show the correct Wessel machine keyboard entry codes for data transfers)
Press D to change the default drive and enter A or B as required.
Note that a Sub-directory may also be specified along with the drive letter.
e.g. A:\PCBDRL
If the changes in parameters are only to be temporary then press the Spacebar to return to
the Main Menu.
SAVING PARAMETER CHANGES
If the changes are to be permanent then it is possible to save them so that they are used
each time you launch MM-FILE .
Instead of pressing the Spacebar:
Hold down the Alt key and, while it is held down, press S.
A message will inform you that the changes have been saved and pressing the Spacebar will
return to the Main Menu.
Note that both the RS232 screen data and the drive screen data must be saved separately if
they have been changed.
12
Micromat International
MM-FILE V1
PC to other drilling machines.
By inserting a multi way switch (T-switch) in line with the RS232 cable from the PC's
communication port, a number of other drilling machines or other devices, such as paper
tape readers, can be connected to the system and selected at will.
Option S, ‘System Parameters’ can be selected from the main menu to allow the system to
be set to communicate with different devices which may require different settings for the
RS232 interface. The settings as supplied will be found to cover most needs.
MICROMAT PARAMETER SETTINGS
The Micromat Baud Rate can be set to 300, 1200, 2400, 4800 or 9600 and this is selected
by the right hand digit of the SIL switch.
e.g.
BAUD Rate
SIL Switch
300
1200
2400
4800
9600
03
01
02
04
09
MICROMAT TOOL SWITCH SETTINGS AND DATA INPUT FORMAT
The format of the data to be transmitted over the serial link and RECEIVED by the
Micromat is determined by the setting of the tool switch.
TOOL SWITCH
0
1
2
3
4
5
6
7
8
9
10 - 15
Micromat International
CODE
UNITS
ACCEPTABLE FORMAT
ASCII/ISO
ASCII/ISO
EIA
EIA
ASCII/ISO
ASCII/ISO
EIA
EIA
not used.
EIEIO V42
not used.
MM x .01
MM x .01
MM x .01
MM x .01
INCH x .001
INCH x .001
INCH x .001
INCH x .001
No Leading zeros, 5 digits
No Trailing zeros
No Leading zeros, 5 digits
No Trailing zeros
No Leading zeros, 5 digits
No Trailing zeros
No Leading zeros, 5 digits
No Trailing zeros
MM x .01
N/A (binary data)
13
MM-FILE V1
Tool Switch positions of 0 to 7 will all accept 5 digit numbers with both leading and trailing
zeros.
Positions 1,3,5 and 7 will accept numbers with more than 5 digits but will truncate them to
5 digits.
On tools 0 and 2, "100" will be read as one millimetre. ( 1.010mm )
On tools 1 and 3, "01" will be read as one millimetre. ( 1.010mm )
On tools 4 and 6, "1000" will be read as one inch. ( 1.0100" )
On tools 5 and 7, "01" will be read as one inch. ( 1.0100" )
DATA OUTPUT FROM THE MICROMAT
Tool Switch positions of 0 to 7 will ALL output 5 digit metric numbers with both leading
and trailing zeros.
Tool Switch position 9 is the only one which will allow the transmission and reception of
Micromat programs which include routing commands, drill speed and feed information, and
step and repeat data.
All other selections other than 9 will only handle drilling data i.e. HOLES, and therefore
Micromat drill programs MUST be expanded before transmission. If not, then any RPT or
BRACKET commands will be ignored.
14
Micromat International
MM-FILE V1
DATA STORAGE AND ORGANISATION
HARD DISK
Although it may seem a good idea to keep all drill files on the hard disk of a computer
system it MUST be remembered that hard disk drives CAN and DO fail. This means that
your data is vulnerable, and storage on hard disk should NOT be undertaken unless you are
prepared to make frequent backup copies. The DOS Backup command can be used for this
purpose but it requires a supply of floppy disks and is very time consuming.
With the best will in the World it will not be done often enough. In a working environment
a backup should be made at least once a day and probably more often if there is a high
throughput of data.
To make the backup operation reliable and effective the system should include a cartridge
tape backup system. This will make a security copy of all your data in minutes instead of
hours. The cost of such a system will be repaid many times over the first time there is a
problem with either the hard disk or the computer system.
FLOPPY DISKS
Probably a more sensible approach is to store ALL drill data on floppy disks on a "one disk
- one job" basis.
Floppy disks are low in cost, have the ability to be readily copied for security purposes and
can be stored safely in a filing system along with the rest of the paperwork for each
particular job.
This makes repeat jobs simple as all the manufacturing data is kept securely in one place
with no possibility of a computer failure destroying valuable data.
Even if the computer in use should fail the data is safe and can be loaded into the drilling
machine through a replacement computer with a minimum of down time.
We therefore recommend that drill files are NOT stored on hard disks but on FLOPPY
DISKS on a "ONE DISK - ONE JOB" basis, in the firm belief that this is more reliable
and more economic in the long term.
Micromat International
15
MM-FILE V1
DATA FORMAT
General format (n = number)
%
Tn
or
XnnnnnYnnnnn
or
XnnnnnYnnnnn .. etc.
M30 or $
TnXnnnnnYnnnnn
XnnnnnYnnnnnTn
start of drill file
hole coordinates and tool number
hole coordinates and tool number
end of drill file
The Tool numbers may be on separates lines or on the same line as the first coordinates of
that tool size. If the T command is on a separate line then the next set of X and Y
coordinates will use that tool size.
Coordinates are expressed as a string of digits with no embedded
punctuation, such as commas or decimal points. A + or - sign before the number is
acceptable. Negative numbers are stored in binary twos complement and they will usually
appear in the program as large positive numbers. The pattern may, however, be moved
using the Micromat MOVE command and will then appear correctly. It should be moved a
positive amount equal to, or slightly greater than, the largest negative amount in either X or
Y in the drill file.
e.g. -0.01mm would appear as 655.35mm. If the program was moved +0.05mm then it
would appear as 0.04mm ( - 0.01 + 0.05 ).
Each coordinate value must follow a letter "X" or "Y". If an "X" or "Y" coordinate is
missing completely then the previous value will be used, or 0 if no previous value read. "
X" or "Y" alone equals 0.
Only tool numbers and X and Y coordinates are processed. Any other special codes, apart
from "M30" or "$" are ignored.
If values are read in that appear to be too large or too small then change the INCH/METRIC
option on the Tool switch and try again. If the values read in will not fit on the table then
the pattern may be moved using the normal Micromat commands. In extreme cases some
holes may be pushed off one edge of the table and reappear on the opposite edge, the
pattern appearing as two split patterns. The normal Micromat MOVE procedure should
recover even this situation.
If the file has already been processed by MM-PLOT then its position on the drill bed will
already have been corrected as required.
16
Micromat International
MM-FILE V1
X Y SWAP
If the X and Y values need to be exchanged to fit the program on to the Micromat table the
required Micromat commands are:
1)
2)
3)
4)
5)
6)
7)
Press reset.
Switch on
Switch on
Switch on
Press and hold
Press
Press
PROG.
HOLD.
CHECK.
LOAD until the tone ends.
CTRCCW
(the left-hand "CTR" command).
RESET
X and Y values will then be swapped.
Micromat International
17
MM-FILE V1
CONNECTIONS
RS232 signals are available on the 25 way "D" connector, signal functions and directions as
listed are with respect to the Micromat interface.
pin
signal
interface function
1
2
3
4
5
6
7
PG
TXD
RXD
RTS
CTS
DSR
SG
Ground (OV)
Received Data
Transmitted Data
Clear to send
Request to send
Linked to 5 (CTS)
Common (OV)
direction
input
output
input
output
output
-
In the receive mode, accessed after a one second press of the LOAD button, data may be
sent to pin 2, (TXD), only when the interface is ready to accept data as indicated by the
CTS line, pin 5, going high (+12V). As a data word is received the CTS line will go to 12V and will return to +12V when ready to accept a further word. While the CTS line, pin
5, is low, (-12V), data must not be sent to the interface from the host computer. In the
transmit mode, accessed after a one second press of the SAVE button, one word of data will
be sent from pin 3, (RXD), when the RTS line, pin 4, is high (+12V). Consecutive data
words will be sent while the RTS line is at +12V but data transmission will halt if pin 4
(RTS) is held low. The interface will connect directly to an ‘EPSON’ type serial printer
using up to 15 metres of screened cable between two miniature 25 way "D" connectors a
ribbon cable will suffice for short distances.
CONNECTING CABLE
MICROMAT I/F
to
TYPICAL 25 PIN HOST or 9 PIN HOST
pin 1
pin 2
pin 3
pin 4
pin 5
pin 6
pin 7
pin 20
to
to
to
to
to
to
to
to
pin 1
pin 2
pin 3
pin 4
pin 5
pin 6
pin 7
pin 20
SCREEN
TXD
RXD
RTS
CTS
DSR
Common
DTR
SCREEN
TXD
RXD
RTS
CTS
DSR
Common
DTR
pin
pin
pin
pin
pin
pin
pin
3
2
7
8
6
5
4
TXD
RXD
RTS
CTS
DSR
Common
DTR
Note that 9 pin to 25 pin adaptors are available from your PC supplier.
The operation manuals of other equipment should be consulted before connection is
attempted.
18
Micromat International
MM-FILE V1
SOME OF THE CAD PACKAGES ALREADY SUPPORTED BY MM-FILE.
GCAM
OrCAD
PROTEL
BOARDMAKER 2
GCAM
VUTRAX
RACAL
P-CAD
EEDESIGNER
EAGLE CAD
GCAM
PC PADS ( PADS DRILL )
SEETRAX ( EXCELLON METRIC )
ULTIBOARD
EASY-PC ( AS FROM 28/03/90 )
TERADYNE
ECAM
RANGER
MENTOR
Micromat International
19
MM-FILE V1
20
Micromat International