1
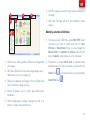
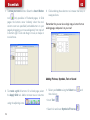
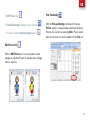
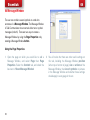
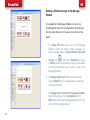
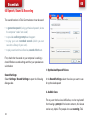
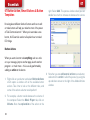
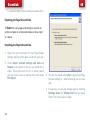
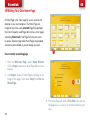
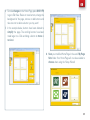
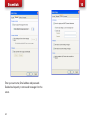
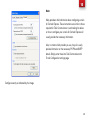
Getting Started with Essentials
Getting Started
Tobii Communicator - Getting Started with Essentials
Applies from Tobii Communicator Version 4.6.
Content subject to change without notice.
Please check Tobii web site www.tobii.com for updated
versions of this manual.
Important:
Manual Version 2.0
09/2011
All rights reserved.
© Tobii Technology AB
The information contained in this document is proprietary
to Tobii Technology. Any reproduction in part or whole
without prior written authorization by Tobii Technology is
prohibited.
Tobii_GettingStartedGuide_Communicator_V2_0_01092011_UKEng.indd
2
Please back up all computer files occasionally, including
your Page Sets. The My Page Sets folder, located in My
Documents, should be copied to a separate computer or
memory device for safekeeping.
This booklet contains limited information. For more details,
please see the Tobii Communicator User’s Manual. A
searchable Help function is available within the software.
Select Help > Tobii Communicator User’s Manual or
Help for Tobii Communicator.
Getting Started
Essentials
1. Installing
4
01 Editing Buttons in Run View & Edit View
8
2. Starting Tobii Communicator 4
5
02 Setting Up For a User or Multiple Users
12
3. Activating Tobii Communicator 4
5
03 Making a New Page and Adding Buttons
15
4. Welcome Page
6
04 Message Window
20
5. Ready-Made Page Sets
7
05 Speech, Sound & Recording
24
06 Navigation & Linking Pages
28
07 Button Action, Smart Buttons & Button
Templates
32
08 Backing-up, Importing & Exporting Pages
35
09 Making Your Own Home Page
38
10 Configure E-mail and Tobii Communicator 4 42
11 Eye Control Settings
46
3
Getting Started
Welcome to Tobii Communicator 4
Tobii Communicator 4 enables people with physical or communication disabilities to use a computer or
communication device. It can produce speech, allow the user to write in text or symbols, send messages
or e-mails and provide control of other computer programs. It is also easy to create interactive games,
activities and much more.
2. Install SymbolStix Library:
1. Installing
Press the button ‘SymbolStix’ to start the
Tobii Communicator 4 has 2 installation CDs.
installation of the symbol library SymbolStix.
Please install in the sequence described below.
By installing this component you get
access to more than 10.000 symbols
Application CD
designed by professional illustrators.
After you have inserted the CD into your computer’s CD
drive, you will see a window in yellow design on the screen,
offering installation of two components.
1. Install Tobii Communicator 4:
Press the button ‘Tobii Communicator
4’ to start the installation of the main
Communicator program on the CD.
You must always install this component.
4
Additional resources: Voices
After you have inserted the CD into your computer’s CD
drive, you will see a yellow window with an option to install
another component.
3. Install Acapela voices:
the user’s communication device, the therapist’s laptop,
and an assistant or teacher’s computer.
Press the button for the selected voice
to start the installation of the Acapela
synthesized voices.
By installing this component
Communicator will to be able to speak text
with synthetic speech.
2. Starting Tobii Communicator 4
t Installing this software automatically places
an icon on your Windows desktop.
t Double-click the icon to start the program.
3. Activating Tobii Communicator 4
t When Communicator 4 starts, you will be prompted
to activate Tobii Communicator 4. Start the Licenses
Manager, next select Activate and follow the onscreen instructions to complete the simple activation
process, or use the Evaluation Mode temporarily.
Each serial number serves up to three computers, e.g.
t Your serial number can be found on the CD box. To
move the licence to a new computer, first deactivate the
current license.
t After successful installation, you are advised to ensure
that your software is up to date. Select Help > Check
for Updates and perform this check regularly.
5
Getting Started
4. Welcome Page
t Recent Page Set: Easy access to recently opened
Page Sets.
Tobii Communicator 4 will open on the Welcome Page.
t Page Set Central: Lets you open the Page Set Central
home page in an internet browser. Share Page Sets with
others over the internet. http://www.pagesetcentral.com
Settings and Tools
t Setup Wizard: Allows you to choose which Page Sets
the user would like to use, choose a start-up page, setup
the user’s input method, e-mail contacts, phrases and
other personal settings.
Page Sets
t View Ready-Mades: Allows you to see and try all
the existing Page Sets that are included with Tobii
Communicator 4. These can also be used as a starting
point for making your own.
t Create a new Page Set: Automatically opens the
“Page Set Dialog”, from where you can create a new
page set. Once you have created and saved a page set,
it will appear in the Ready-Made Pages section, under
My Page Sets.
6
t Settings: Allows you to quickly access settings such as:
Sounds, Add phrases, Configure keyboard, Configure
e-mail, mobile phone, Facebook, system settings, etc.
t Import/Export: Import and Export user data to and
from any device.
t Licenses: Licenses handling for Tobii Communicator 4
and the Tobii Sono Suite.
Go To
t User’s Home: Customized User’s Home page.
t Change user: Allows you to change the currently active
user.
t Help & Training: Access to help and training information
on the Tobii webpage, on our YouTube channel, the Help
file and the PDF manual.
1
2
t Exit: Exit and close Tobii Communicator 4.
5. Ready-Made Page Sets
A Page Set is simply a collection of Pages that are linked
together and saved as one file. Tobii Communicator
4 comes with a variety of Ready-Made Page Sets,
including text- and symbol-based communication pages,
on-screen keyboards, games, music players and remote
controls.
1. Click on the Tabs on the top of the page to see different
types of Ready-Made Page Sets (Text or Symbol
pages, Keyboards, Mail etc.)
2. Click on the page image to see or try a Page Set.
Explore some of the pages that are provided for you!
You can return to the Welcome Page by selecting the
Exit button located on the page you have visited or by
right-clicking anywhere on a page and then selecting
Back.
7
Essentials
01 Editing Buttons in Run View & Edit
View
Run View
This is the ‘working’ or User’s mode of the program,
where pages you have made or edited are ready for use.
When buttons are pressed in Run View, their sounds,
actions and links will work. To go to Run View, press F5.
8
01
Modifying a button in Run View
Press F5 to go to Run View. Right-click on the button you
want to modify and select Edit Button. This opens the
Edit Button Wizard which can change the text, picture
or symbol and sound on the button. Click Next to move
through the wizard.
01
2. Button Picture searches for a symbol or picture
from the Picture Libraries that have been added to
Tobii Communicator 4, or allows browsing for images
located elsewhere on the computer. Try various words
when searching for pictures and symbols! The most
suitable picture might be ‘labelled’ something different
than the Button Text.
1. Button Text is what is written on the button. This
need not be the same as what the button ‘speaks’
when pressed. For example, a button containing a
picture of a horse may be labelled ‘Riding Lessons’.
When pressed, the button could say ‘Tom is going to
his riding lesson today’.
9
Essentials
3. Sound on Click allows you to change what the
button ‘speaks’ when pressed. It can produce
synthesized speech, saying either the Button Text
or an alternative message. When using recorded
sounds, Tobii Communicator 4 matches the Text
to speak. If no matching sound is found, Tobii
Communicator 4 can revert to synthesized speech
for that button. You can also record a sound directly
to the button, using your computers microphone, by
selecting the Record Sound button.
10
01
Changing Settings in Run View
While in Run View, you are able to change certain settings
for Tobii Communicator 4. If you cannot see the menus
(File, View, Tools etc.) at the top of the screen, press Esc.
To remove the menus again, press F10.
Edit View
This is the ‘design mode’ of the program and allows
editing of existing buttons and pages, or making new
pages. Buttons will not perform any actions or make any
sounds etc. when pressed. You can change all settings
from within this view. To go to Edit View, press Shift+F5.
01
7
5
1
2
4
6
3
6. Grid Tool: Apply an automatic grid layout of buttons to
the page.
7. Menu bar: Settings and tools are available in these
menus.
Modifying a button in Edit View
1. To ensure you are in Edit View, press Shift+F5. Select
the button you want to modify and then the Text,
Picture or Sound tool. Here, you can change the
Button Text, the symbol or picture and what the
button ‘speaks’ when pressed – all in one place.
1. Work area or editing window: Where you design/edit
your pages.
2. Remember to check which tool is selected when
editing buttons. To click on a button, you will need the
2. Edit Tools: Special tools that make page design easy –
add buttons, links, text, images etc.
Select tool
3. Page List: A preview of all pages in the set. Right-click
here for access to page settings.
Insert Text tool
, or for entering text, you may need the
4. Button Templates: List of useful pre-made button
templates.
5. Button Appearance settings: change the look of a
button – shape, colour, border etc.
11
Essentials
02
02 Setting Up For a User or Multiple Users
A special Page Set called ‘Setup Wizard’ helps you
through the steps to prepare Tobii Communicator 4 for a
user.
You can choose which pages to use and adjust the input
settings (such as whether the user will use a mouse,
switches, eye control or an alternative input method).
If more than one user or therapist will be using Tobii
Communicator 4 on a single computer, each person
should have their own user profile.
Setting up for a Single User
From the File menu, select Run Special Page Set and
then Setup Wizard. Alternatively, from the Welcome
Page, select Setup Wizard. There are five steps to work
through, indicated by the buttons along the bottom of the
page.
1
2
3
4
5
Select Step1: Check the white box next to each page
set that the user would like to use, including any you have
made yourself. All selected page sets will be indicated with
a check mark.
Select Step 2: Choose a Home Page for the user. This
can be any of the page sets selected above, or one of the
pre-made Home Pages (which automatically link to your
chosen page sets), or you can make your own.
Select Step 3: Choose the order in which pages should
appear on the Home Page. You may want to put more
frequently used page sets near the top.
12
02
Select Step 4: Adjust the User Settings including input
method (e.g. switches, eye tracking etc.), adding the
user’s own contacts, music, frequently used phrases
and configuring e-mail and phone or messaging
settings.
Most of the these settings can also be adjusted from
Settings in the Windows menu at the top of the screen.
Work through each section in this step. As you select an
option, such as ‘Add Phrases’, a further window will open
where you will be able to add useful phrases for this user.
Select Step 5: Choose how Tobii Communicator should
always start: on the Welcome Page, on the user’s Home
Page or in Edit View.
13
Essentials
Setting up for Multiple Users
If several users all use one computer in a school, they
would need their own Tobii Communicator 4 user profile.
For example, an assistant’s profile could open in editing
mode and be controlled by mouse and keyboard, while the
user’s profile could automatically open on his/her Home
Page and be configured for scanning control.
To Create a New User: Select the menu command
Settings, then Users and Manage Users. Enter the
name of the new user.
You may wish to always start Tobii Communicator 4 with
a particular user profile – the user’s settings, rather than
the assistant’s, for example.
To set the Start-up user, select Settings then Users and
Change Start-up user.
You can also start Tobii Communicator 4 on a page which
shows all the user profiles on that computer, and allows
14
02
the user to select their own. Select Settings then Users.
Next, select Change Start-up User and check the option
Allow me to select user on start-up.
Tobii Communicator 4 will now start on a page similar
to this:
03
03 Making a New Page and Adding
Buttons
Create...
Creating a New Page Set
t Device Templates (for print use only)
From the Welcome Page, select Create new Page Set,
to open the New Page Set Dialog.
t Blank Page Set for Screen 1 or for Paper 2
t Activity Templates (for print use only)
Open...
Or, ensure you can see the windows menus (press Esc
in Run View) or are in Edit View (press Shift+F5) and
select File then New to open the New Page Set Dialog.
t Recently Used
t My Page Sets
t Ready-Made Page Sets
New Page Set Dialog
t Browse... (for any Page Set)
Making New Buttons
1
In the New Page Set Dialog the user can choose to create
a grid or freehand page set for screen or print.
2
15
Essentials
1. To draw your own buttons: Select the Insert Button
tool
(only possible in Freehand pages, in Grid
pages the buttons occur indirectly when the row/
column count are specified) and add buttons to your
page by dragging your mouse diagonally from top-left
to bottom-right. Click and drag to move, re-shape or
re-size these.
03
3. Click and drag these buttons to increase their size, or
swap positions.
Remember that you can also simply copy a button from an
existing page, and paste it on your own!
Adding Pictures, Symbols, Text or Sound
2. To create a grid of buttons: On a blank page, select
the Apply Grid tool. Add or remove rows or columns
using the adjoining icons.
1. Select your button using the Select tool
then click on:
t Insert Text
t Search for and insert Symbols/Pictures
16
and
03
t Edit Picture Tool
Free Positioning
t Free Positioning of elements within a button
With the Free positioning combined with the new
Picture search it is now possible to add more Symbols/
Pictures into a button by selecting Add in Picture search.
More text elements can also be added with the Text tool.
t Or access further sound/message options
Edit Picture Tool
With the Edit Picture tool it is now possible to make
changes to a Symbol/Picture, for example: draw, change
colours, rotate etc.
17
Essentials
Buttons – The Basics
You can change the button’s colour, border width, shape
etc. using the editing icons in Edit Mode (Shift+F5).
03
t Static Text and Static Pictures
are buttons
that are automatically non-selectable. These can be
used for instructional or decorative purposes.
Adding a new page to a Page Set
t To change the size of a button, select the button and
drag the border to the desired size.
1. Select Page from the menus at the top of the screen,
then New Page.
t To move buttons: on a grid page, drag the
button you want to move to its new location. It will
automatically swap places with the button that was
there. On a non-grid page, you may move buttons
freely, but they will not automatically swap places.
2. Or, right-click on the existing page in the Page List,
and select New Page. Pages may also be duplicated
or deleted here.
t You can make buttons of ANY shape using the
Polygon tool
. Select the tool, and click each
point of the shape you would like to make.
t It may be useful to have hidden buttons (for hiding
a button, rather than deleting it) or non-selectable
buttons (for making visible buttons inaccessible).
Non-selectable buttons are also excluded from scan
groups. Right-click on a button and select Button, then
either Hidden or Non-selectable.
18
03
Saving your Page Sets
Select File then Save. If this is a new page set, you will
be asked to name the set. You should always save it in the
correct user’s My Page Sets folder. By default, the user
name is Guest, unless you have added more users.
19
Essentials
04
04 Message Window
The user can combine several symbols or words into
sentences in a Message Window. The Message Window
in Tobii Communicator 4 can contain either text or symbol
messages (or both). There are two ways to create a
Message Window: by using the Page Properties or by
creating a Message Window button.
Using the Page Properties
1. Open the page on which you would like to add a
Message Window, and select Page then Page
Properties. Select the Content tab, and check the
box next to ‘Show Message Window’.
20
2. You will notice that there are other useful settings on
this tab, including the Message Window position
(either top or bottom of page), size or actions of the
Message Window, the size of symbols or pictures
in the Message Window and whether these settings
should apply to every page in the set.
04
Creating a Message Window Button
1. Open the page on which you would like to add a
Message Window and insert a button using the Insert
Button tool.
It can be whichever size, shape and
position you choose.
2. In the Button Templates tab, under the Message
Window section, you will see that there are readymade button templates. Click on your button, and then
select the option you would like from the templates
list – either a Text and Symbol Message Window,
or Text only.
3. Your button will automatically receive a label and a little
‘cog’ in the upper left corner, to show you that it is now
a Message Window.
Making it work
Once you have created a Message Window, make sure
that the buttons on your page know how to ‘talk’ to the
Message Window. Select all the buttons containing text or
symbols that you want to send to the Message Window.
It is most efficient to select multiple buttons at one time
(using ordinary Windows mouse actions and keyboard
shortcuts).
1. In the Button Templates tab, under the Write
section, there are two ready-made button templates.
Select Write Button Text. To test whether they are
working, press F5 (for Run View) and click on a
button. To return to Edit View, press Shift+F5.
21
04
Essentials
Sending a different message to the Message
Window
It is possible for the Message Window to write or say
something other than what is visible/written on the button.
You may even choose not to have any text written on the
button.
1. To change the text that is sent to the Message
Window: Select the button whose message you
want to change. Select the Smart Button Type and
Actions tool
and select Properties to open
the Write button action dialog. Here you will be able
to write the alternative text you wish to send to the
Message Window.
2. To change what is said: Select the button and
use the Sound tool. This changes what is said upon
activating the button.
To change what is said by the message window:
Select the button, go into the properties of the
Write action and choose the appropriate option in the
section “When reading content”.
22
04
Editing the contents of the Message Window... and
much more.
1. To create buttons that erase, speak, move the cursor
within a message etc.: Create a new button, right-click
on it and select Button Actions. Select the Message
Window tab. There is a list of actions you can ‘add’
to the button – try these powerful options to see what
they do. Click on an action to see a description of what
it does, then select Add.
23
05
Essentials
05 Speech, Sound & Recording
The sound functions in Tobii Communicator 4 can be used:
1
2
3
t to generate speech (using synthesized speech, where
the computer ‘reads’ text aloud)
t to provide auditory prompts and support
t to play your own recorded sounds (which you can
save into a library of your own).
t to play sound and music libraries, sound effects etc.
First, check that the sound on your computer is working –
check Windows sound settings and that your speakers are
switched on.
1. Synthesized Speech/Voices
Sound Settings:
Select Settings / Sound Settings to open the following
dialogue box.
In the Sound Settings, select the voice you want to use
for synthesized speech
2. Audible Cues
For any user that has visual difficulties, or who may benefit
from hearing a prompt of the button contents, this feature
can be very helpful. For people who use scanning, Tobii
24
05
Communicator 4 can read the name of the scan-group
as the scan advances. See the Audible Cue tab under
Sound Settings for the many settings available here.
3. If you want the button to say something other than
what is written on the button:
3. Read as you Type
t Using Recorded Sounds: See Below
t Using Synthesized Speech: Select the option ‘Speak
this text’. This can also be done from the Sound tool.
You can control whether each letter, word, or sentence is
read aloud as it is typed into a Message Window. This can
be very helpful for people who need additional support
while writing.
Recording Sounds
Button Sounds
1. In Run View - Right click the button to change and
select Edit Button.. to start the Edit Button Wizard.
To change which sound is made when a button is pressed,
and to specify the details of any auditory cues provided by
a button:
2. Select Next unit Sound on Click.
Many laptops have built-in microphones, but the quality of
recordings is often better from an external microphone.
3. Select Recorded sound. (see 4)
4. Select Record sound. (see 5)
1. Select the Button Sound tool
option you would like.
and check the
2. By default, Tobii Communicator 4 will ‘speak’ exactly
what is written on the button, as long as the option
‘Synthesized Speech’ is selected.
25
05
Essentials
Sound Libraries
Tobii Communicator 4 can support multiple sound libraries
– for example, you may have a collection of sound files
from the Internet, as well as your own recorded sounds.
To tell Tobii Communicator 4 where to find these sound
libraries:
4
5
5. Record and save the recorded sound.
Remember to name the sounds carefully, if you are
using the Edit Button Wizard to record the sound
the Wizard will automatically name the file correctly,
– Tobii Communicator 4 automatically searches for
a recorded sound name that matches a button’s
text, so name a sound ‘Whistle’ rather than ‘Sound
1’ for example. These are all added to the user’s My
Recorded Sounds folder, which can be copied and
managed in the same way as Windows folders.
26
Select Tools / Sound Libraries and New. Then Browse
to the location of your new sound library. You may want to
name the library in a descriptive or useful way for future
use, for example ‘My Audio Books’.
05
Smart Buttons
You can create buttons that allow the user to adjust the
volume, change the voice (for example, switching to a
whispering voice in some situations – as long as you have
different voices installed on your computer) or stop any
sound file that is playing.
1. Select the Smart Button Type and Actions tool
select Add, and select the Sound tab. You can
choose several options here, by adding these to your
button.
27
Essentials
06
06 Navigation & Linking Pages
If there is more than one page in a Page Set and the user
will need to move from one page to another, you will need
some buttons which can perform these links. For example,
a button labelled ‘Food’ may link to a page with all of the
user’s favourite foods.
Making a Linking Button
1. First, create all the pages you want to link to/from,
before you start adding links to buttons. This is done
in Edit View (Shift+F5). New pages can be added
by right-clicking on the page in the Page List to the
left of the editing window, and selecting New Page.
2. Select the button you want to add a link to, and select
the Add Links tool
or right-click on the button
and select Button Actions, the Miscellaneous tab
and then Go to. This will open a new window where
you can choose where to link to.
3. Selecting Go to Page, will open a window showing
all the pages in this Page Set for you to choose from
28
06
Linking Principles
Placing all linking buttons consistently on every page helps
users to learn where to expect navigation buttons. You
may want to place these out of the way if users are likely to
select them accidentally, or in easily accessible locations if
users will want to navigate frequently.
4. Remember that there are Button Templates created
for some common links too – see the list to the left of
the editing window.
Linking buttons can have any appearance you wish, but it
may be helpful to have an image or text that indicates the
content of the next page. This could also be achieved by
colour coding – for example a blue linking button may link
to a page with a blue background etc.
29
Essentials
Linking to other Page Sets
You can link to another Page Set, rather than just another
page within the same Page Set. For example, a user may
have a ‘home’ page, with links to a communication page
set, a games page, a remote control etc.
06
Right-click on the page in the Page List to the left of the
editing window, select Page Actions and then either Page
Open Actions or Page Close Actions
1. As for any link, click on the button you want to add a
link to, and select the Add Links tool.
2. Select Go to Page Set and Browse to the Page Set
you would like to link to. Select one of the ready-made
Page Sets, or if you have made your own Page Sets,
these will usually be located in the My Page Sets
folder.
Actions when opening or closing a Page
3. In this example, select Page Close Actions, the
Sound tab, select Stop Playing and Add.
You may want an action to occur every time a Page is
opened or closed. For example, you might want to stop any
sounds that may have been playing when a user leaves the
current page.
4. Each time this page is closed (i.e. when a button links
away from this page) any sounds will stop playing.
30
06
Actions when opening or closing a Page Set
As above, you may want an action to occur when a new
Page Set opens or closes. For example, you may want to
clear any deleted messages each time a user closes a text
messaging page set.
1. Select File, Page Set Actions and then either Page
Open Actions or Page Close Actions.
2. In this example, select Page Close Actions, the
Mobile tab, Clear Deleted Messages and Add.
31
Essentials
07 Button Action, Smart Buttons & Button
Templates
07
right. Select Add. This opens a window where you can
decide how much to increase or decrease the volume.
Knowing about different kinds of buttons and how to edit
or make buttons will help you make the most of the power
of Tobii Communicator 4! When you have made a new
button, this Essentials section will explain how to make it
DO things.
Button Actions
When you want a button to do anything, such as: write
or say a message, jump to another page, launch another
program – or much more – this is usually performed by
adding an action to the button.
1. Right-click on your button and select Button Actions
which opens a window with all the available button
actions. Take time to look at the different tabs, and
some of the actions a button could perform!
2. For example, a button could decrease the volume of
the computer. Select the Music Player tab, click on
Volume. Note the explanation of the action on the
32
3. Note that you can add several actions to one button,
and control the order in which they occur, by using the
up and down arrows to the right of the Added Actions
window.
07
Smart Buttons
Smart Buttons are those with additional capability
pre-programmed for you. For example, if making a Match
game, you can create a button that already knows how
to check whether two matching buttons were selected
consecutively.
This is done by using the pre-made Smart Buttons – one
of which is a ‘Match Item’ button.
1. Right-click on a button and select Smart Button
Type or select your button, and then select the Smart
Button Types and Actions tool,
Change.
then select
Button Templates
2. Select the Games tab and then Match Item. Your
button is now a Smart Button – it contains a lot of
information, but is very simple for you to make!
Some of the most frequently used Button Actions and
Smart Buttons have been pre-made for you and are
available in the list of Button Templates in Edit View
(Shift + F5).
3. Take time to look at the different tabs, and some of the
Smart Buttons you could create!
1. To use a Button Template, select your button, ensuring
that the Select tool
your button.
is enabled before clicking on
33
Essentials
2. In the Button Templates list, select the template you
would like to apply (for example, Write Button Text
– which sends text to a Message Window). Many of
these will add a label to your button, to indicate the
selection you have made.
3. To adjust any available properties (such as whether to
send the text on the button, or a different message to
the Message Window), double-click on your button,
click on the action you have applied, and select
Properties. If there are adjustable properties here,
this will open a further window with more options.
34
07
08
08 Backing-up, Importing & Exporting
Pages
Backing-Up your Page Sets and Data
It is extremely important to back-up any personalized
Page Sets and user data (contacts, phrases, settings etc.).
Remember to do this each time you make any
modifications to a user’s Page Sets. This will save time
and save the user’s personal pages, if they need to be
reinstalled!
1. To make a back-up, select the menu command File
then Import/Export Settings and Data which
opens a wizard to assist you.
2. Check Export selected settings and data, Next
and Standard Export. A Standard Export is usually
sufficient and will collect all of the user’s page sets,
settings, recorded sounds, phrases, contacts,
dictionaries, and grammar settings.
3. Next, name the archive – usually the user’s name.
4. Choosing where to save this back-up is important. We
recommend you save it onto another computer, an
external USB memory device, or a CD. This will mean
35
Essentials
08
it is safe and ready to import should you need to do so.
Exporting your Page Sets and Data
To Export the user’s pages and settings to use them on
another computer or communication device, follow steps 1
to 4 above.
Importing your Page Sets and Data
1. Select the menu command File then Import/Export
Settings and Data which opens a wizard to assist you.
2. Check Import selected settings and data and
browse to the location of the files you would like to
import. These may be on the CD or memory device
you have used to store or transfer them with. Select
Full Import.
3. You can now decide which user to apply these Page
Sets and settings to – either an existing user or a new
user.
4. If necessary, you can later change users by selecting
Settings, Users then Change User from the menus
(Press F10 if these are not visible).
36
08
Importing Files Made in Other Software
You can import and use boards that you have made in
some other software, such as SD Pro or Boardmaker. For
SD Pro for example:
3. Each individual page will appear as a thumbnail
image in the user’s My Page Sets folder. Select the
front/starting page from these and use your boards
as usual.
1. From the menus, select File, and Import SD Pro files,
which will open a wizard to assist you.
2. Browse to the location of the SD Pro files on your
computer, and select Next to proceed with the wizard.
37
Essentials
09
09 Making Your Own Home Page
A Home Page is the ‘main’ page for a user, much like the
desktop on your own computer. The Home Page can
simply be one of the user’s selected Page Sets (perhaps
their most frequently used Page) or it can be a ‘main’ page
containing links to all of the Page Sets the user wants
to access. Several ready-made Home Pages are provided
and can be personalized, or you can design your own.
Use or modify an existing page
1
1. From the Welcome Page, select Setup Wizard.
Click on Step 1 and choose which Page Sets the user
requires.
2. Click Step 2. Select a Home Page by clicking on the
image of the page. Then select Step 5 and Go to
Home Page.
2
3. The Home Page will open in Run View. You can use
this page as it is, or use it as the basic model for your
own.
38
09
4. To make changes to the Home Page, press Shift+F5
to go to Edit View. Resize or move buttons, change the
background of the page, remove or add buttons and
take care not to delete a button you may want!
5. In the example below, buttons have been deleted to
simplify the page. The scrolling buttons have been
made larger too. Click and drag a button to move or
re-size it.
6. Save your modified Home Page in the user’s My Page
Sets folder. Your Home Page will now be available to
choose when using the ‘Setup Wizard’.
39
09
Essentials
Design and Make your Own Home Page
1. Ensure you have selected which Page Sets the user
will require. To do so, on the Welcome Page, select
Setup Wizard and the tab 1: View and Select Page
Sets. Check the boxes next to the required pages.
2. From the Welcome Page, select Create new Page
Set, which opens the New Page Set Dialog. Under
Create... select Blank Page Set > Freehand Page
for Screen. This will open a blank page.
3. Assuming the user accesses four different Page Sets,
we could, for example, personalize the background
image, create a label for the user’s new Home Page
and add buttons that take the user to their four Page
Sets.
4. Right-click on the page in the Page List, select Page
Properties and the Background tab. Change the
colour or browse to a personal photo here, for example.
5. To add a ‘Static’ label (one that will not be selectable
by the user) saying, ‘Sam’s Home Page’, click the
Insert Static Text icon
40
and draw a button on
09
your page. Click on the Insert Text icon
to write
in the button. You can edit the font, colour, size of text
etc. Finally draw the buttons you will need for the four
Page Sets, by using the Insert Button tool
In Run Mode (Press F5), these buttons will
automatically link to the user’s selected Page Sets.
and
Duplicate Objects
icons (which simply copies
the first button you made).
7. Make the new page set the Home page for your user:
On the Welcome Page in Communicator, select
Setup Wizard > Home Page. Click Browse and find
your new file. Whenever the user selects Home in any
page set, the new Home page will be opened.
6. Highlight all four buttons and click the Smart Button
Types and Actions icon,
. Select Change then
the Home Page tab and click on Selected Page
Set Item. Click OK and then Save. The buttons
now have labels, informing you of their button type.
41
Essentials
10
10 Configure E-mail and Tobii
Communicator 4
Tobii Communicator 4 works with most e-mail services,
including several free Internet-based providers. Each
provider will need to give you their unique settings,
so contact them or search your e-mail software for
instructions.
Gmail is a widely used, free, internet-based e-mail
provider and the following instructions show how to
configure Tobii Communicator 4 to receive and send
e-mails using Gmail.
1. Create a Gmail account on www.google.com by
following the standard on-screen instructions.
2. To Enable POP in your Gmail account, once you have
an account and are logged in:
t Select the Settings link
t Select the Forwarding and POP/IMAP tab
t Check the button next to Enable POP for all mail.
t Click Save Changes.
t Log out of the e-mail account.
42
10
3. Launch Tobii Communicator 4
4. In Tobii Communicator 4’s menus, select Settings and
then E-mail Settings.
5. Complete the Account, Reception, Delivery and
Advanced tabs as indicated by the images below,
using your own name, Gmail address and password.
43
Essentials
Enter your own name, Gmail address and password.
Decide how frequently to remove old messages from the
server.
44
10
10
Note:
Many providers offer information about configuring e-mails
for Outlook Express. These instructions are similar to those
required for Tobii Communicator 4, and looking for advice
on how to configure your e-mails for Outlook Express will
usually provide the necessary information.
Also, no matter which provider you use, they will usually
provide information on the necessary POP3 and SMTP
details. Simply enter these into Tobii Communicator 4’s
E-mail Configuration settings page.
Configure exactly as indicated by the image.
45
11
Essentials
11 Eye Control Settings
2
Tobii Eye Tracker Settings
If you are running Tobii Communicator on a device with
a Tobii Eye Tracker module, an extra button will be visible
on the Settings page, Input tab, Eye Tracker Settings
(See 1). Basic settings for a user profile, such as the Dwell
Time - the time required to select; Click Type - switch,
dwell or blink etc. are available to adjust here (See 2).
Eye Control Smart Buttons & Actions
1
Occasionally it will be useful to create eye control buttons
on a page of your own. Just like you can create buttons
containing pictures or actions to speak, you can create
buttons that provide useful eye control functionality. You
could create a button that starts a calibration, or allows
the user to see the Track Status box for example.
Tobii Eye Control Settings
Additional eye tracker settings can be found within Tobii
Communicator in Settings > Input Method > Tobii Eye
Tracker > Eye Tracker Settings (See 3) or from the Tobii
46
11
4
Eye Control Options icon on the desktop (See 4).
3
Adjusting Settings
All of the eye control settings listed below are accessible
by the eye control user within Communicator in “Eye
Tracker Settings”. These settings may also be adjusted
in Tobii Eye Control Options. There are three eye control
access methods: dwell, blink, or switch. (See 5)
a. Dwell allows the user to gaze for a defined period of
time at a button in order to select that button. In the
dwell setting, you are able to choose that dwell time.
47
Essentials
5
11
Feedback
The feedback settings adjust the dot that the user sees
when making selections. Choose the feedback dot colour,
size, and type in this menu. Available feedback types
are listed next to the corresponding types of eye control
access: switch, blink, dwell.
These settings can be found within Tobii Eye Control
Options and are eye control accessible within Tobii
Communicator. (See 6)
Tip: New users generally start around 1000ms
(=1 second) or slightly greater. With practice and
experience in using dwell, most people will want to
reduce their dwell time so that they can access familiar
content faster.
6
b. Switch allows the user to gaze at a button to initially
choose it and press an external switch to confirm the
selection of that button. In the switch setting you can
choose the parameters of the switch press speed.
c. Blink requires the individual to gaze at the desired
button and blink to confirm selection of that button. In the
blink setting, you are able to choose the minimum and
maximum durations of eye closure that count towards
the blink.
48
Note: For many people new to eye control, it is easiest
to start with larger buttons and fewer buttons, or with
11
a familiar page set layout. We also recommend taking
frequent breaks when first using eye control.
Creating a New User Profile
From the Desktop select the Tobii Eye Control Options
icon, then User Profiles. Create a new profile, such as
‘Sara with Glasses’. You will need to select the new profile
from the drop-down list at the top of this window (See 7)
and select OK or Apply before it will become ‘active’ and
appear as an available profile in the Tobii CEye Settings.
Always ensure that the appropriate profile is selected
before making adjustments to the settings for that profile.
7
An ‘eye tracking User Profile’ is not the same as a ‘Tobii
Communicator User’. It may be useful for one Tobii
Communicator User to have several User Profiles, to
accommodate their changing eye tracking needs, for
example when he/she wears glasses.
Also, if a device is used by several people such as in a
school or hospital, each person should have a customized
Tobii Communicator User (containing personal page sets)
and one or more customized eye tracking User Profiles
(containing calibration, dwell time etc.)
When a new Tobii Communicator User is made, an eye
control profile is automatically created for that user and will
appear in the profiles list in Eye Tracker Settings.
49
Getting Started
Finally
This booklet contains limited instructions and information.
For more details, please see the User Guide, located in
the binder or within the software.
The information and features in this booklet refer to Tobii
Communicator 4 Premium.
Please Back Up your personal Page Sets and data, by
selecting File and then Export Settings and Data. It is
also important to check for software updates regularly.
This can be done from the Help tab. Select Check for
Updates. A high speed, reliable Internet connection is
required.
Contact your local supplier or our support about software
updates if you do not have an Internet connection.
50
Notes:
51
www.tobii.com
Tobii Support
SWEDEN
GERMANY
USA
JAPAN
Phone: +46 8 522 950 20
Phone: +49 69 24 75 03 4-28
Toll-Free: +1-800-793-9227
Phone: +1-781-461-8200
Phone: +81-3-5793-3316
[email protected]
[email protected]
[email protected]
[email protected]
Support hours: 8 am - 6 pm
Between July-August: 9am - 5pm
Support hours: 8 am - 6 pm
Between July-August: 9am - 5pm
Support hours: 9 am - 9 pm
Support hours: 9 am - 5.30 pm
(Central European Time, GMT +1)
(Central European Time, GMT +1)
(US Eastern Standard Time, GMT -6)
(Japan Standard Time, GMT +9)
© Tobii®. Illustrations and specifications do not necessarily apply to products and services offered in each local market. Technical specifications are subject to change without prior notice. All other trademarks are the property of their respective owners.
EUROPE, MIDDLE EAST, AFRICA
Tobii Technology AB
CENTRAL EUROPE
Tobii Technology GmbH
NORWAY
Tobii Norge
ASIA
Tobii Technology, Ltd.
NORTH AMERICA
Tobii ATI
Karlsrovägen 2D
S-182 53 Danderyd
Sweden
Niedenau 45
D-60325 Frankfurt am Main
Germany
Thormøhlens gate 55
5008 Bergen
Norway
3-4-13 Takanawa, Minato-ku
Tokyo 108-0074
Japan
333 Elm Street
Dedham, MA 02026
USA
Phone : +46 8 663 69 90
Fax: +46 8 30 14 00
Phone: +49 69 24 75 03 40
Fax: +49 69 24 75 03 429
Phone: +47 55 55 10 60
Fax: +47 55 55 10 61
Phone: +81-3-5793-3316
Fax: +81-3-5793-3317
Toll-Free: 800-793-9227
Phone: 781-461-8200
Fax: 781-461-8213
www.tobii.com
[email protected]
www.tobii.com
[email protected]
www.tobii.com
[email protected]
www.tobii.com
[email protected]
www.tobiiATI.com
[email protected]