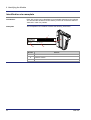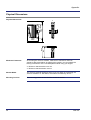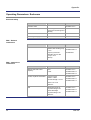
1
JX3-PS1
JetWeb
Power Supply Module
User Manual
Article no.: 60873296
Revision: 1.01
October 2008 / Printed in Germany
Introduction
Revision 1.01
Jetter AG reserve the right to make alterations to their products in the interest of technical progress. These alterations
need not be documented in every single case.
This User Manual and the information contained herein have been compiled with due diligence. However, Jetter AG
assume no liability for printing or other errors or damages arising from such errors.
The brand names and product names used in this document are trademarks or registered trademarks of the respective
title owner.
2
Jetter AG
JX3-PS1
Adress
Introduction
How To Contact us:
Jetter AG
Gräterstraße 2
D-71642 Ludwigsburg
Germany
Assignment to product
Phone - Switchboard:
+49 7141 2550-0
Phone - Sales:
+49 7141 2550-433
Phone - Technical Hotline:
+49 7141 2550-444
Fax - Sales:
+49 7141 2550-484
E-Mail - Sales:
[email protected]
E-Mail - Technical Hotline:
[email protected]
This User Manual is an integral part of JX3-PS1:
Type:
Serial #:
Year of construction:
Order #:
To be entered by the customer:
Inventory #:
Place of operation:
© Copyright 2008 by Jetter AG. All rights reserved.
Jetter AG
3
Introduction
Significance
Significance of the User Manual
The User Manual is an integral part des JX3-PS1:
It must be kept in a way that it is always at hand, until the JX3-PS1 will be
disposed of.
If the JX3-PS1 is sold or loaned/leased out, the User Manual has to be
passed on.
In any case you encounter difficulties to clearly understand this User Manual,
please contact the manufacturer.
We would appreciate any suggestions and contributions on your part and
would ask you to contact us by our e-mail address [email protected]. This will
help us to produce manuals that are more user-friendly and to address your
wishes and requirements.
This User Manual contains important information on how to transport, erect,
install, operate, maintain and repair the JX3-PS1.
Therefore, the persons carrying out these jobs must carefully read, understand
and observe this User Manual, and especially the safety instructions.
Missing or inadequate knowledge of the User Manual results in the loss of any
claim of liability on part of Jetter AG. Therefore, the operating company is
recommended to have the instruction of the persons concerned confirmed in
writing.
4
Jetter AG
JX3-PS1
Introduction
Hazard Levels
Introduction
This topic describes the safety labels and hazard levels used in this manual.
Safety Labels
Signs using this symbol are to warn you of inuries or even death. It is
imperative to follow the instructions to prevent hazards.
Hazard Levels
Safety information is classified into the following hazard levels:
Hazard Level
Jetter AG
Consequences
Probability
DANGER
Death/severe injury (irreversible)
The hazard is imminent
WARNING
Death/severe injury (irreversible)
Potential occurrence
CAUTION
Slight injury (reversible)
Potential occurrence
CAUTION
Material damage
Potential occurrence
5
JX3-PS1
Contents
Table of Contents
Hazard Levels ................................................................................................................................5
1
Safety Instructions
9
Generally Valid Safety Instructions ..............................................................................................10
Ensure Your Own Safety..............................................................................................................12
Instructions on EMI ......................................................................................................................13
2
Engineering
15
Product Description – JX3-PS1 Module ......................................................................................16
Parts and Interfaces of the Module ..............................................................................................17
List of Documentation ..................................................................................................................18
Physical Dimensions....................................................................................................................19
Terminal Assignment X10 ............................................................................................................20
Connector Specification of X10 Terminal .....................................................................................21
LED of the Module .......................................................................................................................22
Engineering of a JX3 Station equipped with JC-3xx ....................................................................23
Engineering of a JX3 Station equipped with JX3-BN-ETH ..........................................................24
Engineering of a JX3 Station equipped with JX3-BN-CAN..........................................................25
Limitations to be Taken Into Account When Engineering a JX3 Station ......................................26
3
Locating Faults
29
LED of the Module .......................................................................................................................30
Voltage is not OK .........................................................................................................................31
4
Identifying the Module
33
Identification via nameplate .........................................................................................................34
Appendix
A:
B:
Jetter AG
35
Technical Data ............................................................................................................................36
Technical Data..............................................................................................................................37
Physical Dimensions....................................................................................................................38
Operating Parameters: Environment and Mechanics ..................................................................39
Operating Parameters: Enclosure................................................................................................40
DC Power Supply Inputs and Outputs .........................................................................................41
Shielded Data and I/O Lines ........................................................................................................42
Index............................................................................................................................................43
7
JX3-PS1
1
Safety Instructions
Safety Instructions
Introduction
This chapter informs the user of general safety instructions and warns of
residual dangers, if applicable. Furthermore, it contains information on EMC.
Contents
This chapter contains the following topics:
Topic
Page
Generally Valid Safety Instructions............................................................... 10
Ensure Your Own Safety .............................................................................. 12
Instructions on EMI ....................................................................................... 13
Jetter AG
9
1 Safety Instructions
Generally Valid Safety Instructions
Introduction
This device complies with the valid safety regulations and standards. Special
emphasis was given to the safety of the users.
Of course, the user should adhere to the following regulations:
relevant accident prevention regulations;
accepted safety rules;
EC guidelines and other country-specific regulations
Intended Conditions of
Use
Usage according to the intended conditions of use includes operation in
accordance with this User Manual.
The JX3-PS1 module provides power supply of up to 8 JX3 expansion
modules. This module is required if more than 8 JX3 expansion modules are
connected to a JX3 bus head or to a controller of the JetControl 300 series.
It can be connected to the JX3 backplane bus. The JX3 backplane bus starts
at the JX3-BN-xxx module or at the JC-3xx controller.
The operating voltage of the JX3-PS1 is DC 24 V. This operating voltage is
classified as SELV (Safety Extra Low Voltage).
Therefore, the JX3-PS1 is not subject to the EU Low Voltage Directive.
The JX3-PS1 module may only be operated within the limits of the stated data,
see chapter Technical Data on page 37.
Usage Other than
Intended
This device must not be used in technical systems which to a high degree
have to be fail-safe, e. g. ropeways and aeroplanes.
If the device is to be run under ambient conditions which differ from the
conditions mentioned in chapter Operating Condition on page 39, the
manufacturer is to be contacted beforehand.
Who may Operate the
Device?
Only instructed, trained and authorized persons are permitted to operate this
device.
Modifications and
Alterations to the Device
10
Transport:
Only by personnel with knowledge in handling electrostatically
sensitive components.
Installation:
Only by specialists with training in electrical engineering.
Engineering:
Only by trained personnel, as specific know-how of electrical
engineering is required.
Commissioning:
Only by specialists with profound knowledge of, and
experience with, electrical engineering / drive technology.
For safety reasons, no modifications and changes to the device and its
functions are permitted.
Any modifications to the device not expressly authorized by the manufacturer
will result in a loss of any liability claims to Jetter AG.
Jetter AG
JX3-PS1
Safety Instructions
The original parts are specifically designed for the device. Parts and
equipment from other manufacturers are not tested on our part, and are,
therefore, not released by Jetter AG.
The installation of such parts may impair the safety and the proper functioning
of the device.
Any liability on the part of Jetter AG for any damages resulting from the use of
non original parts and equipment is excluded.
Repair and Maintenance
This device must not be repaired by the operators themselves. The device
does not contain any parts that could be repaired by the operator.
The device must be sent to Jetter AG for repair.
Decommissioning and
Disposal
The environmental regulations of the respective country must be complied
with when decommissioning and disposing of devices on the operating
company's premises.
Transporting JX3
Modules
To exclude damages to JX3 modules the JX3 backplane bus has to be
attached during transport. This is particularly true for transport via mail.
Replacing Modules
During exchange of JX3 modules, class of protection IP20 is not ensured. Do
not touch any electronic components once the JX3 module enclosure has
been removed from the JX3 backplane module.
Touching the EMC clip may result in damages to this clip and, thus, in lower
noise immunity.
Jetter AG
11
1 Safety Instructions
Ensure Your Own Safety
Caution
Follow this procedure in order to ensure your own safety:
Measures
Malfunctions or Other
Damages
1
Isolate the device from the mains, if maintenance works have to be
carried out. By doing so, you will prevent accidents resulting from
electric voltage and moving parts.
2
Safety and protective devices, e.g. the barrier and cover of the
terminal box must never be shunted or by-passed.
3
Dismantled protective equipment, such as guards, must be
reattached prior to commissioning and checked for proper
functioning.
4
Prior to commissioning, the machine manufacturer shall conduct a
hazard analysis for the machine and take appropriate measures to
prevent personal injury and damage to property resulting from
accidental movements.
Follow this procedure in the case of malfunctions or damages:
Measures
Information Signs and
Labels
12
Action
Action
1
Immediately separate the device from the mains.
2
The device must be protected from improper or inadvertent use.
3
Malfunctions or other damages are to be reported to a responsible
person at once.
Markings, information signs, and labels always have to be observed and kept
readable.
Damaged or unreadable information signs and labels have to be replaced.
Jetter AG
JX3-PS1
Safety Instructions
Instructions on EMI
Noise Immunity of a
System
The noise immunity of a system is determined by the weakest component of
the system. For this reason, correct wiring and shielding of cables is of
paramount importance.
Measures to be Taken
Measures for increasing immunity against EMI in electric plants:
The JX3-PS1 module has to be attached to a DIN rail acc. to EN 50022-35
x 7.5.
Follow the instructions given in Application Note 016 "EMC-Compatible
Installation of the Electric Cabinet" published by Jetter AG.
The following instructions are excerpts from Application Note 016:
On principle, physical separation should be maintained between signal
and power lines. We recommend spacings greater than 20 cm. Cables and
lines should cross each other at an angle of 90°.
The following line cables must be shielded:
Analog lines, data lines, motor cables coming from inverter drives (servo
output stage, frequency converter), lines between components and
interference suppressor filter, if the suppressor filter has not been placed at
the component directly.
Shield cables at both ends.
Unshielded wire ends of shielded cables should be as short as possible.
The entire shield must, in its entire perimeter, be drawn behind the
isolation, and then be clamped under an earthed strain relief with the
greatest possible surface area.
Download of Application
Note 016
Jetter AG
You can download Application Note 016 from our homepage
http://www.jetter.de. The path leading to Application Note 016 "EMCCompatible Installation of Electric Cabinets" is "Industrial Automation Support - Downloads - Miscellaneous - Application Notes".
13
JX3-PS1
2
Engineering
Engineering
Purpose of this Chapter
This chapter is for supporting you when engineering a plant equipped with the
JX3-PS1 module in the following fields of activity:
Wiring of a JX3 station
Commissioning of a JX3 station in an electric cabinet
Contents
This chapter contains the following topics:
Topic
Page
Product Description – JX3-PS1 Module ....................................................... 16
Parts and Interfaces of the Module............................................................... 17
List of Documentation ................................................................................... 18
Physical Dimensions .................................................................................... 19
Terminal Assignment X10 ............................................................................. 20
Connector Specification of X10 Terminal...................................................... 21
LED of the Module........................................................................................ 22
Engineering of a JX3 Station equipped with JC-3xx..................................... 23
Engineering of a JX3 Station equipped with JX3-BN-ETH ........................... 24
Engineering of a JX3 Station equipped with JX3-BN-CAN .......................... 25
Limitations to be Taken Into Account When Engineering a JX3 Station....... 26
Jetter AG
15
2 Engineering
Product Description – JX3-PS1 Module
The JX3-PS1 Module
The JX3-PS1 module provides power supply of up to 8 JX3 peripheral
modules. This module is required if more than 8 JX3 peripheral modules are
connected to a JX3 bus head or to a controller of the JetControl 300 series.
Characteristics
The following list shows the characteristics of this module:
Power supply for up to 8 JX3 peripheral modules
For operation along with all JX3 bus heads and controllers of the
JetControl 300 series
Expansion of a JX3 station to up to 16 JX3 peripheral modules
Color of LED sheeting: light grey (RAL 7035)
Scope of Delivery
16
The following items are included in the scope of delivery of the JX3-PS1
module:
Article #
Quantity
Description
10000542
1
JX3-PS1
60870409
1
2-pin connector, spring cage technology
60870411
10
Terminal labels
60871940
1
Installation Instructions
Jetter AG
JX3-PS1
Engineering
Parts and Interfaces of the Module
Parts and Interfaces
The JX3-PS1 module features the following parts and interfaces:
1
6
2
5
4
Number
3
Part
Function
1
Upper latch
For removing the JX3 module enclosure from
the JX3 backplane module.
2
X119
Connector for additional JX3 modules
3
Release lever
For removing the JX3 module from the DIN
rail.
4
Lower latch
For removing the JX3 module enclosure from
the JX3 backplane module.
Not visible in illustration.
Jetter AG
5
Terminal X10
Power supply connector for JX3 peripheral
modules to be supplied
6
LED
Diagnostic and status LED
17
2 Engineering
List of Documentation
Introduction
Various documents and software tools will support the user when engineering
and installing the JX3-PS1 module. These documents and software tools can
be downloaded from our homepage http://www.jetter.de.
Engineering
When performing engineering tasks, the following documents and software
tools will support you:
Data Sheet on the module JX3-PS1
Product Description
Technical Data
Dimensional Drawings
User Manual on the module JX3-PS1
the document at hand
Drawings of the module JX3-PS1
3D data (stp file)
2D data (dxf file)
JX3-I/O System - User Information
Upgrading from JX2 to JX3
Accessories for the JX3 System
Dimensional Drawings
Engineering of a JX3 station
Installing and removing a JX3 station
Connectors for JX3 modules
Product descriptions on JX3 Modules
Installation
When installing such modules, the following document will support you:
Installation Instructions
It is included in the boxed module JX3-PS1 and contains
information on the following items:
installation of the module on a DIN rail
terminal assignment
specification of conductor terminals
diagnostics using LED
18
Jetter AG
JX3-PS1
Engineering
Physical Dimensions
Physical Dimensions
Minimum Clearances
95,6
102,9
100,6
25
131,4
63,5
30
31
25
At mounting the JX3-PS1 module, make sure to maintain a minimum
clearance above and below. At replacing the module, you can operate the
locking mechanisms of the JX3 backplane module using your fingers.
Minimum clearance above: 30 mm
Minimum clearance below: 25 mm
Module Width
The JX3-PS1 module requires a space of 31 mm width. At connecting the
JX3-PS1 module to a JX3 station, the width is increased by 25 mm.
Mounting Position
The mounting position of the JX3-PS1 module is vertical.
Jetter AG
19
2 Engineering
Terminal Assignment X10
Terminal Interface
The following power supply is connected to the terminal X10:
Power supply for up to 8 JX3 peripheral modules which have been installed
to the right of the JX3-PS1 module.
Terminal Assignment
POWER
X10
DC24V
1,0A
0V
Terminal point
DC 24 V, 1.0 A
0V
20
Function
Supply voltage for connected JX3 peripheral modules
Reference potential
Jetter AG
JX3-PS1
Engineering
Connector Specification of X10 Terminal
Order Data - Connector
Connector Specification
A 2-pole connector is included in the scope of delivery of the JX3-PS1 module:
This connector can be ordered separately using the following order data:
Designation
BU_02_E_BLZF_GE_RM3.5
Article #
60870409
For information on connector specification refer to the following list:
Connector Specification
Connector technology
Spring cage connection
Type
2 poles, 3.5 mm contact spacing
Connectable conductors
Outer diameter of insulation
max. 2.90 mm
AWG
16 ... 28
Capacity of terminals
0.13 ... 1.5 mm2
Stripping length
10 mm
Specification without wire end ferrules
Solid conductor H05(07) V-U
0.2 ... 1.5 mm2
Finely stranded conductor H05(07) V-K
0.2 ... 1.5 mm2
Specification with wire end ferrules
Screw Driver
Jetter AG
Wire end ferrule without collar to DIN 46228/1
0.2 ... 1.5 mm2
Wire end ferrule with collar to DIN 46228/4
0.2 ... 1.5 mm2
Crimping tool to DIN 46228
PZ 4, PZ 6 ROTO, PZ 6/5
The fitting screw driver can be ordered from Jetter AG directly.
Type
SD 0.4 x 2.5 - DIN 5264-A
Designation
DIV_SCHRAUBENDREHER_2,5*75
Article #
60871712
21
2 Engineering
LED of the Module
The JX3-PS1 module signals via LED whether the logic voltage supply for
connected JX3 peripheral modules is faultless. This feature allows the user to
directly locate a fault.
LED of the Module
The JX3-PS1 module is equipped with an LED which indicates the condition of
the supply voltage.
JX3-PS1
Introduction
R
Jetter
Element
"R" LED
22
Status
Function
Off
Logic voltage supply for connected JX3 peripheral
modules is not OK
Green, lit
Logic voltage supply for connected JX3 peripheral
modules is OK
Jetter AG
JX3-PS1
Engineering
Engineering of a JX3 Station equipped with JC-3xx
Engineering Rules for a
JX3 Station
When engineering a JX3 station, follow the rules listed below:
Up to 8 JX3 peripheral modules can directly be connected to a JC-3xx
controller.
Before the ninth JX3 peripheral module, a JX3-PS1 power supply module
must be inserted.
To a JX3-PS1 power supply module up to 8 more JX3 peripheral modules
can be connected.
Fully Equipped
JX3 Station
The following illustration shows a JX3 station with a JC-3xx controller and 16
JX3 peripheral modules. Downstream the eighth JX3 peripheral module a
JX3-PS1 power supply module has been inserted.
2
3
4
5
Jetter
X19
S11
4
7
8
R
E D1 D2
1
2
3
4
5
6
7
8
R
E D1 D2
1
2
3
4
5
6
7
8
R
E D1 D2
1
2
3
4
5
6
7
8
R
E D1 D2
1
2
3
4
5
6
7
8
R
E D1 D2
1
2
3
4
5
6
7
8
9 10 11 12
9 10 11 12
9 10 11 12
9 10 11 12
9 10 11 12
13 14 15 16
13 14 15 16
13 14 15 16
13 14 15 16
13 14 15 16
X21
X21
X21
X21
X21
X21
X21
R
Jetter
X21
R
E D1 D2
1
2
3
4
5
6
7
8
R
E D1 D2
1
2
3
4
5
6
7
8
R
E D1 D2
1
2
3
4
5
6
7
8
R
E D1 D2
1
2
3
4
5
6
7
8
R
E D1 D2
1
2
3
4
5
6
7
8
R
E D1 D2
1
2
3
4
5
6
7
8
R
E D1 D2
1
2
3
4
5
6
7
8
JX3-DI16
3
6
JX3-DI16
2
5
9 10 11 12
JX3-DI16
E D1 D2
1
JX3-DI16
R
13 14 15 16
JX3-DI16
8
JX3-DI16
4
7
JX3-DI16
3
6
JX3-PS1
2
5
9 10 11 12
13 14 15 16
JX3-DI16
E D1 D2
1
JX3-DI16
R
JX3-DI16
8
JX3-DI16
4
7
JX3-DI16
3
6
JX3-DI16
2
5
9 10 11 12
R
E D1 D2
1
2
3
4
5
6
7
8
9 10 11 12
9 10 11 12
9 10 11 12
9 10 11 12
9 10 11 12
9 10 11 12
9 10 11 12
9 10 11 12
13 14 15 16
13 14 15 16
13 14 15 16
13 14 15 16
13 14 15 16
13 14 15 16
13 14 15 16
13 14 15 16
X21
X21
X21
X21
X21
X21
X21
X21
LOAD
STOP
ETHERNET
BUS OUT
1
X14
X10
SD-CARD
SER
X61
DC24V
1,2A
0V
1
1
1
1
1
1
1
1
1
1
1
1
1
1
1
2
2
2
2
2
2
2
2
2
2
2
2
2
2
2
2
3
3
3
3
3
3
3
3
3
3
3
3
3
3
3
3
4
4
4
4
4
4
4
4
4
4
4
4
4
4
4
5
5
5
5
5
5
5
5
5
5
5
5
5
5
5
6
6
6
6
6
6
6
6
6
6
6
6
6
6
6
7
7
7
7
7
7
7
7
7
7
7
7
7
7
7
8
8
8
8
8
8
8
8
8
8
8
8
8
8
8
0V
0V
0V
0V
0V
0V
0V
0V
0V
0V
0V
0V
0V
0V
0V
X22
X15
X11
POWER
E D1 D2
1
13 14 15 16
X22
X22
X22
X22
X22
X22
X22
X22
X22
X22
X22
X22
X22
X22
4
5
6
7
8
0V
X22
9
9
9
9
9
9
9
9
9
9
9
9
9
9
9
9
10
10
10
10
10
10
10
10
10
10
10
10
10
10
10
10
11
11
11
11
11
11
11
11
12
12
12
12
12
12
12
12
13
13
13
13
13
13
13
13
14
14
14
14
14
14
14
14
15
15
15
15
15
15
15
15
16
16
16
16
16
16
16
16
0V
0V
0V
0V
0V
0V
0V
0V
X10
POWER
RUN
R
JX3-DI16
JX3-DI16
R E D1 D2
JX3-DI16
6
JC-360
1
DC24V
0,5A
0V
11
11
11
11
11
11
11
11
12
12
12
12
12
12
12
12
13
13
13
13
13
13
13
13
14
14
14
14
14
14
14
14
15
15
15
15
15
15
15
15
16
16
16
16
16
16
16
16
0V
0V
0V
0V
0V
0V
0V
0V
7
DC24V
0V
Number
Element
Function
1
End clamp for DIN rail
For securing JX3 modules on the DIN rail
2
JC-3xx
Controller and power supply for the first 8
JX3 peripheral modules
3
JX3-DI16
8 JX3 peripheral modules
4
JX3-PS1
Power supply module for the next 8 JX3
peripheral modules
5
JX3-DI16
8 JX3 peripheral modules
6
End clamp for DIN rail
For securing JX3 modules on the DIN rail
7
Voltage supply lines DC24V
and 0V
Logic voltage supply for all modules of
the JX3 station
Related Topics
Limitations to be taken into account when engineering a JX3 station
on page 26
Jetter AG
23
2 Engineering
Engineering of a JX3 Station equipped with JX3-BN-ETH
Engineering Rules for a
JX3 Station
When engineering a JX3 station, follow the rules listed below:
Up to 8 JX3 peripheral modules can directly be connected to a
JX3-BN-ETH bus head.
Before the ninth JX3 peripheral module, a JX3-PS1 power supply module
must be inserted.
To a JX3-PS1 power supply module up to 8 more JX3 peripheral modules
can be connected.
Fully Equipped
JX3 Station
The following illustration shows a JX3 station with a JX3-BN-ETH bus head
and 16 JX3 peripheral modules. Downstream the eighth JX3 peripheral
module a JX3-PS1 power supply module has been inserted.
2
3
4
5
ETHERNET
POWER
4
7
8
R
E D1 D2
1
2
3
4
5
6
7
8
R
E D1 D2
1
2
3
4
5
6
7
8
R
E D1 D2
1
2
3
4
5
6
7
8
R
E D1 D2
1
2
3
4
5
6
7
8
R
E D1 D2
1
2
3
4
5
6
7
8
9 10 11 12
9 10 11 12
9 10 11 12
9 10 11 12
9 10 11 12
13 14 15 16
13 14 15 16
13 14 15 16
13 14 15 16
13 14 15 16
X21
1
X21
1
X21
1
X21
1
X21
1
X21
1
R
Jetter
X21
R
E D1 D2
1
2
3
4
5
6
7
8
E D1 D2
1
2
3
4
5
6
7
8
R
E D1 D2
1
2
3
4
5
6
7
8
R
E D1 D2
1
2
3
4
5
6
7
8
R
E D1 D2
1
2
3
4
5
6
7
8
R
E D1 D2
1
2
3
4
5
6
7
8
R
E D1 D2
1
2
3
4
5
6
7
8
R
E D1 D2
1
2
3
4
5
6
7
8
9 10 11 12
9 10 11 12
9 10 11 12
9 10 11 12
9 10 11 12
9 10 11 12
9 10 11 12
9 10 11 12
13 14 15 16
13 14 15 16
13 14 15 16
13 14 15 16
13 14 15 16
13 14 15 16
13 14 15 16
13 14 15 16
X21
1
R
JX3-DI16
3
6
JX3-DI16
2
5
9 10 11 12
JX3-DI16
E D1 D2
1
JX3-DI16
R
13 14 15 16
JX3-DI16
8
JX3-DI16
4
7
JX3-DI16
3
6
JX3-PS1
2
5
9 10 11 12
1
1
X21
1
X21
1
X21
1
X21
1
X21
1
X21
1
X21
1
2
2
2
2
2
2
2
2
2
2
2
2
2
2
2
2
3
3
3
3
3
3
3
3
3
3
3
3
3
3
3
3
4
4
4
4
4
4
4
4
4
4
4
4
4
4
4
5
5
5
5
5
5
5
5
5
5
5
5
5
5
5
6
6
6
6
6
6
6
6
6
6
6
6
6
6
6
7
7
7
7
7
7
7
7
7
7
7
7
7
7
7
8
8
8
8
8
8
8
8
8
8
8
8
8
8
8
0V
0V
0V
0V
0V
0V
0V
0V
0V
0V
0V
0V
0V
0V
0V
X22
X15
E D1 D2
1
13 14 15 16
X21
X14
R
9 10 11 12
JX3-DI16
8
JX3-DI16
4
7
JX3-DI16
3
6
JX3-DI16
2
5
JX3-DI16
E D1 D2
1
JX3-DI16
R
13 14 15 16
X22
X22
X22
X22
X22
X22
X22
X22
X22
X22
X22
X22
X22
X22
4
5
6
7
8
0V
X22
9
9
9
9
9
9
9
9
9
9
9
9
9
9
9
9
10
10
10
10
10
10
10
10
10
10
10
10
10
10
10
10
11
11
11
11
11
11
11
11
12
12
12
12
12
12
12
12
13
13
13
13
13
13
13
13
14
14
14
14
14
14
14
14
X10
15
15
15
15
15
15
15
15
DC24V
0,5A
0V
16
16
16
16
16
16
16
16
0V
0V
0V
0V
0V
0V
0V
0V
X10
POWER
Jetter
JX3-DI16
JX3-DI16
R E D1 D2
JX3-DI16
6
JX3-BN-ETH
1
DC24V
0,5A
0V
11
11
11
11
11
11
11
11
12
12
12
12
12
12
12
12
13
13
13
13
13
13
13
13
14
14
14
14
14
14
14
14
15
15
15
15
15
15
15
15
16
16
16
16
16
16
16
16
0V
0V
0V
0V
0V
0V
0V
0V
7
DC24V
0V
Number
Element
Function
1
End clamp for DIN rail
For securing JX3 modules on the DIN rail
2
JX3-BN-ETH
Bus head and power supply for the first 8
JX3 peripheral modules
3
JX3-DI16
8 JX3 peripheral modules
4
JX3-PS1
Power supply module for the next 8 JX3
peripheral modules
5
JX3-DI16
8 JX3 peripheral modules
6
End clamp for DIN rail
For securing JX3 modules on the DIN rail
7
Voltage supply lines DC24V
and 0V
Logic voltage supply for all modules of
the JX3 station
Related Topics
Limitations to be taken into account when engineering a JX3 station
on page 26
24
Jetter AG
JX3-PS1
Engineering
Engineering of a JX3 Station equipped with JX3-BN-CAN
Engineering Rules for a
JX3 Station
When engineering a JX3 station, follow the rules listed below:
Up to 8 JX3 peripheral modules can directly be connected to a
JX3-BN-CAN bus head.
Before the ninth JX3 peripheral module, a JX3-PS1 power supply module
must be inserted.
To a JX3-PS1 power supply module up to 8 more JX3 peripheral modules
can be connected.
Fully Equipped
JX3 Station
The following illustration shows a JX3 station with a JX3-BN-CAN bus head
and 16 JX3 peripheral modules. Downstream the eighth JX3 peripheral
module a JX3-PS1 power supply module has been inserted.
2
3
4
5
X18
BUS IN
BUS OUT
POWER
X10
8
R
E D1 D2
1
2
3
4
5
6
7
8
R
E D1 D2
1
2
3
4
5
6
7
8
R E D1 D2
1
2
3
4
5
6
7
8
R
E D1 D2
1
2
3
4
5
6
7
8
R
E D1 D2
1
2
3
4
5
6
7
8
9 10 11 12
9 10 11 12
9 10 11 12
9 10 11 12
9 10 11 12
13 14 15 16
13 14 15 16
13 14 15 16
13 14 15 16
13 14 15 16
X21
X21
1
X21
1
X21
1
X21
1
X21
1
X21
1
R
Jetter
X21
R
E D1 D2
1
2
3
4
5
6
7
8
E D1 D2
1
2
3
4
5
6
7
8
R
E D1 D2
1
2
3
4
5
6
7
8
R
E D1 D2
1
2
3
4
5
6
7
8
R
E D1 D2
1
2
3
4
5
6
7
8
R
E D1 D2
1
2
3
4
5
6
7
8
R
E D1 D2
1
2
3
4
5
6
7
8
R
E D1 D2
1
2
3
4
5
6
7
8
9 10 11 12
9 10 11 12
9 10 11 12
9 10 11 12
9 10 11 12
9 10 11 12
9 10 11 12
9 10 11 12
13 14 15 16
13 14 15 16
13 14 15 16
13 14 15 16
13 14 15 16
13 14 15 16
13 14 15 16
13 14 15 16
X21
1
R
JX3-DI16
4
7
JX3-DI16
3
6
JX3-DI16
2
5
9 10 11 12
JX3-DI16
E D1 D2
1
JX3-DI16
R
13 14 15 16
JX3-DI16
8
JX3-DI16
4
JX3-DI16
3
7
JX3-PS1
2
6
9 10 11 12
13 14 15 16
1
X21
1
X21
1
X21
1
X21
1
X21
1
X21
1
X21
1
2
2
2
2
2
2
2
2
2
2
2
2
2
2
2
2
3
3
3
3
3
3
3
3
3
3
3
3
3
3
3
3
4
4
4
4
4
4
4
4
4
4
4
4
4
4
4
5
5
5
5
5
5
5
5
5
5
5
5
5
5
5
6
6
6
6
6
6
6
6
6
6
6
6
6
6
6
7
7
7
7
7
7
7
7
7
7
7
7
7
7
7
8
8
8
8
8
8
8
8
8
8
8
8
8
8
8
0V
0V
0V
0V
0V
0V
0V
0V
0V
0V
0V
0V
0V
0V
0V
X22
DC24V
0,5A
0V
E D1 D2
1
5
9 10 11 12
1
X19
R
JX3-DI16
8
JX3-DI16
4
7
JX3-DI16
3
6
JX3-DI16
2
5
JX3-DI16
E D1 D2
1
JX3-DI16
R
13 14 15 16
X22
X22
X22
X22
X22
X22
X22
X22
X22
X22
X22
X22
X22
X22
4
5
6
7
8
0V
X22
9
9
9
9
9
9
9
9
9
9
9
9
9
9
9
9
10
10
10
10
10
10
10
10
10
10
10
10
10
10
10
10
11
11
11
11
11
11
11
11
12
12
12
12
12
12
12
12
13
13
13
13
13
13
13
13
14
14
14
14
14
14
14
14
15
15
15
15
15
15
15
15
16
16
16
16
16
16
16
16
0V
0V
0V
0V
0V
0V
0V
0V
X10
POWER
Jetter
JX3-DI16
R E D1 D2
JX3-DI16
6
JX3-BN-CAN
1
DC24V
0,5A
0V
11
11
11
11
11
11
11
11
12
12
12
12
12
12
12
12
13
13
13
13
13
13
13
13
14
14
14
14
14
14
14
14
15
15
15
15
15
15
15
15
16
16
16
16
16
16
16
16
0V
0V
0V
0V
0V
0V
0V
0V
7
DC24V
0V
Number
Element
Function
1
End clamp for DIN rail
For securing JX3 modules on the DIN rail
2
JX3-BN-CAN
Bus head and power supply for the first 8
JX3 peripheral modules
3
JX3-DI16
8 JX3 peripheral modules
4
JX3-PS1
Power supply module for the next 8 JX3
peripheral modules
5
JX3-DI16
8 JX3 peripheral modules
6
End clamp for DIN rail
For securing JX3 modules on the DIN rail
7
Voltage supply lines DC24V
and 0V
Logic voltage supply for all modules of
the JX3 station
Related Topics
Limitations to be taken into account when engineering a JX3 station
on page 26
Jetter AG
25
2 Engineering
Limitations to be Taken Into Account When Engineering a JX3 Station
Introduction
JX3 modules of a JX3 station are supplied with logic voltage either by a
JC-3xx controller, or a JX3-BN-xxx bus head, or a JX3-PS1 power supply
module. Each of these modules is able to supply up to 8 downstream JX3
modules with logic voltage.
Certain JX3 modules, however, have a higher power consumption which may
reduce the number of connectable JX3 modules. Depending on the power
consumption, the JX3 station has to be equipped with additional JX3-PS1
power supply modules.
When does this
Limitation Apply?
When engineering a JX3 station, this limitation applies in the following cases:
if a JX3-AO4 module is used for current output
if a JX3-AO4 module with HW revision 01.xx is connected
Allowed Power
Consumption
The following table shows the allowed power consumption of JX3 modules
connected to the right (downstream) of the power supply module.
Power Supply Module
Modules not to be Taken
into Account
Power Consumption P24V
Power Consumption P5V
JC-3xx
18 W
6W
JX3-BN-ETH
18 W
6W
JX3-BN-CAN
22 W
6W
JX3-PS1
24 W
6W
The following JX3 modules are not taken into account when calculating power
consumption:
Controller JC-3xx
Bus head JX3-BN-ETH
Bus head JX3-BN-CAN
Power supply module JX3-PS1
Engineering Steps
26
When engineering a JX3 Station, take the following steps:
Step
Action
1
Determine the current consumption of JX3 modules given in the Technical
Data of the JX3 backplane bus.
2
Calculate the power consumption of the JX3 modules.
3
Add the power consumption of JX3 modules included in the JX3 station.
Start with the first JX3 module connected to the JC-3xx controller, or
JX3-BN-xxx bus head.
4
Check whether the allowed power consumption has been exceeded.
Jetter AG
JX3-PS1
Engineering
Step
Action
5
Power Consumption
Calculation
If ...
Then ...
the allowed 5 V power
consumption has been reached
insert a JX3-PS1 power supply
module upstream the next JX3
module
the allowed 24 V power
consumption has been reached
insert a JX3-PS1 power supply
module upstream the next JX3
module
8 JX3 modules have been
connected
insert a JX3-PS1 power supply
module upstream the next JX3
module
16 JX3 modules have been
connected
the JX3 station is fully equipped
Calculate the power consumption of a JX3 module by the following formula:
P5 V = 5 V ⋅ I5 V
P24V = 24 V ⋅ I24V ⋅
P5 V
0.85
Element
Example
Function
I24 V
Current consumption - additional backplane voltage
I5 V
Current consumption - logic backplane voltage
16 JX3-AO4 modules (HW revision 1.xx) are connected to a JC-3xx controller.
The limitations to be taken into account when engineering a JX3 station apply
to these JX3-AO4 modules.
Step
1
Action
Determine the current consumption of JX3-AO4 modules given in the
Technical Data:
Current consumption - logic backplane voltage: 220 mA
Current consumption - additional backplane voltage: 20 mA
2
Calculating the power consumption of a JX3-AO4 module:
P5 V = 5 V ⋅ 220mA = 1.1W
P24 V = 24 V ⋅ 20mA = 1.77 W
3
Add the power consumption of n JX3-AO4 modules:
∑P
∑P
5V
24 V
Jetter AG
=n ⋅ P5 V
=n ⋅ P24 V
27
2 Engineering
Step
Action
4
Checking the allowed power consumption:
For JC-3xx:
∑P
∑P
5V
∑P
∑P
≤ 6W
≤ 6W
5V
≤ 18W
24 V
5
For JX3-PS1
≤ 24 W
24 V
The power consumption at 5V limits the number of JX3-AO4 modules:
n=
∑P
5V
6W
= 5.54 ⇒ 5
1.1W
=
P5 V
Every 5 JX3-AO4 modules a JX3-PS1 power supply module must be
inserted.
Engineering of the JX3 station mentioned in our example which is equipped
with 16 JX3-AO4 modules (HW revision 1.xx) is carried out as follows:
X19
S11
R
E D1 D2
R
E D1 D2
R
X51
X51
X51
X51
X51
R
E D1 D2
R
E D1 D2
R
E D1 D2
R
E D1 D2
R
E D1 D2
Jetter
X51
X51
X51
X51
X51
R
JX3-AO4
E D1 D2
JX3-PS1
R
JX3-AO4
E D1 D2
JX3-AO4
R
JX3-AO4
E D1 D2
7
R
8
E D1 D2
Jetter
X51
X51
X51
X51
X51
X51
LOAD
X10
SD-CARD
SER
X61
DC24V
1,2A
0V
1
1
1
1
1
1
1
1
1
1
1
1
1
1
2
2
2
2
2
2
2
2
2
2
2
2
2
2
2
3
3
3
3
3
3
3
3
3
3
3
3
3
3
3
4
4
4
4
4
4
4
4
4
4
4
4
4
4
4
5
5
5
5
5
5
5
5
5
5
5
5
5
5
5
6
6
6
6
6
6
6
6
6
6
6
6
6
6
6
7
7
7
7
7
7
7
7
7
7
7
7
7
7
7
8
8
8
8
8
8
8
8
8
8
8
8
8
8
8
0V
0V
0V
0V
0V
0V
0V
0V
0V
0V
0V
0V
0V
0V
0V
X52
X15
X11
1
2
3
9
X52
9
X52
X52
9
9
X52
X52
9
9
X52
9
X52
9
X52
9
X52
X52
9
9
X52
9
X52
9
X52
9
10
10
10
10
10
10
10
10
10
10
10
10
10
10
10
11
11
11
11
11
11
11
11
11
11
11
11
11
11
12
12
12
12
12
13
13
13
13
14
14
14
14
14
15
15
15
15
15
16
16
16
16
16
0V
0V
0V
0V
0V
12
12
12
12
12
13
13
13
13
13
X10
14
14
14
14
14
15
15
15
15
15
DC24V
0,5A
0V
16
16
16
16
16
0V
0V
0V
0V
0V
6
7
8
0V
9
11
13
4
5
X52
X52
12
12
12
12
12
13
13
13
13
13
X10
14
14
14
14
14
15
15
15
15
15
DC24V
0,5A
0V
16
16
16
16
16
0V
0V
0V
0V
0V
9
10
11
12
13
POWER
ETHERNET
BUS OUT
1
X14
POWER
STOP
POWER
R
Jetter
POWER
RUN
R
6
JX3-AO4
E D1 D2
Jetter
JX3-AO4
R
JX3-PS1
E D1 D2
5
JX3-AO4
R
JX3-AO4
E D1 D2
JX3-AO4
R
4
JX3-AO4
E D1 D2
JX3-PS1
R
3
JX3-AO4
E D1 D2
JX3-AO4
R
JX3-AO4
E D1 D2
2
JX3-AO4
R
JX3-AO4
JC-360
1
JX3-AO4
Engineering the JX3
Station mentioned in our
Example
14
X10
15
DC24V
0,5A
0V
0V
16
DC24V
0V
Number
28
Element
Function
1
JC-3xx
Controller
2
JX3-AO4
Modules 1 to 5 supplied by JC-3xx (1)
3
JX3-PS1
Power Supply Module
4
JX3-AO4
Modules 6 to 10 supplied by JX3-PS1 (3)
5
JX3-PS1
Power Supply Module
6
JX3-AO4
Modules 11 to 15 supplied by JX3-PS1 (5)
7
JX3-PS1
Power Supply Module
8
JX3-AO4
Module 16 supplied by JX3-PS1 (7)
Jetter AG
JX3-PS1
3
Locating Faults
Locating Faults
Purpose of this Chapter
This chapter is for supporting you when locating faults of the JX3-PS1 module
in the following fields of activity:
Identifying the root cause of a fault
Detecting a fault
Prerequisites
To be able to locate a fault of the JX3-PS1 module the following prerequisites
have to be fulfilled:
The module JX3-PS1 is part of a JX3 station.
The module JX3-PS1 is supplied with power.
Contents
This chapter contains the following topics:
Topic
Page
LED of the Module........................................................................................ 30
Voltage is not OK .......................................................................................... 31
Jetter AG
29
3 Locating Faults
LED of the Module
The JX3-PS1 module signals via LED whether the logic voltage supply for
connected JX3 peripheral modules is faultless. This feature allows the user to
directly locate a fault.
LED of the Module
The JX3-PS1 module is equipped with an LED which indicates the condition of
the supply voltage.
JX3-PS1
Introduction
R
Jetter
Element
"R" LED
30
Status
Function
Off
Logic voltage supply for connected JX3 peripheral
modules is not OK
Green, lit
Logic voltage supply for connected JX3 peripheral
modules is OK
Jetter AG
JX3-PS1
Locating Faults
Voltage is not OK
Detecting the Fault
The LED "R" of the JX3-PS1 module is only lit if all internally generated
voltages are OK.
Root Cause of Fault
The fault may be caused by the following root causes:
Defective hardware for internal voltage generation
No voltage or undervoltage at terminal X10.DC24V
Response of the Module
to this Fault
The module responds to this fault in the following levels:
Level
Fixing the Root Cause
Description
1
The LED "R" on the module goes out.
2
The LED "R" on all JX3 peripheral modules connected to the JX3-PS1
module goes out.
Carry out the following steps to fix the root cause:
Step
1
2
Resetting the Fault
Jetter AG
Action
Check the voltage at terminal X10.DC24V.
If ...
Then ...
the voltage is below 20.4 V
ensure a sufficient voltage supply
the voltage is between 20.4 V
and 28.8 V
a hardware fault has occurred.
Send the JX3-PS1 module to Jetter AG
for repair
It is not possible to reset this fault.
31
JX3-PS1
4
Identifying the Module
Identifying the Module
Purpose of this Chapter
This chapter is for supporting you when identifying the JX3-PS1 module in the
following fields of activity:
Determining the revision of this module.
Contents
This chapter contains the following topics:
Topic
Page
Identification via nameplate .......................................................................... 34
Jetter AG
33
4 Identifying the Module
Identification via nameplate
Introduction
Each JX3 module can be identified by its nameplate attached to its enclosure.
You will need the hardware revision data if you have to contact the hotline of
Jetter AG in case of a problem.
Nameplate
The nameplate of JX3 modules contains the following information:
1
S. / N. : 20080130060039
Part No.:10000542
Rev.: 02.01.00
JX3-xxx
3
2
Number
34
Element
1
Serial number
2
Hardware revision
3
Module name
Jetter AG
JX3-PS1
Appendix
Appendix
Introduction
This appendix contains electrical and mechanical data, as well as operating
data.
Contents
This appendix contains the following topics:
Topic
Page
Technical Data .............................................................................................. 36
Jetter AG
35
Appendix
A: Technical Data
Introduction
This section of the appendix contains both electrical and mechanical data, as
well as operating data of the JX3-PS1 module.
Contents
This chapter contains the following topics:
Topic
Page
Technical Data .............................................................................................. 37
Physical Dimensions..................................................................................... 38
Operating Parameters: Environment and Mechanics................................... 39
Operating Parameters: Enclosure ................................................................ 40
DC Power Supply Inputs and Outputs .......................................................... 41
Shielded Data and I/O Lines ......................................................................... 42
36
Jetter AG
JX3-PS1
Appendix
Technical Data
Electrical Data: Power
Supply
Parameter
Value
Rated voltage
DC 24 V
Permissible voltage range
-15 % ... +20 %
Input current
max. 1.0 A
Power consumption
max. 24 W
Characteristics:
JX3 Backplane Bus
Parameter
Logic voltage of backplane
DC +5 V (-15 % ... +10 %)
Current consumption of connected
JX3 modules supplied by logic voltage of
backplane
I5V = max. 1,200 mA
Power consumption of connected
JX3 modules supplied by logic voltage of
backplane
max. 6 W
Additional voltage of backplane
DC +24 V (-15 % ... +20 %)
Current consumption of connected
JX3 modules supplied by additional
backplane voltage
I24V = max. 1,000 mA
Power consumption of connected
JX3 modules supplied by additional
backplane voltage
max. 24 W
Power consumption of connected
JX3 modules supplied by power supply
voltage from JX3-PS1 module.
Nominal power absorbed from the
JX3 backplane bus
Jetter AG
Value
24 V ⋅ I 24 V +
5V ⋅ I 5V
≤ 24 W
0.85
0W
The JX3-PS1 module provides
JX3 modules with logic and additional
voltage.
37
Appendix
Physical Dimensions
Physical Dimensions
Minimum Clearances
95,6
102,9
100,6
25
131,4
63,5
30
31
25
At mounting the JX3-PS1 module, make sure to maintain a minimum
clearance above and below. At replacing the module, you can operate the
locking mechanisms of the JX3 backplane module using your fingers.
Minimum clearance above: 30 mm
Minimum clearance below: 25 mm
Module Width
The JX3-PS1 module requires a space of 31 mm width. At connecting the
JX3-PS1 module to a JX3 station, the width is increased by 25 mm.
Mounting Position
The mounting position of the JX3-PS1 module is vertical.
38
Jetter AG
JX3-PS1
Appendix
Operating Parameters: Environment and Mechanics
Environment
Parameter
Value
Operating temperature range
0 ... +50 °C
Storage temperature range
-40 ... +70 °C
Standard
DIN EN 61131-2
DIN EN 60068-2-1
DIN EN 60068-2-2
Air humidity
10 ... 95 %,
DIN EN 61131-2
non-condensing
Pollution degree
2
DIN EN 61131-2
Corrosion /
Chemical resistance
No special protection against corrosion. Ambient air
must be free from higher concentrations of acids,
alkaline solutions, corrosive agents, salts, metal
vapors, or other corrosive or electroconductive
contaminants
Max. operating altitude
2,000 m above sea level
DIN EN 61131-2
Mechanical Parameters
Parameter
Free falls withstanding test
Value
Free fall at
Shipping packaging: 1 m
Standard
DIN EN 61131-2
DIN EN 60068-2-32
Product packaging: 0.3 m
Vibration resistance
5 Hz - 9 Hz: 3.5 mm
amplitude
DIN EN 61131-2
DIN EN 60068-2-6
9 Hz - 150 Hz : 1 g
acceleration:
1 octave/minute, 10
frequency sweeps
(sinusoidal), all 3 spatial
axes
Jetter AG
Shock resistance
15 g occasionally, 11 ms,
DIN EN 61131-2
sinusoidal half-wave, 3
shocks in the directions of all DIN EN 60068-2-27
three spatial axes
Degree of protection
IP 20
Mounting position
Vertical position, snapped on
DIN rail
DIN EN 60529
39
Appendix
Operating Parameters: Enclosure
Electrical Safety
Parameter
Value
Standard
Protection class
III
DIN EN 61131-2
Dielectric test voltage
Functional ground is
DIN EN 61131-2
connected to chassis ground
internally.
Protective connection
0
DIN EN 61131-2
Overvoltage category
II
DIN EN 61131-2
EMC - Emitted
Interference
Parameter
Enclosure
Value
Standard
Frequency band 30 DIN EN 61000-6-3
230 MHz, limit 30 dB (µV/m)
DIN EN 61000-6-4
in 10 m
DIN EN 55011
Frequency band 230 1,000 MHz, limit 37 dB
(µV/m) in 10 m
(class B)
EMC - Immunity to
Interference
Parameter
Magnetic field with mains
frequency
Value
Standard
50 Hz
DIN EN 61131-2
30 A/m
DIN EN 61000-6-2
DIN EN 61000-4-8
RF field, amplitude-modulated
Frequency band
80 MHz - 2 GHz
Test field strength: 10 V/m
DIN EN 61131-2
DIN EN 61000-6-2
DIN EN 61000-4-3
AM 80 % at 1 kHz
Criterion A
ESD
Discharge through air:
Test peak voltage 8 kV
Contact discharge:
Test peak voltage 4 kV
DIN EN 61131-2
DIN EN 61000-6-2
DIN EN 61000-4-2
Criterion A
40
Jetter AG
JX3-PS1
Appendix
DC Power Supply Inputs and Outputs
EMC - Emitted
Interference
Parameter
Value
Signal and control interface Frequency bands:
DC power supply inputs
and outputs
Standard
DIN EN 61000-6-3
0.15 to 0.5 MHz,
limit 40 to 30 dB
0.5 to 30 MHz,
limit 30 dB
(class B)
EMC - Immunity to
Interference
Parameter
RF, asymmetric
Value
Standard
Frequency band 0.15 – 80 MHz DIN EN 61131-2
Test voltage 3 V
DIN EN 61000-6-2
AM 80 % at 1 kHz
DIN EN 61000-4-6
Source impedance 150 Ohm
Criterion A
Bursts
Test voltage 2 kV
DIN EN 61131-2
tr/tn 5/50 ns
DIN EN 61000-6-2
Repetition frequency 5 kHz
DIN EN 61000-4-4
Criterion A
Jetter AG
Voltage surges,
tr/th 1.2/50 µs
DIN EN 61131-2
asymmetric
(line to earth),
Common-mode interference
voltage 1 kV
DIN EN 61000-6-2
symmetrical
(line to earth)
Series-mode interference
voltage 0.5 kV
DIN EN 61000-4-5
41
Appendix
Shielded Data and I/O Lines
EMC - Immunity to
Interference
Parameter
Asymmetric RF, amplitudemodulated
Value
Standard
Frequency band 0.15 – 80 MHz DIN EN 61131-2
Test voltage 3 V
DIN EN 61000-6-2
AM 80 % at 1 kHz
DIN EN 61000-4-6
Source impedance 150 Ohm
Criterion A
Bursts
Test voltage 1 kV
DIN EN 61131-2
tr/tn 5/50 ns
DIN EN 61000-6-2
Repetition frequency 5 kHz
DIN EN 61000-4-4
Criterion A
Voltage surges, asymmetric tr/th 1.2/50 µs
DIN EN 61131-2
(line to earth)
DIN EN 61000-6-2
Common-mode interference
voltage 1 kV
DIN EN 61000-4-5
EMC - Interference
Immunity of Functional
Earth Connections
Parameter
RF, asymmetric
Value
Standard
Frequency band 0.15 – 80 MHz DIN EN 61131-2
Test voltage 3 V
DIN EN 61000-6-2
AM 80 % at 1 kHz
DIN EN 61000-4-6
Source impedance 150 Ohm
Criterion A
Bursts
Test voltage 1 kV
DIN EN 61131-2
tr/tn 5/50 ns
DIN EN 61000-6-2
Repetition frequency 5 kHz
DIN EN 61000-4-4
Criterion A
42
Jetter AG
JX3-PS1
B: Index
Index
Representation of Safety Information • 5
S
C
Safety Instructions • 9
Scope of Delivery • 16
Components of JX3-PS1 • 17
T
D
Decommissioning • 10
Technical Data • 37
Terminal X10 • 20
Transport • 10
E
U
EMC
Remarks • 13
Usage other than intended • 10
F
Faults
Voltage is not OK • 31
I
Intended Conditions of Use • 10
L
LED • 22
List of Documentation • 18
M
Modifications • 10
O
Operating Parameters
DC Power Supply Inputs and Outputs • 41
Enclosure • 40
Environment and Mechanics • 39
Shielded Data and I/O Lines • 42
P
Physical Dimensions • 19
Product Description • 16
Q
Qualified Staff • 10
R
Repair • 10
Replacing Modules • 10
Jetter AG
43
Jetter AG
Gräterstraße 2
D-71642 Ludwigsburg
Germany
Phone:
+49 7141 2550-0
Phone Sales:
+49 7141 2550-433
Fax Sales:
+49 7141 2550-484
Hotline:
+49 7141 2550-444
Internet:
http://www.jetter.de
E-Mail:
[email protected]
Jetter Subsidiaries
Jetter Asia Pte. Ltd.
Jetter (Switzerland) AG
Jetter USA Inc.
32 Ang Mo Kio Industrial Park 2
Münchwilerstraße 19
13075 US Highway 19 North
#05-02 Sing Industrial Complex
CH-9554 Tägerschen
Florida - 33764 Clearwater
Switzerland
U.S.A
Singapore 569510
Singapore
Phone:
+65 6483 8200
Phone:
+41 71 91879-50
Phone:
+1 727 532-8510
Fax:
+65 6483 3881
Fax:
+41 71 91879-69
Fax:
+1 727 532-8513
E-Mail:
[email protected]
E-Mail:
[email protected]
E-Mail:
[email protected]
Internet:
http://www.jetter.com.sg
Internet:
http://www.jetterag.ch
Internet:
http://www.jetter.de
Jetter Italia s.r.l.
Via Massarenti 13
20148 Milano
Italy
I
44
Phone:
+39 02 40 09 31 40
Fax:
+39 02 48 75 25 79
E-Mail:
[email protected]
Internet:
http://www.jetter.it
Jetter AG