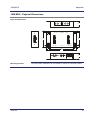
1
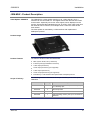
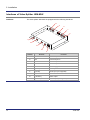
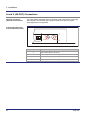
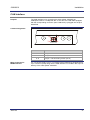
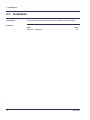
JXM-MUX Video Splitter Introduction Item # 60874930 Revision 1.30 May 2011 / Printed in Germany Jetter AG reserve the right to make alterations to their products in the interest of technical progress. These alterations need not be documented in every single case. This user manual and the information contained herein have been compiled with due diligence. However, Jetter AG assume no liability for printing or other errors or damages arising from such errors. The brand names and product names used in this document are trademarks or registered trademarks of the respective title owner. 2 Jetter AG JXM-MUX Address Introduction How To Contact us: Jetter AG Graeterstrasse 2 D-71642 Ludwigsburg Germany Assignment to Product Phone - Switchboard: +49 7141 2550-0 Phone - Sales: +49 7141 2550-433 Phone - Technical Hotline: +49 7141 2550-444 Fax - Sales: +49 7141 2550-484 E-Mail - Sales: [email protected] E-Mail - Technical Hotline: [email protected] This user manual is an integral part of JXM-MUX: Type: Serial #: Year of construction: Order #: To be entered by the customer: Inventory #: Place of operation: Jetter AG 3 Introduction Significance Significance of this user manual The user manual is an integral part of JXM-MUX: It must be kept in a way that it is always at hand, until the JXM-MUX will be disposed of. If the JXM-MUX is sold or loaned/leased out, the user manual has to be passed on. In any case you encounter difficulties to clearly understand this user manual, please contact the manufacturer. We would appreciate any suggestions and contributions on your part and would ask you to contact us by our e-mail address [email protected]. This will help us to produce manuals that are more user-friendly and to address your wishes and requirements. This user manual contains important information on how to transport, erect, install, operate, maintain and repair the JXM-MUX. Therefore, the persons carrying out these jobs must carefully read, understand and observe this user manual, and especially the safety instructions. Missing or inadequate knowledge of the user manual results in the loss of any claim of liability on part of Jetter AG. Therefore, the operating company is recommended to have the instruction of the persons concerned confirmed in writing. 4 Jetter AG JXM-MUX Contents Table of Contents 1 Safety Instructions 7 Basic Safety Instructions................................................................................................................8 Instructions on EMI ......................................................................................................................10 2 Installation 2.1 2.2 2.3 3 11 Equipment Configuration..........................................................................................................12 JXM-MUX - Product Description ..................................................................................................13 Interfaces of Video Splitter JXM-MUX..........................................................................................14 JXM-MUX - Physical Dimensions ................................................................................................15 Interfaces ....................................................................................................................................16 Power Supply Jack POWER........................................................................................................17 Camera Inputs CA1 to CA4 .........................................................................................................18 A and V (AV-IN) Connections.......................................................................................................19 A and V (AV-OUT) Connections...................................................................................................20 CAN Interface...............................................................................................................................21 Installation ..................................................................................................................................22 JXM-MUX - Installation ................................................................................................................23 Configuration 25 JXM-MUX - Configuration ............................................................................................................26 Appendix A: B: Jetter AG 32 Technical Data ............................................................................................................................33 JXM-MUX - Technical Data ..........................................................................................................34 JXM-MUX - Physical Dimensions ................................................................................................35 JXM-MUX - Environment and Mechanics....................................................................................36 Index............................................................................................................................................37 5 JXM-MUX 1 Safety Instructions Safety Instructions Introduction This chapter informs the user of general safety instructions and warns of residual dangers, if applicable. Furthermore, it contains information on EMC. Contents Topic Page Basic Safety Instructions ................................................................................ 8 Instructions on EMI ....................................................................................... 10 Jetter AG 7 1 Safety Instructions Basic Safety Instructions Introduction This device complies with the valid safety regulations and standards. Special emphasis was given to the safety of the users. Of course, the user should adhere to the following regulations: relevant accident prevention regulations; accepted safety rules; EC guidelines and other country-specific regulations Intended Conditions of Use Usage according to the intended conditions of use implies operation in accordance with this user manual. This device has been designed as a peripheral module for use in commercial vehicles and mobile machines and is intended for connection to an already existing controller. The JXM-MUX is a video splitter merging up to 4 video signals into one video signal. The JXM-MUX meets the requirement of the European Automotive EMC Directive for electric/electronic subassemblies. The JXM-MUX must be operated within the limits given in the technical specifications. The operating voltage of the JXM-MUX is classified as SELV (Safety Extra Low Voltage). Therefore, the JXM-MUX is not subject to the EU Low Voltage Directive. Usage Other Than Intended This device must not be used in technical systems which to a high degree have to be fail-safe, e.g. ropeways and aeroplanes. The JXM-MUX is no safety-related part as per Machinery Directive 2006/42/EC. This device is not qualified for safety-relevant applications and must, therefore, NOT be used to protect persons. If the device is to be run under ambient conditions which differ from the allowed operating conditions, Jetter AG is to be contacted beforehand. Personnel Qualification Depending on the life cycle of the product, the persons involved must possess different qualifications. These qualifications are required to ensure proper handling of the device in the corresponding life cycle. 8 Product Life Cycle Minimum Qualification Transport / Storage: Trained and instructed personnel with knowledge in handling electrostatic sensitive components. Mounting / Installation: Specialized personnel with training in electrical/automotive engineering, such as automotive mechatronics fitters. Commissioning / Programming: Trained and instructed experts with profound knowledge of, and experience with, automotive / automation technology, such as automotive engineers for mobile machinery. Operation: Trained, instructed and assigned personnel with knowledge in operating electronic devices for mobile machinery. Jetter AG JXM-MUX Safety Instructions Product Life Cycle Minimum Qualification Decommissioning: Specialized personnel with training in electrical/automotive engineering, such as automotive mechatronics fitters. Modifications and Alterations to the Device For safety reasons, no modifications and changes to the device and its functions are permitted. Any modifications to the device not expressly authorized by Jetter AG will result in a loss of any liability claims to Jetter AG. The original parts are specifically designed for the device. Parts and equipment from other manufacturers are not tested on our part, and are, therefore, not released by Jetter AG. The installation of such parts may impair the safety and the proper functioning of the device. Any liability on the part of Jetter AG for any damages resulting from the use of non-original parts and equipment is excluded. Transport The JXM-MUX contains electrostatic sensitive components which can be damaged if not handled properly. To exclude damages to the JXM-MUX during transport it should only be shipped in its original packaging or in packaging protecting against electrostatic discharge. This is particularly true for transport via mail. Use an appropriate outer packaging to protect the JXM-MUX against impact or shock. In case of damaged packaging inspect the device for any visible damage. Inform your freight forwarder and the manufacturer, if applicable. Storing When storing the JXM-MUX observe the environmental conditions given in the technical specification. Repair and Maintenance This device must not be repaired by the operators themselves. The device does not contain any parts that could be repaired by the operator. The device must be sent to Jetter AG for repair. Disposal When disposing of devices, the local environmental regulations must be complied with. Jetter AG 9 1 Safety Instructions Instructions on EMI Wiring Instructions To ensure immunity to interference the JXM-MUX must be wired as shown below. The jacks CA1 to CA4 are soldered to the JXM-MUX housing. V A AV-OUT A CAN V AV-IN Control Box CA1 CA2 CA3 CA4 POWER INPUT DC10V-32V Trigger inputs cut off or not assigned Retaining clip 10 GND +UB Cam4 Cable snap ferrite 7427122 Cam3 Cam2 Cam1 CAN Video Out Cable snap ferrite 7427122 Jetter AG JXM-MUX 2 Installation Installation Introduction This chapter covers the configuration, interfaces and installation of the video splitter JXM-MUX. Wiring Instructions To ensure immunity to interference follow the wiring instructions on page 10. Contents Topic Page Equipment Configuration .............................................................................. 12 Interfaces ...................................................................................................... 16 Jetter AG 11 2 Installation 2.1 Equipment Configuration Introduction This chapter describes equipment configuration. Contents Topic Page JXM-MUX - Product Description................................................................... 13 Interfaces of Video Splitter JXM-MUX .......................................................... 14 JXM-MUX - Physical Dimensions ................................................................. 15 12 Jetter AG JXM-MUX Installation JXM-MUX - Product Description Video Splitter JXM-MUX The JXM-MUX is a video splitter merging up to 4 video signals. Up to 4 cameras can be connected to it. The signals from these cameras are routed to the monitor. Optionally one to four video signals can be displayed on the monitor. Supported video standards are PAL or NTSC. Each video signal from the cameras can be mirrored, for example when a camera is used as rear view camera. The video splitter is controlled by a CAN interface with implemented CANopen® protocol. Product Image Product Features The features of this module are listed below: Scope of Delivery Jetter AG Video system: NTSC, PAL (5 channels) 4 camera jacks (5-pin MiniDIN connectors) 1 video input (RCA/cinch) 1 audio input (RCA/cinch) (not supported) 1 video output (RCA/cinch) 1 audio output (RCA/cinch) (not supported) Controlled by a CAN interface with implemented CANopen® protocol. The following items are included in the scope of delivery of the video splitter JXM-MUX: Item # Quantity Description 10000790 1 Video splitter JXM-MUX with power cable (2 m) and 2 retaining clips 60240700 2 Cable snap ferrite 60873457 1 CAN cable 1 m 60873458 1 CAN terminating resistor (120 Ω) for connection to JXM-MUX 13 2 Installation Interfaces of Video Splitter JXM-MUX Interfaces The video splitter JXM-MUX is equipped with the following interfaces: 10 9 8 7 6 1 2 3 5 Number 14 Element Function 1 CA1 Camera input # 1 2 CA2 Camera input # 2 3 CA3 Camera input # 3 4 CA4 Camera input # 4 5 POWER Power supply 6 V (AV-IN) Video input 7 A (AV-IN) Audio input (not supported) 8 MONITOR CAN interface 9 V (AV-OUT) Video output 10 A (AV-OUT) Audio output (not supported) Jetter AG JXM-MUX Installation JXM-MUX - Physical Dimensions V A AV-OUT MONITOR A V AV-IN 5 69 105 5 17 17 28 Physical Dimensions CA3 CA4 130 154 19 CA1 CA2 5 6 12 28 6 12 POWER INPUT DC 10V~32V 10 10 19 5 Mounting Position Jetter AG The video splitter JXM-MUX can be installed in vertical or horizontal position. 15 2 Installation 2.2 Interfaces Jack POWER The function of the jack POWER is as follows: Power supply for video splitter JXM-MUX MiniDIN connectors (female) CA1 to CA4 The function of MiniDIN connectors CA1 to CA4 is as follows: Connection of cameras with an operating voltage of 12 VDC RCA/cinch jacks V (AV-IN) The function of the RCA/cinch jacks V (AV-IN) is as follows: Additional AUX input for a video signal RCA/cinch jacks V (AV-OUT) The function of the RCA/cinch jacks V (AV-OUT) is as follows: Output of a resulting video signal CAN Interface The function of the CAN interface is as follows: Configuration and control of the video splitter JXM-MUX via CANopen® bus Contents Topic Page Power Supply Jack POWER......................................................................... 17 Camera Inputs CA1 to CA4 .......................................................................... 18 A and V (AV-IN) Connections........................................................................ 19 A and V (AV-OUT) Connections.................................................................... 20 CAN Interface ............................................................................................... 21 Installation ..................................................................................................... 22 16 Jetter AG JXM-MUX Installation Power Supply Jack POWER Purpose The jack POWER is for connecting the power supply cord to the video splitter JXM-MUX. Contact Assignment 1 8 Pin Technical Data Male Connector for POWER jack Jetter AG Function 1 VIn (10 ... 32 VDC) 8 Reference potential (GND) Parameter Value Operating voltage 10 ... 32 VDC Typical input current at 12 VDC max. 2.0 A Typical input current at 24 VDC max. 1.0 A Power consumption 24 W max. An 8-pole connector (male) is included in the scope of delivery of the video splitter JXM-MUX. The power supply cord with one red and one black core (each 2 m in length) is connected to the connector terminals. 17 2 Installation Camera Inputs CA1 to CA4 Purpose The following camera types can be connected to the MiniDIN connectors CA1 to CA4: CCD cameras Internal vehicle cameras Rear view cameras Monitoring cameras Cameras with an operating voltage of 12 VDC Cameras with audio output Cameras with PAL or NTSC video signals Contact Assignment of MiniDIN Connectors CA1 to CA4 3 2 1 5 4 Pin 18 Function 1 Power 12 VDC 2 Audio IN 3 Mirror 4 Video IN 5 GND Jetter AG JXM-MUX Installation A and V (AV-IN) Connections Purpose of A and V (AV-IN) Connections The video splitter JXM-MUX offers the option to feed in an additional video signal via AUX input (RCA/cinch jacks). Audio signals are not supported. Contact Assignment of A and V (AV-IN) Jacks 3 1 2 Pin Jetter AG 4 Function 1 Video input signal V (AV-IN) 2 Reference potential for video signal 3 Audio input signal A (AV-IN) (not supported) 4 Reference potential for audio signal (not supported). 19 2 Installation A and V (AV-OUT) Connections Purpose of A and V (AV-OUT) Connections The video splitter JXM-MUX forms a resulting video signal from the incoming video signals. The resulting video signal is output via V (AV-OUT) jacks. Audio signals are not supported. Contact Assignment of A and V (AV-OUT) Jacks Pin 20 1 3 2 4 Function 1 Video output signal V (AV-OUT) 2 Reference potential for video signal 3 Audio output signal A (AV-OUT) (not supported) 4 Reference potential for audio signal (not supported). Jetter AG JXM-MUX Installation CAN Interface Purpose The CAN interface is for connecting the video splitter JXM-MUX as CANopen® node to a CANopen® bus. To this end, the CAN cable equipped with the corresponding connector (item # 60873457) is plugged into the jack MONITOR. Contact Assignment 1 3 Pin Male Connector for MONITOR Jack Jetter AG 4 Function 1 CAN_H 2 CAN_L 3-4 2 Jumper = CAN terminating resistor (120 Ω) A 2-core power supply cord (1 m in length) (item # 60873457) equipped with a 4-pin connector (male) fitting into the CAN interface is included in the scope of delivery of the video splitter JXM-MUX. 21 2 Installation 2.3 Installation Introduction This chapter describes how the video splitter JXM-MUX is to be installed. Contents Topic Page JXM-MUX - Installation ................................................................................. 23 22 Jetter AG JXM-MUX Installation JXM-MUX - Installation Installation Carry out the following steps for installing the video splitter JXM-MUX: Step Jetter AG Action 1 Install the video splitter JXM-MUX in a location which has a load carrying capacity of at least 5 kg. 2 Screw down the video splitter JXM-MUX as shown in the illustration below. When doing so, use the screws that come with the module. 3 Plug in the camera cables, then install the retaining clips using the screws that come with the module. 23 JXM-MUX 3 Configuration Configuration Introduction This chapter describes how the video splitter JXM-MUX is configured via CANopen® interface. Contents Topic Page JXM-MUX - Configuration............................................................................. 26 Jetter AG 25 3 Configuration JXM-MUX - Configuration CANopen® Connectivity The JXM-MUX features a CANopen® node with a rate of 250 kBaud. Its design complies with profile DS 301. To allow function monitoring, the node acts as heartbeat producer sending a heartbeat object every 500 ms. Configuring the NODE ID The NODE ID is stored to the flash memory and is, thus, safeguarded against power loss. To set the NODE ID enter the required value into index 4000, sub-index 4. To store the newly set NODE ID to index 1010, sub-index 1 use command "Save All" (0x65766173). Any changes become effective only after the module has been re-initialized. 26 Jetter AG JXM-MUX Object Directory Jetter AG Configuration All available objects are listed in the following illustration. For a detailed definition refer to the EDS file. 27 3 Configuration PDO Assignment and Parameters PDO is short for Process Data Object. There is a permanently mapped PDO1_TX (0x200 + Node ID) with the following parameters: Byte 0 Byte 1 Byte 2 Byte 3 Configuration: Operating parameters (index 4000, sub-index 1) Bit 0 ... 5 Reserved Bit 6 Video output 1 = NTSC, 0 = PAL Bit 7 JXM-MUX operating mode 1 = ON, 0 = OFF Configuration: Camera (index 4000, sub-index 2) Bit 0 CAM1 Mirror Bit 1 CAM2 Mirror Bit 2 CAM3 Mirror Bit 3 CAM4 Mirror Bit 4 ... 7 Reserved Configuration: Display mode (index 4000, sub-index 3) 0 CAM1 1 CAM2 2 CAM3 3 CAM4 4 AUX 5 2-channel split CAM1/CAM2 6 3-channel split CAM1/CAM2/CAM3 7 4-channel split CAM1/CAM2/CAM3/CAM4 Video channel - Display assignment for 2-channel split screen mode (index 4000, sub-index 5) (only valid if not 0, and not 0xFF) Byte 4 Bit 0, 1 Channel (0 ... 3) for left split screen half (default channel 0) Bit 2, 3 Channel (0 ... 3) for right split screen half (default channel 1) Video channel - Display assignment for 3-channel split screen mode (index 4000, sub-index 6) (only valid if not 0, and not 0xFF) Byte 5 Bit 0, 1 Channel for top left split screen third (default channel 0) Bit 2, 3 Channel for top right split screen third (default channel 1) Bit 4, 5 Channel for bottom split screen third (default channel 2) Video channel - Display assignment for 4-channel split screen mode (index 4000, sub-index 7) (only valid if not 0, and not 0xFF) 28 Bit 0, 1 Channel for top left split screen quarter (default channel 0) Bit 2, 3 Channel for top right split screen quarter (default channel 1) Bit 4, 5 Channel for bottom left split screen quarter (default channel 2) Jetter AG JXM-MUX Configuration Bit 6, 7 Channel for bottom right split screen quarter (default channel 3) Important Note When assigning channels take into account that one channel cannot be split into several split screens. JetSym STX Program Activating camera 1 The following program is for connecting camera 1 to video output of the JXM-MUX module. #Include "CanOpen.stxp" Const // CAN number 0 CAN_CONTROLLER_0 = 0; // Node ID of JVM-407 NodeID_JVM_407 = 0x0A; // Node ID of JXM-MUX NodeID_JXM_MUX = 0x7F; // Event time in ms Event_Time = 1000; // Inhibit time in ms Inhibit_Time = 100; End_Const; Var // Permanent PDO mapping of CAN data to JXM-MUX PDO1tx: Array [6] of Byte; End_Var; Task JXM_MUX_Control_Example_1 Autorun Var SW_Version: String; End_Var; SW_Version := 'v4.3.0.2004'; // Initializing CAN 0 by JVM-407 CanOpenInit (CAN_CONTROLLER_0, NodeID_JVM_407, SW_Version); // Transferring data via PDO to JXM-MUX // Permanently assigning video output to camera 1 // Activating JXM-MUX PDO1tx[0] := 0x80; // No mirroring PDO1tx[1] := 0; // Assigning the video output to camera 1 PDO1tx[2] := 0; Jetter AG 29 3 Configuration CanOpenAddPDOTx (CAN_CONTROLLER_0, CANOPEN_PDO1_TX (NodeID_JXM_MUX), 0, CANOPEN_BYTE, 1, PDO1tx[0], Event_Time, Inhibit_Time, CANOPEN_ASYNCPDO | CANOPEN_NORTR); CanOpenAddPDOTx (CAN_CONTROLLER_0, CANOPEN_PDO1_TX (NodeID_JXM_MUX), 1, CANOPEN_BYTE, 1, PDO1tx[1], Event_Time, Inhibit_Time, CANOPEN_ASYNCPDO | CANOPEN_NORTR); CanOpenAddPDOTx (CAN_CONTROLLER_0, CANOPEN_PDO1_TX (NodeID_JXM_MUX), 2, CANOPEN_BYTE, 1, PDO1tx[2], Event_Time, Inhibit_Time, CANOPEN_ASYNCPDO | CANOPEN_NORTR); // All nodes on the CAN bus are in state PREOPERATIONAL // Setting all nodes on the CAN bus to state OPERATIONAL CanOpenSetCommand (CAN_CONTROLLER_0, CAN_CMD_NMT_Value (CAN_CMD_NMT_ALLNODES, CAN_CMD_NMT), CAN_NMT_START); // // // ... ... ... End_Task; JetSym STX Program Selecting a 4-channel split screen The following program is for selecting 4-channel split screen mode of the JXM-MUX module. The image of camera 4 is displayed in the top left quarter of the monitor. The image of camera 3 is displayed in the top right quarter of the monitor. The image of camera 2 is displayed in the bottom left quarter of the monitor. The image of camera 1 is displayed in the bottom right quarter of the monitor. #Include "CanOpen.stxp" Const // CAN number 0 CAN_CONTROLLER_0 = 0; // Node ID of JVM-407 NodeID_JVM_407 = 0x0A; // Node ID of JXM-MUX NodeID_JXM_MUX = 0x7F; // Event time in ms Event_Time = 1000; // Inhibit time in ms Inhibit_Time = 100; End_Const; Var // Permanent PDO mapping of CAN data to JXM-MUX PDO1tx: Array [6] of Byte; End_Var; Task JXM_MUX_Control_Example_2 Autorun 30 Jetter AG JXM-MUX Configuration Var SW_Version: String; End_Var; SW_Version := 'v4.3.0.2004'; // Initializing CAN 0 by JVM-407 CanOpenInit (CAN_CONTROLLER_0, NodeID_JVM_407, SW_Version); // Setting display mode to 4-channel split // Assigning channels: top left channel 3; top right channel 2 // Assigning channels: bottom left channel 1; bottom right channel 0 // Activating JXM-MUX PDO1tx[0] := 0x80; // No mirroring PDO1tx[1] := 0; // Setting video output to 4-channel split: CAM1/CAM2/CAM3/CAM4 PDO1tx[2] := 7; // Video channel assignment in 2-channel split screen mode (default) PDO1tx[3] := 0x04; // Video channel assignment in 3-channel split screen mode PDO1tx[4] := 0x24; // Video channel assignment in 4-channel split screen mode PDO1tx[5] := 0x1B; CanOpenAddPDOTx (CAN_CONTROLLER_0, CANOPEN_PDO1_TX (NodeID_JXM_MUX), 0, CANOPEN_BYTE, 1, PDO1tx[0], Event_Time, Inhibit_Time, CANOPEN_ASYNCPDO | CANOPEN_NORTR); CanOpenAddPDOTx (CAN_CONTROLLER_0, CANOPEN_PDO1_TX (NodeID_JXM_MUX), 1, CANOPEN_BYTE, 1, PDO1tx[1], Event_Time, Inhibit_Time, CANOPEN_ASYNCPDO | CANOPEN_NORTR); CanOpenAddPDOTx (CAN_CONTROLLER_0, CANOPEN_PDO1_TX (NodeID_JXM_MUX), 2, CANOPEN_BYTE, 1, PDO1tx[2], Event_Time, Inhibit_Time, CANOPEN_ASYNCPDO | CANOPEN_NORTR); CanOpenAddPDOTx (CAN_CONTROLLER_0, CANOPEN_PDO1_TX (NodeID_JXM_MUX), 5, CANOPEN_BYTE, 1, PDO1tx[5], Event_Time, Inhibit_Time, CANOPEN_ASYNCPDO | CANOPEN_NORTR); // All nodes on the CAN bus are in state PREOPERATIONAL // Setting all nodes on the CAN bus to state OPERATIONAL CanOpenSetCommand (CAN_CONTROLLER_0, CAN_CMD_NMT_Value (CAN_CMD_NMT_ALLNODES, CAN_CMD_NMT), CAN_NMT_START); // // // ... ... ... End_Task; Jetter AG 31 Appendix Appendix Introduction This appendix contains electrical and mechanical data, as well as operating data. Contents Topic Page Technical Data .............................................................................................. 33 Index ............................................................................................................. 37 32 Jetter AG JXM-MUX Appendix A: Technical Data Introduction This section of the appendix contains both electrical and mechanical data, as well as operating data of the JXM-MUX module. Contents Topic Page JXM-MUX - Technical Data........................................................................... 34 JXM-MUX - Physical Dimensions................................................................. 35 JXM-MUX - Environment and Mechanics .................................................... 36 Jetter AG 33 Appendix JXM-MUX - Technical Data Technical Data Electrical System: Power Supply Parameter Operating voltage 10 ... 32 VDC Typical input current at 12 VDC 2.0 A max. Typical input current at 24 VDC 1.0 A max. Power consumption 24 W max. Video System 34 Value Parameter Value Video system NTSC, PAL standard signal Synchronous system integrated Video inputs 5 channels (4 MiniDIN, 1 RCA/cinch), composite 1 Vp-p 75 Ohm Audio inputs 5 channels (4 MiniDIN, 1 RCA/cinch) (not supported) Video output 1 RCA/cinch composite 1 Vp-p 75 Ohm Audio output 1 RCA/cinch 150 mV RMS, 47 kOhm (not supported) Jetter AG JXM-MUX Appendix JXM-MUX - Physical Dimensions V A AV-OUT MONITOR A V AV-IN 5 69 105 5 17 17 28 Physical Dimensions CA3 CA4 130 154 19 CA1 CA2 5 6 12 28 6 12 POWER INPUT DC 10V~32V 10 10 19 5 Mounting Position Jetter AG The video splitter JXM-MUX can be installed in vertical or horizontal position. 35 Appendix JXM-MUX - Environment and Mechanics Environment Parameter Operating Temperature Range -10 ... +60 °C Storage Temperature Range -25 ... +80 °C Mechanical Parameters 36 Value Parameter Value Vibrations 3G Degree of Protection IP 20 Place of Installation Only indoors Mounting Position Vertical or horizontal Enclosure Steel Weight approx. 0.5 kg Standard Standard DIN EN 60529 Jetter AG JXM-MUX Index B: Index C Components of JXM-MUX - 14 I Instructions on EMI - 10 J Jacks CAN interface jack - 21 Jack POWER - 17 Jacks AV-IN - 19 Jacks AV-OUT - 20 Jacks CA1 to CA4 - 18 JXM-MUX - Configuration - 26 JXM-MUX - Installation - 23 O Operating Parameters Environment and Mechanics - 36 P Physical Dimensions - 15 Product Description - 13 S Safety Instructions - 7 Scope of Delivery - 13 T Technical Data - 34 Jetter AG 37 Jetter AG Graeterstraße 2 D-71642 Ludwigsburg Germany Phone: +49 7141 2550-0 Phone Sales: +49 7141 2550-433 Fax Sales: +49 7141 2550-484 Hotline: +49 7141 2550-444 Internet: http://www.jetter.de E-Mail: [email protected] Jetter Subsidiaries Jetter (Switzerland) AG Jetter UK Ltd. Jetter USA Inc. Münchwilerstrasse 19 Old Witney Road 13075 US Highway 19 North CH-9554 Tägerschen Eynsham Florida - 33764 Clearwater OX29 4PU Witney Switzerland Great Britain U.S.A Phone: +41 71 91879-50 Phone: +44 1865 883346 Phone: +1 727 532-8510 Fax: +41 71 91879-69 Fax: +44 1865 883347 Fax: +1 727 532-8507 E-Mail: [email protected] E-Mail: [email protected] E-Mail: [email protected] Internet: http://www.jetterag.ch Internet: http://www.jetter.uk.com Internet: http://www.jetter.de 38 Jetter AG