1
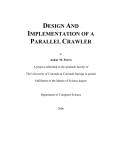
WALDO
Quick Start Guide and User Manual
Peter B. Winter
[email protected]
August 21, 2015
Contents
1 Quick Start Guide
1.1 Selecting Directories . . . .
1.2 Selecting Recordings . . . .
1.3 Select Threshold and ROI .
1.4 Interpreting Scores . . . . .
1.5 Clean Data and See Results
.
.
.
.
.
2
2
2
3
3
4
2 Installation
2.1 Installing a compiled version of WALDO . . . . . . . . . . . . . .
2.2 Installing WALDO from source . . . . . . . . . . . . . . . . . . .
2.3 Installing Multi-Worm Tracker . . . . . . . . . . . . . . . . . . .
4
4
4
4
.
.
.
.
.
.
.
.
.
.
3 Reference
3.1 The Opening Window . . . . .
3.2 The Configuration Window . .
3.3 Selecting a Recording . . . . .
3.4 Selecting a Threshold and ROI
3.5 The Score Card . . . . . . . . .
3.6 Running WALDO . . . . . . .
3.7 Results . . . . . . . . . . . . . .
3.7.1 Results Figure . . . . .
3.7.2 Track Counts . . . . . .
3.7.3 Network Overview . . .
3.7.4 Track Fragmentation . .
3.8 Output Files . . . . . . . . . .
3.8.1 Accuracy . . . . . . . .
3.8.2 Bounds . . . . . . . . .
3.8.3 Starts and Ends . . . .
3.8.4 Start and End Reports .
3.8.5 Matches . . . . . . . . .
1
.
.
.
.
.
.
.
.
.
.
.
.
.
.
.
.
.
.
.
.
.
.
.
.
.
.
.
.
.
.
.
.
.
.
.
.
.
.
.
.
.
.
.
.
.
.
.
.
.
.
.
.
.
.
.
.
.
.
.
.
.
.
.
.
.
.
.
.
.
.
.
.
.
.
.
.
.
.
.
.
.
.
.
.
.
.
.
.
.
.
.
.
.
.
.
.
.
.
.
.
.
.
.
.
.
.
.
.
.
.
.
.
.
.
.
.
.
.
.
.
.
.
.
.
.
.
.
.
.
.
.
.
.
.
.
.
.
.
.
.
.
.
.
.
.
.
.
.
.
.
.
.
.
.
.
.
.
.
.
.
.
.
.
.
.
.
.
.
.
.
.
.
.
.
.
.
.
.
.
.
.
.
.
.
.
.
.
.
.
.
.
.
.
.
.
.
.
.
.
.
.
.
.
.
.
.
.
.
.
.
.
.
.
.
.
.
.
.
.
.
.
.
.
.
.
.
.
.
.
.
.
.
.
.
.
.
.
.
.
.
.
.
.
.
.
.
.
.
.
.
.
.
.
.
.
.
.
.
.
.
.
.
.
.
.
.
.
.
.
.
.
.
.
.
.
.
.
.
.
.
.
.
.
.
.
.
.
.
.
.
.
.
.
.
.
.
.
.
.
.
.
.
.
.
.
.
.
.
.
.
.
.
.
.
.
.
.
.
.
.
.
.
.
.
.
.
.
.
.
.
.
.
.
.
.
.
.
.
.
.
.
.
.
.
.
.
.
.
.
.
.
.
.
.
.
.
.
.
.
.
.
.
.
.
.
.
.
.
.
.
.
.
.
.
.
.
.
.
.
.
.
.
.
.
.
.
.
.
.
.
.
.
.
.
.
.
.
.
.
.
.
.
.
.
.
.
.
.
.
.
.
.
.
5
5
6
7
8
9
10
10
11
12
13
13
15
15
15
16
16
17
3.8.6
3.8.7
3.8.8
3.8.9
3.8.10
3.8.11
3.8.12
3.8.13
.
.
.
.
.
.
.
.
.
.
.
.
.
.
.
.
.
.
.
.
.
.
.
.
.
.
.
.
.
.
.
.
.
.
.
.
.
.
.
.
.
.
.
.
.
.
.
.
.
.
.
.
.
.
.
.
.
.
.
.
.
.
.
.
.
.
.
.
.
.
.
.
.
.
.
.
.
.
.
.
.
.
.
.
.
.
.
.
.
.
.
.
.
.
.
.
.
.
.
.
.
.
.
.
17
17
18
18
19
19
19
20
4 Tips and Trouble Shooting
4.1 Collecting and Organizing Your Data . . . .
4.2 Adjusting and Saving WALDO Figures . . .
4.3 Selecting Data: My recording is colored red
4.4 Selecting Data: My directory is missing . .
4.5 Improving Image Scores . . . . . . . . . . .
.
.
.
.
.
.
.
.
.
.
.
.
.
.
.
.
.
.
.
.
.
.
.
.
.
.
.
.
.
.
.
.
.
.
.
.
.
.
.
.
.
.
.
.
.
.
.
.
.
.
.
.
.
.
.
.
.
.
.
.
20
20
20
21
21
21
1
Missing . . . . . . . . .
Moved . . . . . . . . . .
Node Summary . . . . .
Report Card . . . . . .
ROI . . . . . . . . . . .
Sizes . . . . . . . . . . .
Terminals . . . . . . . .
Threshold and Region of
. . . . .
. . . . .
. . . . .
. . . . .
. . . . .
. . . . .
. . . . .
Interest
.
.
.
.
.
.
.
.
Quick Start Guide
Worm Analysis for Live Detailed Observation, or WALDO, was designed with
two primary functions in mind (1) to assess the quality of your data aquisition
setup and (2) to remove the disruptions in tracking individual worms by correcting many types of imaging errors that occur during real time processing. This
overview covers the basics of using WALDO to cleaning data generated using
the Multi-Worm Tracker (MWT). To jump right into the core functionality of
WALDO, the quick start guide assumes that you have installed WALDO and
MWT (see section 2) and already have several recordings created by the MWT.
To open the WALDO graphical user interface, click the guiwaldo.exe icon.
1.1
Selecting Directories
The opening window (section 3.1) allows you to select the directory that contains
the recordings from MWT and the directory you want to store all of WALDO’s
results. You can also adjust WALDO’s parameters using the configuration button (see 3.2) or run WALDO in batch-mode but these are optional and not
recommended for beginners. Click the ‘next’ button to proceed. If you feel that
you want to redo any of the previous steps, hit the back button until you get to
the section you want to change.
1.2
Selecting Recordings
Once you select a directory, you can specify which recordings you want WALDO
to analyze (section 3.3). The currently selected recording will be marked blue,
invalid recordings are marked red, and recordings that have already been processed are marked green. Click the ‘Next’ button to process the recording you
have selected.
2
Figure 1: An Overview of Steps Involved in Running WALDO
1.3
Select Threshold and ROI
After the recording has been loaded, you are shown two graphs and an image
of the plate so you can provide (1) a pixel-intensity threshold and (2) a region
of interest inside the image. These two pieces of information allow WALDO to
interpret how accurately the recording’s images reflect the data recorded by the
Multi-Worm Tracker. The pixel intensity threshold is selected by clicking on
either of the graphs on the left. The region of interest is selected by selecting
if you want a polynomial or circular region of interest by clicking the buttons
above the image and then by specifying the ROI on the image below (see section
3.5). When you are satisfied with both the threshold and the ROI click ‘Next’.
1.4
Interpreting Scores
WALDO will calculate and display a set of four metrics to judge how well the
image match MWT’s data (section 3.5). The two most important metrics we use
to score recordings are ‘Good Fraction’ and ‘Coverage’. ‘Good Fraction’ shows
the fraction of the worms MWT reported were actually found in the images
by WALDO. ‘Coverage’ shows how many of the worms found by WALDO in
the images were also reported in the MWT tracking data. If these scores are
two low, then the quality of data in this recording is poor and WALDO will
not allow you to continue. If this occurs, we recommend working through our
3
troubleshooting section of this guide (section 4.5). Otherwise, click ‘Next’ to
begin cleaning your data.
1.5
Clean Data and See Results
Progress will be displayed in a series of progress bars shown in a pop-up window
and in a bar graph that will appear and then update in the main window (section
3.6). When WALDO has finished running, it will write a set of output files,
generate several report tables, and display a graph showing how well tracks have
been combined (section 3.7). The cleaned data files will be present inside the
directory you specified in the opening window. Most of the files are written in the
same format used by MWT, however some files contain additional information
such as which tracks were created by collisions. We recommend reading about
the output files in order to pull out what information is relevant to your research
(see section 3.8).
2
2.1
Installation
Installing a compiled version of WALDO
The only thing you need to do to install WALDO is to download the zipped
folder (https://amaral.northwestern.edu/resources/software/waldo). After you unzip the folder, you can run waldo by double clicking on the guiwaldo.exe application. If you plan on running WALDO more frequently, we
heavily recommend you create a shortcut for guiwaldo and placing it on your
desktop.
2.2
Installing WALDO from source
The source code for WALDO is currently being hosted on bitbucket (https://
bitbucket.org/peterbwinter/waldo). After installing mercurial (https://
mercurial.selenic.com/), the WALDO source code can be installed using the
command: ‘hgclonehttps://[email protected]/peterbwinter/
waldowaldo’ Once the repository is cloned, you can launch WALDO’s graphical
user interface with the command: ‘python waldo/code/guiwaldo.py’
2.3
Installing Multi-Worm Tracker
WALDO is currently only configured to process data that is formatted like
Multi-Worm Tracker’s generated output. The MWT project website is http:
//sourceforge.net/projects/mwt/. After downloading a zip file from the
website will include the MWT source code as well as multiple documentation
files. Follow the instructions in the MWT instillation guide.
4
3
3.1
Reference
The Opening Window
This is the first window that will open. From here, you must select the directory
that contains your MWT data, specify the directory you WALDO will save
output to. You can optionally, select whether to run in batch or normal mode,
or open the configuration window to change WALDO’s settings.
Figure 2: The Opening Screen.
The MWT-Data Directory (Raw Data). This is the path to a directory
MWT has created one or more recordings. Don’t worry about selecting which
recordings you want to process, that’s the next step.
The WALDO-Data Directory (Project Data). This allows you to specifying your project directory, in which waldo will save all cleaned information
(see organizing your data for terminology and tips).
Open the Configuration Window. This button opens the configuration
window (see section 3.2). From the configuration window, you can change and
save most of WALDO’s settings. These settings worked well for our analysis
pipeline, however, most of the settings used in waldo processing can be tweaked
and fine tuned in order to create better results for your data.
Activate Batch Mode. There is one additional check box that specifies if
you would like to run waldo in regular mode or batch mode. Regular mode lets
5
you select one recording at a time. Batch mode allows you to specify a group
of recordings that should be analyzed one after the other. We recommend
keeping away from batch mode until you can validate if the lighting and imageacquisition setup recording setup.
3.2
The Configuration Window
The settings in WALDO’s configuration file are exclusively for data cleaning
rather than recording. These settings are divided into two columns Consolidate
and tape. The first column consolidate corresponds to settings for combining
several node fragments. The second column tape connects two disconnected
nodes via an arc.
The consolidate settings determine how split blobs will be merged into one.
Assimilate size the amount of time that is allowed to pass between the initial
and final nodes in the consolidation step. Offshoot defines the amount of time
that is allowed before an offshoot is removed during the Pruning step. The last
two settings Split Abs and Split Rel provide parameters for faster versions of the
consolidation step that acts on the most common types of false splitting that
occurs in the data. Split Abs gives an time based threshold such that any splits
that are less than this amount of time are automatically merged. Split Rel gives
a relative threshold that states if the split tracks exist less than a given fraction
of the tracks sandwiching them, then they should be merged.
To understand the settings in the tape column consider that we are trying to
create arcs between a track that ends and a track that begins such that a
worm could have crawled from the first position to the second. In order to find
situations like this, we compare the positions for every pair of tracks in which
the time between the first track ending and the second track starting, δt, has less
than the number of frames denoted in the Frame Search Limit variable. This
variable does not determine if an arc is created, it only determines if candidates
will be further considered for evaluation. In order to evaluate if a worm could
have plausibly crawled from the first position to the second, we calculate the
max speed observed while tracking the other worms in the recording. This
distance is given by the following formula:
[Estimated Max Speed] = [observed max speed] ∗ [max speed multiplier]
[Max distance allowed] = δt ∗ [Estimated Max Speed] + [Shakycam Allowance]
Since the observed max speed may not be the true maximum speed, we allow for
some extra leeway by multiplying our observed max speed with a scaling factor
called Max Speed Multiplier to give us a more generous estimate. Very short
time-spans can cause us to rule out very small distances that are covered purly
because of vibrations in image aquisition. To prevent these from being ruled
out, we added the Shakycam Allowance factor that specifies a small amount
6
of pixels that a worm is allowed to cover instantaneously. This prevents us
from ignoring obvious connections. This formula defines only which pairs of
tracks will considered as candidates. Any ending track will only be connected
to another track if it has the smallest distance factor and the distance factor is
less than:
[distance factor] = δd ∗ δt
WALDO stores all it’s default parameter values in a configuration file in the
current user’s home directory called ‘waldo config.ini’. In adition to changing
the values through WALDO’s configuration window, the values can be modified
by manually changing the configuration file with a text editor. However, if you
do, be sure to follow formatting rules for json files (see http://en.wikipedia.
org/wiki/JSON).
3.3
Selecting a Recording
Figure 3: Choosing a Recording to Analyze.
This window is intended for selecting which recording you want to process. It
contains a large table displaying all directories inside the MWT-Data Directory.
The columns are the directory name (usually a time-stamp), the experiment
name, and the duration of recording in seconds. Recordings are selected by
7
clicking on the correct row. The row of the selected experiment is colored blue.
Rows that list invalid directories are colored red. Rows that list directories that
already have WALDO output files are colored green.
The Directory (or Recording Time-stamp). The first column is the name
of the recording’s directory. By default, MWT, will name these directories using
the following format: [year][month][day]_[hour][minute][second]. For
example the name 20150528 193535 would correspond to the date 2015/05/28
and time 19:35:35. In the table, these directories are organized in reverse chronological order. If you chose a MWT-Data Directory with contents other than
MWT recordings, those will be visible in the table but colored red to show that
they are invalid selections.
The Recording Name. The second column is the recording’s given name.
This is determined by what the recording was named in MWT before the recording was started. We recommend including the quantity, age, and strain of the
animals used as well as some set of keywords that correspond to the set of
experiments they belong to.
The Recording Duration. The last column shows how many seconds long
the recording is. This is helpful for avoiding recordings with aberrant duration.
WALDO does not include any options to delete data so if you want to remove
any directories that are irrelevant for data-analysis, you will have to manually
move or delete those directories.
3.4
Selecting a Threshold and ROI
This window is designed to select a pixel intensity threshold and a region of
interest (ROI). The pixel intensity threshold is allows WALDO to discern worms
from background during the scoring process. The region of interest is used both
during scoring and analysis in order to focus the analysis on just the relevant
portion of the image. To aid in making these selections WALDO displays two
graphs and an image taken during the recording.
The pixel intensity threshold is selected by clicking on either of the two
graphs on the left half of the window. The x-axis on both graphs show a range
of thresholds available for selection. The top graph shows the number of blobs
detected in the image at each threshold. The bottom graph shows the mean
size of each blob at each intensity threshold. By clicking on either graph, the
position along the x-axis will be stored as the desired threshold and blue lines
will show the outlines corresponding to the object picked up.
In order to detect blobs, WALDO creates a background image that takes the
maximum pixel intensities at each position from a subset of images in the recording. This ensures that when a worm crawling over a portion of the plate, it is
not included in background image. Any portions of the image for which difference between image and the background is larger pixel-intensity threshold are
considered to be blobs and outlined in the image on the right of the window. If
you do not like your selection, click on the graphs again and the new value will
be chosen.
8
The region of interest is specified by selecting whether you want a circle or
a polygon from the two buttons above the image. If circle is selected, you can
define the circle by clicking on three locations on the image that should be at
the edge of the ROI. If polygon is selected, then each click places one of the
polygon’s corners. The clicks should be performed in a row. The selected region
of interest will be highlighted in red. If you do not like the selected region, you
can redefine the area by clicking on the button to select the correct type of
ROI and specifying where it is in the image. When you are satisfied with your
selections, click ‘Next’.
Figure 4: Selecting the Threshold and ROI.
3.5
The Score Card
Scoring provides an independent assessment of the images in order to evaluate
how well MWT is picking up blobs. The scoring system is based on five metrics:
‘Contrast Ratio’, ‘Contrast Diff’, ‘Good Fraction’, ‘Accuracy’ and ‘Coverage’.
Contrast Metrics. The first two metrics, ‘Contrast Ratio’ and ‘Contrast Diff’,
are the based on the contrast between objects and background. ‘Diff’ is the
difference between the average pixel intensity of tracked objects in relation to the
average pixel intensity of the image background inside the ROI. ‘Contrast Ratio’
shows the ratio of those two values. These values can be helpful in determining
whether your animals appear dark enough against the image background to be
properly tracked. If this contrast is poor, it is likely that you are not picking
9
up some of your animals and/or temporarily loosing track of them during the
recording.
Blob Detection Metrics. The next two metrics, ‘Good Fraction’, and ‘Coverage’, all compare the blobs that were picked up during WALDO’s image analysis
with the blobs that are present in MWT’s blob files at the time the image was
taken. ‘Good Fraction’ is the fraction of blobs that MWT says are present that
directly match up with blobs found by WALDO.
All of these numbers should be as close to 1.0 as possible. If ‘Good Fraction’ is
significantly lower than ‘Coverage’ then too many blobs are being picked up by
MWT. If the opposite is true, than worms are being missed by the MWT. Tips
on adjusting your setup can be found in section 4.5.
General Considerations. In order to speed up the scoring process, WALDO
only evaluates the images that are closest to the first quarter, middle and last
quarter of the recording. These three images give us a view of how well blobs
are picked up during different times in the recording process. All comparisons
are based on the pixel-intensity threshold and the region of interest values you
entered in the previous step. If you feel your previous inputs were poorly chosen,
hit the ‘back’ button and enter more fitting parameters.
Figure 5: A Recording’s Scorecard.
3.6
Running WALDO
After the scoring section is complete WALDO now has enough information in
order to try and correct mistakes. This is by far the most time consuming step
in the process. Depending on how long your recording is, how many worms
were recorded, and how many spurious blobs were acquired during the recording, WALDO can take anywhere between 10 minutes to several hours to finish
processing the data. During this time a window with progress bars will be continually updated and either an image or a graph will be displayed, depending
on which stage of analysis you are currently in.
3.7
Results
After WALDO has finished running, it automatically generates a graph and several tables that illustrate how effective it was at cleaning the data and combining
track fragments. The tables and graphs can be accessed by clicking on the tabs
labeled Results, Track Counts, Network Overview, and Track Fragmentation.
Each of these tables and figures provides a different view of the process. Results
10
Figure 6: The WALDO Display while Running.
gives a fast visual overview of WALDO’s performance. Track Counts gives a
detailed table as to how many tracks there are at different lengths. Network
Overview shows some statistics about the network structure. Track Fragmentation shows tables explaining how tracks were found and how tracks were lost.
If you click the ‘Finish’ button at the bottom, you will be taken back to the
‘Recording Selection’ table and given the option of selecting another recording
for cleaning.
3.7.1
Results Figure
The first and second columns of this figure summarized the amount to track fragmentation that is present in the MWT data and the cleaned data from WALDO
respectively. The colored regions represent when a blob is being tracked. Each
row indicates an individual track that cannot be clearly connected to any of the
other tracks present. Three different rows, from top to bottom show tracks that
are longer than 20 minutes, between five and twenty mintues, and tracks that
are less than five minutes. If the blob being tracked does not move more than
one body length it is excluded from this figure. This constraint removes most
spurious objects, since blobs that are not worms will not move. However, this
constraint also prevents most of the very short track fragments from appearing, as any track fragment that exists for less than one second cannot travel
the required distance. We ignore these fragments as they do not contain much
behavioral information.
11
Figure 7: An Overview of WALDO’s Performance.
3.7.2
Track Counts
This tab shows a table that explicitly shows how many tracks of each length are
present at each stage of cleaning and disambiguation. The columns ‘Phase’ and
‘Step‘ indicate which part of the process has just occurred. There are several
phases in WALDO’s process. Each phase consists of one or more steps. The
phases that occur while running WALDO are ‘Input’, ‘pre-cleaning’, and several
repeated iterations called ‘iter 1’, ‘iter 2’, etc. The ‘Input’ phase is really just
showing the raw data that was created by MWT. The ‘pre-cleaning’ phase has
two separate steps. The first step, called ‘roi’, it removes all nodes that only
exist outside of the region of interest. The second step, called ‘blank’, removes
any tracks that contain no position, shape, or connection to the greater network.
Due to MWT’s real-time processing, there are often a hand-full of tracks that
fit this criterion. The last phases consist of several iterations of the same four
steps: ‘resolve collisions’, ‘prune’, ‘consolidate’, and ‘infer gaps’. These steps
are covered in more detail inside the manuscript.
There are several common trends that allow a user to evaluate if these numbers
are showing reasonable performance. The number of total nodes should go down
at every point in the process. The column ’total-tracks’, show how many tracks
are present in the data at each step. The final two columns, ‘duration-mean’
and ‘duration-std’ indicate the mean and standard deviations of track lengths.
12
The columns ‘> 10’, ‘> 20’, ‘> 30’, ‘> 40’ , ‘> 50’ all indicate how many tracks
exist that are longer than a certain amount of minutes. The ‘pre-cleaning’ phase
should reduce the numbers of tracks in every column, including long duration
tracks. This is because some spurious blobs from outside of the region of interest
might have been tracked for a significant portion of the recording. All of the
subsequent steps should show increases in all categories except ‘total-nodes’.
Because the number of tracks that are longer than fifty minutes in column
‘> 50’ are also greater than ten minutes. The column ‘> 10’ includes all the
tracks that are also longer than 20, 30, or any of the other cut-offs. In order to
calculate the number of tracks that are between 10 and 20 minutes long, you
would have to subtract the ‘> 20’ column from the ‘> 10’ column. Altogether,
this provides a global view of how much cleaning is going on in a WALDO
process.
3.7.3
Network Overview
This tab shows a table that explicitly shows general properties about the network of track relationships that WALDO uses to curate the data. This table,
like the ‘Track Duration’ table has the columns ‘Phase’, ‘Step’, and ‘total-nodes’
as the first three columns. For more details on these columns refer to the previous section. The column ‘connected-nodes’ gives the number of nodes that have
at least one arc connecting them to another node. This gives an overview of hos
many nodes have some sort of interaction with another nodes. The ‘isolatednodes’ column shows the numbers of nodes that have no connections. These
nodes will only be joined with other tracks through the ‘infer gaps’ step. The
‘giant component’ column shows how many nodes are in the biggest group of
connected tracks. Typically there is one group of interacting nodes that is much
larger than all the others. If this group is too heavily interconnected, it can be
difficult to determine which nodes belong to which individuals. Lastly, the column ‘# of components’ shows the number of disconnected groups of nodes there
are. Most of the components in # of components will be singletons that are
counted in the ‘isolated nodes’ category. These metrics give some indication as
to how complicated the full network of connections is that WALDO is trying to
untangle, without directly visualizing the network.
3.7.4
Track Fragmentation
The upper and lower tables respectively show how tracks were lost and how
tracks were found. The reasons for a track being lost or found are enumerated
in each column. The rows indicate roughly how long the tracks in question are.
I’ll explain the top table first.
The first column ‘disappear’ indicates that no clear reason could be assigned to
why a worm was dropped by MWT. This typically occurs for two reasons an
animal crawls into a region with poor contrast and background subtraction fails
to find it against the background, or the animal’s size changes enough such that
it falls outside of the range you specified in the MWT settings. Either way, the
13
data suddenly looses the blob somewhere inside the region of interest.
The next two columns, ‘split’ and ‘join’, indicate whether a track was lost because it’s blob split into multiple smaller blobs or because it collided with another blob and fused into a larger blob. At this point, we can’t differentiate
between collisions and false splits, but you can have a strong guess as to which
is the predominant factor based on other experimental factors. If you have a
large amount of worms relative to a small area, most ‘splits’ and ‘joins’ will be
caused by collisions between animals. If you have fairly low resolution for each
animal and heavy interference from the image background, then most of these
are probably caused by false splits that fragment a worm’s body into two or
more blobs.
The column ‘recording-finish’ indicates that a track ends because the recording
stops. This is clearly the most desirable reason to loose track of an animal.
The final two columns ‘image-edge’ and ‘outside-roi’ indicate that the blob was
lost because it crawled to the edge of the image or outside of the denoted region
of interest. Depending on whether you set up you experiment with a barrier
to prevent worm’s from crawling outside of the field of view, these numbers
can range from near zero to the most prevalent reasons for loosing track of an
animal.
The bottom table gives all the analogous reasons for detecting a new track
that were specified as for loosing a track. Several columns are named slightly
differently. ‘disappear’ is listed as ‘appear’, since, from WALDO’ point of view,
a new blob spontaneously pops into existence. ‘recording-finish’ is changed to
‘recording-begins’ to denote any tracks that are discovered within the first 30
seconds of recording. Otherwise all columns list reasons for finding new tracks
that are completely analogous to their counterpart reason for loosing a track.
Figure 8: The Track Fragmentation Report.
14
3.8
Output Files
For every recording that WALDO scores or cleans, WALDO creates a new directory in the WALDO-Data Directory. The output directory contains two
sub-directories called ‘blobs files’ and ‘waldo’ and files that correspond to each
of the summary tables that are shown in the GUI when WALDO finished processing a recording. The ‘blob files’ directory contains cleaned versions of the
MWT files in the MWT formats.
The ‘waldo’ directory contains all the files recording the steps WALDO takes
while cleaning data as well as various pieces of information that are used by
WALDO during processing. The files in this directory always start with the
recording’s ID number and then end with the type of data contained inside.
Most of the output files are stored as comma separated values or CSVs. However
some files are in the json file format. Either way, if you want to look inside of
the files, use a text editor or any other program that can view plain text. These
files will be generated at various points while WALDO is running. If WALDO
fails or has not finished running, then not all the output files will be created.
3.8.1
Accuracy
The ‘accuracy’ file is used to store data about how well waldo’s image processing
compares to the tracks MWT collects data. This file compiles information from
the ‘matches’ and ‘missing’ files into an overview of how well each individual
image performed.
3.8.2
columns
data type
description
false-neg
false-pos
frame
time
true-pos
integer
integer
integer
float
integer
number of false negatives
number of false positives
frames since start of recording
time from start of recording in seconds
number of true positives
Bounds
The ‘bounds’ file contains the bounding box that contains the full time-series of
centriod positions for each blob picked up by the MWT. This provides a good
shorthand reference to estimate how far an animal has moved and to evaluate
if it was ever inside the region of interest.
columns
bid
x min
x max
data type
description
integer
float
float
blob ID number
minimum value of the x centroid position
maximum value of the x centroid position
Continued on next page
15
columns
y min
y max
3.8.3
data type
description
float
float
minimum value of the y centroid position
maximum value of the y centroid position
Starts and Ends
The ‘start’ file contains all necessary information for evaluating how each track
was found during a recording. The ‘ends’ file contains a matching set of information regarding how the track was lost. This is the data used to create the
‘start report’ and the ‘end report’ shown in the ‘Track Fragmentation’ report.
columns
data type
description
bid
t
x
y
f
node id
id change
split
join
lifespan t
on edge
outside-roi
timing
reason
integer
float
float
float
integer
integer
boolean
boolean
boolean
float
boolean
boolean
boolean
string
blob ID number
time from start of recording in seconds
centroid x position
centroid y position
frames since start of recording
ID number for a track/node in WALDOs network
if track started because of split or join
if track started because a blob split
if track started because two blobs touched
number of minutes track lasts
if track started by entering the image
if track started by entering the ROI
if track started at the beginning of the recording
most likely reason this track was found
3.8.4
Start and End Reports
These files contain a concise summary of ends. The data is an exact duplicate
info from main folder ‘end report’ and ‘start report’. The table below shows
columns from the ‘start report’. The ‘end report’ has the same types of values
corresponding to how tracks were lost.
columns
data type
description
lifespan
unknown
split
join
timing
on edge
outside-roi
string
integer
integer
integer
integer
integer
integer
number
number
number
number
number
number
number
of
of
of
of
of
of
of
minutes track lasts
unclear starts
tracks that start
tracks that start because two blobs touch
tracks at the beginning of the recording
tracks that start by entering the image
tracks that start by entering the ROI
16
3.8.5
Matches
The ‘matches’ file contains information on weather each of MWT’s blobs was
matched against a blob picked up during WALDO’s image analysis. This gives
information used during the scoring process.
columns
frame
bid
good
roi
join
3.8.6
data type
description
integer
integer
boolean
boolean
optional
frames since start of recording
blob ID number
if the blob was found during WALDO’s image analysis
if the blob was inside the ROI
ID of another MWT blob matched against the same WALDO blob
Missing
The ‘missing’ file contains information about blobs picked up during WALDO’s
image analysis that were not matched with any of the blobs tracked by MWT.
columns
id
f
t
x
y
xmin
ymin
xmax
ymax
next
3.8.7
data type
description
string
integer
float
float
float
float
float
float
float
string
an ID assigned to the missing object
frames since start of recording
time from start of recording in seconds
centroid x position
centroid y position
minimum x coordinate for the blob shape
minimum y coordinate for the blob shape
maximum x coordinate for the blob shape
maximum y coordinate for the blob shape
ID of next object in this location
Moved
The ‘moved’ file provides a quick reference for roughly how far each MWT blobs
has moved. This is useful for quickly filtering out stationary blobs.
columns
bid
bl moved
data type
description
integer
float
blob ID number
the number of body-lengths a blob has moved
17
3.8.8
Node Summary
The ‘node-summary’ file contains information about the final tracks generated
by WALDO. It contains which track fragments were stitched together into longer
tracks. It also contains the bounding box that encompasses all the centroid
positions and it includes the start and ending times.
columns
bid
bl
components
f0
fN
t0
tN
x max
x min
y max
y min
3.8.9
data type
description
integer
float
string
integer
integer
float
float
float
float
float
float
blob ID number
body lengths
blob IDs in this track
track start frame
track end frame
track start time
track end time
maximum x coordinate for centroid
minimum x coordinate for centroid
maximum y coordinate for centroid
minimum y coordinate for centroid
Report Card
The ‘report-card’ file contains all the data used to generate both the ‘Track
Counts’ and ‘Network Overview’ reports. This data is to give an overview of
how well WALDO succeeds in generating long tracks following the same animal.
columns
# components
>10min
>20min
>30min
>40min
>50min
connected-nodes
duration-mean
duration-med
duration-std
giant-component-size
isolated-nodes
moving-nodes
phase
step
total-nodes
data type
description
integer
integer
integer
integer
integer
integer
integer
float
float
float
integer
integer
integer
string
string
integer
number of blobs used in this track
number of tracks longer than 10 min.
number of tracks longer than 30 min.
number of tracks longer than 20 min.
number of tracks longer than 40 min.
number of tracks longer than 50 min.
number of nodes with arcs
the mean of all track durations
the median track duration
the standard deviation of track durations
number of nodes in giant component
number of nodes with no arcs
number of nodes that move at least 1 body-length
the general process WALDO is running
the specific task WALDO is running
the number of nodes in the network
Continued on next page
18
columns
wm
wm
wm
wm
wm
wm
0min
10min
20min
30min
40min
50min
3.8.10
data type
description
float
float
float
float
float
float
total worm-minutes that are in recording
worm-minutes in tracks longer than 10 min.
worm-minutes in tracks longer than 20 min.
worm-minutes in tracks longer than 30 min.
worm-minutes in tracks longer than 40 min.
worm-minutes in tracks longer than 50 min.
ROI
The ‘roi’ file contains information about which MWT tracks are inside of the
region of interest. The actual coordinates of the region of interest are stored in
the ‘thresholddata.json’ file.
columns
bid
inside roi
3.8.11
data type
description
integer
boolean
blob ID number
if the blob is inside the ROI.
Sizes
The ‘sizes’ file contains the median length and area of each of MWT’s blobs.
This data was initially considered in order to detect collisions, however, was not
implemented due to the large variability in size if lighting conditions are uneven.
columns
bid
area median
midline median
3.8.12
data type
description
integer
float
float
blob ID number
median number of pixels in blob (pxls**2)
median length of blob midline (pxls)
Terminals
The ‘terminals’ file contains the starting and ending positions and times for each
of MWT’s tracks. This is used to connect tracks that were temporarily lost.
columns
bid
x0
y0
t0
f0
xN
data type
description
integer
float
float
float
integer
float
blob ID number
track start x coordinate
track start y coordinate
track start time
track start frame
track end x coordinate
Continued on next page
19
columns
yN
tN
fN
3.8.13
data type
description
float
float
integer
track end y coordinate
track end time
track end frame
Threshold and Region of Interest
The pixel intensity threshold and the region of interest coordinates are stored
in a file called ‘thresholddata.json’. Unlike the majority of files it uses the json
format for storing it’s data. Some values are only used when a circular ROI is
chosen and some values are only used when a polygon ROI is chosen.
variable
threshold
shape
r
x
y
roi type
points
4
4.1
data type
description
float
list
float
float
float
string
list
the pixel intensity threshold
the dimensions of the images aquired
the radius of the circular ROI
the x coordinate of the center of the circle
the y coordinate of the center of the circle
either ’circle’ or ’polygon’
the x,y coordinates for each point in the polygon
Tips and Trouble Shooting
Collecting and Organizing Your Data
When you use the Multi-Worm Tracker to collect data, it will create a directory
used to store all related files. We refer to this directory as ‘the recording’s
directory’. Often, the best organizational strategy is to create one big directory
that contains all the recordings you make with Mulit-Worm Tracker. This big
directory, is referred to as the ‘MWT-Data Directory’.
During the process of collecting several hundred recordings, we left the raw data
for every recording inside the ‘Data Directory’, regardless of which project or
sub-project it belonged to. WALDO is easiest to use if this strategy is kept in
mind, however, if you are really collecting a high volume of recordings, it may
be helpful to periodically archive older recordings.
4.2
Adjusting and Saving WALDO Figures
I frequently use the icons under the image to zoom in on an object in the image
to check if the boarder has been appropriately defined. This is accomplished
by (1) clicking on the magnifying glass icon under the image, (2) clicking and
dragging your mouse across the image to select a rectangle. The image should
zoom in on the desired location. To zoom back out you should click on the
20
house icon underneath the image.
These icons are shown because WALDO uses matplotlib to render the images
and graphs. A more detailed description of how to use each of these icons can
be found from the matplotlib page: http://matplotlib.org/1.4.0/users/
navigation_toolbar.html
4.3
Selecting Data: My recording is colored red
Invalid directories are colored red based on whether they include a ‘.summary’
file. Every recording the MWT creates (without encountering errors) contains
a file that ends with ‘.summary’. WALDO will not function if no ‘.summary’
file is present.
If there is more than one ‘.summary’ file, you either inadvertently copied that
file twice, or you put all the files from two separate recordings into the same
directory.
4.4
Selecting Data: My directory is missing
This problem occurs if you have not specified the correct Raw Data directory
in the previous step. Click back and select the directory that contains the
experiment directory. For more details see the previous section in the manual
on selecting a Raw Data directory.
4.5
Improving Image Scores
If the plate shifts or there are large changes in the bacterial lawn, some spurious objects may be picked up. If these problems occur in this background
subtraction, the same problems are likely to be in the MWT’s data and the
experimental setup should be adjusted accordingly.
Objects are determined to be outside of the region of interest only if their
centroid position falls outside of the denoted region. Thus, if a worm is only
partially outside of the region, it may still be picked up. Due to the specific way
the MWT operates, however, you may temporarily lose track of an individual
if it touches the edge of the image or contacts a larger dark region in the image
such as a barrier or the light distortion from the plate meniscus.
21