1
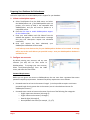
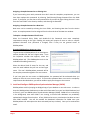
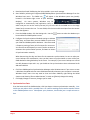
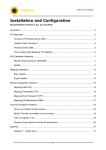
SIMSAnywhere User Guide For use with SIMS version 6.0 Copyright Copyright © 2012 FlanTech Inc. All rights reserved. Trademarks SIMS is a trademark of FlanTech Inc. Microsoft Windows and Windows NT are registered trademarks of Microsoft Corporation. Other brand and product names are registered trademarks or trademarks of their respective holders. Disclaimer and limitation of liability FlanTech Computer Services assumes no responsibility for any damage or loss resulting from the use of this guide. FlanTech Computer Services assumes no responsibility for any loss or claims by third parties which may arise through the use of this software. Be sure to make backup copies of all important data on other media to protect against data loss. Important: Please read the FlanTech End User Software License Agreement before using the accompanying software program(s). Using any part of the software indicates that you accept the terms of the FlanTech End User Software License Agreement. Software download available The latest version of SIMS is available for download from our website at http://www.flantech.net/sims_download.html . A password is required in order to install the download; please contact technical support for more information. Page ii Copyright Table of Contents Setup .................................................................................................................................................1 Software Requirements ............................................................................................................................ 1 Device and Browser Compatibility ............................................................................................................ 1 Preparing Your Database for Online Access ............................................................................................. 2 Accessing SIMSAnywhere Online ........................................................................................................5 Logon Page ................................................................................................................................................ 5 SIMSAnywhere Basics ............................................................................................................................... 5 Beyond the Basics ..................................................................................................................................... 6 Security Features ...............................................................................................................................8 User Accounts ........................................................................................................................................... 8 simsanywhere.com ................................................................................................................................... 8 SIMSAnywhere Synchronization Manager (SASM) ................................................................................... 9 SIMSAnywhere Synchronization Manager (SASM) ............................................................................ 10 Page iii Table of Contents Setup This chapter describes the hardware and software requirements and provides the instructions for preparing your database for use with SIMSAnywhere. Software Requirements The following software is required in order to configure and prepare your online database for use. Sports Injury Monitoring System (SIMS) version 6.0 or later SIMSAnywhere Synchronization Manager (SASM) version 1.0 or later. The SASM download link will be provided to you after you have initiated a SIMSAnywhere trial request from SIMS. Device and Browser Compatibility SIMSAnywhere should run well on most recent browsers. We are not able to test it on every possible browser-device combination, but we expect it to work on the devices and browsers listed below. Due to the constant evolution of technology, this list is subject to change. Please check our website for the latest listing: http://www.flantech.net/sa_platforms.html Apple iOS (3.2 - 5.0) (includes iPad, iPhone and iPod Touch) Android (2.1 - 4.0) Windows Phone (7.0 - 7.5) Blackberry (6.0 - 7.0) Blackberry Playbook (1.0 - 2.0) Palm WebOS (1.4 -3.0) Firebox Mobile (10 Beta) Chrome for Android (Beta) Skyfire 4.1 Opera Mobile 11.5 Meego 1.2 Samsung bada 2.0 UC Browser Kindle 3 and Fire Nook Color 1.4.1 Chrome Desktop (11 - 17) Safari Desktop (4 - 5) Firefox Desktop (4 - 9) Internet Explorer (7 - 9) Opera Desktop (10 - 11) You may or may not have luck running SIMSAnywhere on devices or browsers not listed above, but in all cases your browser must support: Page 1 JavaScript (must be enabled) Cookies (must be enabled) Setup Preparing Your Database for Online Access Follow the steps below to enable SIMSAnywhere support for your database. 1. Initiate a subscription request a. Select Tools/Options from the SIMS menu, and select the SIMSAnywhere tab. If the SIMSAnywhere tab is not present, your version of SIMS is not compatible with SIMSAnywhere, and you will need to update to a compatible version. b. Click the Click here to enable SIMSAnywhere support for this database link. c. Enter your email address and click Submit from the window that appears. You should receive a message that your trial subscription request was submitted successfully. d. Once your request has been submitted, your SIMSAnywhere database will be created. It will take up to one business day for your SIMSAnywhere database to be created. A message will be sent to the email address you provided in step c. once your SIMSAnywhere database is available for use. 2. Configure user accounts By default, existing user accounts, and any new accounts you add, will not have access to SIMSAnywhere. To manage your user accounts, Select Tools/Security/Settings from the SIMS menu, and select the Users folder. Password Requirements Before you can give a user access to SIMSAnywhere, the user must have a password that meets password complexity requirements. Password complexity requirements are as follows: Page 2 Passwords must be at least six characters in length. (It is also possible to require a minimum password length that is greater than six characters, but six is the absolute minimum for SIMSAnywhere access.) Passwords must contain at least one character from three of the following four categories: o English uppercase characters (A through Z) o English lowercase characters (a through z) o Base 10 digits (0 through 9) o Non-alphabetic characters (for example, !, $, #, %) Setup Assigning a Complex Password to an Existing User If you have existing users with passwords that don’t meet the complexity requirements, you can have them update their passwords by selecting Tools/Security/Change Password from the SIMS menu. If you prefer, you can also set the password for any account by right-clicking the user’s name from the Users folder in the Security window, and choosing Set Password. Assigning a Complex Password to a New User New users can be created by selecting the Users folder, and choosing New User from the Action menu. A complex password can be assigned from the General tab of the New User window. To Require a Complex Password for All Users Select the Password Policy folder and double-click the Passwords must meet complexity requirements setting at the right. Enabling this setting will require all users to select a complex password whenever their password is changed, even if they are not granted access to SIMSAnywhere. Granting SIMSAnywhere Access to a User To grant access to SIMSAnywhere for an existing user account, double-click the user’s logon name. From the Properties window that appears, select the SIMSAnywhere tab. (The SIMSAnywhere tab is also available while adding new users.) Select the desired level of access for the user, and enter the email address they will use as their logon name. The user’s SIMSAnywhere password will be the complex password assigned to the user account. If you have given the user access to SIMSAnywhere, the password will be evaluated when you attempt to save the user account record. If the account password does not meet the complexity requirements described above, you will be unable to apply the changes to the account. 3. Install and Configure SIMSAnywhere Synchronization Manager (SASM) SIMSAnywhere works by keeping an abridged copy of your database on our web server. In order to keep the SIMSAnywhere database up-to-date with information from your local SIMS database (and vice versa), you’ll use SIMSAnywhere Synchronization Manager (SASM). SASM will run continuously in the background, even when SIMS is not running, to ensure both databases are periodically updated with changes from the other. In fact, SASM can be run on a workstation that does not even have SIMS installed. You will be emailed the download information for SASM once your SIMSAnywhere trial subscription has been activated (see Step 1 above). Once you’ve received the email: Page 3 Setup a. Download and install SASM using the link provided in your email message. b. Start SASM by selecting All Programs/SIMS/SIMSAnywhere Synchronization Manager from the Windows Start menu. The SASM icon will appear in the Windows system tray (usually located in the bottom-right corner of your Windows desktop). On some systems, Windows may be configured to automatically hide application icons, in which case you can use the small up-arrow (it’s just to the left of the SASM icon in the image shown here) to access the icon. To start SASM, click the icon and choose Open from the context menu that appears. c. From the SASM window, click the Settings tab. Use the button to select the database you have enabled for SIMSAnywhere access. d. Configure the Synchronization Schedule settings to indicate which days, and how often you want SASM to synchronize your SIMS and SIMSAnywhere databases. We recommend a frequency setting of every 10-15 minutes for most users. You can also set the frequency to zero if you do not want to automate the synchronization process, and want to initiate all synchronization manually. When determining the days and times for the automatic synchronization, be sure to take your server backups into consideration, since you don’t want a synchronization to occur while your SIMS database is being backed up on the server. For example, if your server backups are carried out daily between 11pm and 1 am, you should set the synchronization times to between 01:00 AM and 11:00 PM. e. Click Start SIMSAnywhere Synchronization Manager when Windows starts if you want to create a Windows scheduled task that starts SASM automatically whenever your computer is restarted. Windows Vista/7 users: You may need to close and restart SASM by right-clicking the SASM shortcut and choosing “Run as Administrator” in order to effectively change this setting. f. Click Apply Changes to save any changes you’ve made. 4. Synchronize Your Data From the Status tab of the SASM window, click Sync Now to initiate synchronization manually. Your initial sync may take a while—possibly hours—as it will be sending the last twelve months of data to the SIMSAnywhere server. Subsequent syncs, however, should take just a couple minutes or less. Page 4 Setup Accessing SIMSAnywhere Online Once you’ve established at least one user account with SIMSAnywhere, and your first synchronization has completed successfully, you can log on to SIMSAnywhere from your browser, using this address: https://www.simsanywhere.com Logon Page You will be prompted to log on before you’ll be able to access your SIMSAnywhere data. Enter the e-mail address and password that was established for your user account in SIMS. As a matter of convenience, you may want your browser to remember your e-mail address for future visits to the website. This capability is available in most of today’s browsers, so please check your browser’s documentation for details on enabling the feature. Note that your browser may also offer to remember your password, which is inadvisable as it may compromise the security of your data. SIMSAnywhere Basics Once you’ve logged on successfully, you will be taken to Athletes view, which displays a list of athletes for the currently selected roster. The selected roster is determined arbitrarily upon your first logon, but subsequent logons will display the team that was selected during your last session. Selecting a Team for Display To change the currently selected team, click the click Change Display Team. button in the title bar, and Changing the View To change the current view, click the button in the title bar, and click View Athletes, View Injuries/Illnesses or View Injury Maintenance. Adding Records To add a new record, click the button in the title bar while in Athletes, Injuries/Illnesses or Injury Maintenance view. The type of record you add will depend on which view you’re in, i.e., new athletes are added from Athletes view, new injuries are added from Injuries/Illnesses view, and new maintenance records are added from Injury Maintenance view. New records can also be added by clicking then clicking the New button from the menu. and In addition to Injuries/Illnesses view, injury records can also be added from the Injuries and Illnesses section of the athlete edit page, using the New Injury and New Problem buttons. When adding injuries or injury maintenance records from one of the main views, you will be prompted to select an athlete name before the new record is displayed. Page 5 Accessing SIMSAnywhere Online Viewing and Editing Records To view the details of any record, simply click the record listed in one of the main views. In addition to Injuries/Illnesses view, injury records can be opened in the same way from the Injuries and Illnesses section of the athlete edit page.) To edit the content of a record, click the Edit button at the bottom of the collapsible content block (described below) that you want to edit. Collapsible Content When working with records, data will be grouped logically into collapsible content blocks that have a heading with a or button. You can use these buttons to hide or display the content of a block, thus allowing you to control how much information is shown on a page. Typically, each content block will correspond to a tab of the same record type in SIMS. Saving, Cancelling or Closing a Record If you are viewing, and not editing a record, click the button in the title bar to return to the previous page. Otherwise, Save and Cancel buttons will be displayed prominently on the page. Beyond the Basics Most of what you need to know about working with SIMSAnywhere records is covered in the previous section, but each record type has its own unique characteristics. Some additional tips for working with each type of record are provided below. Athlete Records The Contacts and Insurance content blocks are for reference only, and cannot currently be modified via SIMSAnywhere. The Injuries and Illnesses content block allows you add or view/edit injury and problem records for the selected athlete. Injuries/Illness and Problem Records 1. Injury/Illness records allow you to search for clinical impressions by clicking the clinical impression button and entering a search expression. Only the primary clinical impression can currently be entered via SIMSAnywhere. 2. In the Initial Response content block, at the bottom of the Referred To droplist, is a Not Listed option. If you select this option, you will be able to manually enter a Referred To value. Page 6 Accessing SIMSAnywhere Online Injury Maintenance Records 3. At the bottom of the Injury/Problem drop-list, is a Show Closed/Discharged option. After selecting this option, the drop-list will close while SIMSAnywhere loads the additional options. Click the drop-list a second time to view the expanded list of options. 4. Selection of Modality/Rehab/Tests/Other checklist items works differently in SIMSAnywhere than in SIMS. To add items from one of the checklists, click one of the buttons. A checklist will appear, showing the first ten items of the checklist you selected. If the desired items are not included, you can click the Show 10 More or Show All buttons as needed. Once you’ve made your selections, click Done and your selections will be included as part of the main record. Selected items will also include a text area for adding any additional details you wish to record. Page 7 Accessing SIMSAnywhere Online Security Features The security of your data was a major focus during the development of SIMSAnywhere, and will continue to be so going forward. Listed below are the primary security features implemented in SIMSAnywhere. User Accounts Accounts can only be managed from within SIMS. This means a malicious user would never be able to create or modify a user account via the simsanywhere.com website. Account permissions, including access to SIMSAnywhere, can only be granted by a SIMS administrator. Accounts must have complex passwords. Complex passwords make the odds of a successful bruteforce password cracking attempt extremely unlikely. See the Password Requirements section of the Setup chapter for details on complexity requirements. Account lockouts. Consecutive logon attempts that are unsuccessful due to an invalid password will cause a user’s account to be locked. This will occur upon the 4th consecutive failed attempt. Unlocking a SIMSAnywhere Account User accounts must be unlocked from within SIMS. To unlock a user account that has been locked out of SIMSAnywhere: 1. 2. 3. 4. 5. Select Tools/Security/Settings from the SIMS menu. Select the Users folder, and double-click the affected user account on the right. Select the SIMSAnywhere tab and click the Check online account status link. Answer “Yes” to the prompt to unlock the account. You may also want to reset the user’s password from the Security window, by right-clicking the user account and choosing “Set Password”. simsanywhere.com The following security features are in place when you access simsanywhere.com from your web browser. SSL requirement. The SIMSAnywhere server requires a 128-bit Secure Sockets Layer (SSL) connection from your browser. This connection is made automatically by your browser, and ensures that any information transmitted between your browser and the server is encrypted. Data encryption. Identifiable data are stored in your database as AES-256 encrypted text. This means that in the (extremely unlikely) event your database is compromised, the data would be unrecognizable to the person viewing it. Inactivity timeout. You will be automatically logged out of simsanywhere.com after 20 minutes of inactivity. Page 8 Security Features Shut-off switch. You can disable simsanywhere.com access for all of your users at any time from within SIMS. To do so, choose Tools/Options from the SIMS menu, select the SIMSAnywhere tab, and click Disable SIMSAnywhere support for this database. Access can be restored by returning to the same tab and clicking Click here to enable SIMSAnywhere support for this database. SIMSAnywhere Synchronization Manager (SASM) SASM is an application used to ensure the data from your SIMSAnywhere database is kept in sync with your local database. SASM uses the following security features to protect your data. SSL connection. SASM uses a 128-bit SSL connection when transmitting and receiving data from the SIMSAnywhere server, ensuring all data are encrypted while in transit. Administrator requirement. In order to configure SASM to synchronize a database, the user name and password of a SIMS administrator account is required. Our Datacenter Your SIMSAnywhere database is housed in a SAS 70 Type II certified datacenter. This certification recognizes that a datacenter has had an in-depth audit of its control activities conducted by an independent third-party auditor that includes a thorough review of all its controls over information technology and related processes. Passing a SAS 70 audit demonstrates that adequate controls and safeguards have been established in hosting your data and IT infrastructure. The following are some of the measures in place to protect your data: 1. Security. Access to our datacenter is protected 24 hours a day. In order to gain entry into the data center all guests must pass through two-factor authentication barriers. A proximity security badge is required for entry/exit on all datacenter doors in the facility. Shifts patrol the datacenter and facility area regularly, and motion-sensitive cameras throughout the facilities track all datacenter activity. 2. Network monitoring. State-of-the-art traffic profiling and anomaly detection capabilities are used to manage and secure networks, pinpoint and troubleshoot network attacks, monitor servers and applications, and analyze network security performance issues within the datacenter. 3. Firewall. The SIMSAnywhere server is equipped with a firewall to block unnecessary ports, greatly increasing the security of the server. 4. Brute force detection. The SIMSAnywhere server is equipped with a brute force detection engine to block attempts by hackers to gain user level access to your database. 5. Nightly security updates. The SIMSAnywhere server is updated nightly with the latest security releases. Additional Technical Details A list of additional technical details and frequently asked questions is available from our website at: http://www.flantech.net/sa_tech.html Page 9 Security Features SIMSAnywhere Synchronization Manager (SASM) SIMSAnywhere works by keeping an abridged copy of your database on our web server. The SIMSAnywhere Synchronization Manager (SASM) application is critical to ensuring your SIMSAnywhere database is kept up-to-date with information from your local SIMS database (and vice versa). In general, SASM will run quietly in the background, and will not require interaction once it is configured. However, it is important to understand the points below when working with SASM. Configuring SASM For information on the setup and configuration of SASM, please review step 3 in the Preparing Your Database for Online Access section of the Setup chapter. In general, SASM should be run only on a single workstation. SIMS does not need to be installed on the workstation that will run SASM. Please see the instructions later in this chapter to configure SASM for use on a workstation that does not have SIMS installed. User Sessions and the Start SIMSAnywhere Synchronization Manager when Windows starts Setting The Start SIMSAnywhere Synchronization Manager when Windows starts setting is an alternative to starting SASM manually, and allows you to keep SASM running even when you log out of Windows. In order to enable the Start SIMSAnywhere Synchronization Manager when Windows starts setting, Windows Vista and Windows 7 users may need to close and restart SASM by right-clicking the SASM shortcut and choosing “Run as Administrator”. By enabling this setting, you are creating a Windows scheduled task that will start SASM automatically whenever Windows starts. It is important to understand the following when you enable this feature: o Since the task is configured to run SASM when Windows starts, this means the task will not run until you either shut down and restart Windows, or start the task manually using the Scheduled Tasks (XP) or Task Scheduler (Vista/7) feature in Windows. o The scheduled task will start SASM in a separate user session, which means you will not see the icon in your system tray. If you attempt to start SASM while it is already running in a separate user session, you will be prompted to terminate the other instance of SASM. By doing this, SASM will now be running in your user session, which means SASM will be closed down when you log out of Windows. If you want SASM to continue running while you are logged out, you must reboot or manually restart the task, as described in the above bullet. To Configure SASM on a Non-SIMS Workstation Please use the following instructions if you are installing SASM to a workstation that does not have SIMS installed. 1. Identify your System folder. From a SIMS workstation that has already been configured to work with your database, select Tools/Options from the menu, then click the File Locations button. Note the System folder setting. Page 10 SIMSAnywhere Synchronization Manager (SASM) Your System folder must be accessible from the SASM workstation. Please consult the Installation chapter of the SIMS user manual for instructions on sharing your System folder if it does not currently reside on a shared drive. 2. Open SASM by clicking the icon and choose Open from the context menu that appears. 3. Type CTRL+SHIFT+C to open the SASM configuration file. The contents should look similar to this: <?xml version="1.0" encoding="utf-8"?> <configuration> <appSettings> <add key="SystemLoc" value="UseDefault" /> <add key="LastSync" value="8/29/2012 6:20 PM" /> <add key="LastSyncResult" value="Synchronization completed successfully." /> <add key="Database" value="\\your-server\SIMS\Data\SIMS.DBC" /> <add key="SyncInterval" value="0" /> </appSettings> <connectionStrings /> </configuration> 4. Modify the <add key="SystemLoc" value="UseDefault" /> line of the file, replacing “UseDefault” with the path of your System folder, as noted in step 1. The end result should look similar to this: <?xml version="1.0" encoding="utf-8"?> <configuration> <appSettings> <add key="SystemLoc" value="\\your-server\SIMS\System"/> <add key="LastSync" value="8/29/2012 6:20 PM" /> <add key="LastSyncResult" value="Synchronization completed successfully." /> <add key="Database" value="\\your-server\SIMS\Data\SIMS.DBC" /> <add key="SyncInterval" value="0" /> </appSettings> <connectionStrings /> </configuration> 5. Choose File/Save from the menu, then File/Exit. 6. Close SASM by clicking the icon and choose Exit from the context menu that appears. 7. Restart SASM using its shortcut. You should now be configured with a valid System folder. Page 11 SIMSAnywhere Synchronization Manager (SASM)