1
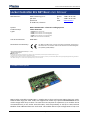
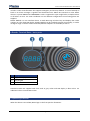
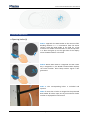
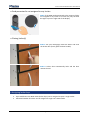
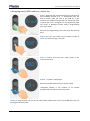
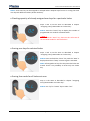
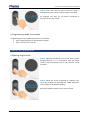
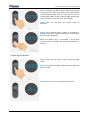
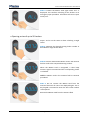
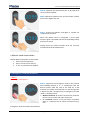
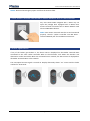
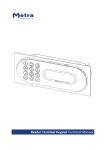
Locker Controller ELS NET Basic User Manual Locker Controller ELS NET Basic User Manual Table of contents Locker Controller ELS NET Basic User Manual ........................................................................................ 3 Product description ............................................................................................................................. 3 Reader Terminal Basic - basic parts .................................................................................................... 4 Operating indicator ............................................................................................................................. 4 Normal operation................................................................................................................................ 5 Opening locker(s)............................................................................................................................ 5 Card presented is not assigned to any Locker ................................................................................ 6 Closing locker(s) .............................................................................................................................. 6 Assigning locker keys .......................................................................................................................... 6 Assigning user(s) RFID media as a locker key ................................................................................. 7 Checking quantity of already assigned user keys for a particular locker ....................................... 8 Erasing user keys for selected locker.............................................................................................. 8 Erasing User cards for all lockers at once ....................................................................................... 8 Programming mode Termination ................................................................................................... 9 Master card presentation ................................................................................................................... 9 Opening single locker ..................................................................................................................... 9 Opening all Lockers ....................................................................................................................... 10 Opening series of up to 50 Lockers .............................................................................................. 11 Master mode termination ............................................................................................................ 12 Emergency Card presentation .......................................................................................................... 12 Door Access Terminal connected to Metra Network with LC Basic devices..................................... 13 Alarm signalization ............................................................................................................................ 13 Page 2 Locker Controller ELS NET Basic User Manual Locker Controller ELS NET Basic User Manual Manufacturer: Metra inženiring d.o.o. IOC Trzin Špruha 19 SI-1236 Trzin, Slovenia System: Product Group: Types: Metra ELS NET Basic – Electronic Locking Systems Locker Controller Year of Construction: 2006-2011 Declaration of Conformity: phone: fax: web: +386 1 56 10 740 +386 1 56 10 744 www.metra.si LC16AEB (Locker Controller 16) LC16EB (Locker Controller 16 on mounting plate) LC24EB (Locker Controller 24 on mounting plate) LC32EB (Locker Controller 32 on mounting plate) LC08 (Locker Controller Extension Module) The Metra ELS NET Basic products have been developed, designed and manufactured in accordance with the EU directive for Electromagnetic Compatibility (2004/108/EC). Locker Controller ELS NET Basic User Manual [rev.1-310811] 2011 Metra inženiring d.o.o. All Rights reserved. No part of this manual may be reproduced in any form or by any means without prior written permission of Metra inženiring d.o.o. The contents of this manual are subject to change without notice. All efforts have been made to ensure the accuracy of the contents of this manual, however, should any errors be detected, Metra inženiring would greatly appreciate being informed of them. Metra inženiring d.o.o. can assume no responsibility for any errors in this manual. Product description Metra Locker Controller ELS NET Basic is simplest way to drive and monitor Metra Electronic Locks. Different RFID Tags (see order codes) are supported as locker keys. Special PROGRAMMING Card is used to assign locker keys so there is no need for a PC Computer for operation. Up to 16 locks can be connected directly to the Locker Controller Basic, with the possibility to add up to two Extension Modules for 8 additional Electronic Locks each. This enables locker layout configurations of 16, 24 or Page 3 Locker Controller ELS NET Basic User Manual 32 locks. Locker Controller Basic also supports emergency and security features. In case of attempt of break in an Alarm message is signalled and distributed over Metra NET network to other Metra devices. A special MASTER and EMERGENCY card is supported to open single locker, multiple lockers or all lockers at once. For easier installation on site different configurations on mounting plates are supplied. Reader Module is a user interface device. It reads RFID Tags as locker keys and displays the Locker number on a four digit LED display. Reader Module can be installed vertically, horizontally, or under 45 degree angle. It can be surface mounted (different adapters are available) or built in. Reader Terminal Basic - basic parts # description 1 4 digit LED display 2 4 key keypad 3 antenna field Standard models are supplied with front mask in gray colour and LED display in blue colour. For additional colours contact Metra sales. Operating indicator When the device is turned ON, Metra logo on the front panel is illuminates. Page 4 Locker Controller ELS NET Basic User Manual Normal operation Opening locker(s) STEP 1: Approach the RFID media to the antenna field. Reading distance is 3 – 5 centimetres from the device surface. Hold the RFID media in the field for a few moments for Reader Terminal Basic to read and process it. A blue dot lights up on the right side of the display when the RFID media is in the field. STEP 2: When RFID media is recognized and the Locker Key is assigned to it, the Reader Terminal Basic displays the locker number. Short beep acoustic signal is also generated. STEP 3: The corresponding locker is unlocked and opened. NOTE: If more than 1 locker is assigned to the presented RFID media all lockers open one by one and each locker number is displayed for half second! Page 5 Locker Controller ELS NET Basic User Manual Card presented is not assigned to any Locker NOTE: If the RFID media presented to the antenna field is not assigned to any locker as a locker key only the blue dot lights up on the right side of the display. Closing locker(s) STEP 1: Put your belongings inside the locker and close the locker door (firmly push the door handle). STEP 2: Locker door automatically locks and the door remains closed. Assigning locker keys Up to 4 different user RFID media (locker keys) can be assigned to open a single Locker. Unlimited number of lockers can be assigned to single user’s RFID media. Page 6 Locker Controller ELS NET Basic User Manual Assigning user(s) RFID media as a locker key STEP 1: Approach the Programming Card to the antenna field. Reading distance is 3 – 5 centimetres from the device surface. Hold the card in the field for a few moments for Reader Terminal Basic to read and process it. When the card is recognized as a Programming Card the “Prog” is displayed. Device enters “Programming user keys” mode. Remove the Programming Card card form the antenna filed. STEP 2: Use “Up” and “Down” keys to select a locker to which you want to assign a user key. STEP 3: Present and hold user’s RFID media in the antenna field until ... STEP 4: ... number* is displayed. Remove user RFID media from the antenna field. *Displayed number is the number of all already programmed user keys for particular locker. NOTE: To assign another user key for the same locker repeat steps 3 and 4. Up to four user keys can be assigned to each locker. Page 7 Locker Controller ELS NET Basic User Manual NOTE: Same user key can be assigned to multiple lockers. Repeat steps from 2 to 4 using the same user key with different lockers (locker numbers). Checking quantity of already assigned user keys for a particular locker Steps 1 and 2 are the same as described in chapter “Assigning user(s) RFID media as a locker key“. STEP 3: Press the “Enter” key to display the number of programmed user cards for selected Locker. NOTE Do not hold the “Enter” key, because this will erase all the user RFID media for selected locker! Erasing user keys for selected locker Steps 1 and 2 are the same as described in chapter “Assigning user(s) RFID media as a locker key“. STEP 3: Press and hold the “Enter” key until the “ErAS” is displayed and short “beep” acoustic signal is activated. NOTE: All assigned user keys for that particular locker are erased. There is no possibility to erase only one locker key. Erasing User cards for all lockers at once Step 1 is the same as described in chapter “Assigning user(s) RFID media as a locker key“. STEP 2: Use “Up” or “Down” key to select “ALL”. Page 8 Locker Controller ELS NET Basic User Manual STEP 3: Press and hold the “Enter” key until “ErAS” is displayed and short “beep” acoustic signal is activated. All assigned user keys for all lockers connected to particular device are erased. Programming mode Termination Programming user keys mode of operation is terminated: after Programming Card is presented once again. after 1 minute of non activity. Master card presentation Opening single locker STEP 1: Approach the Master Card to the antenna field. Reading distance is 3 – 5 centimetres from the device surface. Hold the Master Card in the field for a few moments. STEP 2: When the card is recognized as a Master Card, the 4-Key Keyboard is activated and “0000” displayed. The first digit to be edited is flashing. Remove the Master Card form the antenna filed. Page 9 Locker Controller ELS NET Basic User Manual STEP 3: Compose the desired locker number by pressing the 'up' key to increase or the 'down' key to decrease the currently flashing digit. Use the 'enter' key to move to another digit. When you get to the last digit, pressing the 'enter' key will return the focus to the first digit. NOTE: “Esc” key will abort the master mode of operation. STEP 4: When desired locker number to be opened is displayed, present the Master Card again to the antenna field to confirm unlocking. When the Master Card is recognized, a short beep acoustic signal is activated and corresponding locker is opened. Opening all Lockers Steps 1 and 2 are the same as when unlocking single locker. STEP 3: Compose the number '9999' and leave rightmost digit 9 to flash. STEP 4: Press the 'up' key and display shows “ALL”. Page 10 Locker Controller ELS NET Basic User Manual STEP 5: Present the Master Card again while “ALL” is displayed. This confirms unlocking all the lockers as an emergency open procedure. All Lockers will start to open one by one. Opening series of up to 50 Lockers Steps 1 and 2 are the same as when unlocking a single locker. STEP 3: Compose the desired starting locker number as described for single locker above. STEP 4: Present and hold the Master Card in the antenna field to confirm the composed starting number. When the Master Card is recognized, a short beep acoustic signal is activated and the corresponding locker is unlocked. Hold the Master Card in the antenna field to continue procedure! STEP 5: Do not remove the Master Card form the antenna filed until all 4 zeros are displayed again. The 4Key keypad is activated to enter the last Locker number to be opened. Remove the Master Card form the antenna filed. Page 11 Locker Controller ELS NET Basic User Manual STEP 6: Compose the desired end (last to be opened in the row) locker number. NOTE: Difference between start and end locker number must not be higher than 50. STEP 7: Present the Master Card again to confirm the composed end number. When the Master Card is recognized, a short beep acoustic signal is activated and the corresponding lockers will start to unlock. Display shows the locker numbers that are currently unlocked until the procedure ends. Master mode termination Master Mode of operation is terminated: after successful operation. after 1 minute of non activity. if “Esc” is pressed on the keypad. Emergency Card presentation NOTE Use only for emergencies. STEP 1: Approach the Emergency Card to the antenna field. Reading distance is 3 – 5 centimetres from the device surface. Hold the card in the field for a few moments for Reader Terminal Basic to read and process it. When the card is recognized as an Emergency card the “EOPn” is displayed and: Without network: all Lockers connected to particular device start to unlock and open one by one. In a network: lockers on all the Locker Controllers Basic in a network start to unlock and open one by one. Emergency mode terminates automatically. Page 12 Locker Controller ELS NET Basic User Manual STEP 2: Remove the Emergency Open card form the antenna filed. Door Access Terminal connected to Metra Network with LC Basic devices Any user’s RFID media assigned with a locker key can open the passage door equipped with a Metra Door Access Terminal connected into a Metra Network with other ELS NET Basic devices. NOTE: Door Access Terminal must be set and connected properly. Consult “Locker Controller ELS NET Basic Technical Manual.pdf” for installation instructions. Alarm signalization If any of the lockers gets broken in, the alarm notice is displayed on the Reader Terminal Basic connected to the same Locker Controller Basic as the Electronic Lock where the break-in was detected or Locker Controllers Basic are connected into a network, the alarm notice is displayed on all Reader Terminals Basic in the network. The interrupted acoustic signal is turned on. Display alternately shows '-AL-' notice and the locker number for 20 seconds. Page 13