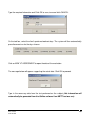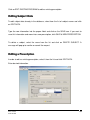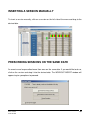
1
iMETT User Manual
© WOODWAY USA
W229 N591 FOSTER COURT
WAUKESHA WI 53209
PHONE (262) 548-6235
FAX (262) 548-6239
FORM: iMETT Manual
REV: 12/2008
APPR BY: EW
1
WOODWAY SERVICE PROVIDER INFORMATION SHEET
NAME OF COMPANY: ______________________________________________________
CONTACT PERSON: _______________________________________________________
ADDRESS: _______________________________________________________________
_________________________________________________________________
PHONE NUMBER: _________________________________________________________
FAX NUMBER: ____________________________________________________________
MAJOR CITIES AND AREAS YOUR COMPANY SERVICES: ________________________
________________________________________________________________________
_________________________________________________________________________
FORM: iMETT Manual
REV: 12/2008
APPR BY: EW
2
TABLE OF CONTENTS
SECTION 1: GALILEO
CHAPTER 1: WARRANTY STATEMENT .............................................................................. 7
CHAPTER 2: INTRODUCTION............................................................................................. 10
CHAPTER 3: SETUP ............................................................................................................ 12
CHAPTER 4: FIRST USE OF SOFTWARE .......................................................................... 15
ENVIRONMENT ...................................................................................................................... 17
MODULES ............................................................................................................................. 18
PROTOCOL AND PARAMETER EDITOR ..................................................................................... 27
CHAPTER 5: SOFTWARE COMPONENTS ......................................................................... 31
ANAMNESIS .......................................................................................................................... 34
ONLINE STRESS TEST ........................................................................................................... 41
VENTILATORY THRESHOLD..................................................................................................... 45
OFFLINE STRESS TEST .......................................................................................................... 48
CHAPTER 6: ADDITIONAL INFORMATION ........................................................................ 56
PURCHASING OPTIONAL MODULES ......................................................................................... 57
PRINTING ............................................................................................................................. 58
PATENTS .............................................................................................................................. 58
SECTION 2: PERIODIZATION
CHAPTER 1: INSTALLING THE PERIODIZATION PROGRAM .......................................... 60
CHAPTER 2: USING PERIODIZATION FOR THE FIRST TIME .......................................... 62
TOOL BAR ............................................................................................................................ 63
PERIODIZATION MENU ........................................................................................................... 66
CHAPTER 3: PRESCRIBING EXERCISE ............................................................................ 67
CHAPTER 4: EDITING AND PRINTING ............................................................................... 73
EDITING SUBJECT DATA ........................................................................................................ 74
EDITING A PRESCRIPTION ...................................................................................................... 74
FORM: iMETT Manual
REV: 12/2008
APPR BY: EW
3
PRINTING ............................................................................................................................. 77
SECTION 3: SUPPORTING DOCUMENTS
CHAPTER 1: OUT OF INDEX ERROR................................................................................. 81
CHAPTER 2: Q&A ................................................................................................................ 84
CHAPTER 3: PROGRAM EXPLANATION ........................................................................... 93
CHAPTER 4: SOFTWARE UPGRADES .............................................................................. 97
FORM: iMETT Manual
REV: 12/2008
APPR BY: EW
4
WOODWAY History
WOODWAY’s history began in Germany in 1974. Willi Schoenberger, a technical director in
charge of planning a fitness center, noticed that the most important piece of equipment, the
treadmill, did not meet the most important requirements: a mechanically sound machine that
is designed to meet human needs.
He envisioned a comfortable surface that did not interfere with the natural biomechanics of
running or walking. Also, he wanted to design a transportation system which eliminated the
friction associated with the conventional (conveyor belt) treadmills. After intensive research,
and trial and error (and in cooperation with the Deutsche Sporthochschule in Koln, Germany),
Willi developed and patented a very unique and revolutionary treadmill design.
In 1975, WOODWAY GmbH was founded in Weil am Rhein, Germany. The name
"WOODWAY" is derived from the German "Waldweg" (Wald = Wood and Weg = Way) – the
feel of running on a soft pine needle covered path in the forest.
In 1983, a manufacturing license was awarded to Sakai Medical, for the use of WOODWAY
technology in the Japanese marketplace.
In 1988, a U.S. license was granted to a small, but well-established manufacturing company
in Waukesha, Wisconsin. WOODWAY USA was formed when the U.S. incarnation of the
WOODWAY was developed and completed in 1990. WOODWAY USA is very proud to be
the primary manufacturer of WOODWAY Treadmills worldwide, exporting treadmills each
month to Germany and Japan for international distribution, in addition to serving our domestic
customers and clients.
Today, WOODWAY’s design and manufacturing facilities in the United States, Germany and
Japan make WOODWAY the largest specialized treadmill manufacturer in the world.
Constant enhancements in quality, design and function are shared and implemented by all
three WOODWAY manufacturers.
FORM: iMETT Manual
REV: 12/2008
APPR BY: EW
5
Section 1: Galileo
FORM: iMETT Manual
REV: 12/2008
APPR BY: EW
6
Chapter
1
WARRANTY STATEMENT
FORM: iMETT Manual
REV: 12/2008
APPR BY: EW
7
WOODWAY ensures to the owner of the product identified below, a warranty for operations
within the specifications during a period of:
1 (one) year, as of the date of installation of the software.
iMETT Galileo
This warranty is applied only to the parts, labor and equipment provided by WOODWAY, that,
in case of proven problem caused by manufacturing defects, WOODWAY has a commitment
of repairing or substituting, at its choice, the defective product or part.
Other warranties are not offered, other than the ones expressed in this WARRANTY
STATEMENT or in another document offered to the client by WOODWAY. Therefore, the
warranties concerning the items below are EXCLUDED from this statement:
• Ceasing of profit, due to the absence of the equipment to repair;
• Any other reimbursements due to a bad operation of the equipment.
In any use of this warranty, the financial duties of WOODWAY will not exceed the amount
paid by the client to WOODWAY.
The services from repairs done under this warranty will be offered at WOODWAY’s
headquarters, located in Waukesha – DF, or by a WOODWAY certified service provider. All
the costs from dislocating technicians to other locations, apart from Waukesha, WI, and / or
freight and packaging for the transportation of the equipment will be the responsibility of the
client.
This warranty includes parts, labor and replacement of equipment, if necessary, provided the
damages have not been caused by:
•
improper operation, improper use or damages caused by a power supply not in
accordance with the rules set by WOODWAY;
•
opening / maintenance or replacing of parts performed by technicians not authorized
by WOODWAY;
•
using software or installing interfaces and / or peripherals that are not specifically
authorized by WOODWAY;
FORM: iMETT Manual
REV: 12/2008
APPR BY: EW
8
•
alterations to the set-up of the equipment or installations without a previous agreement
by WOODWAY;
•
operation done out of the technical or environmental specifications set for the product;
•
imperfection on the packaging or improper transportation, when this transportation is
carried out by the client or by companies authorized by the client including when this
transportation happens due to repairs completed under this warranty;
•
damages incurred due to turmoil, war, natural phenomena or civil disturbances;
•
introduction of computer viruses due to the installation of software performed by
individuals not authorized by WOODWAY.
MICROMED is not obligated to update or modify its products after its sale and those
modifications will not necessarily be communicated to the client.
FORM: iMETT Manual
REV: 12/2008
APPR BY: EW
9
Chapter
2
INTRODUCTION
FORM: iMETT Manual
REV: 12/2008
APPR BY: EW
10
Galileo is the most complete and flexible physical assessment system ever created. It was
designed to be a complete solution for gyms, personal trainers, universities, clinics and all
who require a complete and user friendly physical assessment system at a low cost.
The standard iMETT software allows for the assessor to run the following modules:
•
Standard Modules: Anamnesis, Online Fitness Test, Ventilatory Threshold, and
Manual Stress Test.
•
Additonal Modules Available: Body Composition, Perimetry, Muscle Strength,
Somatotype, Flexibility, Flexibility-Angles, and Postural Analysis.
The iMETT software will not interfere with your existing or future software programs.
The iMETT system utilizes a heart rate sensor, FitView, which allows the reception of the
heart rate from a standard non codified Polar® heart rate monitor strap.
The iMETT software is compatible with Windows 95, 98, ME, 2000 and XP, and Vista. It can
be run on PC’s or laptops.
NOTE: In order to run the optional FitView in computers with no serial ports available,
contact Woodway technical support for options on purchasing adapters.
Galileo’s comprehensive reports make understanding the results of your physical assessment
very easy. This assessment can be completed in groups or individually, helping to provide
great flexibility when setting up workout programs.
The iMETT software has the ability to provide a unique user identification and store that
particular user’s past testing results and programs to track the user’s progression.
FORM: iMETT Manual
REV: 12/2008
APPR BY: EW
11
Chapter
3
SETUP
FORM: iMETT Manual
REV: 12/2008
APPR BY: EW
12
Insert the setup CD and follow the onscreen instructions to install the iMETT Galileo
software:
1. Select the language. English or Portuguese.
2. In the event that you wish to terminate the installation process, simply click the
CANCEL button at any time.
3. To install Galileo, click NEXT.
4. To install the software in a specific folder, select BROWSE, then select the desired
folder. Select NEXT to continue with setup.
FORM: iMETT Manual
REV: 12/2008
APPR BY: EW
13
5. Select a program folder. Click NEXT to continue.
6. Wait while the setup is being performed and the HAPS driver is being installed.
7. Installation is complete. Select FINISH. Insert the USB dongle in the port of your
computer. Your Galileo software is ready to run.
FORM: iMETT Manual
REV: 12/2008
APPR BY: EW
14
Chapter
4
FIRST USE OF SOFTWARE
ENVIRONMENT
MODULES
PROTOCOL AND PARAMETER EDITOR
FORM: iMETT Manual
REV: 12/2008
APPR BY: EW
15
Attention! It is important to perform this configuration before starting the assessments. If you
attempt to make changes after performing assessments, your data may be lost or altered.
You must save your configuration settings when you are finished by clicking OK.
Using the Galileo software for the first time
To use the iMETT Galileo software, the HASP key / USB dongle must be connected to the
USB output of your computer at all times.
In the event that the HASP key / USB dongle is not connected, the message box below will
pop up when you attempt to start the software. If this occurs, select OK and insert the HASP
key / USB dongle and then restart the software.
When you first start the software, you will be prompted to select a language. Make this choice
and then click OK.
FORM: iMETT Manual
REV: 12/2008
APPR BY: EW
16
Environment
To open the environment configuration using the menu ba, select CONFIGURATION ENVIRONMENT.
This form consist of 8 cards of configuration: general, body composition, perimetery, postural
analysis, stress test, somatochart, flexibility, and search zone.
GENERAL
User Data Configuration:
•
Fill in the user’s personal data in the areas labeled name, address and telephone.
•
Select the buttons related to the units of measurement and power units you wish to
use for the test.
•
Select the language which you want to work with by selecting the down lateral arrow in
the reference area and choosing the desired idiom.
FORM: iMETT Manual
REV: 12/2008
APPR BY: EW
17
Customizing Your Software Environment:
Changing layout color scheme
The iMETT Galileo software gives you the option to customize the color of the bars and the
font of the report. Select the reference buttons on the area printing and select the desired
color. Select OK. If you prefer the option of having a single color for all bars of the main
reports, select this option by choosing report unic bars color.
Inserting Your Company Logo
To modify the logo, select CHANGE LOGO, search for a new logo in your files and insert it.
New logo must be in Bitmap format and no larger than 900 x 600.
To delete the logo, select DELETE LOGO. A deleting confirmation box will pop up. Select
YES to delete the logo. Select NO to cancel the action.
After configuring the card GENERAL, select OK to save the current changes and leave the
environment option.
Modules (included with purchase of Premium Package)
1. BODY COMPOSITION (optional module)
General configurations
Selecting the Body Composition Measurement Method
Click on the lateral down arrow to select calculated by system, bioimpedances or others. In
case of an others option, type the name of the method on the area titled another method.
FORM: iMETT Manual
REV: 12/2008
APPR BY: EW
18
Selecting the Desired Partitioning
In the area default formula for body composition calculation you have the ability to customize
the formula for body composition. You can either choose selected by system, or manually
choose the desired formula. If you wish to do it manually, use the lateral down arrows for fat
percentile, bone weight, and residual weight. Repeat this process for measures values
calculus and standard graph style and click OK to save the configurations.
FORM: iMETT Manual
REV: 12/2008
APPR BY: EW
19
Calculation of the Target Weight
To calculate target weight, enter multipliers in the necessary fields (noting different options for
male and female subjects).
FORM: iMETT Manual
REV: 12/2008
APPR BY: EW
20
2. PERIMETRY
•
To insert a girth to be used, select it from the list named available perimeters. Select
ADD PERIMETER or drag it to the desired position (it will be highlighted with a red
underline on the board selected perimeters for use.).
•
To delete a perimeter, select it on the list related to the perimeters selected for use
and click DELETE PERIMETER.
•
Select OK to save the configurations or select CANCEL to cancel the changes.
FORM: iMETT Manual
REV: 12/2008
APPR BY: EW
21
3. POSTURAL ANALYSIS (optional module)
The postural analysis module is composed of four pictures which can each have 16
sentences as well as the group name set as standard.
Protocol
To insert the name of the group or sentences, click on the desired space and enter the
information. Select OK to save changes and leave the configuration environment or select
CANCEL to cancel the modifications.
FORM: iMETT Manual
REV: 12/2008
APPR BY: EW
22
Markers
To edit the grid lines color and the markers colors (horizontal and / or vertical), select
CHANGE COLOR, select the desired color and then select OK.
FORM: iMETT Manual
REV: 12/2008
APPR BY: EW
23
4. SOMATOCHART (optional module)
In editing somatochart, you will be able to choose editing between screen used chart or
printing used chart selecting the button that you prefer. To personalize the way in which the
information will be presented on the somatochart, simply select the reference buttons: show
points coordinates, show internal lines, show pictures. The pictures can also be personalized
by selecting the button related to the picture that you want to set up and search for in your
files. To set up the color of the border, font, axis, chart or background, select the color
reference box, select the color and click OK. To restore the system default colors, select the
button default colors.
In legend, you can choose show points coordinates and / or show (the legend itself) selecting
their reference buttons. To set up the color of the border, font, background, select the color
reference box, select the color and click OK. To restore the system default colors, select the
button default colors.
FORM: iMETT Manual
REV: 12/2008
APPR BY: EW
24
5. FLEXIBILITY (optional module)
In joints you can select the joints by clicking on the desired name by moving the scrolling bar,
or by selecting MOVE UP or MOVE DOWN. If the area active has a red ‘X’ it means that the
related joint is disabled. To enable it, click on the red ‘X’ to turn it to a green check. To
disable, click on a green check and it will turn into a red ‘X’.
FORM: iMETT Manual
REV: 12/2008
APPR BY: EW
25
To insert a joint, select it from the list and select ADD JOINT. Type in the information and
click ENTER. If the desired position is the last one on the list, after selecting ADD JOINT, the
message box below will pop up. Select YES to add the information at the end of the list or
select NO, to insert the information into the previous position. To cancel the action, select
CANCEL. To delete a joint, select it from the list and click DELETE JOINT.
In classification tables, choose male or female and insert or edit information. There must be
coherence among the cells of the typed values. In order to know the inserted data references,
as well as to leave the current reference viewed, select REF. SRC. and type the new
information.
To insert or replace pictures, select from the joint list the joint to which you want to attach the
picture. In pictures, select ADD and search for the picture within your files. Select SAVE to
keep the modifications. Select OK to save or CANCEL to leave.
FORM: iMETT Manual
REV: 12/2008
APPR BY: EW
26
Protocol and Parameter Editor
iMETT Galileo has a formula and parameter editor that allows the user to register any body
composition formula. When entering the screen of the protocol editor, you will see a list with
all the formulas automatically registered in the system.
You can set up the Protocol and Parameter Editor, through the menu bar, selecting
CONFIGURATION PROTOCOL AND PARAMETER EDITOR. The editor has two cards:
Protocols and Parameters.
FORM: iMETT Manual
REV: 12/2008
APPR BY: EW
27
PROTOCOLS
The following instructions concern the 3 cards of protocols: fat percentile, bone weight and
residual weight. To insert a new protocol, select NEW PROTOCOL. A new line will appear at
the end of the list of protocols. Insert the data related to the name, minimum age, and
maximum age. To insert information concerning gender and subject, double click on the
respective area and select the desired option using the lateral down arrow.
To insert the formulas, the protocol editor comes with an alphanumeric keyboard with the
same definitions of a calculator. For example, you use an asterisk (*) to multiply, a slash (/) to
divide, parenthesis [()] to indicate the sum of all parameters. When you insert a formula, you
will be able to follow one of the options below:
1. Use the alphanumeric keyboard of the protocol editor by clicking on its alphanumeric
icons.
2. Click in the formula display and type the information through the keyboard of your
computer.
To insert the parameters, double click on the name of the parameter that you want on the list
of names. You can delete data by using the BACKSPACE key on your keyboard or pressing
the CE icon.
FORM: iMETT Manual
REV: 12/2008
APPR BY: EW
28
To test the registered formula, select CALC. A test box will pop up. Type the values of the
parameters, the required measurements, and select OK. The result will be displayed after the
calculations are done.
To delete a protocol, select it from the list and then select DELETE PROTOCOL. A
confirmation box will pop up. Select YES to delete or NO to cancel the action.
Data capture formula
After the modifications with the editor are complete, select OK to register the modifications
and quit the Protocol Editor.
PARAMETERS
If the protocol that you wish to use requires a specific parameter that is not registered, you
can insert it. To insert a new parameter, select INCLUDE PARAMETER and type the name of
it. If the new parameter is a girth, select YES on the area of the Girth column by clicking and
selecting it with the lateral down arrow.
FORM: iMETT Manual
REV: 12/2008
APPR BY: EW
29
To delete a parameter, select DELETE PARAMETER. The confirmation box below will pop
up to warn you that if the parameter is part of another protocol, that protocol can be
damaged. Select YES to confirm the deletion or NO to cancel the action.
To change the picture, select CHANGE PICTURE and search for it in your files. To save the
picture, select the icon SAVE IMAGE ON DISK. To delete the picture, select DELETE
PICTURE. To save the modifications and quit the Protocol Editor select OK.
FORM: iMETT Manual
REV: 12/2008
APPR BY: EW
30
Chapter
5
SOFTWARE COMPONENTS
ANAMNESIS
ONLINE STRESS TEST
VENTILATORY THRESHOLD
OFFLINE STRESS TEST
FORM: iMETT Manual
REV: 12/2008
APPR BY: EW
31
From the home screen of the software, you begin to use the system by selecting SUBJECT
NEW in the menu bar.
You can also begin by selecting the icon CREATE A NEW SUBJECT below the menu bar.
Insert the sublect data of the subject by clicking and typing on the reference areas.
FORM: iMETT Manual
REV: 12/2008
APPR BY: EW
32
The areas name, birth date, gender and ID are mandatory. If one of these areas is left blank,
an error message will pop up. Select OK and fill in the missing areas. Select SAVE to register
the data into the system, and then the card open is activated.
To begin an assessment, select NEW SUBJECT. Select OK to save the information inserted
and close the window or select CANCEL, to cancel the actions and close the window.
When selecting SAVE, the card open will be activated. This is where you will find subjects
that are registered in the system and their assessments. To find a name, you can type in the
first letter of the name in the area active subject or simply scroll through the list until you find
it. To insert a new subject, select NEW SUBJECT. The data card will open. Follow the steps
described above to fill in the subject data.
To delete a subject already inserted, select DELETE ASSESSMENT. The deletion
confirmation box will pop up. Select YES to continue or select NO to cancel the action.
FORM: iMETT Manual
REV: 12/2008
APPR BY: EW
33
Anamnesis
When you select NEW SUBJECT, the module ANAMNESIS is enabled. It also can be
opened through the menu bar by selecting MODULES ANAMNESIS or selecting the icon
FILL OR CHANGE THE SUBJECT DATA, below the menu bar:
This module has four cards:
General Data
In General Data, some areas will come automatically filled in if the information was previously
inserted on the card data. Fill in the areas related to the weight, height, and B.M.I., by
selecting and typing the necessary information.
In the case that the weight and / or the height are missing, an error box will appear. Click OK
and fill in the missing information.
FORM: iMETT Manual
REV: 12/2008
APPR BY: EW
34
In goals list, use the arrow to select the desired goal. To insert a goal, select the icon with
suspension points
on the lateral part of this area. Select INSERT and type the information.
Select OK to save the inserted goal or select DELETE to delete the selected goal.
In goal activity, use the arrow to select the desired activity. To insert an activity, select the
icon with suspension points
on the lateral part of this area. Select INSERT and type in the
information. Select OK to save the activity inserted or select DELETE to delete the selected
activity.
In assessment data, insert the name of the trainer from the list using the lateral down arrow
or select and type the registration number of the trainer in the area titled code.
FORM: iMETT Manual
REV: 12/2008
APPR BY: EW
35
To insert a trainer, select the icon TRAINERS. Select INSERT and type the name and the ID
of the trainer and then select OK to register the trainer in the system. Select DELETE to
delete the registration of a trainer that is selected on the list. Select OK to save the
registrations performed and exit anamnesis module or select CANCEL, to cancel the actions
performed.
Personal History
In the smoking section, select the button related to the smoking status of the subject. Type in
relevant information in the areas related to length of time and frequency of smoking.
FORM: iMETT Manual
REV: 12/2008
APPR BY: EW
36
In diet, type in the reference area the quantity of meals the subject has a day. With the lateral
down arrow of the area observations, select the desired information on the list. To insert a
new observation, select the icon with suspension points
. Select INSERT and type the new
information. Select OK to register the information in the system. Select DELETE to delete the
selected information from the list.
In current physical activity, type the data related to the periodicity and duration. Select the
intensity description by clicking on the lateral down arrow.
FORM: iMETT Manual
REV: 12/2008
APPR BY: EW
37
To insert a new activity, select the icon with suspension points
. Select INSERT and type
the new information. Select OK to register the activity in the system. Select DELETE to delete
the selected activity from the list.
In notes, select the note that you want by clicking on the lateral down arrow of the reference
area and choose it from the list. To insert a new note, select the icon with suspension
points
. Select INSERT and type the new information. Select OK to register the note in the
system. Select DELETE to delete the selected note from the list. Select OK to save the
registrations performed and leave the ANAMNESIS MODULE or select CANCEL to cancel
the actions performed.
FORM: iMETT Manual
REV: 12/2008
APPR BY: EW
38
Medical History
To include notes about the risk factors, select the desired information under recorded medical
history and then choose either personal or family. To insert a new risk factor, select ADD and
type the information. Select ADD once more so that the information inserted can be
registered in the system.
To delete information from the list, select it and click DELETE. A confirmation box will pop up.
Select YES to continue or select NO to cancel the action. Then, select OK to save the
registrations performed and leave the ANAMNESIS MODULE or select CANCEL to cancel
the actions performed.
FORM: iMETT Manual
REV: 12/2008
APPR BY: EW
39
PAR-Q
In order to answer the questions on the PAR-Q questionnaire, select the answer buttons YES
or NO.
If you answered yes to any of the questions, the message box below will pop up. Select OK
to return to PAR-Q. Select OK to save the registrations performed and leave the
ANAMNESIS MODULE or select CANCEL to cancel the actions performed.
FORM: iMETT Manual
REV: 12/2008
APPR BY: EW
40
Online Stress Test
This module can be opened through the menu bar in MODULES ONLINE STRESS TEST
or by clicking on the icon ONLINE STRESS TEST ACCESS, below the menu bar.
If the iMETT Analyzer is not connected to perform the stress test assessment, the message
box below will pop up. Install the equipment and select OK.
The screen to begin the test will open.
FORM: iMETT Manual
REV: 12/2008
APPR BY: EW
41
To setup, select CONFIGURATION or press F10 on your keyboard. The configuration box
below will open. In iMETT analyzer you can set the mode of the analysis, clicking on the
down arrow and then selecting the from the list (the default selection should be iMETT
analyzer HR). To perform the calibration, select CALIBRATE.
Type the values for syringe volume, correction factor and flow sensor fact into their respective
areas, then select CALIBRATE. Type the values related to the volume and flow in their
respective areas and select VERIFY. Select OK to register the modifications and leave the
configuration box. Select CANCEL to cancel the action and leave the configuration box.
FORM: iMETT Manual
REV: 12/2008
APPR BY: EW
42
In treadmill control, check the box next to automatic control to automatically select the system
or click the down arrow for serial port and select a port from the list.
In treadmill recovery, bike recovery and automatic register, type the desired values in the
reference areas.
In charts you can set the values of line thickness by selecting it from the list. To modify the
colors of the lines, click on the area related to the color and select a color from the palette by
clicking on the desired color. Select OK.
FORM: iMETT Manual
REV: 12/2008
APPR BY: EW
43
To restore the system to original information, select DEFAULT. To register the modifications
and leave the ON LINE CONFIG box, select OK. To cancel the actions, select CANCEL.
To begin the test, select START or press the F1 key on your keyboard. To set the timer as
zero, select ZERO or press the F4 key on your keyboard. To begin the recovery period,
select RECOVERY or press the F12 key on your keyboard. The recovery must have a
minimum period of 2 minutes to be validated. In order to save the captured data during the
test, select REG. or press the F6 key on your keyboard. To finish the test and leave the
module ONLINE STRESS TEST, select END.
FORM: iMETT Manual
REV: 12/2008
APPR BY: EW
44
Ventilatory Threshold
This module can be opened through the menu bar in MODULES VENTILATORY
THRESHOLD or by clicking on the icon VENTILATORY THRESHOLD DETERMINATION,
above the menu bar:
In this module you will find three cards:
Ventilatory Threshold (Note: This is the old way VT was recorded. This will remain an option in the
system, but the standard procedure is shown on page 51)
To set the ventilatory threshold, choose three points on the chart, placing the central point on
the beginning of the hyperventilation. To do that, click the mouse on the locations you want to
insert the points. The blue bar indicates the aerobic status and the yellow bar indicates the
anaerobic status. The central point is the ventilatory threshold. The values of the search zone
start, ventilatory threshold and search zone end are automatically inserted. Select OK to save
the registrations performed and leave the VENTILATORY THRESHOLD card or select
CANCEL to cancel the actions.
FORM: iMETT Manual
REV: 12/2008
APPR BY: EW
45
8. SEARCH ZONE
To insert new values, select the reference area and type the new information. Select OK to
save the configurations and leave the configuration environment or select CANCEL to cancel
the modifications and leave the configuration environment.
Results
The values will be automatically inserted into the results card. To start the periodization
program, select SEND DATA TO PERIODIZATION. The periodization program will open
(check its instructions of use). Select OK to save the registrations performed and leave the
VENTILATORY THRESHOLD card or select CANCEL to cancel the actions.
FORM: iMETT Manual
REV: 12/2008
APPR BY: EW
46
Search Zone
To edit the start and end values of heart rate percentile, click on the reference areas and type
the values. Select OK to save the registrations performed and leave the VENTILATORY
THRESHOLD card or select CANCEL to cancel the actions.
FORM: iMETT Manual
REV: 12/2008
APPR BY: EW
47
Offline Stress Test
This module can be opened through the menu bar in MODULES OFFLINE STRESS
TEST or clicking on the icon ONLINE STRESS TEST ACCESS, below the menu bar.
In this module you will find 4 cards:
Bicycle or Treadmill Test
Select the ergometer and the protocol by clicking on the lateral down arrow and then select
the one that you wish to use. Type in the reference area the value of the heart rate. To set
the VT (ventilatory threshold), click on its reference button and then select on the table the
line of the stage that you want by clicking on the cell Sel. To Set Last Stage, click on its
reference button and then select on the table the line of the stage that you want by clicking on
the cell Sel. To Set Recovery, click on its reference button and then select on the table the
line of the stage that you want by clicking on the cell Sel.
FORM: iMETT Manual
REV: 12/2008
APPR BY: EW
48
To insert a stage, click on the icon with a + sign. The stage will be inserted in the last line of
the numeric sequence. Type the new information. To delete a stage, select it from the list and
click on the icon with a – sign. A confirmation box will appear.
The indirect stress test results are automatically inserted, apart from the cardio fitness
(fitness score) that must be selected through the lateral down arrow of its area.
To analyze the tables of fitness score, select the icon with suspension points
on the lateral
part of the area cardio fitness (fitness score). A box will open showing the following four
cards: cooper, american heart association, ventilatory threshold, fitness score. Select the
desired card and then select OK. To cancel the action, select CANCEL.
FORM: iMETT Manual
REV: 12/2008
APPR BY: EW
49
In ventilatory threshold res., the data will be automatically inserted.
To insert a comment, select COMMENTS. Select OK to register the information and leave the
module. Select CANCEL to cancel the actions.
Charts
To adjust the threshold on the chart, simply hold down the CTRL key, click on the blue line
and drag it to the desired location.
FORM: iMETT Manual
REV: 12/2008
APPR BY: EW
50
Send Data to Periodization
In ventilatory threshold test results, the values are automatically inserted. To start the
periodization program, click on the icon SEND DATA TO PERIODIZATION. The
periodization program will open (check its instructions for use). Select OK to save the
registrations performed and leave the VENTILATORY THRESHOLD card or select CANCEL
to cancel the actions.
FORM: iMETT Manual
REV: 12/2008
APPR BY: EW
51
Fitness Test
Choose the ergometer by clicking on the lateral down arrow and select the preferred
ergometer. To add a protocol, select ADD PROTOCOL and type the new information in its
area. To delete a protocol, select it from the list and click DELETE PROTOCOL. To classify a
protocol as standard, select it from the list and click CHOOSE PROTOCOL AS DEFAULT.
Select the VO2 Formula by clicking on the lateral down arrow of its reference area. To view
the description of the formulas, select the icon
, beside the area VO2 formula.
In the box related to the stages you can set values for time, speed (mph) and inclination, by
selecting the reference area and typing the desired values. To insert a stage, select ADD
STAGE. To delete a stage, select it from the reference box and select DELETE STAGE.
Select the buttons related to the cardio fitness, training zones, and stages printing that you
wish to use. In the area cal iMetter analyze click on the reference area and type the value you
want. Select OK to save the configurations and leave the configuration environment or select
CANCEL to cancel the modifications and leave the configuration environment.
To return to the default configuration of the protocols, select LOAD DEFAULT PROTOCOL. A
confirmation box will pop up. Select YES to confirm or select NO to cancel the action.
FORM: iMETT Manual
REV: 12/2008
APPR BY: EW
52
Training Zones
In training zones, the values can be inserted by clicking and typing in the reference areas.
To insert a line, click on the icon INSERT LINE. A line will appear at the end of the list. Type
the new information.
To delete a line, click on the icon DELETE LINE. A confirmation box will pop up. Select YES
to continue deleting and select NO to cancel the action.
FORM: iMETT Manual
REV: 12/2008
APPR BY: EW
53
To restore the default configuration, click on the icon RELOAD DEFAULT ZONES. The
confirmation box below will pop up. Select YES to substitute the current zones or NO to
cancel the action.
To save the new information as default, select SAVE ZONES AS DEFAULT.
In training zones determination way, choose between using the maximal HR (Heart Rate); the
cronotrophic reserve or the VT HR (Ventilatory Threshold Heart Rate) by selecting one of the
reference buttons. In HEART RATE (Resting), click and type the desired value. Select OK to
register the information and leave the module. Select CANCEL to cancel the actions.
FORM: iMETT Manual
REV: 12/2008
APPR BY: EW
54
Track or Bench Test
Type the value of the HEART RATE (resting) on the reference area and select the test type
from the drop down menu. Under field tests, type in required information in the distance and
HR fields.
In bench test, click and type in the values related to the chronometer, bench height (cm) and
HEART RATE (BPM). If you want to activate the metronome sound, click on its reference
button.
To begin the test, select START. The chronometer will be activated in decreasing order and
will stop when the chronometer shows zero. To stop the test, at any time, select STOP.
FORM: iMETT Manual
REV: 12/2008
APPR BY: EW
55
Chapter
6
ADDITIONAL INFORMATION
PURCHASING OPTIONAL MODULES
PRINTING
PATENTS
FORM: iMETT Manual
REV: 12/2008
APPR BY: EW
56
Purchasing Optional Modules
iMETT Galileo allows the user to acquire optional modules to use on the system. To do so,
select HELP AUTHORIZE MODULES, through the menu bar.
Contact WOODWAY (1-800-WOODWAY or [email protected]) to order the enabling
modules and receive the security key number. Select ENABLE beside the module that you
want to acquire.
FORM: iMETT Manual
REV: 12/2008
APPR BY: EW
57
Printing
To begin printing, select SUBJECT PRINT or click on the PRINT icon on the toolbar.
When printing begins, the box below will pop up. You will only be able to print one report at a
time. Select the reports that you want to print by clicking on their reference buttons. Select
OK to continue printing or select CANCEL to cancel the printing.
Patents
MICROMED®
POLAR®
FORM: iMETT Manual
REV: 12/2008
APPR BY: EW
58
Section 2: Periodization
FORM: iMETT Manual
REV: 12/2008
APPR BY: EW
59
Chapter
1
INSTALLING THE PERIODIZATION
PROGRAM
FORM: iMETT Manual
REV: 12/2008
APPR BY: EW
60
Periodization was designed to assist the personal trainer in prescribing exercise programs for
clients and club members.
NOTE: This program was not designed for medical purposes.
Insert the CD provided with the iMETT into your CD-ROM drive and follow the instructions.
1. The first step is to choose the desired language. This can be done at the screen
below. To cancel this program, click CANCEL.
2. Click OK.
3. Choose where you would like the file to be located. You can either use the default
location or click the BROWSE button to choose your own. Click NEXT when the
desired location is chosen.
4. Choose the setup type that best suits your needs (Note: Typical is recommended).
5. Click OK.
6. Wait for installation to complete. If you wish to abort the installation, click on CANCEL.
7. A status window will appear letting you know it is installing. Wait until the HASP drive
is installed.
8. Once installation is complete, click FINISH.
NOTE: The dongle provided with the system must be in your computer’s USB port in order for
the program to open.
FORM: iMETT Manual
REV: 12/2008
APPR BY: EW
61
Chapter
2
USING PERIODIZATION FOR THE
FIRST TIME
TOOL BAR
PERIODIZATION MENU
FORM: iMETT Manual
REV: 12/2008
APPR BY: EW
62
The periodization program can be opened by double clicking on the icon on your desktop.
If the dongle is not placed in the USB port, the warning message bellow will appear:
Tool Bar
1. Prescription
NEW: Open a new prescription.
OPEN: Open an old prescription.
SAVE: Save a new prescription to the database.
CLOSE: Close a prescription, returning to the beginning.
PRINTING CONFIGURATION: Configure the printing of prescription.
PRINT: Print the prescription.
EXIT: Close the program.
2. Configuration
Note: Configuration is critical prior to the first exercise prescription.
Edit fields to represent facility / trainer information. To insert or change the logo, click on the
indicated key. Delete the current logo by clicking on CLEAR LOGO. Click OK to save. Click
CANCEL to ignore changes. Logo must be in bitmap format and no larger than 600x900.
FORM: iMETT Manual
REV: 12/2008
APPR BY: EW
63
TRAINING ZONES
NOTE: Any changes in the training zones during program use will automatically be calculated
in the previous prescriptions issued. Note: The minimum percentage has to always be less
than the heart rate maximum.
To configure the number of training zones, click on the field NUMBER OF ZONES and
choose the desired number.
Creating new training zones:
•
Click on the field linked to the percentage and type the new values.
•
Click on the heart rate field and select one of the four options. To save, click OK. To
exit, click CANCEL.
FORM: iMETT Manual
REV: 12/2008
APPR BY: EW
64
SETTING THE SYSTEM
To change the bar colors and font, click on the field indicated
then save by clicking once
on the key OK. This is also where you can make a change to the language, if desired.
1. HELP – Program information, Serial Number, Version and Copyright.
NOTE: The serial number listed is the same as on the dongle. This number is required for all
upgrades, changes and additional software options.
FORM: iMETT Manual
REV: 12/2008
APPR BY: EW
65
Periodization Menu
Start
By clicking on this icon you may choose to start a new
prescription or edit an existing prescription.
Session
This button will display a list of daily exercises that have been
prescribed. The values can be organized as once daily (shown below) or more frequently if
desired.
Microcycles
This icon will display a list of sessions based on options
assembled in the last 1-2 months.
Mesocycles / Macrocycles
The mesocycles button will display a list of sessions registered in
the last 1-2 months, while the macrocycles are those assembled in the last eight (8) months
or less.
FORM: iMETT Manual
REV: 12/2008
APPR BY: EW
66
Chapter
3
PRESCRIBING EXERCISE
FORM: iMETT Manual
REV: 12/2008
APPR BY: EW
67
Click NEW PROGRAM PRESCRIPTION to begin a new exercise prescription.
The form SELECT SUBJECT will open. Click NEW SUBJECT to add a new subject.
Insert data for the new subject into the proper fields. Click on SAVE to save or CANCEL to
exit.
Click on SAVE & NEW PRESCRIPTION. A form for the data for the new prescription will
appear. In the field SUBJECT NAME enter the client’s name. In the field SYSTEM USER
choose the name of the trainer prescribing the exercise. If the name is not in the system
library, click on the
icon and insert a new name.
Click NEW to type the subject data.
FORM: iMETT Manual
REV: 12/2008
APPR BY: EW
68
Type the required information and Click OK to save, to cancel click CANCEL.
On the tool bar, select the client’s preferred workout days. The system will then automatically
prescribe exercises for the days chosen.
Click on NEW VT ASSESSMENT to open the date of the evaluation.
The message below will appear suggesting the actual date. Click OK to proceed.
Type in the necessary data from the test performed on the subject (this information will
automatically be generated from the Galileo software if an iMETT test was run).
FORM: iMETT Manual
REV: 12/2008
APPR BY: EW
69
If the subject is not listed click the
to insert a new subject and proceed.
Insert the subject’s goal then click OK to proceed. To cancel, click CANCEL. This will bring
you back to the NEW SUBJECT window. If you wish to add more subjects, do so here.
After data is entered and the goal is selected, click on QUICK REFERENCE.
Upon selecting QUICK REFERENCE, the agenda window will open. Based on the data
entered for the subject, a program will be recommended from the following categories: LOW
CARDIO PROGRAM, MEDIUM CARDIO PROGRAM, HIGH CARDIO PROGRAM and
RECOVERY PROGRAM. Click on OK to proceed with prescription or CANCEL.
FORM: iMETT Manual
REV: 12/2008
APPR BY: EW
70
To select the workout days, click on the date that you wish to begin your program. The
program will distribute the sessions based on the days indicated by the subject. Each type of
session will be represented by colors.
If a workout is generated on a day of the week other than the days previously indicated by the
subject, a warning message will appear indicating this was not a previous preference. To
proceed and arrange a workout on that day, click OK. To cancel this action click CANCEL.
FORM: iMETT Manual
REV: 12/2008
APPR BY: EW
71
To obtain the specific details on any of the selected WORKOUT PLANS, double click the
chosen day. This will provide you with a detailed description of the session intensity based on
the information from the test. Each column represents the number of intervals in the session.
The top of the column indicates the recommended heart rate range during that interval. This
is determined by test results. To return to the overall summary, click on OK.
To review the data, click on VIEW VT ASSESSMENT DATA.
FORM: iMETT Manual
REV: 12/2008
APPR BY: EW
72
Chapter
4
EDITING AND PRINTING
EDITING SUBJECT DATA
EDITING A PRESCRIPTION
PRINTING
FORM: iMETT Manual
REV: 12/2008
APPR BY: EW
73
Click on EDIT EXISTING PROGRAM to edit an existing prescription.
Editing Subject Data
To edit subject data already in the database, select from the list of subject names and click
on EDIT DATA.
Type the new information into the proper fields and click on the SAVE icon. If you want to
save this information and move into a new prescription, click SAVE & NEW PRESCRIPTION.
To delete a subject, select the name from the list and click on DELETE SUBJECT. A
message will pop up to confirm or cancel the request.
Editing a Prescription
In order to edit an existing prescription, select it from the list and click EDIT DATA.
Enter desired information.
FORM: iMETT Manual
REV: 12/2008
APPR BY: EW
74
To edit or delete a user from the library, click in the icon
and select the name you wish to
delete. To edit the data, click on EDIT. To delete click on DELETE.
If you choose EDIT, the operator window will appear. Type in the new information and press
OK.
In order to insert a new prescription, choose the NEW EVALUATION icon.
To exclude an evaluation, click on the icon DELETE. This will automatically delete the
highlighted evaluation.
To delete or edit a goal from the system library, click on the icon
and select NEW, EDIT or
DELETE.
If you choose EDIT, the GOALS LIBRARY MAINTENANCE window will open. Type a new
goal and click on OK to confirm or CANCEL to ignore.
If you choose DELETE, a confirmation window will open to confirm or cancel your decision.
FORM: iMETT Manual
REV: 12/2008
APPR BY: EW
75
INSERTING A SESSION MANUALLY
To insert a session manually, click on a session on the left side of the menu and drag to the
desired date.
PRESCRIBING SESSIONS ON THE SAME DATE
An exercise can be prescribed more than once on the same date. If you would like to do so,
click on the session and drag it into the desired date. The WORKOUT INSERT window will
appear to give you options to proceed.
FORM: iMETT Manual
REV: 12/2008
APPR BY: EW
76
DELETING A SESSION
To delete a session, right click on the desired date and select DELETE.
If there is more than one session on the same date, follow the same procedure after choosing
which you want to delete.
Printing
Upon choosing PRINT from the menu bar, the window below will open. From this window you
can configure the printing of the document.
The user can now choose the desired forms to be printed. Select each form by clicking on the
box on the left side. Click on the PRINT icon to print or CANCEL to ignore.
FORM: iMETT Manual
REV: 12/2008
APPR BY: EW
77
TYPES OF PRINTING
PRESCRIPTION DATA
TRAINING ZONES
SCHEDULED WORKOUTS
Printing one session per page
FORM: iMETT Manual
REV: 12/2008
APPR BY: EW
78
Printing more than one session per page:
Note: Sessions can also be printed in business card format. In this format, the same options
are available (1-10 workouts per page.)
CARD FORM
PLANNER
FORM: iMETT Manual
REV: 12/2008
APPR BY: EW
79
Section 3:
Supporting Documents
FORM: iMETT Manual
REV: 12/2008
APPR BY: EW
80
Chapter
1
OUT OF INDEX ERROR
FORM: iMETT Manual
REV: 12/2008
APPR BY: EW
81
Out of Index Error
This is usually caused by the software not being shut down properly or because of a power
surge. The software has a built-in repair system to correct this error in just a few minutes.
STEPS TO REPAIR OUT OF INDEX PROBLEM:
1. Back-up data base (this should be done weekly or after a large group of tests
performed in one day).
a. Close all programs so you are back at the Windows screen.
b. Select start.
c. Select all programs.
d. Select iMETT Galileo.
e. Select Backup.
f. Select the create backup button.
i. It will create a new file based on the date.
ii. You can then save this new file onto a CD or keep it on your desktop.
iii. To recover a file, select the Backup recovery tab and select the dated file
you would like.
FORM: iMETT Manual
REV: 12/2008
APPR BY: EW
82
2. Repair
a. Close all programs so you are back at the Windows screen.
b. Select start.
c. Select All Programs.
d. Select iMETT Galileo.
e. Select Reparador (repair).
f. On the right side of the screen, select each button one at a time (each will take
only a few seconds)
i. Verify Table
ii. Repair Table
iii. Reconstruct indices
iv. Reconstruct table
1. This will repair the out of index error and should say “error
message 17”
2. If the software freezes on this button, close the screen by clicking
on the red “X” in the right top corner. The repair is complete.
v. Compact table
3. To recover a file, select the backup recovery tab and select the dated file you would
like.
a. Make sure to select the last backup without the error in it (it may be the
previous date).
FORM: iMETT Manual
REV: 12/2008
APPR BY: EW
83
Chapter
2
QUESTIONS AND ANSWERS
FORM: iMETT Manual
REV: 12/2008
APPR BY: EW
84
iMETT User’s Questions and Answers
If you have questions that are not answered here,
contact Paul Robbins:
Fax: 480.449.9200
Email: [email protected]
1. How do you determine the client’s “best protocol” speed?
The “best protocol” speed is a comfortable running or walking speed for the client. The goal of the
test is to determine a speed they can handle comfortably. The incline should be what pushes them
to their AT to peak.
2. Regarding the mask, what, if any, breathing instruction do you offer?
The client should not focus on their breathing and should breathe as they normally do when
working out.
3. Do you suggest tightening the chin or cheek straps first on the mask?
Tighten the cheek strap first.
4. Is it possible to get masks with longer tubing?
No. The masks are a set length to insure the flow volume is correct.
5. Is it possible to get smaller head pieces?
At this time, there is only one size available. On younger athletes, the straps can be tucked
underneath the headpiece for a better fit.
6. Is there a reference point to share with clients regarding their fitness ranking? In other
words, clients are asking if they are “average”, then wondering what numbers would
qualify them as “above average” (numbers for VO2 and HR peak)?
See chart for VO2 found in Offline Stress Test section of this manual. There is no reference for HR
(other than 220 – age). The main reason for this test is to determine true HR zones because there
are no set formulas. Everyone is different.
7. A pop-up box appears and reads “This subject has one or more exercise prescriptions.
Do you want to add this VT assessment to the last one? If you answer “no” a new
exercise prescription will be started and the VT assessment will be added to it”. What
does this mean?
This comes up every time you open the periodization software . Answering yes enables you to add
to your current program.
FORM: iMETT Manual
REV: 12/2008
APPR BY: EW
85
8. Why is it that sometimes the blue vertical line and the dot are automatically present and
correct, while other times present but not correct?
The software is designed to get close to identifying AT, but no software is 100% accurate. You
always have the last read and you can select AT manually by moving the line.
9. How do I utilize the training zone tab?
Currently this is just to show trainers how to design additional HR zones. It doesn’t work with the
programs since we only use 3 zones. Some clients do the testing and provide their own 4-5 zone
programs.
10. How often do you recommend retesting and how often do you find yourself “tweaking”
the workouts with drag and drop?
Retesting is recommended for new clients 4-6 weeks after initial testing and active clients every
4-6 months. You should change the workout programs every 4-6 weeks.
11. What are your thoughts for a client that wants their workout harder?
The QF will give them the best program to start. Trainers can then modify the program for the
client’s personal needs.
12. Do you charge for adjusting workouts?
Yes, I charge it as a personal training session.
13. Do you charge the initial workout separately from the test, or do you roll it into the
initial test expense?
I recommend you create a cardiovascular personal training package which included the test.
14. With athletes, do I go to their Borg’s 8-9, even if they aren’t there yet on the scale, but
their heart has sub maxed, or do I go into recovery with them (for example: new clients,
when heart rate has reached sub max)?
With athletes, take them until they want to stop (8-9 minutes). Don’t worry about the % HR, as that
is just an estimate (220-age). The goal is to determine their individual HR’s.
15. Does recovery (ex. prescription) always give a 6 day series and low cardio a 9 day
series?
Yes, they are set progressions to get the client to the next level.
16. As I understand it, anaerobic threshold (AT) and lactate threshold (LT) are, by
definition, two separate points of intensity within an athlete’s training range. However, I
read trade / online journals and training programs where these two terms are used
interchangeably. AT is measured through oxygen analysis (VO2) and LT is measured
with blood analysis (finger prick). How can these two be the “same” when measured
VO2 at AT is sub maximal and LT occurs at max or near max output?
FORM: iMETT Manual
REV: 12/2008
APPR BY: EW
86
Most people that use LT also get a submax, so they are trying to get close to AT. Based on the
references I have read, LT comes just before AT and when designing training zones, they can be
used the same way.
17. All of the programming I do is centered around AT and the other information derived
from CC test data. How much, if any, should be based on LT?
Because AT is so close to LT and most fitness facilities stay away from blood testing, use AT.
18. Does interval training that brings an athlete above AT only benefit the PEAK ranges of
VO2? Or is there relative benefit to the lower ranges that involve fat burning?
The goal is to increase both the AT and peak zones with this type of training. If we move the AT
up, fat burning moves up as well.
19. If an athlete’s tests are average or good in VO2 ranges and training protocols indicate
medium cardio workouts hovering around AT, what is the expected length of “base
building” that must occur in terms of number of workouts or weeks in a program to
achieve an increase in these scores?
4-6 weeks of base building.
20. The overriding (and overwhelming) factors that bring these questions are a direct
reflection of having to adjust the mindset of lowering intensity to achieve greater
results. At the same time, the mind sometimes gets in the way of reason as perceived
exertion levels will make an athlete want to go harder and further, when that
accomplishment will not bring them to their goal. What have you found to be the most
compelling argument to drive this point across to your athletes?
On their hard interval days, they should be pushed to the limit. They then look forward to the next
day which is recovery. Just like weight training, they have to overload and the recovery phase is
the most important.
21. Is there a resource available that ranks heart rate recovery as poor / fair / average /
good / excellent based on percent of return to resting HR within 2 minutes? Clients
want to know if their heart rate recovery is “good”.
This is based on how fast they return to aerobic zone (yellow zone):
o Excellent – drop more than 15% below AT (this is the low end of yellow zone)
o Good – drop 14% - 5% below AT (this is the top of the yellow zone)
o Poor – if they don’t return to yellow zone.
22. I have a client who wants to know why the majority of her prescribed workout is above
her anaerobic threshold.
If you are using the 3 day rotation from the Quick Reference (yellow, green and red days), then
they are not doing the majority of their work above AT. They have one whole day in yellow and
then a high percentage of the other days have yellow for warm-up, recovery between intervals,
and cool down in yellow as well. Don’t just look at one day, look at the whole progression.
The reason that we do have intervals above AT is to burn calories and increase cardiovascular
strength.
FORM: iMETT Manual
REV: 12/2008
APPR BY: EW
87
23. I was running a test and the VE wasn’t showing up. The green line stayed along the
bottom of the chart.
This means there is something in the line, possibly water. Try to pump it out or just whip the line
around and it should clear it. Make sure the hoses are always up during the test to avoid water in
them.
24. How do I back up the data?
From Windows, open ALL PROGRAMS and select Galileo. There will be an option to backup. You
can backup on the hard drive or onto a CD by selecting CREATE BACKUP. I suggest doing this
once a month.
25. What do I do if there was no AT picked?
If no AT was selected, go to the VO2 off screen. Create an AT line by clicking about ¾ of the way
during the test in the “SEL” column, on the far right side. This will create a blue line on the “chart”
screen for you to make any adjustments needed.
26. No HR. Any suggestions on what the issue might be? The receiver is literally right up
next to the treadmill, so only about 12” from the monitor on the client. Can there be
interference issues with the receiver in the treadmill (even though they are both
Polar®)?
First, make sure the cable is plugged into the unit and the Polar® receiver is plugged into the end
of the cable. The interference is sometimes from the treadmill itself. When you lose the HR, try
holding it behind the client. You may have to move it around to find the best spot. Also, make sure
there are no cell phones nearby. As a backup, you can use a HR watch. On the data page (VO2
off icon) you can override the HR and type in the correct one or add a recovery HR. This way you
can always create a program and printout. Also check to see if the heart rate strap is on tight and
is working correctly.
27. How do you convert from mph to km/h? Can we do this without changing all of the
protocols?
You will need to create new protocols or, if you are only using km/l, change the speed and rename
them. To change to km/h, go to configuration – environment – stress test – then highlight mph
under speed and a drop down arrow will appear. You can then change that to km/h. Finally,
rename it.
28. What are the criteria before running a test? How much rest, exercise or activity can be
done prior to a test, how much should they eat? What should they eat or drink, etc.?
No hard workouts 24 hours before the test is recommended the legs should be as fresh as
possible). No drinks that will increase the heart rate before the test.
29. If I have a test where the HR and VE have a matching increase, then 2 minutes later you
have just a VE increase, which spike do you choose?
FORM: iMETT Manual
REV: 12/2008
APPR BY: EW
88
The rule is the last sharp rise is the VE. If there are two close to one another; choose the one with
the lower HR. You are creating HR zones, so the second will fall into this zone and that way you
are not over-training with too high of a zone.
30. Once a person turns anaerobic, can they turn back to aerobic during the same
workout? The person’s heart rate may come back down to the yellow zone, but what
happens metabolically with them?
Metabolically, no. It takes time to get back to an aerobic state. The yellow zone is designed for
recovery to get the most out of the intervals. But on a recovery day you will stay in the aerobic
zone / system throughout the complete workout.
31. If someone is doing a long run and staying within their yellow zone for say 140 minutes
of a 160 minute run, but runs faster their last 20 minutes increasing their heart rate into
the green zone, have they lost the intended benefit of the long run within the yellow
zone?
No , it’s a great way to do training. The work in the aerobic zone builds a base and strong
endurance, then the overload, will build more cardiovascular strength with the last 20 minutes.
32. When it says repeat the 5 minutes of work and recover, is the yellow zone (cool down)
the recovery?
Yes, the 5 minutes is their active recovery (yellow) before starting the interval again. It could be
called cool down or recovery. Both mean you will do the active recovery before starting the work
phase again. You don’t need to repeat the warm-up.
33. Can I modify the notes section if I wanted to put my own notes in it?
Not at this time, however there is space to hand write notes once it is printed out.
34. Can the iMETT do BMR?
No. the flow is not set up that low.
35. Is there a written summary / printout of the results of the VO2 test?
Yes. On the main screen (Galileo) you will see a print icon. Open that and on the last line there
are options for printing. I suggest the “results” under periodization (lower right box). It will match up
with the periodization software. You can also get the charts and :30 data by selecting graphs and
records.
36. On the printout for the VO2, the page that shows the time, speed, etc., is the green line
(VT), or the exertion peak the person’s VO2?
Green is AT, red is peak and yellow recovery. After you perform the test, you can send the data to
periodization right from Galileo. From there, go to the print screen and print the workouts in card
form as well as the planner.
37. What should I be giving my clients to take home?
FORM: iMETT Manual
REV: 12/2008
APPR BY: EW
89
I suggest the workouts in “card form” for 4 weeks (6 weeks in some programs). You can also give
them the report form from the Galileo under periodization “results”.
38. What is their actual VO2 score? Is it the VO2 max attained (ml/kg/min) or is it the VO2,
VT? What is the difference?
You get both scores. The VT (same as AT) is where they turn anaerobic and the higher VO2 is
their peak, or the end of the test, whichever comes first. The fitness score will tell them if they are
poor, average or good based on age and gender.
39. What is the difference in VO2 from taking a max test and sub max test?
Max is complete failure. Peak is a submax that gives a HR they can perform intervals at. Not many
clients will want to do a true max. The submax peak will give you all the data you need to create a
workout program.
40. Are there articles and manuals I can read to help understand the whole program?
There are two cardio DVD’s available through NASM that will help. One on general cardiovascular
fitness and another on sport specific. Go to NASM.org.
41. If someone is deconditioned and has not done cardio in a long time with the exception
of maybe jogging for 20 minutes, 1 time every 2 months, what type of protocol would
you put them on? Would walking 4.0 mph be appropriate?
Yes, start with a 3 or 4 mph walk.
42. Do you have additional workout programs? I remember you had mentioned a triathlon
program and a program for firefighters, but I don’t have them in my Periodization
software.
All the workouts for triathletes and firefighters are in the program, but you just have to put them in
the order you want. There are too many options for triathletes based on weakness, level, and
goals so it has been very hard to write them in the program. You should create their progression
based on their goals, cardio strength, leg strength, recovery and endurance. The basic training
program has a good mix of all of these (the firefighters program was created with high
cardiovascular and leg strength). More workouts will be available on the NASM website this fall.
43. How do I order the iMETT marketing package?
Call WOODWAY directly at 1.800.WOODWAY (966.3929).
44. What is the difference between “low rehab” and “high rehab” in the periodization
program? Are they meant for fit vs. unfit people or are they meant to be the initial
program (low) and advanced programs as (high)?
Low is for someone that is just coming off rehab and starting off slowly, high is the next level.
Once they complete these they can go on to any of the other goals.
45. If someone normally does incline walking or elliptical work can they also benefit from
this test? It’s not just for runners, right?
FORM: iMETT Manual
REV: 12/2008
APPR BY: EW
90
Yes, there are walking and cycle protocols. When they are on the treadmill, just get them to a
comfortable speed and use incline to push them.
46. Can you explain the percent peak to VO2 value? What does this mean and what if a
beginner scores at 91%?
If the VO2 is low then the % doesn’t mean much. It shows that they peak out too soon after AT. In
this case, it shows that the client could have a good base but once they are pushed they fatigue
quickly.
47. After I perform the assessment what should I be going over with the client?
Go over the test scores but spend most of your time on the program and where their HR should
be.
48. Sometimes the program gives them a low cardio program, which lasts only 2 weeks.
Can I give them a 6 week program and if so which workouts do I insert into the dates?
You can drag any workout over after the computer gives you the first one. When you go to print,
you select the start date and end date so you can choose the period of weeks the program should
run.
49. The error “out of bounds” is showing, what does this mean?
It means the date is off. The first thing is to back up the data, from windows. Open ALL
PROGRAMS and select Galileo. There will be an option to “backup”, you can backup on the hard
drive or onto a CD by selecting create backup. I suggest doing this once a month.
Then go back to programs and find Galileo again. This time select repair, choose ALL
DATABASE, then REPAIR TABLE. Restart the software and it should be back on line. If you lost
any data then just restore it form the backup.
50. How do I get the iMETT to work on Vista?
Open Control Panel, and type in "UAC" into the search box. You'll see a link for "Turn User
Account Control (UAC) on or off":
FORM: iMETT Manual
REV: 12/2008
APPR BY: EW
91
On the next screen you should uncheck the box for "Use User Account Control (UAC)", and then
click on the OK button. You will need to reboot your computer before the changes take effect.
FORM: iMETT Manual
REV: 12/2008
APPR BY: EW
92
Chapter
3
PROGRAM EXPLANATION
FORM: iMETT Manual
REV: 12/2008
APPR BY: EW
93
iMETT Program Explanation
Workouts - all progressions are made up of a three day rotation; Recovery, Medium, and
Interval. There are a variety of workouts under each heading to allow you create your own
progression or substitute for a current workout.
Interval programs – will have 3-5 minutes of work followed by recovery periods. You will
repeat the work to rest as many times as the clients has time for that day. You do not have to
set a time- it’s based on what they can do and what they have time for.
• Recovery - These are workouts designed to keep the client in a recovery zone for
long periods. Used every third day for recovery.
• Medium - The goal of medium intensity is to spend time around AT
• Interval - The goal of these workouts is to push the client to the next level. It will work
on the energy system that is needed for this client base on the time at every interval.
Fitness Goals
Microcycles – These are three workouts put together (Rec, Med, Int)
•
•
•
•
•
•
•
•
•
Base Training - The goal of this progression is to create a good cardio base for the
client before going into the sport specific progression. The base training will have the
client work on recovery, cardio strength and leg strength.
Soccer - The goal of this progression is to work the energy systems needed for
soccer. This can be used for pre season or through the season. Starts with cardio
strength of 1 minute intervals and works to circuits of :05 and :07 sprints.
Basketball - The goal of this progression is to work the energy systems needed for
basketball. This can be used for pre season or through the season. Uses a lot of
circuits with :15 and :05 sprints.
Hockey - The goal of this progression is to work the energy systems needed for
hockey forwards and defensemen. This can be used for pre season. Works on leg
strength and :45 sprints. During the season it best to use the basic training - time is
based on ice time during games.
Runner Cardio - the goal of this running progression is to help the client increase AT
by training close to peak during longer intervals.
Cyclist Cardio - the goal of this bike progression is to help the client increase AT by
training close to peak during longer intervals.
Runner Leg - the goal of this running progression is to help the client build leg
strength for climbing hills.
Cyclist Leg - the goal of this bike progression is to help the client build leg strength for
climbing hills.
Football Skill - The goal of this progression is to work the energy systems needed for
football skill players. This can be used for pre season or through the season. Mainly
circuits from :05 to :15.
FORM: iMETT Manual
REV: 12/2008
APPR BY: EW
94
•
•
•
•
•
•
•
•
•
•
•
•
•
•
•
•
Football Line - The goal of this progression is to work the energy systems needed for
football lineman. This can be used for pre season or through the season. Short circuits
with :05 sprints.
Tennis - The goal of this progression is to work the energy systems needed for tennis.
This can be used for pre season or through the season. Circuits of :05 and :07 sprints
and leg strength
Golf - The goal of this progression is to work the energy systems needed for golf. This
can be used for pre season or through the season. Combination of recovery, leg
strength and cardio programs to keep the client balanced throughout the season.
Baseball Field - The goal of this progression is to work the energy systems needed
for a baseball player- mainly a fielder. This can be used for pre season or through the
season. Cardio Strength using :30 and 1:00 sprints with leg strength.
Baseball Pitcher - The goal of this progression is to work the energy systems needed
for baseball pitcher. This can be used for pre season or through the season. :05 and
:15 sprints with leg strength.
Hockey Goalie - The goal of this progression is to work the energy systems needed
for hockey goalie. This can be used for pre season or through the season. :05 and :15
sprints and leg strength.
5K run - This progression is designed to help client increase leg strength, improve AT
and cardio strength to better prepare for a 5 K run. Not designed for a beginnerdesigned for a 5K run to improve.
10K run - This progression is designed to help client increase leg strength, improve
AT and cardio strength to better prepare for a 10 K run. Not designed for a beginnerdesigned for a 10K run to improve. The interval are longer than the 5K
Obesity - this is very slow progression to get the client to build a good cardio base
before introducing intervals. The goal is for weight loss on low impact equipment.
Plateau - This progression has a variety of workouts to push the client above their
comfort zone and break over any plateau. Great progression for anyone that needs a
change from the base routine. The goal is to use a variety of equipment as well.
During Pregnancy - this program is designed for any client that knows her AT zones
before starting. The progression will just give her variety without pushing to peak.
Post Pregnancy - this is a slow progression to get the client back into cardio training
slowly.
Weight Loss - This progression has a lot of variety. The goal is to get the client to
increase their metabolism by over loading and calorie burning without burning out.
Weight Gain - This progression is designed to be short- 10-15 minutes long total.
They will promote cardio strength increases without burning too many calories.
Rehab Low - This progression is designed for someone that is just starting back for an
injury but has training in the past. They should still have a good cardio base but we
have to build up time in the first two zones first.
Rehab Med - the next progression after low rehab. If the client is now ready to get
back to the level they were before the injury- this progression has time still in the first
two zones but will also ramp them up with hard cardio intervals.
FORM: iMETT Manual
REV: 12/2008
APPR BY: EW
95
Mesocycles- this would be a series of Microcycles put together in a complete rotation.
Macrocycles- no programs designed at this time.
How to put progressions together - there are 100s of ways to set the progressions up. It all
depends on the client’s goals and fitness level.
The progressions work together by slow ramping the workouts up during the progression.
When you start the next progression it will start with easy workouts again and slowly over
load. This will make sure the client doesn’t hit a plateau. They will be pushed to their limits at
the end of a progression and naturally start again with an unload. You could also add a
complete one week unload (all yellow zone 1) between progressions.
Basic- For a beginner they should do the low cardio (or low recovery), then medium cardio
and then high cardio. From there you can go into in fitness goal.
After medium or high cardio – general club member- try doing a goal to improve leg
strength. This will help in over all cross training on different pieces of equipment. The goal is
to make the client strong on every type of equipment (bike, stair machine, etc…) so they can
get cardio benefits without burning out the legs. After the leg strength you can repeat high
cardio and then work on another goal. You could also just keep repeating cardio and leg
strength.
Sports- The after the “quick reference” if you have time you can go into the basic training.
This will give a good mixture of all workouts to prepare the client for any sport. Just before
their season you can pick their sport specific progression.
Weight loss- Start with the quick reference then add the weight loss progression for long
term progression. This can be repeated many times.
Change of pace- Sometimes client’s just want a change in the program. You can put any of
the sports progressions together to give your client variety. Look at the sprint intervals to
decide if your client would like it. The goal is to keep the client coming back for more- all the
programs will aid in cardio improvements and weight loss.
FORM: iMETT Manual
REV: 12/2008
APPR BY: EW
96
Chapter
4
SOFTWARE UPGRADES
FORM: iMETT Manual
REV: 12/2008
APPR BY: EW
97
How to Upgrade Galileo Software
First create a backup of your present database by creating a folder in My Documents.
1. Click on START and go to My Computer
2. Open your computer’s hard drive this is typically your Local Disk C Drive
3. Open Program Files (C:\Program Files)
4. In the Program Files folder, open the folder named FitStation (C:\Program Files\FitStation)
5. In the FITSTATION Folder, there is a folder named Data, right click the mouse and Copy
the Data folder
6. Now open your computer’s My Documents folder and right click your mouse and Paste the
Date file. Now you have backed up your old Galileo database. This folder will be used after
the new Galileo Software is installed.
Next delete your old Galileo Software
1. Click on START and go to Control Panel
2. Click on Add and Remove Programs
3. Locate Galileo, highlight it and delete it
Now you are ready to install Galileo Version 2.0.2.231
1. Insert the Galileo Version 2.0.2.231 CD ROM into your computer, the program will start
automatically.
2. Follow the wizard to complete the installation.
To use files from your old database follow these steps
1. Click on START and go to My Computer
2. Open your computer’s hard drive this is typically your Local Disk C Drive
3. Open Program Files (C:\Program Files)
4. In the Program Files folder, open the folder named FitStation (C:\Program Files\FitStation)
FORM: iMETT Manual
REV: 12/2008
APPR BY: EW
98
5. In the FITSTATION Folder, there is a folder named Data, open it
6. In the new Data folder you’ll find two files, Sensores.PX and Sensores.DB
7. Highlight both click you mouse to Copy them.
8. Go to My Documents and open your old Data folder, right click and Paste the files into the
folder of the backed up database.
9. Now Copy the entire back-up Data folder in My Documents
Now you are ready to remove the new database generated by the upgraded Galileo
version 2.0.2.231 and replace with your backup.
1. Click on START and go to My Computer
2. Open your computer’s hard drive this is typically your Local Disk C Drive
3. Open Program Files (C:\Program Files)
4. In the Program Files folder, open the folder named FitStation (C:\Program Files\FitStation)
5. In the FitStation Folder, delete the folder named Data
6. Now right click and Paste the back-up data folder (from My Documents) into the FitStation
Folder (where you just deleted it)
Now that you have upgraded your Galileo Software, you must re-load your
Periodization Software so that it recognizes the updates. Your updated Galileo
Program will now use all of your existing data files.
FORM: iMETT Manual
REV: 12/2008
APPR BY: EW
99
800-WOODWAY ( 9 6 6 - 3 9 2 9 )
FORM: iMETT Manual
REV: 12/2008
APPR BY: EW
100