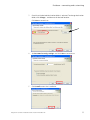
1
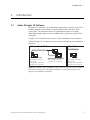
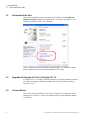
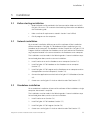
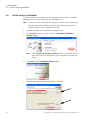
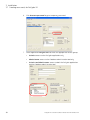
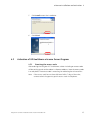
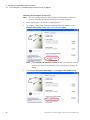
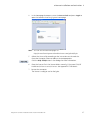
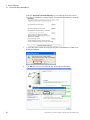
GE Healthcare
DeCyder 2D Software
Version 7.0
Installation Guide
Contents
1
Introduction
1.1
1.2
1.3
1.4
2
About DeCyder 2D Software ........................................................... 5
Documentation files ......................................................................... 6
Upgrade of Decyder 2D 6.5 to DeCyder 2D 7.0 ........................... 6
Uninstallation .................................................................................... 6
Installation preparation and requirements
2.1
2.2
2.3
Computer requirements .................................................................. 7
Recommendations for free space on the computer ................... 8
Computer settings ............................................................................ 8
2.3.1 Administrator rights.......................................................................................8
2.3.2 Regional settings.............................................................................................9
2.3.3 System properties and hard drive settings ...................................... 10
3
Installation
3.1
3.2
3.3
3.4
3.5
3.6
3.7
4
Before starting installation ...........................................................11
Network installation .......................................................................11
Standalone installation ..................................................................11
Oracle server installation ..............................................................12
DeCyder 2D 7.0 Database installation ........................................14
DeCyder 2D Program installation ................................................15
Creating new user(s) for DeCyder 2D ..........................................18
eLicense installation and activation
4.1
4.2
4.3
Preparations ....................................................................................23
Installation of GE Healthcare eLicense Server Program .........24
Activation of GE Healthcare eLicense Server Program ...........25
4.3.1 Receiving the access code ....................................................................... 25
4.4
5
Unavailable eLicense .....................................................................28
Uninstallation
5.1
Uninstallation procedure ..............................................................29
DeCyder 2D Software Installation Guide 28-9414-48 Edition AA
3
Appendix A Database - connecting and customizing
A.1
A.2
Connect the application terminal to the database ................31
Customizing the database ..........................................................32
Appendix B Licensing Server administration - for advanced
users
B.1
B.2
B.3
B.4
4
Open the tool .................................................................................35
View the Host-ID of the computer .............................................35
View configuration settings ........................................................36
Change license configuration .....................................................38
DeCyder 2D 6.5 Software Installation Guide 28-4010-08 AC
Introduction 1
1
1.1
Introduction
About DeCyder 2D Software
DeCyder™ 2D Software is an automated image analysis software suite which
enables detection, quantification, matching and analysis of Ettan™ DIGE
system gels. The two-dimensional (2D) electrophoresis gels are used for
separating complex protein mixtures labelled with up to three CyDye™ DIGE
Fluor dyes.
DeCyder 2D 7.0 Software works with an Oracle™ database where all data is
stored. DeCyder 2D 7.0 Software can be used in a network or on a standalone
computer.
Network installation
Database server
Application terminals
The installation includes:
- Oracle 10g
- DeCyder 2D 7.0 Database
- DeCyder 2D 7.0 Program
The installation includes:
- DeCyder 2D 7.0 Program
Standalone
installation
The installation includes:
- Oracle 10g
- DeCyder 2D 7.0 Database
- DeCyder 2D 7.0 Program
Figure 1-1. Installation types. Installation of XML format descriptions, Pick list, MS Data is
included in the DeCyder 2D 7.0 Program installation. Tutorial data is included in the
DeCyder 2D 7.0 Database installation.
DeCyder 2D Software Installation Guide 28-9414-48 Edition AA
5
1 Introduction
1.2 Documentation files
1.2
Documentation files
Pdf-versions of different documentation are available in the DeCyder 2D
Software Installer dialog, which opens after inserting the DeCyder 2D 7.0
Software installation DVD in the computer.
There is also a button for download of Adobe Reader. This software enables
access to pdf-files and can be downloaded free of charge.
1.3
Upgrade of Decyder 2D 6.5 to DeCyder 2D 7.0
If DeCyder 2D 6.5 is already installed, backup the DeCyder database and then
uninstall the complete software package (see Section 5) before installing
DeCyder 2D 7.0.
1.4
Uninstallation
To uninstall selected modules or the entire DeCyder 2D 7.0 Software from a
computer, see Section 5. Make sure to backup the DeCyder database before
uninstalling.
6
DeCyder 2D Software Installation Guide 28-9414-48 Edition AA
Installation preparation and requirements 2
2
Installation preparation and requirements
Check that the following requirements are fulfilled before starting the DeCyder
2D installation:
2.1
•
Computer requirements (Section 2.1)
•
Computer free space recommendations (Section 2.2)
•
Computer settings (Section 2.3)
Computer requirements
•
Operating System:
Windows Vista Business (x86), Service Pack1, English Language, or
Windows XP Professional (x86), Service Pack 3, English Language, or
Windows Server 2008 Enterprise, Service Pack 1, English Language
Note: The screen dumps may differ from the appearance with Windows
Vista.
•
Internet Explorer™ version 5.5 or higher must be installed to run the
XMLToolbox module
•
At least 2 GB RAM
•
The computer must have a dual layer DVD reader
•
Set the virtual memory so that the total amount of available memory,
including physical RAM, is at least 2.5 GB
•
Minimal free space on local hard drive for an Application terminal is 3 GB
•
Minimal free space on local hard drive for Database server and Standalone
computer is 30 GB
•
Video card capable of 32 bit color
•
The video card driver needs to support Open GL™ (v 1.2 or later)
- ensure that the latest compatible driver is installed
•
Set the color resolution of the PC to 32 bit color
DeCyder 2D Software Installation Guide 28-9414-48 Edition AA
7
2 Installation preparation and requirements
2.2 Recommendations for free space on the computer
2.2
Recommendations for free space on the computer
Type of computer Recommendations
Database Server
C drive: at least 10 GB free space for DeCyder 2D 7.0
Software.
D drive: at least 60 GB free space for Oracle database server
and data.
E drive: at least 50 GB for backup, export and raw images.
Standalone
C drive: at least 10 GB free space for DeCyder 2D 7.0
computer
Software.
D drive: at least 60 GB free space for Oracle database server
and data.
E drive: at least 50 GB for backup, export and raw images.
Application terminal C drive: at least 10 GB for DeCyder 2D 7.0 Software.
Note: Avoid running other programs with high memory requirements at the
same time as DeCyder 2D.
2.3
Computer settings
2.3.1
Administrator rights
Before installing, check that you have full administrator rights on your
computer.
1
8
Select Start:Control Panel:User Accounts.
DeCyder 2D Software Installation Guide 28-9414-48 Edition AA
Installation preparation and requirements 2
2
Check that the account name that you used for log in is marked as
Administrators in the Group column.
Note: Omitting this step can have major consequences later when
installing DeCyder 2D database. If you are not an administrator, you
will not be able to register essential files properly and installation will
fail, forcing you to uninstall the complete DeCyder 2D Software
package.
2.3.2
Regional settings
The regional settings must be US English to ensure that the number, date and
time formats are correct.
Note: You may use other keyboard layouts than the US English keyboard
layout.
1
Select Start:Control Panel:Regional and Language Options.
2
In the Regional Options tab select English (United States) in the dropdown
list and click OK.
DeCyder 2D Software Installation Guide 28-9414-48 Edition AA
9
2 Installation preparation and requirements
2.3 Computer settings
2.3.3
System properties and hard drive settings
1
Select Start:Control Panel:System.
2
Select the General tab in the System Properties dialog.
3
Check that the computer has at least:
•
Windows Vista Business (x86), Service Pack1, English Language, or
Windows XP Professional (x86), Service Pack 3, English Language, or
Windows Server 2008 Enterprise, Service Pack 1, English Language
•
Pentium 4 CPU 1.5 GHz
•
2 GB (2048 MB) of RAM
If the computer does not fulfill these criteria, use another computer which
does or upgrade the computer.
4
10
If desired, change the name of the computer before starting the installation:
Select Computer Name tab, change computer name and click Apply.
DeCyder 2D Software Installation Guide 28-9414-48 Edition AA
Installation 3
3
3.1
3.2
Installation
Before starting installation
•
Read the Read-me file provided in the Documentation folder on the DVD
DeCyder 2D version 7.0. It contains late-breaking information not added to
the installation guide.
•
Make sure that all requirements stated in Section 2 are fulfilled.
•
Exit all programs on the computer.
Network installation
For a network installation, different parts of the software will be installed on
different computers. DeCyder 2D 7.0 database will be installed only on the
Database server computer. The database includes Tutorial files. DeCyder 2D 7.0
Program shall be installed on the Database server itself and can be installed on
any computer located in the same network as the Database server computer.
The installation must be made in the following order. If some installation steps
have already been done, continue to next installation.
3.3
1
Install Oracle server on the Database server computer (Section 3.4).
2
Install DeCyder 2D 7.0 Database on the Database server computer
(Section 3.5).
3
Install DeCyder 2D 7.0 Program on the Database server computer and on
the application terminal computer(s) (Section 3.6).
4
Connect the application terminals to the DeCyder 2D 7.0 Database (Section
A.1).
5
Create users to DeCyder 2D via User Administration Tool (Section 3.7).
Standalone installation
For a standalone installation, all parts of the software will be installed on a single
computer. No network is required.
The installation must be made in the following order. If some installation steps
have already been done, continue to next installation.
1
Install Oracle server (Section 3.4).
2
Install DeCyder 2D 7.0 Database (Section 3.5).
3
Install DeCyder 2D 7.0 Program (Section 3.6).
4
Create users to DeCyder 2D via User Administration Tool (Section 3.7).
DeCyder 2D Software Installation Guide 28-9414-48 Edition AA
11
3 Installation
3.4 Oracle server installation
3.4
Oracle server installation
Install the Oracle Server software on the computer that will work as network
database server or on the computer for standalone use.
Note: If earlier versions of DeCyder 2D Software have been uninstalled, check
that the Oracle folder (default location D:\Oracle) has been removed
before starting the new installation of Oracle.
1
Insert the DeCyder 2D 7.0 Software Installation DVD.
2
Click Install DeCyder 2D Oracle Server in the DeCyder 2D Software
Installer dialog.
Note: If the DeCyder 2D Software Installer dialog is not opened, browse
to the root of the DVD and double-click on setup.exe to display the
dialog.
12
3
Click Next > in the InstallShield Wizard dialog.
4
Check that the desired destination folder is selected.
DeCyder 2D Software Installation Guide 28-9414-48 Edition AA
Installation 3
•
To change destination folder, click Change... and browse for a new
destination folder.
•
Click Details... to get information of available disk space on the
currently selected volume.
Click Next >.
5
Click Install to start the installation.
During the installation the status window indicate progress.
The installation may take 30 minutes.
6
If there is a firewall installed in the computer, click Unblock (or similar if
another dialog is opened) to allow installation.
7
Click Finish to complete the installation.
DeCyder 2D Software Installation Guide 28-9414-48 Edition AA
13
3 Installation
3.5 DeCyder 2D 7.0 Database installation
3.5
DeCyder 2D 7.0 Database installation
Install the DeCyder 2D 7.0 Database on the computer that will work as a
network database server or on the computer for standalone use.
This installation package will create a DeCyder 2D 7.0 Database and install the
Database Administration Tool.
1
If not already inserted, insert the DeCyder 2D 7.0 Software Installation DVD.
2
Click Install DeCyder 2D 7.0 Database in the DeCyder 2D Installer dialog.
Note: If the DeCyder 2D Software Installer dialog is not opened, browse
to the root of the DVD and double-click on setup.exe to display the
dialog.
3
Click Next > in the InstallShield Wizard dialog.
4
Click Next >..
For advanced users it is possible to customize database settings, see
section A.2 for a description.
14
DeCyder 2D Software Installation Guide 28-9414-48 Edition AA
Installation 3
5
Click Install to start the installation.
During the installation the status window indicate progress.
The installation may take 30 minutes.
6
3.6
Click Finish to complete the installation.
DeCyder 2D Program installation
Install DeCyder 2D 7.0 Program on the computer(s).
During installation Microsoft.NET Framework v 1.1 will be installed, if not already
installed. When installing DeCyder 2D Program on a computer that will work as
a network application terminal, an Oracle client installation will automatically
be done.
1
If not already inserted, insert the DeCyder 2D Software Installation DVD.
DeCyder 2D Software Installation Guide 28-9414-48 Edition AA
15
3 Installation
3.6 DeCyder 2D Program installation
2
Click Install DeCyder 2D 7.0 Program in the DeCyder 2D Software Installer
dialog.
Note: If the DeCyder 2D Installer dialog is not opened, browse to the root
of the DVD and double-click on setup.exe to display the dialog.
3
Click Next > in the InstallShield Wizard dialog.
4
Carefully read the License Agreement.
Accept the stated license terms by ticking I accept the terms in the license
agreement.
Click Next > to continue.
16
DeCyder 2D Software Installation Guide 28-9414-48 Edition AA
Installation 3
5
Check that the desired destination folder is selected.
•
To change destination folder, click Change... and browse for a new
destination folder.
•
Click Details... to get information of available disk space on currently
selected volume.
Click Next >.
6
Click Install to start the installation.
During the installation, the status window indicate progress. The
installation will take some time.
7
During installation on a network computer, enter the DeCyder 2D server
computer name in the dialog below and click Next.
DeCyder 2D Software Installation Guide 28-9414-48 Edition AA
17
3 Installation
3.7 Creating new user(s) for DeCyder 2D
8
Click Finish to complete the installation.
9
Restart the computer when prompted.
10 If you have more than one database server, continue with section A.1.
3.7
Creating new user(s) for DeCyder 2D
Before using DeCyder 2D, you have to create a user.
1
Click the Start User Administration Tool button in the DeCyder 2D
Software Installer dialog.
2
Carefully read the license agreement.
Click Yes to accept the license agreement.
Note: To be able to create users for network installation, the database must
be installed.
For network installation: If the DEFAULT_ADMIN username or
password has been changed from the default settings, the updated
settings are needed to login.
18
DeCyder 2D Software Installation Guide 28-9414-48 Edition AA
Installation 3
3
Click Login to login using the default admin user.
4
Click New.
5
Enter login name, full name and, if desired, additional information and click
OK.
DeCyder 2D Software Installation Guide 28-9414-48 Edition AA
19
3 Installation
3.7 Creating new user(s) for DeCyder 2D
20
6
Click Generate password to get a temporary password.
7
Select application DeCyder 2D and check the appropriate Access groups.
•
Scientist: access to the DeCyder application only
•
Administrator: access to the Database administration tool only
•
Scientist and Administrator: access to both the DeCyder application
and the Database administration tool
DeCyder 2D Software Installation Guide 28-9414-48 Edition AA
Installation 3
8
For users that shall be able to add and remove users etc, select application
User Administration Tool and check User Administrator.
9
Copy the password (normally including several special characters) before
continuing, to make it easy to login to DeCyder 2D the first time. You will
have to change password at the first login.
Note: By default, the password expires after 90 days, the account is locked
after 3 login attempts with incorrect password (and can only be
opened again by a User Administrator).
10 Finish by clicking OK and close the dialog.
TIP! Add an extra user with unlimited access and without password expiry.
Note: To have a secure DeCyder installation, change the password for
DEFAULT_ADMIN.
DeCyder 2D Software Installation Guide 28-9414-48 Edition AA
21
3 Installation
3.7 Creating new user(s) for DeCyder 2D
22
DeCyder 2D Software Installation Guide 28-9414-48 Edition AA
eLicense installation and activation 4
4
eLicense installation and activation
DeCyder 2D require an electronic license (eLicense).
A concurrent license (also called floating license) is used for DeCyder 2D. This
license can be used by all computers connected via network to a computer
running a license server. This type of license is useful when many users, but not
all at the same time, need access to DeCyder. The number of computers that
simultaneously can use DeCyder depends on the license. The license(s) is
administered via the license server.
The license server can be installed on any computer in the network, but the
license file must be placed on the computer running the license server. All
computers running a DeCyder 2D program must be connected on the same
network as the computer that you install the eLicense server program on.
To activate DeCyder 2D, you must install the eLicense server program, receive
the access code, collect and place the license file on the computer running the
license server program, and launch DeCyder 2D.
4.1
Preparations
If you have a fire wall activated on your computer, specific ports need to be
open to allow for eLicense communication between the eLicense server and the
computers running DeCyder 2D. For more information, see the ReadMe-file.
DeCyder 2D Software Installation Guide 28-9414-48 Edition AA
23
4 eLicense installation and activation
4.2 Installation of GE Healthcare eLicense Server Program
4.2
Installation of GE Healthcare eLicense Server Program
•
If you previously have installed a GE Healthcare Software Licensing Server
on a computer on your network, continue from Section 4.3.1.
•
If the licensing server is not installed, follow the instructions below.
1
Insert the DeCyder 2D Software installation DVD.
2
Click Install Software License Server in the DeCyder 2D Installer dialog.
Note: If the DeCyder 2D Software Installer dialog is not opened, browse
to the root of the DVD and double-click on setup.exe to display the
dialog.
24
3
Click Next in the Installation Wizard dialog.
4
Click Next to accept the default destination folder.
DeCyder 2D Software Installation Guide 28-9414-48 Edition AA
eLicense installation and activation 4
4.3
5
Click Install to start the installation.
6
Click Finish.
Activation of GE Healthcare eLicense Server Program
4.3.1
Receiving the access code
After ordering the DeCyder 2D 7.0 Software, a letter including an access code
will be sent by courier to the orderer’s shipment address. Store the access code
in a safe place. The access code is necessary for collecting the eLicense files.
Note: If the access code has not been delivered within 7 days of the order,
contact technical support to get the access code via telephone.
DeCyder 2D Software Installation Guide 28-9414-48 Edition AA
25
4 eLicense installation and activation
4.3 Activation of GE Healthcare eLicense Server Program
Collecting and saving an eLicense file
Note: You can use any computer with contact to the internet to collect the
eLicense file and then transfer the file to the correct computer.
1
Insert the DeCyder 2D Software installation DVD.
2
To simplify in later steps, mark the Computer Ethernet Address in the
DeCyder 2D Installer dialog, right-click and select Copy.
Note: If the DeCyder 2D Software Installer dialog is not opened, browse
to the root of the DVD and double-click on setup.exe to display the
dialog.
3
26
Click License Activation Homepage in the DeCyder 2D Installer dialog.
DeCyder 2D Software Installation Guide 28-9414-48 Edition AA
eLicense installation and activation 4
4
In the homepage that opens, enter the Access Code and press Login to
open the Software Licensing System home page.
Note: You can also find the homepage via
http://www.elicensing.amershambiosciences.com/gtlweb/login
5
Collect the License file according to the instructions on the web site.
Paste the Computer Ethernet Address where appropriate.
Click the Help & FAQ button in the dialogs for more information.
6
Place the license file in the license folder, normally C:\Program Files\GE
Healthcare\eLicense server\Licenses. See Appendix B.3 for details.
7
Restart the computer.
The license is ready to use for DeCyder.
DeCyder 2D Software Installation Guide 28-9414-48 Edition AA
27
4 eLicense installation and activation
4.4 Unavailable eLicense
4.4
28
Unavailable eLicense
1
If the requested eLicense is not available when you open DeCyder 2D 7.0
Program, the DeCyder License Manager dialog is displayed.
2
Enter the License Server Host Name (the computer name for the eLicense
server in your network) and click Start DeCyder.
3
Once the eLicense file is found, the DeCyder 2D 7.0 Program will start,
displaying the license agreement.
DeCyder 2D Software Installation Guide 28-9414-48 Edition AA
Uninstallation 5
5
Uninstallation
It is possible to uninstall the entire or selected parts of DeCyder 2D 7.0 Software.
Versions 6.0 and 6.5 of DeCyder 2D Software can also be uninstalled using the
below procedure.
Note: If the DeCyder 2D Oracle Server or DeCyder 2D 7.0 Database is
uninstalled from the Database server computer, it will not be possible to
use DeCyder 2D Software on the application terminals.
5.1
Uninstallation procedure
Before starting uninstallation of software, it is essential to perform backup of
the DeCyder 2D Database. See the DeCyder 2D Software, version 7.0, User
Manual for information on how to perform backups.
1
Shut down all programs.
2
Insert the DeCyder 2D Software installation DVD.
3
Click the Uninstallation tab in the DeCyder 2D Software Installation
dialog.
Note: If the DeCyder 2D Software Installer dialog is not opened, browse
to the root of the DVD and double-click on setup.exe to display the
dialog.
4
Remember to perform a backup before continuing!
To uninstall all or a specific module, click the corresponding check box(es)
DeCyder 2D Software Installation Guide 28-9414-48 Edition AA
29
5 Uninstallation
5.1 Uninstallation procedure
and click Uninstall selected software. By uninstalling the Oracle Server,
DeCyder 2D Database is automatically uninstalled and all data is removed.
30
5
If uninstalling the Oracle server or the DeCyder 2D Database, click Yes in the
dialog that appear.
6
Click OK to finish the uninstallation by restarting the computer.
DeCyder 2D Software Installation Guide 28-9414-48 Edition AA
Database - connecting and customizing
Appendix A
A.1
Database - connecting and customizing
Connect the application terminal to the database
If you have more than one database server, each application terminal must be
connected to the correct network computer with the DeCyder database.
1
To connect the application terminal (client) to the database, find the file
tnsnamnes.ora on the application terminal. The default location is
D:\oracle\product\10.2.0\db_1\NETWORK\ADMIN\tnsnames.ora
2
Add the following rows to the file for each new database that the
application terminal will use.
DECYDER =
(DESCRIPTION =
(ADDRESS = (PROTOCOL = TCP)(HOST = COMPUTERNAME)(PORT = 1521))
(CONNECT_DATA =
(SERVER = DEDICATED)
(SERVICE_NAME = DECYDER)
)
)
3
Replace DECYDER with your own alias. This alias will be shown in the login
dialog when selecting database.
4
Replace COMPUTERNAME to the name of the database computer. IP
address can also be used if the IP address is static.
5
Save the file.
DeCyder 2D Software Installation Guide 28-9414-48 Edition AA
31
ADatabase - connecting and customizing
A.2Customizing the database
A.2
Customizing the database
For advanced users, it is possible to customize database settings. This
instruction continue from step 4 in 3.5, page 14.
32
1
Tick Advanced setup type and click Next >.
2
Enter a database system identifier (SID), maximum 8 alphanumerical and
click Next >.
DeCyder 2D Software Installation Guide 28-9414-48 Edition AA
Database - connecting and customizing
3
Check that the desired destination folder is selected. To change destination
folder, click Change... and browse for desired location.
Click Next > to continue.
4
Set Password security settings: and click Next > to continue.
5
Click Install to start the installation.
DeCyder 2D Software Installation Guide 28-9414-48 Edition AA
33
ADatabase - connecting and customizing
A.2Customizing the database
34
DeCyder 2D Software Installation Guide 28-9414-48 Edition AA
Licensing Server administration - for advanced users
Appendix B
Licensing Server administration - for
advanced users
GE Healthcare Software Licensing Server tools (LMTOOLS) is a dialog for the
advanced user, containing information and tools for the e-license server
program. The most useful tabs are System Setting, Config Services,
Start/Stop/Reread and Server Status.
Note: Using LMTOOLS to control the license server is covered in detail in the
Macrovision Licensing End User Manual.
B.1
Open the tool
Open the LMTOOLS utility by locating the folder where the license
server installation is stored, and double-click lmtools.exe.
LMTOOLS opens.
B.2
View the Host-ID of the computer
The Host-ID, also called Ethernet MAC address, identifies the computer and is
used to activate the eLicense.
1
Click the System Settings tab.
2
The Host-ID is displayed in the Ethernet Address text box.
DeCyder 2D Software Installation Guide 28-9414-48 Edition AA
35
BLicensing Server administration - for advanced users
B.3View configuration settings
B.3
View configuration settings
1
Click the Config Services tab to display the configuration of the eLicense
server.
2
The configuration displayed below should be used for DeCyder 2D
Software.
The field Path to the license file is the directory where the floating license
file should be placed. The default directory for floating license files is
C:\Program Files\GE Healthcare\eLicense Server\Licenses. Do not change
the default path.
By default Use Services is selected, to run the license server as a Windows®
Service. By default Start Service at Power Up is also selected, to
automatically start the license server when the machine boots.
36
3
Click Save Service even if you made no changes in step 2.
4
Select the Start/Stop/Reread tab to control the license manager.
Information about the license file is displayed at the bottom of the dialog:
DeCyder 2D Software Installation Guide 28-9414-48 Edition AA
Licensing Server administration - for advanced users
5
Click the Reread License File button to update the license file information.
Then, it displays Reread Server License File Completed.
6
To confirm that the License Server is operating with the selected license,
select the Server Status tab and press the Perform Status Enquiry button.
Then scroll to the bottom of the text box. The information given here will
confirm that the License has been accepted and the License Server is
operable.
7
Select File:Exit.
DeCyder 2D Software Installation Guide 28-9414-48 Edition AA
37
BLicensing Server administration - for advanced users
B.4Change license configuration
B.4
Change license configuration
If the set of licenses needs to be changed on an e-license server that is already
installed and in operation, perform the following steps:
38
1
Make sure that all licenses offered by the e-license
server are checked in. All e-license server users must
have returned their license to the server, that is,
closed their program windows. Control this by opening the Server Status
tab. Press the Perform Status Enquiry button. Then scroll to the bottom of
the text box. The information given here will confirm that no license is in use.
2
Click the Start/Stop/Reread tab and stop the e-license
server by pressing the Stop Server button.
3
Update the set of licenses that should be used by the e-license server, for
example, if a new license shall be added, copy it to the folder where the
current set of e-licenses resides, by default
C:\Program Files\GE Healthcare\eLicense Server\Licenses. Please observe
that all licenses in this folder must be valid and have the same vendor
name, in our case, gehealth.
4
In the LMTOOLS Start/Stop/Reread tab, press the Start
server button to restart the e-license server.
5
To confirm that the new set of licenses has been
accepted and are available as expected, select the
Server Status tab and press the Perform Status
Enquiry button. Then scroll to the bottom of the text box. The information
given here will confirm that the License has been accepted and the License
Server is operable, see the screen dump in step 1.
6
Select File:Exit.
DeCyder 2D Software Installation Guide 28-9414-48 Edition AA
For contact information for your local
office, please visit
www.gelifesciences.com/contact
GE, imagination at work and GE monogram are trademarks of General
Electric Company.
CyDye, DeCyder and Ettan are trademarks of GE Healthcare companies.
All third party trademarks are the property of their respecive owners.
GE Healthcare Bio-Sciences AB
Björkgatan 30
751 84 Uppsala
Sweden
www.gelifesciences.com/decyder
DeCyder includes an Oracle® 10g database. Copyright © 1995 – 2007
Oracle Corporation. All rights reserved.
Third Party Credit statements:
Oracle is a registered trademark of Oracle Corporation and/or its affiliates.
This product includes the Xerces XML parser. Copyright © 2000 The Apache
Software Foundation, http://www.apache.org . All rights reserved.
This product includes parts developed using ITK, Copyright © 1999-2003
Insight Software Consortium, for licensing information see,
http://www.itk.org
Parts of this product implement the libTiff library, Copyright © 1988-1997
Sam Leffler, Copyright © 1991-1997 Silicon Graphics, Inc,
http://www.libtiff.org
Parts of this product include NMath components from CenterSpace
Software LLC, Copyright © 2002-2008. All rights reserved.
http://www.centerspace.net
Parts of this product include components from Farpoint Technologies, Inc.
Copyright © 1991-2007. All rights reserved. http://www.fpoint.com
Parts of this product include the TeeChart component from Steema
Software SL. Copyright © 1995-2008. All rights reserved.
http://www.teechart.com
Parts of this product include the open source MD5 implementation by L.
Deutsch. Copyright © 1999, 2000, 2002 Aladdin Enterprises. All rights
reserved.
Parts of this product include Cool Scrollbar Library. Copyright © 2001 J.
Brown.
CyDye: 2-D Fluorescence Difference Gel Electrophoresis (2-D DIGE)
technology is covered by US patent numbers US6,043,025, US6,048,982,
US6,127,134, and US6,426,190 and foreign equivalents and exclusively
licensed from Carnegie Mellon University.
CyDye: This product or portions thereof is manufactured under license from
Carnegie Mellon University under US patent number US5,268,846 and other
patents pending.
The purchase of CyDye fluors includes a limited license to use the CyDye
fluors for internal research and development, but not for any commercial
purposes. A license to use the CyDye fluors for commercial purposes is
subject to a separate license agreement with GE Healthcare.
© 2008 General Electric Company—All rights reserved.
All goods and services are sold subject to the terms and conditions of sale
of the company within GE Healthcare which supplies them. A copy of these
terms and conditions is available on request. Contact your local GE
Healthcare representative for the most current information.
GE Healthcare UK Ltd
Amersham Place, Little Chalfont, Buckinghamshire, HP7 9NA, UK
GE Healthcare Bio-Sciences Corp
800 Centennial Avenue, P.O. Box 1327, Piscataway, NJ 08855-1327, USA
GE Healthcare Europe GmbH
Munzinger Strasse 5, D-79111 Freiburg, Germany
GE Healthcare Bio-Sciences KK
Sanken Bldg. 3-25-1, Hyakunincho, Shinjuku-ku, Tokyo 169-0073, Japan
imagination at work
28-9414-48 AA 10/2008