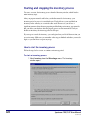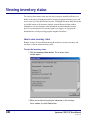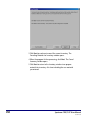
1
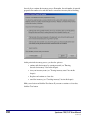
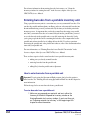
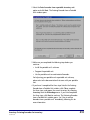
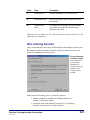
Inventory
7
Understanding inventory........................................................ 420
Preparing materials for inventory .......................................... 424
Entering barcodes for inventory............................................. 431
Overriding a material's inventory status................................. 443
Printing inventory reports ...................................................... 445
Viewing inventory status ........................................................ 448
Canceling inventory ................................................................ 449
Finalizing inventory ................................................................ 451
419
SCC5um1200tb
Understanding inventory
You inventory your materials to determine which materials in your collection may be lost
and which materials are available for circulation. This information is found by comparing
the items you want to inventory (preparing for inventory) and the items that actually are
entered into inventory (entering barcodes). You can also print a variety of reports so you
know the inventory status of prepared materials and the progress of the inventory process.
Spectrum’s inventory process is a wizard—which is a process that guides you through
each step of a multistep operation using a series of windows. For information about the
inventory windows, see "Understanding the inventory windows" in the Inventory chapter
of the Spectrum CIRC/CAT Reference Manual.
Back up your data
We recommend that you back up your entire database before you begin the inventory
process. See "Backing up Spectrum data" in the Backup chapter of this manual for more
information.
Allow enough time
Several steps in the inventory process can tie up your computer for some time depending
on the speed of your computer and how many materials you're inventorying. While it is
not a necessity, you may want to inventory your materials during a slow period or when
your library is closed to patrons. If you don't have enough time to complete a process,
you can close the Inventory part of the program and begin where you left off at a later
time. See "Stopping and starting the inventory process" later in this chapter for more
information.
Steps in the inventory process
The process of performing an inventory consists of several steps. Some of the steps in the
Inventory window are not available all the time—this depends on whether you have
previously completed one or more of the other inventory steps. In other words, the
available steps depend on which inventory processes you have already completed for the
current inventory period. For example, if you haven’t prepared materials for inventory,
then you cannot enter materials or override their status. Likewise, if you quit (not cancel)
420
Spectrum CIRC/CAT User Manual
SCC5um1200tb
the inventory process after completing the preparation step, the succeeding steps are
activated the next time you access inventory.
The following is the recommended order of steps for completing inventory:
1. Prepare the materials for inventory.
2. Enter materials or override their status.
3. Print reports before finalizing.
4. Finalize the inventory.
5. Print reports after finalizing.
For more on each of these five main inventory steps, see the corresponding sections later
in this chapter or the Inventory chapter in the Spectrum CIRC/CAT Reference Manual.
Step
Description
Preparing materials
You must specify which materials to inventory. Preparing
materials opens a current inventory period.
Entering barcodes
You must enter the barcode number of each material you want
to inventory. When you enter a barcode number, you inform
the program that the material exists. During this process, you
can override the status of any material, such as marking a
material lost.
Printing reports
You can print most inventory reports at any time during an
inventory, but some are most useful at a specific time in the
process (for example, before and after finalizing the
inventory).
Finalizing inventory
After you enter all the material barcodes that you want to
inventory, you can finalize the inventory. This closes the
current inventory period. If there are any material barcodes that
weren't entered, they are marked as lost during finalization.
At any time during the inventory period, you can view the status of or cancel the current
inventory. You view the inventory status by clicking the Inventory Status button in any
inventory window. You cancel an inventory by clicking the Cancel button. You should
cancel only if you don't want to complete the inventory you started. When you cancel,
materials are no longer prepared or entered for inventory. You have to start the inventory
process from the beginning if you cancel the current inventory.
Inventory: Understanding inventory
SCC5um1200tb
421
Starting and stopping the inventory process
You start, or restart, the inventory process from the Inventory window, which lists the
main inventory steps.
After you prepare materials and before you finalize materials for inventory, your
inventory period or process is considered open. You don't have to start and finish an
inventory on the same day or even in the same week. However, if you do have a
significant amount of time between preparing and finalizing an inventory, any materials
that you add to your database after the prepare process are not inventoried. Until you
finalize an inventory, the inventory period is still open.
If you stop, not cancel, the inventory, you can begin where you left off the next time you
access inventory. Make sure you remember what step you finished and where you need to
begin, so you don't have to repeat any steps.
How to start the inventory process
Follow the steps below to start or continue an inventory period.
To start an inventory process
1 Select Inventory from the Winnebago menu. The Inventory
window opens.
422
Spectrum CIRC/CAT User Manual
SCC5um1200tb
2 Select Step 1: Prepare materials for inventory and click Next.
See "Preparing materials for inventory" later in this chapter to
continue the inventory process.
To continue an inventory process that you already started
1 Select Inventory from the Winnebago menu. The Inventory
window opens.
2 Select the step that's next in your current inventory process and
click Next.
See the corresponding section in this chapter that relates to the step you need to perform
to continue the inventory process.
Inventory: Understanding inventory
SCC5um1200tb
423
Preparing materials for inventory
Before you can accurately inventory your material collection, you have to choose which
materials to include in the inventory. You do this when you prepare your materials for
inventory. This process may take a while to complete and should not be interrupted.
Make sure you allow enough time for it.
Important! You can prepare materials for inventory while your patrons search the catalog
as long as you prepare using a different client computer.
The program must prepare all the materials that you want to inventory, but you don’t
have to inventory all the materials in your collection. You can specify whether you want
to inventory all or only a portion of your materials. You may want to inventory only a
portion of your collection to make inventory more manageable. For example, rather than
inventorying your whole collection at once, you could inventory your fiction materials,
then your reference materials, and so on. When you finish entering barcodes for one
section of materials, finalize that inventory session, print reports for it, and then start
inventorying the next section of materials.
Note: Any materials prepared but not entered are marked as lost when you finalize your
inventory.
For preparing inventory reference information, see "About the inventory preparation
windows" in the Inventory chapter of the Spectrum CIRC/CAT Reference Manual.
Preparing your entire material collection
By preparing your entire collection, you inventory all of the materials in your material
database. Be aware that the preparing process may require a lot of time, depending on the
size of your collection. For a rough estimate, it takes approximately a half-hour to prepare
a standard library collection of 15,000 records (it may take longer depending on the speed
of your computer). Before you start this process, you should make backups of all the files
in your Spectrum Server folder.
How to prepare your entire material collection
Follow the steps below to prepare your entire material collection for inventory.
424
Spectrum CIRC/CAT User Manual
SCC5um1200tb
To prepare your entire collection
1 Choose Inventory from the Winnebago menu. The Inventory
window opens.
2 Select Step 1: Prepare the materials for inventory and click
Next to continue. The Prepare Materials for Inventory window
opens.
3 Select Prepare the entire collection and click Next. The
Prepare the Entire Collection window opens.
4 Click Next to begin preparing materials.
The Preparing Materials for Inventory progress window opens,
and the preparing process starts. While the program prepares
records, a progress bar and a running count of the total
number of materials prepared are displayed.
5 When the preparing process is complete, click Next. The
Summary of Materials Prepared for Inventory window opens.
See "After preparing materials for inventory" later in this section for information on what
to do after preparing for inventory.
Inventory: Preparing materials for inventory
SCC5um1200tb
425
Preparing a range of materials for inventory
You can inventory a portion of your material collection by specifying a range of materials
for the program to prepare. You can use call numbers, material types, or both to specify
which materials to prepare. If you set up both call number and material type ranges,
materials must meet both of these conditions in order to be prepared for an inventory
period. This means a material’s call number must be within the range you designate, and
it must be one of the material types you specify.
You need to specify at least one material type if you choose to prepare materials by call
number range. If you specify a range by call number without specifying a material type,
no records will be prepared.
How to prepare a range of materials using call numbers
Example scenario: You decided you only have time to prepare materials that fall within
the call numbers 001.6 BAK and M1299. S9.
To prepare materials within a range of call numbers
1 Choose Inventory from the Winnebago menu. The Inventory
window opens.
2 Select the Step 1: Prepare the materials for inventory option
and click Next to continue. The Prepare Materials for Inventory
window opens.
3 Select the Prepare a range of materials option and click Next
to continue. The Prepare Materials Within a Range of Call
Numbers window opens.
426
Spectrum CIRC/CAT User Manual
SCC5um1200tb
4 Select the Prepare materials within a range of call numbers
option.
5 Enter 001.6 BAK in the Prepare call numbers from box
6 Enter M1299. S9 in the to box. The numbers that fall between
the lowest and highest call numbers make up the range of
materials that are prepared for inventory.
7 Click Next. The Prepare Materials by Material Type window
opens.
From this point, you can:
• continue to prepare a range of materials to inventory by specifying the
material types (see "How to prepare a range of materials using
material types" directly after this topic). You must specify at least one
material type. If you only want to prepare materials by call number
range and not filter the selection any further, choose all material types
by clicking the All button in the Prepare Materials by Material Type
window.
• discontinue the inventory (if you click the Close button, none of your
materials are prepared, and because you haven't prepared any
materials, the inventory process is not open).
Inventory: Preparing materials for inventory
SCC5um1200tb
427
How to prepare a range of materials using material types
You should choose this option only if you are confident that your materials are assigned
to the appropriate type. We recommend that you print a report listing all the materials
assigned to the material type called Default. The best report that lists this information is
the Materials report indexed by material type—make sure it's not the "short form" report
(see the Reports chapter in the Spectrum CIRC/CAT user and reference manuals for more
information). If you have any materials in this category, you should assign these
materials to an existing type or create a new one to assign them to. If you have materials
assigned to the Default type and then prepare materials by a specific material type, some
materials may not be prepared and then marked as lost later.
Important! If you only want to prepare materials by call number range and not filter the
selection any further, choose all material types by clicking the All button.
Note: In order to select a material type from the list you need to click the box in front of
the type’s description. If the box is checked, the item is selected. To select all the
available material types, click the All button. To deselect all of the available material
types, click the None button.
Example scenario: You only want to prepare materials that are assigned to either the
Fiction or Reference material type.
To prepare materials by material type
1 Choose Inventory from the Winnebago menu. The Inventory
window opens.
2 Select the Step 1: Prepare the materials for inventory option
and click Next to continue. The Prepare Materials for Inventory
window opens.
3 Select the Prepare a range of materials option and click Next
to continue. The Prepare Materials Within a Range of Call
Numbers window opens.
4 Decide if you want to define a range of materials to inventory
by specifying call numbers. See "How to prepare a range of
materials using call numbers" directly before this topic for more
information.
If you don't want to define a range using call numbers, click
Next to continue. The Prepare Materials by Material Type
window opens.
428
Spectrum CIRC/CAT User Manual
SCC5um1200tb
5 Click the None button to deselect all of the material types (by
default all of the material types are selected).
6 In the material types list, click the box next to the Fiction and
Reference material types.
7 Click Next to begin preparing the range of materials you
selected.
The Preparing Materials for Inventory progress window opens,
and the preparing process starts. While the program prepares
records, a progress bar and a running count of the total
number of materials prepared are displayed.
8 When the preparing process is complete, click Next. The
Summary of Materials Prepared for Inventory window opens.
See "After preparing materials for inventory" later in this section for information on what
to do after preparing for inventory.
After preparing materials for inventory
After the program prepares the materials for inventory, it opens the Summary of
Materials Prepared for Inventory window. This window lists the total number of
materials prepared for inventory and gives you three options for entering material
Inventory: Preparing materials for inventory
SCC5um1200tb
429
barcodes if you continue the inventory process. Remember, the total number of materials
prepared is the number of records that must be entered into inventory before finalizing.
At this point in the inventory process, you have the option to:
• continue with the inventory by entering materials (see "Entering
barcodes for inventory" later in this chapter).
• view your inventory status (see "Viewing inventory status" later in this
chapter).
• Stop here and continue at a later date
• cancel the inventory (see "Canceling inventory" later in this chapter).
Make your selection and click the Next button. If you want to continue at a later date,
click the Close button.
430
Spectrum CIRC/CAT User Manual
SCC5um1200tb
Entering barcodes for inventory
After you prepare your materials, you can begin entering the material barcode numbers.
Entering a barcode verifies that the material exists in your collection. The program stores
the material barcodes you enter.
Entering barcodes for inventory does not mean the same thing as scanning barcodes for
inventory. By the time you are to this point in the inventory process, you should have
already scanned your barcodes, either using a portable inventory unit or a Personal
Digital Assistant (or PDA) unit with the Palm operating system. Be aware that scanning
barcodes may require a lot of time, depending on the size of your collection. For quick
reference, it takes four people approximately two days to scan a library collection of
25,000 records. It may take longer depending on the speed of your computer, setup time,
method used, and experience levels. If you don't have a portable inventory unit or a PDA
unit to scan barcodes, you can record barcodes for inventory using a barcode reader or
your computer's keyboard.
Entering barcodes is the process of taking the barcodes you've scanned and transferring
them to the computer where you're performing inventory. You can choose to enter
barcodes immediately after preparing your materials for inventory by choosing how you
want to enter your barcodes from the Summary of Materials Prepared for Inventory
window. Or, if you stopped the inventory process after preparing your materials, you can
start the inventory process again and access this step through the main Inventory window.
Note: Materials currently checked out are automatically entered into the current
inventory. You can print a list of these materials by generating the Materials Entered by
Circulation report.
Spectrum CIRC/CAT offers you three options for entering barcodes:
• using a portable inventory unit
• using a barcode reader or keyboard
• from a text file
Note: If you are using the Spectrum-in-Hand program, see "Entering barcodes using
Spectrum-in-Hand" later in this chapter for more information.
You can use any or all of the methods above to enter your material barcodes. For
instance, you could enter some barcode numbers at the keyboard, and enter some barcode
numbers from a portable barcode reader.
Inventory: Entering barcodes for inventory
SCC5um1200tb
431
For reference information about entering barcodes for inventory, see "About the
inventory windows for entering barcodes" in the Inventory chapter of the Spectrum
CIRC/CAT Reference Manual.
Entering barcodes from a portable inventory unit
Using a portable inventory unit is a convenient way to scan your material barcodes. You
can take the portable unit throughout your library and scan or key material barcodes into
the unit without having to move your materials. By the time you reach this point in the
inventory process, it's important that you already scanned barcodes using your portable
unit. Once your material barcodes are scanned or keyed into the portable unit, you need
to save the barcodes in the portable unit to a text file (retrieving the barcodes). Lastly,
you're going to upload the text file containing the barcodes to the computer that has the
portable unit software installed on it (adding the barcode file). If you have questions
about using the portable unit or the portable unit software, refer to the documentation that
came with your portable unit.
For more information, see "Entering Barcodes from a Portable Unit window" in the
Inventory chapter of the Spectrum CIRC/CAT Reference Manual.
There are three steps involved to enter barcodes from a portable inventory unit:
• making sure you already scanned barcodes
• retrieving barcodes from the portable unit
• adding file(s) from the portable unit to Spectrum
How to enter barcodes from a portable unit
Important! If you're using the Spectrum-in-Hand program, don't select this option to
enter barcodes. See "Entering barcodes using Spectrum-in-Hand" later in this chapter for
more information.
Follow the steps below to enter barcodes from a portable unit.
To enter barcodes from a portable unit
1 Make sure you prepared your materials and are in either the
Summary of Materials Prepared for Inventory window or the
Entering Barcodes for Inventory window. If you're not there yet,
see "Preparing materials for inventory" at the beginning of this
chapter for more information.
432
Spectrum CIRC/CAT User Manual
SCC5um1200tb
2 Select the Enter barcodes from a portable inventory unit
option and click Next. The Entering Barcodes from a Portable
Unit window opens.
3 Make sure you completed the following steps before you
continue:
• Install the portable unit’s software.
• Program the portable unit.
• Use the portable unit to wand material barcodes.
For help using your portable unit or portable unit software,
please refer to the documentation that came with your portable
unit.
4 If you haven’t completed the three steps listed in the Entering
Barcode from a Portable Unit window, click Close, complete
the three steps, and reopen the current inventory by choosing
Inventory from the Winnebago menu. If you have completed
the three steps, click Next to continue. The Retrieving Barcodes
from a Portable Unit window opens. See "How to retrieve
barcodes from a portable unit" immediately following this for
more information.
Inventory: Entering barcodes for inventory
SCC5um1200tb
433
How to retrieve barcodes from a portable unit
You must choose the proper communications port (COM port) and model in order for
your portable inventory software to be able to properly connect and retrieve the barcodes.
If you don’t know the proper model of your unit, check the manual that came with the
portable unit. Some models may not be included in the Model box. If you don’t see your
model listed, contact technical support.
For reference information about each element in the window, see "Retrieving Barcodes
from a Portable Unit window" in the Inventory chapter of the Spectrum CIRC/CAT
Reference Manual.
Follow the steps below to retrieve barcodes from a portable unit.
To retrieve barcodes from a portable inventory unit
1 Make sure you are in the Retrieving Barcodes from a Portable
Unit window. If you're not there yet, see "How to enter
barcodes from a portable unit" immediately before this section
for more information.
2 In the Retrieving Barcodes from a Portable Unit window, select
your portable unit from the Model box and, if applicable, the
correct COM port.
434
Spectrum CIRC/CAT User Manual
SCC5um1200tb
3 Click Launch to start the portable’s software and save the
barcodes you wanded into the portable to a text file. The
suggested file name for the file that contains your barcodes is
hist.txt, but it may be different if you changed it with the
portable unit communication utility. For more information, see
the documentation that came with your portable unit.
Important! Follow the directions for uploading portable files
with your portable unit software. The steps in this manual only
describe what you do while using your Spectrum CIRC/CAT
program. There are additional steps involving the portable unit
and the portable software that came with the unit. These steps
may be different depending on if you are using a Windows or
Macintosh computer.
4 After saving the barcodes from the portable to a file, click Next
to enter the barcodes from the portable unit’s file into your
current inventory. The Entering Barcodes from Portable Unit
Files window opens.
The next step is to add the text file that contains the barcodes
you wanded using your portable unit. Go to "How to add file(s)
from a portable inventory unit" directly after this topic for
information on how to complete this process.
How to add file(s) from a portable inventory unit
After you retrieve barcodes from a portable unit, you must add the text file containing the
barcodes to inventory. Follow the steps below to add your text file(s).
To add file(s) from a portable inventory unit
1 In the Entering Barcodes from Portable Unit Files window, click
Add.
2 In the window that opens, locate the text file (or enter the
name and path yourself) that contains the material barcodes
you want to enter into your current inventory, and click the
Open button. You can enter more than one text file if
necessary.
3 Click Next to continue and begin processing the barcodes in
the text file(s).
Inventory: Entering barcodes for inventory
SCC5um1200tb
435
When the file(s) are done processing, the Entering Barcodes…
window opens. Here you can view the list of materials and their
barcode flags (if any exist). For more information about the
letter-code flags, see "Material barcode flags" later in this
chapter.
4 Click Next to continue. The Entering Barcodes Summary
window opens.
See "After entering barcodes" later in this section for information on what to do after
entering materials for inventory.
Entering barcodes from a barcode reader or
keyboard
You may want to enter individual barcodes at your computer with a barcode reader or
your keyboard. You must enter these barcodes at the computer where you are completing
your inventory. This option is more time consuming than the other two options because
you have to bring each material you want to inventory to the computer with the barcode
reader or keyboard.
Important! If you choose this option to enter barcodes for inventory, you should make
regular backups of your inventory files because the barcodes that you scan with a barcode
reader or type using the keyboard are not saved in a separate file (as they are when you
use a portable inventory unit, PDA unit, or an existing text file).
You can scroll through the list of barcode numbers and change their inventory or
circulation status by clicking the Override button (see "Overriding a material's inventory
status" later in this section).
Note: If you select the "Receive notifications when barcodes are entered out of call
number order" option before entering your barcodes, you’re notified if the material
barcode numbers you enter are out of call number order. This may help you find
materials that are shelved incorrectly.
How to enter barcodes from a barcode reader or keyboard
Follow the directions below to enter barcodes using a barcode reader or keyboard.
436
Spectrum CIRC/CAT User Manual
SCC5um1200tb
To enter material barcodes from a barcode reader or keyboard
1 Make sure you prepared your materials and are in either the
Summary of Materials Prepared for Inventory window or the
Entering Barcodes for Inventory window. If you're not there yet,
see "Preparing materials for inventory" at the beginning of this
chapter for more information.
2 Select the Enter barcodes from a barcode reader or keyboard
option and click Next. The Entering Barcodes from a Barcode
Reader or Keyboard window opens.
3 Select the Receive notifications when barcodes are entered
out of call number order option.
4 Scan or type a material barcodes in the Barcode box. If you are
using the keyboard, press the Enter key after each barcode you
type. As you enter barcodes, a variety of flags may be displayed
next to a material barcode. For more information about these
flags, see "Material barcode flags" later in this chapter.
5 After entering material barcodes, click Next to continue. The
Entering Barcodes Summary window opens.
See "After entering barcodes" later in this section for information on what to do after
entering materials for inventory.
Inventory: Entering barcodes for inventory
SCC5um1200tb
437
Entering barcodes from a text file
You may want to enter material barcodes from an existing text file into your current
inventory. This file should only contain a list of barcodes and no other data. Entering
barcodes from a text file may be convenient if you have someone enter the barcodes into
a text file at another computer. This text file can then be used to enter barcodes into your
current inventory, but the person entering the barcodes doesn’t have to use Spectrum
CIRC/CAT or even the librarian station computer. The text file you use could also be one
that is created after you retrieve barcodes from a portable inventory unit (such as hist.txt),
or with other software such as a word processor or PDA unit. (This is a lightweight,
hand-held, usually pen-based computer, which typically uses the Palm operating system.
This can be used in conjunction with the Spectrum-in-Hand program to enter barcodes
for portable circulation and inventory.)
How to enter barcodes from a text file
Follow the steps below to enter barcodes for inventory from a text file.
To enter material barcodes from a text file
1 In the Inventory window or the Summary of Materials Prepared
window, select Enter materials or override their status and
click Next.
2 Make sure you prepared your materials and in either the
Summary of Materials Prepared for Inventory window or the
Entering Barcodes for Inventory window. If you're not there yet,
see "Preparing materials for inventory" at the beginning of this
chapter for more information.
3 Select Enter barcodes from a text file and click Next. The
Entering Barcodes from Text Files window opens.
438
Spectrum CIRC/CAT User Manual
SCC5um1200tb
4 In the Entering Barcodes from Text Files window, click Add.
5 In the window that opens, locate and select the text file (or
enter the name and path yourself) that contains the material
barcodes you want to enter into your current inventory, and
click the Open button. You can enter more than one text file if
necessary.
6 Click Next to continue and begin processing the barcodes in
the text file(s).
When the file(s) are done processing, the Entering Barcodes…
window opens. Here you can view the list of materials and their
barcode flags (if any exist). For more information about the
letter-code flags, see "Material barcode flags" later in this
chapter.
7 Click Next to continue. The Entering Barcodes Summary
window opens.
See "After entering barcodes" later in this section for information on what to do after
entering materials for inventory.
Inventory: Entering barcodes for inventory
SCC5um1200tb
439
Entering barcodes using Spectrum-in-Hand
Spectrum-in-Hand is a program that works in conjunction with a portable hand-held
computer (or PDA) for inventory and portable circulation. The hand-held computer uses
Palm computing technology and includes a built-in Symbol portable barcode reader. With
it, you can scan barcodes and enter data using its Graffiti writing area. For more
information or to purchase Spectrum-in-Hand, contact Sagebrush's Sales Department.
Using Spectrum-in-Hand is by far the fastest way to scan barcodes because you can take
the hand-held computer throughout your library and scan material barcodes without
moving your materials. Plus, PDAs have a better scan ratio than portable barcode units,
so you don't have to scan a barcode multiple times in order to get a successful entry.
Important! If you are using the Spectrum-in-Hand program, please refer to the manual
that came with your program to enter barcodes into the Spectrum CIRC/CAT program.
Material barcode flags
A variety of flags may be displayed next to a material barcode when you enter it for
inventory. A material is marked with a one-letter code that stands for the actual flag (see
table below). A barcode may have more than one letter code next to it.
440
Code
Flag
Description
A*
Already Entered
The barcode number was already entered into the
current inventory.
C
Command Barcode
The barcode number is reserved for a circulation
command.
E
Unrecognized Data
The program doesn’t recognize the data entered as a
barcode number.
I*
Inventoried by
CIRC
The barcode number was entered into the current
inventory because it is currently checked out.
L*
Previously Lost
The program considers this material to be lost
because it currently has a lost status in the program.
N*
Not Prepared
This barcode number was not included in the range
of materials specified for inventory.
O
Overridden
This material barcode status was overridden.
Spectrum CIRC/CAT User Manual
SCC5um1200tb
Code
Flag
Description
P
Patron Barcode
This barcode number is for a patron record.
U
Unknown Barcode
This barcode number doesn’t match any record in
your database.
W*
Wanded Out of
Order
According to its call number, this barcode number
was entered out of order. The material may be
misplaced on the shelf.
* Barcode can be overridden. See "Overriding a material's inventory status" later in this
chapter for more information.
After entering barcodes
After you enter materials for inventory, the Entering Barcodes Summary window opens.
This window lists the total number of materials entered for inventory and gives you
options for continuing the inventory process.
Entering Barcodes
Summary window
This window shows
you how many
barcodes were
entered and lets you
decide the next
inventory step to
perform.
At this point in the inventory process, you have the option to:
• continue entering more materials (see "Entering materials for
inventory" earlier in this chapter).
• override the status of the materials you entered (see "Overriding a
material's inventory status" later in this chapter).
Inventory: Entering barcodes for inventory
SCC5um1200tb
441
• print reports (see "Printing inventory reports" later in this chapter).
• finalize the inventory (see "Finalizing inventory" later in this chapter).
• cancel the inventory (see "Canceling inventory" later in this chapter).
• view your inventory status (see "Viewing inventory status" later in this
chapter).
• stop here and continue at a later date.
Make your selection and click the Next button. If you want to continue at a later date,
click the Close button.
442
Spectrum CIRC/CAT User Manual
SCC5um1200tb
Overriding a material's inventory status
You can change a material’s inventory status with the override feature. Notice that the
Inventory window describes Step 2 as "Enter materials or override their status." Each
material you enter also has an inventory status. You can change a status that is incorrect
due to an error in entering barcodes.
Important! You can only override from the Entering Barcodes from a Barcode Reader or
Keyboard window.
Overriding a material designates it as lost and/or removes it from the current inventory.
Overriding a lost material designates it as not lost and/or adds it to the current inventory
count. As you enter materials, certain materials are flagged to specifically describe their
inventory status. Some of these flags describe a status, such as "previously lost," which
you can change. After you change a material’s status, it is flagged with an "O" because it
has been overridden, but the original flags also remain attached to the material barcode
number (for example, "L" for Previously Lost).
Examples of when to override a material's
inventory status
Flags attached to a material often alert you of the need to override the inventory status.
Material flagged with an "L"
A material barcode number flagged with an "L" has been marked as previously lost by
the program. If you realize that this material is actually lost but somehow entered into
inventory due to a typing error, you can override this material to make it lost and remove
it from the inventory. If you don’t override this barcode number, then the program thinks
the material has been found because you were able to enter its barcode number into
inventory.
Material flagged with an "N"
If you accidentally entered a material barcode number you chose not to prepare for this
inventory, then you can remove it from inventory by overriding it.
Inventory: Overriding a material's inventory status
SCC5um1200tb
443
Material flagged with an "O"
If you override a material’s status and then realize that you chose the wrong override
option, then you can override this material again and choose a different option.
How to override a material's inventory status
Example scenario: When you enter the barcode number 20034 into the Entering Barcodes
from a Barcode Reader or Keyboard window, the program flags it as Already Entered.
You want to override this status by marking it as lost and removing it from inventory.
To override a material status
1 In the Entering Barcodes from a Barcode Reader or Keyboard
window, select the barcode 20034 from the barcode list.
2 Click the Override button. The Override a Material's Inventory
Status window opens.
3 Select the Mark this material as lost and remove it from
inventory option.
4 Click Save. The Override a Materials Inventory Status window
closes, and you are returned to the Entering Barcodes from a
Barcode Reader or Keyboard. The material that you overridden
is no longer in the list of materials to inventory.
444
Spectrum CIRC/CAT User Manual
SCC5um1200tb
Printing inventory reports
It’s a good idea to print inventory reports both before and after you finalize inventory.
The following table lists all of the inventory reports, what parts of the program they are
available in, and when it's most useful to print them.
Report
Where available
When to print
Materials Entered
Inventory and Reports
Before finalizing
Materials Entered Out of
Order
Inventory and Reports
After finalizing
Materials Entered that were
Overridden
Inventory and Reports
After finalizing
Materials Found this Period
Inventory and Reports
After finalizing
Materials Lost
Inventory and Reports
After finalizing
Materials Not Lost
Inventory and Reports
After finalizing
Materials Remaining to be
Entered
Inventory (only when an
inventory is in progress)
Before finalizing
Unrecognized Barcodes
Inventory and Reports
Before and after
finalizing
You can print inventory reports while an inventory is in progress from the following
inventory windows: Inventory window, Entering Barcodes Summary window, Finalize
Inventory window, and Finalize Summary window. For more information about each of
these windows, see the Inventory chapter in the Spectrum CIRC/CAT Reference Manual.
If you don't print reports while conducting inventory, don't worry. You can generate
inventory reports from the Reports part of the program. The exception is the Materials
Remaining to be Entered report, which can only be generated while an inventory is in
progress.
Inventory: Printing inventory reports
SCC5um1200tb
445
To access inventory reports from the Reports part of the program
1 Click the Reports button in the Navigator toolbar.
2 Select Inventory from the pop-up menu.
3 Choose the inventory report you want to print from the list.
For a description of each inventory report, see "Inventory Reports" in the Reports chapter
of the Spectrum CIRC/CAT Reference Manual.
How to print an inventory report
When you print an inventory report, you need to:
• Specify an index
• Set up the range
• Choose your options *
• Create the report
• Print the report
For more information about any of the above tasks, see the Reports chapter in this
manual.
* You only need to set options for the Materials Entered and Materials Lost reports. For
more information on the Inventory Reports Options windows, see "Inventory Reports
Options window" in the Reports chapter of the Spectrum CIRC/CAT Reference Manual.
Example scenario: Before you finalize your current inventory, you want to print the
Materials Remaining to be Entered report. You want the report to be indexed by call
number, and you want to include all of the materials. Note: By default, the program uses
the first and last items of the index you choose for the range.
To print an inventory report
1 In the Inventory Reports window, choose Materials Remaining
to be Entered from the Report box.
2 Choose Call Number from the Index box.
3 Accept the default call numbers already entered into the Start
at and End at boxes.
4 Click Create. A browser window opens and displays the report.
446
Spectrum CIRC/CAT User Manual
SCC5um1200tb
5 If the report is large enough to be contained in more than one
.htm file, the Displaying Records message in the navigator bar
display as "1 to x of y" (where x is the number of records in this
data set and y is the total number of records). Click the Next
Set button to open the next report file.
6 When you are done viewing or printing the report, click the
close button in the upper right (Windows) or upper left
(Macintosh) corner of the browser window to close it.
7 After you print a report from the Inventory Reports window,
you can return to the Inventory window by clicking the Back
button. If you’re not continuing with inventory, click the Close
button.
For more information on using the Inventory Reports window, see "Setting up reports" in
the Reports chapter of this manual.
Inventory: Printing inventory reports
SCC5um1200tb
447
Viewing inventory status
You can view the inventory status any time after you prepare materials and before you
finalize an inventory. Preparing materials for inventory begins the inventory process and
creates a new log of the current inventory status. Clicking the Inventory Status button that
is available in many of the inventory windows opens the Inventory Status window.
Although you can view inventory status information any time during the inventory
process, you cannot print it. If you want to print it, we suggest you copy/paste the
information into a word-processing program and print it from there.
How to view inventory status
Example scenario: You just finished entering the materials you want to inventory and
now want to view the current inventory status.
To view the inventory status
1 Click the Inventory Status button. The Inventory Status
window opens.
2 When you are finished viewing the information in the Inventory
Status window, the click Close button.
448
Spectrum CIRC/CAT User Manual
SCC5um1200tb
Canceling inventory
Canceling your current inventory discontinues the current inventory. You can cancel the
current inventory any time after you prepare your materials in the following windows:
Summary of Materials Prepared for Inventory, Inventory window, and Enter Barcode
Summary window. You should cancel only if you don’t want to complete the inventory
you’ve started. When you cancel an inventory that's already in progress, materials are no
longer prepared or entered. If you cancel an inventory that's in progress, you have to
completely restart the inventory process. Only cancel your current inventory if you’re
positive you want to eliminate the work you have done for the current inventory.
Canceling an inventory may take a while. For comparison, it doesn’t take as long as
preparing for inventory—unless you prepared the entire collection.
Why cancel?
You may want to cancel an inventory if you prepared an incorrect range of materials.
After you prepare your materials for inventory, there is no way to go back and prepare
additional materials to include in the inventory you started. You can either wait and
inventory those materials during another inventory period or cancel the current inventory
and start over.
For canceling inventory reference information, see "About the inventory cancellation
windows" in the Inventory chapter of the Spectrum CIRC/CAT Reference Manual.
How to cancel inventory
Example scenario: You started an inventory a week ago by preparing the materials.
However, within that one week, you added about 25 materials to your database. You
want to include those new materials in the current inventory, so you need to cancel the
current inventory and start a new one.
To cancel your inventory
1 Open the current inventory by choosing Inventory from the
Winnebago menu. The Inventory window opens.
2 Click the Cancel Inventory button. The Cancel Inventory
window opens.
Inventory: Canceling inventory
SCC5um1200tb
449
3 Click Next to continue to cancel the current inventory. The
Canceling Materials for Inventory window opens.
4 When the program finishes processing, click Next. The Cancel
Summary window opens.
5 Click Next to return to the Inventory window to re-prepare
materials for inventory—this time including the new materials
you entered.
450
Spectrum CIRC/CAT User Manual
SCC5um1200tb
Finalizing inventory
Finalizing an inventory marks the end of the inventory period and closes the current
inventory. This process compares the materials that you prepared for inventory with those
you entered into inventory. All of the materials entered into inventory are considered
available for circulation and all the materials prepared but not entered are considered lost.
Important! Do not finalize an inventory until you enter all the prepared materials that
aren’t lost because after materials are finalized there is no way to change their status in
inventory. Materials that are prepared but not entered will be marked as lost after you
finalize. You can only change a lost status in the Circulation part of the program or by
performing another inventory. If you need to enter additional materials before finalizing
your inventory, click the Back button in the Finalize Inventory window.
Before finalizing
Make sure you do the following before you finalize an inventory:
• Print reports. Before you finalize an inventory, you should print
inventory reports to see if any materials were prepared but not entered,
erroneously marked as lost, and so on. Using the reports, you can go
back and enter as many material barcodes that you can account for
and/or override the status of any materials. To see a list of
recommended reports to print before you finalize an inventory, see
"Printing inventory reports" earlier in this chapter.
• Back up. It's a good idea to make a backup of your database before
you finalize an inventory. See the Backup chapter in this manual for
more information.
• Allow time. Finalizing inventory can take some time, so you may
want to do it during a slow time or when your library is closed to
patrons.
How to finalize inventory
Example scenario: You prepared and entered the material barcodes that you want to
inventory. You even printed the Materials Remaining to be Entered report to make sure
you entered all the materials that you prepared for inventory. Everything looks good, so
you want to finalize the current inventory.
Inventory: Finalizing inventory
SCC5um1200tb
451
Finalizing
Inventory
window
This is the first
window in the
finalizing
inventory
process.
To finalize an inventory
1 In the Finalize Inventory window, click Next to begin finalizing.
The Finalizing Materials for Inventory window informs you of
the finalizing progress.
2 When the program is finished processing, click Next. The
Finalize Summary window opens (the final window in the
inventory process).
3 Click the Close button exit inventory.
Remember, it's a good idea to print inventory status reports after you finish finalizing an
inventory and before you prepare another section of your library to be inventoried. See
"Printing inventory reports" earlier in this chapter for a list of recommended reports to
print after finalizing an inventory.
After finalizing inventory
The Finalize Summary window displays the number of materials that were marked as lost
from those you prepared and finalized. The inventory process is now complete. You can
print inventory reports about the most recent inventory period (the one you just finalized).
For a list of recommended inventory reports to print after finalizing an inventory, see
"Printing inventory reports" earlier in this chapter.
452
Spectrum CIRC/CAT User Manual
SCC5um1200tb