1
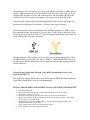
H2 - REQUIREMENTS FOR SUBMISSION OF VIDEO CONTENT
Version 1.6
1. REQUIREMENTS
The following are a few guidelines on the submission process for H2 content.
NOTICE!
Submissions not meeting these set requirements will be rejected.
- Video content must be 720x480 NTSC, 29.97 frames per second, 4:3 aspect ratio
- Audio sampling rate must be 48 Khz (48,000 Hz) with a bit rate of 24 bits per second
- Submissions must be on DVD, or in a digital file (Quicktime, AVI or MPEG).
- Any video submitted to CassComm to be aired on H2 must contain the following:
1. The H2 introduction clip (provided by CassComm on our website)
2. A title overlay of the event throughout the video.
3. Closing credits and the closing H2 clip (provided by CassComm on our website)
- Submissions must be no less than 1 minute, 30 seconds in length.
- Use of unlicensed music in video submissions is prohibited and will be rejected.
- SPECIAL NOTE: While taping sporting events, please be sure to stop recording
during any extended breaks, such as half-time.
Submitter must acknowledge that CassComm is not responsible for the return of media
upon receipt. If a submitter wishes to have media returned to them, they must submit a
request for return prior to the delivery of said media.
Filming
Special Note!
If you are using the Canon FS200 camera, please initialize the card in the camera before
shooting. Initializing formats the card for use with the camera, plus it erases any data
previously stored to the card. Initializing the card before each use will ensure that you
have a full card to use during your taping.
You need to ensure that the footage you acquire is of the highest quality you can achieve
with your equipment. This can be accomplished in a few simple ways.
1. Set camera for full auto (auto focus/auto iris/auto white balance)
2. Place your camera on a tripod whenever possible to cut down on shaking.
3. Try to follow movement whenever possible, but keep long telephoto shots to a
minimum as shakiness increases greatly.
4. Even if your camera has the option for it, never use digital zoom.
Video Editing
The key things you’ll want to ad to the video while editing are the following:
1. The H2 logo clip (provided by CassComm from our website) to the beginning of the
video. *
2. A fade from black effect at the start of the video
3. Subtitles stating what the video is about.
4. A fade to black effect at the end of the video
5. Closing credits and the closing H2 clip (provided by CassComm from our website) **
* Link to H2 intro clip: http://www.casscomm.com/H2/video/h2opening.avi
** Link to H2 closing clip: http://www.casscomm.com/H2/video/h2closing.avi
If you are not capable of authoring a DVD video, you must submit your video in either
Windows AVI or Apple Quicktime format. The choice of deliverable media is yours (i.e.
Data DVD, USB flash drive, external hard drive, SDHC card, etc.)
2. RECOMMENDATIONS
The following are a list of product and software recommendations by CassComm to help
ease the process of turning your footage into acceptable H2 content.
Camera
If you or your organization does not have a video camera of your own, we highly
recommend the use of the Canon FS200. It is a solid state camera, meaning it records
video to SD memory cards. We will supply you with 8GB SDHC cards for use with your
camera if you choose to purchase the Canon FS200 as this is the camera we use most
often and have the most experience troubleshooting.
If you or someone from your organization is shooting events for H2 under the agreement
that CassComm will be responsible for handling all editing duties, then the use of the
Canon FS200 will be required for submission of footage. If you, or someone from your
organization, will be handling editing duties, choice of camera will be left to your
discretion.
Format Conversion Software
If you use a camera that records digitally to an internal hard disk or to flash memory such
as SDHC cards you will need to convert the files from their native MOD format on the
camera to a format that editing programs can import. While most cameras provide you
with their own software for doing this, sometimes they are limited in output choices and
as our needs our very specific, you may find that the programs cannot provide the
flexibility you need to deliver a usable video file to us.
It is for this reason we highly recommend a program called Mpeg Streamclip from
Squared 5. This program can be used to quickly and easily convert and combine video
clips from these type of cameras into an easily editable format.
The program can be downloaded free from the squared 5 website. However, some
options are not available without the purchase of the Apple Quicktime MPEG2 playback
decoder plug-in for $19.99. Instructions for download and installation can be found on
the website.
http://www.squared5.com
Editing Software
If you do not regularly use editing software, we highly recommend the use of Sony Vegas
Movie Studio HD 9.0. It is an easy to use, low cost editing solution for Windows 7, Vista
or XP. The software can be purchased at retail outlets such as Best Buy, Office Depot or
Staples, or you can purchase it online and download it straight to your computer. Retail
price of the program is $49.95, but you can save $10 by downloading from the Sony
Creative Software web site.
http://www.sonycreativesoftware.com
3. TIPS FOR SHOOTING AND EDITING VIDEO
In this section we will discuss the use of specific equipment and software for the
production of H2 content. While much of this information is specific to H2 production,
the same principals and general settings can be used in the production of any video
intended to be viewed on television.
Using miniDV cameras
Cameras that record to miniDV tape can be utilized in H2 production only if you or
someone from your organization will be handling editing repsonsibilities. You will need
to ensure that your computer or editing station has a firewire 400 (IEEE 1394)
connection. Your camera will have a smaller, 4-pin connection port (often labeled “DV”
on your camera), while your computer or editing station should have a larger 6-pin
connection port. You will also need a 4-pin to 6-pin firewire 400 cable to connect the two
together. Many times this cable will be included in the box your camera came in. If your
computer does not have a firewire 400 connection port, you will need to purchase and
install a firewire PCI card for your computer. They range in price from $20 to $60.
Footage must be captured in real-time during playback of the tape from the camera to a
program such as Windows Movie Maker, or similar video capture software.
Newer cameras that record to internal hard discs and flash memory have USB 2.0 ports.
Any computer produced in the past 10 years will have a USB 2.0 port. Often times 4-pin
firewire ports are mistaken for USB 2.0. Cameras designate the difference with either the
words USB and DV or images, seen below:
Footage captured by these cameras can be moved to your computer through files. These
are MPEG2 files, however they often carry a .MOD or .TOD extension. These files can
be converted to multiple formats like AVI or Quicktime files through programs such as
MPEG Streamclip.
A Step-By-Step Editing Walk-Through Using MPEG Streamclip and Sony Vegas
Movie Studio HD 9.0
This guide is for anyone utilizing the Canon FS200 camera, MPEG Streamclip and Sony
Vegas Movie Studio HD 9.0, per our recommendations.
INITIAL TRANSCODING FROM MPEG TO AVI USING MPEG STREAMCLIP
1.
2.
3.
4.
5.
6.
7.
8.
Open Mpeg Streamclip
Open the Batch List from the “list” option in the menu bar at the top of the window.
Click on the “Add Files..” button.
When the browser appears, open the folder where you’ve placed your MOD files.
Right click anywhere in the browser window and roll over “Arranged Icons By >” till another
window appears. Select “Modified”.
Select all files in the folder by hitting CTRL+A or shift click the file group till they are all
highlighted, then hit the “Open” button.
A new window opens asking you to “Please choose a task:”
Select “Export to AVI” from the drop down menu.
9. Click on “Join all the files” and “Fix timecode breaks”, then click “OK”
10. Select the destination of the file MPEG Streamclip will be creating (I usually select my desktop)
11. On the next window you will be provided with quite a few options in which to set up your output
video. Please use these settings:
a. Compression: Apple DV/DVCPRO – NTSC
b. Quality: 100%
c. Sound: Uncompressed – Stereo – 48 KHz
d. Frame Size: 720x480 (DV-NTSC)
e. Frame Rate: 29.97
f. Frame Blending: Unchecked
g. Better Downscaling: Unchecked
h. Interlaced Scaling: Checked
i. Reinterlace Chroma: Checked
j. Deinterlace Video: Unchecked
k. Field Dominance: Lower Field First
l. Rotation: No
m. Zoom: 100%
n. X/Y: 1
o. Center: 0, 0
p. Cropping: Unchecked
12. You can save these settings as a preset by clicking the “Preset” button.
13. Click “New..” in the “Preset Manager” window, skip the next window, then enter a name for your
preset.
14. Once finished, click “Load”
15. Click “To Batch”
16. Once you’re back at the Batch List window, click “Go” to begin rendering the AVI file.
EDITING TOGETHER VIDEO USING SONY VEGAS MOVIE STUDIO HD 9.0
1.
2.
3.
4.
5.
6.
7.
8.
9.
10.
11.
12.
13.
14.
15.
16.
17.
18.
Open Sony Vegas Movie Studio HD 9.0
Type in a name for your project, then click “Finish”
In the explorer window located at the top left of the screen, find the file named “h2opening.avi”
Drag and drop the file onto the video track and make sure it is at the very beginning of the timeline
In the explorer window, find the file you created in MPEG Streamclip of the footage from the
camera
Drag and drop the file onto the video track and make sure it is just behind the h2opening clip
In the explorer window, find the file named “h2closing.avi”
Drag and drop the file onto the video track and make sure it is just behind the last video clip
With your full video assembled, click on the “Media Generators” tab at the bottom of your
explorer window
From the list at the left, select “Text”
Drag and drop your choice of title preset into the “Video Overlay” track.
When the “Video Media Generators” window appears, edit the sample text to display what the title
of the video will be
Click on the “Placement” tab in the “Video Media Generators” window to reposition your text
where you want it to appear
Close the “Video Media Generators” window and resize the text block to fill the length of the
entire event clip
Grab the top left hand corner of the event video clip and drag to the right, this will create a fade in
Create a fade out at the end of the clip by grabbing the top right of the clip and dragging to the left
Create a fade in and out for the overlaying text by following the same steps as with the video track
If needed, the audio track of the event video clip can be faded in and out in the same manner as the
video and text
19. Add your credits at the end of the video as a graphic overlay during the h2closing.avi clip or
shortly thereafter.
20. Go to the menu bar at the top of the window and select “Project”
21. Click on “Render As” in the Project menu
22. Select the location you wish to save the finished video clip in from “Renders” to wherever you
feel comfortable
23. If the following settings are correct, then click the “Save” button:
a. Save as type: Video for Windows (*.avi)
b. Template: NTSC DV
c. Description: Audio 48,000 Hz, 16 Bit, Stereo, PCM, Uncompressed Video: 29.97 fps,
720x480, Lower Field First
24. If the settings are incorrect, then click on the “Custom” button
25. In the “Custom Template” window, adjust all the settings until the read as follows:
a. PROJECT
i. Template: NTSC DV
ii. Video rendering quality: Best
b. VIDEO
i. Include video: Checked
ii. Frame size: unselectable
iii. Frame rate: 29.970 (NTSC)
iv. Field Order: Lower field first
v. Pixel aspect ratio: unselectable
vi. Video format: NTSC DV
vii. Quality: unselectable
viii. Interleave every (seconds): 0.250
ix. Interleave every frame: leave unchecked
x. Keyframe every (frames); unselectable
xi. Data rate (Kbytes/second): unselectable
xii. Render alpha channel (uncompressed video formats only): unselectable
xiii. Create an OpenDML (AVI version 2.0) compatible file: checked
c. AUDIO
i. Include audio: Checked
ii. Audio format: PCM Uncompressed
iii. Attributes: unselectable
iv. Sample rate (Hz): 48,000
v. Bit depth: 16
vi. Channels: Stereo
26. Once rendering has been completed, it can be dumped to either DVD-R, USB flash memory or
SDHC card or sent to our server via FTP.
INSTRUCTIONS ON TRANSFERING FILES OVER THE INTERNET
If you have access to broadband internet, you may be able to transfer the finished product
via FTP over the internet to our server. First, you will need to download Filezilla, a FTP
client program, which can be located at http://filezilla-project.org/download.php.
In order to reduce confusion later on in the process, be sure that your completed AVI
video file is saved to your desktop. Once you have downloaded and installed Filezilla,
you will need to set up a site. This will be the your connection point to our FTP server.
The set up procedure is as follows:
1. Launch Filezilla
2. Toward the top, you will see a bar that says Host: with a white box next to it
followed by “Username:” with a white box next to it. This is where you will want
to enter the following information.
Host:
Username:
Password:
Port:
ftpvideo.casscomm.com
casscomm
cAssc033
21
3. Once you have entered this information, hit the “Quickconnect” button. This
should connect you to our FTP site.
4. In the right window labeled “Remote Site:”, you will see a series of folders. Click
on the one that says “H2”
5. This will open the H2 folder and show the content within.
6. In the left window labeled “Local Site:” You will want to select your desktop to
view.
7. Locate the AVI video file then drag it into the right window.
You may encounter difficulties in transferring large files where the transfer times out in
the middle. In this situation you may want to send the larger files one at a time. If you
find that even sending the files one at a time causes the transfer to time out, then please
contact me at [email protected]
4. TROUBLESHOOTING
This section is dedicated to the on-going process of identifying and assisting in the
solution of any problems experienced during the process.
There are quite a few possibilities to consider when troubleshooting a problem and the
answer varies greatly depending on the type of equipment you are using. Before perusing
this guide for assistance, we strongly urge you to review the user manual for your
equipment to determine a few bits of information that will be useful when attempting to
solve any problem you may be having.
All camera-related troubleshooting steps provided in this section are specific to the
Canon FS200
Footage out of sequence during editing ~ Oct 23, 2009
This is a problem consistent with the use of Mpeg Streamclip. Mpeg Streamclip
has the ability to combine multiple video clips together into one clip upon
importing, however the order in which the clips are put together is determined
solely on their file name. Using cameras such as the Canon FS200, we’ve learned
that the files are not given names linking them in chronological order.
The way to ensure that your clips are going to be combined together in the proper
order is to make sure they are named sequentially based on the ‘Date Modified’
metadata. You can view this information by selecting ‘View’ in your folder
options. A drop down menu will appear showing you a few options including
‘Thumbnails’ and ‘Icons’. You will need to select ‘Details’ in order to see the
‘Date Modified’ information for each clip. From here you can actually arrange the
clips in order of the date in which the clip was created by clicking on the cell
called ‘Date Modified’. An upward facing triangle will appear indicating that the
files in this folder are now in ascending order based on the Date Modified
information. So a clip that has the time/date stamp of 10/23/09 6:41 PM, will
appear above a clip with the time/date stamp of 10/23/09 6:58 PM.
UPDATE ~ Oct 28th, 2009
In your folder options, you can select to arrange the files located in your folder by
a number of different criteria. By selecting ‘Arrange Icons By – Modified’, you
can batch import files into MPEG Streamclip and not have to worry about out of
sequence clips in your final video.
Now that you have your clips in order of their time/date stamps, you can look
again to the file names of each clip and see that they are no longer in a perfect
order. If you wish to combine all clips together as one in Mpeg Streamclip, you
may need to rename your clips so both their file names are in numeric/alphabetic
order and their ‘Date Modified’ info is in the correct time/date order.
Can’t hear audio through headphones ~ Oct 27, 2009
Some cameras have jacks for headphone use, but to cut production costs they
sometimes make these jacks multi-functional in which one jack serves multiple
uses. In the case of the Canon FS200, the headphone jack also serves as the
Audio/Video output for hooking up the camera to a television set. The
functionality of the jack is set in the menu system of the camera by pressing the
FUNC button on the flip-out LCD monitor, then with the joystick moving down
to ‘System Setup’. In this menu you will see a listing for ‘AV/PHONES’. This is
where you will need to change the mode of the output jack from A/V to phones.
Keep in mind that once you have selected ‘phones’, you will no longer be able to
hear sound from the cameras internal speaker upon playback. To change this, you
will need to go back into the ‘System Setup’ menu and change the
‘AV/PHONES’ setting back to A/V.
Audio from the mixer is too loud ~ Nov 17, 2009
Determining the audio level during a game will be challenging. The camera does
not have a level control, but rather something called AGC or “Auto Gain Control”
which automatically adjusts the level based on the audio coming in. Usually, the
radio stations we work with have us tap into the headphone output on their
system. This isn’t ideal as it puts another amplifier in an already hot signal path.
The input of the camera is designed for dynamic microphones and not line level
feed from a mixing board and especially not from the amplified output of a
headphone jack. For this reason we provide special cables with built-in -40db
pads in them to reduce the level coming from the headphone output into the
camera. This usually requires the headphone level control to be turned up
considerably.
It may be difficult to hear the announcers talking through the headphones with the
noise of the crowd all around, so it is recommended to have the audio level meter
displayed in the camera’s LCD screen so you can visually see if audio is coming
into the camera. If you see the meters rise and fall, then record a short clip of the
announcers talking, then play it back to ensure that it recorded. Even though the
overall audio may sound low, the levels can be boosted during editing. What can’t
be changed in editing is if the audio level is too loud coming into the camera and
everything is distorted.
QUESTIONS AND ASSISTANCE
For any questions regarding the submission process or technical inquiries not found
within this document, please contact the following:
John Plunkett
Production Manager
Phone: 217-452-4147
Email: [email protected]
ADDITIONAL INFORMATION
Canon FS200 Manual - http://gdlp01.c-wss.com/gds/7/0300001917/01/fs20-21-22-200nim-en.pdf
Mpeg Streamclip - http://www.squared5.com
Sony Vegas Movie Studio HD 9.0 http://www.sonycreativesoftware.com/moviestudiohd
Ver 1.6