1
Digital Video Gamcorder
User's Manual
Welcome:
Dear user, Thanks for purchasing this product. This
manual offers to you more detailed instructions and
information.
Safety Notice:
digital video camera (or abnormal taste), or the
camera is hot, give out strange sound, at the any
abnormality state, please don't use the digital video
camera
2. The abnormity caused because of no operating
according to the manual, take charge by user.
3. Please don't put this video camera in the moist
environment, keep the video camera dry.
4. During thunder, if you use the power adapter, please
don't tbuch the plug may let you get an electric shock.
5. lf there is an eye winker in the digital video camera,
please don't use the digital video camera.
6. irlease don't insert metal thing or other things in the
video camera but SD card, manufacturers are not
responsible for this trouble.
7. Please don't try to redo the digital video camera.
8. Please don't operate the digital video camera when
you are driving.
g. Flease don't use the wet cloth to cover or wrap up the
digital video camera or power adapter, please keep
the digital video camera in ventilate place.
'10. Please don't make the digital video camera strike
with hard thing.
11 . Please don't move the digital video camera while
turning on the power.
(When you are using the power adapter). Please pull
out the line connected in front of moving the digital
video camera.
1
I
I
I
I
I
I
r
r
. lf a
1
12.The normalfunction of the prodrdmy be disturbed
by strong electro-magnetic irttrelel( so,
simply rest the product to resurE rsrfrr, operalion
by following the instruction manrd_ kr cese the
function could not resume, pleaseusel0reproduct in
other location.
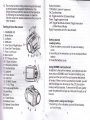
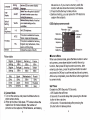
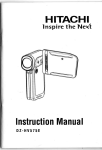
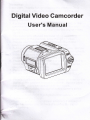
Getting to know the camera
1. CHARGER LED
2. Mode Button
3. Up Button
4. OK Button
5. Face Detect / Right Button
6. Down/Self-Timer Button
7. Flash / Left Button
8. Menu Button
9. TFT Display Screen
10- T-Zoom in Button
11. W-Zoom out Button
121314.
15"
1617.
Shutter Button
Speaker
Power Button
USB Port
SD/MMC Socr(et
OUT Plug
18. Focal Length Button
,9.Lens Ring
2O. Lens
21. Flash Strobe
22. Battery Cover
23. Battery Cover Switch
24. Microphone
W
Button functions
T/W Button: zoom in / zoom out
OK: Confirm/enter
Up: Toggle resolution (Camera Mode)
Down : Toggle capture mode
Left: Toggle flash/back-forward, Toggle resolution
(Video Record Mode)
Right: Face detect on/off or fast-forward
Getting started
Loading battery
1. Slide the battery cover switch to open the battery
cover.
2. According to the
indication, put in an enclosed lithium
battery.
3. Close the battery cover.
Using SD/MMC card (optional)
ln addition to the built-in memory, your camera can also
store data on SD/MMC card. To insert a memory card,
gently push the card until the card reaches the bottom
of the slot. When a card is successfully inserted, you will
see the storage icon showing on the LCD, the built-in
memory will be disabled. To remove the SD card, genfly
push the card and it will pop up, then pull the card out of
the slot.
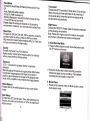
Charge battery using seat charger
1. According to the indication, put in a lithium battery,
pull out the plug.
2. Plug the charger to an electricdqE" ard the
charge will start. The LED indir:*c red lght during
charging. When the batteryisfutyrdcged, the LED
light will turn green.
Charging battery using pC
1. Poweron your computer. Connectoneend of the
USB
cable to the computer.
2. Connect the other end of the USB cable to the camera,
and the charge will start to take place, the charge light
(in the camera) indicates red during charging.
When
the battery is fully charged, the charge light (in the
camera) will go out.
Note: Please power off the camera during charging!
Porering the earlera on and off
1- Press the
Po*er button for one second, the video
camera will tum on.
2. Press the Power button for seconds, the video camera
will be tumed ofi_
Note: The camera will be automatically shut_down due to
'Auto Off setting.
lf you don't use the video camera for a long period of time,
please remove the battery.
1. Video Record
Mode
- record videos
take pictures
- record voice clips
4. Music Player - play Mp3 music
5. Playback Mode - view movies, pictures and listen
to record voice
2. Camera Mode
3. Voice Recorder
Basic operations
1. Video Record Mode:
1. Turn on the video camera; the video icon will show on
the top left corner of the on-screen-display.
2. When at the time of idle state, TFT screenshows the
related icon for mode indicator, recording time, white
balance, battery status and so on. lf you insert a
memory card, the monitorwill also show the memory
card status.
3. While shooting the video, you can move the T/W
button to capture the subjects.
4. Press the Shutter key to start recording.
5. To stop recording, press the Shutter key again.
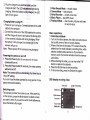
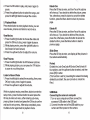
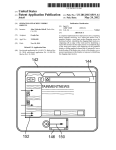
OSD display-recoding video
Video size
Switching mode
Length of recording
Mode icon
The camera provides five modes to use. After powering
on the camera, press the Mode button to select a mode
you want to enter. lf you want to switch mode aftenrards,
press the Mode button again.
4
White balance
Exposure
Fools mode
Battery life
Storage icon
IVideo Henu
When use vileo mode, presstrelleru brflon to enter set
up menu, pressdontn/up brrtbobiliHrtre set up
function, then press OK key to eilhr sr#menu, after
entering sub-nrenu, press the uy'donn builon to select and
press the OK key to confirm and bad< to set up menu. After
set up completed, press the Menu button again back to
video mode.
- Cloudy: This setting is suitable for recording in cloudy
weather or shady environments.
- Tungsten: This setting is suitable for indoor recording
with incandescent lamp lighting, or environments with
low color temperature.
- Fluorescent: This setting is suitable for indoor
recording in fluorescent lamp lighting, or environments
with high color temperature.
ISetup
Mode
Resolution
ln Video Mode/Camera Mode /Playback Mode, press the
Divided inlo 1280x720P, Dl , VGA and QVGA, press the
up/down button to select, press the OK key to confirm.
(High resolution means better image quality, but a larger
resolution will occupy more memory storage space, will
cause shorter video recording time)
Menu button, then press right button to enter setup
menu, press down button to switch setup function, press
OK key to enter sub-menu, after entering sub-menu, use
the up/down to select, press OK key to enter. After set up
completed, press the Menu button again to exit setup
mode.
Exposure
Menu items in setup mode
+2.0 - -2.0 press the up/down button to make the selection,
press the OK keyto confirm.
Manually adjust the exposure to gain better effect when the
preview image appears too bright or too dark. A positive
value indicates the image will be brighter than usual; while
a negative value makes the image dimmer.
White Balance
Divided into the following 5 options, press the up/down
button to make the selection, press the OK key to enter.
-Auto: The camera automatically adjusts white balance.
- Daylight: This setting is suitable foroutdoor recording in
daylight environment.
6
Yes/No
Format the storage medium. Note
that your all files stored in the
medium will be oone.
Date Format
Time Format
Set Date/Time
Set the Date and Time farmat, Set
date and time.
Formal
Date/Time
Auto
Power
off
tseep soun0
Frequency
Description
Options
Item
'l
Set how long the camera will
automatically shut down when
Min/3Min/Ofl staying inactive. Setting to [Offlwill
make the camera stay powered on
until it runs out of Dower.
On/Off
Tooole beeo sound on/off
Set flicker frequency to 50Hz or 60Hz
50H2,/60H2
See table below for more details.
7
Language
S€ttng
Settlre GSD (on screen display)
Lanorre
],Ififfi
SelectYesorNo option to decide if
Logo
On/Otr
Display
you
rant a certain screen when
fuminothecamera on.
Restoe factory deraults. Note that
Default
Setting
your current settings will be
Yes/No
overidden-
LCD
Brightness
1-8
NTSC
TV Mode
PAL
verston
Settinq
Reqion
Settinq
Italv
50Hz
China
50Hz
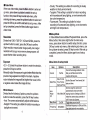
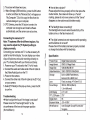
OSD display-camera mode
Flashlight
Picture
Set LCD brightness.
This option is suitable forAmerica,
Taiwan. JaDan and Korea areas.
This option is suitable for cermany,
England, ltaly, Netherlands, China,
JaDan. and Honq Kono.
lndicate the version of the DV
Flicker table:
Reoion
life and so on. lf you insert a memory card, the
monitor will also show the memory card status.
3. Press the Shutter key to take picture.
4. Before shooting, you can press the T/W button to
capture the subjects.
Enoland
50Hz
Portuoal
50Hz
Germany
50Hz
America
50Hz
Soain
50Hz
Netherlands
50Hz
Korea
60Hz
Jaoan
50/60H2
France
50Hz
Taiwan
60Hz
Russia
50Hz
Thailand
50Hz
2. Camera Mode
1. Turn on the camera, and press the Mode button to
enter camera mode.
2. When at the time of idle state, TFT screen shows the
related icon for mode indicator, the number of
pictures can be captured, White Balance, and battery
I
size 666s
Quality mode
Mode icon
Number ol
pictures
White balance
Exposure
Focus mode
Battery life
Storage icon
lCamera Menu
When use camera mode, press the Menu button to enter
set up menu, press down button to switch the set up
function, then press OK key to enter sub-menu, after
entering sub-menu, press the up/down button to select
and press the OK key to confirm and back to set up menu.
After set up completed, press the Menu button again back
to camera mode.
Self Timer
Divided into Offi 5 Seconds/10 Seconds.
- Off: Disable the self timer.
-5 Seconds: 5 seconds delay after pressing the Shutter
button to take a picture.
-1 0 Seconds: 1 0 seconds delay after pressing the
Shutter button to take a picture.
FlashIode
Divired irnlsArtorForce On/Red Eye
Reductioni Force
Face detect
Divided into Off / Face detect/ Smile
detect. lf set as face
derect, the picture_frame wirr rorrow
ine-ra"# #Jr;il i,
set as. smile detect, when rne camera
recognize smile
will take photo automatically.
-Auto: llastr onlywhen needed.
-torce On: flash is always on.
+H's#fl,";tl3li,i;31"#.tte
nea-se_ make
nash causes red eve'
the selection depends on the
shootino
enyrronment; otherwise,
vo,
""n
Resolution
irlt
"l;pl;;;iJ;ihrt"
Divided into 12M, 8M, SM, 3M,
1M five options, press the
:?.,;[i?f #,,#f; {IiJ,,,,,."
iiifiHs,X,',?t;"".#38:fi
occupy more memory storage
spa-ce..
Qualitv
F:ifffdiffifi:,iffi
"#?TfJ;,,,,,
occupy more memory storage
space.
b
ut
Night Scene
Divided.into ON/OFF, please make
the selection
vvts
-"-" depends
on the shooting environment
nis.ht scene off in outdoor strong
tight
Illg_:l!::: turn
envrronment,
otherwise may cause or"r"rpo""Ji t
3. Voice Recorder Mode
1. Press_the Mode button to enter
Voice Recorder mode,
the TFT screen will shows:
wi, a so
Exposure
+2.0 -.-2.0 press the
up/down button to make the
selection.
Irranuaily adjust the exposure
to gain better effect when
image app'ears too oiighi oi.tol;;rk:i
I"^pl9.ri"ry
posttive
value indicai6s tne tmage will
be brighter than
usuat; while a negative vatue
mities'ii.,;l;;;;;i;r",
White Balance
f,fff:
refer to the white batance section
under video
Date Stamp
P,yigSo into Offl Date & Date / Time, after setectins the
can be shown
/;#i;ffi,;;ili,H,no
t:i,"j;?Jll,""iate
";
10
2. Press the Shutter key to start
recording, press the
n a i n.to. i to p re co rd i n g. r h; ;
i ia ;
911*,:!"1,
recording
time will display on tne LtO.
";
;
;
4. Music Player
,
the camera, press the Mode button
to enter
l?.y:r_9!
mustc player mode.
2. Press the OK bufton to play, and press it again to
pause.
3. Press the up/down button to select the songs, and
press the lefUright button to adjust the volume.
5.
Delete One
Press the OK key to enter, and then Yes or No options
will show up. lf you decide to delete the picture, press
Yes; otherwise, press No button to cancel the delete
function, press the Menu button to back to previous
page.
Playback Mode
Press mode button to enter playback mode, you can
view movies, pictures and listen to record voice.
View Movies
1. Press the left/right button to choose the video and
press the OK key to play, press it again to pause.
2. While playing movie, press the right/left button to
fast-forward or back-forward,
3. Press the up/down button to adjust the volume.
View Pictures
1. Press the left/right button to shift between pictures.
2. While playing picture, you can press the T/W button
to zoom in or out the picture.
Listen to Record Voice
1. Press the left/right to select the recording, then press
OK key to play, press it again to pause.
2. Press the up/down to adjust the volume.
While in playback mode, press Menu button to enter the
setup menu, press the down button to select press the
OK key to enter sub-menu, after entering sub-menu,
press up/down to select and press the OK key to confirm
and back to set up menu. After setup completed, press
the Menu button again back to playback mode.
12
DeleteAll
Press the OK key to enter, and then Yes or No options
will show up. lf you decide to delete all the pictures,
press Yes; otherwise, press No button to cancel the
delete function, press the Menu button to back to
previous page.
Slide Show
Press the OK key to enter, can display all the pictures in
the camera automatically.
Protect
Divided into Lock One/LockAll/Unlock One/UnlockAll
four options, use the up/down button to select, and then
press [OK] to enter.
(This function is set for preventing the videos from being
deleted by accident; the user can lock or unlock the
files.)
USB Mode
Gonnecting the camera to computer
1. Turn on your computer and then connect the
accessory USB cable to the USB port.
2. Connect the other end of the USB cable to your
camera and then power on the camera.
13
I How to take a picture?
Please adjust the focus properly at first, then press the
shutter button, the screen will show up a "funnel"
marking, please do not move camera until the "funnel"
disappear, a clear picture could be taken easily.
3. The screen will show two icons:
3-1 Mass Storage (USB hard disc), press the OK button
to enter; and then the "Remove Disc" will appear on
"My Computer". Click it to copy the files from the
camera storage to your computer.
3-2PC Camera, press the OK button to enter; the
computer can recognize and install software
automatically, and the camera can act as lens.
<) The flashlight does not working?
The flashlight will not work when the electricity of the
battery is low, or the flash mode is off.
Connecting the camera to TV
Note: TV systems differ for different regions. You
may need to adjust the [TV Systeml setting to
display normally.
Connecting your camera and TV via the accessory AV
cable for real-time display. You can display your video
clips, still pictures, and audio recordings directly on
your TV, sharing them with your friends and family.
Power on your TV and switch the TV to AV mode.
2. Connect the audio and video ends of the AV cable to
the [Video/Audio] ports on the TV.
3. Power on the camera.
4. Connect the other end of the AV cable to the [TV Out]
on your camera.
5. Select [TV Mode] on the pop-up menu, press the OK
to confirm.
1
.
t The digital camera does not response while operating
and the buttons do not work?
Please check it the battery has been properly installed
or change the battery with full electricity.
I
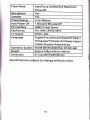
Specification
Product Tvpe
lmaqe Sensor
lmaoe Size
Video Resolution
Storage
Lens
Focus Range
LCD DisDlav
TFT LCD Rotate
Troubleshooting
I
How to adjust the focus if the image is not clear?
Please move the "Focal length Switch" on the
circumference of the lens to the proper position
(Normal/Macro)
14
Diqital Zoom
Exoosure Value
White Balance
Diqital Video Camcorder
CMOS 5.1Meoa Pixels
'12M,8M,5M,3M,1M
1
280 x
7
20P I D 1/VGA/OVGA
Built in 32MB Flash Memory,
External: SD or MMC Card
Fixed. two steps. f=7.45mm F/3.0
300m m-500m m (Macro)
1.2m-lnf(Normal)
2.4',LCD
270"
8X
-2.O-+2.OEV
Auto/ Daylight /Cloudy/Fluorescent/
Tunosten
15
Flash Mode
Microphone
Speaker
Power Source
Auto Power Off
PC lnterface
File Format
ry Outout
Language
Auto/Force On/Red Eye Reduction/
Force Off
Yes
Yes
Li-ion Battery
I Minute/3 Minutes/Off
US82.0 Hiqh Speed
AVI, WAV, JPEG, MP3
NTSC i PAL
English/France/Deutsch/Spanish/ ltalian /
Portuguese/T.Chinese /S.Chinese /Japan/
Turkish /Russian /Arabic/lranian
Operation Svstem Win98 SE/Win2000iWin XP/W|n ME
Weioht
Approx 256q (without batterv)
Dimension
97.5(L)x56(H )x85(W)mm
Specifications subject to change without notice.