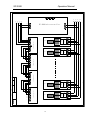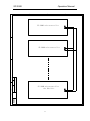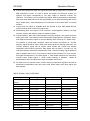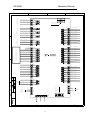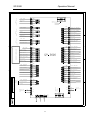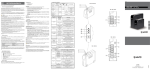
1
USER MANUAL
SP-3000
Please read this manual carefully so that when you have any questions , it can help you.
Thank you for using it.
SP-3000V
Index
Preface…………………………………………………………….……1
Safety Precaution……………………………………………………..3
1. Elements
Chapter 1- Main Board…….………………………………….……………….4
Chapter 2- Serial Communication Car Call Board ..……………………...6
Chapter 3- Serial Communication Landing-call Board ..……….……….7
Chapter 4- Control System…….………………………………….……….....9
2. I/O Signals, Wiring
Chapter 5- Input Signals….………………………………….…………..….12
Chapter 6- Output Signals……………………………..……………………17
Chapter 7- Wiring……………………………….……….…………………... 20
3. System Functions
Chapter 8- Function Details..……………………………….………………23
Chapter 9- LCD & Parameter Setting……..……………………………….28
Chapter 10-Parameter List.......……………………………..……….……..33
Chapter 11-Parameter Details…………..………………….……….……...40
4. System Test Run
Chapter 12-Slow Test…………………………..…….……….………….…..44
Chapter 13-Fast Test………..………………………….………………….…47
5. Ports between System & Inverter
Chapter 14-Emerson Inverter..………………………………….….………49
Chapter 15-KEB Inverter.…………………………………………..………..52
Chapte16-Mico Inverter……………………………………………..……… 58
Chapter 17-Yaskawa Inverter……………………………….………………60
Chapter 18-Fuji Inverter.……………………………………….……….……66
6. Maintainance
Chapter 19- Errors and Prompts…………………………….…….………72
SP-3000
Operation Manual
Preface
Thanks for using SP-3000 Series lift control system. This manual will tell you about the
product’s installation, test, maintenance etc. please read this book carefully so that it can
help you if you have any questions.
SP-3000 is one set of control system purpose-designed for lift. It is PC controlled,
intelligent & serial communication. This system, which introduces PHILIPS advanced
technology, integrates design & sales engineers’ wisdom & efforts, can fulfill nearly all the
end-user’s requirements.
Following is the main functions of the SP-3000:
Efficient & Safe Running Control
The system adopts 2pcs-accelerated CPU for data processing so that little responding
time can control the lift’s running.
Remote terminals gather Real-time signals from car & car tracks, RS485 data bus transfer
those signals to main board, then the main board process those data to ensure the
efficient & safe control.
RS485 Data Bus Serial Communication
To transfer data among parts, RS485 data bus is adopted. It’s anti-interference designed
& popular in international.
A few transmission lines effects data transfer. It’s fast & safe. It’s not only reduces the
working, but also increases the system’s stability.
SMT Technology
SP-3000 adopts SMT technology. Each board has a compact structure, enhanced stability
& higher nature price ratio.
Enhanced Anti-interference Design
The main board is anti-interference designed. It can work stably under very bad
circumstances. It has a built-in switching power supply as well.
The key parts are separately powered. Power voltage can be from DC15V to DC24V;
Hardware & software double watchdog, system can itself resume running if chance failure.
Photo coupler input, relay output; main board is isolated from the outer circumstances.
Good anti-interference performance of RS485.
Parallel Connection Group Control & Remote Monitoring System
SP-3000 advanced group control making groups stable, schedule reasonable and running
efficiency much enhanced.
The remote monitoring system can monitor the lift’s running. Only 1 line in the building can
monitor 8 lifts maximum at the same time. The monitoring system has friendly interface &
powerful functions. It reduces much maintenance working.
Powerful operation function, flexible & practical
Powerful, advanced & reasonable functions;
large capacity & human person-computer operation interface;
Flexible locale configuration; intuitionistic & simple debug
1
SP-3000
Operation Manual
LCD can show not only running status but also the Real-time error record.
Comprehensive Application
The main board is applicable for lifts varied with floor, speed & function requirements.
Standard configuration of inverter include Emerson, KEB,MICO,YASKAWA,FUJI and
those compatible to the above mentioned 6 types. You can equip a increment (common)
encoder or absolute value encoder (Germany HEIDENHAIN absolute value encoder or
those compatible with it).
2
SP-3000
Operation Manual
Safety Precautions
Please pay attention the following points not only for main board, but also for the others
electronic, electric parts & equipments that are in one group with main board.
Please check carefully if any damage occurred during transportation when you opening
the box. Please check whether you received meets your order or not. Please contact the
supplier or us for solution if any damage or shortage.
Cautions:
If the system is not properly operated, it may cause light or medium injury or components
damaged.
1: when delivery, please handle with great care. Otherwise it may cause damage to the
controller.
2: No touching the components of the controller, otherwise it will be destroyed by static
electricity.
3: please install the system on noncombustible materials like metal otherwise there will be
a fire danger.
4: please keep the installation environments far away from explosive gases, oil mists to
prevent fire danger or controller damaged.
DANGER – Please Pay High Attention
Danger 1: Only qualified engineer can connect wires. Make sure the main board power is
off in case of board damage or fire.
Danger 2: No testing of pressure resistance on the main board. Please check carefully:
the anode/cathode is rightly connected; the voltage meets the design requirement.
Danger 3: Running admitted when the security return route & the security devices are
working to avoid person casualty/device damaged.
3
SP-3000
Operation Manual
CHAPTER ONE
Main Board
1. SP-3000-V main board outlines
SP-3000-V main board consists of a single board.
The parts include 1pc LED (64*196 dots-matrix); 4pcs operation buttons; 32
positive-shared input points; 14 relay output points; 4 RS485 serial communication
ports (port 1,2,3,4), 3 indicator lamp and 1 button battery.
The 3 lamps from top to bottom are:
Power Supply indicator (light on all the time)
Main CPU working (blink all the time)
Communication port 1 working indicator (blink when working)
Operation buttons used for status view & parameter modification
Enter
ESC
UP
DOWN
enter next window or set the parameter
return to the previous window or cancel what you modified on parameter
page up or increasing the parameter
page down or decrease the parameter
The button battery supplies power for real-time clock chip. The clock chip
benchmarks system time. Its power voltage ranged from 10.V to 5.5V. The button battery’s
lifetime will be affected by actual capacity & circumstances. Please change new one when
battery is insufficient. Rated voltage is 3.3V.
RS485 serial communication connects the main board and the terminals.
Communication port 1: I/O of car call signals & instruction signals in car.
Communication port 2: I/O of all signals from car guide rail.
Communication port 3: parallel communication or group control.
Attention: 2 types terminals for port 3.
Communication port 4: remote monitoring. In this case, RS485 signals must transformed
into RS232 signals at first, then go from RS485-232 commutator to Modem.
4
CN7
CN4
CN2
CN1
CN3
CN12
CN11
5
SP-3000 MICRO CONTROLLER
ENTER
CN8
CN6
CN9
UP
DOWN
LCD-DISPLAY-192×64
SP-3000
LIFT-CONTROL
ESC
SP-3000
Operation Manual
CN10
CN5
SP-3000
Operation Manual
CHAPTER TWO
Serial Communication Car Call Board
1.car call board outline
The board has 16 bidirectional ports (Input & output shared one port). Each port
corresponds to one floor’s car call signal. I/01 corresponding floor 1 signal; I/02
corresponding floor 2 signal;the others analogized in turn. The car call board is reliably
grounding via PE port; public button signals terminal connect with negative 24V; answer
light signals connect with positive 24V. Please add another board for floor above 16 and
be aware software between the 2 boards is different. Details please consult from
producer.
2. Indicator lamp
LP1
communication on or off (the light blinks if communication on)
LP2
CPU working on or off (the light always blinks if CPU working)
LP3
Power on or off (the light always on if working)
Illustration –car call board physical appearance & dimensions
6
SP-3000
Operation Manual
CHAPTER THREE
Serial Communication Landing-Call Board
1. Address setting of Landing-call:
We use a 5-digit code switch to set landing-call board address, which is recorded by
binary system. Code switch 1 is the lowest bit, code switch 5 is the highest bit.
Address setting shows by station (absolute floor). If you set address as 0, the
landing-call board can serve for display board in car.
2. Landing-call board:
Standard landing-call board is serial communication. Floor number & run direction
showed by dots & matrix.
At the very beginning a landing-call board powered on, if you set address as zero,
it will show “C”, which means it can serve as one display board in car. If you set address
as a binary value, it will show “Fx”. Such as, setting value is 3, the board will show “F3”,
which means it’s a landing-call board on 3rd floor. A few seconds after the board powered
on, showing will be in good order. In case no communication, showing will black out. The
board shows current floor (i.e. actual floor) & run direction in good running order. It will
alternately show error No. & current floor in case of error. For example, error 3 shows a
blink “E3”. If 2 or above simultaneous errors, it shows minimum error in priority. Error
signal detail as follow:
E1: safety circuit error
E2: force land or limit error
E3: inverter error
E4: main contactor error
E5: brake contactor error
E6: door lock error
E7: input setting error
E8: overtime run
E9: EEPROM error
E10: encoder error
3. Landing-call button input
When addressing a landing call board and main board defining the corresponding
floor as a stopping floor, the landing call board will gather button signals and transfer
them to main board. You can control certain floors non-stopped by setting parameter.
In this instance, landing call board will neither gather button signals nor output answer
light signals. If a pressed button blocked for over 20 seconds, the board will ignore this
signal to ensure running in good order.
4. Indicator light
There is a bigger indicator light on a landing call board. The light will show “inspection”
when it is located in hall while show “overload” when located in car.
There are 3 indicator lamps on a landing call board. Meaning as follow:
LED1 communication indicator (blinks when the communication is on)
LED2 CPU working indicator (always blinks)
7
SP-3000
Operation Manual
LED3 Power lamp (always on)
Illustration: landing call board structure & sketch map
158
151
inspection
service off input
V-
8
B2
A2 V+
+24V
VDN
DNLP
V+
0V
63 47
A2
VUP
UPLP
V+
B2
VST
SP-3000
Operation Manual
CHAPTER FOUR
Control System
This chapter will tell you how the system is established by serial communication. Parallel
communication, group control and remote monitoring are optional, not standard
configuration.
1. Main board
The main board takes majority working of the system. It includes I/O of all control
signals, I/O of car & landing calls, emergency error handle, call processing dispatched
by parallel controller, real-time status record (i.e. run time, run times, errors etc.) and
an english person-computer interface.
2. Serial communication landing-call board
In charge of gathering & registering landing calls; real time showing the current floor.
3. Serial communication car call board
Car calls gather & register.
4. Serial communication car instruction board
To extend I/O for main board; when main board I/O port not enough, a car instruction
board needed to gather/output instruction signals in car.
5. Parallel controller
To gather each lift’s running status, register each lift’s landing calls; real time by
optimization calculation distribute landing calls; make reasonable running schedule.
To simply describe, this book refers to 2 lifts parallel control and 3+-group control as
parallel control.
6. Remote monitoring control board
There are 2 instances. Instance 1 is monitoring only 1 lift’s run. Connecting RS232
serial communication port of main board with Modem; Modem then connected to
telephone dialer network to carry out the monitoring. Instance 2 is to monitor multi-units
lifts in one building. You should add a signal gathering control board, whose RS485 Port
connected with each lift’s port 4, to gather each lift’s run status; then via RS232 port of
signal gathering control board connecting with Modem to carry out monitoring. The
software can monitor 8 lifts at the same time.
9
SP-3000
Operation Manual
0V
D
C
B
A
+24V
PE
0V
B2
A2 +24V
0V B1 A1 +24V
1
1
SP-3000 microcontroller
A1
B2
B1
A2
A1
V+
B1
B2
A2
V+
2
2
A1
inspection
Vfloor 2
V-
full load
V-
floor 1
car call board 1
B1
V-
full load
inspection
V+
B2
A2
V+
V+
A1
B1
V+
A1
B1
car call board 2
V-
V-
3
3
V+
A1
B1
V-
V-
floor N-1
B2
A2
V+
V+
Drawn By:
V+
A1
floor N
V4
4
V-
full load
B1
car call board 4
Sheet Of
A1
inspection
Revision
Date:
serial communication wiring diagram
Number
A1
full load
Title
Size
File:
V+
inspection
V-
car call board 3
B1
B2
A2
V+
B1
SUMPO
V-
D
C
B
A
10
SP-3000
Operation Manual
D
C
B
A
1
1
SP-3000 microcontroller
B3
A3
B3
2
2
SP-3000 microcontroller
A3
3
3
Title
Size
File:
Number
Revision
Sheet Of
parallel & group control wiring
diagram
Date:
SP-3000 microcontroller
the 8th Unit
B3
A3
4
4
Drawn By:
SUMPO
D
C
B
A
11
SP-3000
Operation Manual
CHAPTER FIVE
Input Signals
Standard SP-3000 can process 45 input signals. You can define follow 45 input signals in
parameter setting. Defining any input signal to any input port on main board is ok (but
encoder pulse signal input can only be on X1~X2). The system can automatically
recognize port definition thereby distinguish the process-needed input signals.
Input signals overview:
Sequence
Sequence
Signal
No.
Signal
No.
1
Car stop (Inverter zero speed)
25
Light load
2
Decelerating pass
26
Non-stop run
3
Encoder signal
27
Door open limit B
4
Inverter fault
28
Door close limit B
5
Doors lock
29
Door switch
6
Inspection
30
Level zone
7
Up Inspection
31
Force Land Up 2
8
Down Inspection
32
Force Land Down 2
9
Fireman
33
Light bar
10
Service off
34
Light bar B
11
Safety brake contactor
35
Car door lock
12
operator
36
Brake checking
13
Main output feedback
37
Safety brake relay
14
Brake feedback
38
Door lock relay
15
Over load
39
Force Land Up 3
16
Full load
40
Force Land Down 3
17
Door open button
41
Fireman mode
18
Door close button
42
Emergency power
19
Door open limit
43
Emergency run
20
Door close limit
44
Inverter working
21
Top limit
45
Pre-open door
22
Bottom limit
46
Customer
23
Force Land Up 1
47
Customer
24
Force Land Down 1
48
customer
Notes 1:
1. You can define signals you need in actual situation. Not all signals need to be defined.
2. The following signals MUST be defined in “input port definition”; otherwise there will
be danger or bad order running (Arabic number in brackets is sequence No.):
(11)safety brake contactor, (6)inspection, (7)up inspection, (8)down inspection,
(13)main output feedback, (14)brake feedback, (5)doors lock, (21)top limit, (22)bottom
limit, (23)force land up1, (24)force land down 1, (30)level zone, (15)over load, (33)light
bar, (17)door open button, (18)door close button, (19)door open limit, (20)door close
12
SP-3000
3.
4.
5.
6.
7.
Operation Manual
limit, (16)full load, (4)inverter fault.
The following signals USUALLY be defined in “input port definition”(Arabic number in
brackets is sequence No.):
(10)service off, (36)brake checking, (9)fireman, (12)operator.
system with YASKASIA,Fuji inverter, “brake feedback” and “contact feedback” signals
instructed by main board, you MUST define follow signals (Arabic number in brackets
is sequence No.):
(1)car stop (invert zero speed), (44)inverter working.
system with Emerson inverter, if specific distance of car stop request, you MUST
define follow signals in “input port definition” (Arabic number in brackets is sequence
No.): (1)car stop (inverter zero speed), (2)decelerating pass.
If multi-speed control, there is no need to define “decelerating pass” and no need to
define “inverter zero speed” in general.
if system runs at high speed (basic speed) & decelerate distance is larger than
distance between one & next floors, the following signal MUST be defined in “input
port definition”: (31) force land up 2, (32)force land down 2.
signals not mentioned define according to actual situations. If one signal not defined in
“input port definition”, system will handle nothing of this signal. For example, function
of “operator control non-stopped”, if system no need this function, do NOT define
“operator control non-stopped” in “input port definition”.
Notes 2:
1. inspection: when the signal is disconnected, system will be on inspection running
status; when it is connected, system will be on normal running status.
2. up inspection/down inspection: the 2 car signals can be used for operator to make
system directional run. That is under “operator” condition, pressing “up inspection”
button can up run the system, pressing “down inspection” button can down run the
system.
3. main output feedback: to feedback the main output contactor’s actual working status.
4. brake feedback: to feedback brake contactor’s actual working status.
5. brake checking: it’s optional. Most brake equipment has its own brake checking switch
to feedback the actual working status.
6. doors lock: to feedback doors lock contactor’s actual working status. it’s a normal
open contactor.
7. car door lock: it’s optional. When the signal is not series connected in door lock circuit,
it can directly connect input of main board.
8. top limit/bottom limit: they respectively installed on slightly higher location than top
floor level zone and slightly lower location than bottom floor level zone. When top limit
switch is normal open, fast/slow up running is not admitted. When bottom limit switch
is normal open, fast/slow down running is not admitted.
9. force land up 1/force land down 1: the force land up 1 switch is installed between the
top floor level zone and second top floor level zone. It’s used for up run floor regulation.
Force land down 1 switch is installed between the bottom floor level zone and second
bottom floor level zone. It’s used for down run floor regulation.
13
SP-3000
Operation Manual
10. force land up 2/force land down 2: it’s optional. When system runs at high speed
(basic speed) and decelerating distance is larger than distance between one and the
next floor, you should add a pair of force land switch, that is force land up 2/force land
down 2.
11. fireman: it’s optional. system will immediately switch to fire run mode when fire control
switch is actuating during atuo running status. There is no need to set “fireman” signal
in system without fire control switch.
12. fireman operating: it’s optional. The “fireman operating” switch is located in the car.
System with “fireman operating” switch, please set the parameter “fireman mode” as
“return firebase”. In this instance, system will directly run to firebase if there is fire
control, open the door and keep the door not closed, when fireman arrives, press
“fireman operating” switch, system will immediately goes into fire run mode.
13. safety brake contactor: to feedback working status of the contactor on safety brake
circuit.
14. safety brake relay: it’s optional. The safety brake relay & contactor both serial
connected in the circuit. They magnetic suctioned and released simultaneously. If only
either of them is open connected, system will regard it safety brake circuit error so as
to enhance security.
15. emergency power: to feedback current working status of emergency power. It’s used
for system with UPS. When emergency power signal is actuating, it means power in
use is emergency power. In using of emergency power, if lift is not at level zone, it will
auto search the nearest one and open the door after leveling. then system will delay a
“auto close door” time, The lift will output “stop emergency power” signal after the
delayed time.
16. emergency run: there is no need to define this signal if no emergency power. It’s
optional when system with emergency power. When system supplied by emergency
power and “emergency running” signal connected through, system, will not output
signal of “stop emergency service” can still slow run, but not fast run.
17. light load, full load and overload: “light load” signal is optional. it’s used for preventing
trouble. when there is light load signal input, if car calls reach the number in parameter
setting, system will regard this as trouble and clear all the car calls. When there is full
load signal input, system will direct run and not respond car calls. The overload signal
is only valid when system is parking. If system overloads, it will not run and the door
will forcibly open, meanwhile output overload alarm.
18. non-stop run: it’s optional. Under operator mode, pressing “direct run” button until
system starts, the lift will run directly to the registered car call floor, not responding
landing calls.
19. door open limit B, door close limit B, Door switch, Light bar B:
They are used for system with double doors. Under inspection status, front door is in
working when door switch is open. Back door is in working when door switch is closed.
if only one door will open at any floor in double doors system,it means door switch
doesn’t work under auto run status. if either front door or back door can open at
certain floor in double doors system, it means door switch works at the certain floor
under auto run status.
14
SP-3000
Operation Manual
20. inverter zero speed (car stop): the signal connected with a output port on inverter. For
KEB and MICO inverter, no need to define this signal. For Emerson inverter, it’s
optional. this signal corresponds to “car stop” output of Emerson inverter. For
Yaskawa,Fuji inverter, you must define this signal. After lift decelerate to destination
floor level zone, Main board, from the signal began to act, will start braking after a time
lag of “brake delay”, then withdraw the run instruction of the inverter after a “car stop
duration”.
21. inverter fault: the signal is available when the inverter is fault. Main board will ban
system running when inverter fault signal acts.
22. decelerating pass: this signal is from Emerson Inverter(specific distance car stop
request); system with others inverter no need this signal.
23. inverter working: after main board transmit running instruction, the signal would act
within given time. That means inverter has already responded the instruction. When
main board received the signal, it will start braking after a time lag of “ brake delay”.
For instance a normal open contactor: when the inverter is powered on, “inverter
working” signal should be open. When main board gives out running instruction, the
“inverter working” signal will be closed, which means the inverter has already
responded main board’s instruction. Main board will not brake if “inverter run” not
connected through. after the lift decelerate to stop, “inverter working” signal should be
open to prepare the next run. Vice versa a normal closed contactor. For FuJi inverter,
this signal corresponds to “35: brake signal 1”. Main board transmits run instruction,
inverter output “brake signal 1”, which means braking is admitted. When lift
decelerates to stop, the signal open again to prepare the next run.
24. Pre-open door: it’s optional. when inverter output pre-open door signal at the time lift
decelerate to destination floor door zone, main board output open door signal and
door opened.
INPUT SIGNAL LOGIC OVERVIEW:
Signal
Logic
Signal
Logic
Car stop (Invert zero
speed)
Normal open
Force Land Down 1
Normal close
Decelerating pass
Normal open
Force Land Up 2
Normal close
Doors lock
Normal open
Force Land Down 2
Normal close
Car door lock
Normal open
Force Land Up 3
Normal close
Door lock relay
Normal open
Force Land Down 3
Normal close
Up Inspection
Normal open
Level zone
Customer
Down Inspection
Normal open
Light load
Customer
fireman
Normal open
Full load
Customer
Fireman mode
Normal open
Over load
Customer
operator
Normal open
Light bar
Customer
Non-stop run
Normal open
Light bar B
Customer
Door open button
Normal open
Door open limit
Customer
15
SP-3000
Operation Manual
Door close button
Normal open
Door close limit
Customer
Door switch
Normal open
Door open limit B
Customer
Emergency run
Normal open
Door close limit B
Customer
Inverter working
Normal open
Main
feedback
Customer
Inspection
Normal close
Brake feedback
Customer
Normal close
Brake checking
Customer
Safety brake relay
Normal close
Inverter fault
Customer
Top limit
Normal close
Service off
Customer
Bottom limit
Normal close
Emergency power
Customer
Force Land Up 1
Normal close
Pre-open door
Either normal open
or normal close
Safety
contactor
brake
output
Notes:
1. if input signal’s logic is normal open, that means this signal will work when it is
connected (the signal will act when it is connected on).
2. if input signal’s logic is normal close, that means this signal will work when it is open
(the signal will act when it is open).
3. “customer” means you can define certain signal’s logic as normal open or normal
close by setting the parameter.
4. signals not defined in “input port defining”, their logic can set as either normal open or
normal close. System will deal nothing with those not defined signals. Such as a non
double doors lift, defining open door limit B neither normal open nor normal close will
influence the running.
5. for KEB and MICO inverter, lift can only run when “inverter working” signal connected.
For YASKAWA inverter, “inverter working” signal is connected when car stop. it is
open when system run.
Signals defined in “input port defining”, if its logic can customize, then you must set it
correctly. Fox example: a non double doors system, you defined a unused input port
as door open limit B and set its logic as normal open, in this instance, the limit B will
not act and system will not run.
16
SP-3000
Operation Manual
CHAPTER SIX
Output Signals
Standard SP-3000 can process 39 output signals.
Y1-Y7、Y8-Y9、Y10-Y14 total 14 output terminals can be defined signals as follow.
Sequence
No.
1
2
3
4
5
6
7
8
9
10
11
12
13
Signal
Sequence
No.
21
22
23
24
25
26
27
28
29
30
31
32
33
Up
Down
Brake
Main output
Open door
Close door
Open door B
Close door B
Service off 2
brake enable
Bell
Overload output
Buzzer
Signal
Multi-speed 3
Enable, Level speed
Inverter reset
Inspection speed
Fire base
Close emergency service
system running
Decelerating
Inspection output
Full load output
Undefined
LCD 一
LCD A(1)
14
Power management (normal
open)
34
LCD B(2)
15
Power management (normal
close)
35
16
pre-opening door
36
LCD D(8)
17
Down run, PX1
37
LCD E(1)
18
Up run, PX2
38
LCD F(2)
19
Multi-speed 1, PX3
39
LCD G(4)
20
Multi-speed 2, PX4
40
LCD 10
LCD C(4)
Car instruction board Y1-Y16 total 16 output terminals (or Y1-Y8 total 8 output points) can
be defined signals as follow:
16
Fan & lighting
27
Up
17
Bell
28
Down
18
Buzzer
29
Floor indicate -
19
Inspection
30
Floor indicate A (0,0)
20
Full load
31
Floor indicate B (1,1)
21
Overload
32
Floor indicate C (2,2)
22
Door open
33
Floor indicate D (3,3)
23
Door close
34
Floor indicate E (4,0)
24
Leveling
35
Floor indicate F (5,1)
25
Decelerating
36
Floor indicate G(6,2)
26
System running
37
Floor indicate 10
17
SP-3000
Operation Manual
Notes:
1. Defining Y1-Y7 as inverter output signals. Please do not define signals unrelated to
inverter on Y1-Y7. Signals from main board to inverter will vary with inverter type.
Such as signal “up run, PX1”, for Emerson inverter, it means “PX1”; while for KEB
inverter, it means “up run”.
2. System with Emerson Inverter, if specific distance car stop request, Y1-Y7 should be
respectively defined as PX1、PX2、 PX3、PX4、no output signal、inverter enable、
inverter reset.
3. Multi-speed (binary combination) control system with KEB inverter, Y1-Y7 should be
respectively defined as: multi-speed 1, multi-speed 2, multi-speed 3, up, down,
inverter enable and inverter reset.
4. Parallel control (point to point) with MICO inverter, Y1-Y7 should be respectively
defined as: high speed, medium speed, low speed, up, down , crawl speed, inspection
speed.
5. multi-speed (binary combination) control system with YASKAWA inverter, Y1-Y7
should be respectively defined as: multi-speed 1, multi-speed 2, multi-speed 3, up,
down, inverter enable and inverter reset.
6. multi-speed (binary combination) control system with FuJi inverter, Y1-Y7 should be
respectively defined as: multi-speed 1, multi-speed 2, multi-speed 3, up, down,
inverter enable and inverter reset.
7. Y8 & Y9 constantly output as door open signal & door close signal.
8. for SP-3000-F main board, Y15-Y18 constantly output: brake enable, brake, main
output & main power.
9. for SP-3000-V main board, there are no Y15-Y18 points on it. If system with
YASKAWA or FuJi inverter, the 2 essential signals “main output” & “brake” will be out
from Y14 & Y13. In this instance, parameter setting on Y14 & Y13 doesn’t work.
10. service off 2 (main power) is located the input side of the inverter. The contactor will be
open when service off.
11. main output, also named as main contactor, is located the output side of the inverter. It
can be located the input side of the inverter in system with MICO inverter.
12. brake: it controls brake contactor. The brake contactor controls mechanical brake
equipment.
13. high voltage brake release-enable: brake equipment with synchronization motor
needs high voltage to make the brake open but to keep it open, only low voltage is
needed. Here you need signal of “high voltage brake release-enable”.
14. pre-open door output: when system decelerates to destination floor and the “pre-open
door” signal from inverter begins to act, main board output “pre-open door output”
signal. The signal will be terminated when main output contactor broken.
15. Fire base: under fire control status, system will output this signal when it arrives a fire
base station. The signal output will at the fireman station. Signal terminates when
system leave the fire base station.
16. close emergency service: if sudden electricity break during system run, operator
should shift to UPS power supply so that car can level at nearest door zone and open
door to release passenger. A few seconds (auto close door time) after the door
18
SP-3000
17.
18.
19.
20.
21.
22.
23.
24.
Operation Manual
completely opened, main board will output “stop emergency service” signal to shut
down the UPS; meanwhile car door keeps open. If input signal of “emergency run”
comes, main board will not output “stop emergency service” signal and system can
run at inspection status.
fans & lighting: the signal switches on when car power is off. But it will be broken if
main board lose its power.
bell: a period of time(delay time) after system starts decelerating, there will be bell
signal output. You can adjust the delay time (up/down delay time) & bell output
duration by setting the parameter.
buzzer: there would be buzzer output if overload.
system running: the signal output is available from system start to end. Here “end”
means main board removes all the instruction to the inverter.
decelerating: signal output available from system start decelerating to stop.
leveling: signal output: 1) when system decelerates to destination floor 2) system
arrives at door zone during up/down inspection run. The signal output will be
terminated if system stop running.
up / down : signal output available when system is running or directional running.
floor indicate: these signals can directly output from main board by defining output
terminals. The outputs can be LCD、BCD or binary code. If output is binary code or
BCD, the measure unit is station. That is the bottom floor (station 1) output as 1,
station 2 output as 2, the other floors calculate in turns. Binary code or BCD outputs
can be used for station phonetic declaration.
Signal output
Binary code output
BCD output
LCD output
Floor indicate
―――
―――
Negative
underground floor
Floor indicate A(0,0)
Bit 0
Bit 0
LCD A
Floor indicate B(1,1)
Bit 1
Bit 1
LCD B
Floor indicate C(2,2)
Bit 2
Bit 2
LCD C
Floor indicate D(3,3)
Bit 3
Bit 3
LCD D
Floor indicate E(4,0)
Bit 4
Bit 4
LCD E
Floor indicate F(5,1)
Bit 5
Bit 5
LCD F
Floor indicate G(6,2)
Bit 6
Bit 6
LCD G
Floor indicate 10
―――
―――
Tens digit
19
sign,
SP-3000
Operation Manual
CHAPTER SEVEN
Wiring
This chapter illustrates the wiring of SP-3000-V & the default ports definition. Most ports
definitions can be customized by manually changing parameter setting, but it is strongly
recommended that you remain default ports definitions. Because uniform ports definition
can simplify system design and bring convenience for locale maintenance &
telecommunications.
20
SP-3000
Operation Manual
3A 250V~AC
Y14
multi-function output 13
Y13
SP2
3A 30VDC
load range
COM11
public port COM11
multi-function output 14
Communication port4
remote monitoring
CN10
COM10
3A 250V~AC
3A 30VDC
load range
multi-function output 12
COM3
public COM3(+24V)
X32
customer input 24
X31
customer input 23
Y12
COM9
Y11
multi-function output 11
X30
customer input 22
X29
customer input 21
X28
customer input 20
COM8
multi-function output 10
Y10
3A 250V~AC
3A 30VDC
load range
CN9
COM7
public port COM7
door open output
Y9
door close output
Y8
X27
customer input 19
X26
customer input 18
X25
customer input 17
CN5
CN8
public COM6
COM6
lift-speed-controller
multi-function output 7
Y7
multi-function output 6
Y6
multi-function output 5
Y5
multi-function output 4
Y4
multi-function output 3
Y3
multi-function output 2
Y2
multi-function output 1
Y1
COM2
public COM2(+24V)
X24
customer input 16
X23
customer input 15
X22
customer input 14
X21
customer input 13
X20
customer input 12
X19
customer input 11
X18
customer input 10
X17
customer input 9
CN7
CN4
COM4
public port COM4(+24V)
COM1
public COM1(+24V)
X16
customer input 8
X6
X15
customer input 7
spped controller feedback 2
X5
X14
customer input 6
speed controller feedback 1
X4
X13
customer input 5
speed controller feedback 5
X8
speed controller feedback 4
X7
speed controller feedback 3
speed controller feedback 1
X3
CN2
pulse A
X2
pulse B
X1
customer input 4
X11
customer inout 3
X10
customer input 2
X9
customer input 1
CN3
A2
B2
V-
V+
+24V
21
CN6
PE
CN12
SP1
B2
0V
landing
call
communication
port
A2
Communicarion
port3
parallel
CN1
PE(接地)
encoder
feedback
signal
SP-3000
COM5
public port COM5(+24V)
X12
B1
B1
A1
A1
CN11
car call
communication
port
Operation Manual
load range
3A 250V~AC
3A 30VDC
public COM11
COM11
main output
Y14
brake
Y13
SP2
SP-3000
Communication port4
remote monitoring
CN10
COM10
power managment
load range
3A 250V~AC
3A 30VDC
COM3
public port COM3(+24V)
X32
operator
X31
main output feedback
Y12
COM9
Y11
buzzer
X30
brake feedback
X29
safety brake contactor
COM8
service off
Y10
3A 250V~AC
3A 30VDC
load range
CN9
public COM7
COM7
door open output
Y9
Y8
door close output
X28
doors lock
X27
service off
X26
safety brake relay
X25
brake checking
CN5
CN8
public COM6
COM6
lift-speed-controller
inverter reset
Y7
inverter enable
Y6
multi speed 3
Y5
multi speed 2,PX4
Y4
multi speed 1,PX3
Y3
up run,PX2
Y2
down run,PX1
Y1
COM2
public COM2(+24V)
X24
down inspection
X23
up inspection
X22
inspection
X21
fireman
X20
over load
X19
full load
X18
door close limit
X17
door open limit
CN7
CN4
COM4
public COM4(+24V)
COM1
public COM1(+24V)
X16
door close button
door open button
inverter fault
X8
inverter working
X7
car stop
X6
X15
X5
X14
light bar
X13
bottom limit
X4
X3
CN2
encoder signal A
X2
pulse B
X1
top limit
X11
force land down 1
X10
force land up 1
X9
level zone
CN3
A2
B2
V+
+24V
22
CN6
V-
PE
CN12
SP1
B2
0V
landing call
communication
port
A2
Communicarion
port3
parallel
CN1
PE
encoder
feedback
signal
SP-3000microcontroller default
port definition
COM5
public COM5(+24V)
X12
B1
B1
A1
A1
CN11
car call
communication
port
SP-3000
Operation Manual
CHAPTER EIGHT
Function Details
Basic functions of the lift as following:
1.
Inspection run
2.
Operator
3.
Operator direction first
4.
Slow run self-rescue
5.
Emergency UPS run
6.
All calls-responding control
7.
open/cose door automatic at station, pre-open the door
8.
landing area door open
9.
door close button to close the door ahead of default time
10.
Door open repeatedly if door blocked
11.
change station to stop
12.
Non-stop when full load
13.
Non-stop when operator button pressed
14.
Bell
15.
Intelligent power management
16.
Remove mistake car call
17.
remove reverse car call
18.
absolute-value encoder optional
19.
Humanistic LCD & menu
20.
data self-learning
21.
service floor setting
22.
actual floor setting
23.
I/O ports setting
24.
input signal logic setting
25.
intelligent handle input signals
26.
dots-lattice mode floor display
27.
scrolling show running direction
28.
floor position trimming
29.
fireman return floor
30.
fireman operation
31.
fireman run
32.
door-open disable outside door zone
33.
person-pinched prevention
34.
overload protection
35.
run overtime protection
36.
Trouble car
37.
force decelerating
38.
main output & brake contactor conglutination prevention
39.
door lock contactor conglutination prevention
40.
inverter error protection
23
SP-3000
Operation Manual
41.
real-time error show
42.
history error
43.
double built-in watchdog of main board
44.
service off
45.
Monitoring
46.
remote monitoring
47.
parallel control
48.
group control
1. Inspection Run: Pressing up/down button to run the lift at inspection speed; when
service off, pressing open/close door button to open/close door.
2. Operator: change shift bar to operator mode to carry out the following functions: auto
directional, manual directional, manual close door & non-stop run etc.
3. operator direction first: you can change the run direction by this function even if the lift
already is auto directional.
4. slow run self-rescue: if lift stops at non door zone, under non-inspection status, as
long as it meets startup requirements, the lift will slow run till level zone, then stopped
and open the door.
5. emergency UPS run: if sudden electricity broken during the run, you can start UPS.
The lift will slow run till level zone then open the door to release passenger.
6. All calls-responding control: landing calls from any floor will be responded by pressing
the up/down button.
7. open/cose door automatic at station, pre-open the door: under auto run or operator
status, system will respond calls and open the door once automatic. Until the door
completely open, followed by a time delay, system will automatic close the door. The
time delay is auto close door time. It’s adjustable. When you give main board a
“pre-open door” signal, car door can open in advance at landing level zone.
8. landing area door open: car door will open automatic when the landing call button is
pressed. Keep the button pressed, the door remains open. If button pressed time
beyond 20 seconds, system will ignore this call and car door will automatic close.
9. door close button to close the door ahead of default time: you can press the door
close button to close the car door immediately, that is to say, no need to wait the door
close automatic.
10. Door open repeatedly if door blocked: if the door lock is not connected well after
period of time’s shutting, system regards it as door blocked. The door will open
repeatedly till it closed well. Door block time parameter setting is adjustable.
11. change station to stop: if system tried opening car door for period of time but open
limit switch still doesn’t respond, system would regard this as door blocked. car door
will close automatic and system would respond the next call. Door block time
parameter setting is adjustable.
12. Non-stop when full load: system will respond only car calls if full loaded, not
responding landing calls.
13. Non-stop when operator button pressed: if operator press “Non-stop manual
operation” button before system starts, the following running will directly run to the
24
SP-3000
14.
15.
16.
17.
18.
19.
20.
21.
22.
23.
24.
25.
26.
27.
28.
Operation Manual
registered car call floor, not responding the landing call.
Bell: there will be a bell signal output during decelerating or leveling process so that
passengers in the car or on the platform can know that the lift is leveling. The bell can
ring at any time from deceleration starting till landing. The bell ring duration is
adjustable by setting the parameter.
Intelligent power management: car lighting & fan will power off if car call or landing call
registered beyond the time. On the other hand, they will resume work if new car call or
landing call signals in. The power management time is adjustable by setting the
parameter.
remove mistake car call : if you pressed an floor number by mistake in car call, you
can remove it by pressing the number again. The function is adjustable by setting the
parameter.
remove reverse car call: if the lift is arriving or landing at a certain floor, reverse
direction car calls will be removed automatically. The function is adjustable by setting
the parameter.
absolute-value encoder optional: system with KEB, MICO & YASKAWA inverters can
effect high accuracy if you match a absolute-value encoder to it. No matter it is
inspection run, emergency brake or sudden electricity broken during run, system will
not show wrong floor.
Humanistic LCD & menu: LCD can not only show lift’s run status, direction, failure &
prompt message but also can be used for setting all kinds of parameter & looking up
run records etc.
data self-learning: before lifts runs, start self-learning function of car trail to learn all
kinds of datas (floor high, total floors, door zone length,force decelerating switch
position etc.) and save these data permanently.
service floor setting: using this function, you can set the lift to stop at which floor or
non-stop at which floor.
actual floor setting: you can set actual floor each station corresponds to. System runs
measured by station, but car display board and landing call board both show the
actual floor.
I/O ports setting: Except encoder pulse signal, you can define any input signal onto
any input port of main board. Same situation, you can define any output signal onto
any output port of main board.
input signal logic setting: either open-circuit or close-circuit is ok for 16 input signals.
intelligent handle input signals: system has more than 40 input signals. Customer will
use only portion signals. System will ignore those unused signal and deal nothing with
them.
dots-lattice mode floor display: car board and landing call board both adopt dots-lattice
mode display. It make display lively.
scrolling show running direction: car board and landing call board both scrolling
show running status.
floor position trimming: system will trim positional signal upon self-learning position
pulse when it runs to force decelerating act point or each floor’s level zone. When
system touches the up force-decelerating switch or down force-decelerating switch, it
25
SP-3000
29.
30.
31.
32.
33.
34.
35.
36.
37.
38.
39.
40.
41.
42.
43.
44.
Operation Manual
will auto trim the floor number.
fireman return floor: setting “fireman mode” as “fireman return floor”, when you press
the “fireman” button, system will immediately cancel all car calls and landing calls,
return to fire station rapidly and open the door. In this case, auto close door or manual
close door both disabled.
fireman operation: setting “fireman mode” as “fireman return floor”, when you press
the “fireman” button, system will immediately cancel all car calls and landing calls,
return to fire station rapidly and open the door. In this case, auto close door or manual
close door both disabled. When fireman arrives, who should press the “fireman
operation” button in car, system will start fire controlling. At the time, system will only
respond car calls. All the car calls will be cleared when arrived at the station.
fireman run: setting “fireman mode” as “fireman run”, when “fireman” button pressed,
system will immediately clear all car calls and landing calls, then return to station,
open the door and start fire controlling. At this time, system will only respond car calls.
All the car calls will be cleared when arrived at the station.
door-open disable outside door zone: if lifts stops at non door level, there is no auto
open door or manual open door function.
person-pinched prevention: when light bar or security baffle act, system will
unconditionally open car door. car door will not closed if light bar or security baffle
action not clear.
overload protection: when overload switch acts, system will not close car door.
overload lamp will light and buzzer will ring.
run overtime protection: main board real-time detect running status during run process.
If floor shift not effect during period of time, system will ban running.
trouble car: when lightload switch acts and total car calls exceeds a certain number,
system will clear all car calls. The figure of car call numbers can adjust by setting
parameter.
force decelerating: system installs 1~2 pairs force decelerating switch on top & bottom
to prevent lift beyond the field.
main output & brake contactor conglutination prevention: system checks main output
& brake contactors acts reliably or not. If contactor conglutinated, system will ban
running.
door lock contactor conglutination prevention: system checks door lock contactor acts
reliably or not. if contactor conglutinated, system will ban running.
inverter error protection: system will emergently brake if received inverter error signal.
real-time error show: when system occurs run error, error status will real-time showed
on LCD until error cleared. The 10 most security-related errors will real-time showed
as error code on landing call boards.
history error: if run error occurred, system will real-time record error’s time, run status
& details.
double built-in watchdog of main board: main board has watchdog of hardware &
software. If CPU error or program error is inspected, main board will reset once, close
all outputs by strong hand to restart system.
service off: under auto run or manual run status, if service off switch acts, all landing
26
SP-3000
45.
46.
47.
48.
Operation Manual
calls will be cleared. Lift can continue responding car calls until all car calls executed
over. lift will return service off base station, open/close car door automatic, and stops.
Floors display blacks out. System will restart when service off switch is reset.
monitoring: connecting RS485 data bus, RS485-232 commutator, monitoring PC and
monitoring software, you can monitor lift floor location, run direction, error status etc
on PC.
remote monitoring: Connecting Modem and telephone cable, you can real time remote
monitor locale lifts’ running.
parallel control: parallel control is 2 lifts associate to respond car/landing calls by
RS485 serial data bus to transmit data. The parallel controls distribute landing calls on
principle of the nearer, the priority. Any landing calls, system will distribute it to the
nearest lift to maximum shorten passenger’s waiting time. The system runs 2 lifts
according to principle “lift gets in first responds calls first”, “the nearer, the more
priority”, & “same direction priority”. Parallel control has another function: returning to
basic station automatic. The lift nearer to the station returns first.
group control: group control is multi-lifts associate to respond car/landing calls by
RS485 serial data bus to transmit data. The parallel controls distribute landing calls on
principle of the nearest, the priority. Any landing calls, system will distribute it to the
nearest lift to maximum shorten passenger’s waiting time. The system runs multi lifts
according to principle “lift gets in first responds calls first”, “the nearest, the more
priority”, & “same direction priority”. If one lift is out of the group for service off or
inspection, the rest lifts can still group run. Group control has another function:
returning to basic station automatic. The lift nearest to the station returns first.
27
SP-3000
Operation Manual
CHAPTER NINE
LCD & Parameter Setting
1. Parameter view & setting
Enter parameter setting mode
At home page, press “enter” button for parameter setting mode. You can view or
change the parameter. The selection parameter will show in highlight.
Select the parameter you want to view or modify
Press “up” or “down” button to select the parameter
previeous window or next window
Select the item you want, press “ enter” key to enter the next window or ESC key to
back the previous window
Parameter view or setting
Saving or cancel modification
When finished parameter setting, Press “enter” key to save it and back to the
previous menu.
Press “ESC” key to cancel the modification and back to the previous menu.
2. LCD display sketch map
Example of running status:
Row 1:name of manufacturer;
Row 2: date, time and run frequency
Row 3: run status & car guide position (showed by encoder pulse);
Row 4: prompt info
ABCD LIFT CO., LTD
28 July am12:00 times
th
18 Floor. Insp. Up
SETTING
000123
0003 2531
VIEW
Example of error status:
Row 3 right real time shows error info
ABCD LIFT CO., LTD
28 July am12:01 times
th
19 Floor.
000125
Secure Circuit Error
SETTING
VIEW
Example of parameter setting mode (press “enter”)
Initial view as follow, press “ESC” to exit and return to current page view.
System set
Basic set
Port set
Floor set
28
SP-3000
Operation Manual
press “down” button 4 clicks, show as follow:
basic set
port set
floor set
car display
when “call display” is selected, Press “enter” to expand it, you can view or change
some settings. Only system administer is admitted to modify the parameter. Before you
modify the parameter, type PIN to put system on inspection status. Press “ESC” to exit
and return to previous menu.
Room call
Sign dispose
Remove 2
Auto
Example of view mode. “Home Page” is default selection.
Home page
Input
Output
Error record
Example of view mode
Press “down” button to select “error record”, press “enter” button to view the records.
The following Row 1 shows date and time errors occurred; Row 2 shows system’s
running status; Row 3 shows errors sequence & details.
July 28, 2005 AM12:02
20 F Insp.
Up
E01 door open
Setting
View
Press “down” button to view all history errors. Press “ESC” button to exit and return to
previous menu. Press “enter” button to parameter settings mode.
29
SP-3000
Operation Manual
3. view running status
At home page, LCD can real time show lift current run status.
At home page, press “ESC” button, entering “view” menu to select the following:
Home page, input, output, error record, landing call board connection status, upward
landing call, downward landing call, time record, times record, version information,
registers. Details as follow:
3.1 home page
home page is default display when system starts.
Row 1: manufacturer’s name & label.
Row 2: date, time and running sequence no.
Row 3: floor No., run status, run direction, car guide rail position (encoder pulse No.)
& error (prompt) information. If there is no error (prompt) information, row 3 right side
will show encoder pulse number. If there is error (prompt) information, row 3 right will
show either failure information when lift stops or encoder pulse when lift runs. In
system with EM inverter, inverter processes car guide rail position data, so it won’t
show encoder pulse. System has 9 sorts of run status and 24 sorts of errors. The 9
run status from high priority to low is: service off, self learning, inspection, door zone
searching,decelerating, fireman mode, operator, parallel control & auto. The priority
higher, the anterior showed. The 24 errors from high priority to low is: safety circuit
error, force land or limit error, inverter error, main contactor error, brake
contactor error, door lock error, input setting error, overtime run, EEPROM
error (a clip used for saving parameter settings), output interrupt, brake
interrupt, brake checking error, door lock relay error, limit interrupt, inspection
insert during run, open door during run, self learning successful, self learning
unsuccessful, wrong floor, door jam, back door jam, car call communicate error,
self learning needed & landing call communicate error. The priority higher of
above mentioned, the anterior showed.
Row 4: prompt info.
3.2 input port status:
There are 32 input ports on main board. You can real time monitor each port status by
LCD .
Row 1: prompt information
Row 2: X1~X16 input status. X1 is at the leftmost; X16 is at the rightmost.
Row 3: X17~X32 input status. X17 is at the leftmost; X32 is at the rightmost.
If one input port is disconnected, the corresponding bit will show a hollow square; if
one input port is connected, the corresponding bit will show a solid square.
3.3 output port status
There are 14 standard relay output ports on main board. You can real time monitor
each port status by LCD.
Row 1: prompt information
Row 2: Y1~Y14 output status. Y1 is at the leftmost; Y14 is at the rightmost. The
rightmost 2 ports have no defining.
Row 3: the 8 extended output port status
If an input port is disconnected, the corresponding bit will show a hollow square; if an
30
SP-3000
Operation Manual
input port is connected, the corresponding bit will show a solid square.
3.4 error records:
Main board can save latest 20 failure records.
Row 1: dates & times of error
Row 2: system’s run status when error occurred. It includes run mode, working or not,
run direction. Run mode include auto, fireman, inspection, door zone searching. Here
auto also includes operator, parallel control and group control.
Row 3: error details: the details from high priority to low is: emergency brake, force
land or limit error, inverter error, main contactor error, brake contactor error,
door lock error, input setting error, overtime run, EEPROM error, encoder error,
output interrupt, brake interrupt, brake checking error, door lock relay error,
limit interrupt, inspection insert during run, open door during run, door jam,
back door jam, car call communicate error & landing call communicate error.
The priority higher of above mentioned, the anterior showed.
Page up or down can view history errors.
3.5 landing call board connection status
LCD can real time show connection status between each floor’s landing call board
and main board. The connection status shows by station (absolute floor). If landing call
board is well connected with main board, the corresponding bit will show as a solid square.
You can check landing call boards connection status by LCD.
The following may cause bad connection between main board and landing call board: 1)
landing call board address is not assigned or wrong assigned; 2) although landing call
board address is correctly assigned, top floor setting of main board less than actual floors.
3) cables between landing call boards not connected well or wrong connected.
3.6 car call
3.7 upward landing call
3.8 downward landing call
LCD can real time show registration of car calls, upward landing calls & downward
landing calls. Floor selection or calls registration is based on station. When calls
available, the corresponding bit will show as a solid square.
3.9 time records
Row 1: current time. Current time will be cleared if re-powered.
Row 2: time in total
Row 3: tractor run time
3.10 times record
Row 1: door open times
Row 2: power-on times
Row 3: emergency brakes times
3.11 version information
Main board consists of 2 circuit boards. 2pcs powerful CPU associatively control
running. Here you can find basic information of software & hardware.
Row 1: prompt information
Row 2: from left to right in turn shows the upper board’s software version, dates,
hardware version & sequence No.
31
SP-3000
Operation Manual
Row 3: from left to right in turn shows the lower board software version, dates,
hardware version & sequence No.
3.12 registers: only for producers
32
SP-3000
Operation Manual
CHAPTER TEN
Parameter List
Menu Overview:
Sequence
No.
Display
English
1
Home page
Home page
2
In
Input
3
Out
Output
4
Err rec
Error record
5
Land call
Landing call board connection status
6
Car call
Car call
7
Upw land call
Upward landing call
8
Downw land call
Downward landing call
9
Time rec
Time record
10
Times rec
Times record
11
Ver info.
Version information
12
Reg.
Registers
Sequence
No.
Display
English
1
System set
System setting
2
Basic set
Basic setting
3
Port set
Port setting
4
Floor set
Floor setting
5
Call display
Call display
Sequence
No.
Display
English
1.1
1.1.1
Days and dates
yyyy.mm.dd.
week.x
hh.mm.ss.
Days and dates
1.2
Erase err
Erase error record
1.3
Lcd light
30 min
10 min
Lcd light
Black out in 30 min
Black out in 10 min
1.4
Pin 2
Pin 2
1.5
Change pin
Change pin
1.1.2
□
□
Sequence
No.
Display
English
2.1
Basic set
in
in
in
in
English Details
English Details
English Details
English Details
Basic setting
33
SP-3000
Operation Manual
2.2
Time set
Time setting
2.3
Distanc set
Distance setting
2.4
Comm. set
Communication setting
2.5
Ignore lift err
Ignore lift error
2.6
Start auto-tun
Start self-learning
2.1
2.1.1
2.1.2
2.1.3
2.1.4
Basic set
Lift No.
Spd sort
Run mode
Fireman mode
Basic setting
Lift No.
Speed sort
Run mode
Fireman mode
2.1.2
Spd sort
Basic spd
Basic, low spd
Basic, mid spd,
low spd
Speed sort
Basic speed
Basic, low speed
Basic, middle speed, low speed
2.1.3
Run mode
Single lift
Double
Run mode
2.1.4
Fireman mode
Fireman return basefloor
2.2
Time set
Time setting
Cabin pwr
Return b floor
Auto cls door
Door jammed
Open door delay
Cls door delay
Bell delay
Bell time
Start time
Open brake
Stop delay
Brake time
Run time
Land time
Level time
Cabin power
Return basic floor
Auto close door
Door jammed
Open door delay
Close door delay
Bell output delay
Bell rings time
Srart time
Open brake
Stop delay
Brake time
Run time
Land time
Level time
Distanc set
Distance setting
Door zon length
Abs encoder
Low spd dec. dist
mid spd dec. dist
High spd dec. dist
mid spd run dist
Door zone length
Abs encoder
Low speed decelerate distance
Middle speed decelerate distance
High speed decelerate distance
Middle speed run distance
2.2.1
2.2.2
2.2.3
2.2.4
2.2.5
2.2.6
2.2.7
2.2.8
2.2.9
2.2.10
2.2.11
2.2.12
2.2.13
2.2.14
2.2.15
2.3
2.3.1
2.3.2
2.3.3
2.3.4
2.3.5
2.3.6
34
SP-3000
2.3.7
2.4
2.4.1
2.4.2
2.4.1
2.4.2
2.5
2.5.1
2.5.2
2.5.3
2.5.4
2.5.5
2.6
Operation Manual
High spd run dist
High speed run distance
Comm. set
Communication setting
Land comm.
Car comm.
Land communication
Car communication
Land comm.
Land communication
mid spd
High spd
Middle speed
High speed
Car comm.
Car communication
mid spd
High spd
Middle speed
High speed
Ignore lift err
Ignore lift error
Port set
Lock fault
Brake fault
Main fault
Invert fault
Port setting
Door lock fault
Brake fault
Main output fault
Inverter fault
Start auto-tun
Start self-learning
□no
□yes
Sequence
No.
Display in English
English Details
3.1
In port
Input
3.2
Out port
Output
3.3
Input type
Input type
3.1
In port
Input
3.1.1
3.1.2
3.1.3
…
3.1.32
3.2
3.2.1
3.2.2
3.2.3
…
3.2.24
3.3
3.3.1
3.3.2
X1
X2
X3
…
X32
Out port
Output
Y1
Y2
Y3
…
Y24
Input type
Input type
Level
no
nc
Overload
Leveling
Normal open
normal close
Overload
35
SP-3000
3.3.3
3.3.4
3.3.5
3.3.6
3.3.7
3.3.8
3.3.9
3.3.10
3.3.11
3.3.12
3.3.13
3.3.14
3.3.15
3.3.16
Operation Manual
no
nc
Fullload
no
nc
Lightload
no
nc
Light bar
no
nc
Light bar b
no
nc
Contact back
no
nc
Brake back
no
nc
Invert fault
no
nc
Service off
no
nc
Open limit
no
nc
Cls limit
no
nc
Open limit b
no
nc
Cls limit b
no
nc
Brake check
no
nc
Pwr
no
nc
Normal open
normal close
Fullload
Normal open
normal close
Lightload
Normal open
normal close
Normal open
normal close
Normal open
normal close
Contact feedback
Normal open
normal close
Brake feedback
Normal open
normal close
Normal open
normal close
Normal open
normal close
Open door limit
Normal open
normal close
Close door limit
Normal open
normal close
Open door limit b
Normal open
normal close
Close door limit b
Normal open
normal close
Normal open
normal close
Emergency power
Normal open
normal close
36
SP-3000
Operation Manual
Sequence
No.
Display in English
4.1
Fact floor
4.2
Floor
4.3
Park floor
4.4
Door type
4.1
Fact floor
4.1.1
4.1.2
4.1.3
…
4.1.32
4.2
4.2.1
4.2.2
4.2.3
4.2.4
4.2.5
4.3
4.3.1
4.3.2
4.3.3
…
4.3.32
4.4
4.4.1
4.4.2
4.4.3
…
4.4.12
English Details
Floor 1
Floor 2
Floor 3
…
Floor 32
Floor
Floor number
Current floor
Service off
Fireman floor
Basic floor
Park floor
Floor 1
Floor 2
Floor 3
…
Floor 32
Door type
Floor 1
Floor 2
Floor 3
…
Floor 12
5. call display
Sequence
No.
Display in English
5.1
5.2
5.3
5.4
5.5
Room call
Sign dispose
Remove 2
Auto
Operator
English Details
5.1 Room Call
37
SP-3000
Operation Manual
call xx,xx,xx,xx
5.2 Sign dispose
5.2.1 remove car call
5.2.2 car floor
5.2.3 land call
5.2.4 floor encode
5.2.1 remove car call
□ remove when dec. (decelerating)
□ remove when stop
5.2.2 car floor
□ overload
□ insp.
(inspection)
5.2.3 land call
□ insp. (inspection)
□ fullload
5.2.4 floor encode
□ binary
□ BCD
□ LCD
5.3 Remove 2
5.3.1 trouble car: X call
5.3.2 beep when land 0.0 s
5.4 auto
5.4.1 remove mistake car
5.4.2 remove car reverse
5.4.3 blink car
5.4.4 stop when no call
5.4.1 remove mistake car
□ no
□ push again
5.4.2 remove car reverse
□ no
□ remove top or bottom
□ remove when reverse
5.4.3 blink car
□ no
□ yes
5.4.4 stop when no call
□ open door
□ no open
5.5 operator
5.5.1 remove mistake car
5.5.2 remove car reverse
38
SP-3000
Operation Manual
5.5.3 blink car
5.5.4 stop when no call
5.5.5 car call direction first
5.5.1 remove mistake car
□ no
□ push again
5.5.2 remove car reverse
□ no
□ remove top or bottom
□ remove when reverse
5.5.3 blink car
□ no
□
yes
5.5.4 stop when no call
□ open door
□ no open
5.5.5 car call direction first
□ no
□ yes
39
SP-3000
Operation Manual
CHAPTER ELEVEN
Parameter Details
1. System settings:
1.1 days & dates: to set or verify system date & time
Erase error record: to clear all history error records
LCD light: to reduce electricity load, system will close LCD light automatically if long
time no button pressed.
1.4 pin 2: pins for producer, customer no need to care it.
1.5 change pin: you can only change the pins after you logged on.
2. Basic settings:
2.1 basic settings:
(1) Lift no.: label a number for each lift.
(2) Speed sort
(3) Run mode: selecting single lift run mode in parallel communication, system will
separately run the lift; selecting double lift run mode, system will run 1 or 2 lifts
according to actual situations. When lift is in service off, inspection, fireman,
overload and error status or there is no communication between parallel lifts,
system will auto run single lift.
(4) Fireman mode: if setting is “fireman return basefloor”, when fire control, the lift will
directly run to basic station, the door will open and no longer close, and will not
respond calls. Until fireman arrives and pressed “fireman operation” button,
system will immediately goes into fireman running mode. if setting is “fireman run”,
the “fireman operation” input signal is not needed any more. Lift will immediately
goes into fireman running mode after it return to basic station. If system hasn’t
fireman control function, you can remove the input signal-“fireman”.
2.2 time settings:
(1) Cabin power: system will auto close fan & lighting if long time no calls in.
(2) Return basic floor: lift will auto return basic floor when it is idle for a
designated time. If value is equal to 0, then no this function. In parallel
communication, it means lift auto return to station (basic floor). But here
returning base station is controlled by parallel controller, which will allocate
only one lift to return base station when designated idle time’s up,
(3) Auto close door: under auto running status, the time from door complete
open till auto close.
(4) Door jammed: under auto running status, if door will not open/close
completely within designated time after door open/close output signal,
system regards it as door jammed. System will execute door open/close over
again. If door open/close still not works after 3 times repeated, system will
stop trying door open/close & declare door jammed error.
(5) Open door delay: door open signal will continue outputting after limit switch is
touched to ensure the door is opened well enough. common setting of the
parameter is 0.
(6) Close door delay: door close signal will continue outputting after limit switch
is touched to ensure the door is closed well enough. common setting of the
40
SP-3000
Operation Manual
parameter is 0.
(7) Bell output delay: the delay is from decelerating starting to bell signal output.
If setting is 0, it means bell signal output is synchronous with decelerating
starting.
(8) Bell rings time: time duration of bell rings from starts to ends.
(9) Start time:
(10) Open brake: you need to set open brake delay time for inverters those will
not output brake control signals. That is inverter will output a pre-torque
before opening brake. If brake control signal is directly output from inverter,
no need to set this parameter. The minimum setting can be zero, which
equals there is no delay. Details of the parameter please refer to chapter 14
to 19 in this book.
(11) stop delay: for Emerson, KEB, MICO,inverter, starting from brake?passing
a stop delay, that is keep the stopping for a time, then remove run instruction
(direction & enable). For YASKASIA,Fuji inverter, starting from inverter zero
speed signal, passing a stop delay, then remove run instruction. If parameter
setting is zero, there will be no stop delay.
(12) brake time: you need to set delay brake time for inverters those will not
output brake control signals. From inverter gives out “inverter 0 speed
“ signal, passing by a brake delay, the brake will engage. If brake control
signal is directly output from inverter, no need to set this parameter. The
minimum setting can be zero, which equals there is no delay. Details of the
parameter please refer to chapter 14 to 19 in this book
(13) Run time: it’s the maximum time lift took running from one door zone to the
next one. Beyond “run time”, system will declare “ run timeouts” error. Only
shutting down power can you clear this error. Run time calculated from you
start the elevator to decelerating beginning. The lift runs slowly at starting
phase. Run time of this phase will auto extend 3 second. If you set run time
as 20 seconds, starting phase run time will become 23 seconds. As long as
run time not exceeds 23 seconds before entering the next door zone, system
will not declare run timeouts. Hereafter each door zone run time will
automatically set as 20 second. When system searches for door zone, run
time will auto extend decuple. It will declare “run timeouts” error as well if
system hasn’t arrived the next door zone beyond the decuple run time. If you
set run time as 99 seconds, system will specially handle run time. Actual run
time will become 5 minutes, run time of door zone searching is 20 minutes.
(14) Land time: it’s time lift from decelerating starting run to destination floor door
zone. Lift will automatically stop beyond this time.
(15) level time: for Emerson, KEB, MICO inverter, it’s the time from system
entering into destination floor door zone to system has detected brake
release. System will automatically stop beyond this time. For YASKAWA, Fuji
inverter, it’s the time from system entering into destination floor door zone to
inverter gave out inverter zero speed signal output. System will automatically
stop beyond this time.
41
SP-3000
Operation Manual
2.3 distance setting:
System with Emerson inverter no need distance setting.
(1) Door zone length: set door zone actual length. The parameter must be correctly
set. there is no door zone in car guide rail in system with absolute value encoder.
but you still need to set this parameter so that system can know landing area in
order to land & door open.
2) Abs encoder: one rolling circle length of abs encoder.
3) Low speed decrease distance / middle speed decrease distance / high speed
decrease distance
They respectively are the distance setting at low speed, middle speed and high
speed. Decrease distance is distance from decelerating starting to destination
floor level zone, distance inside leveling zone not included. If decelerating
distance setting too long, lift would have a long creep distance. If decelerating
distance setting too short, lift would have a stroke 。 You’d better set a
decelerating distance apparently larger than inverter’s actual decreasing
distance, then you adjust it according to actual situation. You can better analyze
the problem in this way.
4) Middle speed run distance / high speed run distance
It’s the shortest admit running distance at medium speed and high speed (rated
speed). Run distance should be larger than the sum of accelerating distance and
decelerating distance. System calculates distance between current floor and
destination floor to decide which speed to run.
Main board calculates distance between current floor and destination floor before
startup. If calculated distance is larger than high speed run distance setting,
system will run at high speed. Otherwise, system will run at middle speed. If
neither, system will run at low speed.
In application, lift with running speed less than 1m/s, you can set “l high speed run
distance“ shorter than any floor’s height so that lift runs at only one speed. Lift
with running speed less than 1.75m/s always run at two types speed. Here you
should set middle speed run distance same as high speed run distance. In this
way, system will nohow run at middle speed.
For example, one lift runs at 3 speeds. Setting middle speed run distance as 5
meter. setting high speed run distance as 10 meter. Distance between one and
the next station is 3 meter. Then the lift will run single floor (distance is 3 meter) at
low speed, run 2 floors (distance is 6 meter) & 3 floors (distance is 9 meter) at
middle speed, run 4 floors or above (distance larger than 10 meter) at high speed.
2.4 ignore lift error:
To make initial stage testing convenient, testing person can ignore lift error during
tests. Those ignored errors will not show any longer in running. Considering lift
running safety, you can only temporally ignore lift error. When you re-power on the
system next time, default setting is no ignore lift error.
2.5 start self-learning:
42
SP-3000
Operation Manual
Using this parameter to learn data from car guide rail. Before self-learning, you
should run lift under inspection status to bottom door zone first.
3. floor setting:
You can set each station landing call display character, total stations, basic station of
service off, fireman base station, basic floor, landing floor and door open position of
each station. “display character” is only used for floor display. System inside still runs
according to station (absolute floor). By setting “landing area” you can decide which
stations is admitted to land. Here “landing” aims at station (absolute floor, door zone),
having no relation with actual floor.
Door open position setting is valid from station 1 to 12. (single door open, back door
open, both doors open). Station 13 and above all default setting as single door open.
4. call display:
1) remove car call: to remove current floor car call at decelerating start or at landing
point.
2) Floor encode: some lift, especially rebuild lift, will use parallel communication floor
display board. To match different manufacture’s circuit board, system offers 3
code: binary code, BCD & LCD .
3) Trouble car: it means when there is light load signal input, the admitted maximum
car calls. when setting is 0, it means there is no this function.
4) Remove mistake car call : press same button again to cancel the car call or not.
5) Remove reverse car call: to set when you remove the opposite direction car calls.
6) Blink car if landing calls: to set if there is landing call, the corresponding floor car
button blink or not.
7) Stop when no call: system will stop at the nearest leveling zone if there is no call.
You can set the one time door open or not.
8) Landing call not directional: when setting is “yes”, landing call will not be
directional. In this case, landing call only used for midway picking passengers.
9) beep when land: buzzer rings or not under operator mode when there is landing
calls. If setting is 0.0, buzzer doesn’t ring. If setting isn’t 0, it means when there is
landing calls, buzzer rings time.
10) Parameter setting of auto mode is invalid in operator mode. Parameter setting of
operator mode is invalid in auto mode.
43
SP-3000
Operation Manual
CHAPTER TWELVE
Slow Test
1. Inspection Run
inspection run needs to meet the following conditions:
1)
car door and floor door are both well closed. That is doors lock, open limit
and close limit all meet the requirements.
2)
inspection up run doesn’t touch top limit switch; inspection down run
doesn’t touch down limit switch.
3)
ensure system not occurred following errors: safety circuit error, inverter
error, main output error, brake error, doors lock error, input port wrong
setting, run overtime & brake checking errors.
2. self-learning (common encoder):
A newly installed lift needs self-learning before fast run. If you changed the position of
landing baffle’s or force decelerating switch, a self-learning for car guild rail also needed.
A unsuccessful self-learning will have no any influence for system. If system has a right
self-learning before, the lift will run at previous data. If a self-learning is unsuccessful,
please re-start the system to resume previous data.
After a successful learning, you need to re-powered the system to ensure the self-learning
did succeed. The learned data are saved in permanent saving unit. When system is
started, all parameter and learned data will read out from the permanent saving unit. At
the same time, system will auto judge if these data valid or not. If data is valid, system will
prompt “need self-learning”.
2.1 a self-learning need to meet the following conditions:
1) to meet the conditions an inspection run needed;
2) system stops at floor 1 door zone and you can know from floor showing that
current floor is station 1. if floor showing is not station 1, you should up run the lift
until it touched “down force decelerating” switch, then down run it till bottom floor
door zone so that the lift can auto verify the floor showing as station 1.
3) All I/O cables well connected; there is no barrier in car guide rail.
When all above conditions satisfied, you can start a self-learning. Menu flows as follow:
setting→basic setting→distance setting→start self-learning→yes.
2.2 when a self-learning is successful, system will prompt “self-learning succeed”. For
system with Emerson inverter, main board will save self-learned total floors number. For
system with others inverters, main board will save self-learned total floors numbers, each
door zone’s position, each force decelerating switch’s position and door zone baffle’s
length. When a new self-learning is successful, all the previous self-learned data will be
cleared. If a new self-learning is not successful, system will give it up and save nothing.
For lifts only 2 stations, door zone baffle’s length is invalid. System will calculate
decelerating point as down force decelerating distance. The down force decelerating
distance is calculated from upper edge of bottom door zone.
2.3 if a self-learning is unsuccessful, there may be for the following reasons:
1) A lift will not stop up run until it touches up-force-decelerating” switch when it will brake
emergent and system declare “self-leaning unsuccessful”
2) Although a lift touched up-force-decelerating switch, it can’t find door zone which will
44
SP-3000
Operation Manual
leads it touches top limit ultimately. When system will brake emergent and will declare
“self-learning unsuccessful”.
3) Error occurred during run.
2.4 The following instance need a re-powered on after a self-learning:
1) it’s the first time self-learning
2) the self-learning is unsuccessful
3) although previous self-learning, reself-learning for main board changed
4) reself-learning for pairs of force- decelerating switch changed
5) reself-learning for total floors number changed
2.5 the following no need to re-powered on the system after self-learning:
1) reself-learning for adjusting the location of force-decelerating switch
2) reself-learning for adjusting the location of landing baffle
3. self-learning (absolute value encoder):
Main board can equips with HEIDENHAIN absolute value encoder. Signal gathering is
RS485 synchronous serial communication. Encode format is GRAY code. It needs 2pcs
clock cables, 2pcs data cables and 2pcs power cables. Different absolute encoders have
different signal gathering modes and encode format. Using others absolute encoder may
cause components damaged or signal wrongly gathered.
System with absolute value encoder has no landing baffle. When self-learning, testing
people will adjust the leveling accuracy in car, manually press current floor’s button,
system will auto record the lift’s current absolute location.
You can have a self-learning when system runs with car door open. During self-learning
run, system will check neither open/close limit switch nor door lock contactor. But you
must keep door lock signal always be connected on. All floor doors must completely
closed. Having a testing people short connect car door lock signal at the moment.
Particularly attention: No short connecting floor door lock signal, otherwise there will be
person casualty or property damage.
There should not following errors during a self-learning: safety circuit error, inverter error,
main contact error, brake error, doors lock error, input port wrong setting and run overtime.
Before you start a self-learning, run lift slowly first to leveling position of station 1. Then
menu open as follow: setting→basic setting→distance setting→start self-learning→yes. If
car door is not open, system will auto open the door, hereafter door open/close can only
be manual.
When self-learning, debugging person must be a safeguard specialist. Inspection
running system to each door zone, levelly landing properly and pressing corresponding
floor’s car button, system will auto record the current absolute position of lift and car
display board will show the current floor No. If current floor is station 1 and system has
successfully self-learned before, system will record current absolute position and auto
verify the others floors absolute position, thereby no need to learn the others floors.
When lift has successfully self-learned, car guide rail of station 1 can be used for
verifying the others floors’ absolute position, that is self-learning of station 1 will auto verify
the others floors’ absolute position. Considering this point, it had better start self-learning
from station 1.
45
SP-3000
Operation Manual
After all floors’ self-learned, except station 1, there is no need to self-learn the others
floors in future. There might be an offset after system runs a period of time,
re-self-learning door zone of station 1 if necessary. In case lift large-scale inspection,
there would be an out of gear between the belt in car and absolute value encoder rotary
shaft; which will lead to an offset of level landing. If the offset were larger than 10 circles,
there would be a declaration of encoder error. In such instance, you should have a
self-learning of door zone to station 1.
Please immediately remove short circuit signal on car door lock after self-learning is
over. If it’s the first time self-learning, you should switch off control system, then re-switch
on the power.
46
SP-3000
Operation Manual
CHAPTER THIRTEEN
Fast Test
1. Please ensure the following points to make preparations for fast running:
(1) basement parts well installed; basement buffer is valid; no water in
basement.
(2) Good seal between floor door and door hole.
(3) Car guide rail installation meets requirement; quality checking passed.
(4) Tightrope well installed and fastened;
(5) Limit switch well installed and fastened;
(6) Speed limit tightrope tackle well installed;
(7) Cable attached installed well enough so as not to touch other articles during
run.
(8) car installation finished; all parts installed;
(9) No barriers in car guide rail;
(10) All parts in control cabins aligned according to industry standard;
(11) Checking oils in slowing tank of gearing tractor;
(12) Check encoder on main unit fixed firmly enough not to shake during run;
(13) Speed limit equipment neatly aligned;
(14) Clear and neat cable layout; check copper connection between slots.
(15) clear and neat cables layout in control cabinet;
(16) Leveling sensor pin board of each floor well connected;
(17) Checking floor door driver cable connection; checking light bar cable
connection;
(18) Checking top floor leveling sensor cable connection;
(19) good performance of safety switch in rail;
(20) Checking installation & performance of top safety switch & bottom safety
switch in rail;
(21) Checking up/down limit switch installation & performance;
(22) Checking up/down force decelerating switch installation & performance;
(23) Checking interphone cable connection & performance;
(24) Checking cable connection of bell;
(25) Checking cable connection of car call board;
(26) Checking cable connection of landing call board;
(27) Double check communication cables.
2. Procedures of fast test run:
(1) Rightly set inverter parameter. You can set the value referring the
experimental data and adjust slightly in future fast run testing;
(2) Rightly set main board parameter. You can set the value referring the
experimental data and adjust slightly in future fast run testing;
(3) Running lift at inspection status to bottom door zone to have the system a
slow self-learning;
(4) Running lift at inspection status to floor 2 or 2nd top floor, making the lift on
automatic status, not having person standing in the car;
47
SP-3000
Operation Manual
(5) Menu selection to call car. If lift is on floor 2, call it up to floor 3; if lift is on 2nd
top floor, call it down to 3rd top floor. Closely observing lift’s running status,
please emergently brake the lift in time if decelerating can’t be effected;
(6) In good running order, setting decreasing distance to make lift decelerate
properly;
(7) Menu selection to call car, confining the lift running between one and next
floors and setting related parameter to make lift decelerate properly;
(8) Menu selection to call car, confining the lift running among 3 continous floors
and setting related parameter to make lift decelerate properly;
(9) Better not run lift to bottom or top floor until it runs in good order;
(10) Having one testing person stand in the car so that he can set the inverter’s
parameter according to himself comfortable feeling, to make a public good
comfortable feeling when lift accelerates or decelerates.
(11) Setting inverter & main board parameter according to testing person’s
comfortable feeling to make a good comfortable feeling when lift starts or
stops. Meanwhile setting the related parameter of inverter to levelly land the
lift properly.
(12) Setting decreasing distance parameter of main board so that lift can
decelerates to creep speed as soon as it arrives at destination floor door
zone.
(13) Setting others parameters of main board to optimize lift’s running.
(14) Testing lift’s all functions to make it meets requirements.
48
SP-3000
Operation Manual
CHAPTER FOURTEEN
Emerson Inverter
You can refer to this chapter when you use main board with Emerson Inverter. In
application, please obey the manufacture’s introduction.
1. The essential inverter parameter setting:
Code
Inverter LCD display
Notes
F0.02
Operation mode
Setting as “2 terminal speed
control
F3.03
Multi-speed 0
Must be as 0
F3.04
Multi-speed 1
Slow speed of door zone
searching
F3.05
Multi-speed 2
Fast speed of door zone
searching
F3.17
Self-learning speed
F3.19
Inspection speed
F3.20
Inspection
speed
F3.21
Creep speed
Speed before going into the
level area
F3.22
Force decelerating speed 1
Refer to code F7.11
F4.07
Leveling distance adjust
Inverter auto setting as
F4.07 when self-learning,
F3.21 & F4.07 is adjustable
according to actual leveling
accuracy
F5.10
PX1 ports function selection
Setting
as
“
34
programmable logic input”
F5.11
PX2 ports function selection
Setting
as
“34
programmable logic input”
F5.12
PX3 ports function selection
Setting
as
“34
programmable logic input”
F5.13
PX4 ports function selection
Setting
as
“34
programmable logic input”
F5.14
Logic 0000
Setting as “0”
F5.15
Logic 0001
Setting as “640”, meaning
up
show
door
zone
searching
F5.16
Logic 0010
Setting as “384”, meaning
down show door zone
searching
F5.17
Logic 0011
Setting as “1024”
F5.18
Logic 0100
Setting as “1024”
F5.19
Logic 0101
Setting as “576”, meaning
up fast door zone searching
decelerating
49
SP-3000
Operation Manual
F5.20
Logic 0110
Setting as “320”, meaning
down fast door zone
searching
F5.21
Logic 0111
Setting as “520”, meaning
up self-learning
F5.22
Logic 1000
Setting as “1024”
F5.23
Logic 1001
Setting as “517”, meaning
up creep speed
F5.24
Logic 1010
Setting as “261”, meaning
down creep speed
F5.25
Logic 1011
Setting as “514”, meaning
up inspection speed
F5.26
Logic 1100
Setting as “258”, meaning
down inspection speed
F5.27
Logic 1101
Setting as “516”, meaning
high speed up
F5.28
Logic 1110
Setting as “260”, meaning
high speed down
F5.29
Logic 1111
Setting as “1024”
F5.36
Decelerating point output
Setting as “0.200” seconds
F7.08
Force decelerating speed 3
Refer to F7.07
F7.10
Force decelerating speed 2
Refer to F7.09
2. running sequence of specific distance car stop request:
(1) When doors completely close and there is not any influencing run safety errors,
Main board responds to calls and transmit running instructions (inverter enable
PX1、PX2、PX3、PX4)。
(2) inverter responds the running instruction from main board & output main output
contactor suction instruction (CR); the main output is engaged.
(3) when Inverter inspected main output contactor suction, inverter enables.
(4) Inverter output braking instructions, brake released.
(5) Main board will start the running when main output contactor suction, brake
contactor suction & brake check switch acts, respond car calls & landing calls and
pick up passengers in same direction.
(6) In good running order, passing each decelerating point, inverter will transmit the
“decelerating pass” signal. when it runs to destination decelerating point, main
board will transmit deceleration instruction, system starts decelerating.
(7) When inverter decelerates till speed 0, brake releases.
(8) When main board inspected the brake already released or received the “service
off” signal, passing a stopping delay, it will remove the instructions to inverters
and output door open signal.
(9) Inverter closes main output contactor, one running ends.
50
SP-3000
Operation Manual
3. distance control speed list
Main board
signals
output
PX1
PX2
PX3
PX4
Rated speed up
1
0
1
1
Rated speed down
0
1
1
1
Creep speed up
1
0
0
1
Creep speed down
0
1
0
1
Inspection up
1
1
0
1
Inspection down
0
0
1
1
Door zone searching
up
1
0
1
0
Door zone searching
down
0
1
1
0
Door zone searching
slow up
1
0
0
0
Door zone searching
slow down
0
1
0
0
Up self-learning
1
1
1
0
4. distance control line connections chart:
Emerson inverter
PX1
PX2
PX3
PX4
Inverter enable (ENA)
Outer reset (RST)
Service off
Decelerating pass
Relay error output
micro controller
PX1
PX2
PX3
PX4
Inverter enable
Inverter reset
Inverter zero speed
Decelerating pass
Inverter fault
51
SP-3000
Operation Manual
CHAPTER FIFTEEN
KEB Inverter
1. KEB inverter parameter:
Parameter
Notes
LF.0
Operation authority (-4: read only –5: allow operate)
LF.1
User’s pin
LF.2
Operation mode, binary coded multi-speed run mode, setting is 1
LF.4
Motor type, 0: asynchronous motor; 1: synchronous motor
LF.5
Change tractor’s run direction
LF.6
Change definition of speed, frequency and torque; if controlling a
tractor without gear, setting is 1
LF.19
Direct voltage compensation, only used for open loop (LF.30=0)
LF.20
Rated system speed, the maximum lift speed
LF.21
Tractor wheel diameter
LF.22
Deceleration ratio of tractor
LF.23
Winding type(traction ratio)
LF.24
Loading weight
LF.25
Door driver start torque
LF.26
Door driver rated rotation speed
LF.27
Door driver rated frequency
LF.28
Door driver rated voltage
LF.30
Control mode, setting as “2 speed feedback closed loop control”
LF.31
KP speed. If value is too large, it will leads to shaking during constant
speed motion. If value is too small, there would be an offset of run
curve between setting value and actual value
LF.32
KI speed. Setting is related with inverter and motor
LF.33
KI speed offset. Adjusting it can better control the loading; avoiding
opposite pulling when it starts; setting increase or decrease per 500
units
LF.34
Current proportion increase. Setting is related with inverter and motor
LF.35
Current integral increase. Setting is related with inverter and motor.
LF.36
Motor’s maximum torque. Protect motor to prevent motor damaged.
The acceleration time would extend at fullload; if a synchronous motor,
when setting is too high and motor long time overloaded, the magnet
would be demagnetized and motor would be damaged accordingly.
LF.37
Motor’s start torque. Only used for open loop (LF.30=0)
LF.38
Carrier wave frequency recommended setting is 0. in case more
frequency of E.0L2 error, you should use setting 0.
LF.40
Repeat leveling speed VB
LF.41
Creep speed VE
LF.42
Rated speed (high speed ) Vn
LF.43
Inspection speed Vi
LF.44
Speed 1 (medium speed) V1
52
SP-3000
Operation Manual
LF.45
Speed 2 (Low speed) V2
LF.46
Door driver speed
LF.50
Steep start accelerating, too high value will lead to oscillation
LF.51
Acceleration rate
LF.52
Steep decelerating, if setting is too low, LF.53 doesn’t work
LF.53
Decelerating rate
LF.54
Steep landing decelerating, it’s a decelerating of entering leveling zone
LF.55
Steep start acceleration. Only to adjust this parameter when you
release safety clamp. If LF.50 changed, LF.55 will be covered by the
parameter set in LF.50
LF.56
Acceleration. Only to adjust this parameter when you release safety
clamp. If LF.51 changed, LF.56 will be covered by the parameter set in
LF.51. To make lift release safety clamp, you should adjust this
parameter and LF.55 to maximum value.
LF.57
Speed offset mode. This parameter, LF.58 and LF.59 can check speed
offset. If actual speed LF.89 offset up to a pre-established value
(adjustable by LF.58) and over a definite time (adjustable by LF.59),
you should use LF.57 to respond its results. 0: function invalid; 1:
causing errors informationE.hdS (speed offset too large), to stop lift
immediately, shut down inverter power module. 2: terminal X2.8 output
alarm of speed offset
LF.58
According to selected mode in parameter LF.57 to make corresponding
respond for percent of certain given speed offset.
LF.59
When offset with given speed up to the setting percent and time in
LF.58, making corresponding respond according to selected mode in
LF.57
LF.60
Brake permitting speed; if speed below the setting value, inverter will
close brake output (x3.15)
LF.61
Over speed monitoring. When speed is over the setting value, inverter
declare over speed and stop.
LF.62
Decelerating monitoring (zero speed detecting); if speed below the
value, X3.17 will act
LF.63
Pre-open door run speed. If speed below the value, X3.18 被置位。It is
invalid on machine shell of D & E.
LF.64
Direct current monitoring
LF.65
Over heated delay time
LF.66
Radiator temperature monitoring
LF.67
Pre-torque increase. If you set pre-torque function (LF.30=3), increase
of the compensation value from X2.16 input, measured by load
detecting equipment should set by this parameter.
LF.68
Pre-torque offset. If imbalance less than 50%, LF.68 equalizes the
difference.
LF.69
Pre-torque direction. Depending on torque compensation direction
53
SP-3000
Operation Manual
LF.70
Open brake time. Passing a setting time after inverter output brake
control signal (X3.15), motor begins to run
LF.71
High speed (rated speed Vn) decelerating path optimization
LF.72
Medium speed V1 decelerating path optimization
LF.73
Low speed V2 decelerating path optimization
LF.74
Creep speed VE decelerating path optimization
LF.75
Top arc function selection
LF.76
Top arc function status
LF.77
Decelerating distance (used for top arc function)
LF.78
Maximum floor distance (used for top arc function)
LF.79
Brake acting time, it adjusts the time from broken of brake control
X3.15 to closed of inverter module. I.e. the keeping time of inverter
torque. If the time setting too short, inverter closing before brake
properly engaging, system will slide along the load direction.
LF.80
Software version
LF.81
Software date
LF.82
Input status of X2.1~X2.7, showed by binary code. They respectively
are bit 0,1,2,3,4,5,6. Display is decimal system.
LF.83
Output status of X2.8, X2.9, X20/X2.21, showed by binary code. They
respectively are bit 0,1,2. Display is decimal system.
LF.84
Output status of X3.1-X3.7, showed by binary code. They respectively
are bit 0,1,2,3,4,5,6. Display is decimal system. It’s invalid on the
inverter of D machine cover & E machine cover.
LF.85
Output status of X3.13, X3.15/X3.16, X3.14, X3.17, X3.18/X3.19,
X3.20/X3.21, X3.22, X3.23, showed by binary code. They respectively
are bit 0,2,3,4,5,7,10,12. Display is decimal system. It’s invalid on the
inverter of D machine cover & E machine cover.
LF.86
Actual assigned value. Value 0~7 respectively corresponds to
V=0,VB,VE,VN,Vi, V1,V2,V=0
LF.87
Inverter actual percentage in use (%)
LF.88
Inverter given rotary speed (rpm)
LF.89
Inverter actual speed (rpm), used only for closed loop control
LF.90
Lift actual speed (m/s), used only for closed loop control
LF.92
Creeping distance
LF.93
Running distance
LF.98
Error status (more details see LF.99)
LF.99
Inverter run status
dr. 0
Rated motor power, see nameplate
dr. 1
Rated motor speed, see nameplate
dr. 2
Rated motor current, see nameplate
dr. 3
Rated motor frequency, see nameplate
dr. 4
Asynchronous motor rated power factor, see nameplate
dr. 7
Synchronous motor stable current, see nameplate
54
0: close 1: open
SP-3000
Operation Manual
dr. 9
Rated motor torque, see nameplate
dr. 10
Maximum torque, see nameplate
dr. 12
Asynchronous motor rated voltage, see nameplate. If you want to
change the parameter setting, press “enter” key to confirm
dr. 13
Asynchronous motor maximum torque angle speed, it’s auto calculated
after input of parameter dr.12
dr. 16
Asynchronous motor maximum torque under dr.19 instance. It’s auto
calculated after spinput of parameter dr.12
dr. 17
Synchronous motor EMK voltage constant, see nameplate
dr. 19
Asynchronous motor low magnetic field rotary speed, It’s auto
calculated after input of parameter dr.12
dr. 20
Asynchronous motor low magnetic field increase
dr. 21
Asynchronous motor magnetic flux
dr. 41
Synchronous motor coil interphase resistance, see nameplate
dr. 42
Synchronous motor coil interphase inductance, see nameplate
EC. 0
Port 1 of encoder parameter
EC. 1
Pulse number of encoder
EC. 2
To change A, B phase sequence of asynchronous motor encoder
EC. 3
Pole pairs of encoder, setting can be only as 1 if synchronous motor
EC. 4
Motor self learning; self learning starting when setting is 1. Tractor
should be empty load status. self learning ending when setting is 7
EC. 5
Clock frequency of encoder 1
EC.6
Mode of encoder 1
EC.7
Location of motor rotor
EC.8
Speed sampling time of encoder 1
EC.9
Setting acting value of rotary encoder for input of parameter E.EnC
EC.10
Encoder port 2
EC.11
Encoder 2 pulse number per circle
EC.17
Output port X5 frequency factor of increment type encoder
EC.20
Hiper encoder type connected with encoder 1
2. KEB inverter multi-section speed running sequence:
1) When doors completely close and there is not any influencing run safety errors,
Main board responds to calls and transmit running instructions (directions and
running speed)
2) inverter responds the running instruction from main board & output main output
contactor control signal. Main output contactor engages.
3) Main board gives out “inverter enable” signal as soon as main output engages.
4) Inverter output brake control signal, brake open.
5) Main board start running, responds to car/landing calls and real time calculates
decelerating point as soon as main output contactor engages, brake contactor
engages and brake checking switch acts.
6) Lift runs in good order, pick up the same direction passengers. When system runs
to decelerating point, main board gives out creep speed, lift start to decelerate.
55
SP-3000
Operation Manual
7) When lift decelerate to creep speed, it will evenly run at the creep speed.
8) Lift entering door zone at creep speed, main board remove speed instruction,
only left inverter enable and direction.
9) After inverter decelerates to brake permission speed (LF.60), system close brake
control signal.
10) Main board detected that brake contactor broken, passing a delay (car stopping
time. Set it a little larger than LF.79 +0.3 seconds), remove inverter enable &
direction signal, meanwhile output door open signal.
11) After inverter close brake control signal, passing a delay (LF.79), delay again 0.3
seconds, main output control signal close. That’s all a running.
3. Notice:
If inverter declare E.EnC error, the possible reason is: motor cable UVW accords with
inverter UVW or not; main output contactor not connected well; parameter EC. Setting
is wrong and encoder itself problems.
4. multi-section speed control assigned value:
Main
signal
board
output
Multi-section 1
Multi-section 2
Multi-section 3
High
speed
speed VN)
(rated
0
1
1
Medium speed (V1)
1
0
1
Low speed (V2)
1
1
0
Creep speed (VE)
0
1
0
0
0
0
Inspection
1
0
0
Door zone searching
(wrong floor, to top floor
or bottom floor for floor
verifying)
1
0
0
Door zone searching
(search for nearest door
zone)
0
1
0
Door zone searching
(when up run touches
up force shift switch or
down run touches down
shift
decelerating
switch)
0
1
0
Self learning
1
0
0
Entering
leveling
door
zone
56
SP-3000
Operation Manual
5. cable connection with KEB inverter:
KEB inverter
micro controller
X3.4
X3.3
X3.2
Forward rotation X2.3
Reverse rotation (X2.4)
reset (X2.2)
control enable (X2.1)
run ready
Multi-Speed 1
Multi-speed 2
Multi-speed 3
Up
down
inverter reset
inverter enable
inverter fault
57
SP-3000
Operation Manual
CHAPTER SIXTEEN
MICO Inverter
1. MICO inverter parameter:
Error memory
No.1
IPM overcurrent, because of parameter setting wrong or short-circuite
No.2
U phase overcurrent, because of parameter setting wrong or IMP damaged
No.3
V phase overcurrent, because of parameter setting wrong or IMP damaged
No.4
W phase overcurrent, because of parameter setting wrong or IMP damaged
No.5
Radiator overtemperatured
No.6
Middle loop overvoltage, brake not connected or damaged
No.7
Middle loop low temperatured, main power voltage too low
No.8
Main contactor not engaged when starting or main power least 1 phase
shortage
No.9
Main contactor not engaged when running or main power least 1 phase
shortage
No.10
Direction instruction loses during running or before braking ending
No.11
Direction instruction “up” & “down” both in use
No.12
Wrong direction, to change input phase of encoder or encoder damaged
No.13
Offset, inverter overload or wrong motor/encoder parameter
No.14
Encoder no pulse signal
No.15
Middle loop charged in advance, brake resistance or error of main power
grounding
No.16
Changing direction instruction during run
2. MICO inverter running sequence:
1) When doors completely close and there is not any influencing run safety errors,
Main board responds to calls, transmit run instruction (direction, V0 and speed
V3,V2,V1).
2) Inverter responds to run instruction from main board, output main contactor
engaged instruction, main output contactor engaged.
3) Inverter output brake instruction, open the brake
4) As soon as main board detects main output contactor engaged, brake contactor
engaged and brake checking switch act, it will turn into running status, responds
to car/landing calls and real time calculates decelerating point.
5) Lift runs in good order, pick up the same direction passengers. When it runs to
decelerating point, main board remover run speed, only left creep speed V0,
system start to decelerate
6) When lift decelerates to creep speed, it will runs evenly at the speed
7) Lift entering door zone at creep speed, main board remove creep speed
instruction, with direction instruction left.
8) Inverter will close brake when it decelerates to zero speed
9) Main board detects brake contactor broken, passing a delay (car stopping time),
remove direction signal & output door open signal.
10) Inverter close main output contactor. That’s all a running.
58
SP-3000
Operation Manual
3. speed control value:
Main board output signals
Inverter input signals
High speed running
High speed + creep speed
V3+V0
Medium speed running
Medium speed + creep speed
V2+V0
Low speed running
Low speed + creep speed
V1+V0
decelerating
Creep speed
V0
levelling
Remove speed signal
Inspection run
Inspection speed
Vi
Door zone searching (wrong
floor, to top floor or bottom
floor for floor verifying)
Inspection speed
Vi
Door
zone
searching
(search for nearest door
zone)
Creep speed
V1
Self learning
Inspection speed
Vi
4. cable connection with MICO inverter:
MICO inverter
V1
V2
V3
UP
DOWN
VO
Vi
Run ready
micro controller
Low speed
Medium speed
High speed (rated speed)
up
down
creep speed
inspection speed
inverter fault
59
SP-3000
Operation Manual
CHAPTER SEVENTEEN
YASKAWA Inverter
1. YASKAWA inverter parameter:
Parameter
Name
Setting
A1-00
Language selection
0
A1-01
Parameter grade
2
A1-02
Control mode selection
B1-01
Frequency
selection
instruction
0
B1-02
Running
selection
instruction
1
B1-03
Stopping ways selection
0
B1-04
No reverse rotating
0
B1-05
Run selection below the
minimum frequency
0
B1-06
Control terminals twice
scan time selection
1
B2-01
Direct
current
frequency
brake
0.5
B2-03
Direct
current
when starting
brake
0
B2-04
Direct
current
when stopping
brake
0.5
B3-01
Speed search selection
when starting
1
B4-01
On Delay time
0
B4-02
Off Delay time
0
B5-01
PID
control
selection
B6-01
DWELL
frequency
B6-02
DWELL starting time
0
B6-03
DWELL
frequency
0
B6-04
DWELL stopping time
0
B7-01
Droop control increase
0
B7-02
Droop control delay time
B9-01
Zero servo increase
5
B9-02
Zero servo fulfill width
10
C1-01
Accelerating time 1
C1-02
Decelerating time 1
C1-03
Accelerating time 2
0
C1-04
Decelerating time 2
0
3 (closed loop)
mode
0
starting
0
stopping
60
0.05
Remark
SP-3000
Operation Manual
C1-05
Accelerating time 3
0
C1-06
Decelerating time 3
0
C1-07
Accelerating time 4
0
C1-08
Decelerating time 4
0
C1-09
Emergent brake time
C1-10
Accelerating/decelerating
time setting unit
1
C1-11
Decelerating/decelerating
time shift frequency
0
C2-01
Curve S of acceleration
start
C2-02
Curve S of acceleration
end
C2-03
Curve S of deceleration
start
C2-04
Curve S of deceleration
end
C3-01
Rotary
difference
compensation increase
C5-01
ASR portion increase 1
C5-02
ASR integral time 1
C5-03
ASR portion increase 2
C5-04
ASR integral time 2
C5-05
ASR limit
C5-06
ASR output delay
C5-07
ASR shift frequency
C6-01
Carrier wave frequency
top limit
15.0
C8-08
AFR increase
1.0
D1-01
Frequency instruction 1
Leveling speed
after entering door
zone
D1-02
Frequency instruction 2
Inspection speed
D1-03
Frequency instruction 3
Creep speed
D1-04
Frequency instruction 4
Low speed
D1-05
Frequency instruction 5
0
D1-06
Frequency instruction 6
Medium speed
D1-07
Frequency instruction 7
High speed (rated
speed)
D1-08
Frequency instruction 8
0
D1-09
Frequency instruction 9
0
D1-10
Frequency instruction 10
0
D1-11
Frequency instruction 11
0
1.0
1.0
20.00
Highest frequency
0.5
Highest frequency
20.00
Low frequency
0.5
Low frequency
0
0.004
0
61
Low frequency
SP-3000
Operation Manual
D1-12
Frequency instruction 12
0
D1-13
Frequency instruction 13
0
D1-14
Frequency instruction 14
0
D1-15
Frequency instruction 15
0
D1-16
Frequency instruction 16
0
D1-17
press-act Frequency 17
0
D2-01
Frequency
upper limit
instruction
100%
D2-02
Frequency
lower limit
instruction
0
D3-01
Jumping frequency 1
0
D3-02
Jumping frequency 2
0
D3-03
Jumping frequency 3
0
D3-04
Jumping frequency width
1.0
D4-01
Frequency
instruction
holding function selection
0
D4-02
Positive/negative
limit
D5-01
Torque control selection
D5-02
Torque instruction delay
time
D5-03
Speed limit selection
1
D5-04
Speed limit
0
D5-05
Speed limit offset
10
D5-06
Speed/torque control shift
time
0
E1-01
Input voltage setting
400
E1-04
Maximum
frequency
50*
E1-05
Maximum voltage
380*
E1-06
Basic frequency
50*
E1-09
Minimum
frequency
speed
output
25%
0
output
0
F1-01
PG constant
F1-02
action selection when PG
cable broken is detected
0
F1-03
Action selection when
overspeed is detected
0
F1-04
Action selection when
overlarge
offset
is
detected
0
F1-05
PG working direction
F1-06
PG
frequency
dividing
62
SP-3000
Operation Manual
ratio
F1-08
Overspeed
standard
detecting
F1-09
Overspeed detecting time
1.0
F1-10
Speed offset overlarge
detecting standard
30
F1-11
Speed offset overlarge
detecting time
3.5
H1-01
Multi-function joint input 1
H1-02
Multi-function joint input 2
14
H1-03
Multi-function joint input 3
3
H1-04
Multi-function joint input 4
4
H1-05
Multi-function joint input 5
5
H1-06
Multi-function joint input 6
9
H2-01
Multi-function joint output
8
H2-02
Multi-function joint output
1
1
H3-05
Frequency
selection
1F
L1-01
Motor protection
L1-02
Motor protection time
L2-01
Instantaneous electricity
broken action selection
0
L2-02
Instantaneous protection
time
2.0
L2-03
Minimum base block time
0.7
L2-04
Voltage reset time
0.3
L2-05
Low voltage
standard
380
L3-04
Function selection of
preventing speed losing
during decelerating
instruction
115%
1
1.0
detecting
0*
2. YASKAWA inverter running sequence:
1)
When doors completely close and there is not any influencing run safety
errors, Main board responds to calls, output main contactor control signal
2)
Main output contactor engages normally, main board transmit lift running
instruction (inverter enable, direction and section speed )
3)
From running instruction given out, main board delay 1 second. Delay time is
up, if inverter doesn’t transmit running 2 signal, it means inverter doesn’t
respond. System will remove running instruction and re-transmit running
instruction. If giving out running instruction 3 times, system still not run in good
order, main board will auto clear all calls.
4)
From inverter transmit running 2 signal, main board pass a “delay open brake”
63
SP-3000
Operation Manual
time. Delay time is up, main board output brake control signal, open the
brake.
5)
Main board will go into running status after it detected main contactor engages,
brake contactor engages and brake checking switch acts, responds
car/landing calls real time calculates decelerating point.
6)
Lift runs in good order, pick up the same direction passengers. when it runs to
decelerating point, main board transmit creep speed, lift start to decelerate.
7)
when lift decelerating to creep speed, it will run evenly at the speed
8)
main board transmit section speed instruction 000 after it enters door zone at
creep speed
9)
inverter transmit inverter zero speed signal. after main board receives the
signal, passing a “delay close brake” time, it will close brake control signals
output.
10)
Inverter transmit inverter zero speed signal, after main board receives the
signal, passing a “car stop holding time”, it removes direction signals.
11)
Main board close main output control signal. that’s all a running.
3. multi-section speed control value:
Main board output
signal
Multi-section speed
1
Multi-section speed
2
Multi-section speed
3
High speed (rated
speed)
0
1
1
Medium speed
1
0
1
Low speed
1
1
0
Creep speed
0
1
0
Entering door zone
leveling
0
0
0
Inspection
1
0
0
Door
zone
searching
(wrong
floor, to top floor or
bottom floor for floor
verifying)
1
0
0
Door
zone
searching (search
for nearest door
zone)
0
1
0
Door
zone
searching (when up
run touches up force
shift switch or down
run touches down
shift
decelerating
switch)
0
1
0
Self learning
1
0
0
64
SP-3000
Operation Manual
4. cable connection with YASKAWA inverter:
YASKAWA inverter
Multi-speed 1
Multi-speed 2
Multi-speed 3
Forward rotation
Reverse rotation
Close off
Reset
Inverter zero speed
In closing
Fault output
micro controller
Multi-speed 1
Multi-speed 2
Multi-speed 3
up
down
inverter enable
inverter reset
inverter zero speed
inverter running
inverter fault
65
SP-3000
Operation Manual
CHAPTER EIGHTEEN
Fuji Inverter
You can refer to this chapter when you use main board with Emerson Inverter. In
application, please obey the manufacture’s introduction.
1. parameter overview:
1) partial parameter (FRENIC G11UD)
o10
Multi-section
speed
instruction consistency
timer
To prevent speed instruction wrongly given
out; setting as 0.010
o11
Accelerating/decelerating
time 9
Decelerating time of emergency brake
o13-o22
S curve setting
o23
Run
instruction
consistency timer
To prevent instable direction instruction
signal, setting as 0.005
o29
Output signal logic
Setting Y3,Y4 whether opposite phase logic
output or not
o38
Start time
Time from zero speed to start frequency
o39
Select speed 0
Setting as 001
o40
Select speed 1
Setting as 111
o41
Select speed 2
Setting as 000
o42
Select speed 3
Setting as 010
o43
Select speed 4
Setting as 100
o44
Select speed 5
Setting as 110
o45
Select speed 6
Setting as 101
o46
Select speed 7
Setting as 011
o25
Brake release time
Time from main board output direction signal
to brake control signal 1 (DBRS) on
E01
X1 input
0
E02
X2 input
1
E03
X3 input
2
E04
X4 input
8
E05
X5 input
31
E15
Accelerating/decelerating
time 8
Decelerating time of emergency brake
E21
Y2 output
Setting as “38 speed consistency signal”
E22
Y3 output
Setting as “0 in running signal”
E23
Y4 output
Setting as “34 speed signal available”
E25
Output logic
Setting as Y5 whether logic output or not
E32
Frequency checking lag
Setting as 0.1hz
E36
Frequency checking 2
To judge whether lift output door open signal
or not, used for pre-opening door
F23
Start frequency
Control beginning frequency when starting
F24
Start time
Duration time of starting frequency
66
SP-3000
Operation Manual
F25
Inactive frequency
Main board to judge zero speed stop or not
C05
Multi-frequency 1
For emergency use
C06
Multi-frequency 2
C07
Multi-frequency 3
Creep speed
C08
Multi-frequency 4
Inspection speed
C09
Multi-frequency 5
Low speed
C10
Multi-frequency 6
Medium speed
C11
Multi-frequency 7
High speed
C12
Multi-frequency 0
Zero speed
2) partial parameter (FRENIC lift )
F01
Speed setting
0
F03
Highest speed
Same with rated speed
F04
Rated speed
F05
Rated voltage
Motor voltage
F07
Accelerating/decelerating
time 1
Low speed run accelerating time
F08
Accelerating/decelerating
time 2
Low speed run creep decelerating time
F23
Start speed
0*
F24
Duration time
Time from zero speed to start frequency
F25
Stopping speed
To judge zero speed brake signal
L01
Pulse encoder
0 asynchronous motor
L02
Pulse number
1024
L11
Zero speed instruction
Setting as 001
L12
Manual medium speed
instruction
Setting as 111
L13
Maintenance
instruction
Setting as 100; inspection speed instruction
L14
Creep speed instruction
Setting as 010
L15
Manual
low
instruction
speed
Setting as 000
L16
Low speed
selection
instruction
Setting as 110
L17
Medium
speed
instruction selection
Setting as 101
L18
High speed instruction
selection
Setting as 011
L19
Start arc curve
12%; setting value more smaller, the steeper
curve. It’s an accelerate start curve.
L20
Low or high speed run
setting curve
12%; setting value more smaller, the steeper
curve. It’s an accelerate end curve.
L21
Low speed run setting
12%; setting value more smaller, the steeper
speed
67
SP-3000
Operation Manual
curve
curve. It’s a low speed decelerate start curve.
L22
Medium
speed
setting curve
run
12%; setting value more smaller, the steeper
curve. It’s an accelerate end curve.
L23
Medium
speed
setting curve
run
12%; setting value more smaller, the steeper
curve. It’s a medium speed decelerate start
curve.
L25
High speed run setting
curve
12%; setting value more smaller, the steeper
curve. It’s a high speed decelerate start
curve.
L26
Creep run setting curve
12%; setting value more smaller, the steeper
curve. It’s a creep decelerating end curve.
L28
Zero run setting curve
12%; setting value more smaller, the steeper
curve. It’s a zero speed decelerating starts &
end curve.
L36
ASR (P constant at high
speed)
40*
L37
ASR (I constant at high
speed)
0.1*
L38
ASR (P constant at low
speed)
40*
L39
ASR (I constant at low
speed)
0.1*
L42
(FF increase)
0
L49
Vibration increase
0.00
L50
Mechanical
integral time
0.1
L51
Mechanical vibration load
inertia
0.01
L52
Control mode selection
0; speed control
L54
Torque offset
0; simulated value
L55
Torque offset (timer start)
L56
Torque offset (timer end)
L57
Torque offset (limit)
L60
Torque offset (drive side
increase)
L61
Torque offset (brake side
increase)
L65
Imbalance
compensation
selection)
L66
Imbalance
load
compensation (operation
time)
vibration
load
(act
68
SP-3000
Operation Manual
L67
Imbalance
compensation
time)
load
(starting
L68
Imbalance
compensation
constant P)
load
(ASR
When vibration occurred, please decrease
constant P
L69
Imbalance
compensation
constant I)
load
(ASR
When vibration occurred, please increase
constant I
E01
X1 input
0
E02
X2 input
1
E03
X3 input
2
E04
X4 input
8
E05
X5 input
60
E10
Accelerating/decelerating
time 3
Accelerating time at medium speed
E11
Accelerating/decelerating
time 4
Creep decelerating time at medium speed
E12
Accelerating/decelerating
time 5
Accelerating time at high speed
E13
Accelerating/decelerating
time 6
Creep decelerating time at high speed
E14
Accelerating/decelerating
time 7
Decelerating time at zero speed; starting
from door zone
E18
Run
consistency
selection)
3
E19
Multi-step
instruction
timer
E22
Y3 output
Setting as “35 inverter outputting” RUN2
E23
Y4 output
Setting as “1070 speed available, signal
available”
E27
Terminal
output)
C04
Multi-frequency 1
C05
Multi-frequency 2
C06
Multi-frequency 3
Inspection speed
C07
Multi-frequency 4
Creep speed
C08
Multi-frequency 5
C09
Multi-frequency 6
Low speed
C10
Multi-frequency 7
Medium speed
C11
Multi-frequency 0
High speed
instruction
(function
speed
consistency
30A/B/C(relay
0.01
99
69
SP-3000
Operation Manual
C21
Speed defination
0: measure unit is r/min; 1:measure unit is
m/min; 2:measure unit is HZ
P01
Motor electrode
P02
Motor capacity
P03
Motor rated current
P04
Customer rectification
P06
No load current
H65
Soft start speed time
H66
Speed detect mode end
0
H67
Speed
detect
duration
0
mode
2. FUJI inverter multi-section speed run sequence:
(1) When doors completely close and there is not any influencing run safety
errors, Main board responds to calls and output control signal;
(2) Main output contactor is suction closed, main board gives out lift run
instruction (inverter enable, direction & section speed);
(3) From giving out direction signal, main board will delay 1 second. If inverter
has not given “ brake control” signal within the delayed 1 second, it means
that the inverter not responded, and main board will withdraw the run
instruction, re-transmit it. If 3 times run instructions given out, system still not
run in good order, main board will auto clear all the calls;
(4) From inverter gives out “brake control” signal, main board will pass a “brake
release delay” time, then output “brake control” signal and brake releases;
(5) When main board detects that main output contactor suction closed, brake
contactor suction closed and brake checking switch acts, system will be in
running order, respond all car calls & landing calls and real time calculate
system’s decelerating point;
(6) System runs in good order, pick up same direction passengers. When
system runs to decelerating point, main board gives out creep speed, lift start
decelerating;
(7) When lift decelerating to creep speed, it will run at even creep speed;
(8) When lift runs to door zone at creep speed, main board withdraw speed
instruction, with inverter enable and direction signal left.
(9) Inverter gives out frequency detecting signal. when main board received this
signal, it will pass a “brake release delay” time, to close the output of brake
control signal.
(10) Inverter gives out frequency detecting signal. when main board received this
signal, it will pass a “holding car stop” time, withdraw direction signal;
(11) Main board close main output control signal. one running ends.
70
SP-3000
Operation Manual
3. multi-speed run control value list:
Main board output signals
Multi-secti
on speed 1
Multi-s
ection
speed
2
Multi-s
ection
speed
3
High speed (rated speed)
0
1
1
Medium speed
1
0
1
Low speed
1
1
0
Creep speed
0
1
0
In door zone leveling
0
0
1
Inspection speed
1
0
0
Door zone searching (wrong floor, to top floor or bottom
floor for floor verifying)
1
0
0
Door zone searching (wrong floor, when up run
touches up force decelerating switch or down run
touches down force decelerating switch)
0
1
0
Door zone searching (search for nearest door zone)
0
1
0
Self-learning
1
0
0
4. cables connection with FUJI inverter:
FUJI inverter
SS1
SS2
SS4
Forward rotation
Reverse rotation
Reset
enable
speed signal available
inverter outputing
alarm output
micro controller
Multi-speed 1
Multi-speed 2
Multi-speed 3
up
down
inverter reset
inverter enable
Inverter zero speed
Inverter running
Inverter fault
71
SP-3000
Operation Manual
CHAPTER NINETEEN
Errors and Prompts
1. frequently questions analysis:
questions
Possible reason
Inspection run disable
Door
lock
signal
should
connect
through;
open/close limit satisfies “doors completely closed well”
requirements; if you defined “inverter ready” signal, it should be
connected
Auto searching for
door zone disable
Meets conditions of “inspection run”
Auto run disable
Meets conditions of “inspection run”; emergency power or
emergency run signals act
Cabin calls is ok,
directional
landing
calls disable
“Fulload” and/or “operator direct run” signal act; parameter “other
setting”→operator running→landing calls unidirectional” already
set as “yes”
Door close disable
Overload and/or light bar signal acts; “fire run mode” set as “return
fire base”, fire signal act and lift stops at fire base
Door lock error
Checking open/close limit signal to door drive supply whether
powered on
2. errors or prompt information:
Errors or prompt
Frequently reason
safety circuit error
Protective measure
Error clear
Emergency brake to
ban system running
It will auto cleared
when
signal
conditions
meets
requiremtns
Fast
run
not
allowed; when both
up limit and down
limit are good, slow
run still ok
It will auto cleared
when
signal
conditions
meets
requiremtns
decelerate or limit
switch error
Up
force
decelerating or up
limit broken, down
force decelerating or
down limit broken
inverter error
Inverter output an
error signal to main
board
Emergency brake to
ban system running
It will auto cleared
when
signal
conditions
meets
requiremtns
main contactor error
Lift stops but main
contactor
not
released
To
ban
running
system
Switch off power or
have an emergency
brake
brake error
Lift stops but brake
contactor
not
released
To
ban
running
system
door lock error
Door already open
(open limit signal
act) but door lock
To
ban
running
system
72
Switch off power or
have an emergency
brake
SP-3000
Operation Manual
not broken
Repeated input port
defination
To
ban
running
Run time out
Lift not shift floor out
of allowed run time
Fast
run
not
allowed, auto door
zone searching not
allowed; slow run is
ok
EEPROM error
Used
for
permanently saving
parameter and run
data saving unit
damaged
To
ban
running
encoder
error
(common encoder)
No or too less pulse
signal in fast run
(should not less
than 5 pulse per 0.1
second at rated
speed)
Fast
run
not
allowed;
auto
searching door zone
is ok; slow run is ok
To check hardware,
reasonably setting
pulse
frequency-divided
coefficient
No data signal;
absolute location is
lower than bottom
door zone 10 circles
or higher than top
door zone 10 circles
Fast run is not
allowed;
auto
searching door zone
is not allowed; slow
run is ok; no door
open/close
under
auto run
Please
check
hardware for no
data
signal;
if
hardware checked
well,
please
self-learned bottom
door zone position
and switch off the
power
Generally because
inverter protection
during run leads to
run stop. Inverter
released
main
output, but inverter
not output “inverter
error” signals to
main board
Emergency brake
Auto cleared after
run stops
Generally because
inverter protection
during run leads to
run stop. Inverter
released
main
output, but inverter
not output “inverter
Emergency brake
Auto cleared after
run stops
input definition error
encoder
(absolute
encoder)
Main
interrupt
error
value
output
Brake interrupt
73
system
To power off system
then powered on
system
SP-3000
Operation Manual
error” signals
main board
to
Brake
contactor
acts,
but
brake
checking switch not
act;
or
brake
contactor not act but
brake
checking
switch act. In one
word, the 2 acts not
consistent. If you not
defined
“brake
checking”
input,
there will no the
error
Emergency brake,
to
ban
system
running
Auto clear when
conditions
meets
requirements
Limit switch interrupt
Up run touched up
limit,
down
run
touched down limit
Emergency brake
Auto clear after run
stops
Door open during
run
Door lock, door
open limit and door
close limit 3 signals
not
meets
requirement of door
well closed during
run, system regard
door not closed well
Emergency brake
Auto clear after run
stops
Self-learning
successful
When self-learning
finished, system will
permanently record
car guild trail data.
System
with
absolute
value
encoder have no
prompt
Emergency brake
Auto clear after run
stops
Wrong floor
Not very good of
door zone signal,
which lead main
board
received
wrong door zone
signal.
serious
interference
especially in low
speed run (such as
in decelerating)
Auto slow run to
2-end station to
verify floor after lift
stopped
Auto clear after floor
verification finished
Brake
errors
checking
74
SP-3000
Operation Manual
Door jam
Door
open/close
repeated 3 times,
still not worked well
To
stop
auto
open/close door, but
manual
door
open/close is ok
Manually open/close
door or auto clear
after
conditions
meets requirements
Back door jam
Back
door
open/close repeated
3 times, still not
worked well
To
stop
auto
open/close door, but
manual
door
open/close is ok
Manually open/close
door or auto clear
after
conditions
meets requirements
Car
call
communication error
Communication
between car call
controller and main
board bad or no
communication
Self-learning
not
allowed in system
with absolute value
encoder
Auto clear after
communication
in
good working
Self-learning
needed
(common
encoder )
Not
have
self-learning to car
guide rail; although
system
already
have
successful
self-learning,
system
detect
up/down
force
decelerating switch
wrongly installed by
car
guide
rail
position
record.
System
with
Emerson
inverter
have no prompt
Fast run not allowed
Self-learning
needed
(common
encoder )
Have
no
self-learning of car
guide rail at all
Fast run & auto door
zone searching not
allowed;
no
open/close
door
action under auto
run status
Landing
call
communication error
Bad
or
no
communication
between landing call
board and main
board
Auto clear after
communication
in
good working
75
Elevator adjustment and maintenance
Operation Instruction
Technicians in elevator design, installation, commissioning,
maintenance and technical support related with the product should carefully study
this instruction, and please appropriately retain it for futur e reference.
Afersales service address: Shanghai Sumpo Electric Co.,Ltd.
17 buildings lane 2933 huqingping highway zhaoxiang
qingpu Shanghai China
Postcode: 201703
Tel: +86-21-69755901 69755098 69755023
Fax:+86-21-69755902
Email:[email protected]
http://www.shengdisi.com
In the same time of the product improvement, if there are modification for system function and relative documents, we
httpw.shengdisi.com
reserves the right to amend the relevant content without prior notice
July, 2013