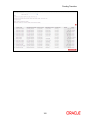
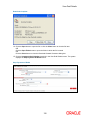
1
Oracle FLEXCUBE Direct Banking Release 12.0.1.0.0 Retail Transfer and Payments User Manual Part No. E52306-01 Retail Transfer and Payments User Manual Table of Contents 1. Transaction Host Integration Matrix ........................................................................................ 3 2. Beneficiary Maintenance .......................................................................................................... 6 2.1. Beneficiary Maintenance ...................................................................................................... 7 2.2. Beneficiary Maintenance - Internal Account Transfer ........................................................ 13 2.3. Beneficiary Maintenance - Domestic Account Transfer ..................................................... 15 2.4. Beneficiary Maintenance - International Account Transfer ................................................ 18 2.5. Beneficiary Maintenance - Domestic Drafts ....................................................................... 21 2.6. Beneficiary Maintenance - International Draft .................................................................... 24 2.7. Beneficiary Maintenance – SEPA CREDIT Transfer ......................................................... 27 2.8. Beneficiary Maintenance – SEPA Card Payment .............................................................. 29 2.9. Beneficiary Maintenance – UK Payments .......................................................................... 31 3. Own Account Transfer ............................................................................................................ 34 4. Internal Transfer ...................................................................................................................... 39 5. Multiple Internal Transfer ........................................................................................................ 43 6. Domestic Account Transfer .................................................................................................... 51 7. International Account Transfer .............................................................................................. 58 8. Domestic Drafts ....................................................................................................................... 66 9. International Drafts .................................................................................................................. 72 10. SEPA Credit Transfer ............................................................................................................ 78 11. SEPA Card Payments ............................................................................................................ 82 12. UK Payments.......................................................................................................................... 87 13. View Standing Instruction .................................................................................................... 94 14. Standing Instruction Cancellation ....................................................................................... 97 15. Pending Transfers ............................................................................................................... 101 16. Inward Remittance Inquiry.................................................................................................. 105 17. Outward Remittance Inquiry............................................................................................... 112 18. Domestic Collection Inquiry ............................................................................................... 120 19. FCY Collection Inquiry ........................................................................................................ 126 20. View Draft Details ................................................................................................................ 131 21. Service Requests ................................................................................................................. 138 21.1. Stop Payment of Drafts .................................................................................................. 139 21.2. Stop Payment Of Wired Transfer ................................................................................... 142 22. View Limits Utilization ......................................................................................................... 146 23. Change Users Limits ........................................................................................................... 150 24. Move Money In ..................................................................................................................... 153 25. Move Money Out .................................................................................................................. 156 26. Linked Account .................................................................................................................... 159 27. Savings Plan ........................................................................................................................ 162 28. Template Look Up ............................................................................................................... 165 29. Additional Options (Save as Drafts\Template, Save and Submit, View Limits) ............ 168 29.1. Save as Drafts ................................................................................................................ 169 29.2. Save as Template .......................................................................................................... 171 29.3. Save and Submit ............................................................................................................ 173 29.4. View Limits ..................................................................................................................... 175 Transaction Host Integration Matrix 1. Transaction Host Integration Matrix Legends NH No Host Interface Required. Host Interface to be developed separately. Pre integrated Host interface available. Pre integrated Host interface not available. Transaction Name FLEXCUBE UBS Third Party Host System NH NH NH Beneficiary MaintenanceInternal Transfer NH Beneficiary Maintenance Domestic Transfer NH Beneficiary Maintenance – Domestic Drafts NH Beneficiary MaintenanceInternational Transfer NH Beneficiary Maintenance Beneficiary Template 3 Transaction Host Integration Matrix Transaction Name FLEXCUBE UBS Third Party Host System Beneficiary Maintenance – International Draft NH Beneficiary Maintenance – SEPA CREDIT Transfer NH NH Beneficiary Maintenance – SEPA Card Payment NH NH Beneficiary Maintenance – UK Payments NH NH Own Account Transfer Internal Transfer Multiple Internal Transfer Domestic Funds Transfer International Account Transfer International Drafts Domestic Drafts SEPA Credit Transfer SEPA Card Payments UK Payments View Standing Instruction Standing Instruction Cancellation Usage of Deals in Cross Currency Transactions Pending Transfers View Limits Utilization NH NH Change User Limits NH NH Inward Remittance Inquiry Outward Remittance Inquiry Domestic Collection Inquiry FCY Collection Inquiry 4 Transaction Host Integration Matrix Transaction Name FLEXCUBE UBS Third Party Host System View Drafts Details Move Money In Move Money Out Linked Account Savings Plan Templates Look up NH NH Additional Options (Save as Drafts\Template, Save and Submit, View Limits) NH NH 5 Beneficiary Maintenance 2. Beneficiary Maintenance A Business user having access to Beneficiary Maintenance can maintain Beneficiary. The search criteria allow searching the beneficiary templates created earlier. Beneficiary Maintenance is supported for following Transactions Internal Transfer Domestic Transfer International Transfer Domestic Drafts International Draft SEPA Credit Transfers SEPA Credit Card Transfers UK Payments 6 Beneficiary Maintenance 2.1. Beneficiary Maintenance Navigate through the menus to Payments > Beneficiary Maintenance. Beneficiary Maintenance Note: You can create new beneficiaries template for various transaction types, by selecting any transaction type and clicking the Create Beneficiary Template button. Refer section Beneficiary Maintenance – Internal Transfer onwards for beneficiary creation. Field Description Field Name Transaction Type Description [Mandatory, Drop-Down] Select the transaction type, for which template is to be searched, from the drop-down list. Beneficiary ID [Optional, Alphanumeric, 10] Type the beneficiary ID Beneficiary Name [Optional, Alphanumeric, 35] Type the beneficiary name. Beneficiary Account No [Optional, Alphanumeric, 35] Beneficiary Email [Optional, Alphanumeric, 35] Type the beneficiary account number. Type the beneficiary email id. Beneficiary Bank Name [Optional, Alphanumeric, 35] Type the beneficiary bank name. 1. Click the Search button. The system displays Beneficiary Maintenance screen with exiting templates that can be viewed, deleted, or modified. Beneficiary Maintenance 7 Beneficiary Maintenance 2. Click 3. Click or or to navigate to the next or previous page in the list, respectively. to navigate to the first or last page in the list, respectively. 4. Click the Download button to download the complete statement. The system displays the Beneficiary Maintenance download screen dialog screen. 5. Click the reorder button list. 6. Click the Print button 7. Click on Edit button to reorder the columns or select the columns that appear in the to print the data. column to edit the number of columns. Beneficiary Maintenance - Download 8 Beneficiary Maintenance Field Description Field Name Description Download Type [Mandatory, Drop-Down] Select the report type from the drop-down list. The options are: File Format Page Layout [Conditional, Drop-Down] Select the appropriate type of file format from the drop-down list. The options are PDF XLS HTML RTF 8. Select the download type and file format from the drop-down list. 9. Click the 10. Click the included. button to exclude the option from downloading. button to Included the option for downloading. All the fields are, by default, 11. Click the Download button. The system displays the File Download message box. OR Click the Close button to close the downloading. File Download 9 Beneficiary Maintenance 12. Click the Save button to save the file on your file system. The system displays the Save As dialog box. 13. Enter the name for the file and the location and click the Save button. Once the download is complete, the system displays the Download complete message box. Download Complete 14. Click the Open button to open the file. OR Click the Open Folder button to open the folder in which the file is saved OR Click the Close button to close the Download complete dialog box and to view the file later. 15. Select beneficiary ID by selecting the respective checkbox from the Beneficiary Maintenance search screen. 16. Click the Modify button to modify the selected beneficiary template. The system displays Modify Beneficiary screen. 10 Beneficiary Maintenance Modify Beneficiary 1. Enter the details to modify the beneficiary template. 2. Click the Modify button to modify the selected beneficiary template. The system displays Modify Beneficiary - Verify screen. OR Click the Back button to navigate to the previous screen. Modify Beneficiary - Verify 3. Click the Confirm button. The system displays Modify Beneficiary - Confirm screen. OR Click the Change button to change the details. Modify Beneficiary – Confirm 4. Click the OK button. The system displays initial Beneficiary Maintenance screen. 11 Beneficiary Maintenance Deleting a Beneficiary 1. Click the Delete button in the Beneficiary Maintenance screen with the search result. The system displays the Beneficiary Maintenance – Delete Beneficiary – Verify screen. Beneficiary Maintenance – Delete Beneficiary – Verify 2. Click the Confirm button. The system displays the Beneficiary Maintenance – Delete Beneficiary – Confirm screen. OR Click the Back button to navigate to the previous screen. Beneficiary Maintenance – Delete Beneficiary – Confirm 3. Click the OK button. The system displays initial Beneficiary Maintenance screen. 12 Beneficiary Maintenance - Internal Account Transfer 2.2. Beneficiary Maintenance - Internal Account Transfer To maintain a beneficiary for internal account transfer 1. Select the Internal Account Transfers option from the Transaction Type drop-down list from the Beneficiary Maintenance screen. 2. Click the Create Beneficiary Template button. The system displays the Beneficiary Maintenance - Add Beneficiary screen. Beneficiary Maintenance - Internal Account Transfer Add Beneficiary Field Description Field Name Transaction Type Description [Display] This field displays the type of transaction. Beneficiary Id [Mandatory, Alphanumeric, 10] Type the beneficiary ID Beneficiary Name [Mandatory, Alphanumeric, 25] Type the beneficiary name Beneficiary Bank Branch [Mandatory, Drop down] Select the bank's branch in which account is held. Beneficiary Account [Mandatory, Numeric, 35] No Type the beneficiary account number. Beneficiary Email [Optional, Alphanumeric, 255] Type the beneficiary email address. 3. Enter the relevant information. 4. Click the Back button. The system displays the Beneficiary Maintenance screen. OR 13 Beneficiary Maintenance - Internal Account Transfer Click the Add button. The system displays the Beneficiary Maintenance - Add Beneficiary - Verify screen. Beneficiary Maintenance - Add Beneficiary-Internal Account Transfer- Verify 5. Click the Change button. The system displays the Beneficiary Maintenance - Add Beneficiary screen. OR Click the Confirm button to create a beneficiary. The system displays the Beneficiary Maintenance - Add Beneficiary - Confirm screen with the status message. Beneficiary Maintenance - Add Beneficiary-Internal Account Transfer- Confirm 6. Click the OK button. The system displays the Beneficiary Maintenance screen. 14 Beneficiary Maintenance - Domestic Account Transfer 2.3. Beneficiary Maintenance - Domestic Account Transfer To maintain a beneficiary for-domestic transfer 1. Select the Domestic Account Transfer option from the Transaction Type drop-down list from the Beneficiary Maintenance screen. 2. Click the Create Beneficiary Template button. The system displays the Beneficiary Maintenance - Add Beneficiary screen. Beneficiary Maintenance – Domestic Account Transfer-Add Beneficiary Field Description Field Name Transaction Type Description [Display] This field displays the type of transaction. Beneficiary Id [Mandatory, Alphanumeric, 10] Type the beneficiary ID Beneficiary Name [Mandatory, Alphanumeric, 25] Type the beneficiary name Account Type [Mandatory, Drop-Down] Select the account type. The option are Beneficiary Address Enter Account No Pay Over Counter [Conditional, Alphanumeric, 35, 2 Lines] Select the beneficiary address. This field is enabled if the Pay Over Counter option is selected from the Account Type drop-down list. 15 Beneficiary Maintenance - Domestic Account Transfer Field Name City Description [Conditional, Alphanumeric, 35] Type the name of the city. This field is enabled if the Pay Over Counter option is selected from the Account Type drop-down list. Beneficiary Email [Optional, Alphanumeric, 255] Type the beneficiary email address. Beneficiary Account Number [Mandatory, Alphanumeric, 35] National Clearing Code Type [Optional, Drop-Down] National Clearing Codes [Optional, Search, Lookup] Bank Name [Display] Type the beneficiary account number. Select the national clearing code type from the drop-down list. Click the Look Up icon to search the beneficiary bank/branch code. This field displays the selected bank name Bank Address [Display] This field displays the selected beneficiary bank/branch address Beneficiary Bank City [Display] This field displays the selected beneficiary bank/branch city 3. Enter the relevant details. 4. Click the Back button. The system displays the Beneficiary Maintenance screen. OR Click the Add button to create a beneficiary. The system displays the Beneficiary Maintenance - Add Beneficiary - Verify screen. Beneficiary Maintenance - Add Beneficiary - Domestic Account Transfer - Verify 5. Click the Change button. The system displays the Beneficiary Maintenance - Add Beneficiary screen. 16 Beneficiary Maintenance - Domestic Account Transfer OR Click the Confirm button to create a beneficiary. The system displays the Beneficiary Maintenance - Add Beneficiary - Confirm screen with the status message. Beneficiary Maintenance - Add Beneficiary-Domestic Account Transfer- Confirm 6. Click the OK button. The system displays the Beneficiary Maintenance screen. 17 Beneficiary Maintenance - International Account Transfer 2.4. Beneficiary Maintenance - International Account Transfer To maintain a beneficiary for-international account transfer 1. Select transaction type as International Account Transfer 2. Click the Create Beneficiary Template button. The system displays Beneficiary Maintenance - Add Beneficiary screen. Beneficiary Maintenance - International Account Transfer- Add Beneficiary Field Description Field Name Transaction Type Description [Display] This field displays the type of transaction. Beneficiary Id [Mandatory, Alphanumeric, 10] Type the beneficiary Id. Beneficiary Name [Mandatory, Alphanumeric, 25] Type the beneficiary name Destination Account [Mandatory, Drop-Down] Select the destination account type. The options are Pay Over Counter Account Number Beneficiary Address [Optional, Alphanumeric, 35 x 2] Type the beneficiary address. City [Optional, Alphanumeric, 35] Type the beneficiary city. 18 Beneficiary Maintenance - International Account Transfer Field Name Description Beneficiary Country [Mandatory, Drop-Down] Select the beneficiary country name from the drop-down list. Beneficiary Email [Optional, Alphanumeric, 255] Type the beneficiary email address. Beneficiary Bank Details Transfer option [Optional, Radio Button] Select the radio button through which the transfer is to be made. The options are Swift National Clearing Code Bank Details Beneficiary Account [Mandatory, Numeric, 35] Number Type the beneficiary account number. SWIFT Code [Optional, Search, Lookup] Click the Look Up icon to search the SWIFT ID. National Clearing Code Type [Mandatory, Drop Down] National Clearing Codes [Optional, Search, Lookup] Bank Name [Display] Select the national clearing code type from the drop-down list. Click the Look Up icon to search the beneficiary bank/branch code. This field displays the selected bank name. Bank Address [Display] This field displays the selected beneficiary bank/branch address. City [Display] This field displays the selected city. Country [Display] This field displays the selected bank country 3. Enter the relevant information. 4. Click the Back button. The system displays the Beneficiary Maintenance screen. OR Click the Add button to create a beneficiary. The system displays the Beneficiary Maintenance - Add Beneficiary - Verify screen. Beneficiary Maintenance - Add Beneficiary- International Account Transfer - Verify 19 Beneficiary Maintenance - International Account Transfer 5. Click the Change button. The system displays the Beneficiary Maintenance - Add Beneficiary screen. OR Click the Confirm button to create a beneficiary. The system displays the Beneficiary Maintenance - Add Beneficiary - Confirm screen with the status message. Beneficiary Maintenance - Add Beneficiary- International Account Transfer - Confirm 6. Click the OK button. The system displays the Beneficiary Maintenance screen. 20 Beneficiary Maintenance - Domestic Drafts 2.5. Beneficiary Maintenance - Domestic Drafts To maintain a beneficiary for-domestic drafts 1. Select the Demand Draft – Pay Order Request option from the Transaction Type dropdown list from the Beneficiary Maintenance screen. 2. Click the Create Beneficiary Template button. The system displays the Beneficiary Maintenance - Add Beneficiary screen. Beneficiary Maintenance – Demand Draft Pay Order Request - Add Beneficiary Field Description Field Name Transaction Type Description [Display] This field displays the demand draft request as a transaction type. Beneficiary ID [Optional, Alphanumeric, 10] Type the beneficiary ID Beneficiary Name [Optional, Alphanumeric, 35] Type the beneficiary name. Beneficiary Address [Optional, Alphanumeric, 35 x 2] Type the beneficiary address. City [Optional, Alphanumeric, 35] Type the beneficiary city name. Country [Mandatory, Drop-Down] Type the beneficiary country name. Zip/Postal Code [Optional, Alphanumeric, 255] Type the beneficiary’s postal code. Phone [Optional, Alphanumeric, 35] Type the beneficiary’s phone number. 21 Beneficiary Maintenance - Domestic Drafts Field Name Beneficiary Email Description [Optional, Alphanumeric, 35] Type the beneficiary email id. Mode of Delivery [Mandatory, Radio button] Select the mode of delivery options by selecting the respective radio button. Options are: Branch Note: If you select branch radio button then also select city and branch from the dropdowns shown. If you select courier or post radio button then those two dropdowns will be disabled. Draft Delivery Option Post /Courier [Conditional, Drop-Down] Select the draft delivery option from the drop-down list. 3. Enter the relevant information. 4. Click the Back button. The system displays the Beneficiary Maintenance screen. OR Click the Add button to create a beneficiary. The system displays the Beneficiary Maintenance - Add Beneficiary - Verify screen. Beneficiary Maintenance - Add Beneficiary- Demand Draft Request - Verify 5. Click the Change button. The system displays the Beneficiary Maintenance - Add Beneficiary screen. OR Click the Confirm button to create a beneficiary. The system displays the Beneficiary Maintenance - Add Beneficiary - Confirm screen with the status message. Beneficiary Maintenance - Add Beneficiary- Demand Draft Request - Confirm 22 Beneficiary Maintenance - Domestic Drafts Click the OK button. The system displays the Beneficiary Maintenance screen. 23 Beneficiary Maintenance - International Draft 2.6. Beneficiary Maintenance - International Draft To maintain a Beneficiary for-international draft 1. Select transaction type as International Draft. 2. Click the Create Beneficiary Template button. The system displays the Beneficiary Maintenance - Add Beneficiary screen. Beneficiary Maintenance – International Draft - Add Beneficiary Field Description Field Name Transaction Type Description [Display] This field displays the type of transaction. Beneficiary Id [Mandatory, Alphanumeric, 10] Type the beneficiary ID Beneficiary Name [Mandatory, Alphanumeric, 80] Type the beneficiary name. Beneficiary Address [Display] This field displays the selected beneficiary bank/branch address. City [Optional, Alphanumeric, 35] Type the beneficiary’s city name. Country [Optional Drop Down] Select the country from the drop-down list. Zip/Postal Code [Optional, Numeric, 10] Type the zip/postal code. Beneficiary Email [Optional, Alphanumeric, 35] Type the beneficiary email address. 24 Beneficiary Maintenance - International Draft Field Name Mode of Delivery Description [Mandatory, Radio button] Select the mode of delivery options by selecting the respective radio button. Options are: Branch Note: If you select branch radio button then also select city and branch from the dropdowns shown. If you select courier or post radio button then those two dropdowns will be disabled. Courier Post 3. Enter the relevant information. 4. Click the Back button. The system displays the Beneficiary Maintenance screen. OR Click the Add button to create a beneficiary. The system displays the Beneficiary Maintenance - Add Beneficiary - Verify screen. Beneficiary Maintenance - Add Beneficiary- International Draft - Verify 5. Click the Change button. The system displays the Beneficiary Maintenance - Add Beneficiary screen. OR Click the Confirm button to create a beneficiary. The system displays the Beneficiary Maintenance - Add Beneficiary - Confirm screen with the status message. Beneficiary Maintenance - Add Beneficiary- International Draft - Confirm 25 Beneficiary Maintenance - International Draft 6. Click the OK button. The system displays the Beneficiary Maintenance screen. 26 Beneficiary Maintenance – SEPA CREDIT Transfer 2.7. Beneficiary Maintenance – SEPA CREDIT Transfer To maintain a beneficiary for-SEPA Credit transfer 1. Select the SEPA Credit Transfer option from the Transaction Type drop-down list from the Beneficiary Maintenance screen. 2. Click the Create Beneficiary Template button. The system displays the Beneficiary Maintenance - Add Beneficiary screen. Beneficiary Maintenance – SEPA CREDIT Transfer -Add Beneficiary Field Description Field Name Transaction Type Description [Display] This field displays the type of transaction. Beneficiary Id [Mandatory, Alphanumeric, 10] Type the beneficiary ID. Name [Mandatory, Alphanumeric, 80] Type the beneficiary name. Beneficiary Account [Mandatory, Alphanumeric, 35] (IBAN) Type the beneficiary IBAN number. Beneficiary Email [Optional, Alphanumeric, 35] Type the beneficiary email address. Beneficiary Bank Details Beneficiary Bank Code (BIC)* [Search, Lookup] Click the search button to select the beneficiary bank code. 3. Enter the relevant information. 4. Click the Back button. The system displays the Beneficiary Maintenance screen. OR Click the Add button to create a beneficiary. The system displays the Beneficiary Maintenance - Add Beneficiary - Verify screen. 27 Beneficiary Maintenance – SEPA CREDIT Transfer Beneficiary Maintenance - Add Beneficiary- SEPA CREDIT Transfer - Verify 5. Click the Change button. The system displays the Beneficiary Maintenance - Add Beneficiary screen. OR Click the Confirm button to create a beneficiary. The system displays the Beneficiary Maintenance - Add Beneficiary - Confirm screen with the status message. Beneficiary Maintenance - Add Beneficiary- SEPA CREDIT Transfer - Confirm 6. Click the OK button. The system displays Beneficiary Maintenance screen. 28 Beneficiary Maintenance – SEPA Card Payment 2.8. Beneficiary Maintenance – SEPA Card Payment To maintain a beneficiary for-SEPA card payment 1. Select the SEPA CARD PAYMENT option from the Transaction Type drop-down list from the Beneficiary Maintenance screen. 2. Click the Create Beneficiary Template button. The system displays the Beneficiary Maintenance - Add Beneficiary screen. Beneficiary Maintenance - Add Beneficiary – SEPA CARD PAYMENT Field Description Field Name Transaction Type Description [Display] This field displays the type of transaction. Beneficiary Id [Mandatory, Alphanumeric, 10] Type the beneficiary ID Name [Mandatory, Alphanumeric, 80] Type the beneficiary name. Beneficiary Account(IBAN) [Mandatory, Alphanumeric, 35] Type the beneficiary IBAN number. Beneficiary Email [Optional, Alphanumeric, 35] Type the beneficiary email address. Beneficiary Bank Details Beneficiary Bank Code (BIC)* [Search, Lookup] Click the Search button to select the beneficiary bank code. 3. Enter the relevant information. 4. Click the Back button. The system displays the Beneficiary Maintenance screen. OR 29 Beneficiary Maintenance – SEPA Card Payment Click the Add button to create a beneficiary. The system displays the Beneficiary Maintenance - Add Beneficiary - Verify screen. Beneficiary Maintenance - Add Beneficiary - SEPA Card Payment- Verify 5. Click the Change button. The system displays the Beneficiary Maintenance - Add Beneficiary screen. OR Click the Confirm button to create a beneficiary. The system displays the Beneficiary Maintenance - Add Beneficiary - Confirm screen with the status message. Beneficiary Maintenance - Add Beneficiary- SEPA Card Payment - Confirm 6. Click the OK button. The system displays the Beneficiary Maintenance screen. 30 Beneficiary Maintenance – UK Payments 2.9. Beneficiary Maintenance – UK Payments To maintain a beneficiary for-UK payments 1. Select the UK Payments option from the Transaction Type drop-down list from the Beneficiary Maintenance screen. 2. Click the Create Beneficiary Template button. The system displays the Beneficiary Maintenance - Add Beneficiary screen. Beneficiary Maintenance – UK payment - Add Beneficiary Field Description Field Name Transaction Type Description [Display] This field displays the type of transaction. Type of Payments [Mandatory, Radio Button] Select the type of payment. The options are as: Beneficiary Id Non - Urgent Urgent Faster UK Payments [Mandatory, Alphanumeric, 10] Type the beneficiary ID Beneficiary Name [Mandatory, Alphanumeric, 80] Type the beneficiary name. Beneficiary Email [Optional, Alphanumeric, 35] Type the beneficiary email address. Enter Beneficiary Bank Details 31 Beneficiary Maintenance – UK Payments Field Name Bank Sort Code Description [Conditional, Radio Button] Select button to select the bank code. Bank Details [Mandatory, Radio Button] Select the type of payment. The options are as: Non - Urgent Urgent Faster UK Payments Beneficiary Account No [Mandatory, Alphanumeric, 35] Bank Sort Code [Conditional, Search Button] Type the beneficiary account number. Click the search button to select the bank code. This field is enabled if the Bank Sort Code is selected. Bank Name [Conditional, Alphanumeric, 40]. Type the bank name. This field is enabled if the Bank Details is selected. Bank Address [Conditional, Alphanumeric, 40] Type the bank address. This field is enabled if the Bank Details is selected.. City [Display] This field displays the city. 3. Enter the relevant information. 4. Click the Back button. The system displays the Beneficiary Maintenance screen. OR Click the Add button to create a beneficiary. The system displays the Beneficiary Maintenance - Add Beneficiary - Verify screen. Beneficiary Maintenance - Add Beneficiary-UK Payments- Verify 32 Beneficiary Maintenance – UK Payments 5. Click the Change button. The system displays the Beneficiary Maintenance - Add Beneficiary screen. OR Click the Confirm button to create a beneficiary. The system displays the Beneficiary Maintenance - Add Beneficiary - Confirm screen with the status message. Beneficiary Maintenance - Add Beneficiary- UK Payments - Confirm 6. Click the OK button. The system displays the Beneficiary Maintenance screen. 33 0. Own Account Transfer 3. Own Account Transfer Using the Own Account Transfer option, you can initiate funds transfer between any of your accounts, i.e. the accounts that are under the customer IDs mapped to you. Such transfer can be done either by making a new payment transaction or by using the existing beneficiary details (i.e. templates) to make the payment. The payment can be processed immediately, or on a specific future date, or you can set recurring instructions with the bank. Navigate through the menus to Payments > Within Bank > Own Account Transfer. The system displays the Own Account Transfer screen. Own Account Transfer Field Description 34 Own Account Transfer Field Name Description Existing Template [Mandatory, Drop-Down] Make New Payment [Optional, Radio Button] Select Existing Template radio button to select the existing Payment template for funds transfer. Select Make New Payment option button to make a new funds transfer entry. The transfer can be done either by using Existing Payment Template or Make New Payment. User Reference [Optional, Alphanumeric, 40] Type the user reference number that you want to use to identify this transaction. Source Account [Mandatory, Drop-Down] Select the source account number from the drop-down list. Click the button. The system will automatically fetch and display the available balance for the selected source account. Destination Account [Mandatory, Drop-Down] Transfer Amount [Mandatory, Numeric, 15] Select the destination account number from the drop-down list. Click the button. The system will automatically fetch and display the available balance for the selected destination account. Type the amount to be transferred. Pay now [Optional, Radio Button] Select the Pay now radio button to process the funds transfer immediately. The transfer can be done in any of the three modes: Pay now, Pay later or Setup Standing Instruction. Pay later [Optional, Radio Button] Select the Pay later radio button to make the funds transfer on a future date. Setup Standing Instruction [Optional, Radio Button] Select Setup Standing Instruction to set standing instructions for funds transfer for a period. The system auto transfers the fund on the specified date and frequency. 35 Own Account Transfer Field Name SI Execution Frequency Description [Conditional, Pick List] Select the standing instruction execution frequency for the funds transfer from the drop-down list. The options are: Daily Weekly Fortnightly Monthly Bi-Monthly Quarterly Half -Yearly Yearly This field is displayed if you select the Setup Standing Instruction option. First Execution Date [Conditional, Pick List] Select the execution date for the first standing instruction from the Calendar pick list. This field is displayed if you select the Setup Standing Instruction option. Expiry Date [Conditional, Pick List] Select the standing instruction Expiry date from the Calendar pick list. This field is displayed if you select the Setup Standing Instruction option. Narrative [Optional, Alphanumeric, 35] Type the narrative. 1. Click the Initiate button. The system displays the Own Account Transfer - Verify screen. Own Account Transfer - Verify 36 Own Account Transfer 2. Click the Confirm button. The system displays the Own Account Transfer - Confirm screen with the status message. OR Click the Change button to navigate to the previous screen. 37 Own Account Transfer Own Account Transfer - Confirm 3. Click the OK button. The system displays the Own Account Transfer screen. 4. Refer Additional Options sections for options like Save as Draft/Templates, Save and Submit, View Limits. 0. 38 Internal Transfer 4. Internal Transfer Using the Internal Transfer option, you can transfer funds within the bank, i.e. you can transfer funds to any accounts of the same bank. You can also create and save payment templates to be used later for funds transfer. Such transfer can be done either by making a new payment transaction or using the existing beneficiary details (i.e. templates) to make the payment. The payment can be processed immediately or on a specific future date, or you can set recurring instructions with the bank. Navigate through the menus to Payments > Within Bank > Internal Account Transfer. The system displays the Internal Account Transfer screen Internal Transfer Field Description 39 Internal Transfer Field Name Description Existing Template [Optional, Drop-Down] Make New Payment [Optional, Radio Button] Select Existing Template radio button option button to select the existing Payment template for funds transfer. Select the Make New Payment radio button to make a new funds transfer entry. The transfer can be done either by using Existing Payment Template or Make New Payment. User Reference [Optional, Alphanumeric, 40] Type the user reference number that you want to use to identify this transaction. Source Account [Mandatory, Drop-Down] Select the source account number for the internal transfer from the drop-down list. Click the button. The system will automatically fetch and display the available balance for the selected source account. Beneficiary Account [Mandatory, Lookup] Beneficiary Branch [Display] Beneficiary Email [Display] Transfer Amount [Mandatory, Numeric, 15] Transfer Currency [Mandatory, Drop-Down] Pay now [Optional, Radio Button] Click the Lookup button to select any beneficiary. Account of that selected beneficiary will get displayed here. Beneficiary branch will get automatically populated here after the selection of Beneficiary Account. Beneficiary email will get automatically populated here after the selection of Beneficiary Account. Type the transfer amount for the internal transfer. Select the transfer currency for the internal transfer from the dropdown list. Select Pay now to process the internal transfer immediately. The transfer can be done in any of the three modes: Pay now, Pay later or Setup Standing Instruction. Pay later [Optional, Radio Button] Select Pay later to make the internal transfer on a future date. The transfer can be done in any of the three modes: Pay now, Pay later or Setup Standing Instruction. 40 Internal Transfer Field Name Setup Standing Instruction Description [Optional, Radio Button] Select Setup Standing Instruction to set standing instructions for the internal transfer for a period. The system auto transfers the fund on the specified date and frequency. The transfer can be done in any of the three modes: Pay now, Pay later or Setup Standing Instruction. SI Execution Frequency [Conditional, Drop-Down] Select the standing instruction execution frequency for the internal transfer from the drop-down list. The options are: Daily Weekly Fortnightly Monthly Bi-Monthly Quarterly Half -Yearly Yearly This field is displayed if you select the Setup Standing Instruction option. First Execution Date [Conditional, Pick Lis] Select the execution date for the first standing instruction from the Calendar pick list. This field is displayed if you select the Setup Standing Instruction option. Expiry Date [Conditional, Pick List] Select the standing instruction Expiry Date from the Calendar pick list. This field is displayed if you select the Setup Standing Instruction option. Narrative [Optional, Alphanumeric, 35] Type the narrative. 1. Click the Initiate button. The system displays the Internal Transfer - Verify screen. 41 Internal Transfer Internal Transfer - Verify 2. Click the Confirm button. Depending on the type of verify screen, the system displays the Internal Transfer - Confirm screen with the status message. OR Click the Cancel button to cancel the funds transfer. Internal Transfer Confirm 3. Click the OK button. The system displays Internal Transfer screen. 4. Refer Additional Options sections for options like Save as Draft/Templates, Save and Submit, View Limits. 0. 42 Multiple Internal Transfer 5. Multiple Internal Transfer This option allows you to initiate multiple internal transfers. You can transfer money from one account to as many as five different accounts. In addition you can transfer money from different accounts to a single or multiple accounts as per the instructions. Navigate through the menus to Payments > Within Bank > Multiple Internal Transfer. The system displays the Multiple Internal Transfer screen Multiple Internal Transfers- Debit Single Account 43 Multiple Internal Transfer Field Description Field Name Description Debit Single Account [Optional, Radio Button] Debit Multiple Account [Optional, Radio Button] User Reference [Optional, Alphanumeric, 15] Select Debit Single Account to debit a single account. Select Debit Multiple Account to debit more than one account. Type the user reference number for the transaction. Source Account [Mandatory, Numeric, 18] Select the source account from the dropdown list. Destination Branch [Mandatory, Numeric, 18] Select the destination branch from the dropdown list. Payment Instruction Destination Account [Mandatory, Alphanumeric, 34] Destination Branch [Display] Type the destination account which will act as a credit account for the transaction. This field displays the destination branch selected in the destination branch dropdown. 44 Multiple Internal Transfer Field Name Transfer Amount Description [Mandatory, Numeric, 18] Type the amount to be transferred. Transfer Currency [Mandatory, Drop-Down] Pay Now [Optional, Radio Button] Select the currency from the drop-down list. Select Pay Now to process the transaction immediately. Pay Later [Optional, Radio Button] Select Pay Later to make the payment on future date. Setup Standing Instruction [Optional, Radio Button] Select Setup Standing Instruction to set the standing instruction for a period for multiple debits. Following fields are displayed if Setup Standing Instruction radio button is selected. SI Execution Frequency [Conditional, Drop-Down] Select the standing instruction execution frequency from the dropdown list. The options are: Daily Weekly Fortnightly Monthly Bi-Monthly Quarterly Half -Yearly Yearly First Execution Date [Conditional, Pick List] Expiry Date [Conditional, Pick List] Select the first standing instruction execution date from the pick list. Select the standing instruction Expiry date from the Calendar pick list. This field is displayed if you select the Setup Standing Instruction option. Other Details 45 Multiple Internal Transfer Field Name Narrative Description [Mandatory, Alphanumeric, 15] Type the brief description of the transaction. 1. To fill the details for Multiple Debit Account, select the Debit Multiple Account radio button. 46 Multiple Internal Transfer Multiple Internal Transfer- Debit Multiple Account Field Description Field Name Description Debit Single Account [Optional, Radio Button] Debit Multiple Account [Optional, Radio Button] User Reference [Optional, Alphanumeric, 15] Select Debit Single Account to debit an account. Select Debit Multiple Account to debit more than one account. Type the user reference number for the transaction. Source Account [Mandatory, Drop-Down] Select the source account from the drop-down list. Destination Branch [Mandatory, Drop-Down] Select the branch of destination account from the drop-down list. Payment Instruction Source Account [Display] This field displays the source account selected in the source account dropdown. 47 Multiple Internal Transfer Field Name Description Destination Account [Mandatory, Alphanumeric, 34] Destination Branch [Display] Transfer Amount [Mandatory, Numeric, 18] Type the destination account which will act as a credit account for the transaction. This field displays the destination branch selected in the destination branch dropdown. Type the amount to be transferred. Transfer Currency [Mandatory, Drop-Down] Pay Now [Optional, Radio Button] Select the currency from the drop-down list. Select Pay Now to process the transaction immediately. Pay Later [Optional, Radio Button] Select Pay Later to make the payment on future date. Setup Standing Instruction [Optional, Radio Button] Select Setup Standing Instruction to set the standing instruction for a period for multiple debits. Following fields are displayed if Setup Standing Instruction radio button is selected. SI Execution Frequency [Conditional, Drop-Down] Select the standing instruction execution frequency from the dropdown list. The options are: First Execution Date Daily Weekly Fortnightly Monthly Bi-Monthly Quarterly Half -Yearly Yearly [Conditional, Pick List] Select the first standing instruction execution date from the pick list. 48 Multiple Internal Transfer Field Name Expiry Date Description [Conditional, Pick List] Select the standing instruction Expiry date from the Calendar pick list. This field is displayed if you select the Setup Standing Instruction option. Narrative [Mandatory, Alphanumeric, 15] Type the brief description of the transaction. 2. Click the Add More button to add multiple records. 3. Click the button to delete a record from the grid. 4. Click the Initiate button. The system displays the Multiple Internal Transfer - Verification screen. Multiple Internal Transfer - Verify 5. Click the Confirm button. The system displays the Multiple Internal Transfer Confirmation screen with the status message. OR Click the Change button to navigate to the previous screen. 49 Multiple Internal Transfer Multiple Internal Transfer - Confirm 6. Click the OK button. The system displays the Multiple Internal Transfer screen. 0. 50 Domestic Account Transfer 6. Domestic Account Transfer Using the Domestic Account Transfer option, you can transfer funds to any account in another bank within the country. The transfer is usually made through the local payments network. The payment can be processed immediately, or on a specific future date, or You can set recurring instructions with the bank. Navigate through the menus to Payments > Within Country > Domestic Account Transfer. 51 Domestic Account Transfer Domestic Funds Transfer Field Description Field Name Description Payment To Existing Template [Optional, Radio Button] Make New Payment [Optional, Radio Button] Select Existing Template option button to select the existing Payment template for funds transfer. Select Make New Payment option button to make a new funds transfer entry. The transfer can be done either by using Existing Payment Template or Make New Payment. User Reference [Optional, Alphanumeric, 40] Type the user reference number that you want to use to identify this transaction. If a payment template is selected from the Payment Template, this field displays the user reference number of the selected payment template. Source Account [Mandatory, Drop-Down] Select the source account number from the drop-down list. Click the button. The system will automatically fetch and display the available balance for the selected source account. Beneficiary Name [Mandatory, Lookup] Click the Lookup button to select any beneficiary. Name of that selected beneficiary will get displayed here.. 52 Domestic Account Transfer Field Name Destination Account Type Description [Mandatory, Drop Down] Select the destination account type from the drop-down list. The options are: Account No Pay Over Counter Beneficiary Account [Display] Beneficiary Address [Display] City [Display] Beneficiary account number will be automatically populated here after the selection of Beneficiary name Beneficiary address will be automatically populated here after the selection of Beneficiary name. Beneficiary city will be automatically populated here after the selection of Beneficiary name. Beneficiary Email [Display] Beneficiary e-mail will be automatically populated here after the selection of Beneficiary name. Enter Beneficiary Bank Details National Clearing Codes This section provides the National Clearing Code look up icon to search the National Clearing Code details. The Look Up icon allows you to view all the Clearing Codes, Bank Name and Address. You can either type the National Clearing Code details or select the same using the Look Up function for maintaining the details. National Clearing Code Type [Conditional, Drop-Down] Select the national clearing code type from the drop-down list. This field is enabled if you select the National Clearing Codes option. National Clearing Codes [Conditional, Lookup] Click the search button to select national clearing code. This field is enabled if you select the National Clearing Codes option. Bank Name [Display] Type the name of the beneficiary bank. This field is enabled if you select the Bank Details option. If you select National Clearing Codes Option then bank name will get automatically populated here. 53 Domestic Account Transfer Field Name Bank Address Description [Display] Type the address of the beneficiary bank. This field is enabled if you select the Bank Details option. If you select National Clearing Codes Option then bank address will get automatically populated here. City [Display] Type the city of the beneficiary bank. This field is enabled if you select the Bank Details option. If you select National Clearing Codes Option then bank city will get automatically populated here. Payment Details Transfer Amount [Mandatory, Numeric, 15] Type the transfer amount for the domestic transfer. Transfer Currency [Mandatory, Drop-Down] Pay Now [Optional, Radio Button] Select the transfer currency for the domestic transfer from the drop-down list. Select Pay Now to process the transaction immediately. The transfer can be done in any of the three modes: Pay now, Pay later or Setup Standing Instruction. Pay Later [Optional, Radio Button] Select Pay Later to make the payment on future date. Setup Standing Instruction [Optional, Radio Button] Select Date [Conditional, Pick List] Select Setup Standing Instruction to set the standing instruction for a period for multiple debits. Select the appropriate future date on which you want to make the domestic transfer from the Calendar pick list. This field is displayed if you select the Pay later option. Setup Standing Instruction [Optional, Radio Button] Select Setup Standing Instruction to set standing instructions for domestic transfer for a period. The system auto transfers the fund on the specified date and frequency. 54 Domestic Account Transfer Field Name SI Execution Frequency Description [Conditional, Drop-Down] Select the standing instruction execution frequency for the domestic transfer from the drop-down list. The options are: Daily Weekly Fortnightly Monthly Bi-Monthly Quarterly Half -Yearly Yearly This field is displayed if you select the Setup Standing Instruction option. First Execution Date [Conditional, Pick List] Select the execution date for the first standing instruction from the Calendar pick list. This field is displayed if you select the Setup Standing Instruction option. Expiry Date [Conditional, Pick List] Select the standing instruction Expiry date from the Calendar pick list. This field is displayed if you select the Setup Standing Instruction option. Purpose of Remittance [Optional, Drop-Down] Description of Remittance Purpose [Optional, Alphanumeric, 20] Select the purpose of remittance from the drop-down list. Type the description of remittance purpose. This field is enabled if the Other option is selected from the Purpose of Remittance drop-down list. Narrative [Optional, Alphanumeric, 35] Type the narrative. 1. Click the Initiate button. The system displays the Domestic Funds Transfer - Verify screen. 55 Domestic Account Transfer Domestic Funds Transfer - Verify 2. Click the Confirm button. The system displays the Domestic Funds Transfer - Confirm screen with the status message. OR Click the Change button to navigate to the previous screen. 56 Domestic Account Transfer Domestic Funds Transfer - Confirm 3. Click the OK button. The system returns you to the Domestic Funds Transfer screen. 4. Refer Additional Options sections for options like Save as Draft/Templates, Save and Submit, View Limits. 0. 57 International Account Transfer 7. International Account Transfer Using the International Transfer option, you can transfer funds globally, i.e., you can transfer funds to any account in any bank across the globe. Such transfer can be made either by using an existing template or as a new payment transaction. The payment can be processed immediately, or on a specific future date, or as per your standing instructions with the bank. Navigate through the menus to Payments > International Payments Cross Border > International Account Transfer. 58 International Account Transfer International Account Transfer Field Description Field Name Description Payment To Existing Template [Optional, Radio Button] Select Existing Template option button to select the existing Payment template for funds transfer Make New Payment [Optional, Radio Button] Select Make New Payment option button to make a new funds transfer entry. The transfer can be done either by using Existing Payment Template or Make New Payment. User Reference Number [Optional, Alphanumeric, 20] Source Account [Mandatory, Drop-Down] Type the user reference number as per the your choice. Select the source account from the drop-down list. Click the button. The system will automatically fetch and display the available balance for the selected source account. Beneficiary Details Beneficiary Name [Mandatory, Alphanumeric, 35, Lookup] Click the Lookup button to select any beneficiary. Name of that selected beneficiary will get displayed here. 59 International Account Transfer Field Name Destination Account Type Description [Conditional, Drop-Down] Select the destination account from the drop-down list. The options are as follows: Beneficiary Address Enter Account No Pay Over The Counter [Conditional, Alphanumeric, 35 x 2] Beneficiary address will get automatically populated here after the selection of beneficiary name. This field is editable when you select Pay Over the Counter option from the Destination Account Type dropdown City [Conditional, Alphanumeric, 35] Beneficiary city will get automatically populated here after the selection of beneficiary name. This field is enabled when you select Pay Over the Counter option from the Destination Account Type dropdown Country [Conditional, Drop-Down] Select the country of the beneficiary from the drop-down list. This field is enabled when you select Pay Over the Counter option from the Destination Account Type dropdown Beneficiary Email [Conditional, Alphanumeric, 40] Type the beneficiary email address. This field is enabled if you select the Make New Payment option Account Number [Conditional, Alphanumeric, 34] Type the beneficiary account number. This field is enabled when you select Enter Account No option from the Destination Account Type dropdown Beneficiary Bank Details Enter Beneficiary Bank Details [Optional, Radio Button] Select the option to enter the beneficiary bank details . The options are follows: SWIFT Code SWIFT National Clearing Codes Bank Details [Conditional, Lookup] Click the lookup button to select the swift code. 60 International Account Transfer Field Name Bank Name Description [Display] Beneficiary bank name will get automatically populated here after the selection of swift code. This field is enabled if the Bank Details option is selected from the Enter Beneficiary Bank Details. Bank Address [Conditional, Alphanumeric, 70] Type the bank address. This field is enabled if the Bank Details option is selected from the Enter Beneficiary Bank Details. If you select Swift Code then this field will get automatically populated. National Clearing Code [Search, Lookup] Click the search button to select the beneficiary bank code. This field is enabled if the National Clearing Codes option is selected from the Enter Beneficiary Bank Details. National Clearing Code Type [Mandatory, Drop-Down] Country [Conditional, Alphanumeric, 35] Select the national clearing code type from drop-down list. Type the country name. This field is enabled if the Bank Details option is selected from the Enter Beneficiary Bank Details. If you select Swift Code then this field will get automatically populated City [Conditional, Alphanumeric, 26] Type the city of the beneficiary. This field is enabled if the Bank Details option is selected from the Enter Beneficiary Bank Details. If you select Swift Code then this field will get automatically populated Intermediary Bank Details [Conditional, Radio button] Select from the radio button : Swift Code Bank Details. Note: If you select Swift Code radio button, then after selecting any swift code through search option at Swift Code field, remaining details will get auto populated. If you select Bank details radio button then you will have to enter remaining details. Swift Code [Conditional, Lookup Select the swift code using search button provided. 61 International Account Transfer Field Name Bank Name Description [Conditional, Alphanumeric, 40] Type the bank name. Bank Address [Conditional, Alphanumeric, 70] Type the bank address. City [Conditional, Alphanumeric, 26] Type the city of the beneficiary. This field is enabled if the Bank Details option is selected from the Enter Beneficiary Bank Details. Country [Conditional, Alphanumeric, 35] Type the country name. This field is enabled if the Bank Details option is selected from the Enter Beneficiary Bank Details. Payment Details Transfer Amount [Mandatory, Numeric, 15] Type the transfer amount. If a payment template is selected from the Payment Template drop-down list, this field displays the transfer amount of the selected payment template. Transfer Currency [Mandatory, Drop-Down] Select the transfer currency for the international transfer from the drop-down list. Pay Now [Optional, Radio Button] Select Pay Now to process the transaction immediately. Pay Later [Optional, Radio Button] Select Pay Later to make the payment on future date. Other Details Payment Details 1 [Mandatory, Drop-Down] Select the payment details from the drop-down list. Payment Details 2/3/4 [Optional, Alphanumeric, 35 x 3] Type the description for payment details. Other Details Correspondence Charges [Mandatory, Drop-Down] Select the correspondence charges from the drop-down list. 62 International Account Transfer Field Name Narrative Description [Optional, Alphanumeric, 35] Type the narrative. 1. Click the Initiate button. The system displays the Internal Account Transfer Verify screen. 63 International Account Transfer International Account Transfer Verify 2. Click the Confirm button. The system displays the International Account Transfer Confirm screen. OR Click the Change button to navigate to the previous screen. 64 International Account Transfer International Account Transfer Confirm 3. Click the OK button. The system displays International Account Transfer screen. 4. Refer Additional Options sections for options like Save as Draft/Templates, Save and Submit, View Limits. 0. 65 Domestic Drafts 8. Domestic Drafts Using this option, you can initiate an online demand draft requisition. You will be able to specify the location where the demand draft should be payable. If Draft is payable at location other than the source account location then a demand draft will be issued else banker’s cheque will be issued. You can save the demand draft request as a draft by clicking on Save as Draft button and submit it in the future or you can save the entered information on Demand Draft Request screen as a template by clicking on Save as Template button and can use the same template to initiate Demand Draft Requests in future. Navigate through the menus to Payments > Within Country > Demand Draft Request. 66 Domestic Drafts Demand Draft – Pay Order Request Field Description Field Name Existing Template Description [Optional, Radio Button] Click the Existing Template radio button to select the existing payment template to initiate demand draft. Make New Payment [Optional, Radio Button] Select the Make New Payment radio button to make a new demand draft initiation. User Reference Number [Optional, Alphanumeric, 40] Type the number which will be the reference number of the user. The system auto generates the reference number, if the field is blank. Source Account [Mandatory, Drop-Down] Select the source account number from the drop-down list. This account will be debited to initiate demand draft. Click the button. The system will automatically fetch and display the available balance for the selected source account. Beneficiary Details: Beneficiary Name [Mandatory, Lookup] Click the lookup button to select the beneficiary. Draft Details: 67 Domestic Drafts Field Name Draft Favoring Description [Mandatory, Alphanumeric, 80] Type the name of the beneficiary of the draft. Draft Payable at [Mandatory, Drop-Down] Select the draft payable location from the drop-down list. Select Branch [Mandatory, Dropdown] Select the bank branch where the draft should be payable from the drop-down list. Draft Amount [Mandatory, Numeric, 15] Type the amount for the demand draft. Note: The amount and charges of the demand draft will be debited from the specified account. Pay Now [Optional, Radio Button] Select the Pay Now to process the transaction immediately. Pay Later [Optional, Radio Button] Select the Pay Later to make the payment on future date. Other Details Remitter’s Instruction [Optional, Alphanumeric, 50] Type the Instructions for issuing a demand draft or any additional information regarding demand draft. Narrative [Optional, Alphanumeric, 80] Type the narrative. Mode of Delivery [Mandatory, Radio button] Select any one mode of delivery from the below. Select City Branch Post / Courier [Conditional, Drop-Down] Select the city from the drop-down list. This field is enabled if the Branch radio button is selected. Select Branch [Conditional, Drop-Down] Select the bank branch from the drop-down list. This field is enabled if the Branch radio button is selected. 68 Domestic Drafts Field Name Draft Delivery Option Description [Conditional, Drop-Down] Select the draft delivery option from the drop-down list. The options are as follows: Mail to Remitter Mail to Beneficiary This field is enabled if the Post / Courier radio button is selected. Name [Conditional, Alphanumeric, 35] Type the name of the remitter/ beneficiary of the demand draft. Address [Conditional, Alphanumeric, 35 x 3] Type the address for the delivery. City [Optional, Alphanumeric, 35] Type the city of the beneficiary of the demand draft. Country [Optional, Alphanumeric, 35] Type the country of the beneficiary of the demand draft. Zip/Postal Code [Optional, Alphanumeric, 35] Type the zip postal code of the beneficiary of the demand draft. Phone [Optional, Alphanumeric, 35] Type the beneficiary’s phone number. Email [Optional, Alphanumeric, 35] Type the beneficiary email id. Terms and Condition [Mandatory, Checkbox] Select the Terms and Conditions check box to accept the conditions. Note: Unless this is checked, you will not be able to initiate demand draft request. 1. Click the Initiate button. The system displays the Demand Draft – Pay Order Request Verify screen. 69 Domestic Drafts Demand Draft – Pay Order Request Verify 2. Click the Confirm button. The system displays the Online Demand Draft - Confirm screen with the status message. OR Click the Change button to navigate to the previous screen. 70 Domestic Drafts Demand Draft – Pay Order Request Confirm 3. Click the OK button. The system displays the Demand Draft – Pay Order Request screen. 4. Refer Additional Options sections for options like Save as Draft/Templates, Save and Submit, View Limits. 0. 71 International Drafts 9. International Drafts Using the International Draft option, you can issue drafts payable at any bank located in any country across the globe, as specified by you. Such a draft can be initiated either by using an existing template or as a new payment transaction. Navigate through the menus to Payments > International Payments Cross Border > International Draft. 72 International Drafts International Draft Field Description Field Name Description Payment To Existing Template [Optional, Radio Button] Select Existing Template option button to select the existing Payment template for funds transfer. 73 International Drafts Field Name Description Make New Payment [Optional, Radio Button] User Reference Number [Optional, Alphanumeric, 40] Source Account [Mandatory, Drop-Down] Select the Make New Payment option button to make a new funds transfer entry. Type the user reference number that you want to use to identify this transaction. Select the source account from the drop-down list. Click the button. The system will automatically fetch and display the available balance for the selected source account. Beneficiary Details Beneficiary Name [Mandatory, Lookup] Click the lookup button to select beneficiary. Draft Details Drafting Favoring [Mandatory, Alphanumeric, 70] Draft Payable at [Mandatory, Drop-Down] Type the drafts details. Select the country from the dropdown list as the draft payable at location. Select City [Mandatory, Drop-Down] Select the city from the dropdown list. Draft Amount [Mandatory, Numeric, 15] Type the amount of the draft. Draft Currency [Mandatory, Drop-Down] Select the draft currency from the drop-down list. Pay Now [Optional, Radio Button] Click the Pay Now to process the transaction immediately. Pay Later [Optional, Radio Button] Click the Pay Later to make the payment on future date. Select date [Conditional, Pick List] Select the appropriate future date on which you want to make the international transfer from the Calendar pick list. This field is displayed if you select the Pay later option. Other Details 74 International Drafts Field Name Description Remitter’s Instruction [Optional, Alphanumeric, 35*2] Narrative [Optional, Alphanumeric, 35] Type the remitter’s instruction. Type the narrative for the transaction. Delivery Details Mode of Delivery [Mandatory, Radio button] Select the mode of delivery for draft delivery by selecting from the following radio buttons The option are as follows: Name Branch Post / Courier [Conditional, Alphanumeric, 35] Type the name for the receiver in case of Mode of delivery is Post / Courier. Address [Conditional, Alphanumeric, 35 x 3] Type the address of the delivery in case of Mode of delivery is Post / Courier. City [Optional, Alphanumeric, 26] Type the city of the delivery in case of Mode of delivery is Post / Courier.. Country [Optional, Drop-Down] Select the country of the delivery in case of Mode of delivery is Post / Courier from the drop-down list. Zip/Postal Code [Optional, Numeric, 10] Type the zip/postal code. Email [Optional, Alphanumeric, 40] Type the beneficiary email address. Terms and Conditions [Mandatory, Checkbox] Click the Terms and Conditions check box to accepts the term and conditions 1. Click the Initiate button. The system displays the International Draft - Verification screen. International Draft - Verification 75 International Drafts 2. Click the Confirm button. The system displays the International Draft - Confirmation screen with the status message. OR Click the Change button to navigate to the previous screen. 76 International Drafts International Draft - Confirmation 3. Click the OK button. The system displays International Draft screen. 4. Refer Additional Options sections for options like Save as Draft/Templates, Save and Submit, View Limits. 0. 77 SEPA Credit Transfer 10. SEPA Credit Transfer This option is used for the SEPA credit transfer. The credit transfer is an instruction from a customer to their bank authorizing the bank to debit amount from the customer's account, and pass on the credit to his beneficiary account in another Bank or Financial Institution. Navigate through the menus to Payments > Within Country > SEPA Credit Transfer. SEPA Credit Transfer Field Description Field Name Description One of the radio buttons has to be selected from the following two options. 78 SEPA Credit Transfer Field Name Existing Template Description [Optional, Radio Button] Click the Existing Template radio button to select the existing payment template for funds transfer. Make New Payment [Optional;, Radio Button] User Reference Number [Optional, Alphanumeric, 40] OIN [Optional, Alphanumeric, 35] Click the Make New Payment radio button to make a new funds transfer entry. Type the user reference number which identifies this transaction. Type the originator identification number. OIN Description [Optional, Alphanumeric, 40] Type the description originator identification number. Source Account [Mandatory, Drop-Down] Select the source account from the drop-down list. Click the button. The system will automatically fetch and display the available balance for the selected source account. Beneficiary Details Beneficiary ID [Mandatory, Alphanumeric, 10] Type the beneficiary ID Name [Mandatory, Alphanumeric, 35] Type the name of the beneficiary. Beneficiary Account (IBAN) [Mandatory, Alphanumeric, 35] Type the beneficiary IBAN number. Beneficiary Bank Details Beneficiary Bank Code (BIC) [Mandatory, Lookup] Click the lookup button to select the beneficiary bank code. Payment Details Amount [Mandatory, Numeric, 15, Two] Type the amount for the credit transfer. Currency [Display] This field displays the currency. One of the radio buttons has to be selected from the following two options. 79 SEPA Credit Transfer Field Name Pay Now Description [Optional, Radio Button] Click the Pay Now radio button to set earliest date. Pay Later [Optional, Radio Button, Pick List] Click the Pay Later radio button to set date. Select the date from the pick list. Other Details Narrative [Optional, Alphanumeric, 35] Type the narrative for the transaction. 1. Click the Initiate button. The system displays SEPA Credit Transfer - Verify screen. SEPA Credit Transfer - Verify 2. Click the Confirm button. The system displays the SEPA Credit Transfer - Confirm screen with the status message. OR Click the Change button to navigate to the previous screen. 80 SEPA Credit Transfer SEPA Credit Transfer - Confirm 3. Click the OK button. The system displays SEPA Credit Transfer screen. 4. Refer Additional Options sections for options like Save as Draft/Templates, Save and Submit, View Limits. 0. 81 SEPA Card Payments 11. SEPA Card Payments This option is used for the card payment .The card payment is an instruction from a customer to their bank authorizing the bank to debit varying amounts from his Credit card, and pass on the credit to his creditor’ a account in another Bank or Financial Institution. Navigate through the menus to Payments > Within Country > SEPA Card Payments. SEPA Card Payments Field Description Field Name Description 82 SEPA Card Payments Field Name Description One of the radio buttons has to be selected from the following two option. Existing Template [Optional, Radio Button] Click the Existing Template radio button to select the existing payment template for funds transfer. Make New Payment [Optional, Radio Button] User Reference Number [Optional, Alphanumeric, 40] OIN [Mandatory, Alphanumeric, 35] Click the Make New Payment radio button to make a new funds transfer entry. Type the user reference number which identifies this transaction. Type the originator identification number. The OIN is the unique number given to participants who are authorized to use the Direct Debit Scheme. SEPA Card Number [Mandatory, Numeric, 16] OIN Description [Mandatory, Alphanumeric, 40] Type the SEPA card number. Type the description originator identification number. Beneficiary Details Beneficiary ID [Mandatory, Lookup] Click the lookup button to select the beneficiary ID. Name [Display] This field displays the beneficiary name. Beneficiary Account (IBAN) [Display] Beneficiary Email [Display] This field displays the beneficiary IBAN. This field displays the beneficiary email. Beneficiary Bank Details Beneficiary Bank Code (BIC) [Mandatory, Lookup] Click the lookup button to select the beneficiary bank code. Payment Details Amount [Mandatory, Numeric, 15] Type the amount for the credit transfer. 83 SEPA Card Payments Field Name Currency Description [Display] This field displays the currency. One of the radio buttons has to be selected from the following three option. Pay Now [Optional, Radio Button] Click the Pay Now radio button to set earliest date. Pay on [Optional, Radio Button, Pick List] Click the Pay On radio button to set date. Select the date from the pick list. Setup Standing Instruction [Optional, Radio Button] SI Execution Frequency [Conditional, Drop-Down] Select Setup Standing Instruction radio button for the setting an instructions. Select the standing instruction execution frequency from the dropdown list. This field is enabled if the Setup Standing Instructions radio button is selected. First Execution Date [Conditional, Pick List] Select the first execution date from the pick list. This field is enabled if the Setup Standing Instructions radio button is selected. Expiry Date [Conditional, Pick List] Select the standing instruction Expiry date from the Calendar pick list. This field is displayed if you select the Setup Standing Instruction option. Other Details Narrative [Optional, Alphanumeric, 35] Type the narrative for the transaction. 1. Click the Initiate button. The system displays SEPA Card Payment Verify screen. 84 SEPA Card Payments SEPA Card Payment Verify 2. Click the Confirm button. The system displays SEPA Card Payment Confirm screen. OR Click the Change button to change the inputs. SEPA Card Payment Confirm 3. Click the OK button. The system displays SEPA Card Payments screen. 85 SEPA Card Payments 4. Refer Additional Options sections for options like Save as Draft/Templates, Save and Submit, View Limits. 0. Note: Online Integration for this transaction with FLEXCUBE UBS is not available currently. 86 UK Payments 12. UK Payments This option is used to initiate the payment through payment networks available in UK. Navigate through the menus to Payments > Within Country > UK Payments. 87 UK Payments UK Payments Field Description Field Name Description One of the radio buttons has to be selected from the following two options. Existing Template [Optional, Radio Button] Click the Existing Template option button to select the existing payment template for funds transfer. Make New Payment [Optional, Radio Button] Click the Make New Payment to create the new payment template. Type of Payments [Mandatory, Radio Button] Select the type of payment. The options are as follows: Non - Urgent Urgent Faster UK Payments User Reference Number [Optional, Alphanumeric, 40] Source Account [Mandatory, Drop-Down] Type the user reference number which identifies this transaction. Select the source account from the drop-down list. Click the button. The system will automatically fetch and display the available balance for the selected source account. Beneficiary Details 88 UK Payments Field Name Beneficiary Name Description [Mandatory, Lookup] Click the lookup button to select the beneficiary name. Beneficiary Account [Display] This field displays the beneficiary account. Beneficiary Email [Display] This field displays the beneficiary email. The following fields are displayed if the Non – Urgent OR Faster UK payment radio button is selected as a payment type. Beneficiary Bank Details Beneficiary Bank Details [Mandatory, Radio Button] Select the beneficiary bank details. The options are as follow: Bank Sort Code Bank Sort Code Bank Details [Conditional, Lookup] Click the lookup button to select the bank code. This field is enabled if the Bank Sort Code is selected. Bank Name [Conditional, Alphanumeric, 40] Type the bank name. This field is enabled if the Bank Details is selected. Bank Address [Conditional, Alphanumeric, 40] Type the bank address. This field is enabled if the Bank Details is selected. City [Conditional, Alphanumeric, 40] Type the city. This field is enabled if the Bank Details is selected. The following fields are displayed if Urgent radio button is selected as a payment type. SWIFT Code [Mandatory, Lookup] Click the lookup to select the SWIFT code. Bank Name [Display] This field displays the bank name. Bank Address [Display] This field displays the bank address. 89 UK Payments Field Name City Description [Display] This field displays the name of the city. Country [Display] This field displays the name of the country. Payment Details Transfer Amount [Mandatory, Numeric, 15] Type the amount for the credit transfer. Transfer Currency [Display] This field displays the transfer currency. One of the radio buttons has to be selected from the following option. Pay Now [Optional, Radio Button] Select Pay Now radio button to set earliest date. Pay Later [Optional, Radio Button, Pick List] Select Pay Later radio button to set date. Select the date from the pick list. Setup Standing Instruction [Optional, Radio Button] SI Execution Frequency [Conditional, Drop-Down] Select Setup Standing Instruction radio button for setting up an instructions. Select the standing instruction execution frequency from the drop-down list. This field is enabled if the Setup Standing Instructions is selected. First Execution Date [Conditional, Pick List ] Select the first execution date from the pick list. This field is enabled if the Setup Standing Instructions is selected. Expiry Date [Conditional, Pick List] Select the standing instruction Expiry date from the Calendar pick list. This field is displayed if you select the Setup Standing Instruction option. Other Details Correspondence Charges [Optional, Drop-Down] Select the correspondence charges from the drop-down list. 90 UK Payments Field Name Narrative Description [Optional, Alphanumeric, 35] Type the narrative for the transaction. 1. Click the Initiate button. The system displays UK Payments - Verify screen. 91 UK Payments UK Payments – Verify 2. Click the Confirm button. The system displays UK Payments – Confirm screen. OR. Click the Cancel button to navigate to the previous screen. 92 UK Payments UK Payments - Confirm 3. Click the OK button. The system displays UK Payments screen. 4. Refer Additional Options sections for options like Save as Draft/Templates, Save and Submit, View Limits. 0. Note: Online Integration for this transaction with FLEXCUBE UBS is not available currently. 93 View Standing Instruction 13. View Standing Instruction Standing Instruction facility allows you to intimate the bank in advance to transfer funds between your current and savings accounts in the bank periodically. Whenever these kind of periodic transactions are to be effected, you can instruct the bank to do the same by setting up a standing instruction (SI). This section enables to view and cancel the standing instruction. Navigate through the menus to Payments > Recurring Transfer and Payments > View Standing Instructions. Standing Instructions View Field Description Field Name Source Account Description [Mandatory, Drop-Down] Select the source account from which funds are transferred. Transfer Mode [Optional, Drop-Down] Select the type of transfer from the drop-down list. 94 View Standing Instruction Field Name Description First Execution Date From [Optional, Pick list] First Execution Date To [Optional, Pick list] Select the start date for the standing instruction from the pick list. Select the end date for the standing instruction from the pick list. Reference No [Optional, Numeric] Type the standing instruction reference number. Frequency Type [Optional, Drop-Down] Select the execution SI frequency from drop down list. 1. Click the Submit button. The system displays Standing Instructions View screen with the details. Standing Instruction View Field Description Field Name Reference No Description [Display] This field displays the standing instruction reference number. Transfer Mode [Display] This field displays the type of transfer. Status [Display] This field displays the status of SI. Amount [Display] This field displays the amount of the SI. Account [Display] This field displays Source account from which funds are transferred. 95 View Standing Instruction Field Name Branch Description [Display] This field displays the branch name of the source account. First Execution Date [Display] This field displays the initiation date of SI. 2. Click the Reference No link to view the details of SI. The system displays Standing Instructions View – within Bank Transfer screen. Standing Instructions View 3. Click the Back button to go to the previous screen. 96 0. Standing Instruction Cancellation 14. Standing Instruction Cancellation To cancel standing instruction Navigate through the menus to Payments > Recurring Transfer and Payments > Standing Instruction Cancellation. Standing Instructions Cancellation Field Description Field Name Source Account Description [Mandatory, Drop-Down] Select the source account from which funds are transferred Transfer Mode [Optional, Drop-Down] Select the type of transfer. 97 Standing Instruction Cancellation Field Name Description First Execution Date From [Optional, Pick list] First Execution Date To [Optional, Pick list] Reference No [Optional, Numeric] Select the first execution date from which the search should begin from the pick list. Select the end date for the first execution from the pick list. Type the standing instruction reference number. Frequency Type [Optional, Drop-Down] Select the execution SI frequency from drop down list. 1. Click the Submit button. The system displays Standing Instructions for cancellation in the Standing Instruction Cancellation screen. Standing Instructions Cancellation Field Description Field Name Reference No Description [Display] This field displays the standing instruction reference number. Transfer Mode [Display] This field displays the type of transfer. Status [Display] This field displays the status of SI. Amount [Display] This field displays the amount of SI. Account [Display] This field displays Source account from which funds are transferred. 98 Standing Instruction Cancellation Field Name Branch Description [Display] This field displays the branch name of the source account. First Execution Date 2. [Display] This field displays the initiation date of SI. Click the Reference No link of SI that has to be cancelled. The system displays Standing Instruction Cancellation – Within Bank Transfer – Verify screen. Standing Instructions Cancellation- Within Bank Transfer - Verify 3. Click Confirm to cancel the Standing Instruction. The system displays Standing Instruction Cancellation – within Bank Transfer – Confirm screen. OR Click the Change to change the Standing Instruction that has to be cancelled. Standing Instructions Cancellation - Confirm 99 Standing Instruction Cancellation 4. Click the OK button. The system displays initial Standing Instruction Cancellation screen. 0. 100 Pending Transfers 15. Pending Transfers This section enables the customers to view the pending transfers whether it is move money in or move money out and group them for clarity purpose. It also allows canceling any pending transfers from the system. Navigate through the menus to Payments > Pending Transfer. Pending Transfers 101 Pending Transfers 102 Pending Transfers Field Description Field Name Transfer Type Description [Display] This column displays the type of transfer. Host Reference Number [Display] Source Account [Display] This column displays the host reference number. This column displays the source account for the transaction. Destination Account [Display] Transfer Date [Display] This column displays the destination account for the transaction. This column displays the transfer date for the transaction. Amount [Display] This column displays the amount of the transaction. Status [Display] This column displays the reason due to which the transfer is pending. 1. Select any of the Transfer Type radio button of which the transfer is to be canceled. 2. Click the Cancel Transfer button. The system displays the Pending Transfer View – Cancel Verify screen. Pending Transfers View – Cancel Verify 3. Click the Confirm button. The system displays Pending Transfer - Cancel – Confirm screen. OR Click the Change to change the entered details. 103 Pending Transfers Pending Transfers – Cancel - Confirm 4. Click the OK button. The system displays Pending Transfer screen. 0. 104 Inward Remittance Inquiry 16. Inward Remittance Inquiry Using this option, you can inquire on inward remittance received on an account. Navigate through the menus to Collection and Remittances > Inward Remittance Inquiry. Inward Remittance Inquiry Field Description Field Name Account Number Description [Mandatory, Drop-Down] Select the account number from the drop-down list. Click the button. The system will automatically fetch and display the available balance for the selected account. Currency [Mandatory, Drop-Down] Select the currency from the drop-down list. Channel Type [Mandatory, Drop-Down] Select the channel type from the drop-down list. 105 Inward Remittance Inquiry Field Name Amount From Description [Optional, Numeric, 15] Type the minimum amount range for search criteria. Amount To [Optional, Numeric, 15] Type the maximum amount range for search criteria. Note: The amount to set here cannot be less than the amount from. From Date [Optional, Pick list] Select the start date of the period, for which you want to view the inward remittance inquiry, from the pick list. The start date should not be greater than the current date. To Date [Optional, Pick list] Select the end date of the period, for which you want to view the inward remittance inquiry, from the pick list. The end date should be greater than or equal to start date. 1. Click the Search button. The system displays the Inward Remittance Inquiry results screen. Inward Remittance Inquiry Column Description Column Name Description 106 Inward Remittance Inquiry Column Name Description Transaction Ref. No. [Display] Transaction Date [Display] This column displays the transaction reference number. This column displays the transaction date. Debit Amount and Currency [Display] Credit Amount and Currency [Display] Remitter Bank [Display] This column displays the currency and amount. This column displays the credit currency and amount. This column displays the name of the Remitter bank. Remitter Name [Display] This column displays the name of the remitter. 2. Click 3. Click or or to navigate to the next or previous page in the list, respectively. to navigate to the first or last page in the list, respectively. 4. Click the Download button, to download the complete statement. The system displays the Inward Remittance Inquiry download screen. 5. Click the reorder button list. 6. Click the Print button 7. Click on Edit button to reorder the columns or select the columns that appear in the to print the data. column to edit the number of columns. Download Inward Remittance Inquiry 107 Inward Remittance Inquiry Field Description Field Name Description Download Type [Mandatory, Drop-Down] Select the appropriate report type from the drop-down list. The options are as follows: File Format Page Layout [Conditional, Drop-Down] Select the appropriate type of file format from the drop-down list. The options are as follows: PDF XLS HTML RTF 8. Select the download type and file format from the drop-down list. 9. Click the button to exclude the option from downloading. 10. Click the included. button to included the option for downloading. All the fields are, by default, 11. Click the Download button. The system displays the File Download message box. OR Click the Close button to close the downloading. File Download 12. Click the Save button to save the file on your file system. The system displays the Save As dialog box. 108 Inward Remittance Inquiry 13. Enter the name for the file and the location and click on the Save button. Once the download is complete, the system displays the Download complete message box. Download Complete 14. Click the Open button to open the file or click the Close button to view the file later. OR Click the Open Folder button to open the folder in which the file is saved OR Click the Close button to close the Download Outward Guarantee dialog box. 15. Click the Transaction Ref. No. hyperlink in the Inward Remittance Inquiry screen. The system displays Inward Remittance Details screen. 109 Inward Remittance Inquiry Inward Remittance Detail Field Description Field Name Transaction Ref. No. Description [Display] This field displays the transaction reference number for which the data is displayed. Funds Received From Name [Display] This field displays the name of the remitter. Bank and Branch [Display] This field displays the name of the bank and branch of the remitter. Account Number [Display] This field displays the amount number of the sender. Funds Deposited To Account Number [Display] This field displays the amount number of the receiver. Branch [Display] This field displays the name of the branch of the receiver. Transaction Details 110 Inward Remittance Inquiry Field Name Received Funds Description [Display] This field displays the amounts of funds received. Funds Received On [Display] Funds Credited On [Display] Credited Funds [Display] This field displays the date on which funds are received. This field displays the date on which the funds are credited on receiver’s account. This field displays the amount credited to the account. Other Details Remittance Purpose [Display] Remark [Display] This field displays the purpose of remittance. This field displays the remarks. 16. Click the Back button to go to the previous screen. 111 0. Outward Remittance Inquiry 17. Outward Remittance Inquiry This option provides inquiry of outward remittances sent through various domestic and international channels. Navigate through the menus to Collection and Remittances > Outward Remittance Inquiry. Outward Remittance Inquiry Field Description Field Name Account Number Description [Mandatory, Drop-Down] Select the account number from the drop-down list. Click the button. The system will automatically fetch and display the available balance for the selected account. Currency [Mandatory, Drop-Down] Select the currency from the drop-down list. 112 Outward Remittance Inquiry Field Name Channel Type Description [Mandatory, Drop-Down] Select the channel type from the drop-down list. Amount From [Optional, Numeric, 15] Type the minimum amount range for search criteria. Amount To [Optional, Numeric, 15] Type the maximum amount range for search criteria. Note: The amount to set here cannot be less than the amount from. From Date [Optional, Pick list] Select the start date of the period, for which you want to view the Inward Remittance Inquiry, from the pick list. The start date should not be greater than the current date. To Date [Optional, Pick list] Select the end date of the period, for which you want to view the Inward Remittance Inquiry, from the pick list. The end date should be greater than or equal to start date. 1. Click the Search button to find the list of Outward remittance made by you. The system displays the Outward Remittance Inquiry screen with the search result. Outward Remittance Inquiry Column Description 113 Outward Remittance Inquiry Column Name Description Transaction Date [Display] This column displays the transaction date. Credit Amount and Currency [Display] Debit Amount and Currency [Display] Beneficiary Bank [Display] This column displays the credit amount and currency. This column displays the debit amount and currency. This column displays the name of the beneficiary bank. Beneficiary Name [Display] This column displays the beneficiary name. Account [Display] This column displays the account number of the customer. Branch [Display] This column displays the branch to which account belongs. Customer Id [Display] This column displays the customer id to which account belongs. Transaction Reference Number [Display] Remittance Notes [Display] This column displays the transaction reference number. You can click on this link to view the transaction details. This field will display any remarks or Notes attached with the remittance. 2. Click 3. Click or or to navigate to the next or previous page in the list, respectively. to navigate to the first or last page in the list, respectively. 4. To download the complete statement, click the Download the Outward Remittance Inquiry dialog screen. 5. Click the reorder button list. 6. Click the Print button 7. Click on Edit button button. The system displays to reorder the columns or select the columns that appear in the to print the data. column to edit the number of columns. 114 Outward Remittance Inquiry Outward Remittance Inquiry Download Field Description Field Name Description Download Type [Mandatory, Drop-Down] Select the appropriate report type from the drop-down list. The options are as follows: File Format Page Layout [Conditional, Drop-Down] Select the appropriate type of file format from the drop-down list. The options available are PDF XLS HTML RTF 8. Select the download type and file format from the drop-down list. 9. Click the button to exclude the option from downloading. 10. Click the included. button to included the option for downloading. All the fields are, by default, 11. Click the Download button. The system displays the File Download message box. OR Click the Close button to close the downloading. File Download 115 Outward Remittance Inquiry 12. Click the Save button to save the file on your file system. The system displays the Save As dialog box. 13. Enter the name for the file and the location and click on the Save button. Once the download is complete, the system displays the Download complete message box. Download Complete 14. Click the Open button to open the file or click the Close button to view the file later. OR Click the Open Folder button to open the folder in which the file is saved OR Click the Close button to close the Download Outward Guarantee dialog box. 15. Click the Transaction Reference Number hyperlink in the Outward Remittance Inquiry screen. The system displays Outward Remittance Details screen. Outward Remittance Details 116 Outward Remittance Inquiry Field Description Field Name Description Transaction Details Transaction Ref. No. [Display] This field displays the transaction reference number. Transaction Date [Display] This field displays the date on which the transaction is received by the bank. Account Debited [Display] This field displays the account number that is to be debited. Remittance Amount [Display] This field displays the amount that is remitted. Purpose of Remittance [Display] This field displays the reason of remittance. Funds Remitted To Beneficiary Name [Display] This field displays the name of the beneficiary. Beneficiary Address [Display] This field displays the beneficiary address. 117 Outward Remittance Inquiry Field Name Description Beneficiary Account Number [Display] Beneficiary Bank [Display] This field displays the beneficiary account number. This field displays the beneficiary bank name. Beneficiary Bank Address [Display] View SWIFT Advices [Display, Hyperlink] This field displays the address of the beneficiary’s bank. This section displays SWIFT advices linked to the transaction 16. Click the Cancel Payment button to cancel the payment. The system displays Stop Payment of Wired Transfer screen. OR Click the Back button to go back to the previous screen. Stop Payment of Wired Transfer 17. Click the Submit button. The system displays Stop Payment of Wired Transfer Verify screen. OR Click the Back button to go back to the previous screen. 0. Note: For the further details about the screen, refer to the Stop Payment of Wired Transfer screen. 118 Outward Remittance Inquiry 119 Domestic Collection Inquiry 18. Domestic Collection Inquiry Using this option, you can inquire the status of the domestic cheques received and deposited with the bank. Navigate through the menus to Collection and Remittances > Domestic Collection Inquiry. Domestic Collection Inquiry Field Description Field Name Account Number Description [Mandatory, Drop-Down] Select the account number from the drop-down list. Cheque Currency [Optional, Drop-Down] Select the cheque currency from the drop-down list. 120 Domestic Collection Inquiry Field Name Cheque Status Description [Optional, Drop-Down] Select the cheque status from the drop-down list. The options are: From Date Reversed Rejected Settled [Optional, Pick List] Select the start date from the pick list. To Date [Optional, Pick List] Select the end date from the the pick list. Amount From [Optional, Numeric, 15] Type the lower limit of amount in this field. Amount To [Optional, Numeric, 15] Type the upper limit of amount in this field. 1. Click the Search button to find the list of Instruments sent for Domestic Collection Inquiry. The system displays search result in the Domestic Collection Inquiry screen. Domestic Collection Inquiry 121 Domestic Collection Inquiry Column Description Column Name Description Cheque Collection Date [Display] This column displays the cheque collection date. Cheque Number [Display] This column displays Cheque Number for Collection. Status [Display] This column displays the status of the domestic collection. Amount [Display] This column displays the paid amount. Clearing House Location [Display] This column displays the clearing house location. Collection Branch [Display] This column displays the collection branch code. Collection Branch Name [Display] This column displays the collection branch name. Debit Account Number [Display] This column displays the debit account number. Reference Number [Display] This column displays the reference number. Customer No [Display] This column displays the customer number. Credit Branch Name [Display] This column displays the credit branch name. Credit Account Number [Display] This column displays the credit account number. 2. Click 3. Click or or to navigate to the next or previous page in the list, respectively. to navigate to the first or last page in the list, respectively. 4. To download the complete statement, click the Download the beneficiary maintenance dialog screen. 5. Click the reorder button list. 6. Click the Print button button. The system displays to reorder the columns or select the columns that appear in the to print the data. 122 Domestic Collection Inquiry 7. Click on Edit button column to edit the number of columns. Domestic Collection Inquiry – Download Field Description Field Name Description Download Type [Mandatory, Drop-Down] Select the appropriate report type from the drop-down list. The available choices are: File Format Page Layout [Conditional, Drop-Down] Select the appropriate type of file format from the drop-down list. The options available are PDF XLS HTML RTF 8. Select the download type and file format from the drop-down list. 9. Click the button to exclude the option from downloading. 123 Domestic Collection Inquiry 10. Click the included. button to included the option for downloading. All the fields are, by default, 11. Click the Download button. The system displays the File Download message box. OR Click the Close button to close the downloading. File Download 12. Click the Save button to save the file on your file system. The system displays the Save As dialog box. 13. Enter the name for the file and the location and click on the Save button. Once the download is complete, the system displays the Download complete message box. Download Complete 124 Domestic Collection Inquiry 14. Click the Open button to open the file or click the Close button to view the file later. OR Click the Open Folder button to open the folder in which the file is saved OR Click the Close button to close the Download Outward Guarantee dialog box. 0. 125 FCY Collection Inquiry 19. FCY Collection Inquiry This is the inquiry function which enables helpdesk users to track the status of the cheques received by the corporate customers and deposited with the bank. This functionality is relevant for Foreign Currency cheques. Once the customer deposits the cheque, and then on the value date sends the same for clearing (outward collection). Navigate through the menus to Collection and Remittances > FCY Collection Inquiry. FCY Collection Inquiry Field Description Field Name Description Account Number [Mandatory, Drop-Down] Select the customer ID from the drop-down list. Cheque Currency [Mandatory, Drop-Down] Select the cheque currency from the drop-down list. 126 FCY Collection Inquiry Field Name Description Cheque Status [Mandatory, Drop-Down] Select the cheque status from the drop-down list. The options are as follows: From Date All Settled [Optional, Pick List] Select the start date range from the pick list. By default, the system displays system date. To Date [Optional, Pick List] Select the end date range from the pick list. By default, the system displays system date. Note: The date selected here should be greater than From Date. Amount From [Optional, Numeric,15] Type the start amount range to search a record. All the records within the specified amount range will be displayed. Amount To [Optional, Numeric,15] Type the end amount range to search a record. All the records within the specified amount range will be displayed 1. Click the Search button. The system displays the FCY Collection Inquiry screen with the search result. FCY Collection Inquiry 127 FCY Collection Inquiry Field Description Column Name Description Transaction Reference No [Display] Purchase/Collection Date [Display] Amount [Display] This column displays the transaction reference number. This column displays the date on which the cheque was financed or received. This column displays the amount. Cheque Number [Display] This column displays the cheque number of the transaction. Payer Bank [Display] This column displays the name of the payer bank. Status [Display] This column displays the collection status of the cheque. Clearing House Location 2. Click 3. Click or or [Display] This column displays the clearing house location. to navigate to the next or previous page in the list, respectively. to navigate to the first or last page in the list, respectively. 4. To download the complete statement, click the Download the FCY Collection Inquiry dialog screen. 5. Click the reorder button list. 6. Click the Print button 7. Click on Edit button button. The system displays to reorder the columns or select the columns that appear in the to print the data. column to edit the number of columns. FCY Collection Inquiry - Download 128 FCY Collection Inquiry Field Description Field Name Description Download Type [Mandatory, Drop-Down] Select the appropriate report type from the drop-down list. The available choices are: File Format Page Layout [Conditional, Drop-Down] Select the appropriate type of file format from the drop-down list. The options available are PDF XLS HTML RTF 8. Select the download type and file format from the drop-down list. 9. Click the button to exclude the option from downloading. 10. Click the included. button to included the option for downloading. All the fields are, by default, 11. Click the Download button. The system displays the File Download message box. OR Click the Close button to close the downloading. 129 FCY Collection Inquiry File Download 12. Click the Save button to save the file on your file system. The system displays the Save As dialog box. 13. Enter the name for the file and the location and click on the Save button. Once the download is complete, the system displays the Download complete message box. Download Complete 14. Click the Open button to open the file. OR Click the Open Folder button to open the folder in which the file is saved OR Click the Close button to close the Download Outward Guarantee dialog box. 0. 130 View Draft Details 20. View Draft Details Using this option you can view the draft details and also can stop payments of drafts. Navigate through the menus to Payments > View Draft Details. View Draft Details Field Description Field Name Description Instrument Type [Mandatory, Drop-Down] Select the instrument type from the drop down list. Source Account [Optional, Drop-Down] Select the source account from the drop down. Click the button. The system will automatically fetch and display the available balance for the selected source account. 131 View Draft Details Field Name Description Beneficiary Name [Optional, Alphanumeric, 35] Type the beneficiary name to be searched. Currency [Optional, Drop-Down] Select the currency from the drop-down list. Amount From [Optional, Numeric, 13.Two] Type the amount from which the search should begin. Amount To [Optional, Numeric, 13.Two] Type the end amount for the search. From Date [Optional, Pick List] Select the start date range from the drop-down or pick list. To Date [Optional, Pick List] Select the end date range from the drop-down or pick list. The date selected here should be greater than from Date. 1. Click the Search button. The system displays the View Draft Details screen with the search result. View Draft Details Field Description Column Name Instrument Serial Number Description [Display] This column displays the instrument serial number. Accounts [Display] This column displays the accounts. 132 View Draft Details Column Name Description Beneficiary Name [Display] This column displays the beneficiary name. Currency [Display] This column displays the currency of the draft amount. Issue Date [Display] This column displays the issue date of the draft. Amount [Display] This column displays the amount of the draft. 2. Click 3. Click or or to navigate to the next or previous page in the list, respectively. to navigate to the first or last page in the list, respectively. 4. Click the Download button to download the complete statement. The system displays the View Draft Details dialog screen. 5. Click the reorder button list. 6. Click the Print button 7. Click on Edit button to reorder the columns or select the columns that appear in the to print the data. column to edit the number of columns. View Drafts Details - Download Field Description 133 View Draft Details Field Name Description Download Type [Mandatory, Drop-Down] Select the appropriate report type from the drop-down list. The available choices are: File Format Page Layout [Conditional, Drop-Down] Select the appropriate type of file format from the drop-down list. The options available are PDF XLS HTML RTF 8. Select the download type and file format from the drop-down list. 9. Click the button to exclude the option from downloading. 10. Click the included. button to included the option for downloading. All the fields are, by default, 11. Click the Download button. The system displays the File Download message box. OR Click the Close button to close the downloading. File Download 12. Click the Save button to save the file on your file system. The system displays the Save As dialog box. 13. Enter the name for the file and the location and click on the Save button. Once the download is complete, the system displays the Download complete message box. 134 View Draft Details Download Complete 14. Click the Open button to open the file or click the Close button to view the file later. OR Click the Open Folder button to open the folder in which the file is saved OR Click the Close button to close the Download Outward Guarantee dialog box. 15. Click the Instrument Serial Number hyperlink in the View Draft Details screen. The system displays the Stop Payments Of Drafts screen. Stop Payments of Drafts 135 View Draft Details Field Description Field Name Description Instrument No [Display] This field displays the instrument number. Account [Optional, Drop-Down] This field displays the account mentioned in the draft. Amount [Display] This field displays the draft amount. Currency [Display] This field displays the currency of the draft amount. Issue Date [Display] This field displays the issue date of the draft. Beneficiary Name [Display] This field displays the beneficiary name. Reason [Mandatory, Drop-Down] Select the reason for stopping the draft payment from the dropdown list. Specify Reason [Mandatory, Drop-Down] Type the beneficiary name to be searched. Action [Mandatory, Drop-Down] Select the action to be performed on the draft, from the dropdown list. Refund Account Number [Conditional, Drop-Down] Type the from amount i.e. lower limit of amount. Note: This field is enabled only if you select User Reference [Optional, Numeric, 15] Type the user reference number. 16. Click the Submit button. The system displays Stop Payment Of Demand Draft/Pay Order Verify screen. OR Click the Back button to navigate to the previous screen. 136 View Draft Details Stop Payment Of Demand Draft/Pay Order – Verify 17. Click the Confirm button. The system displays Stop Payment Of Demand Draft/Pay Order Confirm screen. OR Click the Back button to navigate to the previous screen. Stop Payment Of Demand Draft/Pay Order – Confirm 18. Click the OK button. The system displays Stop Payment Of Draft screen. 0. 137 Service Requests 21. Service Requests Using this option you can initiate a service request for any transaction given in the list. To initiate service request: 1. Logon to the Internet Banking application. 2. Navigate through the menus to Customer Services > New Service Request. The system displays the Service Request screen. Service Request Field Description Field Name Select Transaction Description [Mandatory, Drop-Down] Select the transaction from the drop-down list. 3. Select the transaction for which the request needs to be given and click the Submit button. 138 Service Requests 21.1. Stop Payment of Drafts Using this option you can raise a request to stop payment of drafts. Stop Payment of Drafts Field Description Field Name Description Instruments Details Instrument No [Mandatory, Numeric, 16] Type the Instrument no which is to be stopped for payments. Amount [Mandatory, Alphanumeric,15] Type the amount in the instrument to be stopped for payments. Account [Mandatory, Drop-Down] Select the account from the drop-down list. Click the button. The system will automatically fetch and display the available balance for the selected account. Issue Date [Mandatory, Pick List] Select the value date from the pick list. Currency [Mandatory, Drop-Down] Select the currency from the drop-down list. Beneficiary Name [Optional, Alphanumeric, 20] Type the beneficiary name. Additional Information 139 Service Requests Field Name Reason Description [Mandatory, Drop-Down] Select the reason from the drop-down list. The options are follow: Destroyed Stolen Others Lost Specify Reason [Conditional, Alphanumeric, 20] Type the specific reason for stop of payments of draft. This field will be activated on selecting others in the Reason field. Action [Mandatory, Drop-Down] Select the action from the drop-down list. The options are follow: Reissue duplicate draft Refund draft account to an account. Refund account number [Conditional, Drop-Down] User Reference [Optional, Alphanumeric, 25] Select the refund account number from the dropdown list. Click the button. The system will automatically fetch and display the available balance for the selected refund account. Type the user reference number. 4. Click the Submit button and the verification page is displayed OR Click the Another Service Request button to return to the service request screen. Stop Payment of Demand Draft / Pay Order - Verify 5. Click the Confirm button. The system displays the Stop Payment of Draft - Confirm screen OR Click the Back button to change the details. 140 Service Requests Stop Payment of Demand Draft/Pay Order - Confirm 6. Click the Ok button. The system displays Stop Payment of Draft service request screen. OR Click the Another Service Request. The system displays the New Service Request screen. 0. 141 Service Requests 21.2. Stop Payment Of Wired Transfer Using this option you can raise a request to reissue transaction password. Stop Payment of Wired Transfer Field Description Field Name Description Customer Details Wired Transfer Reference number [Mandatory, Alphanumeric, 25] Source Account [Mandatory, Dropdown] Type the wired transfer reference number. Select the source account from the dropdown list. Click the button. The system will automatically fetch and display the available balance for the selected account. Currency [Mandatory, Dropdown] Select the currency from the dropdown list. 142 Service Requests Field Name Amount Description [Mandatory, Alphanumeric,25] Type the wired transfer reference number. Value Date [Mandatory, pick list] Select the value date from the pick list. Beneficiary Details Beneficiary Name [Optional, Alphanumeric, 35] Type the Beneficiary name. Destination Account [Optional, Alphanumeric, 20] Beneficiary Address [Optional, Alphanumeric, 35*2] City [Optional, Alphanumeric, 35] Type the destination account number. Type the destination address. Type the Name of the city. Country [Optional, Dropdown] Select the country from the dropdown list. Beneficiary Bank details BIC [Mandatory, Look up] Select the BIC code from the list displayed on clicking on the look up screen. Bank Name [Display] This field displays the Bank name as per the BIC selected. Value Date [Mandatory, pick list] Select the value date from the pick list. Country [Display] This field displays the country of the Bank as per the BIC selected. City [Display] This field displays the city of the Bank as per the BIC selected. Additional information Reason [Mandatory, Alphanumeric, 25] Type the reason for cancellation of wired transfer. 143 Service Requests Field Name Description Refund Account Number [Mandatory, Dropdown] User Reference [Optional, Alphanumeric, 25] Select the refund account number from the dropdown list. Click the button. The system will automatically fetch and display the available balance for the selected refund account. Type the User reference number for cancellation of wired transfer. 1. Click the Submit button and the verification page is displayed OR Click the Another Service Request button to return to the service request screen. Stop Payment of Wired transfer - Verify 2. Click the Confirm button. The system displays the Stop Payment on Wired Transfer Confirm screen OR Click the Back the button to change the details. 144 Service Requests Stop Payment of Wired transfer - Confirm 3. Click the Ok button. The system displays Stop Payment on Wired Transfer Service Request screen. OR Click the Another Service Request. The system displays the New Service Request screen. 0. 145 22. View Limits Utilization Using the View Limits Utilization option, you can view the limits utilized. Navigate through the menus to Payments > View Limit Utilization. Select Transaction Field Description Field Name Transaction Description [Mandatory, Drop-Down] Select the transaction from the drop-down list. From Date [Conditional, Pick List] Select the specific duration of the date from the drop-down list. To Date [Conditional, Pick List] Select the specific duration of the date from the drop-down list. 1. Click the Continue button. The system displays the View Utilized Limits screen. 146 View Limits Utilization 2. Initiation and Authorization limits for the limits allocated to you at User level and customer level are displayed in the below screen. View Utilized Limits 3. 4. Click the Change limits button to Modify the Limits. The system displays the Change limits screen for the transaction selected. Click the Back button to go to the previous screen. 147 View Limits Utilization Limits Applicable to me Field Description Field Name Description Initiation limit Minimum Transaction Amount [Optional, Numeric] Maximum Transaction Amount [Optional, Numeric] Type the new minimum transaction amount. Type the new maximum transaction amount. Daily Authorization Limit Total Amount [Optional, Numeric] Type the new total authorization amount. Number of Transactions 5. [Optional, Numeric] Type the new total transactions for authorization. Click the Change button. The system displays the Change Limits Verify screen.. OR Click the Back button to return to the previous screen 148 View Limits Utilization Change Limits Verify 6. Click the Change button. The system displays the Change Limits Confirm screen.. OR Click the Back button to return to the previous screen Confirm Changed Limits 7. Click the OK button to return to the View Utilized Limits. 149 0. Change Users Limits 23. Change Users Limits Using this option, you can change the users limits. Limits Applicable To Me Field Description 150 Change Users Limits Field Name Description Initiation limit Minimum Transaction Amount [Optional, Numeric] Maximum Transaction Amount [Optional, Numeric] Type the new minimum transaction amount. Type the new maximum transaction amount. Daily Authorization Limit Total Amount [Optional, Numeric] Type the new total authorization amount. Number of Transactions [Optional, Numeric] Type the new total transactions for authorization. 1. Click the Own Account Transfer link to select the transaction for changing the limits of that transaction. 2. Click the Change button. The system displays the Verify Changed Limits screen. OR Click the Back button to return to the previous screen. Change Limits Verify 3. Click the Change button. The system displays the Confirm Changed Limits screen. OR Click the Back button to return to the previous screen Confirm Changed Limits 151 Change Users Limits 4. Click the OK button to return to the change users Limits screen. 152 0. Move Money In 24. Move Money In Using this option, you can transfer funds from linked account to the internal bank account owned by you. The transfer will get initiated on first available business day. Move Money In Field Description Field Name Source Account Description [Mandatory, Drop-Down] Select the source account number from the drop-down list. 153 Move Money In Field Name Bank BC Code Description [Display] This field displays the bank BC code. Destination Account [Mandatory, Drop-Down] Transfer Money Out [Mandatory, Radio Button] Select the destination account number from the drop-down list. Select the type of transfer money out. The options are as follows: (First) Start Date Now: Select this option if the transfer is to be done instantly. Later: Select this option if the transfer is to be done later at the specified date. Saving Plans: Select this option if the transfer is to be done as per the saving plan. [Conditional, Pick list] Select the date on which the transfer is to be done from the pick list. This field is enabled if the Later or Saving Plan radio button is selected as a type of transfer money out. This field displays the current date if the Now radio button is selected as a type of transfer money out. Transfer Amount [Mandatory, Numeric, 15] Type the amount to be transferred. Currency [Mandatory, Drop-Down] Select the currency of the amount to be transferred from the drop down list. 1. Click the Submit button. The system displays Move Money In - Verify screen. Move Money In - Verify 2. Click the Confirm button. The system displays Move Money In - Confirm screen with the status message. OR Click the Back button to navigate to the previous screen. 154 Move Money In Move Money In - Confirm 3. Click the OK button. The system displays Move Money In screen. 155 0. Move Money Out 25. Move Money Out Using the Move Money Out option, you can transfer funds from bank account to linked account mapped to you. The transfer will get initiated on first available business day. Move Money Out Field Description Field Name Source Account Description [Mandatory, Drop-Down] Select the source account number from the drop-down list. Destination Account [Mandatory, Drop-Down] Select the destination account number from the drop-down list. 156 Move Money Out Field Name Description Transfer Money Out It is mandatory to selected one of the radio button from the following fields. Now [Optional, Radio Button] Click the Now radio button if the transfer is to be done instantly. Later [Optional, Radio Button] Click the Later radio button if the transfer is to be done later at the specified date. [Conditional, Pick List] Select the specific date to transfer the money from the pick list. This field is enabled if the Later radio button is selected. Transfer Amount [Mandatory, Numeric, 13.2] Type the amount to be transferred. Currency [Mandatory, Drop-Down] Select the currency of the amount to be transferred from the drop down list. 1. Click the Submit button. The system displays the Move Money Out - Verify screen. Move Money Out - Verify 2. Click the Submit button. The system displays Move Money Out Confirm screen with the status message. OR Click the Back button to navigate to the previous screen. Move Money Out Confirm 157 Move Money Out 3. Click the OK button. The system displays Move Money Out screen. 158 0. Linked Account 26. Linked Account This option allows you to add a new account and link it to the existing account. You can move money in or out of the existing account through this linked account. Linked Account 1. Click the Add Another Linked Account button. The system displays Add Another Linked Account screen. 159 Linked Account Add Another Linked Account Field Description Field Name Source Account Description [Mandatory, Numeric, 10] Type the valid account number to be added. Bank BIC Code [Mandatory, Lookup] Click the lookup button to select the bank code. Note: Select the correct BIC code of the bank; otherwise the addition of linked account will be rejected. 2. Click the Submit button. The system displays Add Another Linked Account Verify screen. OR Click the Back button to navigate to the previous screen. Add another Linked Account Verify 3. Click the Confirm button. The system displays Add Another Linked Account Confirm screen. OR Click the Back button to navigate to the previous screen. 160 Linked Account Add Another Linked Account Confirm 4. Click the OK button. The system displays initial Linked Account screen. 0. 161 Savings Plan 27. Savings Plan Using this option, you can view or cancel any savings plan. Savings Plans Field Description Field Name Source Account Description [Display] This column displays the source account with the hyperlink. Destination Account [Display] Host Reference Number [Display] This column displays the destination account. This column displays the host reference number. 162 Savings Plan Field Name Transfer Amount Description [Display] This column displays the transfer amount of the savings plan. Frequency [Display] This column displays the frequency of the savings plan. Start Date [Display] This column displays the start date. Next Direct Debit Date 1. [Display] This column displays the next direct debit date. Click the Source Account hyperlink. The system displays Savings – Detailed Overview screen. Savings – Detailed Overview 2. Click the Cancel Plan button. The system displays Verify Cancel Saving Plan screen. OR Click the Back button to navigate to the previous screen. Verify Cancel Saving Plan 3. Click the Confirm button. The system displays Confirm Cancel Saving Plan screen. OR Click the Back button to navigate to the previous screen. Confirm Cancel Saving Plan 163 Savings Plan 4. Click the OK button. The system displays Savings Plans screen. 0. 164 Template Look Up 28. Template Look Up Using this option, you can use already existing templates for any of the payments transactions. You need not to enter any field details for those fields which are already filled in that existing template. To use template look up 1. Log on to the Internet Banking application. 2. Navigate to any payments transaction. For e.g. Own Account Transfer which is explained below. 3. Navigate through the menus to My Payments > Within Bank > Own Account Transfer. The system displays the Own Account Transfer screen. 165 Template Look Up Own Account Transfer 4. Select the Existing Template radio button. 5. Click the Lookup button to select existing template. The system displays Template Look Up screen. Template Look Up 6. Enter the details for searching the existing template. 7. Click the Search button. The system displays the Template Lookup screen with search results. 8. Select the User Reference No. radio button for selecting the template. 9. Click the Use Template button. The system displays the Own Account Transfer screen with all the details of template. 0. 166 Template Look Up Own Account Transfer Note: For the further details of the fields refer to payment transaction section. 167 Additional Options (Save as Drafts\Template, Save and Submit, View Limits) 29. Additional Options (Save as Drafts\Template, Save and Submit, View Limits) While doing Payments transactions there are additional options available as Save as Drafts\Template, Save and Submit, View Limits. Using Save as Drafts\Template option, you can save the entered details as drafts or templates. These saved drafts or templates can be used later for any of the payments transactions. You need not to enter any field details for those fields which are already filled in these existing drafts or templates. Using Save and Submit you can save as well as initiate that transaction. Using View Limits option, you can view the limits status for that particular transaction. 168 Save as Drafts 29.1. Save as Drafts 1. Log on to the Internet Banking application. Navigate to any payments transaction. For e.g. Own Account Transfer which is shown below. 2. Navigate to My Payments > Within Bank > Own Account Transfer. The system displays Own Account Transfer screen. Own Account Transfer 3. Click the Save as Draft button to create a draft version of the transaction. The system displays Own Account Transfer – Confirm screen with the status message. You can use the draft version later to initiate the payment. Note: You can enter details in parts and save. Submission of the entered details can be done on any preferred date using Save as Draft. 169 Save as Drafts Own Account Transfer - Confirm 4. Click the OK button. The system displays initial Own Account Transfer screen. 5. Click the Save as Draft button, if you initiate any payments transactions through any existing Draft. The system displays the Save as Draft screen. Save as Draft 6. Click the Yes button to overlap the existing draft with this draft. OR Click the New Draft button to create a new draft. 170 Save as Template 29.2. Save as Template 1. Log on to the Internet Banking application. Navigate to any payments transaction. For e.g. Own Account Transfer which is shown below. 2. Navigate to My Payments > Within Bank > Own Account Transfer. The system displays Own Account Transfer screen. Own Account Transfer 3. Click the Save as Template button to create a payment template of the transaction. The system displays Own Account Transfer – Confirm screen with the status message. Note: While saving any transaction as template, system performs field validations i.e. you have to enter the mandatory details, otherwise it won’t perform Save as Template. 171 Save as Template Own Account Transfer - Confirm 4. Click the OK button. The system displays initial Own Account Transfer screen. 5. Click the Save as Template button, if you are initiating any payments transactions through any existing template. The system displays the Save as Template screen. Save as Template 6. Click the Yes button to overlap the existing template with this template. OR Click the New Template button to create a new template. 172 Save and Submit 29.3. Save and Submit 1. Log on to the Internet Banking application. Navigate to any payments transaction. For e.g. Own Account Transfer which is shown below. 2. Navigate to My Payments > Within Bank > Own Account Transfer. The system displays Own Account Transfer screen. Own Account Transfer 3. Click the Save and Submit button to create a payment template of the transaction as well as initiating the transaction. Note: While doing save and submit, system performs field validations i.e. you have to enter the mandatory details, otherwise it won’t perform Save and submit. 173 Save and Submit Save and Submit Field Description Field Name Template Details Description [Optional, Radio Button] Click the Template Details option button to save template details. Draft Details [Optional, Radio Button] Click the Draft Details option button to save draft details. New Template [Optional, Alphanumeric, 20] Type the new template details. 4. Click the Submit button to submit the template. The system will save it as a template and also initiate the transaction by showing Own Account Transfer – Verify screen. 174 View Limits 29.4. View Limits 1. Log on to the Internet Banking application. Navigate to any payments transaction. For e.g. Own Account Transfer which is shown below. 2. Navigate to My Payments > Within Bank > Own Account Transfer. The system displays Own Account Transfer screen. Own Account Transfer 3. Click the View Limits button. It will display View utilized limits screen in which it will graphically display allowed, utilized and remaining number of transaction and allowed, utilized and remaining daily limits(in terms of amount). 175 View Limits View Utilized Limits 4. Click the Close button to close the View Utilized Limits screen. 176 Oracle FLEXCUBE Direct Banking Retail Transfer and Payments User Manual October 2012 Version Number: 12.0.1.0.0 Oracle Financial Services Software Limited Oracle Park Off Western Express Highway Goregaon (East) Mumbai, Maharashtra 400 063 India Worldwide Inquiries: Phone: +91 22 6718 3000 Fax:+91 22 6718 3001 www.oracle.com/financialservices/ Copyright © 2008, 2012, Oracle and/or its affiliates. All rights reserved. Oracle and Java are registered trademarks of Oracle and/or its affiliates. Other names may be trademarks of their respective owners. U.S. GOVERNMENT END USERS: Oracle programs, including any operating system, integrated software, any programs installed on the hardware, and/or documentation, delivered to U.S. Government end users are “commercial computer software” pursuant to the applicable Federal Acquisition Regulation and agencyspecific supplemental regulations. As such, use, duplication, disclosure, modification, and adaptation of the programs, including any operating system, integrated software, any programs installed on the hardware, and/or documentation, shall be subject to license terms and license restrictions applicable to the programs. No other rights are granted to the U.S. Government. This software or hardware is developed for general use in a variety of information management applications. It is not developed or intended for use in any inherently dangerous applications, including applications that may create a risk of personal injury. If you use this software or hardware in dangerous applications, then you shall be responsible to take all appropriate failsafe, backup, redundancy, and other measures to ensure its safe use. Oracle Corporation and its affiliates disclaim any liability for any damages caused by use of this software or hardware in dangerous applications. This software and related documentation are provided under a license agreement containing restrictions on use and disclosure and are protected by intellectual property laws. Except as expressly permitted in your license agreement or allowed by law, you may not use, copy, reproduce, translate, broadcast, modify, license, transmit, distribute, exhibit, perform, publish or display any part, in any form, or by any means. Reverse engineering, disassembly, or decompilation of this software, unless required by law for interoperability, is prohibited. 177 View Limits The information contained herein is subject to change without notice and is not warranted to be error-free. If you find any errors, please report them to us in writing. This software or hardware and documentation may provide access to or information on content, products and services from third parties. Oracle Corporation and its affiliates are not responsible for and expressly disclaim all warranties of any kind with respect to third-party content, products, and services. Oracle Corporation and its affiliates will not be responsible for any loss, costs, or damages incurred due to your access to or use of third-party content, products, or services. 178