1
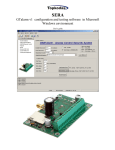
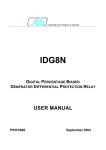
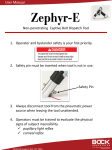
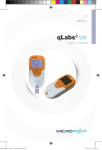
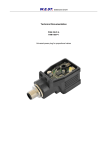
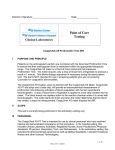
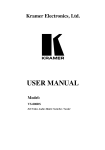
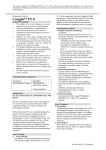
hiClot
User Manual
version March 19th , 2010
Chapter 1
General information
1.1
Layout of the device
hiClot is a single channel low cost clot meter, very simple to
use and capable of performing the most common clot assays.
PT
PTT
TT
FIB
Prothrombin time
Partial thromboplastin time
Thrombin time
Fibrinogen (Clauss)
A piece of software is available1 for connecting the hiClot
to an external computer in order to manage an archive of the
assay results and to print reports.
It is a small box that has an LCD back lit display, a keyboard and
12 positions to preheat the samples
2 positions for the reagents
1 reading well
1 The
most recent version of this package can be downloaded from
www.hilab.it
hiClot user manual
hiClot right side
4
General information
The device can be controlled by means of a three button
keyboard and the display on top of it. The power switch and
the plug for the external supply on the right side, the connector of the PC interface is on the left side.
1.2 Structure of the instrument
hiClot left side
The hiClot upper side has the control panel and the thermostatic block.
1.2.1 Thermostatic block
The thermostatic block is made of aluminum and has some
wells to preheat the samples and the reagents as well as the
reading station. It is covered with a plastic surface to lower
its dissipation thus assuring temperature uniformity which is
between 36, 5o C and 37, 5o C. The central well incorporates
the optical reader and is where to insert the reaction cup to
hiClot user manual
1.3 Working principle
5
be read.
1.2.2
Control panel
The control panel is composed by an alphanumeric LCD display and a three button keyboard. It is seldom used during
the normal work as it serves only to select the assay type and
start the assay.
and
select the items of a list
The two upper keys
while the lower one
accepts the current selection.
OK
1.3
Working principle
All the clot assay determine chain reactions that end by transforming the Fibrinogen into Fibrin using Thrombin as a catalyst. The Fibrin forms a high turbidity jelly clot that can be
monitored by measuring the absorbance augmentation.
hiClot user manual
6
General information
Actually, hiClot is fundamentally a mono channel blue
light colorimeter that can be schematized as follows.
The semitransparent cup is crossed by the light beam
generated by the emitter whose intensity variation is measured by the optical sensor on the opposite side.
The assay sequence begins by inserting a cup into the
measuring well containing the needed volume of sample. The
cup insertion is revealed by the photometer. When the
key is pressed, a three second count down begins at the end
of which the operator adds the reagent: from now on, hiClot
starts monitoring the clot formation.
The typical absorbance graph after the reagent addition
is shown in the following plot.
OK
250
200
150
100
50
0
0
5
10
t (sec)
15
20
hiClot user manual
1.3 Working principle
7
For about ten seconds nothing happens, then after 12 ÷ 13
seconds the sample starts clotting and the absorbance raises
as it is clearly seen in the figure2 . As the Fibrin is being
synthesized the absorbance raises until the upper limit that
corresponds to the total clot formation.
hiClot follows completely the absorbance curve and builds
the straight segments that control the stopwatch. This results
in a good repeatability and improves hiClot insensibility to
external disturbances.
2 Please
note that the vertical absorbance scale is arbitrary.
hiClot user manual
Chapter 2
Assays
2.1
Basics
Whet switched on, hiClot shows its name and the software
version for a while, then automatically starts heating the measurement block up to 37o C. During the heating phase, lasting
for about 5 ÷ 8 minutes depending on the external temperature, it displays an arrow that moves slowly rightwards as the
temperature rises.
When the heating is over, the message Insert sample
is shown on the upper row and on the second the method list
begins with PT PTT and continues rightwards as implied by
the arrow.
Please note that PT is surrounded by square parentheses
to show that it is the current method, i.e. the one the instrument is ready to execute.
You can change the current method by means of the
and
keys.
Pressing
the selection goes to the next method: in the
middle of the row now the PTT method is surrounded by the
hiClot user manual
2.1 Basics
9
parentheses. Pressing
once more, the selection goes to the
subsequent method (now TT is among parentheses).
Please note that the arrow to the right disappears so we
are at the end of the list while an arrow is now to the left
since the head of the list is no more shown. Pressing
goes
back and the previous method is selected. The methods are
ordered as follows: PT, PTT, TT e FIB.
In order to start an assay, a cup must be inserted into the
measurement well: the photometer reveals its presence and
starts waiting for the reagent dispensation. Now the display
shows the selected method and Reagent. If the instrument
is not calibrated for the chosen method, an asterisk is shown:
in such case no other result but the clot formation time will
be delivered.
Press
and the displays shows a three second countdown. Insert the reagent when the countdown ends. the stopwatch starts an it will stopped by the clot formation. After
that the instrument shows the time and, if calibrated, the calculated results depending on the chosen method as indicated
by the following table.
OK
test
PT
P
PTT
TT
FIB
parameter
Prothrombin time
Ratio = P T /P Tpool
INR = RatioISI
Activity
Partial Prothrombin time
Ratio = P T T /P T Tpool
Thrombin time
Ratio = T T /T Tpool
Derived Fibrinogen
Concentration
sec
%
sec
sec
sec
mg/dl
display
XXX.X
XX.XX
XX.XX
XXX.X
XXX.X
XX.XX
XXX.X
XX.XX
XXX.X
XXX.
The last column to the right contains the significant figures: for instance XXX.X means that the result will be shown
hiClot user manual
10
Assays
by means of a number having one decimal figure and up to
three figures before the decimal point (example 12.3)
If you take out the cup from the reading well during the
clot formation, the measurement is interrupted and hiClot
sets for a new reaction. The maximum time for the clot formation is 300 sec after which the test is anyway interrupted.
For the PT, PTT and TT assays, the ratio computations
needs the P Tpool , P T Tpool and T Tpool coefficients that should
be determined on a pool of sera that represents well the healthy
population of the laboratory.
2.2
PT - Prothrombin time
The Prothrombin or factor II is a glycoprotein synthesized by
the liver whose concentration in plasma is 10 ÷ 16 mg/dl.
The PT test detects the activity of the coagulation factors of the extrinsic pathway specifically the I,II, V, VII ad
X some of which are influenced by the oral anticoagulant
therapy. For this reason the PT assay is used for monitoring
patients under such therapy.
2.2.1
Assay execution
Select the PT method1
Preheat the PT reagent in a reagent well.
Insert a hollow cup in a preheating well.
Put 100 µL of sample in it (plasma)
Preheat the sample for at least 2 min or the time indicated on the reagent box.
6. Move the cup in the reading well: the system automatically senses its presence and asks the operator to insert
1.
2.
3.
4.
5.
1 The selected method is the one between parentheses on the second row
of the display. Select it by means of the
and
hiClot user manual
2.2 PT - Prothrombin time
11
the reagent.
7. Press
: a three second countdown starts. When it
is over, dispense 200 µL of preheated reagent into the
sample cup and the timer starts.
8. Once the clot is formed, the timer stops and the results
are shown.
OK
2.2.2
Calibration
A four point calibration is needed in order to calculate the
PT Activity: the calibrators are obtained from the normal
control plasma2 diluting it with a salt solution as shown by
the following schema:
A
B
C
D
Activity
%
100
50
25
12.5
Dilution
1:1
1:2
1:4
1:8
Preparation
plasma solution
100 µL
50 µL
50 µL
25 µL
75 µL
12.5 µL 87.5 µL
Preheat the cups with the calibrators for no less than 2 min
and then:
1. Measure calibrator A (100 %) with the procedure described in the last paragraph. When the assay is over,
press the
key: CAL is displayed lower right to indicate that the first calibration point has been accepted.
2. Measure the B calibrator (50 %) and press
to enter
the second point.
3. Measure the C calibrator (25 %) and press
to enter
the third point.
4. Measure the D calibrator (12.5 %) and press
to enter the fourth point.
OK
OK
OK
OK
2 which
is supposed to have 100% activity
hiClot user manual
12
Assays
After such procedure the system is calibrated and can calculate the Ratio and the Activity. The calibration curve is
the regression straight line based on the calibration points as
shown in the figure with the inverse Activity (1/A) on the x
axis and the clot time in seconds on the y axis.
Verification of the calibration data
The calibration data can be shown and changed pressing
when the current test is PT The coagulation time T0 of the
calibrator A appears.. Pressing
con and on, the coagulation time T1 of the B calibrator is shown, then T2 of the C
calibrator and T3 of the last calibrator.
OK
OK
2.2.3
Insertion of the ISI
If you press
once more after the last calibration point, the
current value of the ISI 3 is displayed which, as known, is
used in the calculation of the INR4 . This parameter is norOK
3 International
4 International
Sensitivity Index
Normalized Ratio
hiClot user manual
2.2 PT - Prothrombin time
13
mally found on the reagent box and generally depends on the
production lot.
Let us suppose that the current ISI value is 1.00 and it
should be 1.08. Proceed as follows
1. Press
- the previous value disappears and a 1 appears : accept it pressing
2. Press
- a decimal point is shown : accept it pressing
OK
OK
3. Press
- besides the decimal point the figure 9 appears, pressing
once more it turns into 8. Continue
pressing
until 0 is selected : accept it pressing
4. Press
five times until besides 0 a 5 appears : accept
the figure with
5. Now the selected number is correct: enter it pressing
another time
OK
OK
OK
Actually the procedure consists in inserting a decimal
selects the next digit,
number selecting each single digit:
the previous one. The decimal point lies after 9 and before 0 and the system inhibits to insert more than one.
2.2.4
Delivered results
When the instrument is well calibrated, the assay results are
four values organized as follows.
hiClot user manual
14
Assays
top left
PT: clotting time in seconds (15.0 in the example)
top right
Ratio: ratio between the PT of the sample and
that of the A calibrator (1.23 in the shown example)
bottom left IN R = RatioISI (1.20 in the example)
bottom right Activity expressed as a percentage and based
on the described calibration procedure (78.4%
in the example)
2.2.5
Reset of the PT calibration
The aforementioned procedure is aimed at inserting automatically the calibration points from the calibrator assay results.
In order to recalibrate the instrument, it is mandatory to
clear the current calibration: switch the instrument off and
switch it on again keeping pressed the
button until the
software version is disappears.
2.3
PTT - Partial Thromboplastin Time
It is the clotting time of a platelet deficient plasma after the
insertion of phospholipids (in place of platelets) and of calcium ions. It verifies the extrinsic coagulation pathway.
2.3.1
Assay execution
1. Select the PTT assay
2. Preheat the Ca Cl2 in a reagent well
3. Insert a void cup in a sample well
hiClot user manual
2.4 TT - Thrombin time
15
4. Dispense 100 µL of sample (plasma) and incubate for
2 min
5. Dispense 100 µL of PTT reagent ad incubate for another 3 ÷ 5 min
6. Move the sample cup to the reaction well: the system
automatically senses its presence and asks the operator
to insert the reagent.
: a three second countdown starts and when
7. Press
it is over dispense 100 µL of preheated Ca Cl2 into the
sample cup. The stopwatch starts counting.
8. When the clot is developed, the stopwatch stops and
shows the results
OK
The first result is the PTT in seconds, the second is the
ratio between this time and the normal PTT value.
2.4
TT - Thrombin time
It is the clotting time of a citrated platelet deficient plasma to
which a known volume of Thrombin is dispensed. This assay
investigates the final pathway of the coagulation reaction: the
transformation of Fibrinogen into Fibrin and its polymerization.
2.4.1
1.
2.
3.
4.
5.
Assay execution
Select the TT assay
Preheat the TT reagent in a reaction well.
Insert a void cup into a sample well
Pipet 200 µL of sample (plasma)
Preheat the sample for at least 3 min or the time you
can find on the reagent box.
hiClot user manual
16
Assays
6. Move the sample cup into the reading well: the system
senses automatically its presence and asks the operator
to insert the reagent.
7. Press
: a three seconds countdown starts and, when
it ends, pipet 100 µL of preheated reagent into the sample cup. The stopwatch gets started.
8. When the clot is formed, the timer is stopped and the
results are shown
OK
The first result is the Thrombin time in seconds, the second is the ratio between this value and the normal TT.
2.5
FIB - Fibrinogen (Clauss method)
The Fibrinogen or factor I is a dimer of three polymeric chains
(α, β and γ) with a residual carboxylic terminal whose normal concentration in plasma is 200 ÷ 400 mg/dL. The Fibrinogen is converted into Fibrin by means of a polymerization catalyzed by Thrombin or other similar enzymes. hiClot
uses the Clauss method to determine it that is an indirect assay based on a modified Thrombin Time. In presence of high
Thrombin concentration, the polymerization time of Fibrin
of a diluted citrated plasma is correlated to the concentration
of that protein.
This reaction is influenced by additives having antithrombinic activity (FDP, heparin) or by changes in the structure of
the Fibrinogen protein and in these cases it is underestimated.
2.5.1
Assay execution
WARNING For this assay the samples must be diluted
1:10 into IBS tampon.
1. Select the FIB assay
hiClot user manual
2.5 FIB - Fibrinogen (Clauss method)
17
2.
3.
4.
5.
Preheat the FIB reagent in a reagent well.
Insert a void cup into a sample well.
Pipet 200 µL of diluted sample (plasma) into it
Preheat the sample for at least 5 min or the time printed
on the reagent box.
6. Move the sample cup into the reading well: the system automatically senses its presence and prompts the
operator to insert the reagent.
: starts a three seconds countdown at the end
7. Press
of which pipet 100 µL of preheated reagent into the
sample cup. The stopwatch gets started.
8. When the clot is formed, the timer stops and shows the
results
OK
2.5.2
Calibration
This assay needs a three point calibration with calibrators
that are produced from a normal control plasma which is to
be diluted with the following schema
Dilution
A
B
C
1:5
1 : 10
1 : 20
Preparation
plasma
IBS
100 µL 400 µL
50 µL 450 µL
25 µL 475 µL
Preheat the calibrators for 2 min in the sample wells and
operate as follows
1. Measure the A calibrator with the procedure described
in the previous paragraph. When the assay is finished
press
: bottom right appears CAL to indicate that
the first point of the calibration curve has been accepted.
OK
hiClot user manual
18
Assays
2. Measure the B calibrator and press
second value.
3. Measure the C calibrator and press
third.
OK
to accept the
OK
to accept the
The calibration curve is the regression straight line approximating the calibration points placed on a bi logarithmic
plane as indicated in figure where the logarithm of the concentration runs along the x axis (mg/dl) and the clotting time
(sec) is on the y axis.
Verification of calibration data
The calibration data can be shown and edited pressing
when the selected assay is FIB. The clotting time T0 of the A
calibrator. Pressing
on and on the T1 clotting time of the
B calibrator appears and then the T2 clotting time for the C
calibrator.
OK
OK
hiClot user manual
2.5 FIB - Fibrinogen (Clauss method)
2.5.3
19
Insertion of the concentration
Pressing
after the last calibration point has been shown,
the concentration in mg/dl of the control plasma is displayed.
Insert the new values entering each digit as seen for the PT
assay.
OK
2.5.4
Delivered results
When the hiClot is calibrated for FIB with the procedure
described in the previous paragraph, the following results are
delivered
top left Clotting time in seconds (16.3 in the example)
top right Ratio between the sample time and that of the
A calibrator. (1.21 in the example)
bottom Fibrinogen concentration in mg/dl
(228 in the example)
2.5.5
Reset of the FIB calibration
The calibration procedure described permits to insert automatically the calibration values measuring the calibrators.
In order to recalibrate the instrument it is mandatory to
reset the current calibration data. This can be done switching
the instrument off and switching it on again pressing the
key until the software version disappears.
hiClot user manual
20
Assays
2.6
General advice
1. Cold reagents stored in the refrigerator should stay at
least 5 minutes in the heated reagent cups before usage.
2. The insertion of reagents or starters at the end of the
countdown should be fast. If the insertion is too slow,
poor mixing of the components turns into wrong assay
results.
3. Please check properly the pipettes. Non repeatable results normally are due to poor repeatability of liquid
dispensation.
4. Preparation of the calibration samples by means of dilutions is critical. Errors made in this phase cause
wrong measurements.
5. This is a manual instrument, so good results depend on
proper manipulation of reagents and samples and on
good liquid dispensation as well. The operator should
be trained in using both the reagents and the pipettes.
6. During the assay, the second row of the display shows
the time elapsed to the right, the measured absorbance
in an arbitrary scale to the left.
7. Each hiClot is identified by a serial code, written on
a sticker under the instrument, composed by HC, four
digits a dash and four more digits. This code is needed
to download the software package to interface the hiClot
to a PC.
hiClot user manual
Chapter 3
Security and
installation rules
In order to use the hiClot at its best, please follow carefully
the security rules and installation advices contained in the
following paragraph.
3.1
Security rules
1. Read carefully and preserve this manual.
2. Before cleaning, disconnect all the power plugs.
3. For cleaning the instrument, do not use cleaning liquids, aerosols or any other detergent that can penetrate
into the it: use only a damp cloth.
4. Do not modify in any way the instrument without an
explicit authorization of the builder.
5. Do not store or use the system in a wet or excessively
damp environment.
6. Do not place the system on an unstable plane.
hiClot user manual
22
Security and installation rules
7. The back and bottom of the unit has holes aimed at
cooling the instrument: keep them clear.
8. Connect the system only to a power supply conforming
the rules and able to deliver the needed power.
9. An uninterruptible power supply (UPS) is strongly recommended.
10. A ground connection of the power lines is required for
a correct and safe usage of the system.
11. Place the system as near as possible to the power plug.
12. Do not lay anything on the cables.
13. Do not surcharge the power plug using multiple plugs.
14. Do not insert objects into the system.
15. The system has been tested for a typical room temperature of 25o C; in case the room temperature is much
higher than this, air conditioning is strongly recommended.
16. Do not open the system: any repair should be carried
out by trained personnel.
17. Disconnect the system from the power net and call the
technical assistance in case of danger.
18. Use only original spare parts for reparation.
19. The system must be used only by trained personnel.
20. Do not use flammable matter near the instrument.
3.2
Package content and installation rules
The hiClot is forwarded inside a carton box that contains a
shockproof soft and elastic plastic frame that itself contains
the instrument.
The box contains:
- The hiClot
- The power supply
hiClot user manual
3.2 Package content and installation rules
23
- A flyer containing the basic instructions
- 30 sample cups
- 6 reagent cups
hiClot user manual
24
3.3
Security and installation rules
Declaration of conformity
The builder company hiLab S.r.l. (www.hilab.it), sited in via
Piero Aloisi 36, 00158 ROMA, ITALY, hereby declares that
the instrument named hiClot conforms to the following EC
directives:
89/336/CEE
73/23/CEE
92/31/CEE
93/68/CEE
93/97/CEE
It conforms moreover to the product requisites as stated by
the following rules
CEI EN 50082-1
CEI EN 50081-1
CEI EN 60335-1
hiLab S.r.l. - l’amministratore unico
ing. Francesco Iovine
Roma, lì 5/5/2004
hiClot user manual
Index
1
2
General information
1.1 Layout of the device . . .
1.2 Structure of the instrument
1.2.1 Thermostatic block
1.2.2 Control panel . . .
1.3 Working principle . . . . .
.
.
.
.
.
.
.
.
.
.
.
.
.
.
.
.
.
.
.
.
.
.
.
.
.
.
.
.
.
.
3
3
4
4
5
5
Assays
2.1 Basics . . . . . . . . . . . . . . . .
2.2 PT - Prothrombin time . . . . . . .
2.2.1 Assay execution . . . . . .
2.2.2 Calibration . . . . . . . . .
2.2.3 Insertion of the ISI . . . . .
2.2.4 Delivered results . . . . . .
2.2.5 Reset of the PT calibration .
2.3 PTT - Partial Thromboplastin Time .
2.3.1 Assay execution . . . . . .
2.4 TT - Thrombin time . . . . . . . . .
2.4.1 Assay execution . . . . . .
2.5 FIB - Fibrinogen (Clauss method) .
2.5.1 Assay execution . . . . . .
2.5.2 Calibration . . . . . . . . .
.
.
.
.
.
.
.
.
.
.
.
.
.
.
.
.
.
.
.
.
.
.
.
.
.
.
.
.
.
.
.
.
.
.
.
.
.
.
.
.
.
.
.
.
.
.
.
.
.
.
.
.
.
.
.
.
.
.
.
.
.
.
.
.
.
.
.
.
.
.
8
8
10
10
11
12
13
14
14
14
15
15
16
16
17
.
.
.
.
.
.
.
.
.
.
.
.
.
.
.
.
.
.
.
.
hiClot user manual
26
INDEX
2.6
3
2.5.3 Insertion of the concentration
2.5.4 Delivered results . . . . . . .
2.5.5 Reset of the FIB calibration .
General advice . . . . . . . . . . . .
.
.
.
.
.
.
.
.
.
.
.
.
.
.
.
.
19
19
19
20
Security and installation rules
21
3.1 Security rules . . . . . . . . . . . . . . . . . 21
3.2 Package content and installation rules . . . . 22
3.3 Declaration of conformity . . . . . . . . . . . 24
hiClot user manual