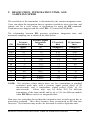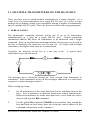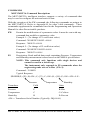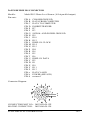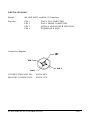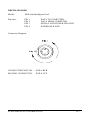
1
Paroscientific, Inc. Digiquartz® Pressure Instrumentation User’s Manual For Intelligent RS-232 Only Instruments Series 1000 / 6000 / 9000 Intelligent Transmitters Model 760 Portable Field Standard Series 8DP / 8WD / 8B Intelligent Depth Sensor MET3 And MET3A Broadband Meteorological Measurements Systems PS-2 Water Stage Sensor “The standard by which other standards are measured” DIGIQUARTZ PRECISION PRESSURE INSTRUMENTS USER’S MANUAL FOR INTELLIGENT RS-232 ONLY INSTRUMENTS SERIES 1000 / 6000 / 9000 INTELLIGENT TRANSMITTER MODEL 760 PORTABLE FIELD STANDARD SERIES 8DP / 8WD / 8B INTELLIGENT DEPTH SENSOR MET3 AND MET3A BROADBAND METEOROLOGICAL MEASUREMENT SYSTEMS PS-2 WATER STAGE SENSOR DOCUMENT NO. 8107-001 REVISION AG September 2013 Please visit www.paroscientific.com for the latest manual revisions. COPYRIGHT 2013 PAROSCIENTIFIC, INC. TABLE OF CONTENTS SECTION PAGE 1 INTRODUCTION ...................................................................................1-1 2 HARDWARE DESCRIPTION ..............................................................2-1 3 SPECIFICATIONS .................................................................................3-1 4 HOW TO GET STARTED .....................................................................4-1 INSTALLATION ......................................................................................4-1 Pressure Ports and Buffer Tubes ........................................................4-2 Oil Filled vs. Non-Oil Filled...............................................................4-2 TYPES OF MEASUREMENTS ...............................................................4-3 TYPES OF SAMPLING ...........................................................................4-4 COMMAND FORMAT ............................................................................4-5 SET-UP COMMANDS .............................................................................4-6 STANDARD CONFIGURATION SETUP ..............................................4-6 SAMPLE PROGRAMS.............................................................................4-6 5 COMMAND LIST...................................................................................5-1 6 COMMAND DESCRIPTIONS ..............................................................6-1 SAMPLING COMMANDS (may be used as global commands.) ............6-1 MEASUREMENT INTEGRATION TIME COMMANDS ......................6-5 CONFIGURATION CONTROL COMMANDS ......................................6-7 POWER MANAGEMENT COMMANDS .............................................6-11 TARE AND OVERPRESSURE COMMANDS .....................................6-13 TIME REFERENCE STAMP COMMAND ...........................................6-16 SPECIAL DIAGNOSTIC COMMANDS ...............................................6-18 CALIBRATION COMMANDS..............................................................6-19 7 GLOBAL COMMANDS.........................................................................7-1 8 NANO-RESOLUTION FEATURES & FUNCTIONS.........................8-1 INTRODUCTION………………………………………………..……... 8-1 ENABLING NANO-RESOLUTION…………………………………. ...8-2 CONFIGURING IIR FILTER MODE………………………………...... 8-2 DEFAULT NUMERIC FORMAT FOR IIR FILTER...............………… 8-4 CONTROLLING THE NUMERIC FORMAT……………….. ...............8-4 TABLE OF CONTENTS i SECTION 9 PAGE RESOLUTION, INTEGRATION TIME, & SAMPLING SPEED.....9-1 10 HIGH SPEED SAMPLING ..................................................................10-1 11 MULTIPLE TRANSMITTERS ON THE RS-232 BUS.....................11-1 12 TARING AND OVERPRESSURE WARNING .................................12-1 13 MET3/MET3A INSTALLATION, OPERATION, AND MAINTENANCE...................................................................................13-1 INTRODUCTION ...................................................................................13-1 PERFORMANCE SPECIFICATIONS ...................................................13-1 HARDWARE DESCRIPTION ...............................................................13-2 FIELD INSTALLATION........................................................................13-3 BENCH TEST & GPS RECEIVER INTERFACE INFORMATION.....13-6 COMMANDS..........................................................................................13-7 CONNECTOR DIAGRAM...................................................................13-13 MAINTENANCE..................................................................................13-14 MET3 Maintenance Procedures .....................................................13-14 MET3A Maintenance Procedures ..................................................13-16 NOTES ON CALIBRATION OF MET3/MET3A SENSORS .............13-19 INTELLIGENT INTERFACE COMMAND SUMMARY...................13-22 14 SUPPLIMENTAL INFORMATION………………………………. ..14-1 APPENDIX A HOOKUP ......................................................................14-1 APPENDIX B CONNECTOR PIN ASSIGNMENTS ..........................14-3 APPENDIX C PROGRAMMING HINTS............................................14-8 APPENDIX D SAMPLING COMMANDS........................................14-10 APPENDIX E CALCULATION OF PRESSURE..............................14-11 APPENDIX F ZERO AND SPAN ADJUSTMENTS.........................14-12 APPENDIX G SOFTWARE VERSIONS...........................................14-13 APPENDIX H COMMAND LIST......................................................14-15 TABLE OF CONTENTS ii 1. INTRODUCTION This manual describes the programming and operation of Paroscientific's line of intelligent instruments with the RS-232 interfaces only. These instruments have a common instruction set except for the Model 760 where noted throughout this manual. Please visit our website at www.paroscientific.com for the latest manual revision. The Intelligent Transmitter, Portable Pressure Standards and RS-232C serial interface boards each provide direct digital pressure output, in the user's choice of engineering units, to a computer or other RS-232 serial host device. The intelligent devices receive commands and data requests via a two way RS-232 port and return data via the same bus. Up to 98 transmitters can be attached to a single RS-232 port. Powerful, easy to use program commands allow the user to address any or all transmitters on the bus and control data sampling rates, sample integration time, baud rate, and other operating parameters. Pressure values are output in any of eight standard sets of engineering units or in user definable units. Output pressure data is fully compensated for temperature effects over the calibrated temperature range. The different models can easily be mixed on the same RS-232C bus. The same basic commands are used with all models. A few additional commands control special features unique to some models. Although the following sections apply to the pressure sensor of MET3 and MET3A Broadband Meteorological Measurement System, please read the MET3/MET3A section for more specific information. LATEST FEATURES Starting with firmware revision R5.10 or later, it is now possible to achieve parts-per-billion resolution (nano-resolution) as opposed to parts-per-million resolution in standard mode. This feature can be easily enabled/disabled via software commands. Please refer to Section 8 for additional information on this new feature. INTRODUCTION 1-1 2. HARDWARE DESCRIPTION Digiquartz Intelligent Transmitters, Portable Pressure Standards, Intelligent Depth Sensors, MET stations, and Water Stage Sensors consist of a standard Paroscientific pressure transducer and a digital interface board in an integral package. The digital interface boards are also available separately for customer systems where separate packaging of the transducer and interface board is desired. Programming and operation are the same in all configurations. The digital board has a microprocessor-controlled counter and RS-232 port. The microprocessor operating program is stored in permanent memory (EPROM). User controllable parameters are stored in user writable memory (EEPROM). The user interacts with the unit via the two-way RS-232 interface. The pressure transducer provides two continuous frequency output signals: one corresponds to the pressure and the other to sensor internal temperature. The digital board uses these two signals to calculate fully temperature-compensated pressure. The equations used are described in Appendix E. The microprocessor monitors incoming commands from the computer. When a sampling command is received, the microprocessor selects the appropriate frequency signal source and makes a period measurement using a 14.74 MHz timebase counter. The counter integration time is user selectable. Some commands require measurements of both temperature and pressure signals. In that case, the temperature period is measured first, followed by the pressure period. When the period measurement is completed, the microprocessor makes the appropriate calculations and loads the data onto the RS-232 bus. HARDWARE DESCRIPTION 2-1 3. SPECIFICATIONS See MET3/3A section for specifications for these products. NOTE: 710 Display is only supported by older instruments with display clock and display data outputs. RS-232 BUS: Baud Rates User selectable from 300 to 19200 baud Input levels Any RS-232C compatible level Output levels 5 VDC nominal Data framing 8 data bits, no parity, one stop bit Handshaking Not required. POWER REQUIREMENTS: TRANSMITTERS AND DEPTH SENSORS SHIPPED PRIOR TO 10/01/2001: +6 TO +16 VDC Typical current drain: 12 mA Quiescent 14 mA at 1 sample/s 25 mA Max 25 mA Peak Instantaneous Current TRANSMITTERS AND DEPTH SENSORS SHIPPED AFTER 10/01/2001 WITH FIRMWARE VERSION R1.00 – R3.00): +6 TO +16 VDC Typical current drain: 3 mA In Sleep Mode 17 mA Quiescent 38 mA Max SPECIFICATIONS 3-1 TRANSMITTERS AND DEPTH SENSORS SHIPPED WITH FIRMWARE VERSION R4.00 AND LATER: +6 TO +16 VDC Typical current drain: 7 mA In Sleep Mode 12 mA Quiescent 16 mA Max SAMPLING MODES: Single sample and send Synchronized sample and hold Continuous sample and send Special burst sampling modes SAMPLE INTEGRATION TIME: User selectable in approximately 3 ms steps from 3 ms to 30 s. SAMPLE SPEED: Depends on integration time Up to 50 samples/ s in normal modes Up to 135 samples/ s in burst sampling modes RESOLUTION: Depends on integration time User selectable in 15000 steps Typically: 100 ppm full scale at 70 samples/ s 10 ppm at 8 samples/ s 1 ppm at approximately 1 sample/ s 0.1 ppm once every 15 s PRESSURE UNITS: User selectable Choice of psi, hPa, mbar, bar, kPa, MPa, inches of Hg, Torr, meters of water or user definable. SPECIFICATIONS 3-2 4. HOW TO GET STARTED This section concentrates on items a first time user needs to know. Hook up the transmitter as described in Appendices A and B. Then read through Sections 1 and 2 to get an overview of the capabilities of the transmitter. Download the latest Digiquartz Interactive software (DQI) from www.paroscientific.com. Once download is complete, run executable and follow on-screen instructions to install on a Windows PC (must be equipped with at least one RS-232 serial port). Download and install the Digiquartz Assistant program to log data from the instrument. Context sensitive help is also available while running each program. There are a variety of other useful programs that may be found on the Paroscientific website. You may also use a standard terminal emulation program to interact with your instrument. If trouble is encountered, check the programming hints in Appendix C of this manual. INSTALLATION Digiquartz Intelligent Transmitters can generally be mounted in any orientation. Mounting hole patterns for units so equipped can be found on the Specification Control Drawing (SCD) supplied with the unit. CAUTION Pressure head effects vary with transducer orientation, and result in zero offsets. These effects are more pronounced when liquid-filled pressure lines are being used. These effects can be minimized by keeping the transducer pressure port and the pressure source at the same elevation, or by making an offset correction to compensate for the pressure head. HOW TO GET STARTED 4-1 PRESSURE PORTS AND BUFFER TUBES Digiquartz Intelligent Transmitters include a nylon or stainless steel buffer tube that is an integral part of the mechanical shock protection system of the transmitter. For Series 1000 and 9000 devices, the buffer tube is located within the transducer housing. For Series 6000 devices, it is externally attached. WARNING For 6000 Series units, DO NOT REMOVE THE EXTERNAL COILED BUFFER TUBE FROM TRANSMITTER. Disconnecting the buffer tube from the transmitter pressure fitting may cause irreversible damage to the unit. Only make connections to the buffer tube fitting and avoid coupling directly to the transmitter pressure fitting. If the transmitter pressure fitting becomes flared, stripped or damaged, it will be necessary to return the unit to Paroscientific for repairs. For additional information, see the application note “The Use and Handling of Buffer Tubes” at www.paroscientific.com. Parker A-Lok or equivalent nut and ferrule fittings are used on most Digiquartz Intelligent Transmitters. Series 1000 and 6000 devices use the 1/8" OD configuration. Series 9000 transmitters are equipped with a modified ¼” HIP or equivalent fitting. CAUTION It is recommended that all pressure fittings are installed finger tight, then tightened an additional ¾ turn to complete the pressure seal. Two 7/16" wrenches are required when making or breaking any 1/8-inch pressure fitting. The first wrench is used to stabilize the stationary fitting, and the second wrench is used to turn the other fitting. For the modified ¼” HIP fitting, one 5/8” wrench and one 3/4” wrench are required to make and break the connections. OIL FILLED VS. NON-OIL FILLED UNITS OIL FILLED TRANSMITTERS Transmitters that are to be used to measure liquid media pressures are oil filled at Paroscientific. Transmitters that are oil filled should never be used in gas media applications. Oil fill and bleed all pressure lines that are to be connected to an oil filled transmitter. The same oil used to fill the transmitter should be used to fill the pressure lines; consult the transmitter Specification Control Drawing for details. HOW TO GET STARTED 4-2 CAUTION If your transmitter and buffer tube are oil filled, do not pull a vacuum or apply pressurized gas to the unit. Doing so could allow bubbles to form in the pressure lines and transmitter, which will adversely affect the accuracy of the unit. CAUTION Pressure head effects result in zero offsets. These effects are more pronounced when liquid filled pressure lines are being used. These effects can be minimized by keeping the transmitter pressure port and the pressure source at the same elevation, or by making an offset correction to compensate for the pressure head. NON-OIL FILLED TRANSMITTERS Non-oil filled transmitters are intended for use in gas media applications, and should never be used in liquid media applications. WARNING If your transmitter and buffer tube are not oil-filled, do not apply pressurized liquid media to the unit. Liquid may contaminate the unit, and may adversely affect the accuracy of the unit. It is not possible to completely remove most liquids from the transmitter once they have been introduced. For additional information, see the application note “Oil Filled Transducers Accuracy, Performance, and Handling” at www.paroscientific.com. TYPES OF MEASUREMENTS The transmitter can make four types of measurements: 1. Pressure - Pressure measurements are the most frequently used. 2. Temperature (internal sensor temperature) - The sensor internal temperature measurement is intended for thermal compensation of pressure. Because the sensor is thermally isolated, the internal temperature changes slowly and might be read only occasionally. The period measuring commands are used mainly for calibration or diagnostic tests. They also can be used for high speed burst sampling. 3. Period of the pressure sensor 4. Period of the temperature sensor HOW TO GET STARTED 4-3 TYPES OF SAMPLING There are four types of sampling: 1. Single measurement sample and send, (e.g., command P3) 2. Single measurement sample and hold, (e.g., command P5) 3. Continuous sample and send, (e.g., command P4) 4. Special high speed burst sampling, (e.g., command P7) The simplest commands to use are the single sample commands, and beginners should start with them. Command Transmitter Response P3 Make one pressure measurement and send it to the computer. P5 Make one pressure measurement hold value until requested. DB or DS Send value being held to computer. The difference is that P3 sends data as soon as it is available, while P5 holds the data until a DB (dump buffer) or DS (dump sequential) request is received. P5 is intended primarily for sampling simultaneously with several transmitters and then reading them out one by one. The continuous and burst sampling procedures are described later. They are more complicated to use because data keeps coming in and user programs must keep up with it. HOW TO GET STARTED 4-4 COMMAND FORMAT All commands have the form: *ddsscc__<cr><lf> Data framing is 8 data bits, no parity, with one stop bit or 7 data bits with even or odd parity, one stop bit. Set by command PT. 1. Each line starts with an asterisk (*). 2. The next 2 digits, dd are the destination for the command (00-99). The controller (IBM PC, etc.) is address 00, and the transmitters can be 01 through 98. Address 99 is for "global". A transmitter responds only to its own address or 99. 3. The next 2 digits, ss, are the source of the message (00-98). 4. The next 2 characters, cc, specify the type of message, and may be followed by more characters in some messages. Characters must be upper case. Reply messages may substitute data for the cc characters. 5. Each message line is terminated by a carriage return <cr> and a line feed <lf>. 6. Undefined commands are absorbed. 7. A command arriving before a previous command is completed cancels the previous command. A typical message from the PC to transmitter #1 asking for pressure: *0100P3 <cr> <lf> A typical reply from the transmitter to the PC: *000114.573 <cr> <lf> HOW TO GET STARTED 4-5 SET-UP COMMANDS Before a computer can talk to the transmitter, its baud rate (BR), parity (PT), and identification (ID) number must be known. Transmitters are normally shipped set to BR = 9600, PT = N, and ID = 1. Users may change these parameters but should record the new values. If the baud rate and parity of a transmitter are not known, the computer will have to search all values to reestablish communication. The command PR sets the counter integration time in multiples of about 0.003 seconds. This command determines the Pressure Resolution. The transmitters are shipped set to PR = 238, which gives a pressure resolution of about 1 ppm and a counter integration time of about 0.7 seconds. Users may select the value best suited for their applications. Larger values give higher resolution but take longer. Once these parameters are set, you are ready to take data. The transmitter retains these parameters in EEPROM even if turned off. The sample programs on the following pages will help you to get started. STANDARD CONFIGURATION SETUP The intelligent devices are shipped with a data sheet of the configuration setup. It shows the settings of all the configuration parameters and calibration coefficients. The user should safeguard this data sheet for future reference. SAMPLE PROGRAMS For programming examples in Visual Basic and Visual C, see the website http://www.paroscientific.com under the software menu option. HOW TO GET STARTED 4-6 5. COMMAND LIST SAMPLE COMMANDS (May be used as global commands) P1 P2 P3 P4 P5 P6 P7 Sample and send one pressure sensor period. Continuously sample and send pressure periods. Sample and send one pressure. Continuously sample and send pressure. Sample and hold one pressure. Sample and hold one pressure period. Burst and sample pressure: read temperature once; then continuously send pressure compensated using original temperature. Q1 Q2 Q3 Q4 Q5 Q6 Sample and send one temperature period. Continuously sample and send temperature periods. Sample and send one temperature. Continuously sample and send temperature. Sample and hold one temperature. Sample and hold one temperature period. DB DS 1 Dump buffer. Sends values being stored. Dump sequential. Sends stored values in sequential order. CONFIGURATION CONTROL COMMANDS BR BL ID PT 2 EW 1 2 Enter baud rate. Must be global command. Locks baud rate and parity to prevent change. Must be global command. Auto-number transmitters in a loop. Must be global command. Sets transmitter parity. Must be global. Enable EEPROM write for one command. NOT SUPPORTED FOR TRANMITTERS AND DEPTH SENSORS SHIPPED WITH FIRMWARE VERSIONS R1.00 - R2.01. PARAMETER IS READ-ONLY, FIXED AT 8 DATA BITS, NO PARITY, AND 1 STOP BIT IN TRANSMITTERS AND DEPTH SENSORS SHIPPED AFTER 10/1/01 (FIRMWARE VERSION R1.00 AND LATER). COMMAND LIST 5-1 REMAINING COMMANDS CANNOT BE GLOBAL PI TI PR TR UN Set or read the pressure measurement integration time Set or read the temperature measurement integration time Read/enter pressure resolution. Read/enter temperature resolution. Read/enter choice of pressure units. 0. user defined 1. psi 2. mbar or hPa UF MD 3. bar 4. kPa 5. MPa 6. in Hg 7. Torr or mm Hg 8. m H2O Read/enter user definable units. Reads or sets power-up mode. TARE AND OVERPRESSURE COMMANDS BP OP ZS ZV ZL Sound overpressure beeper. Read/enter the overpressure alarm setting. Read the position of the zero set switch. Zero value. Read the zero offset value. Zero lock. Enable or disable taring. TIME REFERENCE STAMP COMMAND TS Enables and disables the time reference stamp feature. SPECIAL DIAGNOSTIC COMMANDS MC 3 CS CT3 CX Memory check. Checks program PROM. Check stack of microprocessor. Check counter timebase. Check crystal of microprocessor clock. NANO-RESOLUTION COMMANDS XM IA XN 3 Resolution mode. IIR mode cut-off frequency. Number of significant digits. NOT SUPPORTED FOR TRANSMITTERS AND DEPTH SENSORS SHIPPED AFTER 10/1/01 (FIRMWARE VERSION R1.00 AND LATER). COMMAND LIST 5-2 CALIBRATION COMMANDS WARNING!! THE FOLLOWING COMMANDS CAN CHANGE THE CALIBRATION COEFFICIENTS. SN 4 PA PM TC4 Read/enter transmitter serial number. Read/enter pressure adder. Read/enter pressure multiplier. Read/enter timebase correction factor. C1 C2 C3 Read/enter C1 pressure coefficient. Read/enter C2 pressure coefficient. Read/enter C3 pressure coefficient. D1 D2 Read/enter D1 pressure coefficient. Read/enter D2 pressure coefficient. T1 T2 T3 T4 T5 Read/enter T1 pressure coefficient. Read/enter T2 pressure coefficient. Read/enter T3 pressure coefficient. Read/enter T4 pressure coefficient. Read/enter T5 pressure coefficient. U0 Read/enter U0 temperature coefficient. Y1 Y2 Y3 Read/enter Y1 temperature coefficient. Read/enter Y2 temperature coefficient. Read/enter Y3 temperature coefficient 4 READ-ONLY FOR TRANSMITTERS AND DEPTH SENSORS SHIPPED AFTER 10/1/01 (FIRMWARE VERSION R1.00 AND LATER). COMMAND LIST 5-3 6. COMMAND DESCRIPTIONS (For commands specific to nano-resolution, please refer to Section 8.) SAMPLING COMMANDS (may be used as global commands.) P1 Sample and send one period measurement of the pressure signal in microseconds. ACTION: Start pressure count, read count when done, calculate period using timebase and integration time, send reading, await next command. TYPICAL COMMAND: *0100P1 TYPICAL REPLY: *000129.12345 P2 Continuously sample and send pressure signal periods. ACTION: Start pressure count, read count when done, restart count, calculate period using timebase and integration time, send reading, read next count when available and loop until stopped. TYPICAL COMMAND: *0100P2 TYPICAL REPLY: *000129.12345 *000129.12346 *000129.12344, etc. P3 Sample and send one compensated pressure. ACTION: Start temperature count, read count when done, start pressure count, correct temperature count for timebase and integration time, compute temperature compensated pressure coefficients, read pressure count when done, correct pressure count for timebase and integration time, calculate pressure, send reading, await next command. TYPICAL COMMAND: *0100P3 TYPICAL REPLY: *0001555.444 COMMAND DESCRIPTIONS 6-1 P4 Continuously sample and send compensated pressure. ACTION: Start temperature count, read count when done, start pressure count, correct temperature count for timebase and integration time, compute temperature compensated pressure coefficients, read pressure count when done, restart temperature count, correct pressure count for timebase and integration time, calculate pressure, send reading, loop until stopped. TYPICAL COMMAND: *0100P4 TYPICAL REPLY: *0001555.444 *0001555.447 *0001555.444, etc. P5 Sample and hold one compensated pressure. ACTION: Same as P3 except save reading and await DB command. TYPICAL COMMAND: *0100P5 TYPICAL REPLY: None until DB or DS command received. P6 Sample and hold one pressure signal period. ACTION: Same as P1 except save reading and await DB command. TYPICAL COMMAND: *0100P6 TYPICAL REPLY: None until DB or DS command received. P7 Burst sample pressure: read temperature once; then continuously send pressure compensated with original temperature reading. ACTION: Start temperature count, read count when done, start pressure count, compute temperature compensated pressure coefficients and save for repeated use, read pressure count when done, restart pressure count, correct pressure count for timebase and integration time, calculate pressure, send reading, wait for next pressure count, and loop until stopped. TYPICAL COMMAND: *0100P7 TYPICAL REPLY: *0001555.444 *0001555.447 *0001555.444, etc. COMMAND DESCRIPTIONS 6-2 Q1 Sample and send one temperature signal period. ACTION: Start temperature count, read count when done, correct for timebase and integration time, send reading, await next command. TYPICAL COMMAND: *0100Q1 TYPICAL REPLY: *00015.812345 Q2 Continuously sample and send temperature signal period. ACTION: Start temperature count, read count when done, restart count, correct count for timebase and integration time, send reading, get next count, and loop until stopped. TYPICAL COMMAND: *0100Q2 TYPICAL REPLY: *00015.812345 *00015.812346 *00015.812347, etc. Q3 Sample and send one temperature in degrees C. ACTION: Start temperature count, read count when done, correct count for timebase and integration time, compute temperature and send, await next command. TYPICAL COMMAND: *0100Q3 TYPICAL REPLY: *000122.1234 Q4 Continuously sample and send temperature. ACTION: Start temperature count, read count when done, restart count, correct for timebase and integration time, compute temperature and send, wait for next count, and loop until stopped. TYPICAL COMMAND: *0100Q4 TYPICAL REPLY: *000122.1234 *000122.1235 *000122.1234, etc. Q5 Sample and hold one temperature. ACTION: Same as Q3 except save reading and await DB command. TYPICAL COMMAND: *0100Q5 TYPICAL REPLY: None until DB or DS command received. COMMAND DESCRIPTIONS 6-3 Q6 Sample and hold one temperature period. ACTION: Same as Q1 except save reading and await DB or DS command. TYPICAL COMMAND: *0100Q6 TYPICAL REPLY: None until DB or DS command received DB Dump buffer. Send reading being stored. ACTION: Send reading saved during P5, P6, Q5, or Q6 command. The DB command must be the next command addressed to the transmitter after a sample and hold. If the DB command arrives before the sample is ready, data are sent when ready. TYPICAL COMMAND: *0100DB TYPICAL REPLY: *0001555.444 DS 5 Dump sequential. Usually a global command. ACTION: Similar to DB command except it guarantees that the data from multiple transducers comes back in sequential order. Sends reading saved during a P5, P6, Q5, or Q6 sample and hold command and then sends a global DS command to trigger the next transmitter in the loop. The DS command must be the next command addressed to the transmitter after the sample and hold. If the DS command arrives before the sample is ready, data are sent when ready. TYPICAL COMMAND: *9900DS TYPICAL REPLY: *000114.576 *000214.577 *9900DS 5 First transmitter Second transmitter NOT SUPPORTED FOR TRANMITTERS AND DEPTH SENSORS SHIPPED WITH FIRMWARE VERSIONS R1.00 - R2.01. COMMAND DESCRIPTIONS 6-4 MEASUREMENT INTEGRATION TIME COMMANDS Digiquartz Intelligent devices sample the transducer’s pressure and temperature signals for a length of time specified by the measurement integration time commands. The measurement integration time has a direct affect on sampling rate and measurement resolution. See Section 9 for details. PI and TI are the primary integration time commands for pressure and temperature signal measurement. The legacy commands PR and TR may also be used. The advantage of PI and TI is that the specified integration time is expressed directly in milliseconds. NOTE: The legacy commands PR and TR traditionally specified the number of signal periods to sample. This integration scheme has been replaced by integration over a fixed length of time. For backward compatibility, values input using PR and TR are converted to an equivalent time using nominal pressure and temperature period values. PRIMARY INTEGRATION TIME COMMANDS PI Set or read the pressure measurement integration time Units: Milliseconds Range: 1 to 290000 when XM = 0 1 to 72500 when XM = 1 Default: 666 Typical set command: *0100EW*0100PI=1000 Typical set response: *0001PI=1000 Typical read command: *0100PI Typical read response: *0001PI=1000 NOTE: Whenever the value of PI is changed, TI is automatically updated with the same value. TI Set or read the temperature measurement integration time Units: Milliseconds Range: 1 to 290000 when XM = 0 1 to 72500 when XM = 1 Default: 666 Typical set command: *0100EW*0100TI=1000 Typical set response: *0001TI=1000 COMMAND DESCRIPTIONS 6-5 Typical read command: *0100TI Typical read response: *0001TI=1000 NOTE: Changing TI has no effect on PI. NOTE: It is usually recommended that TI and PI be set to the same value. NOTE: Do not set PI to a value of less that 10 when using a Model 715 display. Doing so may result in an inconsistent display. LEGACY INTEGRATION TIME COMMANDS PR Set or read pressure measurement integration time Units: None Range: 1 to 16383, integer values only Default: 238 Typical set command: *0100EW*0100PR=200 Typical set response: *0001PR=200 Typical read command: *0100PR Typical read response: *0001PR=200 NOTE: Whenever the value of PR is changed, TR is automatically updated with the value of PR times 4. NOTE: Whenever the value of PR is changed, PI is automatically updated to reflect the equivalent pressure integration time. TR Set or read temperature measurement integration time Units: None Range: 1 to 65535, integer values only Default: 952 Typical set command: *0100EW*0100TR=800 Typical set response: *0001TR=800 Typical read command: *0100TR Typical read response: *0001TR=800 NOTE: Changing TR has no effect on PR. NOTE: Whenever the value of TR is changed, II is automatically updated to reflect the equivalent temperature integration time. COMMAND DESCRIPTIONS 6-6 CONFIGURATION CONTROL COMMANDS BR Enter baud rate. Must be a global command. CAUTION Think carefully before changing the baud rate. ACTION: Sets baud rate. Does not require an EW command. Choices are 150, 300, 600, 1200, 2400, 4800, 9600, 19200 baud. TYPICAL COMMAND: *9900BR = 2400 TYPICAL REPLY: *9900BR = 2400 set BR = 2400 NOTE: When the baud rate is changed, the confirming reply is sent at the original baud rate but all subsequent commands should be at the new baud rate. BL Baud lock. Must be global command. ACTION: Locks or unlocks baud rate and parity to prevent accidentally changing them. BL = 0 is unlocked and allows values to be changed. BL = 1 is locked. When modems are used, it is wise to lock the baud rate at a value compatible with the modem. TYPICAL COMMAND: *9900BL TYPICAL REPLY: *0100BL = 0 *9900BL TYPICAL COMMAND: *9900EW *9900BL = 1 TYPICAL REPLY: *9900EW *0001BL = 1 *9900BL = 1 ID not locked lock all Auto-number transmitters in a loop. Must be a global command. ACTION: Causes units to auto-number around a loop. Command begins at the PC with *9900ID. The first unit sees that the previous unit was "00" and numbers itself "01" and stores the value in EEPROM. Unit sends out *9901ID which causes the next unit to number itself "02". The PC eventually will receive the message *99nnID, where nn is the number of units in the loop. TYPICAL COMMAND: *9900ID TYPICAL REPLY: *9901ID COMMAND DESCRIPTIONS 6-7 PT 6 Sets transmitter parity. Must be a global 99 command. Parameter PT controls parity sent by the transmitter. Parity on incoming messages is ignored. Choices are: N E O 8 data bits, no parity, one stop bit 7 data bits, even parity, one stop bit 7 data bits, odd parity, one stop bit. TYPICAL COMMAND: *9900PT = N TYPICAL REPLY: *9900PT = N VR Set to 8 data bits, no parity Read software version. May be a global command. ACTION: Unit sends the software version number stored in the program EPROM. TYPICAL COMMAND: *0100VR TYPICAL REPLY: *0001VR = 01.00 EW Enable EEPROM write for one command. May be a global command. ACTION: Set flag allowing EEPROM write on next command. Flag is cleared after next command is received. TYPICAL COMMAND: *0100EW TYPICAL REPLY: None NOTE: The following commands cannot be global commands. UN Read/enter choice of pressure units. ACTION: Selects unit conversion factor by which all computed pressures are multiplied before output. UN = 1 to 8 selects from eight standard sets of units. UN = 0 chooses the user defined multiplier which is set with command UF. UN 1 2 3 4 5 6 7 6 UNITS psi mbar or hPa bar kPa MPa in Hg mm Hg or torr MULTIPLY PSI BY 1.0000000 68.94757 .06894757 6.894757 .00689476 2.036021 51.71493 PARAMETER IS READ-ONLY, PROTOCOL IS FIXED AT 8 DATE BITS, NO PARITY, AND 1 STOP BIT IN TRANSMITTERS AND DEPTH SENSORS SHIPPED AFTER 10 /1/01. COMMAND DESCRIPTIONS 6-8 8 0 m H2 O user defined TYPICAL COMMAND: TYPICAL REPLY: TYPICAL COMMAND: TYPICAL REPLY: * UF .7030696 * set by UF command *0100UN What are units? *0001UN = 4 Units are kPa *0100EW *0100UN = 2 Set to mbar *0001UN = 2 For fresh water applications only. For sea water applications, consult the application note “Digiquartz Depth Sensor Ocean Depth Conversion” at http:\\www.paroscientific.com. Read/enter user defined unit conversion factor. ACTION: Allows users to convert pressure to any desired set of units by defining a conversion factor. Then, when UN = 0 is selected, the output pressure will be psi * UF. TYPICAL COMMAND: *0100UF Present factor? TYPICAL REPLY: *0001UF = 1.000000 TYPICAL COMMAND: *0100EW *0100UF = 144.0000 Define units TYPICAL REPLY: *0001UF = 144.0000 lb/ft2 Pressure to Depth Conversions 1 psi= m of H 2 O 0.7030696 d=1 cm of H 2 O 70.30696 d=1 in. of H 2 O 27.67991 d=1 ft. of H 2 O 2.306659 d=1 m of sea water 0.683853 d=1.0281 ft of sea water 2.243613 d=1.0281 m of air 600.9143 d=0.00117 in. of air 23658.04 d=0.00117 COMMAND DESCRIPTIONS 6-9 MD Read or set the mode parameter MD. ACTION: This parameter controls the power-up state of the transmitter. The transmitter always responds to user commands, but it can also drive a remote display and send data continuously on the RS-232 bus in a background mode. These background tasks are turned on and off by the MD command. Display MD = 0 MD = 1 MD = 2 MD = 3 off on off on Continuous RS-232 off off on on Whenever the transmitter calculates pressure in response to a user request, the data are also sent to any active background tasks. In addition, whenever the transmitter is not servicing user requests, it measures pressure and sends it to any active background tasks. Background tasks are temporarily interrupted whenever the higher priority computer requests require attention. Users requiring maximum sample speed or minimum current drain should turn off any unnecessary background tasks. Model 760 portable pressure standard resets to MD = 1 when power is applied. Other models do not. TYPICAL COMMAND: *0100MD TYPICAL REPLY: *0001MD = 0 What mode? No background tasks TYPICAL COMMAND: *0100EW *0100MD = 1 Turn on display TYPICAL REPLY: *0001MD = 1 Display active COMMAND DESCRIPTIONS 6-10 POWER MANAGEMENT COMMANDS Digiquartz Intelligent devices can be commanded to enter a low-power “sleep” mode during periods of serial port inactivity. The unit “awakens” 0.6 seconds after a single serial character is received on either port. Since the unit is “asleep” when the wake-up character is received, that character will be lost, and will not be interpreted as being part of a command. It is therefore necessary to send a character and wait at least 0.6 seconds before sending a command to an intelligent device that is “asleep.” CAUTION Power management features are not available if MD is set for continuous pressure data output or display data output. SL 7 Set or read the sleep mode enable state. ACTION: Allows sleep mode to be enabled or disabled. When sleep mode is enabled, the device will enter sleep mode when both serial ports have received no characters for the number of seconds specified by the value of ST. When sleep mode is disabled, the device cannot enter sleep mode. RANGE: 0 = sleep mode disabled 1 = sleep mode enabled DEFAULT: 0 TYPICAL COMMAND: TYPICAL RESPONSE: TYPICAL COMMAND: TYPICAL RESPONSE: *0100EW*0100SL=1 *0001SL=1 *0100SL *0001SL=1 NOTE: If MD is set for continuous pressure data output or display data output, the device will never enter sleep mode regardless of the values of SL or ST. 7 SUPPORTED IN TRANSMITTERS AND DEPTH SENSORS SHIPPED AFTER 10/1/01 (FIRMWARE VERSION R1.00 AND LATER). COMMAND DESCRIPTIONS 6-11 ST7 Set or read the sleep mode timeout length. ACTION: When SL=1, the device enters sleep mode if both serial ports have received no characters for ST seconds. UNITS: Seconds RANGE: 5 to 255, integer values only. DEFAULT: 10 TYPICAL COMMAND: *0100EW*0100ST=5 TYPICAL RESPONSE: *0001ST=5 TYPICAL COMMAND: *0100ST Typical response: *0001ST=5 COMMAND DESCRIPTIONS 6-12 TARE AND OVERPRESSURE COMMANDS NOTE: These commands are supported only on Intelligent Transmitters and RS-232C Serial Interface Boards with 9-pin connectors and on the Model 760 pressure standard. BP Beep. ACTION: Causes the overpressure warning beeper to sound for approximately one second. (Model 760 only.) TYPICAL COMMAND: *0100BP TYPICAL REPLY: None. OP Overpressure. ACTION: Read or set the value of the overpressure limit. Any pressure reading greater than this value triggers an overpressure warning. On intelligent transmitters and RS-232 interface cards, overpressure causes the overpressure indicator line to go high (+5 volts). The indicator line goes low again if measured pressure drops below the limit. For purposes of determining overpressure, untared pressure with no PA is used. Operation of the Model 760 is similar, except that overpressure triggers a warning beeper instead of a logic output level. Also, on the Model 760, OP must be entered in psi. TYPICAL COMMAND: TYPICAL REPLY: TYPICAL COMMAND: TYPICAL REPLY: ZS *0100OP *0100OP = 10200.0 *0100EW *0100OP = 17.00 *0001OP = 17.00000 Zero set. ACTION: Read or set the value of the zero switch. On intelligent transmitters and RS-232 interface cards, ZS is a logic switch stored in RAM which controls taring, the subtraction of some initial value. It has three states: ZS = 0 when tare is off ZS = 1 when taring has been requested ZS = 2 when taring is in effect COMMAND DESCRIPTIONS 6-13 ZS is set to 0 on power up. Once the taring commands have been activated by setting ZL = 0, taring can be requested either with ZS = 1 command or by toggling a contact closure line. At the first pressure reading following a tare request, the measured pressure is stored in RAM parameter ZV, parameter ZS is automatically set to 2 to indicate that taring is in effect, and the value ZV is subtracted from all subsequent pressure readings until taring is turned off. Changing the value of ZS by software command requires an EW command, even though ZS is stored in RAM rather than in EEPROM. NOTE: If taring is already in effect when a ZS = 1 command is issued, a new zero value is initialized at the next pressure reading and taring continues using the new value. Operation of the Model 760 is somewhat different. On these models, taring can be initiated only by a mechanical switch closure. The ZS command returns value 0 or 1 depending on whether the zero set switch is off or on. TYPICAL COMMAND: TYPICAL REPLY: TYPICAL COMMAND: TYPICAL REPLY: TYPICAL COMMAND: TYPICAL REPLY: TYPICAL COMMAND: TYPICAL REPLY: ZV *0100ZS *0001ZS = 0 No taring *0100EW *0100ZS = 1 Initiate taring *0001ZS = 1 *0100P3 Measure pressure *0001.0000 *0100ZS *0001ZS = 2 Zero value. ACTION: Reads or sets the pressure value that is subtracted from reading when taring is activated. ZV is stored in RAM. Users may force a specific value to be used if taring is presently in effect (ZS = 2) by setting ZV to any desired value. Note, however, that if taring is subsequently requested either by a ZS = 1 command or by contact closure, a new ZV will overwrite the value you have set. Changing the value of ZV by software command requires an EW command, even though ZV is stored in RAM rather than in EEPROM. The value of ZV is lost if power is turned off. COMMAND DESCRIPTIONS 6-14 Operation is similar on the Model 740 and Model 760 except taring can only be initiated by mechanical switch closure and a command to set ZV to a specific value will be interpreted as being in psi, regardless of the pressure units selected. Commands to read the value of ZV show it in whatever pressure units are selected. TYPICAL COMMAND: *01000ZV TYPICAL REPLY: *0001ZV = 14.592 ZL Zero lock. ACTION: If ZL is set to 1, the taring feature is locked out. If ZL is set to 0, the tare contact closure and ZS =1 commands are enabled. (Not supported on Model 760.) TYPICAL COMMAND: *0100ZL TYPICAL REPLY: *0001ZL = 1 COMMAND DESCRIPTIONS Taring disabled 6-15 TIME REFERENCE STAMP COMMAND NOTE: The time reference stamp feature is available in firmware version 4.10 or later. A time reference stamp can be appended to pressure and temperature measurement data to help you determine when the pressure or period measurement was taken, relative to the transmission of the measurement command response. The time reference value reported is the time interval between the midpoint of the integration period and the start of the transmission of the first ASCII character of the response data. TS Enables and disables the time reference stamp feature. The TS command affects the following measurement commands: P1, P2, P3, P4, P5, P6, P7, Q1, Q2, Q3, Q4, Q5, and Q6. ACTION: When is enabled, a comma delimited time reference stamp is appended to the measurement values returned by the aforementioned commands, expressed in microseconds. RANGE: 0 = Time reference stamp disabled 1 = Time reference stamp enabled TYPICAL SET COMMAND: TYPICAL SET RESPONSE: TYPICAL READ COMMAND: TYPICAL READ RESPONSE: *0100EW*0100TS=1 *0001TS=1 *0100TS *0001TS=1 The time reference value reported is the time interval between the midpoint of the integration period and the start of the transmission of the first ASCII character of the response data, expressed in microseconds. DL=1 pads the time reference stamp value to 9 digits. Examples: (Pressure = 14.74638, time reference stamp = 500637 microseconds) P3 response, DL=0: P3 response, DL=1: *000114.74638,500637 *0001+14.746380000,000500637 Transmission delay COMMAND DESCRIPTIONS 6-16 The response data as seen by the serial host is delayed by the time it takes to transmit the data. For high accuracy applications, it is necessary to compensate for this delay. The formula for calculating the transmission delay time is as follows: T = (N * 10) (1E6/BR) Where: T = transmission delay in microseconds N = number of characters transmitted BR = baud rate Don’t forget to consider the carriage return and line feed characters when determining the number of characters transmitted. Processing delay For high accuracy applications, it is also necessary to compensate for any delay by the serial host in acknowledging the first character of the response data. COMMAND DESCRIPTIONS 6-17 SPECIAL DIAGNOSTIC COMMANDS MC 8 Memory check. ACTION: Checks integrity of PROM program. Returns "Y" if correct, "N" if error. TYPICAL COMMAND: *0100MC TYPICAL REPLY: *0001MC = Y CS Program correct Check stack. ACTION: Returns number of unused bytes in microprocessor operations stack since power was last applied. TYPICAL COMMAND: *0100CS TYPICAL REPLY: *0001CS = 5 CT8 Check counter timebase. Supported on all transmitters having a separate timebase for the microprocessor and the counter. ACTION: Puts counter timebase divided by 512 onto display clock line (pin 6 on 9-pin connector or pin 11 on 25-pin connector). Cancelled by next command. The counter timebase is very stable; however, several microseconds of jitter appear on the output waveform because the microprocessor interrupts which generate the divided output are asynchronous relative to the counter timebase. TYPICAL COMMAND: *0100CT TYPICAL REPLY: None CX8 Check crystal. ACTION: Puts microprocessor clock divided by 480 onto display clock line (pin 6 on 9-pin connector or pin 11 on 25-pin connector). Cancelled by next command. TYPICAL COMMAND: *0100CX TYPICAL REPLY: None 8 COMMANDS ARE NOT SUPPORTED FOR TRANSMITTERS AND DEPTH SENSORS SHIPPED AFTER 10/1/01 (FIRMWARE VERSION R1.00 AND LATER). COMMAND DESCRIPTIONS 6-18 CALIBRATION COMMANDS NOTE: CHANGING THESE VALUES PERMANENTLY ALTERS THE CALIBRATION. The commands below are used to read or change the transmitter calibration coefficients. Altering values requires a prior EW command. NOTE: These commands cannot be global commands. SN 9 Read/enter transmitter serial number. ACTION: Same as other coefficients. SN is 6 digits long. TYPICAL COMMAND:*0100SN Read present value TYPICAL REPLY: *0001SN = 004876 TYPICAL COMMAND: *0100EW *0100SN = 004444 Change value TYPICAL REPLY: *0001SN = 004444 PA Read/enter pressure adder in units selected by UN setting. PM Read/enter pressure multiplier. ACTION: Same as for other coefficients. Intended for offset and span adjustments to calibration. Output P = PM * (Pcalc + PA), where Pcalc is pressure calculated using original calibration data and UN. TYPICAL COMMAND: TYPICAL REPLY: TYPICAL COMMAND: TYPICAL REPLY: TC9 Read/enter timebase correction factor. ACTION: Same as other coefficients. TC = 10 MHz/TCXO freq. TYPICAL COMMAND: TYPICAL REPLY: TYPICAL COMMAND: TYPICAL REPLY: 9 *0100PA *0001PA = .0000000 *0100EW *0100PM = 1.00002 *0001PM = 1.000020 *0100TC *0001TC = .6666667 *0100EW *0100TC = .6666666 *0001TC = .6666666 COMMANDS ARE READ-ONLY FOR TRANSMITTERS AND DEPTH SENSORS SHIPPED AFTER 10/1/01 (FIRMWARE VERSION R1.00 AND LATER). COMMAND DESCRIPTIONS 6-19 C1 C2 C3 Read/enter C1 pressure coefficient, as above. Read/enter C2 pressure coefficient, as above. Read/enter C3 pressure coefficient, as above. D1 D2 Read/enter D1 pressure coefficient, as above. Read/enter D2 pressure coefficient, as above. T1 T2 T3 T4 T5 Read/enter T1 pressure coefficient, as above. Read/enter T2 pressure coefficient, as above. Read/enter T3 pressure coefficient, as above. Read/enter T4 pressure coefficient, as above. Read/enter T5 pressure coefficient, as above. U0 Read/enter U0 pressure coefficient, as above. Y1 Y2 Y3 Read/enter Y1 pressure coefficient, as above. Read/enter Y2 pressure coefficient, as above. Read/enter Y3 pressure coefficient, as above. COMMAND DESCRIPTIONS 6-20 7. GLOBAL COMMANDS Sometimes it is convenient to have a single command affect all transmitters in a loop. For certain instructions, using the destination address 99 causes all the transmitters in the loop to respond. Some commands can only be sent with a global address. They are: BR BL ID PT The global address is often used with the sample and hold commands when there are multiple transmitters in a loop. The global address synchronizes the transmitters to take measurements at the same time. The sample and hold commands are: P5 and P6 Q5 and Q6 All of the sampling commands and a few other commands may be either individually or globally addressed. P1 through P7 Q1 through Q6 DB DS VR EW When a transmitter recognizes a global command, it relays it to the next transmitter in the loop before acting on it. The result is that the global command echoes around the loop and comes back to the computer in addition to the transmitter responses. For all global commands except the VR and DS commands, the echoed command precedes the responses. GLOBAL COMMANDS 7-1 8. NANO-RESOLUTION FEATURES & FUNCTIONS INTRODUCTION With firmware revision R5.10, it is now possible to achieve parts-per-billion resolution. This feature can be enabled by software command. When disabled, the sensor is backward compatible and works in the standard mode with typical parts-per-million resolution. Nano-resolution is achieved by sub-sampling the pressure at a much higher rate (typically 8 kHz) and applying digital signal processing techniques. Because of the much higher processing requirements, more input power is required. In general, the nano-resolution feature is only useful if pressure is stable enough over effective sampling period and the data acquisition system can handle additional digits. The practical bandwidth of interest is in the infrasound and deep infrasound (10 to 0.001 Hz). The digital signal processing technique utilizes the infinite impulse response (IIR) filter available with firmware R5.10 and later. It consists of a 5-stage digital low-pass filter acting on the sub-samples. It filters all frequencies with a roll-off of -100 dB/decade above a user selectable cutoff frequency. It is an effective anti-aliasing filter. The inherent resolution depends on the cutoff frequency and not on the sampling period. Typically the sampling rate is set at the Nyquist limit, or twice the cutoff frequency. NANO-RESOLUTION FEATURES & FUNCTIONS 8-1 ENABLING NANO-RESOLUTION Nano-resolution can be enabled and disabled by the XM serial command. XM Set or read the resolution mode. Range: 0 = Standard Resolution (backward compatible) 1 = Nano-resolution, IIR Filter Default: 0 Typical set command: *0100EW*0100XM=1 Typical set response: *0001XM=1 Typical read command: *0100XM Typical read response: *0001XM=1 CONFIGURING IIR FILTER MODE SETTING RESOLUTION Resolution is a function of the cutoff frequency when operating in IIR mode. The cutoff frequency is user-selectable and is set by the IA command. IA Set or read the cutoff frequency setting. Range: 0 - 16 Default: 11 Typical set command: *0100EW*0100IA=11 Typical set response: *0001IA=11 Typical read command: *0100IA Typical read response: *0001IA=11 Refer to the following table for a list of ranges for IA values, cutoff frequencies, measurement resolution, and the number of digits reported. NANO-RESOLUTION FEATURES & FUNCTIONS 8-2 IA Cutoff Frequencya (Hz) 0 1 2 3 4 5 6 7 8 9 10 11 12 13 14 15 16 1400 700 350 175 88 44 22 11 5.5 2.8 1.4 0.7 0.35 0.18 0.09 0.045 0.023 Effective Time Intervalb (ms) 0.1 1 2 3 6 11 22 44 89 178 350 700 1400 2800 5600 11200 22400 Measurand Resolutiond Period Resolutionc (dB) -82 -94 -105 -117 -127 -140 -149 -157 -167 -177 -186 -196 -203 -206 -207 -207 -207 Pressure & Temp. Digitse (dB) -62 -74 -85 -97 -107 -120 -129 -137 -147 -157 -167 -176 -183 -186 -187 -187 -187 790 200 56 14 4.5 1.0 0.35 0.14 45 14 4.5 1.6 0.7 0.5 0.4 0.4 0.4 ppm ppm ppm ppm ppm ppm ppm ppm ppb ppb ppb ppb ppb ppb ppb ppb ppb 6 7 7 8 8 8 9 9 10 10 11 11 12 12 12 12 12 a Cutoff Frequency is the -3dB point of the low-pass IIR filter. Effective Time Interval is the recommended maximum time interval between measurements that ensures sampling up to the specified cutoff frequency. The time interval is set using the PI command. c Period Resolution is the resolution of pressure and temperature period measurements. d Measurand Resolution is the resolution of pressure and temperature measurements. e Pressure and Temperature Digits is the total number of digits used to report pressure and temperature measurements. Pressure and temperature period measurements contain one additional digit. b NANO-RESOLUTION FEATURES & FUNCTIONS 8-3 DEFAULT NUMERIC FORMAT FOR IIR FILTER The default numeric formats used to report period, pressure, and temperature measurement values are as follows, where N = the number of significant digits shown in the resolution tables. PRESSURE The sensor full-scale pressure defines the number of digits reserved for the integer portion of the pressure value. For example, a 1000 psi full-scale unit would have 4 digits reserved (but not necessarily used) for the integer portion of the pressure value, leaving N-4 digits for the fractional portion. TEMPERATURE Three digits are reserved (but not necessarily used) for the integer portion of the temperature value, leaving N-3 digits for the fractional portion. Negative temperature values include a sign but the numeric format is otherwise unaffected. PRESSURE PERIOD Two digits are used for the integer portion of the pressure period value, leaving N-2 digits for the fractional portion. TEMPERATURE PERIOD One digit is used for the integer portion of the pressure period value, leaving N1 digits for the fractional portion. CONTROLLING THE NUMERIC FORMAT The XN command sets the number of significant digits used to report period, pressure, and temperature measurement values. The XN command overrides the default numeric format. XN Set or read the number of significant digits. Range: 0 - 13 Default: 0 Typical set command: *0100EW*0100XN=10 Typical set response: *0001XN=10 Typical read command: *0100XN Typical read response: *0001XN=10 When XN is set to 0, the default numeric formats are used. When nonzero, XN specifies the number of significant digits used to report NANO-RESOLUTION FEATURES & FUNCTIONS 8-4 period, pressure, and temperature measurement values. With the exception of the total number of digits, all default format characteristics apply. The integer portion is never expressed with fewer digits than required regardless of the value of XN. The fractional portion is rounded or padded with zeros as required to fit the specified format. The XN command works with and without IIR Filter enabled. NANO-RESOLUTION FEATURES & FUNCTIONS 8-5 9. RESOLUTION, INTEGRATION TIME, AND SAMPLING SPEED The resolution of the transmitter is determined by the counter integration time. Users can adjust the integration time to optimize resolution, noise rejection, and sample rate for a wide variety of applications by using the PR command. Transmitters are shipped with the value PR = 238 stored in EEPROM. The relationship between PR, pressure resolution, integration time, and maximum sampling rate is shown in the table below. PR 10000 2380 1190 476 238 119 48 24 12 6 4 3 1 Pressure Resolution fs (ppm) 0.05 0.1 0.2 0.5 1 2 5 10 20 40 60 80 240 Pressure Signal Integration Time (s) 28.0 6.7 3.3 1.3 0.67 0.33 0.13 0.07 0.033 0.017 0.011 0.0084 0.0028 P2 (period) max (samples/s) 0.036 0.15 0.30 0.75 1.5 3.0 7.3 14 28 55 85 115 274 P4 (pressure) max (samples/s) 0.02 0.08 0.16 0.40 0.80 1.6 4.0 8.0 15 30 46 61 159 NOTE: The reference values shown above are for a transmitter in standard resolution mode only, with a pressure signal period (Pper) of 28 microseconds, and a temperature signal period (Tper) of 5.8 microseconds. Values may vary by about 20% for different transmitters of the same model and by up to 35% for different models when PR/TR are used to set integration time. Data rates are somewhat slower than the integration time would suggest due to processing overhead. This effect becomes more pronounced as the data rate increases. The baud rate may need to be increased to achieve high data rates. RESOLUTION, INTEGRATION TIME, & SAMPLING SPEED 9-1 Resolution, integration time, and maximum samples rates may be calculated for all models using the equation below, where sensor periods are in microseconds: Resolution/f.s.= = 1 150 * PR * Pper Pressure Sensor Integration Time = PR * Pper 10,000 P2 command Max Samples/s = 10,000 PR * Pper P4 Command Max Sample/s = 10,000 PR * Pper + (TR + 1) * Tper sec. At very short counter integration times, sample rates are limited by microprocessor speed or baud rate rather than by integration time. RESOLUTION, INTEGRATION TIME, & SAMPLING SPEED 9-2 10. HIGH SPEED SAMPLING High speed sampling requires special attention to baud rate, sample integration time, and programming. Assuming a typical message at high speed of 14 characters, the maximum number of data values/second at various baud rates is tabulated below. BAUD RATE 300 600 1200 2400 4800 9600 19200 MAXIMUM SAMPLES/SEC 2.1 4.3 8.6 17.0 34.0 69.0 137.0 Thus, high baud rates must be used for fast sampling. Assuming that the baud rate and computer are fast enough, the transmitter operating parameters which affect speed are the PR command and the sampling mode chosen. For large values of PR, the sample rate is limited by the counter integration time. As PR is made smaller, the sample rate increases. Somewhere around 40 samples/s, the speed begins to be limited by the microprocessor calculation speed. Generally, the continuous send commands are somewhat faster than repeated individual commands because counting of the next sample proceeds while the previous one is being calculated. HIGH- SPEED SAMPLING 10-1 Two special burst sampling procedures can be used to obtain faster sample rates. The P7 command allows up to about 90 samples/s. With this command, temperature is measured once and that value is used for the temperature correction of all subsequent pressure measurements. This is faster because time is saved by not having to count the temperature signal on every reading and because many of the temperature correction terms are calculated only once and then stored. This command is intended for relatively short bursts. If internal sensor temperature changes rapidly during the data run (more than about 0.3 degrees C), small errors will be introduced in the data because all temperature corrections are being made with the temperature measured at the start of the run. In more rapidly changing thermal environments, errors can be minimized by reissuing the P7 command periodically to force an update of the temperature being used. The fastest sampling method uses period measurement commands Q1 and P2 and can achieve sample rates up to 135 samples/s. The transmitter reports period data directly, and calculation of pressure is done in the user's computer. Typically, the user takes a single temperature period with command Q1, a burst of pressure periods with command P2, and then another temperature with Q1. The user interpolates the before and after temperature periods to get a temperature period corresponding to each pressure period measurement and uses this pair of periods to calculate the corrected pressure using the equation in Appendix E. Note that the transmitter calibration coefficients can be obtained via bus commands. The mode parameter MD can affect sampling speed. When doing high speed sampling at greater than about 20 samples per second, sample rates using commands P3, P4, or P7 will be slightly slower in mode MD =1 or MD = 3 than in mode MD = 0 or MD = 2 because of the extra time required for the display. The extra time required is approximately 6 milliseconds per sample for DD = 0 and 36 milliseconds per sample for DD = 1. Other commands are not affected. For example, a P4 command that gives 19 samples/s for MD = 0 will run about 5% slower for MD = 1, and a P7 command giving 45 samples/s for MD = 0 will run about 20% slower for MD = 1. HIGH- SPEED SAMPLING 10-2 11. MULTIPLE TRANSMITTERS ON THE RS-232 BUS There are three ways to attach multiple transmitters to a single computer: (1) a serial loop of several transmitters on a single RS-232 port, (2) a relay or logic multiplexer switching a single port sequentially among a number of transmitters, and (3) multiple RS-232 ports. These are discussed in the following paragraphs. 1. SERIAL LOOPS The addressable command structure allows use of up to 98 transmitters simultaneously in a loop on a single RS-232 port. Global commands (destination address 99) allow all transmitters to be addressed with a single command. Keep in mind that the maximum number of messages per second on the bus is limited by the baud rate (see Section 10). For loops with multiple transmitters, the higher baud rates are recommended. Logically, the structure of the bus is a one way circle. transmitter loop is shown below: A typical three All messages move clockwise around the loop, relayed from transmitter to transmitter. Each transmitter picks off the messages addressed to it and relays responses or other messages onward. When setting up a loop: 1. Set all transmitters to the same baud rate before installing them in the loop. Two transmitters at different baud rates cannot communicate. When all transmitters are at the same baud rate, a new baud rate can be chosen with a global BR command. 2. Use the global ID command *9900ID to auto-number units around the loop and find out how many there are (from the source address of the command coming back to the computer.) MULTIPLE TRANSMITTERS ON THE RS-232 BUS 11-1 3. The serial number of each transmitter can be checked by polling it with the SN command. 4. The easiest way to take data is with a global sample and hold *9900P5 followed by a global dump command *9900DS. This keeps samples synchronized and keeps the data sorted out at the computer. 5. It is possible to have several transmitters simultaneously in continuous send mode, but because exact integration time varies from unit to unit, the data can come back in a chaotic order and must be sorted out according to address. 6. The wiring diagram for loop interconnections is shown on the next page. Pin connections shown are for 9-pin D connectors, but an analogous system could be used for any connector type. Note that only 4-wire cabling is required, or only 3-wire cabling if transmitter power is not bussed. The terminator block after the last transmitter wraps the transmit data line back to the computer input. With this arrangement, any transmitter can be removed from the loop either by unplugging the transmitter and replacing it with a terminator jumper or by removing the y-adapter and plugging the two extension cables together. MULTIPLE TRANSMITTERS ON THE RS-232 BUS 11-2 SERIAL LOOP CONNECTIONS Pin-outs are shown for transmitters and interface boards with 9-pin connectors. MULTIPLE TRANSMITTERS ON THE RS-232 BUS 11-3 2. MULTIPLEXER SYSTEM For high security applications with a large number of transmitters, it may be desirable to use a relay multiplexer as a switching hub to select separate data lines running out to the individual transmitters or clusters of transmitters in the system. Loss of any one data line through accident or failure will affect only the cluster on that data line. 3. MULTIPLE RS-232 PORTS. Transmitters or clusters of transmitters can be assigned to individual serial ports. This approach can provide simultaneous very high speed sampling of large numbers of transmitters. Expansion cards are available for PCs which provide up to 32 serial ports per card. Some versions with on-board IO processors and dual ported RAM can transfer data at 19200 baud to and from all ports simultaneously. These boards can provide data at 100 samples per second from each of 32 transmitters. This approach also offers good system integrity in the sense that failure of any transducer or cable does not affect the rest of the system. MULTIPLE TRANSMITTERS ON THE RS-232 BUS 11-4 12. TARING AND OVERPRESSURE WARNING Taring and overpressure warning capabilities are supported in slightly different ways on 9-pin version of the Intelligent Transmitter, RS-232C Serial Interface Board, and Model 760. OVERPRESSURE WARNING Paroscientific pressure transducers can be damaged by the application of pressure greater than 1.2 times their rated full-scale pressure. Users should protect the transducer with overpressure relief valves in applications where overpressure could be applied. The software command OP sets the overpressure warning level. Pressure in excess of this limit triggers a 5-volt logic level on the RS-232C Serial Interface Board and triggers a warning beeper on the Model 760. TARING Taring is the subtraction of an initial value from pressure readings. This feature is activated and used with software commands ZS, ZV and ZL (as described in Section 6). On the Model 760, taring is initiated by a front panel switch and remains in effect as long as the switch remains closed. On some 9-pin versions of the RS-232C Serial Interface Board (NOT MODEL 760), Tare Request, Tare Indicator, and Overpressure Warning can be brought out on unused pins of the 9-pin output connector. Contact Paroscientific for details. TARING AND OVERPRESSURE WARNING 12-1 13. MET3/MET3A INSTALLATION, OPERATION, & MAINTENANCE INTRODUCTION The Paroscientific MET3/MET3A Meteorological Measurement System is a precision instrument that measures barometric pressure, temperature, and relative humidity. The MET3/MET3A may be interfaced to a variety of instruments including personal computers, GPS receivers, and data loggers. The MET3/MET3A is packaged in a rugged, weather-resistant housing with a waterproof connector to provide reliable operation under adverse field conditions. PERFORMANCE SPECIFICATIONS PRESSURE (DIGIQUARTZ BAROMETRIC STANDARD) Range: Resolution: Accuracy, including pressure hysteresis, repeatability, linearity & temperature conformance: Stability: 620 to 1100hPa (9 to 16 psia) Better than 0.001 hPa Better than 0.08 hPa Better than 0.1 hPa per year TEMPERATURE (PLATINUM RESISTANCE TEMPERATURE PROBE) Range: -50 to +60 °C Resolution: Better than 0.01 °C Accuracy: MET3A: Better than 0.1 °C MET3: Better than ± 0.5 °C Stability: Better than 0.1 °C per year RELATIVE HUMIDITY (CAPACITANCE PROBE) Range: Accuracy: Saturation recovery time (not applicable for MET3): 0 to 100% Better than 2% RH at 25 °C 2 minutes or less MET3/MET3A INSTALLATION, OPERATION & MAINTENANCE 13-1 HARDWARE DESCRIPTION 1. Required Test And Installation Components MET3/MET3A Meteorological Measurement System 2. MET3/MET3A Interface Cable (P/N 2319-XXX) 3. Digiquartz CD Library * 4. Power Breakout / Supply Kit* - 9 to 12 VDC from 110 VAC (P/N 1727-001) or - 9 to 12 VDC from 220 VAC (P/N 1727-002) * These items may be optional for your field installation. To verify the operation of the device with a PC you will require an external power source and breakout as the PC serial port does not supply power to the MET3/MET3A. Paroscientific Power Supply Kit will simplify this process. Status Indicators In early 2002, a status indicator panel was added to the MET3/MET3A. These status indicators allow you to determine whether input power is applied to the unit, and to monitor RS-232 serial activity. The status indicator panel is located on the bottom of the of the unit, adjacent to the electrical connector. The following table explains the function of the status indicators: Indicator Color Red Green Yellow Function ON: Input power on OFF: Input power off FLICKERING: Activity on RS-232 receive line OFF: No activity on RS-232 receive line FLICKERING: Activity on RS-232 transmit line OFF: No activity on RS-232 transmit line MET3/MET3A INSTALLATION, OPERATION & MAINTENANCE 13-2 FIELD INSTALLATION This section discusses physical installation of the MET3/MET3A. For information on connecting the MET3/MET3A to a PC or GPS receiver, please review our GPS-MET support site: “Integrating Digiquartz MET3 and MET3A Broadband Meteorological System with a GPS Receiver” found at http:\\www.paroscientific.com/pdf/GPSMETIntegration.pdf. MET3/3A Physical Installation / Mounting The MET3/MET3A is packaged to withstand adverse field conditions and no additional shielding or protection is required. We recommend that the MET3 interface cable used to connect to the recording device be protected from longterm exposure to the elements. A typical installation will include placing the cable in conduit to ensure extended cable life and reliable data transmission. Proper cable strain relief will minimize cable and connector damage. Install the mounting bracket on a pole of not more than 2 inches in diameter. (An optional flat monument mounting plate is available.) Be sure the mounting fixture and structure are capable of supporting the weight of the MET3/MET3A under adverse weather conditions. The mounting hardware supplied with the MET3/MET3A provides ground isolation from the mounting pole. No other ground connection should be made except at the recording device through the cable shield and connector shells (as shown in Connector Diagram section). The MET3 should be installed vertically with the sun-shield and barometric port assembly facing upwards (on the top-side). This position will assure optimum performance of the sensors. MET3/MET3A INSTALLATION, OPERATION & MAINTENANCE 13-3 BAROMETRIC REFERENCE HEIGHT (Base of Unit) MET3 The MET3A must be installed with the barometric port assembly vertical as shown below. MET3A units that are delivered with the barometer port dismounted from the main body should be assembled in the following manner: Apply at least three wraps of Teflon pipe tape (supplied with unit) to the ¾” male pipe thread on the top of the main body of the instrument. Ensure that the entire thread is adequately covered with the tape. Carefully mate the female thread at the base of the barometer port with the taped male thread and screw the two together HAND TIGHT. Do not over-tighten these threads. Over-tightening could cause damage to the threads and impede future disassembly. MET3/MET3A INSTALLATION, OPERATION & MAINTENANCE 13-4 MET3A Install the unit in a location where the ports remain unobstructed. There should be at least one foot of clearance in all directions and at least four feet of clearance from the ground. The ports are designed to minimize effects caused by solar radiation and wind, and obstruction of the ports could result in erratic performance. For GPS Meteorology applications we recommend that the MET3A be installed with the barometer port at the GPS antenna height. MET3/MET3A INSTALLATION, OPERATION & MAINTENANCE 13-5 BENCH TEST AND GPS RECEIVER INTERFACE INFORMATION Please also review our GPS-MET support site: “Integrating Digiquartz MET3 and MET3A Broadband Meteorological Systems with a GPS Receiver” found at http:\\www.paroscientific.com/pdf/GPSMETIntegration.pdf. Digiquartz MET3 and MET3A Compatible GPS Receivers Thales Navigation (Ashtech) Javad Navigation Systems Novatel Trimble Leica MET3/3A Data Cable & Power Adapter Kit The MET3/3A Data Cable & Power Adapter Kit is an optional accessory provided to integrate a MET station with a data acquisition system such as a GPS receiver, PC, or a data logger. This kit includes a data cable, a power adapter, and power break out. All these items are needed when connecting a MET station to a data acquisition system. Paroscientific recommends the data cable and power adapter kit for diagnostics purposes. The power adapter and power breakout are used to provide power to a MET station on pin 9. Some GPS receivers, such as Thales, may provide power to MET stations. In this case, you don't have to use the power adapter and the breakout to power up the MET station. For instructions on connecting your GPS receiver, see the website http://www.paroscientific.com under the manuals menu option. . MET3/MET3A INSTALLATION, OPERATION & MAINTENANCE 13-6 COMMANDS MET3/MET3A Command Descriptions The MET3/MET3A intelligent interface supports a variety of commands that may be used to configure the unit and retrieve data. With the exception of the EW command, the following commands are unique to the MET3/MET3A. Refer to Appendix-H for other valid commands. These commands supplement the commands listed in the Programming and Operations Manual for other Paroscientific products. EW Permits the modification of a parameter value. It must be sent with any command that modifies a parameter value. Example 1: (To change a Z1 coefficient value) Command: *0100EW*0100Z1=##### Response: *0001Z1=##### Example 2: (To change a G2 coefficient value) Command: *0100EW*0100G2=##### Response: *0001G2=##### P9 Description: Read unified data word containing Pressure, Temperature and Humidity measurement values based on the NMEA specification. NOTE: This command only functions with single devices and cannot be used in a serial loop. The instrument only responds to P9 commands when the engineering units are set to Bar (UN=3). Command: *0100P9 Typical Response: $WIXDR,P,<[P]>,B,<SN>,C,<[T]>,C,<SN>,H, <[H]>,P,<SN><CR><LF> Pressure Temperature Humidity Transducer Field Units Pressure P B=Bar Temperature C C=Celsius Humidity H P=Percent <SN>= Transducer Serial Number (Typically- DQ#####) MET3/MET3A INSTALLATION, OPERATION & MAINTENANCE 13-7 L1 Provides pressure, temperature, and RH measurement data in a unified, fixed field length format. This format simplifies the parsing of the individual measurement values, and enhances the MET3/MET3A’s compatibility with commercial data loggers, such as the Handar 555 Data Collection Platform. NOTE: The L1 command is only supported by MET3/MET3A firmware revision 1.02 and above. The L1 command only functions with single devices and cannot be used in a serial loop. Typical command: *0100L1 Typical response: *098765,+00.995874,+23.45,+045.7,1<cr><lf> The L1 data record is formatted as follows: Field Start character " * " (asterisk) Serial Number field Comma Pressure field Comma Temperature field Comma RH field Comma Fan Status field Termination characters Character position (1-based) 1 2-7 8 9 – 18 19 20 – 25 26 27 – 32 33 34 35 – 36 Pressure, temperature, and RH values are padded with leading and trailing zeroes as required to maintain a fixed field width. The serial number field is padded with leading zeroes as required to maintain a fixed field width. The decimal point always appears in the same character position within each field. The pressure, temperature, and RH fields have explicit signs. If the MET3A fan is operational, a “1” is returned in the Fan Status field, otherwise a “0” is returned. To determine which firmware version is loaded, activate the VR command. VR returns the firmware version number stored in the program EPROM. Example: Command: Response: *0100VR *0001VR=01.01 MET3/MET3A INSTALLATION, OPERATION & MAINTENANCE 13-8 NH Read or set NMEA header used in the P9 command response. By default, the NH (NMEA Header) string is set to produce the generic NMEA header “$WI”. The default P9 output looks like this: $WIXDR,P,<Pres Value>,B,<SN>,C,<Temp value>,C,<SN>,H,<Hum value>,P,<SN><CR><LF> To change the header string to “$PASHS,”, use the following NH (NMEA Header) command. Command: *0100EW *0100NH=$PASHS, Response: *0001NH=$PASHS, The P9 response will now look like this… $PASHS,XDR,P,<Pres Value>,B,<SN>,C,<Temp value>,C,<SN>,H,<Hum value>,P,<SN><CR><LF> Remember to add a comma to the end of the string if a comma is to appear before XDR. The maximum string length is 7 characters. Unused characters to be "null" not spaces. ASCII characters 32 through 90 are valid, except “*” and “=”. TT or A1 Read an external temperature sensor measurement in degrees Celsius Command: *0100TT (*0100A1) Response: *0001#.## or *0001##.## *0001-#.## or *0001-##.## (for negative temperature values) NOTE: See MD command for fan status indication. RH or A2 Read an external humidity sensor measurement in percent. Command: *0100RH (*0100A2) Response: *0001#.# or *0001##.# N1 Read raw analog to digital converter value for the temperature input. Command: *0100N1 Response: *0001###### MET3/MET3A INSTALLATION, OPERATION & MAINTENANCE 13-9 N2 Read raw analog to digital converter value for the humidity input. Command: *0100N2 Response: *0001###### AR Read or set current analog resolution If AR = 0 then output resolution is 0.1 degrees C, 0.1% RH. If AR = 1 then output resolution is 0.01 degrees C, 0.1% RH. Command: *0100AR Response: *0001AR=0 To change AR value: Command: *0100EW*0100AR=1 Response: *0001AR=1 Z1 Read or set zero adjustment coefficient for calculated temperature value. Command: *0100Z1 Response: *0001Z1= ###### NOTE: Changing this parameter affects temperature calibration! Z2 Read or set zero adjustment coefficient for calculated humidity value. Command: *0100Z2 Response: *0001Z2= ###### NOTE: Changing this parameter affects humidity calibration! M1 Read or set span adjustment coefficient for calculated temperature value. Command: *0100M1 Response: *0001M1= ###### NOTE: Changing this parameter affects temperature calibration! MET3/MET3A INSTALLATION, OPERATION & MAINTENANCE 13-10 M2 Read or set span adjustment coefficient for calculated humidity value. Command: *0100M2 Response: *0001M2= ###### NOTE: Changing this parameter affects temperature calibration! E1, E2, F1, F2, G1, G2, H1, H2, K1, K2 Read or set temperature and humidity calibration coefficients. Channel 1: E1, F1, G1, H1, K1 (temperature) Channel 2: E2, F2, G2, H2, K2 (humidity) Example: Command: *0100E1 Response: *0001E1=###### NOTE: Changing these parameters affects the temperature and/or humidity calibration! MET3/MET3A INSTALLATION, OPERATION & MAINTENANCE 13-11 Aspiration Fan Status Indicator- MET3A Only A warning character can be added to the temperature data to indicate the operational status of the aspiration fan. This indication may be toggled on and off by using the Mode (MD) command. When the Mode is set to MD = 4, a plus (+) sign will be appended to temperature measurement data if the fan is not operating properly. Example: Read or set the Mode (MD) parameter. Read the Mode setting Command: *0100MD Response: *0001MD= 04 - The mode is set to report fan status. Set the Mode setting Command: *0100EW*0100MD=4 Response: *0001MD= 04 - The mode is set to report fan status. Example: Read a temperature reading with the fan status indication. (MD = 4, fan OK) Command: *0100TT Response: *000122.23 Example: Read a temperature measurement with the fan status indication. (MD=4, fan not working) Command: *0100TT Response: *000122.23+ *0001-22.23+ (example of negative temperature values). NOTE: The fan status indication applies to the TT, A1 and P9 commands. Digiquartz Intelligent Interface Commands Not Supported by the MET3/MET3A. The following commands are not supported in the MET3/MET3A. Refer to Digiquartz Programming and Operations manual for descriptions. Display Commands: DC, DD, DP, DR, DV Tare Commands: BP, OP, ZS, ZV, ZL 16 Bit Interface Commands: LL, LH, IM, IC MET3/MET3A INSTALLATION, OPERATION & MAINTENANCE 13-12 CONNECTOR DIAGRAM Double check that the power to the MET3/MET3A unit is correct in voltage requirements (MET3: +7Vdc to +16Vdc @ 20mA nominal, 200mA maximum; MET3A: 7Vdc to +16Vdc @ 105mA nominal, 200mA maximum) and that the communication pin-outs to the MET3/ MET3A connector are correct. Earth CONNECTOR: W.W. FISCHER S104A065-130* CLAMP ASSY: W.W. FISCHER E3104.2/7.7+B MET3/MET3A INSTALLATION, OPERATION & MAINTENANCE 13-13 MAINTENANCE The MET3/MET3A Meteorological Measurement System is a highly accurate, reliable instrument that is intended to operate for a long period of time without need of maintenance or calibration. For critical installations, yearly checks of temperature, humidity, and barometric pressure may be appropriate. Transfer standards, such as the Paroscientific Model 760-16B (for pressure), or a newly calibrated MET3/MET3A unit would be suitable for field verification of installed units. Ensuring that the MET3/MET3A package remains clean and debris-free will improve the overall performance. The electronics package is environmentally sealed, requires no cleaning or maintenance, and contains no customer serviceable parts. Opening of the sealed enclosure may affect the Paroscientific warranty. MET3 Maintenance Procedures Periodic cleaning of the solar shield and barometer port inlet is the only recommended physical maintenance for the unit. The cleaning procedure consists of removing the solar shield and barometer port assembly, cleaning the port inlet, and re-installing the assembly. Solar Shield and Barometer Port Removal The solar shield and barometer port assembly has been designed for easy removal so that the user may clean the temperature / humidity probe. Using a 3/16” Allen wrench, dismount the shield/port assembly by removing the two socket head cap screws that attach the assembly to the electronics enclosure. Carefully lift the shield assembly upwards to expose the probe. Cleaning the Temperature / Humidity Probes Remove the heat sink from the RH probe and clean the sensor screen with distilled water. Sensors that become heavily contaminated in field use can be cleaned off with a soft brush and distilled water. Replace the heat sink before re-assembling. MET3/MET3A INSTALLATION, OPERATION & MAINTENANCE 13-14 Remove Assembly (Lift Vertically) MET3 Solar Shield and Barometer Port Replacement The solar shield and barometer port assembly should be replaced in its original orientation. The base of the shield/port assembly has a gasket seal between it and the electronics enclosure to prevent any moisture from entering the electronics. Be sure that the gasket is in good condition and properly seated when replacing the port. Hand-torque the cap screws to 25 in-lbs. This torque will compress the gasket approximately 50 percent; over tightening may distort the gasket or strip the threads within the electronics enclosure. MET3/MET3A INSTALLATION, OPERATION & MAINTENANCE 13-15 MET3A Maintenance Procedures Periodic cleaning of the housing, barometer port inlet and temperature / humidity sensor is the only recommended physical maintenance of the unit. Barometer Port Removal The cleaning procedure consists of unscrewing the barometer port in a counterclockwise direction, cleaning out any debris from between the upper and lower plates and the adjacent orifice plates and checking for unobstructed flow through the port assembly. If flow is still obstructed, the upper plate and upper orifice plate may be removed by unscrewing the ½-20UNF flat head socket screw on top of the port. Use a 5/16” Allen hex wrench. This allows access to both the orifice plates and the interior of the upper end of the column. Remove any debris from the various orifices and reassemble, applying a small amount of Loctite 609 to the screw. Torque the screw to 25 ft/lbs to secure the assembly. Prior to re-installation of the pressure port it is recommended that the Teflon pipe tape on the male ¾” thread be removed and replaced with at least three wraps of fresh tape. Carefully re-mate the barometer port to the main body of the instrument and screw the two together, HAND TIGHT. Do not over-tighten these threads. Over-tightening could cause damage to the threads and impede future disassembly. Do not permit water to enter the exposed port on the electronics enclosure. Cleaning the Barometer Condensation Drain The condensation drain is the brass fitting with a sintered stainless steel screen, located on the underside of the upper body adjacent to the electrical connector. Inspect the screen for contamination and if necessary, clean the screen with a nylon brush and distilled water. MET3/MET3A INSTALLATION, OPERATION & MAINTENANCE 13-16 MET3A Cleaning the Temperature / Humidity Sensor You may visually check the aspirated portion of the enclosure for contamination. Prior to any cleaning activity, turn off the power. The screens are intended to prevent large particles from entering the system. Clean these with a nylon brush. It is necessary to remove the lower portion of the MET3A aspirated temperature / humidity system to access the sensor. Locate the two hex head screws found just below the upper screen and remove using a 3/32” Allen hex wrench. Carefully slide the outer housing down. You may encounter a small amount of resistance while removing this housing due to the O-ring seals. Do not force the housing off the assembly. Once removed, you will see the temperature / RH sensor mounted within the isothermal block. Clean the sensor screen with distilled water. Sensors which have become heavily contaminated may be scrubbed off with a nylon brush and distilled water. Inspect or replace and lubricate the O-rings with any silicone-based O-ring lubricant. Carefully re-assemble the outer housing. MET3/MET3A INSTALLATION, OPERATION & MAINTENANCE 13-17 Aspiration Fan Replacement The internal fan used to provide airflow for the temperature and humidity probe is a highly reliable weather-hardened device requiring little or no maintenance. In the unlikely event of a failure do not replace it with a standard fan assembly. It is recommended that you contact Paroscientific to obtain all the appropriate replacement parts and instructions for performing this procedure. MET3/MET3A INSTALLATION, OPERATION & MAINTENANCE 13-18 CALIBRATION OF MET3/MET3A SENSORS Pressure Sensor The MET3A uses a Digiquartz Barometric Standard that offers 0.08 hPa accuracy and a 3-year stability warranty of better than 0.1 hPa per year. Pressure Calibration Overview All Digiquartz Barometric Standard transducers are calibrated and conformance tested over their operational pressure and temperature ranges against NISTtraceable standards. Transducer output and applied pressure are recorded at test pressures that span the transducer range over a minimum of at least six different temperatures. These measurements are used to derive calibration coefficients for the best fit for each individual transducer. The differences between the indicated pressures and the applied pressures from the primary standard are less than 0.08 hPa for Digiquartz barometers. Temperature Sensor The temperature sensor is a precision thin-film platinum 1000-ohm resistance element (RTD). The sensor was chosen for its accuracy and long-term stability. The resolution of the sensor is better than 0.01 degree C and the accuracy is better than 0.1 degree C over the full temperature range from –50 to + 60 degrees C. MET3 Only: The temperature probe is surrounded by a Gill multi-plate solar shield, which greatly reduces the effects of direct and reflected solar radiation. When placed in full sunlight and still air, the temperature rise at the sensor is approximately 1 degree C. This effect decreases rapidly with wind speed, and is less than 0.4 degrees C at a wind speed of 3 m/s. MET3A Only: The time constant of the fully packaged sensor is approximately 15 minutes, and the self-heating of the sensor in still air is less than 0.07 degree C. The temperature probe is surrounded by a fanaspirated solar shield, which greatly reduces the effects of direct and reflected solar radiation. MET3/MET3A INSTALLATION, OPERATION & MAINTENANCE 13-19 Temperature Calibration Overview MET3 Only: The MET3 electronics and temperature sensors are separately calibrated against a NIST traceable temperature reference standard over the entire operational temperature range. The resulting coefficients for the electronics and the temperature sensor are combined into a single set of systemlevel coefficients. Each MET3 is then conformance tested over the entire operational temperature range to ensure specified temperature measurement accuracy. MET3A Only: The MET3A incorporates a precision thin-film RTD to sense temperature. A thermal chamber is used to control environmental temperature, and an independently calibrated, NIST traceable thermistor is used as a temperature reference. The MET3A humidity/temperature sensor is enclosed in a small isothermal block that includes a bore designed to accept a standard 0.125” diameter temperature reference probe. The bore terminates in close proximity to the humidity/temperature sensor, assuring good isothermal contact between it and the temperature reference probe. The MET3A RTD sensor and electronics are simultaneously calibrated by taking reference probe temperature and MET3A temperature measurements at various stable points over the range of –50 to +60C, and adjusting the MET3A temperature coefficients to correct for combined temperature sensor and electronics nonlinearity. This process yields system temperature measurement accuracies of 0.1C or better over the temperature range of –50 to +60C. Relative Humidity Sensor The humidity sensor uses a polymer capacitance element. It was selected for its accuracy, stability, and resistance to contamination. Its output is corrected for temperature effects over a wide temperature range. MET3 Only: The time constant of the RH sensor in slowly moving air is approximately 5 minutes (longer for high humidity). Very large steps in humidity can require considerably longer for full equilibrium. A step change of 75% RH settles within 5% of final value in 10 minutes and within 1% of final value in 2.5 hours. In addition, there can be hysteresis effects of a few percent after prolonged exposure to humidity above 90% RH. Exposure of the humidity sensor to condensing conditions can lead to humidity readings in excess of 100%, however, the probe will recover after several hours return to reduced humidity atmospheric conditions. MET3/MET3A INSTALLATION, OPERATION & MAINTENANCE 13-20 MET3A Only: The recovery time of the aspirated RH sensor is typically less than 2 minutes. Very large steps in humidity can take longer to reach full equilibrium. A step change of 75% RH settles within 5% of final value in 2 minutes and within 1% of final value in 5 minutes. In addition, there can be hysteresis effects of a few percent after prolonged exposure to humidity above 90% RH. Relative Humidity Calibration The MET3/MET3A humidity sensor is a standard humidity probe characterized by the manufacturer. All MET3/MET3A units are conformance tested against a transfer standard to ensure proper performance. MET3/MET3A INSTALLATION, OPERATION & MAINTENANCE 13-21 DESCRIPTION Sample and respond with NMEA formatted data values Return User Defined NMEA header ($WI, - default) Sample & return external temperature measurement in °C Sample & return an external humidity measurement in percentage Sample & return an analog integer count for analog channel 1 (T) Sample & return an analog integer count for analog channel 2 (RH) Return current analog resolution; AR=0 then output resolution is 0.1 °C, 0.1% RH; AR=1 then output resolution is 0.01 °C, 0.1% RH Set/Return zero adjustment coefficient for analog channel 1 (T) Set/Return zero adjustment coefficient for analog channel 2 (RH) Set/Return the span adjustment coefficient for analog channel 1 (T) Set/Return the span adjustment coefficient for analog channel 2 (RH) Set/Return temperature coefficient E1 Set/Return temperature coefficient F1 Set/Return temperature coefficient G1 Set/Return temperature coefficient H1 Set/Return temperature coefficient K1 Set/Return humidity coefficient E2 Set/Return humidity coefficient F2 Set/Return humidity coefficient G2 Set/Return humidity coefficient H2 Set/Return humidity coefficient K2 Enable EPROM write for one command string. May be a global command. Example: Change E1 temperature coefficient to 0.1 MET3/MET3A INSTALLATION, OPERATION & MAINTENANCE Z1 Z2 M1 M2 E1 F1 G1 H1 K1 E2 F2 G2 H2 K2 EW COMMAND P9 NH TT or A1 RH or A2 N1 N2 AR MET3/3A INTELLIGENT INTERFACECOMMAND SUMMARY *0100Z1 *0100Z2 *0100M1 *0100M2 *0100E1 *0100F1 *0100G1 *0100H1 *0100K1 *0100E2 *0100F2 *0100G2 *0100H2 *0100K2 *0100EW...(cmd) *0100EW *0100E1=0.1 INPUT COMMAND *0100P9 *0100NH *0100TT (*0100A1) *0100RH (*0100A2) *0100N1 *0100N2 *0100AR 13-22 OUTPUT RESPONSE $WI,XDR,…. *0001NH=$WI, *0001##.## *0001##.# *0001###### *0001###### *0001AR=0 *0001AR=1 *0001Z1=###### *0001Z2=###### *0001M1=###### *0001M2=###### *0001E1=###### *0001F1=###### *0001G1=###### *0001H1=###### *0001K1=###### *0001E2=###### *0001F2=###### *0001G2=###### *0001H2=###### *0001K2=###### Cmd Response *0001E1=.1000000 14. SUPPLIMENTAL INFORMATION APPENDIX A HOOKUP FOR RS-232 ONLY DIGIQUARTZ SENSORS GENERAL DESCRIPTION Hookup consists of providing power to the transmitter and running receive, transmit, and signal ground lines from the transmitter to the computer RS-232 output connector. The required connections are shown schematically in the figure below. Proper connection requires identifying the correct output pins on the computer RS-232 port and on our transmitter output connector. CONNECTING TO THE TRANSMITTER ELECTRICAL CONNECTOR Because our equipment is used in many different applications, a number of different output connectors are used. The most common is a 9-pin D connector. Output connector diagrams and pin assignments for all of our products are given in Appendix B. The user should locate the "data to computer", "data from computer", and "signal ground" pins on the appropriate diagram. These must be connected to the computer serial port. SUPPLEMENTAL INFORMATION 14-1 CONNECTING TO THE COMPUTER RS-232 PORT Most computer RS-232 ports have either male or female 25-pin or 9-pin connectors. The most common computer pin connections are tabulated below. Check your computer manual to verify pin assignments. IBM PC AT 9-pin STANDARD RS-232 25-pin 3 2 5 4 8 6 1 2 Data from computer 3 Data to computer 7 Signal ground 20 DTR 5 CTS 6 DSR 8 CD 1 Frame ground Data from computer Data to computer Signal ground DTR CTS DSR CD Our transmitter requires only connections for data from computer, data to computer, and signal ground. However, depending on the user computer and how a program opens up the RS-232 port, the user may need to provide handshaking signal levels by enabling jumper pins on the computer connector. If messages cannot be retrieved from the transmitter, ensure that the baud rate is correct and that the communications channel is set up for 8 data bits, no parity, 1 stop bit. Then try a global command (*9900VR) to make sure the ID is correct. If that does not work, the computer may be waiting for handshake signals (CTS, DSR, CD) which the transmitter does not provide. On the IBM PC and most other computers, you can choose to ignore these signals when you open up the communications channel. See the programming examples in the text. If your computer insists on these signals, you can provide them by jumpering back the DTR signal to the CTS, DSR, and CD pins on the same connector. SUPPLEMENTAL INFORMATION 14-2 APPENDIX B CONNECTOR PIN ASSIGNMENTS 9-PIN D CONNECTOR Models: Intelligent Transmitter (RS-232) Digital Barometer Model 760 Portable Field Standard Pin-outs: PIN 1 PIN 2 PIN 3 PIN 4 PIN 5 PIN 6 PIN 7 PIN 8 PIN 9 CHASSIS GROUND DATA TO COMPUTER DATA FROM COMPUTER not used SIGNAL AND POWER GROUND DISPLAY CLOCK (Model 760 Only) not used DISPLAY DATA (Model 760 Only) POWER (SEE SCD) Connector Diagram: CONNECTOR PART NO.: MATING CONNECTOR: Type DE9-S Type DE9-P SUPPLEMENTAL INFORMATION 14-3 9-PIN BENDIX MS CONNECTOR Models: Model PS-2 Water Level Sensor (RS-232) Pin-outs: PIN A PIN B PIN C PIN D PIN E PIN F PIN G PIN H PIN J CHASSIS GROUND DATA TO COMPUTER DATA FROM COMPUTER not used SIGNAL AND POWER GROUND DISPLAY CLOCK not used DISPLAY DATA POWER (SEE SCD) Connector Diagram: CONNECTOR PART NO.: MS3102A22-20P MATING CONNECTOR: MS3106A22-20S SUPPLEMENTAL INFORMATION 14-4 26-PIN BENDIX MS CONNECTOR Models: Pin-outs: Model PS-2 Water Level Sensor (16-bit parallel output) PIN A PIN B PIN C PIN D PIN E PIN F PIN G PIN H PIN J PIN K PIN L PIN M PIN N PIN P PIN R PIN S PIN T PIN U PIN V PIN W PIN X PIN Y PIN Z PIN a PIN b PIN d CHASSIS GROUND DATA FROM COMPUTER DATA TO COMPUTER INHIBIT/TRIGGER D7 D3 SIGNAL AND POWER GROUND D9 D10 D12 DISPLAY CLOCK D14 D15 DO D4 D5 D6 DISPLAY DATA D2 D1 D0 D11 D13 DATA VALID POWER (SEE SCD) not used Connector Diagram: CONNECTOR PART NO.: MS3102A28-12P MATING CONNECTOR: MS3106A28-12S SUPPLEMENTAL INFORMATION 14-5 DEPTH SENSORS Model: 8B, 8DP 8WD, with RS-232 interface Pin-outs: PIN 1 PIN 2 PIN 3 PIN 4 DATA TO COMPUTER DATA FROM COMPUTER SIGNAL AND POWER GROUND POWER (SEE SCD) Connector diagram: CONNECTOR PART NO.: MATING CONNECTOR: XSG-4-BCL XSG-4-CCP SUPPLEMENTAL INFORMATION 14-6 DEPTH SENSORS Model: 8DP with Intelligent Card Pin-outs: PIN 1 PIN 2 PIN 3 PIN 4 DATA TO COMPUTER DATA FROM COMPUTER SIGNAL AND POWER GROUND POWER (SEE SCD) Connector Diagram: CONNECTOR PART NO.: MATING CONNECTOR: XSE-4-BCR XSE-4-CCP SUPPLEMENTAL INFORMATION 14-7 APPENDIX C PROGRAMMING HINTS Sometimes it is difficult to be sure exactly what your computer is sending out. One trick is to disconnect the transmitter and replace it with a connector which wraps the computer transmitted data back to the computer receive line. Then by looking at the data in the receive buffer, you can find out exactly what was sent. 1. MESSAGES NOT COMING BACK FROM TRANSMITTER - If you cannot seem to get any messages back from the transmitter, first make sure that the baud rate is correct and the communications channel is set up for 8 data bits, no parity, 1 stop bit. Then try a global command (*9900VR) to make sure the ID is correct. If that does not work, the computer may be waiting for handshake signals (CTS, DSR, CD) which the transmitter does not provide. On the IBM PC and most other computers, you can choose to ignore these signals when you open up the communications channel. See the programming examples in the text. If your computer insists on these signals, you can provide them by jumpering back the DTR signals to the CTS, DSR, and CD pins on the same connector. See APPENDIX B for common pin-outs. 2. UNREQUESTED CONTINUOUS DATA - If the transmitter sends data continuously without being asked whenever powered up, check the setting of the MD parameter. 3. REPLY DELAY - Almost all commands generate a reply, but for long integration times some replies may take several seconds. Exceptions: a) An undefined (garbage) command addressed to a specific sensor will be absorbed. Example: *0100ZQ b) Sample and hold commands generate no response. 4. GLOBAL COMMAND ECHO - Global commands echo back the command in addition to whatever response they produce. The reason is that each transmitter passes on the command to the next transmitter in the loop before acting on the command. Example: COMMAND: *9900P1 REPLY: *9900P1 *000128.12345 SUPPLEMENTAL INFORMATION 14-8 5. GARBAGE CHARACTERS IN INPUT BUFFER - The computer receive buffer should be cleared after applying power to the transmitter. Turning on power to the transmitter causes the output lines to go from zero to defined voltage levels. This produces a garbage character in the input buffer of some computers. Alternatively, when getting data from the input buffer, throw away leading characters until you come to an * . All legitimate transmitter replies begin with *. 6. CLEAR TRANSMITTER - At the start of all programs, send a command (*9900VR is a good choice) to terminate whatever the transmitter may have been doing and then clear out the RS-232 receive buffer on your computer. Remember that when a "continuous send" command is given, the transmitter continues to send data even after the computer is halted. If you restart the program, the transmitter will still be sending data whether it is expected or not. 7. REWRITING EEPROM - Do not routinely rewrite EEPROM at the start of every program. Check the values and change only what needs changing. A given register in EEPROM is guaranteed only for 10,000 rewrites. 8. WRITING CONTROL PARAMETERS IN EEPROM - When writing control parameters in EEPROM, (e.g. BR =, PR =, UN =, etc.), always wait for the reply before sending other commands addressed to the same transmitter. The sensor ignores commands addressed to it until its EEPROM write is completed (about 0.1 seconds). Commands for other transmitters are relayed properly. No wait is required when reading EEPROM. SUPPLEMENTAL INFORMATION 14-9 APPENDIX D SAMPLING COMMANDS APPROX. MAX SAMPLES PER SEC. STANDARD SAMPLING COMMANDS PRESSURE P3 Single sample and send P4 Continuous sample and send 30 50 P5 Single sample and hold DB Send stored value 30 TEMPERATURE Q3 Single sample and send 45 Q4 Continuous sample and send 100 Q5 Single sample and hold DB Send stored value 45 PERIOD SAMPLING COMMANDS P PERIOD P1 Single sample and send 50 P2 Continuous sample and send 135 P6 Single sample and hold DB Send stored value T PERIOD 50 Q1 Single sample and send 58 Q2 Continuous sample and send 145 Q6 Single sample and hold DB Send stored value 55 BURST SAMPLING COMMANDS PRESSURE BURST P7 Continuous sample and send PERIOD BURST Q1, P2, Q1 Command sequence 130 SUPPLEMENTAL INFORMATION 90 14-10 APPENDIX E CALCULATION OF PRESSURE The transmitter calculates temperature and pressure from period measurements of two frequency signals. The equations used in the calculations are given below: Temperature = Y1U + Y2U2 + Y3U3 °C P = C(1 - T02/Tau2)[1 - D(1 - T02/Tau2)] psi where: Tau = pressure period in microseconds U = (temp period) - U0 microseconds C = C1 + C2U + C3U2 D = D 1 + D2 U T0 = T1 + T2U + T3U2 + T4U3 + T5U4 These equations express temperature and pressure in terms of the transducer calibration coefficients: Temperature coefficients: Pressure coefficients: U0 Y1 Y2 Y3 C1 C2 C3 D1 D2 T1 T2 T3 T4 T5 These coefficients are stored in EEPROM and can be obtained from the transmitter via the RS-232 bus. Final output pressure is computed from the above using the following equation: P output = PM [(units multiplier) P + PA] When units are changed using the UN command, PA is automatically recalculated to be correct in the new units. SUPPLEMENTAL INFORMATION 14-11 APPENDIX F ZERO AND SPAN ADJUSTMENTS Commands PA and PM can be used for minor transmitter zero and span adjustments. Normally the pressure adder PA is set to zero and the pressure multiplier PM is set to 1.0. Adjusted pressure is calculated using the equation: P adjusted = PM (P + PA) where P is the pressure calculated using the original calibration coefficients and the selected unit factor. The user enters PA in the selected units. The transmitter converts the entered value to psi before storing it. Whenever the transmitter is asked to send the value of PA, it will be reconverted and sent in the units in effect at the time of the request. The PA parameter can also be used to offset absolute pressure readings to read gauge pressure. WARNING: Be very careful when using the PA and PM commands because they directly affect the transmitter calibration. Inaccurate values will result in inaccurate data. SUPPLEMENTAL INFORMATION 14-12 APPENDIX G SOFTWARE VERSIONS A number of evolutionary improvements have been made to the hardware and software in the intelligent transmitter to add display capability and extra commands and features. We have maintained full forward compatibility, so that user programs written for one version operate properly with all later versions, and different versions can be mixed on the same loop. The hardware and software version of any transmitter can be determined with the VR command. If desired, any transmitter can be upgraded to support all of the latest features. Design changes for all standard 1000, 6000, and 9000 series transmitter products are summarized below: VERSION 1.00 Original series. 2.00 Commands added: Hardware change: 3.00 Display capability added. Commands added: MD, DV, DC. Hardware change: display driving. 4.00 Refinements to display capability, parity, sequential dump. Commands added: DP, DR, DS, MC, PT. No hardware changes. 4.04 Commands BL, DD, IM, IC added. 4.05 Hardware change: Input select circuit. 7.00 Commands added: Hardware change: ZL, ZS, ZV, OP. Tare request indicator. OP indicator. 7.10 Software change. Faster math package. none. Input selection modified. S2.00 Surface-mount revision, transzorbs, faster clock S2.01 More significant figures at UN=0 SUPPLEMENTAL INFORMATION 14-13 S2.02 Minor reset improvements after changes in configuration S2.03 Multi-drop capability added R1.00 R1.01 Hardware and Firmware revision General maintenance revision R2.00 R2.01 Support for S3 Processor General maintenance revision R3.00 Added power-saving features R4.00 R4.01 R4.02 General maintenance revision General maintenance revision General maintenance revision Different versions of the software are used for other models as follows: VERSION MODEL 60.xx Model 760 M1.02 MET3/MET3A SUPPLEMENTAL INFORMATION 14-14 APPENDIX H COMMAND LIST SAMPLE COMMANDS (May be used as global 99 commands) P1 P2 P3 P4 P5 P6 P7 Sample and send one pressure sensor period. Continuously sample and send pressure periods. Sample and send one pressure. Continuously sample and send pressure. Sample and hold one pressure. Sample and hold one pressure period. Burst and sample pressure: read temperature once; then continuously send pressure compensated using original temperature. Q1 Q2 Q3 Q4 Q5 Q6 Sample and send one temperature period. Continuously sample and send temperature periods. Sample and send one temperature. Continuously sample and send temperature. Sample and hold one temperature. Sample and hold one temperature period. DB Dump buffer. Sends values being stored. DS 10 Dump sequential. Sends stored values in sequential order. CONFIGURATION CONTROL COMMANDS BR BL ID PT 11 EW Enter baud rate. Must be global command. Locks baud rate and parity to prevent change. Must be global command. Auto-number transmitters in a loop. Must be global command. Sets transmitter parity. Must be global. Enable EEPROM write for one command. 10 NOT SUPPORTED FOR TRANMITTERS AND DEPTH SENSORS SHIPPED WITH FIRMWARE VERSIONS R1.00 - R2.01. 11 PARAMETER IS READ-ONLY, FIXED AT 8 DATA BITS, NO PARITY, AND 1 STOP BIT IN TRANSMITTERS AND DEPTH SENSORS SHIPPED AFTER 10/1/01 (FIRMWARE VERSION R1.00 AND LATER). SUPPLEMENTAL INFORMATION 14-15 REMAINING COMMANDS CANNOT BE GLOBAL PI TI PR TR UN Set or read the pressure measurement integration time Set or read the temperature measurement integration time Read/enter pressure resolution. Read/enter temperature resolution. Read/enter choice of pressure units. 0. user defined 1. psi 2. mbar or hPa UF MD 3. bar 4. kPa 5. MPa 6. in Hg 7. Torr or mm Hg 8. m H2O Read/enter user definable units. Reads or sets power-up mode. TARE AND OVERPRESSURE COMMANDS BP OP ZS ZV ZL Sound overpressure beeper. Read/enter the overpressure alarm setting. Read the position of the zero set switch. Zero value. Read the zero offset value. Zero lock. Enable or disable taring. TIME REFERENCE STAMP COMMAND TS Enables and disables the time reference stamp feature. SPECIAL DIAGNOSTIC COMMANDS MC 12 CS CT12 CX12 Memory check. Checks program PROM. Check stack of microprocessor. Check counter timebase. Check crystal of microprocessor clock. NANO-RESOLUTION COMMANDS XM IA XN 12 Resolution mode. IIR mode cut-off frequency. Number of significant digits. NOT SUPPORTED FOR TRANSMITTERS AND DEPTH SENSORS SHIPPED AFTER 10/1/01 (FIRMWARE VERSION R1.00 AND LATER). SUPPLEMENTAL INFORMATION 14-16 CALIBRATION COMMANDS WARNING!! THE FOLLOWING COMMANDS AFFECT PRESSURE TRANSDUCER ACCURACY. SN 13 PA PM TC13 Read/enter transmitter serial number. Read/enter pressure adder. Read/enter pressure multiplier. Read/enter timebase correction factor. C1 C2 C3 Read/enter C1 pressure coefficient. Read/enter C2 pressure coefficient. Read/enter C3 pressure coefficient. D1 D2 Read/enter D1 pressure coefficient. Read/enter D2 pressure coefficient. T1 T2 T3 T4 T5 Read/enter T1 pressure coefficient. Read/enter T2 pressure coefficient. Read/enter T3 pressure coefficient. Read/enter T4 pressure coefficient. Read/enter T5 pressure coefficient. U0 Read/enter U0 temperature coefficient. Y1 Y2 Y3 Read/enter Y1 temperature coefficient. Read/enter Y2 temperature coefficient. Read/enter Y3 temperature coefficient. 13 READ-ONLY FOR TRANSMITTERS AND DEPTH SENSORS SHIPPED AFTER 10/1/01 (FIRMWARE VERSION R1.00 AND LATER). SUPPLEMENTAL INFORMATION 14-17 NOTES: SUPPLEMENTAL INFORMATION 14-18 Paroscientific, Inc. th 4500 148 Avenue N.E. Redmond, WA 98052, USA Tel: (425) 883-8700 Fax: (425) 867-5407 http://www.paroscientific.com E-mail: [email protected] Doc. Number 8107-001 Rev. AG ©Paroscientific, Inc. 2013