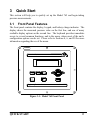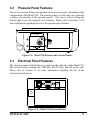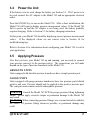
1
Paroscientific, Inc. Digiquartz® Pressure Instrumentation Model 765 Pressure Standard User Manual “The standard by which other standards are measured” Model 765 Pressure Standard User Manual DOCUMENT NO. 8005-001 REVISION D JANUARY 2012 Please visit www.paroscientific.com for the latest manual revisions. COPYRIGHT 2012 PAROSCIENTIFIC, INC. TABLE OF CONTENTS 1 2 3 4 5 6 INTRODUCTION .................................................................. 9 1.1 Conventions ...................................................................... 9 1.2 Warnings and Safety Precautions ..................................... 9 GETTING FAMILIAR ........................................................ 11 2.1 Physical Inspection ......................................................... 11 2.2 Performance, Features and Configurations .................... 11 2.3 Physical Description ....................................................... 12 QUICK START .................................................................... 13 3.1 Front Panel Features ....................................................... 13 3.2 Pressure Panel Features .................................................. 14 3.3 Electrical Panel Features ................................................ 14 3.4 Power the Unit ................................................................ 15 3.5 Applying Pressure .......................................................... 15 USER INTERFACE ............................................................. 17 4.1 Display ............................................................................ 17 4.2 Keypad ............................................................................ 17 4.3 Battery Light ................................................................... 19 4.4 Numeric Data Entry ........................................................ 19 4.5 Operating Modes ............................................................ 20 ELECTRICAL FEATURES ............................................... 22 5.1 Access Panel ................................................................... 22 5.2 Electrical Panel ............................................................... 22 5.3 Battery ............................................................................ 23 5.3.1 Charging the Battery............................................... 23 5.3.2 Determining the Charge Level ............................... 23 5.3.3 Battery Maintenance ............................................... 24 FRONT PANEL OPERATION .......................................... 25 6.1 Pressure Display Functions ............................................ 25 6.2 Second Line Display Functions ...................................... 25 v TABLE OF CONTENTS 6.3 Display Control Functions .............................................. 28 6.4 General System Settings ................................................. 29 6.5 Data Logging Features ................................................... 32 6.5.1 Overview ................................................................ 32 6.5.2 Data Logging Functions ......................................... 32 7 REMOTE OPERATION ..................................................... 36 7.1 Overview ........................................................................ 36 7.2 RS-232 Operation ........................................................... 36 7.3 USB Operation ............................................................... 37 7.3.1 Virtual COM Port Overview .................................. 37 7.3.2 Establishing USB Communications ....................... 38 7.3.3 Uninstalling VCP Drivers....................................... 39 7.4 Digiquartz Software........................................................ 40 7.4.1 Digiquartz VCP Locator ......................................... 40 7.4.2 Digiquartz Data Download ..................................... 41 7.4.3 Digiquartz Interactive 2.0 (DQI) ............................ 41 7.4.4 Digiquartz Assistant (DQA) ................................... 41 7.4.5 Digiquartz Terminal (DQT) ................................... 42 7.5 Command and Response Basics ..................................... 42 7.6 Command and Response Format .................................... 43 7.7 Establishing RS-232/USB Communications .................. 44 7.8 Setting and Reading Parameter Values .......................... 47 7.9 Command Reference ...................................................... 48 7.9.1 Enable Write Command ......................................... 48 7.9.2 Serial Communications Commands ....................... 48 7.9.3 Measurement Commands ....................................... 50 7.9.4 Pressure Rate, Trend, and Scatter Commands........ 57 7.9.5 User-Defined Commands ....................................... 61 7.9.6 Measurement Integration Time Commands ........... 65 7.9.7 Measurement Mode Commands ............................. 68 7.9.8 Minimum/Maximum Pressure Commands............. 69 vi TABLE OF CONTENTS 7.9.9 Data Output Mode Command ................................ 71 7.9.10 Unit Commands ...................................................... 72 7.9.11 Tare Commands...................................................... 74 7.9.12 Pressure Alarm Commands .................................... 75 7.9.13 Measurement Data Formatting Commands ............ 77 7.9.14 Unit Identification Commands ............................... 80 7.9.15 Display Configuration Commands ......................... 82 7.9.16 Date and Time Commands ..................................... 85 7.9.17 Data Logging Commands ....................................... 86 7.9.18 Calibration Commands ........................................... 91 7.9.19 Global Commands .................................................. 94 7.10 Networking ..................................................................... 95 7.10.1 Networking Basics.................................................. 95 7.10.2 RS-232 Serial Loop Networking ............................ 95 7.10.3 USB Networking .................................................... 97 8 PRESSURE MEASUREMENT CONCEPTS ................... 98 8.1 Measurement Basics ....................................................... 98 8.2 Measurement Types........................................................ 98 8.3 Measurement Modes .................................................... 100 8.4 Sampling Types ............................................................ 101 8.5 Tare Function................................................................ 102 8.6 Resolution, Integration Time, and Sampling Rate ....... 103 8.7 Optimizing Pressure Data Rate .................................... 105 8.8 Calculations and Formulas ........................................... 105 9 ACCESSORIES .................................................................. 107 9.1 Included Accessories .................................................... 107 9.2 Optional Accessories .................................................... 107 10 MAINTENANCE ........................................................... 109 11 CALIBRATION ............................................................. 110 11.1 Calibration Procedure ................................................... 110 vii TABLE OF CONTENTS 11.2 11.3 Zero and Span Adjustments.......................................... 110 Calibrating Other Instruments ...................................... 112 12 WARRANTY .................................................................. 113 13 SERVICE AND SUPPORT ........................................... 114 14 TROUBLESHOOTING ................................................. 115 15 DISPLAY DATA NOT AVAILABLE MESSAGE ..... 117 16 PRESSURE UNIT CONVERSION TABLE................ 118 17 GLOSSARY .................................................................... 119 18 CONNECTOR AND WIRING DIAGRAMS .............. 120 18.1 Model 765 RS-232 Port Connector .............................. 120 18.2 PC RS-232 Port Connector ........................................... 121 18.3 RS-232 Wiring.............................................................. 122 18.4 RS-232 Serial Loop Network ....................................... 122 19 FREQUENTLY ASKED QUESTIONS ....................... 123 20 QUICK REFERENCE MENU – MODEL 765............ 125 21 COMMAND AND PARAMETER REFERENCE ...... 126 viii 1 Introduction Thank you for your purchase of a Digiquartz® Model 765 Portable Pressure Standard. 1.1 Conventions The following conventions are used throughout this manual: Digiquartz Intelligent Device – A Digiquartz Intelligent Instrument or Transmitter with one or more serial data interfaces. Serial data interfaces include RS-232, RS-485 and USB. Digiquartz Pressure Transducer – A Digiquartz pressure transducer with frequency outputs. CAUTION is used to draw your attention to a situation that may result in an undesirable outcome, but will not damage the unit. WARNING is used to draw your attention to a situation that may result in permanent damage to the unit or will void the warranty. DANGER is used to draw your attention to a situation that may result in injury. Serial commands are shown in bold type. Example: P3 is the command that returns a single pressure value. Menu options are shown in bold type. Example: Sampling time is set by selecting the Sampling Time option from the System menu. This menu selection would be shown in this manual as System/Sampling Time. 1.2 Warnings and Safety Precautions The Model 765 is a precision instrument, and as such, it should be operated with a certain degree of care to ensure optimum performance. INTRODUCTION 9 WARNING Digiquartz pressure transducers are designed to operate over a specific pressure range. Calibration can be affected if this range is exceeded, and permanent damage can result if the unit is sufficiently over-pressured. A pressure relief valve may be used to guard against damage in the event that the unit is over-pressured. WARNING The Model 765 is a rugged field instrument. However, excessive mechanical shock may cause irreparable damage. Do not drop the Model 765, or allow tools or other hard objects to fall on the front panel or its pressure port. WARNING There are no user-serviceable components inside the Model 765. Disassembling the unit will void the warranty. WARNING The Model 765 is housed in a splash-resistant enclosure. It is not waterproof. Do not submerge the unit, or allow a pressurized stream of liquid to contact the unit. Do not allow liquid to accumulate on the front panel. Do not allow water or other liquids to enter the unit through the power supply storage cavity. Damage to the electronics or other system components may result. If the unit is to be used outside of a dry environment, keep the access panel closed. WARNING The Model 765 contains a sealed lead-acid battery. Do not dispose of the unit without first removing the battery. The battery should be disposed of in accordance with federal, state, and local environmental regulations. INTRODUCTION 10 2 Getting Familiar 2.1 Physical Inspection You should have received the following items with your Model 765: Model 765 Portable Pressure Standard User’s manual USB cable Universal AC adapter Menu Quick Reference Card Specification Control Drawing (SCD) for the Model 765 Certificate of Calibration Certificate of Conformance (NIST traceable) Status Report Adapter Assembly, VCO ¼” (only for units having a VCO fitting) 2.2 Performance, Features and Configurations PERFORMANCE Resolution: Better than 0.0001% of full scale Accuracy: Better than 0.008% of full scale accuracy for all ranges, except: ± 0.08 hPa of full scale for barometric pressure range 0.02% of full scale for 30,000 and 40,000 psi units FEATURES Rugged, splash-resistant plastic enclosure Intuitive front panel menu system Two-line backlit alphanumeric LCD display Menu-selectable functions: Enhanced measurement, including averaged and min/max pressures 8 standard pressure units, and 1 user-defined pressure unit Data logging Pressure rate, trend, and scatter Upper and lower pressure alarms Resolution and sampling rate GETTING FAMILIAR 11 Taring Real-time clock Password protection RS-232 and USB remote operation Powerful command set Universal AC adapter PC software for configuration, data acquisition, transfer of logged data, and diagnostics. Up to 150 hours continuous operation from internal lead acid battery Firmware may be updated via RS-232 or USB CONFIGURATIONS 19 absolute pressure ranges: 0-15 psia (0.1 MPa) to 0-40000 psia (276 MPa) 6 gauge pressure ranges: 0-15 psig (0.1 MPa) to 0-200 psig (1.38 MPa) QUALITY AND STANDARDS 2.3 CE certified NIST traceable ISO 9001 quality system Physical Description The Model 765 is a precision pressure measurement system housed in a rugged, splash-resistant enclosure. An internal Digiquartz pressure transducer and microprocessor-controlled electronics provide the pressure measurement capability. The unit is operated via the front panel user interface, consisting of a two-line backlit LCD display and membrane keyboard. The unit may also be accessed remotely via RS-232 or USB. Depending on the configuration, one or more pressure ports are conveniently located on the right side of the unit. Also on the right side, an access panel covers the electrical panel and the storage compartment for the universal AC power supply. The electrical panel features an RS-232 port, a USB port, and DC power jack. An internal valve-regulated lead acid battery provides sufficient power for up to 150 hours of continuous operation. GETTING FAMILIAR 12 3 Quick Start This section will help you to quickly set up the Model 765 and begin taking pressure measurements. 3.1 Front Panel Features The front panel contains the display, keypad, and battery charge indicator. The display shows the measured pressure value on the first line, and one of many available display options on the second line. The keyboard provides immediate access to several common functions, and to the menu, where most of the unit’s configuration options can be set. Please refer to Sections 4, 6, and 20 for more information regarding the use of the menu. BATTERY Paroscientific, Inc. HOLD ON OFF TARE UNITS ENTER FAST KEY MENU Digiquartz Portable Standard Model 765 Figure 3-1: Model 765 Front Panel QUICK START 13 3.2 Pressure Panel Features One or two pressure fittings are mounted on the pressure panel, depending on the configuration of the Model 765. The pressure panel is set into the case to provide a degree of protection to the pressure port(s). The case is relieved along the bottom edge to provide adequate tool clearance. Please refer to Section 3.5 for more information regarding the use of the pressure panel features. CAUTION NO OIL OR FLUIDS DRY GAS ONLY Figure 3-2: Model 765 Pressure and Access Panels 3.3 Electrical Panel Features The electrical panel is behind the access panel on the right side of the Model 765. The electrical panel contains the USB port, RS-232 port, and DC power jack. Please refer to Section 5.2 for more information regarding the use of the electrical panel features. Figure 3-3: Model 765 Electrical Panel QUICK START 14 3.4 Power the Unit If the battery is to be used, charge the battery per Section 5.3. If AC power is to be used, connect the AC adapter to the Model 765 and an appropriate electrical outlet. Press the ON/OFF key to turn on the Model 765. After a short initialization, the Model 765 will begin to display pressure measurement values. If the Model 765 fails to power up and the AC adapter is not being used, the battery probably requires charging. Refer to Section 5.3 for battery charging instructions. At this point, your Model 765 should be displaying correct pressure measurement values. If the displayed values are not correct, refer to Section 14 for troubleshooting tips. Refer to Section 6 for information about configuring your Model 765 to suit to your application. 3.5 Applying Pressure Now that you have your Model 765 up and running, you are ready to connect your pressure source(s) to the pressure port(s). The connections you will make depend on the type of pressure transducer in the Model 765. ABSOLUTE UNITS Units equipped with absolute pressure transducers have a single pressure port. GAUGE UNITS Units equipped with gauge pressure transducers have two pressure ports labeled positive and vent. Pressure should only be applied to the positive pressure port. The vent port must remain vented to atmospheric pressure. WARNING Consult the Model 765 SCD for proper pressure fitting tightening torque. Do not apply excessive torque or permanent damage to the Model 765 may result. WARNING When connecting pressure fittings, use a second wrench to stabilize the Model 765 pressure fitting whenever possible, or permanent damage may result. QUICK START 15 WARNING Digiquartz pressure transducers are designed to operate over a specific pressure range. Calibration can be affected if this range is exceeded, and permanent damage can result if the unit is sufficiently over-pressured. A pressure relief valve may be used to guard against damage in the event that the unit is over-pressured. CAUTION Model 765 units that are intended to be used in liquid pressure applications are oil-filled at Paroscientific. If your Model 765 is oil-filled, do not pull a vacuum or pressurize with gas, or gas bubbles may be introduced into the pressure transducer, which will negatively affect its performance. Pressure lines connected to oil-filled transducers should be filled with clean hydraulic fluid and bled to remove gas bubbles. Consult the Model 765 SCD to determine the oil to use to fill the Model 765 pressure lines. CAUTION Pressure head effects result in zero offsets. These effects are more pronounced when liquid-filled pressure lines are being used. These effects can be minimized by keeping the transducer pressure port and the pressure source at the same elevation, or by using the tare or pressure adder functions to make an offset correction to compensate for the pressure head. QUICK START 16 4 User Interface 4.1 Display The Model 765 features a 2-line, 16 character backlit alphanumeric LCD display. 4.2 Keypad The functions of the keys are as follows: ON/OFF KEY Press ON/OFF to turn the unit on. Press ON/OFF again to turns the unit off. HOLD KEY Press HOLD to hold the current display value(s). A small “H” character in the upper left corner indicates that the display hold function is active. Press HOLD again to resume live pressure value updates. WARNING Since the pressure display is not updated when the hold function is enabled, care should be taken to ensure that the monitored pressure does not exceed the Model 765 rated pressure or any applicationspecific maximum pressure. TARE KEY Press TARE to tare pressure measurements using the next pressure measurement value. A small “T” character in the upper left corner indicates that a tare pressure is being displayed. Press TARE again to disable the tare function. UNITS KEY Press UNITS to access the pressure unit menu. Press UP ARROW and/or DOWN ARROW to scroll to the desired unit. Press ENTER to select the unit, or press UNITS to exit the pressure unit menu without changing the pressure unit. The available units include psi, hPa, bar, kPa, MPa, inHg, mmHg, mH2O, and a user-defined pressure unit. USER INTERFACE 17 FAST KEY Press FAST KEY to instantly jump to a user-defined location in the menu To program the FAST KEY, enter the menu and navigate to the desired menu location. Press and hold the FAST KEY until the message “FAST KEY PROGRAMMED” is displayed. MENU KEY When in Pressure Display Mode, press MENU to enter the menu. When in the MAIN MENU, press MENU to return to pressure display mode. When in a lower-level menu, press MENU to return to the previous menu level. When in a data entry screen, press MENU to abort the edit function, and return to the previous menu level. UP ARROW KEY When in a menu, pressing UP ARROW scrolls the menu to the previous menu option. When in a data entry screen, UP ARROW increments the data value. DOWN ARROW KEY When in the menus, pressing DOWN ARROW scrolls the menu to the next menu option. When in a data entry screen, DOWN ARROW decrements the data value. LEFT ARROW KEY When in a data entry screen, LEFT ARROW moves the cursor to the left. RIGHT ARROW KEY When in a data entry screen, RIGHT ARROW moves the cursor to the right. ENTER KEY When in the menu, pressing ENTER selects the displayed menu item. When in a data entry screen, ENTER accepts the displayed value. USER INTERFACE 18 4.3 Battery Light The battery light is used while charging the battery to indicate whether the Model 765 battery is fully charged. When the light is red, the Model 765 battery is still charging. When the light is green, the battery is fully charged. NOTE: The BATTERY light is only lit when the AC adapter is being used to charge the battery. 4.4 Numeric Data Entry Many of the functions of the Model 765 require that numeric values be entered via the menu. Numbers are entered either by changing individual digits in a numeric data entry field, or by incrementing or decrementing the value in a scrolling field. NUMERIC DATA ENTRY FIELDS Numeric data entry fields allow each digit to be edited individually. The digit value is selected by using the UP ARROW and DOWN ARROW keys. The digit to be edited is indicated by a blinking cursor. The cursor is moved to the desired digit by using the LEFT ARROW and RIGHT ARROW keys. Only the applicable numbers and characters are available for each digit. Examples: If the maximum digit value is 2, the number choices will be limited to 0, 1, and 2. If the number must be positive, no negative sign will be available. Blank characters or leading zeros can be used if the desired number requires fewer digits than the field provides. The displayed value is entered by using the ENTER key. The number will not be accepted if: The number is out of range The number contains multiple negative signs, multiple decimal points, or other illegal numeric representations. Blanks or negative signs appear anywhere other that to the left of the number USER INTERFACE 19 SCROLLING NUMERIC FIELDS Scrolling numeric fields allow a number to be edited by incrementing or decrementing its value by using the UP ARROW and DOWN ARROW keys. The displayed value is entered by using the ENTER key. 4.5 Operating Modes The Model 765 operates in one of three modes: Pressure Display Mode, Data Logging Mode or Menu Mode. PRESSURE DISPLAY MODE At power-up, the Model 765 will be in Pressure Display Mode. When in Pressure Display Mode, the first line displays the following information: Pressure value Pressure unit Pressure value update indicator (blinking dot between the pressure value and pressure unit) Hold and Tare indicators The second line can display one of the following: Pressure bar graph Digiquartz pressure transducer internal temperature Pressure rate Pressure trend Pressure scatter Minimum/maximum pressure Text stored within the Model 765 External text sent to the Model 765 via the RS-232 or USB ports Current tare value No information USER INTERFACE 20 The second line also displays the following warning messages. An overpressure warning is displayed if the measured pressure exceeds the limits of the Digiquartz pressure transducer. Because of the serious nature of an overpressure condition, this message preempts the selected second line display option. A message is displayed if the Model 765 is waiting to begin data logging. This message alternates with the selected second line display option. MENU MODE Menu Mode is accessed by pressing the MENU key while in Pressure Display Mode. Most configuration options can be accessed through the menu. The menu is organized in a hierarchical fashion, as shown by the Menu Quick Reference Card and in Section 20. The keypad is used to move through the menu, make selections, and change data values. When in the menu, the Model 765 automatically switches back to Pressure Display Mode if no user input is received for two minutes. CAUTION Do not attempt to simultaneously configure the Model 765 through the RS-232 port and the menu. Doing so may cause serial commands or menu selections to be ignored. USER INTERFACE 21 5 Electrical Features 5.1 Access Panel The access panel is located to the right of the pressure panel. It provides a splash-resistant cover for the electrical panel and the AC adapter storage cavity. A quarter-turn fastener is used to lock the panel into place. TO REMOVE THE ACCESS PANEL: Turn the fastener ¼ turn counterclockwise and pull the panel to the left and toward you. TO ATTACH THE ACCESS PANEL: Grasp the access panel by the fastener, with the bail oriented vertically. Guide the access panel into place, engaging the hinge brackets with the right edge of the cavity. Press the fastener in as far as it will go, and turn the fastener clockwise ¼ turn to lock the access panel in place. WARNING The access panel provides a splash-resistant cover for the electrical panel and the AC adaptor storage cavity. The access panel is not waterproof. Reasonable care must be taken to ensure that liquid does not enter the unit, or permanent damage may result. 5.2 Electrical Panel The electrical panel features the RS-232 port, the USB port, and DC power jack. RS-232 PORT The RS-232 port is a standard female 9-pin D subminiature connector. Any standard 9-pin serial cable can be used to connect the Model 765 RS-232 port to a PC or other similar RS-232 host device. USB PORT The USB port is a standard USB-B connector. Any standard USB cable can be used to connect the Model 765 USB to a PC or other similar USB host device. A USB cable is provided with the Model 765. ELECTRICAL FEATURES 22 AC ADAPTER JACK The AC adapter jack is only intended for use with the AC adapter supplied with the Model 765. WARNING Use of an AC adapter other than the supplied unit may damage the Model 765. 5.3 Battery The Model 765 features a valve regulated lead-acid battery as its primary power source. The Model 765 can also be powered by the AC power supply that is provided with the unit. A fully charged battery provides up to 150 hours of operation. 5.3.1 Charging the Battery It can take up to 30 hours to charge a fully discharged battery. The procedure for charging the battery is as follows: Connect the AC adapter to the Model 765 and to an appropriate electrical outlet. Power off the Model 765 using the ON/OFF key. Monitor the BATTERY light on the front panel – the light is red when the battery is charging, and becomes green when the battery is fully charged. It is not possible to overcharge the battery. NOTE: Make sure the unit is powered off whenever the battery is being charged. The Model 765 cannot fully charge its battery when it is powered on. DANGER The access panel must be removed whenever the battery is being charged. Care must also be taken to ensure that the access panel cavity is not blocked while the battery is being charged. 5.3.2 Determining the Charge Level The battery charge level is displayed using menu option System/Battery Charge. ELECTRICAL FEATURES 23 NOTE: It is not possible to display the charge level while the battery is charging. If you wish to determine the battery charge level while charging the battery, temporarily disconnect the AC adapter first. 5.3.3 Battery Maintenance Lead-acid batteries provide longer service if they are kept fully charged as often as possible. It is recommended that the battery be fully charged after each use. This will promote long battery life, minimize the need for lengthy battery charging cycles, and ensure that the Model 765 is always ready to be used. ELECTRICAL FEATURES 24 6 6.1 Front Panel Operation Pressure Display Functions PRESSURE Menu option: Display/Line 1 Display/Pressure The Pressure function displays individual real-time pressure measurement values in the current pressure unit. Pressure values are displayed on first line. AVERAGED PRESSURE Menu option: Display/Line 1 Display/Avg. Pressure The Averaged Pressure function displays the average of 3 or more pressure measurement values in the current pressure unit. The number of pressure values averaged is set using the System/Num. P Points menu option. Averaged pressure values are displayed on first line. No averaged pressure value will be displayed until the specified number of pressure measurements has been taken. If continuous pressure measurement is interrupted, no averaged pressure value will be displayed until the specified number of pressure measurements has been taken. Pressing the LEFT ARROW or RIGHT ARROW keys will reset the averaged pressure function. NOTE: The averaged pressure function is disabled when data logging is underway. 6.2 Second Line Display Functions CURRENT TARE VALUE Menu option: Display/Line 2 Display/Cur. Tare Value The Current Tare Value function displays the current tare value in the current pressure unit. PRESSURE RATE Menu option: Display/Line 2 Display/P Rate FRONT PANEL OPERATION 25 The pressure rate function displays a pressure rate value in the current pressure unit per minute or per second. When selected, the user is prompted to specify the desired unit. If current pressure unit per minute is specified, the user is prompted to enter a smoothing factor value. The smoothing factor helps to prevent pressure fluctuations from producing erratic pressure rate values. This is generally the result of extrapolation when the sampling rate is much less than one minute, as is typical in most applications. The smoothing factor is adjustable from 1 to 200, with 1 being no smoothing and 200 being the highest degree of smoothing available. It should be noted that as the smoothing factor is increased, the sensitivity to step-changes in input pressure are decreased. PRESSURE TREND Menu option: Display/Line 2 Display/P Trend The pressure trend function displays the pressure trend value in the current pressure unit per minute or per second. When selected, the user is prompted to specify current pressure unit per second or per minute. The pressure trend is calculated by finding the slope of a best-fit straight line through a user-selectable number of measured pressure values. The number of pressure values is set using the System/Num. P Points menu option. No pressure trend value will be displayed until the specified number of pressure measurements has been taken. If continuous pressure measurement is interrupted, no pressure trend value will be displayed until the specified number of pressure measurements has been taken. Pressing the LEFT ARROW or RIGHT ARROW keys will reset the pressure trend function. PRESSURE SCATTER Menu option: Display/Line 2 Display/P Scatter The pressure scatter function displays the pressure scatter value and a stable pressure indicator. When selected, the user is prompted to set a stability setpoint. Whenever the pressure scatter is less than or equal to the specified stability setpoint, the stable pressure indicator (*) is displayed to the right of the pressure scatter value. FRONT PANEL OPERATION 26 The pressure scatter value is calculated by finding the standard deviation of a user-selectable number of measured pressure values. The number of pressure values is set using the System/Num. P Points menu option. No pressure scatter value will be displayed until the specified number of pressure measurements has been taken. If continuous pressure measurement is interrupted, no pressure scatter value will be displayed until the specified number of pressure measurements has been taken. Pressing the LEFT ARROW or RIGHT ARROW keys will reset the pressure scatter function MINIMUM / MAXIMUM PRESSURE Menu option: Display/Line 2 Display/Min Max P The minimum / maximum pressure function displays the minimum or maximum pressure in the current pressure unit since the last reset event. The UP ARROW and DOWN ARROW keys are used to toggle between minimum and maximum pressure. When a reset event occurs, minimum and maximum pressure are set to the next pressure measurement value. Reset events include power cycle, explicit reset via the System/Reset Min Max P menu option, explicit reset via serial command, tare on, tare off, change in tare value, and change in calibration coefficients. NOTE: Minimum and maximum pressures are recorded from individual pressure measurements, not from averaged pressures. BAR GRAPH Menu option: Display/Line 2 Display/Bar Graph The bar graph function displays pressure as a percentage of full-scale pressure. SENSOR TEMPERATURE Menu option: Display/Line 2 Display/Sensor Temp The sensor temperature function displays the sensor temperature in the selected temperature unit. When selected, the user is prompted to specify the pressure unit in °F or °C. NOTE: Sensor temperature is not an accurate indication of the temperature outside the Model 765. FRONT PANEL OPERATION 27 STORED TEXT Menu option: Display/Line 2 Display/Stored Text The stored text function displays the text defined using the UL serial command. This function is useful when static text is to be displayed. WARNING Avoid using the stored text function to display dynamic text. The EEPROM used to store the text has a maximum rating of 1,000,000 writes. If this number is exceeded, it will no longer be possible to update the value of UL. EXTERNAL TEXT Menu option: Display/Line 2 Display/External Text The external text function displays the text defined using the DT serial command. This function is useful when dynamic text is to be displayed. The text is temporarily stored in volatile memory, and is lost when the Model 765 is powered off. DISABLE Menu option: Display/Line 2 Display/Disable The disable function displays nothing on the second line. messages will be displayed as required on the second line. 6.3 Only warning Display Control Functions BACKLIGHT DISABLE Menu option: Display/Backlight/Disable The backlight disable function turns the backlight off. This function is useful when the user wishes to extend the battery life as long as possible. BACKLIGHT ENABLE Menu option: Display/Backlight/Enable The backlight enable function turns the backlight on. BACKLIGHT TIMEOUT Menu option: Display/Backlight/Timeout The backlight timeout function automatically turns the backlight off after the specified time has elapsed. The backlight is turned on whenever a key is pressed. This function is useful when the user wishes to extend the battery life, but still desires the backlight feature. FRONT PANEL OPERATION 28 DECIMAL DIGITS Menu option: Display/Decimal Digits Specifies the number of significant digits used to display pressure measurement values. Fewer significant digits will be displayed if the pressure resolution and/or pressure unit will not provide the specified number of significant digits. When the number of digits is set to 6, the maximum number of significant digits is always displayed. DISPLAY CONTRAST Menu option: Display/Contrast Sets the display contrast. This feature can be used to adjust the display contrast to suit various lighting conditions. Increasing the contrast value decreases the contrast; decreasing it increases the contrast. 6.4 General System Settings SAMPLING TIME Menu option: System/Sampling Time Sets the sampling time for pressure measurements. Sampling time can be set from 0.02 to 131.06 seconds in 0.02-second increments. RESET MINIMUM / MAXIMUM PRESSURE Menu option: System/Reset Min/Max P Reset the minimum and maximum pressure values to the next measured pressure value. BATTERY CHARGE LEVEL Menu option: System/Battery Charge Displays the battery charge level as a percentage of full charge. NOTE: Due to the nature of lead-acid batteries, the charge level is an estimate, and is generally accurate to within 10%. NOTE: It is not possible to display the charge level while the battery is charging. If you wish to determine the battery charge level while charging the battery, temporarily disconnect the AC adapter first. FRONT PANEL OPERATION 29 UPPER ALARM SETPOINT Menu option: System/Alarm Setpoints/Upper Setpoint Sets the upper alarm setpoint. Whenever the measured pressure exceeds the upper alarm setpoint, the Model 765 emits an audible alarm and displays a message. The alarm can be silenced and the message cleared for one minute by pressing the ENTER key. The alarm will automatically clear if the measured pressure drops below the upper alarm setpoint. NOTE: It is not possible to set the upper alarm setpoint to a value less than the lower alarm setpoint. LOWER ALARM SETPOINT Menu option: System/Alarm Setpoints/Lower Setpoint Sets the lower alarm setpoint. Whenever the measured pressure is less than the lower alarm setpoint, the Model 765 emits an audible alarm and displays a message. The alarm can be silenced and the message cleared for one minute by pressing the ENTER key. The alarm will automatically clear if the measured pressure rises above the lower alarm setpoint. NOTE: It is not possible to set the lower alarm setpoint to a value greater than the upper alarm setpoint. NUMBER OF PRESSURE DATA POINTS Menu option: System/Num. P Points Sets the number of pressure measurements used to calculate averaged pressure, pressure trend, and pressure scatter. The range is 3 to 20. UNIT ID NUMBER Menu option: System/Communication/Unit ID Sets the unit ID number. This number is used to address an individual unit when multiple Digiquartz Intelligent Devices are connected together in a serial loop network. The range is 01 to 98. BAUD RATE Menu option: System/Communication/Baud Rate Sets the serial baud rate. The available baud rate options are 300, 600, 1200, 2400, 4800, 9600, 19200, 38400, 57600, and 115200 baud. FRONT PANEL OPERATION 30 SET DATE AND TIME Menu option: System/Set Date/Time Sets the current date and time. The date and time are set using the current date and time format. NOTE: If the unit completely loses power (battery is completely discharged and the AC adapter is not supplying power), the unit will lose its date and time settings. A message at power-up will alert the user if the date and time have been lost. DATE FORMAT Menu option: System/Date Format Sets the date format. The available options are MM/DD/YY and DD/MM/YY. TIME FORMAT Menu option: System/Time Format Sets the time format. The available options are 12-hour (includes AM or PM) and 24-hour. PASSWORD Menu option: System/Password Sets the system password. Selects the password required to change settings within the Menu. When the password value is 0000, the password function is disabled, and no password is required to change settings. When the password value is non-zero, the password will be requested each time a setting is to be changed. If the proper password is entered, the setting can be changed; if not, you will be returned to the menu. Contact Paroscientific if you are unable to configure your Model 765 due to a lost password. VERSION INFORMATION Menu option: System/Version Displays firmware and unit identification information. The UP ARROW and DOWN ARROW keys are used to scroll through the various display options. Available options include firmware version, firmware checksum, firmware release date, model number, and serial number. FRONT PANEL OPERATION 31 6.5 6.5.1 Data Logging Features Overview The Model 765 has the ability to store up to 327,680 pressure measurements in its internal non-volatile memory. Each pressure measurement is stored with a date and time stamp, the pressure unit, and a tare indicator. Logged data may be viewed from the front panel, or may be transferred to a PC using the Digiquartz Data Download software included with the unit. The logged data can then be stored on the PC in a comma-delimited text file format suitable for import into Microsoft Excel® or other common analysis software. Data logging can be commanded to start immediately, or can be programmed to begin and end at a future date and time. The Model 765 can be configured to stop logging when its memory is full, or to continue logging, overwriting the oldest stored data with new data. A burst mode is also available, which logs pressure measurement values at the shortest possible interval whenever a pressure change greater than a user-specified magnitude is detected. When data logging begins, the logged data is appended to any data still in memory. Logged data is only deleted upon request, or when data is overwritten after the memory has become full. When the Model 765 is logging data, or is waiting to begin logging, the user interface and serial ports are not available. If a key is pressed, the unit will give the option to resume or abort data logging. Serial commands (with the exception of the LK Abort Data Logging command) will not be carried out, and will return the message “BUSY LOGGING”. When data logging ends, the user interface and serial ports resume normal operation. 6.5.2 Data Logging Functions START LOGGING IMMEDIATELY Menu option: Data Logging/Start Logging/Immediate Begins logging data immediately. The user is prompted for the following data: Logging Interval – Range: 00:00:00 to 24:00:00. If an interval of 00:00:00 is entered, the Model 765 will acquire pressure measurements at the current sampling rate. FRONT PANEL OPERATION 32 Once the time interval is entered, data logging begins, as indicated by the small “L” character displayed to the left of the pressure value. Data logging can be aborted at any time by pressing any key. The user is then given the option to resume or abort data logging. NOTE: If averaged pressure is being displayed when data logging begins, the Model 765 will temporarily switch to individual pressure display and will log individual pressure values. When data logging is complete, the unit will revert back to averaged pressure display. NOTE: If the Model 765 is powered off while data logging is underway, logging will be aborted, and will not resume when the unit is subsequently powered on. START LOGGING AT A FUTURE DATE AND TIME Menu option: Data Logging/Start Logging/Programmed Begins data logging at a user-specified date and time, and stops logging at a userspecified date and time. The user is prompted for the following data: Start Date – Must be the current date or later Start Time – Must be the current time or later End Date – Must be current date or later End Time – Must be later than the Start Time. Logging Interval – Range: 00:00:00 to 24:00:00. If an interval of 00:00:00 is entered, the Model 765 will acquire pressure measurements at the current sampling rate. Once the required setup data has been entered, the unit waits until the start date and time to begin data logging. During this time, the message “Waiting to Log” is alternately displayed on the second line. When data logging begins, the message is no longer displayed, and a small “L” character displayed to the left of the pressure value indicates that data logging is in progress. Data logging can be aborted at any time by pressing any key. The user is then given the option to resume or abort data logging. FRONT PANEL OPERATION 33 NOTE: If averaged pressure is being displayed when data logging begins, the Model 765 will temporarily switch to individual pressure display and will log individual pressure values. When data logging is complete, the unit will revert back to averaged pressure display. NOTE: If the Model 765 is powered off while data logging is underway, logging will be aborted, and will not resume when the unit is subsequently powered on. If the Model 765 is powered off before programmed data logging begins, and is powered on before specified the start date and time, data logging will still begin at the specified start date and time. VIEW LOGGED DATA Menu option: Data Logging/View Data Displays logged data, starting at the first pressure value. The data display can be controlled as follows: UP ARROW - Displays the next pressure value DOWN ARROW - Displays the previous pressure value LEFT ARROW/RIGHT ARROW – Toggles between date/time and data point number display. When displaying the first pressure value, pressing DOWN ARROW moves to the last pressure value. When displaying the last pressure value, pressing UP ARROW moves to the first pressure value DELETE LOGGED DATA Menu option: Data Logging/Delete Data Deletes all logged data currently in memory. DISPLAY AVAILABLE MEMORY Menu option: Data Logging/Avail. Memory Displays the number of data points that can be stored in available memory. The Model 765 can store up to 327,680 pressure measurement values. BURST MODE ENABLE Menu option: Data Logging/Burst Mode/Enable When data logging is underway and Burst Mode is enabled, the Model 765 begins to acquire pressure measurements at the current sampling rate, overriding the Logging Interval setting, when the absolute value of the measured pressure FRONT PANEL OPERATION 34 rate exceeds a user-specified Trigger Rate. Once triggered, data is acquired in Burst Mode for the user-specified Timeout Period. If Burst Mode data acquisition is already underway, and the measured pressure rate again exceeds the Trigger Rate, Burst Mode is re-triggered, and is extended by the Timeout Period. When the Timeout Period expires, data is once again logged according to the Logging Interval setting. When Burst Mode is enabled, the user is prompted for the following data: Trigger Rate – The Trigger Rate is specified in the current pressure unit per minute. Timeout Period – The Timeout Period is expressed in HH:MM:SS format. The range is 00:00:01 to 24:00:00. NOTE: Burst Mode Enable does not initiate data logging. It only affects the way data is logged. BURST MODE DISABLE Menu option: Data Logging/Burst Mode/Disable Disables Burst Mode. WRAPAROUND ENABLE Menu option: Data Logging/Wraparound/Enable When wraparound is enabled, the oldest logged data in memory is overwritten after the memory becomes full. WRAPAROUND DISABLE Menu option: Data Logging/Wraparound/Disable When wraparound is disabled, data logging is aborted when the memory becomes full. FRONT PANEL OPERATION 35 7 7.1 Remote Operation Overview The Model 765 can be operated either as a stand-alone unit, or as part of a computer-based data acquisition system via its RS-232 and USB serial communications ports. Virtually all of the Model 765 functionality is available via the RS-232 and USB ports. You can communicate with a single Model 765, or with multiple units connected in an RS-232 serial loop or USB network. ASCII text commands are used to communicate remotely with the Model 765. Please refer to Sections 7.5, 7.6, and 7.9 for detailed command information. The Unit ID is used in commands to specify the Model 765 that is to carry out the command. You can determine and/or set the unit ID by using the Settings/Communication/Unit ID menu option. The Model 765 supports standard baud rates between 300 and 115,200 baud. The RS-232 serial protocol is fixed at 8 data bits, no parity, and 1 stop bit. You can determine and/or set the baud rate by using the Settings/Communication/Baud Rate menu option. 7.2 RS-232 Operation No special configuration is required to access the Model 765 via the RS-232 port. Simply connect its industry-standard RS-232 port to the RS-232 port of your host device, set your host software or device to match the Model 765 baud rate and serial protocol, and you are ready to begin sending commands. The Model 765 RS-232 port is directly compatible with that of the PC. Any standard male to female 9-pin serial cable can be used to make the necessary connections. WARNING Do not attempt to simultaneously access the Model 765 through the RS-232 port and the menu. Doing so may cause serial commands or menu selections to be ignored. REMOTE OPERATION 36 7.3 7.3.1 USB Operation Virtual COM Port Overview VIRTUAL COM PORT (VCP) DRIVER The Model 765 is supplied with drivers that are used to interface the Model 765 to a Windows PC via a Virtual COM Port (VCP). The VCP driver enables standard PC terminal programs and RS-232 based PC software to be used for USB operation. This greatly simplifies the task of communicating with the Model 765 via USB. A VCP allows the PC USB ports to appear as standard RS-232 COM ports to the user. Windows application software uses the VCP in the same manner as a physical COM port. The only significant difference is that there is no physical port associated with each VCP, as there would be with a standard RS-232 or other COM port. When a new unit is first detected, the VCP drivers assign each Model 765 its own unique VCP. This enables multiple Model 765 units to be connected to a single PC USB port by using a USB hub. Once assigned, each VCP continues to be associated with a particular Model 765 until the driver software is uninstalled. If a Model 765 is disconnected from the PC USB port, Windows will disable its associated VCP, but will not delete it. When that same Model 765 is reconnected to the PC USB port, Windows will reenable the originally assigned VCP. Example: Let us consider a typical PC with a single physical RS-232 port assigned to COM1. When a Model 765 (Serial # 98765) is first connected to the PC, VCP COM2 is assigned to the unit. If another Model 765 (Serial # 12345) is connected to the PC, it will be assigned to VCP COM3. If both units are disconnected from the PC and later re-connected, Model 765 (Serial # 98765) will still be assigned to COM2, and Model 765 (Serial # 12345) will still be assigned to COM3. REMOTE OPERATION 37 7.3.2 Establishing USB Communications The following steps must be completed to establish USB communications between the Model 765 and a Windows PC: Step 1 - Install the Virtual COM Port (VCP) driver Step 2 - Determine the VCP assigned to the Model 765 Step 3 - Use the assigned VCP number, baud rate, and unit ID to configure the PC software to be used to communicate with the Model 765 Step 1 – Install VCP and USB Serial Drivers Download the latest VCP and USB Serial drivers from www.paroscientific.com. Once downloaded, unzipping the file will create the folder “VCP Drivers.” The drivers are compatible with Windows XP, Windows 2000, and Windows 98 SP2 (note that Windows Vista and 7 have intrinsic VCP drivers so no installation is required). WINDOWS XP 1. 2. 3. 4. 5. Connect the Model 765 USB port to a PC USB port using the supplied USB cable. Windows XP will detect the unit and run the Found New Hardware wizard. If the wizard asks to connect to Windows update to search for the driver, click on “No, not this time”, and click on “Next”. Click on “Install from a list or specific location”, and click on “Next”. Select “Search for the best driver in these locations”. Select “Include this location in the search”, and click Browse. Select the folder location for the unzipped VCP driver. Click on “OK”. Click on “Next”. Click on “Finish” to complete the installation of the VCP driver. Repeat Steps 2-4 to install the USB Serial driver. The Windows XP PC is now ready to communicate via USB with the Model 765. WINDOWS 2000 / 98 SP2 For legacy Windows 2000 or 98 SP2 installations, installation is similar to that for XP. Please follow the onscreen instructions for New Hardware Wizard to complete installation. REMOTE OPERATION 38 Step 2 - Determine the VCP assigned to the Model 765 As explained in the beginning of this section, the VCP driver will create a Virtual COM Port for each Model 765 that is connected to the PC. Before you can communicate with a Model 765 via USB, you will need to know the following The Virtual COM PORT (VCP) number assigned to the Model 765. The VCP baud rate The unit ID number of the Model 765 The easiest way to determine these values is to download and run the Model 765 VCP Locator software utility from our website www.paroscientific.com. Refer to Section 7.4.1 for Model 765 VCP Locator installation and operating instructions. NOTE: The VCP driver assigns a unique Virtual COM Port for each Model 765. Therefore, it is only necessary to determine the VCP when a Model 765 is initially connected to a particular PC, or if the VCP drivers are uninstalled and reinstalled. Step 3 – Run PC software IF YOU ARE USING DIGIQUARTZ SOFTWARE Install the desired software as described in Section 7.4. Run the software, and configure it with the information obtained in Step 2. IF YOU ARE USING A GENERIC TERMINAL PROGRAM OR CUSTOM SOFTWARE You must configure your software per the VCP number and baud rate from Step 2. When creating serial commands to send to the Model 765, it is necessary to use the unit ID number from Step 2. See Sections 7.5, 7.6, and 7.9 for detailed information about serial commands. 7.3.3 Uninstalling VCP Drivers If you need to uninstall the VCP drivers: 1. Make sure that all Model 765 units are disconnected from the PC USB port(s). REMOTE OPERATION 39 2. Download and run the program Ftdiunin.exe from our website www.paroscientific.com. You will need to reinstall the VCP drivers to once again communicate with a Model 765 via USB. 7.4 Digiquartz Software Paroscientific provides several software programs that simplify common measurement and configuration tasks. The latest versions of these and other software programs are available at the Paroscientific web site at www.paroscientific.com. NOTE: The VCP drivers must be installed before Digiquartz software can be used with USB. Please refer to Section 7.3 for more information. 7.4.1 Digiquartz VCP Locator OVERVIEW Digiquartz VCP Locator helps you to easily determine the Virtual COM Port number that is associated with each Model 765 connected to the PC’s USB port(s). This software is normally useful only if USB is being used to communicate with the Model 765. HOW TO USE DIGIQUARTZ VCP LOCATOR 1. 2. 3. Ensure that the Model 765(s) is/are connected to the PC USB port(s). If a USB hub is being used, ensure that the hub is powered up. Press the ON/OFF key to power up the Model 765(s). Run the Model 765 VCP Locator software, and click on the Start button. The software will search all COM ports (both physical and VCP) for Model 765 units. The COM port number, unit serial number, unit ID, and baud rate will be reported for each Model 765 detected. This information can then be used to configure the desired PC software for communication with the Model 765(s). REMOTE OPERATION 40 7.4.2 Digiquartz Data Download OVERVIEW Digiquartz Data Download provides access to the logged data stored in the Model 765. The logged data may be transferred to a PC, and stored in a commaseparated value (CSV) format that can be easily imported into Microsoft Excel or other common software programs. HOW TO USE DIGIQUARTZ DATA DOWNLOAD 1. 2. 3. 4. 7.4.3 Connect the Model 765 to the PC, via either RS-232 or USB. Press the ON/OFF key to power up the Model 765. Set the Unit ID and baud rate values to match the Model 765. Set the COM port value to the COM port or VCP being used. Click the Start Download button, and specify the desired filename. Click the Ok button to begin the download. The download process can take several minutes, depending on the amount of data being downloaded and the baud rate. The Cancel Download button can be clicked at any time during the download to abort the process. Digiquartz Interactive 2.0 (DQI) OVERVIEW Digiquartz Interactive 2.0 (DQI) is a Windows program that makes it easy to communicate with and configure Digiquartz Intelligent Devices. We encourage you to install and use DQI to verify proper remote operation, configure your device, take measurements, and experiment with its functions. HOW TO USE DQI Refer to the help function in DQI for more information. 7.4.4 Digiquartz Assistant (DQA) OVERVIEW Digiquartz Assistant is a Windows data logging program. With DQA, you can log time-stamped measurement data from up to 8 Digiquartz Intelligent Devices. Measurement data can also be displayed in real time in an automatically scaled graph. Data is stored to a text file in a format that can easily be imported into popular PC programs such as Microsoft Word or Excel. REMOTE OPERATION 41 HOW TO USE DQA Refer to the help function in DQA for more information. 7.4.5 Digiquartz Terminal (DQT) OVERVIEW Digiquartz Terminal is a Windows terminal program that was developed specifically for use with Digiquartz Intelligent Devices. Like traditional terminal programs, Digiquartz Terminal lets you interactively communicate with Digiquartz Intelligent Devices. In addition, Digiquartz Terminal can log timestamped measurement data to a text file in a format that can easily be imported into popular PC programs such as Microsoft Word or Excel. HOW TO USE DQT Refer to the help function in Digiquartz Terminal for more information. 7.5 Command and Response Basics ASCII text commands are used to communicate remotely with the Model 765. The following basic tasks can be performed by sending the appropriate command: Take a measurement Perform a control function, such as locking the baud rate Set or read the value of an operating parameter, such as integration time Measurement commands typically generate a response that contains the measurement data. Parameter-set commands typically generate a response that reports the updated parameter value. Parameter-read commands report the current parameter value. When setting virtually all parameter values, you must precede the command with an EW command. This reduces the likelihood of accidental alteration of stored parameter values. Please refer to paragraphs 7.9.1 for more information about the EW command. When a command is received, any command that is in progress will be aborted. This enables you to send an RS-232 command to the Model 765 at any time, regardless of its current activity. REMOTE OPERATION 42 7.6 Command and Response Format Commands sent to and responses received from the Model 765 are very similar, and are made up of the following: START CHARACTER The start character is an asterisk (ASCII 42). DESTINATION ID The destination ID is the unit ID number of the device that is to receive the command or response. It is a two-digit integer between 00 and 99. ID 00 is reserved for the serial host, usually a PC. SOURCE ID The source ID is the unit ID number of device that is sending the command or the response. It is a two-digit integer between 00 and 98. ID 00 is reserved for the serial host, usually a PC. COMMAND OR RESPONSE DATA A wide variety of commands and resulting response data are possible, depending on the particular command used. Refer to Section 7.9 for detailed information. TERMINATION CHARACTERS All commands must terminate with a carriage return (ASCII 13 decimal) followed by a linefeed (ASCII 10 decimal). REMOTE OPERATION 43 COMMAND FORMAT Commands are typically sent in the following format. The P3 command will be used in this example. *0100P3CrLf Where: * = Start character 01 = Destination ID 00 = Source ID P3 = Command Cr = Carriage return Lf = Linefeed character Asterisk, ASCII 42 Unit ID of the Model 765 that is to receive the command. Unit ID of the device that is sending the command (Serial host is ID 00) P3 is an example. Refer to paragraph 7.9 for descriptions of the entire command set. ASCII 13 decimal ASCII 10 decimal RESPONSE FORMAT Responses are typically received in the following format: *000114.4567CrLf Where: * = Start character 00 = Destination ID 01 = Source ID 14.4567 = Data Cr = Carriage return Lf = Linefeed character Asterisk, ASCII 42 Unit ID of the serial host that is to receive the response. Unit ID of Model 765 that is responding Data sent in response to prior command) ASCII 13 decimal ASCII 10 decimal These examples are typical, but other response forms exist. Refer to Section 7.9 for specific details regarding each available command. 7.7 Establishing RS-232/USB Communications The following are two methods of establishing and verifying RS-232 or USB communications between the Model 765 and a PC running Microsoft Windows®. REMOTE OPERATION 44 USING DIGIQUARTZ INTERACTIVE SOFTWARE The easiest way to establish RS-232/USB communications is by using Digiquartz Interactive 2.0 (DQI) software. Step 1. Connect the Model 765 to the PC RS-232: Connect the Model 765 RS-232 port to the PC RS-232 port using a standard 9-pin serial cable. USB: Install USB driver per Section 7.3. Connect the Model 765 USB port to the PC USB port using the USB cable supplied with the unit (PN 6785-001). Any standard USB-A to USB-B cable can also be used. Step 2. Install DQI 2.0 Download the latest version of the DQI software from our website www.paroscientific.com. To install the program, please run the executable from the download location on your PC. Step 3. Run DQI 2.0 Power up the Model 765, and run DQI. At the Startup screen, select Configuration and Monitoring and click Next. Set the Search Type to RS232/USB. If the COM port number is known, set COM Port to that value; if the COM port number is unknown, set COM Port to All. Set Baud Rate to All. Click Begin Search. DQI will attempt to detect the Model 765, and if successful, will display its serial number and communications parameters. Click Next to proceed. Select the Numerical Display tab. Click Start to begin acquiring and displaying pressure measurements. If DQI fails to detect the Model 765, check for correct wiring and ensure that the Model 765 is powered. USING A TERMINAL PROGRAM A standard terminal program can also be used to establish RS-232 or USB communications with the Model 765. Digiquartz Terminal (DQT) software can be used for this purpose. Alternately, the Terminal portion of DQI 2.0 can also be used. REMOTE OPERATION 45 Step 1. Connect the Model 765 to the PC RS-232: Connect the Model 765 RS-232 port to the PC RS-232 port using a standard 9-pin serial cable. USB: Install USB driver per Section 7.3. Connect the Model 765 USB port to the PC USB port using the USB cable supplied with the unit (PN 6785-001). Any standard USB-A to USB-B cable can also be used. Step 2. Install DQT The latest version of DQT software can be downloaded from our website www.paroscientific.com. To install the program, please run the executable from the download location on your PC. Any other terminal program already installed on your PC can also usually be used. Step 3. Determine the current baud rate and ID settings of your Model 765 Power up the unit, and press the MENU key to enter the menu. Using the UP and DOWN ARROW keys, scroll to System Menu and select it using the ENTER key. Scroll to Communications and select it using the ENTER key. Scroll to Unit ID and select it using the ENTER key. Note the unit ID number displayed – you will need the unit Id when sending serial commands. Press the MENU key to return to the Communication Menu. Scroll to Baud Rate, and select it using the Enter key. Note the baud rate; you may change the baud rate using the UP ARROW and DOWN ARROW keys. Press the ENTER key to return to Pressure Display mode. Step 4. Configure the terminal program Set the COM port to the PC COM port number that you are using. Set the baud rate to match the Model 765. Set the communications protocol to 8 data bits, no parity, and 1 stop bit. If DQT is not being used, it is often necessary to configure the terminal program to append a line feed character to each carriage return character. At this point, the terminal program should be able to communicate with the unit using the unit ID noted in Step 3. Refer to Section 7.9 for detailed command and response information. Refer to the DQT reference feature for detailed information about using DQT. REMOTE OPERATION 46 7.8 Setting and Reading Parameter Values The behavior of the Model 765 is controlled by several operating parameters. The values of these parameters are stored in non-volatile memory. Serial commands are provided to set and read the parameters values. Refer to Section 7.9 for detailed information about the various parameter commands. SETTING PARAMETER VALUES Each parameter-set command must be preceded with the EW enable write command. The purpose of this is to reduce the chance of changing a parameter value by mistake. Parameter set commands will be ignored unless they are preceded with an EW command. See Section 7.9.1 for more information about the EW command. The following is an example of a parameter-set command preceded with the EW command. For this example, the UN (pressure unit) parameter will be set to a value of 1. Command: Response: *0100EW*0100UN=1CrLf *0001UN=1CrLf All other writable parameters are set in the same way. Some parameters are readonly and cannot be set. READING PARAMETER VALUES The following is an example of a parameter-read command. For this example, the UN (pressure unit) parameter will be read. Command: Response: *0100UNCrLf *0001UN=1CrLf CAUTION Repeatedly setting or reading parameter values may temporarily prevent the display from being updated. REMOTE OPERATION 47 7.9 7.9.1 Command Reference Enable Write Command When setting virtually all parameter values, you must precede the parameter set command with an EW (enable write) command. Parameter set commands will be ignored unless they are preceded with an EW command. EW Enables the next parameter set command to write a new value into nonvolatile memory. You can issue EW as a separate command by terminating it with a carriage return/line feed, or you can string the EW and parameter set commands together, as shown below. Typical syntax: Alternate syntax: *0100EW *0100TR=800 *0100EW *0100TR=800 NOTE: EW is only necessary when using commands to set a parameter value. It is not necessary to use EW to read a parameter value, or when using measurement commands. 7.9.2 Serial Communications Commands The serial communications commands enable the baud rate and device ID to be set via the RS-232 or USB ports. BR Set the RS-232 and USB baud rate. Each individual port can be independently set to its own baud rate. Action: The BR command is used to set the baud rate of the RS-232 and USB ports. The BR command must be addressed to 99, the global ID. This ensures that all units on a network are set to the same baud rate. It is not possible to read the baud rate value. There are three options for the BR command. BR sets the baud rate of both ports. BR1 sets the baud rate of the RS-232 port only, and does not affect the USB port. BR2 sets the baud rate of the USB port only, and does not affect the RS-232 port. REMOTE OPERATION 48 The BR command is unique in that it does not need to be preceded by an EW command. Values: 300, 600, 1200, 4800, 9600, 19200, 38400, 57600, and 115200 Default: 9600 Typical set command: *9900BR=19200 (both ports set to 19200) Alternate set command: *9900BR1=19200 (RS232 port set to 19200) Alternate set command: *9900BR2=19200 (USB port set to 19200) Typical set response: *9900BR=19200 CAUTION Be careful to only set the baud rate to a value supported by your serial host! If you accidentally set the baud rate to an unsupported value and subsequently lose serial communications, use a PC and the DIGIQUARTZ Terminal program to establish communications and restore the baud rate to a supported value. BL Set or read the Baud Lock parameter. Action: The BL command is used to prevent an accidental change of baud rate. The BL command must be preceded with an EW command. The BL set command must be addressed to 99, the global ID; this ensures that all units on a network are set to the same baud lock state. Values: 0 = Baud rate can be changed with BR command. 1 = BR command is ignored. Default: 0 Typical set command: *9900EW*9900BL=1 Typical set response: *9900EW (Echoed EW command) *0001BL=1 (Response from device) *9900BL=1 (Echoed command) Typical read command: *0100BL Typical read response: *0001BL=1 NOTE: The BL command affects both the RS-232 and the USB ports. REMOTE OPERATION 49 ID Set the unit ID. Typical command: Typical response: *9900ID *9901ID ID must be sent to the global ID 99. RS-232 USAGE ID sets the ID of the first unit to the source ID + 1. The unit then responds by incrementing the source ID. Thus, if used in an RS-232 serial loop network, ID will set all units on the serial loop to unique ID values in ascending order, starting with the command source ID + 1. See Section 7.10 for more information regarding serial loop networking. USB USAGE Use of the ID command is not recommended for USB applications. Set the unit ID via the menu. See Section 6.4 for more information. NOTE: It is generally simpler to set the unit ID via the menu. See Section 6.4 for more information. 7.9.3 Measurement Commands The following commands are used to initiate measurements, and to control measurement integration time. 7.9.3.1 Single Measurement Commands The following commands are used to initiate single measurements. They return the resulting measurement value as soon as it is available. P3 Sample and send one pressure measurement Action: Measure temperature period, measure pressure period, calculate temperature-compensated pressure, send pressure value, and await next command. Unit: As specified by UN Typical command: *0100P3 Typical response: *000114.71234 (Value: 14.71234) REMOTE OPERATION 50 P1 Sample and send one pressure period measurement. Action: Measure pressure period, send pressure period value, and await next command. Typical command: *0100P1 Typical response: *000128.123456 (Value: 28.123456) NOTE: Repeatedly issuing the P1 command will temporarily prevent the front panel display from being updated. Q3 Sample and send one temperature measurement. Action: Measure temperature period, calculate temperature, send temperature value, and await next command. Units: °F or °C, as selected by TU Typical command: *0100Q3 Typical response: *000122.345 (Value: 22.345) NOTE: Repeatedly issuing the Q3 command will temporarily prevent the front panel display from being updated. Q1 Sample and send one temperature period measurement. Action: Measure temperature period, send temperature period value, and await next command. Units: Microseconds Typical command: *0100Q1 Typical response: *00015.1234567 (Value: 5.1234567) NOTE: Repeatedly issuing the Q1 command will temporarily prevent the front panel display from being updated. 7.9.3.2 Averaged Pressure Commands The averaged pressure command initiates a pressure measurement, averages it with previously acquired pressure measurements, and sends the resulting averaged pressure value. REMOTE OPERATION 51 P8 Sample pressure and send one averaged pressure measurement. Action: Measure temperature period, measure pressure period, calculate temperature-compensated pressure, average pressure values, send averaged pressure value, and await next command. Unit: As specified by UN Typical command: *0100P8 Typical response: *000114.71234 (Value: 14.71234) The number of pressure measurements averaged is set by the PX command. NOTE: In order to calculate averaged pressure, the number of pressure measurements specified by PX must have already been taken. If the required pressure measurements are not yet available due to a pressure measurement interruption, P8 returns an asterisk instead of the averaged pressure value. Events that interrupt pressure measurement include cycling power, entering the menu, enabling or disabling tare, changing units, and holding the display value. PX Set or read the pressure array size. Range: 3 to 20 Default: 5 Typical set command: *0100EW*0100PX=10 Typical set response: *0100PX=10 Typical read command: *0100PX Typical read response: *0100PX=10 PX determines the number of prior pressure measurements used to calculate averaged pressure. NOTE: PX also determines the number of prior pressure measurements used to calculate Pressure Trend and Pressure Scatter. REMOTE OPERATION 52 7.9.3.3 Sample and Hold Measurement Commands The following commands are used to initiate and send single sample and hold measurements. Measurement values are held until the next command is received. If the next command is a DB or DS command, the measurement value is sent; if it is any other command then the measurement value is lost. If a DB or DS command is received before the measurement command is complete, the measurement value will be sent as soon as it is available. CAUTION Sample and hold commands will temporarily prevent the front panel display from being updated until the DB or DS command is received or the sample and hold command is cancelled by the next valid command. P5 Sample and hold one pressure measurement. Action: Measure temperature period, measure pressure period, calculate temperature-compensated pressure, save pressure value, and await DB or DS command. Units: As specified by UN Typical command: *0100P5 Typical response: No response until DB or DS command is received P6 Sample and hold one pressure period measurement. Action: Measure pressure period, save pressure period value, and await DB or DS command. Units: Microseconds Typical command: *0100P6 Typical response: No response until DB or DS command is received Q5 Sample and hold one temperature measurement. Action: Measure temperature period, calculate temperature, save temperature value, and await DB or DS command. Units: °F or °C, as selected by TU Typical command: *0100Q5 Typical response: No response until DB or DS command is received REMOTE OPERATION 53 Q6 Sample and hold one temperature period measurement. Action: Measure temperature period, save temperature period value, and await DB or DS command. Units: Microseconds Typical command: *0100Q6 Typical response: No response until DB or DS command is received DB Dump Buffer. Send a held measurement value. Action: If a measurement value is being held, send it - otherwise do nothing. Typical command: *0100DB Typical response: *000114.12345 (Value: 14.12345) DS Dump Sequential. Sequentially send a held measurement value. Action: If a measurement value is being held, send it - otherwise do nothing. Typical command: *9900DS Typical response: *000114.12345 (From unit 1) *000214.54321 (From unit 2) *9900DS (Echoed DS command) DS is useful only when acquiring measurement data from two or more units in a serial loop network. DS ensures that measurements are returned in the order that units appear in the serial loop network. See Section 7.10 for more information about serial loop networking. 7.9.3.4 Continuous Measurement Commands The following commands are used to initiate and control continuous measurements. Continuous measurement commands repeatedly take measurement samples and return measurement values until commanded to stop. Continuous measurements are cancelled by sending any valid command. REMOTE OPERATION 54 P2 Continuously sample and send pressure period measurement values. Action: Measure pressure period, send pressure period value, and repeat until commanded to stop. Units: Microseconds Typical command: *0100P2 Typical response: *000128.123456 (Value: 28.123456) *000128.123457 (Value: 28.123457) *000128.123456 … (Value: 28.123456) NOTE: The P2 command will temporarily prevent the front panel display from being updated. P4 Continuously sample and send pressure measurement values. Action: Measure temperature period, measure pressure period, calculate temperature-compensated pressure, send pressure value, and repeat until commanded to stop. Unit: As specified by UN Typical command: *0100P4 Typical response: *000114.71234 (Value: 14.71234) *000114.71235 (Value: 14.71235) *000114.71234 … (Value: 14.71234) P7 Continuously send high-speed continuous pressure measurements. Action: Continuously sample and send pressure measurement values, using temperature measurement interval specified by the current value of PS. P7 automatically performs the following sequence: 1. Initially measure temperature period. 2. Measure pressure period. 3. Calculate temperature-compensated pressure using last temperature period measurement. 4. Send pressure value. 5. Do steps 2-4 the number of times specified by PS, then measure temperature period. 6. Repeat steps 2-5 until commanded to stop. REMOTE OPERATION 55 Unit: As specified by UN Typical command: *0100P7 Typical response: *000114.71234 (Value: 14.71234) *000114.71235 (Value: 14.71235) *000114.71234 … (Value: 14.71234) NOTE: P7 allows maximization of pressure sampling rate by taking temperature measurements at the interval specified by the PS command. Each subsequent pressure value is temperature-compensated using the currently stored temperature value. You can take a single initial temperature measurement, or you can take periodic temperature measurements at the interval you select with the PS command. Please refer to the PS command for more information. PS Set or read temperature measurement interval used by the P7 command. Range: 1 to 65535 Default: 0 Units: Pressure measurements Typical command: *0100EW*0100PS=4 Typical response: *0001PS=4 Controls how often temperature measurements are taken during a P7 pressure measurement sequence. If PS=0, an initial temperature measurement is taken, and all subsequent pressure measurements are compensated using that value. If PS=1, a temperature measurement is taken before each pressure measurement (same as P4). If PS=n and n>1, an initial temperature measurement is taken, and subsequent temperature measurements are taken after every n pressure measurements. NOTE: When setting virtually all parameter values, you must precede the command with an EW (Enable Write) command. Please refer to Section 7.9.1 for more information. REMOTE OPERATION 56 Q2 Continuously sample and send temperature period measurement values. Action: Measure temperature period, send temperature period value, and repeat until commanded to stop. Units: Microseconds Typical command: *0100Q2 Typical response: *00015.1234567 (Value: 5.1234567) *00015.1234568 (Value: 5.1234568) *00015.1234567 … (Value: 5.1234567) NOTE: The Q2 command will temporarily prevent the front panel display from being updated. Q4 Continuously sample and send temperature measurement values. Action: Measure temperature period, calculate temperature, send temperature value, and repeat until commanded to stop. Units: °F or °C, as selected by TU Typical command: *0100Q4 Typical response: *000122.345 (Value: 22.345) *000122.346 (Value: 22.346) *000122.345 … (Value: 22.345) NOTE: The Q4 command will temporarily prevent the front panel display from being updated. 7.9.4 R1 Pressure Rate, Trend, and Scatter Commands Send the current pressure rate value. Action: Calculate and send the current pressure rate value Units: Pressure units (UN) per time unit (RU) Typical command: *0100R1 Typical response: *0001-0.0001 (Value: -0.0001) REMOTE OPERATION 57 R1 is used to determine the pressure rate of change over a fixed time interval. The R1 value is calculated by subtracting the previous pressure measurement from the current pressure measurement, dividing that quantity by the actual measured time interval between the pressure measurements, and scaling the result to the current pressure unit per second or per minute. When the pressure unit per minute option is selected, a smoothing function can be enabled to prevent small pressure variations from resulting in wildly fluctuating pressure trend values. NOTE: Two sequential pressure measurements must have been taken before pressure rate can be calculated. If two sequential pressure measurements are not yet available due to a pressure measurement interruption, R1 will return an asterisk instead of the pressure rate value. Events that interrupt pressure measurement include cycling power, entering the menu, enabling or disabling tare, changing units, and holding the display value. R2 Send the current pressure trend value. Action: Calculate and send the current pressure trend value Units: Pressure units (UN) per time unit (RU) Typical command: *0100R2 Typical response: *0001-0.0001 (Value: -0.0001) R2 is used to determine the slope of the pressure trend based on a userselectable number of previous pressure measurements. The R2 value is calculated by fitting a best-fit straight line through the pressure data, and scaling the result to the current pressure unit per second or per minute. The number of pressure measurements used to calculate pressure trend is set with the PX command. The pressure trend time unit is set with the RU command. NOTE: In order to calculate pressure trend, the number of pressure measurements specified by PX must have already been taken. If the required pressure measurements are not yet available due to a pressure measurement interruption, R2 returns an asterisk instead of the pressure REMOTE OPERATION 58 trend value. Events that interrupt pressure measurement include cycling power, entering the menu, enabling or disabling tare, changing units, and holding the display value. R3 Send the current pressure scatter value. Action: Calculate and send the current pressure scatter value Typical command: *0100R3 Typical response: *0001<0.0001 (Value: 0.0001) The pressure scatter command is used to determine the scatter of the pressure data trend based on a user-selectable number of previous pressure measurements. Pressure scatter is calculated by finding the standard deviation of the pressure data. The number of pressure measurements used to calculate pressure scatter is set with the PX command. A greater than (>) or less than (<) character is returned immediately preceding the pressure scatter value. This character indicates whether the pressure scatter value is greater than (>) or less than or equal to (<) the pressure scatter stability threshold (PC). NOTE: In order to calculate pressure scatter, the number of pressure measurements specified by PX must have already been taken. If the required pressure measurements are not yet available due to a pressure measurement interruption, R3 returns an exclamation point character instead of the pressure scatter value. Events that interrupt pressure measurement include cycling power, entering the menu, enabling or disabling tare, changing units, and holding the display value. PC Set or read the pressure scatter stability threshold. Range: 0 to 9999999 Default: 1 Typical set command: *0100EW*0100PX=10 Typical set response: *0100PX=10 REMOTE OPERATION 59 Typical read command: Typical read response: PX *0100PX *0100PX=10 Set or read the pressure array size. Range: 3 to 20 Default: 5 Typical set command: *0100EW*0100PX=10 Typical set response: *0100PX=10 Typical read command: *0100PX Typical read response: *0100PX=10 PX determines the number of prior pressure measurements used to calculate Pressure Trend and Pressure Scatter. NOTE: PX also determines the number of prior pressure measurements used to calculate averaged pressure. RS Set or read the smoothing factor for the pressure rate function. Smoothing applies only to pressure rates expressed in pressure unit per minute only. Smoothing is useful to prevent small pressure variations from resulting in wildly fluctuating pressure rate values. Range: 1 to 200 Default: 1 Typical set command: *0100EW*0100RS=1 Typical set response: *0001RS=1 Typical read command: *0100RS Typical read response: *0001RS=1 NOTE: Setting RS to 1 results in no smoothing. Higher RS values result in a greater degree of smoothing. Response to pressure changes will be decreased as the value of RS is increased. RS has an effect only when pressure unit per minute is selected. REMOTE OPERATION 60 RU 7.9.5 Set or read the pressure rate / pressure trend time unit. Range: 0 = pressure unit per second 1 = pressure unit per minute Default: 0 Typical set command: *0100EW*0100RU=1 Typical set response: *0001RU=1 Typical read command: *0100RU Typical read response: *0001RU=1 User-Defined Commands The user-defined commands enable the user to define custom commands. All measurement options supported by the Model 765 are available. Any combination of measurement options and text can be specified, and measurement values can be formatted per you specifications. User-defined commands consist of an output mask command to define the command behavior, and an associated command to execute the output mask. Three independent user-defined commands are available. To use a user-defined command, the output mask must be defined using the OM command. The output mask typically contains some combination of command codes, text strings, and numeric format specifiers, each separated by a comma. The OF command is used to execute the command defined by OM. COMMAND CODES Command codes are used in the output mask to produce measurement or text output when executed. The available command codes are listed in Table 7-1. Example: PAVG is the command code for averaged pressure. REMOTE OPERATION 61 Table 7-1: Command Codes for User-Defined Commands Command Description Code P Pressure PAVG Averaged pressure PR Pressure rate PT Pressure trend PS Pressure scatter MINP Minimum pressure MAXP Maximum pressure MINPT Minimum pressure time stamp MINPD Minimum pressure date stamp MAXPT Maximum pressure time stamp MAXPD Maximum pressure date stamp ST Sensor temperature PPER Pressure period TPER Temperature period TV Tare value PU Pressure unit TU Sensor temperature unit UA Destination ID HA Source ID DATE Current date TIME Current time CR Carriage return LF Line feed CRLF Carriage return/line feed STAR Asterisk RESET Set mask to default – must be used alone REMOTE OPERATION Format Specifier? Y Y Y Y Y Y Y N N N N Y Y Y N N N N N N N N N N N N 62 TEXT STRINGS Text strings are literal text delimited by quote characters. They can be inserted at any location with the output mask. The most common use of text strings is to provide space between multiple command code outputs. Example: “This is my text” will output “This is my text” (less the quote characters) when executed. NUMERIC FORMAT SPECIFIERS Numeric format specifiers are used to control the format of measurement value outputs. The command codes that can be used with numeric format specifiers are identified as such in Table 7-2. Numeric format specifiers are placed immediately after the command code to which they apply. Numeric format specifiers have the syntax x.y, where x and y are any number between 0 and 9. The x value specifies the number of digits to the left of the decimal point that will be output. All digits to the left of the decimal point are always output regardless of the x value. If the x value is greater than the number of digits to the left of the decimal point, the output will be padded with leading zeros. The y value specifies the number of digits to the right of the decimal point that will be output. If the y value is less than the number of digits to the right of the decimal point, the output will be rounded to the number of digits specified. If the y value is greater than the number of digits to the right of the decimal point, the output will be padded with trailing zeros. Refer to Table 7-2 for examples. REMOTE OPERATION 63 Table 7-2: User-defined Numeric Formatting Examples Format Value Output specifier 14.56789 1.5 14.56789 14.56789 5.5 00014.56789 14.56789 2.2 14.57 14.56789 2.7 14.5678900 14.56789 5.7 00014.5678900 COMMANDS OM Set or read the user-defined command output mask. Three output masks can be defined - OM1, OM2, and OM3. The number is optional - if no number is specified, OM1 is assumed. Range: 200 characters maximum. Default: OM1 - STAR,HA,UA,P,CRLF OM2 - STAR,HA,UA” “,P,” “ “,PU,CRLF OM3 - STAR," ",P," ",PU," ","TIME:",TIME," DATE:", DATE,CRLF Typ. set command: *0100EW*0100OM=”Pressure:”,P,CRLF Typ. set response: *0001OM=”Pressure:”,P,CRLF Typ. read command: *0100OM Typ. read response: *0001OM=”Pressure:”,P,CRLF When the OM command is sent, the output mask is checked for syntax errors. If a syntax error is detected, an error code is returned, along with the output mask up to the point where the error was detected. The syntax error will be between the last comma and the end of the returned output mask. Refer to Table 7-3 for the list of OM error codes and their descriptions. REMOTE OPERATION 64 Table 7-3: OM Command Error Codes OM Error Code O1 O2 O3 O4 O5 OF Description Unrecognized command Missing quote character Output mask too long RESET mixed with other command codes Bad format specifier Executes the associated user-defined command output mask. OF1, OF2, and OF3 execute output masks defined by OM1, OM2, and OM3, respectively. The number is optional - if no number is specified, OF1 is assumed. Typical command: *0100O F Typical response: Pressure: 14.12345 The OF command processes command codes in the order that they appear in the output mask. The output for each command code is sent as it is processed. 7.9.6 Measurement Integration Time Commands The Model 765 samples the transducer’s pressure and temperature signals for a length of time specified by the measurement integration time commands. The measurement integration time has a direct affect on sampling rate and measurement resolution. See Section 8.6 for details. PI and TI are the primary integration time commands for pressure and temperature signal measurement. The legacy commands PR and TR may also be used. The advantage of PI and TI is that the specified integration time is expressed directly in milliseconds. NOTE: The legacy commands PR and TR traditionally specified the number of signal periods to sample. This integration scheme has been replaced by integration over a fixed length of time. For backward compatibility, values input using PR and TR are converted to an equivalent time using nominal pressure and temperature period values. REMOTE OPERATION 65 NOTE: When Simultaneous Integration is selected, the pressure and temperature signals are integrated simultaneously, resulting in faster data rates at a given pressure resolution. In this case, the time needed to acquire a pressure measurement is controlled by the greater of the pressure and temperature integration times. See Sections 8.3 and 7.9.7 for more information about Simultaneous Integration. TIME-BASED INTEGRATION TIME COMMANDS PI Set or read the pressure measurement integration time Units: Milliseconds Range: 1 to 290000 (.001 to 290 seconds), integer values only Default: 666 Typical set command: *0100EW*0100PI=1000 Typical set response: *0001PI=1000 Typical read command: *0100PI Typical read response: *0001PI=1000 NOTE: Whenever the value of PI is changed, TI is automatically updated with the same value. TI Set or read the temperature measurement integration time Units: Milliseconds Range: 1 to 290000 (.001 to 290 seconds), integer values only Default: 666 Typical set command: *0100EW*0100TI=1000 Typical set response: *0001TI=1000 Typical read command: *0100TI Typical read response: *0001TI=1000 NOTE: Changing TI has no effect on PI. NOTE: It is usually recommended that TI and PI be set to the same value. REMOTE OPERATION 66 NOTE: Do not set PI to a value of less that 10 when using a Model 715 display. Doing so may result in an inconsistent display. PERIOD-BASED INTEGRATION TIME COMMANDS PR Set or read period-based pressure measurement integration time Range: 1 to 16383 Default: 238 Typical set command: *0100EW*0100PR=200 Typical set response: *0001PR=200 Typical read command: *0100PR Typical read response: *0001PR=200 NOTE: Whenever the value of PR is changed, TR is automatically updated with the value of PR times 4. TR Set or read period-based temperature measurement integration time Range: 1 to 65535 Default: 952 Typical set command: *0100EW*0100TR=800 Typical set response: *0001TR=800 Typical read command: *0100TR Typical read response: *0001TR=800 NOTE: Whenever the value of PR is changed, TR is automatically updated with the value of PR times 4. Changing TR has no effect on PR. TR should be set to the value as PR times 4 for optimum performance in most applications. REMOTE OPERATION 67 7.9.7 OI Measurement Mode Commands Select Simultaneous Integration or Sequential Integration Simulation Action: The OI command is used to select Simultaneous Integration or Sequential Integration Simulation. When Simultaneous Integration is selected, the pressure and temperature periods are integrated simultaneously, resulting in increased data rates without sacrificing measurement resolution. When Sequential Integration Simulation is selected, the pressure and temperature periods are still integrated simultaneously, but the measurement timing is similar to units that only support Sequential Integration. Values: 0 = Simultaneous Integration 1 = Sequential Integration Simulation Default: 1 Typical set command: *0100EW*0100OI=1 Typical set response: *0001OI=1 Typical read command: *0100OI Typical read response: *0001OI=1 NOTE: When Simultaneous Integration is selected, the total integration time is equal to either the pressure (PI) or temperature (TI) integration time, whichever is greater. When Sequential Integration Simulation is selected, the total integration time is equal to the sum of the pressure (PI) and temperature (TI) integration times. Refer to Section 8.3 for more information about Simultaneous Integration, Sequential Integration, and Sequential Integration Simulation. FM Set or read Fetch Mode enable Action: The FM command is used to select Trigger Mode or Fetch Mode. When in Trigger Mode, the unit initiates a new measurement when the measurement command is received. REMOTE OPERATION 68 This is the mode in which Digiquartz Intelligent devices have traditionally operated. In Fetch Mode, measurement data is continuously acquired in the background, and the unit responds immediately to measurement commands with the most recent measurement value. Values: 0 = Unit operates in Trigger Mode. 1 = Unit operates in Fetch Mode. Default: 0 7.9.8 Typical set command: *0100EW*0100FM=1 Typical set response: *0001FM=1 Typical read command: *0100FM Typical read response: *0001FM=1 Minimum/Maximum Pressure Commands The Minimum/Maximum Pressure Commands return the minimum and maximum pressure measurement values. The time at which the minimum and maximum pressure measurements were taken is also available. Minimum and maximum pressure values are set to the next measured pressure value when: Power is cycled MR command is sent Calibration coefficients are changed PA or PM is changed Pressure units are changed Tare status is changed M1 Return minimum pressure measurement value Units: Current pressure unit Typical read command: *0100M1 Typical read response: *0001M1=14.12345 (Value: 14.54321) REMOTE OPERATION 69 M2 Return the time and date stamp for the minimum pressure measurement Units: Date and time Typical read command: *0100M2 Typical read response: *0001M2=02/10/04 03:48:19 PM NOTE: The date and time formats are controlled by the GD and GT commands. Refer to paragraph 7.9.16 for more information. M3 Return minimum pressure measurement value Units: Current pressure unit Typical read command: *0100M3 Typical read response: *0001M3=14.12345 (Value: 14.54321) M4 Return the time and date stamp for the minimum pressure measurement Units: Date and time Typical read command: *0100M4 Typical read response: *0001M4=02/10/04 03:48:19 PM NOTE: The date and time formats are controlled by the GD and GT commands, respectively. Refer to paragraph 7.9.16 for more information. MR Reset the minimum and maximum pressure measurement values and time/date stamps Units: Current pressure unit Typical command: *0100MR Typical response: *0001MR>OK When the MR command is received, the minimum and maximum pressure values will be set to the next pressure measurement value. REMOTE OPERATION 70 7.9.9 Data Output Mode Command The data output mode command controls the continuous serial output of pressure measurement data. MD Set or read the data output mode. Action: MD configures the Model 765 for continuous serial pressure measurement output. Table 7-4: Data Output Mode MD value 1 Continuous serial pressure data output OFF 3 ON Once MD is set, the specified data output mode will remain in effect until MD is set to a different value, even through a power cycle. Therefore, the Model 765 will generally perform the specified function whenever power is applied. Range: 1 = Continuous pressure data output off 3 = Continuous pressure data output on Default: 1 Typical set command: *0100EW*0100MD=1 Typical set response: *0001MD=1 Typical read command: *0100MD Typical read response: *0001MD=1 Under the following circumstances, continuous pressure data will be temporarily suspended: Whenever a measurement command is received. Continuous data output resumes when the measurement command is complete. REMOTE OPERATION 71 While a continuous measurement command (P2, P4, P7, Q2, Q4) is in effect. Continuous pressure data output resumes when the measurement command is cancelled. Whenever the Model 765 is accessing front panel user interface functions, such as Hold, Tare, Units, or the menu system. 7.9.10 Unit Commands Unit commands are used to specify the unit to be used when calculating pressure or sensor temperature values, and to configure the user-defined pressure unit. UN Set or read the pressure unit. Action: Sets or reads the unit of all pressure values displayed and output via the serial ports. Range: 0 to 8. See Table 7-5 for available pressure units Default: 1 Typical set command: *0100EW*0100UN=2 Typical set response: *0001UN=2 Typical read command: *0100UN Typical read response: *0001UN=2 Table 7-5: Pressure Units and Conversion Factors UN Pressure Conversion value unit factor 0 User-defined pressure unit Value of UF 1 psi 1.0000000 2 hPa (mbar) 68.94757 3 bar 0.06894757 4 kPa 6.894757 5 MPa 0.00689476 6 in Hg 2.036021 7 mm Hg (Torr) 51.71493 8 m H2O 0.7030696 REMOTE OPERATION 72 Setting UN to a non-zero value selects one of eight standard pressure units. Setting UN to 0 selects a user-defined unit whose conversion factor is specified by the UF command. The native pressure unit of the Model 765 is psi. When a different pressure unit is specified, the pressure value in psi is first calculated, and then converted to the desired unit by multiplying by the appropriate conversion factor. UF Set or read the user-defined pressure unit conversion factor. Action: When UN=0, calculated pressure values in psi are multiplied by the value of UF before being output, thus scaling pressure values in the desired user-defined pressure unit. Range: -9999999 to 9999999 Default: 1.000000 Typical set command: *0100EW*0100UF=2 Typical set response: *0001UF=2.000000 Typical read command: *0100UF Typical read response: *0001UF=2.000000 TU Set or read the sensor temperature unit. Action: Specifies the temperature units for Q3, Q4, Q5, and displayed sensor temperature data. Range: 0 = °C 1 = °F Default: 0 Typical set command: *0100EW*0100TU=1 Typical set response: *0001TU=1 Typical read command: *0100TU Typical read response: *0001TU=1 NOTE: The native sensor temperature unit of the Model 765 is °C, and is converted to °F if TU=1. REMOTE OPERATION 73 7.9.11 Tare Commands Tare is the process of subtracting a specified value from pressure measurements. You may use the current measured pressure as the tare value, or you may specify any desired value. Tare can also be enabled, disabled, and locked out through the use of serial commands. Serial pressure measurement data can be formatted to include an indication when tare is in effect. Refer to the ZI command for more information. ZS Set or read the tare state parameter value. Action: The three states of ZS are as follows: ZS=0 Tare function is off. ZS=1 Tare has been requested, but is not yet in effect. ZS=2 Tare is in effect ZS is set to 0 on power-up. If ZL=0 (tare is not locked out), tare can be requested by setting the ZS to 1. At the first pressure measurement following a tare request, the following sequence occurs: The pressure value is stored in the ZV parameter. The value of ZS is set to 2 to indicate that tare is in effect. The value of ZV is subtracted from all subsequent pressure values until tare is turned off. If tare is already in effect when a ZS=1 command is issued, the sequence described above occurs at the next pressure measurement, and tare continues using a new value of ZV. Tare can be turned off by issuing a ZS=0 command. Range: 0 to 2 Default: 0 Typical set command: *0100EW*0100ZS=1 Typical set response: *0001ZS=1 Typical read command: *0100ZS Typical read response: *0001ZS=1 REMOTE OPERATION 74 ZV Set or read the tare value. Action: Sets or reads the value that is subtracted from pressure measurements when tare is activated. ZV can be set to any desired value when tare is in effect (ZS=2). Note, however, that if tare is subsequently requested, a new value will overwrite the ZV value you have set. The value of ZV is set to 0 on power-up. Range: -9999999 to 9999999 Default: 0 Typical set command: *0100EW*0100ZV=14.7123 Typical set response: *0001ZV=14.7123 Typical read command: *0100ZV Typical read response: *0001ZV=14.7123 ZL Set or read the tare lockout parameter value. Action: When ZL=0, ZS can be set to enable and disable tare. When ZL=1, tare is locked, and the value of ZS cannot be modified via serial commands or the Tare Input I/O line. However, if ZS=1 and a ZL=1 command is issued, tare will be in effect when the next pressure measurement is taken, but you cannot turn tare off until ZL is set to 0. The value of ZL is set to 0 on power-up. Range: 0 or 1 Default: 0 Typical set command: *0100EW*0100ZL=1 Typical set response: *0001ZL=1 Typical read command: *0100ZL Typical read response: *0001ZV=1 7.9.12 Pressure Alarm Commands The pressure alarm commands are used to specify the pressure alarm setpoints. Whenever the current pressure exceeds the specified setpoints, an audible alarm sounds and an appropriate message is shown on the display. REMOTE OPERATION 75 Alarm setpoints are scaled appropriately whenever the pressure unit is changed. AL Set or read the lower alarm setpoint. Action: Sets or reads the lower alarm setpoint value in the current pressure unit. An audible alarm is sounded and an appropriate message is shown on the display whenever the current pressure is less than the value of AL. Range: -9999999 to the current value of AU Default: -999999 Typical set command: *0100EW*0100AL=10.0000 Typical set response: *0001AL=10.0000 Typical read command: *0100AL Typical read response: *0001AL=10.0000 AU Set or read the upper alarm setpoint. Action: Sets or reads the upper alarm setpoint value in the current pressure unit. An audible alarm is sounded and an appropriate message is shown on the display whenever the current pressure is greater than the value of AU. Range: Default: The current value of AL to rated full-scale pressure Rated full-scale pressure of the internal Digiquartz pressure transducer. Typical set command: *0100EW*0100AU=24.0000 Typical set response: *0001AU=24.0000 Typical read command: *0100AU Typical read response: *0001AU=24.0000 REMOTE OPERATION 76 7.9.13 Measurement Data Formatting Commands These commands are used to alter the format of serial measurement data. The following data formatting functions are available: Append engineering unit label to measurement data. Append a tare indication to tare pressure measurement data. Add underscores to separate the measurement data from the rest of the serial output data string to improve readability. Add trailing zeroes to the measurement data to create a fixed-length data string to simplify parsing. Formatting commands can be used separately or in any combination. US Set or read the engineering units suffix parameter value. Action: When US=1, a unit label is appended to measurement data. When US=0, no unit label is appended. Range: 0 or 1 Default: 0 Typical set command: Typical set response: Typical read command: Typical read response: *0100EW*0100US=1 *0001US =1 *0100US *0001US =1 Examples: *000114.71234psia *000121.123C *0001.00015psia/sec (Pressure measurement, US=1) (Temp measurement, US=1) (Pressure rate measurement, US=1) When US=1, a pressure unit label is appended to pressure measurement values according to the value of UN: REMOTE OPERATION 77 Table 7-6: Pressure Label UN value Label 0 Defined by UM 1 psia, psig, or psid 2 hPa 3 bar 4 kPa 5 MPa 6 inHg 7 mmHg 8 mH2O When US=1, a temperature unit label is appended to temperature measurement values according to the value of TU: Table 7-7: Temperature Label TU value Label 0 C 1 F SU Set or read the underscore separator parameter value. Action: When SU=1, an underscore separates the measurement data from the address header and the optional unit suffix. When SU=0, no underscore separators appear. Range: 0 or 1 Default: 0 Typical set command: Typical set response: Typical read command: Typical read response: Examples: *0100EW*0100SU=1 *0001SU=1 *0100SU *0001SU=1 *000114.71234 *0001_14.71234 *0001_14.71234_psia REMOTE OPERATION (SU=0) (SU=1) (SU=1, US=1) 78 ZI Set or read the tare indication parameter value. Action: When ZI=1, a “T” is appended to pressure measurement values when tare is in effect. When ZI=0, no tare indication appears, whether tare is in effect or not. Range: 0 or 1 Default: 0 Typical set command: Typical set response: Typical read command: Typical read response: Examples: DL *0100EW*0100ZI=1 *0001ZI=1 *0100ZI *0001ZI=1 *000114.71234 *000114.71234T *0001_14.71234T *000114.71234Tpsia *0001_14.71234T_psia (ZI=0) (ZI=1) (ZI=1, SU=1) (ZI=1, US=1) (ZI=1, US=1, SU=1) Set or read the fixed field data format parameter. Action: When DL=1, measurement data is formatted in a fixed field format. When DL=0, measurement data is given in the standard format. The fixed field format is specified as follows: *AAAASDDDDDDDDDD, where * = the asterisk character A = destination and source address characters S = sign of pressure data, either + or – D = numeric representation of pressure data, either digits or a decimal point Range: 0 or 1 Default: 0 *0100EW*0100DL=1 Typical set command: REMOTE OPERATION 79 Typical set response: Typical read command: Typical read response: Examples: *0001DL=1 *0100DL *0001DL=1 *000114.71234 *0001+14.7123400 *000121. 123 *0001+21.1230000 (Pressure, DO=0) (Pressure, DO=1) (Temperature, DO=0) (Temperature, DO=1) NOTE: The format specification and examples shown above assume that the other formatting commands are disabled. If other formatting commands are used in combination with DL, a fixed field format will still result, but the format will vary slightly from the one described above. UM Set or read the user-defined unit label parameter. Action: When UN=0 and US=1, the text value of UM is appended to pressure measurements. Range: Any text up to four characters, consisting of ASCII 32 to ASCII 127. Default: user Typical set command: *0100EW*0100UM=test Typical set response: *0001UM=test Typical read command: *0100UM Typical read response: *0001UM=test Examples: *000114.71234 (UN=0, US=0) *000114.71234user (UN=0, US=1, UM=user) 7.9.14 Unit Identification Commands The Unit Identification commands read various unit-specific parameters. These parameters are factory-set, and cannot be modified. REMOTE OPERATION 80 SN Read the serial number. Action: The SN parameter contains the device serial number. SN is a read-only command. Typical read command: Typical read response: VR *0100SN *0001SN=12345 Read the firmware version number. Action: The VR parameter contains the device firmware version number. VR is a read-only command. Typical read command: Typical read response: MN *0100VR *0001VR=D1.02 Read the model number. Action: The MN parameter contains the device model number as a text string. The value of MN always contains 16 characters. If the model number is less than 16 characters, the string will be padded with trailing spaces to a length of 16 characters. MN is a read-only command. Typical read command: Typical read response: PF *0100MN *0001MN=765-15A Read the full-scale pressure value. Action: The PF parameter contains the full-scale pressure value in the current pressure units. If the units are changed, the value of PF is scaled accordingly. PF is a read-only command. Typical read command: Typical read response: REMOTE OPERATION *0100PF *0001PF=30.00000 81 PO Read the pressure transducer type. Action: The PO parameter contains the pressure transducer type. PO is a read-only command. Table 7-8: Transducer Type PO value Transducer type 0 Absolute 1 Gauge 2 Differential Typical read command: Typical read response: *0100PO *0001PO=0 7.9.15 Display Configuration Commands The Display Configuration commands allow you to alter the information shown on the display. DM Set or read the display mode value. The display mode determines what information, if any, is shown on the second line of the display. Action: DM sets the second line of the display to the desired mode. Refer to Table 7-9 for the available display modes and associated DM values. Range: 0 to 9 Default: 0 Typical set command: *0100EW*0100DM=6 Typical set response: *0001DM=6 Typical read command: *0100DM Typical read response: *0001DM=6 REMOTE OPERATION 82 Table 7-9: Display Modes DM Second Line Display Mode Value 0 Bar Graph 1 Sensor Temperature 2 Stored Text (UL) 3 No second Line 4 External Text (DT) 5 Current Tare Value 6 Pressure Rate 7 Pressure Trend 8 Pressure Scatter 9 Min/Max Pressure DP Set or read the maximum number of decimal places in the displayed pressure value. Action: DP sets the maximum number of decimal places in the displayed pressure value. Fewer decimal places will be displayed if the pressure resolution and/or pressure unit will not provide the specified number of decimal places. When DP is set to 6, the maximum number of decimal places is always displayed, according to current pressure resolution. Range: 0 to 6 Default: 6 Typical set command: *0100EW*0100DP=6 Typical set response: *0001DP=6 Typical read command: *0100DP Typical read response: *0001DP=6 REMOTE OPERATION 83 DT Set the text to be displayed on the second line when the External Text display option is selected from the Menu. Use DT when the Model 765 is to be controlled by an RS-232 serial host, and the text must be updated frequently. Action: DT allows a serial host (such as a PC) to send text to be displayed on the bottom line. The text sent using DT is not stored by the Model 765; it is simply transferred to its display. DT cannot be queried, and it is not necessary to precede DT with an EW command. The text is lost when the Model 765 is powered off. Range: 16 characters maximum. Any characters in the range of ASCII 32 to ASCII 127 are legal. Typical set command: *0100DT=This is my text Typical set response: *0001DT=This is my text PL Read the overpressure indication setpoint. This setpoint is used to determine the pressure at which the overpressure indication is displayed. PL is a factory-set, read-only command. Action: When the Model 765 measures a pressure greater than the value of PL, an overpressure indication is displayed. Typical read command: Typical read response: *0100PL *0001PL=120.0000 NOTE: PL is typically factory-set to the overpressure limit as specified in the Specification Control Drawing for the Digiquartz transducer. UL Set or read the text to be displayed on the second line when the Stored Text display option is selected from the Menu. Action: UL defines the text to be displayed on the bottom line. The value of UL is stored in non-volatile memory, and will therefore be retained even if power is lost. REMOTE OPERATION 84 Range: 11 characters maximum. Any characters in the range of ASCII 32 to ASCII 127 are legal. Default: 11 space characters Typical set command: *0100EW*0100UL=My label Typical set response: *0001UL=My label Typical read command: *0100UL Typical read response: *0001UL=My label CAUTION Do not use UL if it is necessary to update the displayed text often; use the External Text display option and the DT command instead. The nonvolatile memory used to store the text data can be written approximately 100,000 times; excessive use of UL will eventually result in the inability to change its value. 7.9.16 Date and Time Commands The date and time commands set, read, and format the date and time. The formatting commands apply to all date and time outputs and displays. GD Set and read the date format Action: Sets and reads the date format. Range: GD=0 MM/DD/YY GD=1 DD/MM/YY Typical set command: Typical set response: Typical read command: Typical read response: GT *0100EW*0100GD=1 *0001GD=1 *0100GD *0001GD=1 Set and read the time format Action: Sets and reads the time format. Range: GT=0 HH/MM/SS XX, where XX=AM or PM GT=1 HH/MM/SS (24 hour format) REMOTE OPERATION 85 Typical set command: Typical set response: Typical read command: Typical read response: GR *0100EW*0100GT=1 *0001GT=1 *0100GT *0001GT=1 Set and read the date and time. Date and time are set and read according to the current format settings. Action: Sets and reads the current date and time. The following examples assume GD=0 and GT=0. Typical set command: Typical set response: Typical read command: Typical read response: *0100EW*0100GR=04/05/04 03:53:00 PM *0001GR=04/05/04 03:53:00 PM *0100GR *0001GR=04/05/04 03:53:00 PM NOTE: GR set commands must be sent per the current date and time format settings. All punctuation and space characters must be included as shown. Improperly formatted GR set commands will be rejected, and will not be carried out. 7.9.17 Data Logging Commands The data logging commands control the data logging function. Two data logging modes are available: Immediate Mode and Programmed Mode. Immediate mode begins data logging immediately when commanded to do so. Programmed mode begins and ends logging at predetermined dates and times. When data logging is underway, the Model 765 will not carry out most commands, and will return the message “BUSY LOGGING…”. The exception is the LK command, which can be used to abort data logging. See Section 6.5 for more information about data logging. REMOTE OPERATION 86 DATA LOGGING CONTROL COMMANDS LM Start Immediate Model data logging. Action: Data logging begins immediately when LM is received. Typical command: *0100LM Typical response: *0001LM>OK LP Start Programmed Model data logging. Action: Enables data logging to begin when the start date and time occur. Typical command: *0100LP Typical response: *0001LP>OK The start date and time (LB) and stop date and time (LC) must be set before the LP command is issued. The LP command will not be carried out and the following error codes will be returned under the following conditions: Error L1: Memory is full Error L2: Start date and time is earlier than current date and time Error L3: Stop date and time is earlier than start date and time Typical error response: *0001LM>ERR:L3 LK Abort data logging. Action: Data logging stops immediately when LK is received. Typical command: *0100LK Typical response: *0001LK>LOGGING OFF LK aborts data logging in both Immediate Mode and Programmed Mode. LK returns no response unless data logging was in progress. REMOTE OPERATION 87 DATA LOGGING CONFIGURATION COMMANDS LB Data logging start date and time. Typical set command: Typical set response: Typ. read command: Typ. read response: *0100EW*0100LB=11/23/04 12:57:19 PM *0001LB=11/23/04 12:57:19 PM *0100LB *0001LB=11/23/04 12:57:19 PM LB must be set according to the current date (GD) and time (GT) formats. LC Data logging stop date and time. Typical set command: Typical set response: Typ. read command: Typ. read response: *0100EW*0100LC=11/23/04 12:57:19 PM *0001LC=11/23/04 12:57:19 PM *0100LC *0001LC=11/23/04 12:57:19 PM LC must be set according to the current date (GD) and time (GT) formats. LV Data logging interval. Range: 00:00:00 to 24:59:59 Default: 00:00:00 Typical set command: Typical read response: Typical read command: Typical read response: *0100EW*0100LV=00:01:00 *0001LV=00:01:00 *0100LV *0001LC=00:01:00 LV must be set according to the current time (GT) format. If LV is set to 00:00:00, data logging will occur at the fastest possible rate, governed by the current sampling rate. REMOTE OPERATION 88 DATA LOGGING MEMORY COMMANDS LE Erase the data in the data logging memory. Typical command: Typical response: *0100EW*0100LE=1 *0001LE>OK LE erases all data stored in the data logging memory. There is no way to recover logged data once it has been erased. If the LE command syntax is not correct, the following error will be returned: ERR>L1. LW Memory wraparound enable/disable. Range: 0 = Memory wraparound disabled 1 = Memory wraparound enabled Default: 0 Typical set command: Typical set response: Typical read command: Typical read response: *0100EW*0100LW=1 *0001LW=1 *0100LW *0001LW=1 When memory wraparound is disabled, the Model 765 stops logging data when memory is full. When memory wraparound is enabled, the Model 765 begins overwriting the oldest data with new data when memory is full. LA Return the number of data logging records available. Typical read command: Typical read response: *0100LA *0001LB=327680 LA is a read-only command. A data logging record is defined as a single pressure measurement and its associated timestamp and configuration data. The maximum number of data logging records that can be stored in the Model 765 is 327680. LS returns the number of data logging records that are currently used. REMOTE OPERATION 89 LS Return the number of data logging records used. Typical read command: Typical read response: *0100LS *0001LS=12345 LS is a read-only command. A data logging record is defined as a single pressure measurement and its associated timestamp and configuration data. The maximum number of data logging records that can be stored in the Model 765 is 327680. LA returns the number of data logging records that are currently available. DATA LOGGING BURST MODE COMMANDS See Section 6.5.2 for more information about Burst Mode. LN Burst Mode enable/disable. Range: 0 = Burst Mode disabled 1 = Burst Mode enabled Default: 0 Typical set command: Typical set response: Typical read command: Typical read response: LT *0100EW*0100LN=1 *0001LN=1 *0100LN *0001LN=1 Burst Mode trigger rate. Range: 0.0 - 9999999 Units: Current pressure unit/minute Default: 0.0 Typical set command: Typical set response: Typical read command: Typical read response: REMOTE OPERATION *0100EW*0100LT=1.000000 *0001LN=1.000000 *0100LN *0001LN=1.000000 90 LO Burst Mode timeout interval. Range: 00:00:00 to 24:59:59 Default: 00:00:00 Typical set command: Typical read response: Typical read command: Typical read response: *0100EW*0100LV=00:01:00 *0001LV=00:01:00 *0100LV *0001LC=00:01:00 7.9.18 Calibration Commands The calibration commands set and read several parameters that directly affect the measurement accuracy of the device. Refer to Section 11 for more information regarding the use of the calibration parameters. CAUTION Calibration values should be modified only when absolutely necessary, and then with extreme caution. Calibration value adjustments should only be performed by a qualified metrology lab. ZERO AND SPAN ADJUSTMENT COMMANDS The PA command is used to make zero offset adjustments to the indicated pressure value. The PM command is used to make span adjustments to the indicated pressure value. PA and PM are used in the following formula to calculate final output pressure: P adjusted = PM * (P + PA) Where: P = Pressure calculated using original calibration coefficients, in the current pressure unit PM = the current value of the PM parameter PA = the current value of the PA parameter REMOTE OPERATION 91 PA Set or read the pressure adder parameter. Action: The pressure adder parameter is used to make zero adjustments to the calibration. PA can also be used to offset absolute pressure measurements by atmospheric pressure to obtain gauge pressure. Range: -9999999 to 9999999 Default: 0.0 Typical set command: *0100EW*0100PA=.0000123 Typical set response: *0001PA=.0000123 Typical read command: *0100PA Typical read response: *0001PA=.0000123 NOTE: The value of PA is entered in the current pressure units, but is converted to psi prior to being stored. When PA is queried, it returns the value scaled to the current pressure units. PM Set or read the pressure multiplier parameter. Action: The pressure multiplier parameter is used to make span adjustments to the calibration. Range: -9999999 to 9999999 Default: 1 Typical set command: *0100EW*0100PM=1.000123 Typical set response: *0001PM=1.000123 Typical read command: *0100PM Typical read response: *0001PM=1.000123 NOTE: The value of PM is dimensionless, and is therefore not scaled if the units are changed. REMOTE OPERATION 92 DIGIQUARTZ PRESSURE TRANSDUCER CALIBRATION COEFFICIENT COMMANDS These commands contain the calibration coefficients for the Digiquartz pressure transducer within the Model 765. C1 Set or read the calibration coefficients. See paragraph 8.8 and C2 Section 11 for more information about calibration and calibration C3 coefficients. D1 D2 T1 T2 T3 T4 T5 U0 Y1 Y2 Y3 Default: Device-specific Typical set command: *0100EW*0100C1=228.1234 Typical set response: *0001C1=228.1234 Typical read command: *0100C1 Typical read response: *0001C1=228.1234 REMOTE OPERATION 93 TIMEBASE CALIBRATION COMMANDS TC is used to normalize the nominal 14.7456 MHz reference crystal frequency to 10 MHz to compensate for the natural variation in reference crystal resonant frequency. TC Read the crystal timebase correction factor. Action: Read the TC value. TC is a read-only command. Typical read command: Typical read response: *0100TC *0001TC=.6666667 7.9.19 Global Commands Under certain circumstances, it may be desirable to send a single command to multiple units on a serial loop network. The ID 99 has been reserved for such global addressing. When a Model 765 receives a legal command addressed to ID 99, it reacts to that command regardless of its assigned ID value. When the Model 765 receives a global command via RS-232, it retransmits the global command before acting on it. This ensures that all units on a serial loop will receive the global command. Eventually, the global command is retransmitted by the last unit in the serial loop and is received by the serial host. The serial host must be able to disregard the retransmitted command. Global addressing is often used with sample and hold measurement commands to synchronize measurements from multiple devices. The sample and hold measurement commands are: P5 P6, Q5 and Q6 All sampling commands and certain other commands may be either individually or globally addressed: P1 through P7, Q1 through Q6, DB, DS, VR, and EW All remaining commands should not be sent as global commands. REMOTE OPERATION 94 7.10 Networking The Model 765 supports RS-232 serial loop and USB networking. Networking allows you to communicate with up to 98 Digiquartz Intelligent Devices from a single RS-232 serial host. It is also possible to connect several Model 765 units to a serial host via one or more USB hubs. 7.10.1 Networking Basics When setting up a network, the following points must be observed. If your network includes older Digiquartz Intelligent Devices, set the older devices to PT = N to assure compatibility with the Model 765. Verify proper operation of each Digiquartz Intelligent Device before installing it in a network. Set all Digiquartz Intelligent Devices to the same baud rate before installing them in a network. Baud rates should be limited to 9600 or 19200 baud. Set each Digiquartz Intelligent Device on the network to a unique ID. 7.10.2 RS-232 Serial Loop Networking Refer to Figure 7-1. In an RS-232 serial loop network, the transmit output of the RS-232 host is connected to the receive input of the first device in the loop. The transmit output of the first device is connected to the receive input of the next device. The remaining devices are connected similarly, with their receive input connected to the transmit output of the previous device, and their transmit output connected to the receive input of the next device. The transmit output of the last device is connected to the receive input of the RS-232 host. The host sends commands to the first device in the loop. If a command is addressed to that device, the command is carried out; if not, the command is resent to the next device. Globally addressed commands are carried out by each device, and are also resent to the next device. When a device responds to a command, the response is addressed to the host, and is therefore resent by each device that receives it until it eventually makes it way to the serial host. REMOTE OPERATION 95 Figure 7-1. Serial loop network block diagram Keep these points in mind when designing an RS-232 serial loop network: As previously described, each device resends any command or response that is addressed to another device. Since each device considers resending to be a higher priority than sending its own response, it is possible that a device can spend all its time resending, and never have an opportunity to send its own response. This occurs only when one or more upstream devices are continuously transmitting. To prevent this situation: Operate your network at 9,600 baud or 19,200 baud Avoid continuous transmission (P2, P4, P7, Q2, and Q4 commands) at extremely low integration times Do not operate a serial loop network above 19,200 baud. It is not possible to precisely synchronize measurements from two or more devices by sending a global measurement command. This is a result of the delay that occurs as the measurement command propagates through the serial loop. When a global command is sent, it propagates through the serial loop, eventually making its way back to the host. Therefore, the data received by the host in response to a global command includes the command itself, followed by the individual responses from all devices on the network. REMOTE OPERATION 96 7.10.3 USB Networking A USB network generally consists of a PC, one or more USB hubs, two or more Model 765 units, and standard USB cables as required. Normally, the PC is connected to the USB hub, and the Model 765 units are connected to the USB hub. Since the VCP driver assigns a unique virtual COM port to each Model 765, it is not necessary to assign each unit a unique ID. Global commands cannot be used to address all units on a USB network. Communication with each Model 765 must be done individually via its associated virtual COM port. See Section 7.3 for more information regarding USB and the VCP driver. REMOTE OPERATION 97 8 8.1 Pressure Measurement Concepts Measurement Basics At the heart of all Digiquartz Intelligent Instruments is a precision Digiquartz pressure transducer. The outputs from a Digiquartz pressure transducer are two square wave signals whose period is proportional to applied pressure and internal transducer temperature. The Model 765 measures these signals using a technique similar to that of a common laboratory frequency counter. Like the frequency counter, a signal must be integrated, or sampled, for a specified period of time to measure its period. The time over which the signal is sampled determines the resolution of the measurement. Longer sampling times increase resolution, but result in a slower sampling rate. The Model 765 allows you to set the sampling time between 0.001 to 290 seconds. Pressure and temperature sampling times can be set independently via the serial ports. You can use these features to configure the unit according to the data acquisition and resolution requirements of your application. Refer to Section 8.6 for more information about integration time, resolution, and sampling rate. 8.2 Measurement Types One or both of the Digiquartz pressure transducer output signals are sampled, depending on the type of measurement requested. Four types of measurements can be taken: Pressure Internal sensor temperature Pressure period Temperature period Period measurements data can only be accessed via the serial ports. PRESSURE MEASUREMENT CONCEPTS 98 PRESSURE MEASUREMENTS Pressure measurements are the most common. Pressure measurement values are displayed on the first line of the Model 765 display, and can also be output via RS-232 or USB. Pressure measurements are fully temperature-compensated, and therefore require an internal temperature measurement. When a pressure measurement is made, the following sequence occurs: The temperature signal period is measured An internal transducer temperature value is calculated using the temperature period and the calibration coefficients The pressure signal period is measured A temperature-compensated pressure value is calculated using the pressure period, temperature value, and the calibration coefficients The pressure value is displayed and optionally output via RS-232 or USB INTERNAL SENSOR TEMPERATURE MEASUREMENTS Internal sensor temperature is normally only used for temperature compensation of pressure, but can be requested independently for diagnostic and other purposes. Internal sensor temperature measurements can optionally be displayed on the second line of the Model 765 display, and can also be output via RS-232 or USB. When an internal sensor temperature measurement is made, the following sequence occurs: The temperature signal period is measured A temperature value is calculated using the temperature period and the calibration coefficients The temperature value is optionally displayed and/or output via RS-232 or USB PRESSURE MEASUREMENT CONCEPTS 99 PRESSURE AND TEMPERATURE PERIOD MEASUREMENTS Period measurements are used mainly for calibration and diagnostic purposes, but may be useful in high-speed sampling applications. Period measurements can only be accessed via the RS-232 or USB ports. When a period measurement is made, the following sequence occurs: The pressure or temperature signal period is measured The period value is output Refer to Section 7.9 for serial measurement command descriptions. 8.3 Measurement Modes TRIGGER MODE VS. FETCH MODE In Trigger Mode, measurements are initiated when a measurement command is received. Data is output when the new measurement is complete. This is the mode in which Digiquartz Intelligent devices have traditionally operated. In Fetch Mode, measurements are continuously taken in the background. When a measurement command is received, the most recently acquired measurement value is immediately output. Refer to Section 7.9.7 for more information. SEQUENTIAL INTEGRATION VS. SIMULTANEOUS INTEGRATION Until recently, the Model 765 used a Sequential Integration scheme for measuring the sensor’s pressure and temperature signals. With Sequential Integration, the temperature period is integrated first, followed by the pressure period. Recent advances in microprocessor technology enable the Model 765 to integrate the temperature and pressure signals simultaneously. Simultaneous Integration results in faster data acquisition without sacrificing measurement resolution. Simultaneous Integration is available with firmware revision P2.00 and later. For backward compatibility with earlier units, a Sequential Integration Simulation mode is also available. The Sequential Integration Simulation uses Simultaneous Integration but produces measurement timing similar to units with firmware versions prior to P2.00. PRESSURE MEASUREMENT CONCEPTS 100 Figure 8-1 illustrates the differences between Sequential Integration, Simultaneous Integration, and Sequential Integration Simulation. Refer to Section 7.9.7 for more information about Sequential and Simultaneous Integration. Figure 8-1: Timing Diagram – Simultaneous vs. Sequential Integration 8.4 Sampling Types Measurement data can be sampled via the RS-232 and USB ports by the following methods: Single measurement Continuous measurement High-speed continuous measurement Sample and hold measurement PRESSURE MEASUREMENT CONCEPTS 101 SINGLE MEASUREMENT SAMPLING Single measurement sampling commands output a single measurement value each time the command is received. CONTINUOUS MEASUREMENT SAMPLING Continuous measurement sampling commands repeatedly output measurement data until commanded to stop. HIGH-SPEED CONTINUOUS MEASUREMENT SAMPLING Similar to regular continuous measurement commands, but internal transducer temperature measurements are taken only occasionally. This type of sampling is useful when sampling rates must be as high as possible, and is particularly appropriate when internal transducer temperature is not expected to change significantly. SAMPLE AND HOLD MEASUREMENT SAMPLING Similar to single measurement sampling, but the measurement value is not output until a separate command is sent. This type of sampling is useful when you need to simultaneously trigger measurements from multiple units, and then read them one by one in a particular order. Refer to Section 7.9 for serial measurement command descriptions. 8.5 Tare Function You can configure the Model 765 to subtract a value from each subsequent pressure measurement. This process is referred to as tare. You can tare subsequent pressure measurements to the current pressure value, or to any value you specify. Tare can be enabled and disabled through the TARE key or by serial command. An indicator on the display and/or a special character in the serial measurement data indicates when tare is in effect. Refer to Sections 4.2 and 7.9.13 for details. PRESSURE MEASUREMENT CONCEPTS 102 8.6 Resolution, Integration Time, and Sampling Rate The outputs from Digiquartz pressure transducers are two square wave signals whose period is proportional to applied pressure and internal transducer temperature. The Intelligent electronics measures these signals using a technique similar to that of a common laboratory frequency counter. Like the frequency counter, a signal must be integrated for a specified period of time to measure its period. The time over which the signal is integrated determines the resolution of the measurement. Longer integration times increase resolution, but reduce the sampling rate. Conversely, shorter integration times decrease resolution, but increase the sampling rate. The integration mode has a significant effect on sampling rate. The effective sampling rate of Simultaneous Integration (OI=0) is roughly double that of Sequential Integration Simulation (OI=1) for a given PI or PR setting, until the maximum serial bandwidth is reached. Note that the relationship between integration time and pressure resolution is not affected by the integration mode. Please refer to Sections 8.3 and 7.9.7 for more information about Sequential Integration and Simultaneous Integration Simulation. Another factor that influences sampling rate is the serial baud rate. For short integration times, faster baud rates enable faster sampling. As integration times increase, the benefit of faster baud rates quickly diminishes. Table 8-1 illustrates the relationship between integration time, resolution, and sampling rate for the P4 command in Simultaneous Integration and Sequential Integration Simulation modes at various baud rates. PRESSURE MEASUREMENT CONCEPTS 103 P4 Command (Continuous Pressure Output) Table 8-1: Relationship of Integration Time, Resolution, and Sampling Rate for P4 Command PI 1 3 8 11 17 34 67 134 333 666 1333 3332 6664 13328 26656 45872 Resolution (ppm) OI=0 339.100 113.000 42.390 30.830 19.950 9.970 5.060 2.530 1.018 0.509 0.254 0.102 0.051 0.025 0.013 0.007 OI=1 678.200 226.100 84.770 61.650 39.890 19.950 10.120 5.061 2.037 1.018 0.509 0.204 0.102 0.051 0.025 0.015 Integration Time (sec) OI=0 0.001 0.003 0.008 0.011 0.017 0.034 0.067 0.134 0.333 0.666 1.333 3.332 6.664 13.328 26.656 45.872 OI=1 0.002 0.006 0.016 0.022 0.034 0.068 0.134 0.268 0.666 1.332 2.666 6.664 13.328 26.656 53.312 91.744 9600 Baud OI=0 OI=1 106.70 106.70 106.70 106.70 87.30 58.00 81.80 42.90 55.10 21.80 28.40 14.40 14.60 7.37 7.38 3.71 2.99 1.50 1.50 0.75 0.75 0.38 0.30 0.15 0.15 0.08 0.08 0.04 0.04 0.02 0.02 0.01 Sampling Rate (Hz) 57600 Baud OI=0 OI=1 442.90 315.50 236.80 138.60 108.80 58.00 81.80 42.90 55.10 21.80 28.40 14.40 14.60 7.37 7.38 3.71 2.99 1.50 1.50 0.75 0.75 0.38 0.30 0.15 0.15 0.08 0.08 0.04 0.04 0.02 0.02 0.01 115200 Baud OI=0 OI=1 449.40 310.30 236.40 137.40 108.00 58.00 81.80 42.90 55.10 21.80 28.40 14.40 14.60 7.37 7.38 3.71 2.99 1.50 1.50 0.75 0.75 0.38 0.30 0.15 0.15 0.08 0.08 0.04 0.04 0.02 0.02 0.01 NOTES: Please refer to Sections 8.3 and 7.9.7 for more information about Simultaneous Integration and Sequential Integration Simulation. The measurement time interval (seconds) is equal to 1 / Sampling Rate (Hz). Data in this table assume TI=PI and version P2.00 or later. PI is approximately equal to PR x 2.8. PRESSURE MEASUREMENT CONCEPTS 104 8.7 Optimizing Pressure Data Rate Use one or more of the following techniques to increase serial sampling rate. 8.8 Reduce integration time. Refer to PI, TI, PR, and TR commands in Section 7.9.6. Use PR and TR rather than PI and TI to control integration time. PR and TR have approximately 1ms resolution, compared to 10ms of PI and TI. See Section 7.9.6 for details. Use a continuous pressure measurement command, such as P4 or P7. See Section 7.9.3.4 for details. Increase the baud rate. Refer to Section 7.9.2. Disable any functions that increase the length of serial responses, such as US and SU. Use the continuous pressure period command (P2), and post-process data to convert to pressure. Refer to Section 8.8 for detailed information about converting period measurements into pressure values. Calculations and Formulas The Model 765 calculates internal sensor temperature and temperaturecompensated pressure from period measurements of the Digiquartz pressure transducer output signals. The equations and coefficients used to perform these calculations are given below. The Model 765 is initialized with its transducer coefficients at the factory. TEMPERATURE CALCULATION The following equation is used to calculate internal sensor temperature: T = Y 1 U + Y 2 U2 + Y 3 U3 Where: T = Temperature (°C) U 0 = temperature period (microseconds) at 0°C U = temperature period (microseconds) – U 0 (microseconds) Temperature coefficients: U 0 Y 1 Y 2 Y 3 PRESSURE MEASUREMENT CONCEPTS 105 PRESSURE CALCULATION The following equation is used to calculate pressure: P = C(1 – τ 0 2/ τ 2)[1 – D(1– τ 0 2/ τ 2)] Where: P = pressure τ = pressure period (microseconds) U = temperature period (microseconds) – U 0 (microseconds) C = C 1 + C 2 U + C 3 U2 D = D1 + D2U τ 0 = T 1 + T 2 U + T 3 U2 + T 4 U3 + T 5 U4 Pressure coefficients: C 1 C 2 C 3 D 1 D 2 T 1 T 2 T 3 T 4 T 5 FINAL OUTPUT PRESSURE CALCULATION The following equation is used with the pressure value calculated above to calculate the final output pressure value: P output = PM * (units conversion factor) * [P + PA] Where: P output = Final output pressure value P = raw pressure value (from pressure equation above) PM = Value stored in the PM parameter PA = Value stored in the PA parameter Units conversion factor = Value used to convert psi to the current pressure unit. The PM and PA parameters allow you to make minor zero and span adjustments to the raw pressure value. Initially, PM (pressure multiplier) is set to 1.0, and PA (pressure adder) is set to 0.0. Refer to Section 7.9.18 for more information. PRESSURE MEASUREMENT CONCEPTS 106 9 9.1 Accessories Included Accessories AC POWER SUPPLY The Model 765 is delivered with a universal 100 - 240VAC, 47 - 63Hz wall power supply. WARNING Use of an AC adapter other than that supplied by Paroscientific may damage the Model 765. If another power supply is to be used, ensure that the AC voltage, DC voltage, current capacity, connector type, and connector polarity match the original unit. USB CABLE The Model 765 is delivered with a six-foot USB cable, Paroscientific PN 6785001. This cable can be used to connect the Model 765 to a standard PC USB port. TUBE FITTING ADAPTER One or two tube fitting adapters are included with all units with VCO fittings (units with full-scale pressure of less than 1000 psi). Tube fitting adapters enable the VCO fitting to interface with Parker A-LOK 1/4” tube fittings. 9.2 Optional Accessories HIGH PERFORMANCE PRESSURE PORT The high-performance DigiPort is optionally available for use with all Digiquartz Barometric Instruments. It provides barometric accuracy of better than 0.08 hPa in strong winds, all wind directions, pitch or tilt angles up to 25 degrees, rain, and freezing conditions. It outperforms open ports, single ports, single disks, shrouded pipes, closely spaced dual-disks, multi-hole probes, probes incorporating spheres or cones, and swiveling pivot tubes with static pressure inlets. ACCESSORIES 107 Figure 9-1: DigiPort mounted on a portable stand. ACCESSORIES 108 10 Maintenance The Model 765 does not require periodic maintenance, other than calibration of the Digiquartz pressure transducer. If the unit becomes soiled, it may be cleaned using a soft cloth lightly moistened with plain water. WARNING Do not allow liquids to enter the enclosure. Electronic failure may result. WARNING Do not open the enclosure. No user-serviceable parts are located inside. Your warranty will be voided if the enclosure is opened. MAINTENANCE 109 11 Calibration 11.1 Calibration Procedure Paroscientific transducers measure pressure with a force sensitive quartz crystal whose output period (or frequency) changes with applied load. For a given temperature, true applied pressure will generate a specific crystal period. Therefore, a measure of the crystal period will indicate what pressure is applied, provided the relationship between crystal period and pressure is known. This relationship is usually expressed as the C, D, T 0 equation. C, D, and T 0 are coefficients that are unique to Paroscientific transducers, and are different for each transducer. In addition, these coefficients are characterized for thermal effects. For each temperature, they are expressed as polynomial expansions with coefficients C1, C2, C3, D1, D2, T1, T2, T3, T4, and T5. Typically, it takes between 7 and 10 coefficients to fully describe the relationship, also called the "CD thermal model", between crystal output, temperature, and pressure. Recalibration is necessary if a user decides that the agreement between true and indicated pressure is outside tolerances set for the particular application. Please see the documents entitled "Recalibration of Paroscientific Transducers - Doc 8140-001" and "Calibration of Digiquartz Sensors" at www.paroscientific.com for recalibration procedures and calibration software support. 11.2 Zero and Span Adjustments The Paroscientific transducer measures a force that is generated by external pressure. Since the quartz crystal is extremely sensitive, any other small force that is transmitted to the sensing element will be added to the pressure measurement. A pressure offset generated in this way is purely additive and is the same at all pressure values. In principle, checking accuracy at a single applied pressure is sufficient to determine an offset. Of course, the offset can be calculated as the average offset of many pressure points. Span is defined here as the pressure difference from minimum pressure to fullscale pressure. A span error is the difference between the indicated pressure span as measured by the transducer and the true pressure span. If a transducer is CALIBRATION 110 carefully adjusted at minimum pressure, the span error is simply the difference between indicated and true applied pressure at full scale. The span of a Paroscientific transducer is rarely adjusted since the scale factor of the sensing element is very stable. Differences are sometimes due to different calibration standards. The span of a dead weight tester used as a primary standard depends directly on the piston area and the value of local gravity. Any apparent change of span in a Paroscientific transducer should be carefully checked to ascertain that the pressure is correctly applied and calculated with the correct piston area and gravity constant, and that the piston is vertical. We recommend recording several pressure points over the entire pressure range to establish any span error. The Paroscientific calibration software program RECAL calculates the best span by a least-squares fit optimization. Please refer to the document entitled "Recalibration of Paroscientific Transducers - Doc 8140-001" at www.paroscientific.com for details regarding offset and span adjustment. Calibration should only be performed by a skilled metrologist. The PA and PM commands allow you to make zero and span adjustments. Normally, PA (pressure adder) is set to 0.0, and PM (pressure multiplier) is set to 1.0. Adjusted pressure is calculated using the following equation: P adjusted = PM * (P + PA) Where: P = Pressure calculated using original calibration coefficients, in the current pressure units PM = the current value of PM PA = the current value of PA Refer to paragraphs 7.9.16 and 8.8 for more information regarding PA and PM. CALIBRATION 111 CAUTION PA and PM directly affect calibration. Use extreme caution when modifying PA or PM. Improper PA and/or PM values will result in inaccurate pressure measurements. 11.3 Calibrating Other Instruments The Digiquartz Model 765 Portable Pressure Standard can be used to calibrate other pressure instruments. Its 0.008% of full-scale accuracy and 0.0001% resolution make the Model 765 ideal for laboratory and metrology applications. When calibrating another pressure instrument, apply the same pressure to the Model 765 and the test instrument. Take the difference in pressure readings between the test instrument and the Model 765. Apply the difference as a correction to the test instrument. For details regarding the calibration of a third party pressure instrument, please review its user documentation or consult the manufacturer. CALIBRATION 112 12 Warranty Paroscientific highly values our customers. A Quality Assurance System that is certified to the requirements of the ISO 9001 International Quality Standard provides consistency in our products and processes from design and development through production, calibration, test, and servicing. Our quality system and commitment to excellence ensure customers of outstanding products and services. As a result, we offer a one-year warranty on all instrumentation systems, and a full five-year limited warranty on all Digiquartz transducers that is unmatched in the industry. This policy applies to all Digiquartz transducers manufactured by Paroscientific, and includes the repair and/or replacement of parts that are required to maintain the unit to the “as purchased” configuration. Excluded from this policy are the following: conversions, product modification, zero adjustments, recalibration, and service analysis charges. This “Extended Limited Warranty” is a supplement to Paroscientific, Inc.’s “Terms and Conditions of Sale”. Shipping charges are the responsibility of the customer. Months From Shipment 0 - 24 25 - 36 37 - 48 49 - 60 Discount From List Price 100% 75% 50% 25% CONDITIONS: The warranty period is from the date of shipment from Paroscientific to date of receipt at Paroscientific. The customer must authorize the repair or replacement of the warranty claim within 45 days of notification by our Service Department. No exceptions to the discount schedule or terms of this policy are allowed. This warranty does not apply to units broken due to overpressure or excessive shock. Warranty returned unit(s) become the property of Paroscientific upon replacement. All barometers also have a three year limited warranty on long-term stability. Years 4 & 5 are covered by the above schedule. WARRANTY 113 13 Service and Support Support is available via our web site www.paroscientific.com and our sales and application engineers. Product technical information, application notes, software and product manuals are available on our web site. Please check the troubleshooting section of this manual if you are having problems with your instrument. If you need technical assistance, contact our sales and application engineers at [email protected] or (425) 883-8700. If you are sending an instrument to us for service, please check our web site under the service section about the details of how to ship a unit to us for service. For customers with an Internet connection (not behind a firewall), remote diagnostic and technical support is available via our web site. Please review our web site about the details of this service and set up your computer according to the instructions on our web site. SERVICE AND SUPPORT 114 14 Troubleshooting This section will help you to diagnose common problems related to the Model 765. If you have taken the recommended action and you are still experiencing difficulty, please contact a Paroscientific Application Engineer. MODEL 765 DOES NOT POWER UP WHEN ON/OFF KEY IS PRESSED If AC adapter is being used, check that the adapter is plugged into the power jack on the rear panel, and is plugged into an appropriate AC outlet. The battery may be fully discharged. Charge the battery per Section 5.3. The AC adapter may be used to power the unit if the battery is fully discharged. MODEL 765 DISPLAYS INCORRECT PRESSURE VALUES Check that the calibration coefficients are correct. Digiquartz Interactive (DQI) software can be used for this purpose. The proper calibration coefficients are listed in the calibration data sheet that was provided with your Model 765 or Digiquartz pressure transducer. If you are unable to locate the calibration data sheet, contact Paroscientific for the calibration coefficients. MODEL 765 DISPLAYS “DISPLAY DATA INTERRUPTED” Refer to Section 15. RS-232 COMMANDS ARE IGNORED Do not attempt to simultaneously access the Model 765 through the serial ports and the Menu. Doing so may cause serial commands or Menu selections to be ignored. TROUBLESHOOTING 115 MENU SELECTIONS ARE IGNORED Do not attempt to simultaneously access the Model 765 through the serial ports and the Menu. Doing so may cause serial commands or Menu selections to be ignored. DIGIQUARTZ INTERACTIVE (DQI) CANNOT DETECT MODEL 765 Check that power is being applied to the Model 765. If pressure values are being displayed, the unit is being powered. Check that the Model 765 is connected to the specified COM port. Check that the serial connections between the Model 765 and the PC are correct. TROUBLESHOOTING 116 15 Display Data Not Available Message Under certain circumstances, the Model 765 is unable to update its pressure value display. When these conditions occur, “DISPLAY DATA NOT AVAILABLE” is displayed. The Model 765 resumes pressure value display when the condition is no longer present. The following conditions will cause the Model 765 to display the “DISPLAY DATA NOT AVAILABLE” message: An asterisk is sent to the RS-232 or USB ports, but the terminating characters (Cr/Lf) are never sent. One of the following serial commands is in effect: P2, P5, P6, Q2, Q4, Q5, Q6 Parameter values are continuously set or queried via RS-232 or USB. DISPLAY DATA NOT AVAILABLE MESSAGE 117 16 Pressure Unit Conversion Table To use this table: Determine original pressure unit and desired pressure unit. Using the table, identify the appropriate pressure conversion factor. Multiply original pressure value by the conversion factor to convert to desired pressure unit. Table 16-1: Pressure Unit Conversion Table Desired Pressure Unit Original Pressure Unit g/cm3 psi in Hg Torr or mmHg g/cm2 mbar or hPa Pa or N/m2 2 Meters H 2 O Pounds/in Inches of mercury Torr or mm of mercury Gram/cm2 Millibar or Hectopascal Pascal or Newton/m2 g/cm3 psi in Hg Torr or mmHg g/cm2 mbar or hPa Pa or N/m2 1 .7030696 .3453155 1.422334 1 .4911541 2.895903 2.036021 1 73.5592 51.71493 25.40000 100.0000 70.30696 34.53155 98.06650 68.94757 33.86388 9806.650 6894.757 3386.388 .01359510 .01933678 .03937008 1 1.359510 1.333224 133.3224 .01000000 .01019716 1.019716 x10⁻⁴ .01422334 .01450377 1.450377 x10⁻⁴ .02895903 .02952999 2.952999 x10⁻⁴ .7355592 .75000617 7.500617 x10⁻³ 1 1.019716 .9806650 1 98.06650 100.0000 .01019716 .01000000 1 PRESSURE UNIT CONVERSION TABLE 118 17 Glossary The following is a list of definitions related to the Model 765 Data Logging – Accumulating data within an instrument for later retrieval. Digiquartz Intelligent Device – A Digiquartz Intelligent Instrument or Transmitter with an RS-232 interface. Digiquartz Pressure Transducer – A Digiquartz pressure transducer with frequency outputs. Integration Time – The time over which the Digiquartz pressure transducer output signals are measured. Also referred to as sampling time. Pressure Signal – The output of a Digiquartz pressure transducer whose frequency is related to applied pressure. Resolution – The smallest change in measured quantity that can be resolved. Sampling Rate – The number of pressure measurements taken per a given time unit, often expressed in Hertz (Hz). Sampling Time – The time over which the Digiquartz pressure transducer output signals are measured. Also referred to as integration time. Temperature Signal – The output of a Digiquartz pressure transducer whose frequency is proportional to internal sensor temperature. User-defined Command – A command whose function is defined by the user. GLOSSARY 119 18 Connector and Wiring Diagrams All connector diagrams in this section are viewed from the mating side. 18.1 Model 765 RS-232 Port Connector DB9-F Pin 1 2 3 4 5 6 7 8 9 Connection Not used RS-232 TX RS-232 RX Not used Ground Not used Not used Not used Not used Figure 18-1: DB9-F Connector Pin-out CONNECTOR AND WIRING DIAGRAMS 120 18.2 PC RS-232 Port Connector Pin assignments are typical. If in doubt, consult the hardware manual that came with your PC. DB9-M Pin 1 2 3 4 5 6 7 8 9 Connection Data Carrier detect (DCD) RS-232 RX RS-232 TX Data Terminal Ready (DTR) Ground Data Set Ready (DSR) Request To Send (RTS) Clear To Send (CTS) Ring Indicator (RI) Figure 18-2: DB9-M Connector Pin-out CONNECTOR AND WIRING DIAGRAMS 121 18.3 RS-232 Wiring Connect the Model 765 RS-232 port to a PC RS-232 port per Figure 18-3 below. Other RS-232 host devices can be connected to the Model 765 in a similar manner; consult the manufacturer’s documentation for RS-232 port specifications. Table 18-1: Model 765 RS-232 to PC RS-232 wiring PC Pin 2 3 5 Signal Rx (Receive) Tx (Transmit) Ground Model 765 Pin 2 3 5 Signal Tx (Transmit) Rx (Receive) Ground 18.4 RS-232 Serial Loop Network The diagram in Figure 18-3 illustrates the wiring for a serial loop network of up to 98 Digiquartz Intelligent Instruments and/or Transmitters. Refer to paragraph 7.10 for more information about serial loop networking. Figure 18-3: Serial loop network wiring diagram. CONNECTOR AND WIRING DIAGRAMS 122 19 Frequently Asked Questions 1. How do I configure my instrument? Refer to Section 6. 2. How do I access the menu system? Refer to Section 4. 3. How do I change the pressure unit? Refer to Section 4.2. 4. How do I change the sensor temperature unit? Refer to Section 7.9.10. 5. How do I change the pressure sampling rate? Refer to Section 7.9.6. 6. How do I talk to the instrument via the RS-232 interface? Refer to Section 7.2. 7. How do I talk to the instrument via the USB interface? Refer to Section 7.3. 8. What are the RS-232 and USB commands? Refer to Section 7.9. 9. How do I tare the unit? Refer to Section 4.2. 10. How do I change the information on the display? Refer to Section 6. 11. How do I change the RS-232 baud rate? Refer to Section 6.4. FREQUENTLY ASKED QUESTIONS 123 12. How do I prevent access to the instrument via the front panel? Refer to Section 6.4. 13. How do I change the number of digits in the pressure display? Refer to Section 6.3. 14. How do I change the unit ID? Refer to Section 6.4 and 7.9.2. FREQUENTLY ASKED QUESTIONS 124 20 Quick Reference Menu – Model 765 QUICK REFERENCE MENU – MODEL 765 125 21 Command and Parameter Reference ACTION COMMANDS BL BR DB DS DT EW ID LA LE LK LM LP LS M1 M2 M3 M4 MR OF P1 P2 P3 P4 P5 P6 P7 P8 Q1 Q2 Q3 Q4 Q5 Q6 R1 Lock baud rate……………………………….……....…………... Set baud rate…………………………………………….……….. Dump buffer……..……………………….…………..………….. Dump buffer sequential………………….…………..…………... Display text on second line……………….……………………... Enable write…………………………………………….……….. Set unit ID…………...………………………………….……….. Return number of data logging records available..…….………... Erase data logging memory…………………………….………... Abort data logging…………………..………………….……….. Start data logging in immediate mode………………….……….. Start data logging in programmed mode …………….………….. Return number of data logging records used……………………. Output minimum pressure value………………………………… Output timestamp for minimum pressure value………….……… Output maximum pressure value………………………………... Output timestamp for maximum pressure value………………… Reset minimum and maximum pressure values………….……… Execute user-defined command…………………………………. Output single pressure period value……………………………... Output continuous pressure period values………………………. Output single pressure values…………………………….……... Output continuous pressure values……………………….……... Sample and hold a pressure value……………………………….. Sample and hold a pressure period value………………………... Output continuous pressure values at maximum rate.…………... Output single averaged pressure value………………………….. Output single temperature period value…………………………. Output continuous temperature period values…..………………. Output single temperature value……...…………………………. Output continuous temperature values………..………….……… Sample and hold a temperature value…………………………… Sample and hold a temperature period value……………………. Output pressure rate value………………………………………. COMMAND AND PARAMETER REFERENCE PAGE 49 48 54 54 84 48 50 89 89 87 87 87 87 69 70 70 70 70 65 51 55 50 55 53 53 55 52 51 57 51 57 53 54 57 126 ACTION COMMANDS (CONTINUED) R2 R3 VR Output pressure trend value……………………………………... Output pressure scatter value……………………………………. Output firmware version………………………………….……... PARAMETER COMMANDS AL AU C1 C2 C3 D1 D2 DL DM DP FM GD GR GT LB LC LN LO LT LV LW MD MN OI OM PA PC PI PL PM PO PR Lower alarm setpoint……………………………………………. Upper alarm setpoint……………………………………………. C1 coefficient…………………………………………….……… C2 coefficient…………………………………………….……… C3 coefficient…………………………………………….……… D1 coefficient…………………………………………….……… D2 coefficient…………………………………………….……… Fixed-field data format………………………………………….. Second line display mode……………………………………….. Decimal places in displayed pressure value…………………….. Set or read fetch mode…………………………………………… Date format……………………………………………….……... Date and time……………………………………………………. Time format……………………………………………………… Data logging start date/time……………………………………... Data logging stop date/time………………….………………….. Burst model enable/disable……………………………….…….. Burst mode timeout interval…………………………………….. Burst mode trigger rate………………………………………….. Data logging interval…………………………………………….. Memory wraparound enable/disable……………………………. Serial data mode……..………………………………………….. Model number…………………………………………………… Select Simultaneous or Sequential Integration…………………... User-defined command definition………………………………. Pressure adder……..…………………………………………….. Pressure scatter stability threshold……………………….……… Pressure integration time……………..………………………….. Overpressure indication setpoint………………………………… Pressure multiplier..……………………………………………... Pressure transducer type………………………………….……… Pressure integration time (legacy)………………………………... COMMAND AND PARAMETER REFERENCE PAGE 58 59 81 PAGE 76 76 93 93 93 93 93 79 82 83 68 85 86 85 88 88 90 91 90 88 89 71 81 68 64 92 59 66 84 92 82 67 127 PARAMETER COMMANDS (CONTINUED) PS PX RS RU SN SU T1 T2 T3 T4 T5 TC TI TR TU U0 UF UL UM UN US VR Y1 Y2 Y3 ZI ZL ZS ZV P7 temperature measurement interval…………………………… Pressure array size………………………………………………. Pressure rate smoothing factor………………………………….. Pressure rate/pressure trend time unit…………………….……... Serial number……………………………………………………. Data separation character enable/disable………………………... T1 coefficient……………………………………………………. T2 coefficient……………………………………………………. T3 coefficient……………………………………………………. T4 coefficient……………………………………………………. T5 coefficient……………………………………………………. Timebase correction factor..……………………………………... Temperature integration time…………….……………………… Temperature integration time (legacy)…………………….…….. Sensor temperature unit (°C/°F)……..………………………….. U0 coefficient…………………………………………….……… User-defined unit factor….……………………………….……... Stored text to display on line 2………..………………….……… User-defined pressure unit label….…………………….……….. Pressure unit…………………………………………………….. Serial data unit suffix enable/disable………….………….…….. Firmware version…………………………………..……………. Y1 coefficient……………………………………..…………….. Y2 coefficient……………………………………..…………….. Y3 coefficient……………………………………..…………….. Tare serial indication enable/disable………….………….……… Tare lock…………..………………………..…………….……... Tare switch state…………………………..…………………….. Tare offset value………………………..……………………….. COMMAND AND PARAMETER REFERENCE PAGE 56 60 60 61 81 78 93 93 93 93 93 94 66 67 73 93 73 84 80 72 77 81 93 93 93 79 75 74 75 128 COMMAND AND PARAMETER REFERENCE 129 Paroscientific, Inc. th 4500 148 Avenue N.E. Redmond, WA 98052 USA Tel: (425) 883-8700 Fax: (425) 867-5407 Web: www.paroscientific.com E-mail: [email protected] Doc. Number 8005-001 Rev. D January 2012 ©Paroscientific, Inc. 2012