1
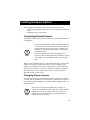
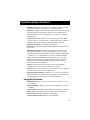
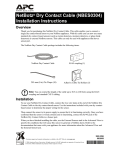
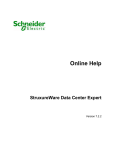
320
About
Your
Appliance
Preface
Copyright
© Copyright NetBotz Inc. 2000 - 2005
Trademarks
BotzWare, NetBotz, and the NetBotz symbol are registered trademarks of
NetBotz, Inc.
Other brand and product names are registered trademarks or trademarks of
their respective holders.
Federal Communications Commission (FCC)
Declaration of Conformity Statement
Note: This equipment has been tested and found to comply with the limits for
a Class A digital device, pursuant to Part 15 of the FCC rules. These limits are
designed to provide reasonable protection against harmful interference when
the equipment is operated in a commercial environment. This equipment
generates, uses, and can radiate radio frequency energy. If it is not installed
and used in accordance with the instruction manual, it may cause harmful
interference to radio communications. Operation of this equipment in a
residential area is likely to cause harmful interference, in which case users
will be required to take whatever measures may be necessary to correct the
interference at their own expense.
U.S. Government Restricted Rights
Restricted rights legend. Use, duplication, or disclosure by the Government is
subject to restrictions as set forth in subparagraph (c) (1) (ii) of the Rights in
Technical Data and Computer Software clause at DFARS 252.227-7013 or
subparagraphs (c) (1) and (2) of the Commercial Computer SoftwareRestricted Rights clause at CFR 52.227-19, as applicable.
Certifications
CE
The NetBotz 320 wall and rack models, described in
this publication, are CE certified.
i
Preface
FCC
• Power - 5V @ 3Amps max; 3.3V @ 3Amps
max
• Jack - 4 Pin Power Din
• Leakage Current - Less than 3.5 mA
VCCI
Cleaning
Use only a dry cloth to clean the NetBotz appliance. To clean your NetBotz
appliance, gently wipe the surface of the NetBotz appliance with a dry cloth.
Misuse
Use your NetBotz appliance ONLY in the manner specified. If the equipment
is used in a manner not specified by NetBotz, the protection provided by the
equipment may be impaired. NetBotz is not responsible for misuse.
ii
About Your Appliance: NetBotz 320
Preface
Improper Use of Video Recording Capabilities
Attention: THE EQUIPMENT CONTAINS, AND THE
SOFTWARE ENABLES, VISUAL RECORDING
CAPABILITIES, THE IMPROPER USE OF WHICH MAY
SUBJECT YOU TO CIVIL AND CRIMINAL PENALTIES.
APPLICABLE LAWS REGARDING THE USE OF SUCH
CAPABILITIES VARY BETWEEN JURISDICTIONS AND MAY
REQUIRE AMONG OTHER THINGS EXPRESS WRITTEN
CONSENT FROM RECORDED SUBJECTS. YOU ARE
SOLELY RESPONSIBLE FOR INSURING STRICT
COMPLIANCE WITH SUCH LAWS AND FOR STRICT
ADHERENCE TO ANY/ALL RIGHTS OF PRIVACY AND
PERSONALTY. USE OF THIS SOFTWARE FOR ILLEGAL
SURVEILLANCE OR MONITORING SHALL BE DEEMED
UNAUTHORIZED USE IN VIOLATION OF THE END USER
SOFTWARE AGREEMENT AND RESULT IN THE
IMMEDIATE TERMINATION OF YOUR LICENSE RIGHTS
THEREUNDER.
Availability of Open Source Technologies
The NetBotz 320 product includes technologies that are governed by the GNU
Public License. The GPL source code contained in our products is available
for free download from:
http://support.netbotz.com/gpl
About Your Appliance: NetBotz 320
iii
Preface
iv
About Your Appliance: NetBotz 320
Contents
Preface.......................................................................... ... i
About Your NetBotz 320............................................. .. 1
Upgrading Your NetBotz 320........................................... ...1
Hardware Upgrades................................................... ...1
Software Upgrades.................................................... ...1
Before You Begin........................................................ .. 3
Package Contents........................................................... ...3
Choosing an Installation Location.................................... ...3
Gathering Network Settings Information.......................... ...4
Administrator Account User ID & Password.................... ...4
Root Account User ID & Password.................................. ...4
The NetBotz 320: A Closer Look................................ .. 5
NetBotz 320 LEDs..................................................... ...6
About the Appliance Camera........................................... ...8
Image Size and Imager Field of View Specifications. ...8
Sensors Included With Your Appliance........................... ...9
Integrated Sensor Types............................................ ...9
External Sensor Ports................................................ .10
About the NetBotz Installer CD.................................. 11
Installing on a Windows System...................................... .11
Installing on a Linux System............................................ .12
Installing on a Solaris System.......................................... .13
Configuring Network Settings.................................... 15
Obtaining Network Settings Using DHCP........................ .15
DHCP Vendor Class Support..................................... .15
Using the Serial Configuration Utility............................... .16
Installing Your Appliance........................................... 19
Installing Hardware Options....................................... 23
Connecting External Sensors.......................................... .23
Changing Camera Lenses............................................... .23
Operational Specifications......................................... 25
Integrated Sensors.......................................................... .25
Warranty and Service.................................................. 27
Life-Support Policy...................................................... 29
About Your Appliance: NetBotz 320
vi
About Your Appliance: NetBotz 320
About Your NetBotz 320
Your NetBotz 320 has been designed to provide extraordinary asset protection
against physical and environmental threats. Your NetBotz 320 includes an
integrated camera as well as integrated temperature, humidity, dew point, air
flow, audio, and door switch sensors. It also includes 4 ports for adding
external sensors (such as external temperature and humidity sensors, Amp
Detectors, or dry contact sensors).
Upgrading Your NetBotz 320
Your NetBotz 320 supports a variety of hardware and software upgrades.
These upgrades, including add-on software applications and external sensors,
enable you to customize your NetBotz 320 appliance to meet your particular
environmental monitoring needs.
Hardware Upgrades
You can upgrade your appliance hardware by connecting a broad variety of
supported external sensors to the integrated external sensor ports, or to a
Sensor Pod 120. Available external sensors include TS100 External
Temperature Sensors, HS100 External Humidity Sensors, FD100 Fluid
Detectors, PS100 Particle Sensors, and Amp Detectors, as well as many thirdparty dry contact sensors (connected to the integrated external sensor ports or
a Sensor Pod 120 using a Dry Contact Cable).
For more information on upgrading your NetBotz 320 hardware,
see “Installing Hardware Options” on page 23.
See also
Software Upgrades
The BotzWare on your NetBotz 320 can be upgraded as newer versions
become available using the Upgrade task. Your appliance also supports addon software applications, such as Advanced Device Crawlers, which provide
powerful advanced environmental threat monitoring functionality. Add-on
software is available for purchase separately from NetBotz and NetBotz
certified resellers.
1
About Your NetBotz 320
2
About Your Appliance: NetBotz 320
Before You Begin
Before you begin configuring and installing your appliance, you should first
confirm that your appliance package contents are complete. You should also
choose an appropriate installation location and gather some information about
the network settings that will be used for the appliance.
Package Contents
Your NetBotz 320 appliance package contains the following:
• NetBotz 320 appliance
• Power supply
• Magnetic door switch Sensor and cable
• Wall mounting bracket (high-quality, heavy-duty, 360° positionable
wall-mounting bracket. Included with wall model only)
• Null modem cable
Choosing an Installation Location
Before configuring and installing your appliance, you should identify the
location where you will mount the appliance. When selecting a location, be
sure to take the following into account:
• Location of the nearest Ethernet port in relation to placement of the
appliance.
• Location where you will place the door sensor in relation to location of
the appliance.
• Location where you will place external sensors, if any, in relation to the
appliance.
• Objects that might obstruct the appliance camera.
3
Before You Begin
Gathering Network Settings Information
You should also collect the following information. You will need this
information to configure the network settings on your appliance.
• DHCP and IP Address Information:
– Does your network use a DHCP server?
– If you do not use DHCP, what IP address is assigned for use by your
appliance?
• Subnet Mask Information:
– Will you use a subnet mask for the appliance LAN interface?
– If you are using a subnet mask, what is the mask?
• Gateway Information:
– Will you use a default gateway for packet routing?
– If you use a default gateway, what is the IP address of the gateway?
Administrator Account User ID & Password
Your NetBotz 320 comes with a pre-configured Administrator account. The
User ID and Password for this pre-configured account are:
• User ID: netbotz
• Password: netbotz
To ensure security, be sure to use the Advanced View Users
task to change the default Administrator account User ID and
Password.
Note
Root Account User ID & Password
Your NetBotz 320 comes with a pre-configured root account. The root
account is used only for appliance communications that are performed using
the serial port, such as when you use the Serial Configuration Utility to
specify network settings (see “Using the Serial Configuration Utility” on
page 16). The User ID and Password for this pre-configured account are:
• User ID: root
• Password: netbotz
Note
4
You cannot change the root account User ID.
However, to ensure security, be sure to use the
Advanced View Change Root Password Tool menu
selection to change the default root account password.
About Your Appliance: NetBotz 320
The NetBotz 320: A Closer Look
Your NetBotz 320 is a single, integrated unit, with a variety of ports and
connections as well as a camera and several environmental sensors housed
within a sturdy case.
Each port or connection is identified with a symbol on the label. The symbols,
and the ports which they identify, are:
Power. The power supply connects to this port. The port and
power supply plug lock together to discourage accidental
unplugging of the appliance.
Serial. Connect the included null modem cable to this port
for network settings configuration.
10/100 Ethernet Connection. Use a standard RJ-45 cable to
connect the appliance to your Ethernet network.
Door Switch Sensor. Used to connect the Door Switch
Sensor to the appliance.
5
The NetBotz 320: A Closer Look
External Sensor Ports. Used to add external sensors (such as
external temperature and humidity sensors, Amp Detectors,
or dry contact sensors) to the appliance. The external sensor
ports are numbered 1 through 4.
NetBotz 320 LEDs
Your NetBotz 320 features a series of 9 LED indicators, shown below. These
LEDs are used to indicate the current power, alert, and network
communication status of the appliance. The following illustration shows the
LEDs as they appear on the NetBotz 320 wall model..
LED
Camera
6
Description
When the appliance is powered on this LED blinks slowly and
steadily (one second on, one second off), indicating that the
appliance is currently active, and capturing video images.
About Your Appliance: NetBotz 320
The NetBotz 320: A Closer Look
LED
Description
Status
Indicates the current operational and alert status of the appliance.
On initial power-up, blinks to indicate that the appliance is in the
process of starting up. Once the startup process is complete,
illuminates steadily. If startup process fails the LED is not
illuminated. If any alerts conditions currently exist the LED
blinks. The LED will blink slowly for less severe alerts, quickly
for more severe alerts. If multiple alert conditions currently exist
the LED blink rate is determined by the most severe alert
condition.
Activity
Blinks to indicate network activity.
10/100
Illuminates if the appliance is currently using a 100MB Ethernet
connection. If not illuminated, the appliance is currently using a
10MB Ethernet connection.
Temp
Blinks if the internal temperature sensor is currently reporting an
alert condition. If the dew point sensor is reporting an alert
condition, both the Temp LED and the Humidity LED will blink
together. If a connected External Temperature Sensor is reporting
an alert, both the Temp LED and the External LED will blink
together.
Humidity
Blinks if the internal humidity or dew point sensors are currently
reporting an alert condition. If the dew point sensor is reporting
an alert condition, both the Temp LED and the Humidity LED
will blink together. If a connected External Humidity Sensor is
reporting an alert, both the Humidity LED and the External LED
will blink together.
Airflow
Blinks if the internal airflow sensor is currently reporting an alert
condition.
Audio
Blinks if the internal audio sensor is currently reporting an alert
condition.
External
Blinks to indicate that an external sensor is currently reporting an
alert condition. If an attached External Temperature Sensor or
External Humidity Sensor is reporting an alert condition the
External LED and the Temp LED or Humidity LED,
respectively, will blink.
About Your Appliance: NetBotz 320
7
The NetBotz 320: A Closer Look
About the Appliance Camera
Your NetBotz 320 includes an integrated camera.
Attention: THE EQUIPMENT CONTAINS, AND THE
SOFTWARE ENABLES, VISUAL RECORDING
CAPABILITIES, THE IMPROPER USE OF WHICH MAY
SUBJECT YOU TO CIVIL AND CRIMINAL PENALTIES.
APPLICABLE LAWS REGARDING THE USE OF SUCH
CAPABILITIES VARY BETWEEN JURISDICTIONS AND MAY
REQUIRE AMONG OTHER THINGS EXPRESS WRITTEN
CONSENT FROM RECORDED SUBJECTS. YOU ARE
SOLELY RESPONSIBLE FOR INSURING STRICT
COMPLIANCE WITH SUCH LAWS AND FOR STRICT
ADHERENCE TO ANY/ALL RIGHTS OF PRIVACY AND
PERSONALTY. USE OF THIS SOFTWARE FOR ILLEGAL
SURVEILLANCE OR MONITORING SHALL BE DEEMED
UNAUTHORIZED USE IN VIOLATION OF THE END USER
SOFTWARE AGREEMENT AND RESULT IN THE
IMMEDIATE TERMINATION OF YOUR LICENSE RIGHTS
THEREUNDER.
The integrated camera includes the following features:
• User adjustable and switchable industry-standard CS-mount lens. CSmount permits access to hundreds of different general purpose and
special purpose lenses.
• Image processor that generates images up to 640x480 resolution, 24-bit
color, and up to 20 frames per second.
Note
The maximum frame rate describes the maximum number of
images that the camera imager is capable of producing each
second. The actual frame rate that will be visible in the Basic
View or Advanced View is largely dependent on the amount of
available bandwidth.
Image Size and Imager Field of View Specifications
• Image Size: 7.7mm x 6.1mm (9.82mm Diagonal = 0.387”).
• Field of View: 64º (H) x 53º (V) for all resolutions.
8
About Your Appliance: NetBotz 320
The NetBotz 320: A Closer Look
Sensors Included With Your Appliance
Your appliance features a variety of integrated sensors. In addition, your
appliance can also support up to 4 additional external sensors. Details on the
sensors that are included with your appliance and whether the sensor is analog
or state follow.
Integrated Sensor Types
Your appliance includes the following sensors:
• Temperature: Analog sensor that reports temperature readings as
degrees Fahrenheit or Celsius. Readings include values down to tenths
of a degree.
• Humidity: Analog sensor that reports relative humidity readings as
whole number percentage values.
• Airflow: Analog sensor that reports airflow readings as whole number
feet or meters per minute values.
• Dew Point: Analog sensor that reports dew point readings as degrees
Fahrenheit or Celsius. Readings include values down to tenths of a
degree.
• Audio: Analog sensor that reports audio level as a whole number
between 0 (silent) to 100 (very loud).
• Door Switch: State sensor that reports whether a door is “open” or
“closed.”
• Camera Motion Sensor: State sensor that reports the presence of
motion in the camera field of view.
About Your Appliance: NetBotz 320
9
The NetBotz 320: A Closer Look
External Sensor Ports
Your appliance also features 4 external sensor ports to which the following
additional sensors can be connected.
• TS100 External Temperature Sensor: Analog sensor that reports
temperature readings as degrees Fahrenheit or Celsius. Readings
include values down to tenths of a degree.
• HS100 External Humidity Sensor: Analog sensor that reports relative
humidity readings as whole number percentage values.
• FD100 Fluid Detector: State sensor that reports the presence or
absence of fluid.
• PS100 Particle Sensor: Analog sensor that reports the presence of dust
and other particulates larger than 1 micro meter.
• Amp Detector: Analog sensors that report the amperage values of the
monitored power source.
• External Door Switch: State sensor that reports whether a door is
“open” or “closed.”
• Dry contact sensors using a Dry Contact Cable: State sensors that
reports a general “open” or “closed” state. Condition monitored or
detected is dependent on the type of dry contact sensor in use.
10
About Your Appliance: NetBotz 320
About the NetBotz Installer CD
You can use the NetBotz Installer CD to install the following applications on
any supported system:
• Advanced View: A Java-based user interface for monitoring and
managing your NetBotz 320.
• Serial Configuration Utility: A Java-based application that you can use
to configure the network settings on your NetBotz 320.
• Java Runtime Environment (JRE)
By default, the NetBotz Installer will copy the NetBotz 320 documentation to
your system. You can also access these PDF files from the DOCS subdirectory
of the CD.
Installing on a Windows System
To install the applications and the JRE on a supported Windows system
1. Place the NetBotz Installer CD-ROM in the CD-ROM drive of the
system that you will use to configure and manage your appliance. The
NetBotz Installer will start automatically. If you have disabled Autostart
on your system, click Start > Run, type x:\install.exe in the
Open field (where x is the drive letter assigned to your CD-ROM drive)
and then click OK.
2. The Welcome screen appears. Read the window contents and then click
Next to continue.
3. The License Agreement window appears. Read the window contents,
click I Accept the terms of the License Agreement to agree to the
terms and conditions of the license agreement and then click Next. If
you do not agree to the terms and conditions of the license agreement,
click Cancel to close the installation program.
4. The Choose Install Set window appears. You can choose to install the
Typical product features, Minimal product features, or Custom product
features.
– If you choose Typical the Serial Configuration Utility, product
documentation, and Advanced View application will be installed on
your system.
– If you choose Minimal only the Advanced View application will be
installed on your system.
– If you choose Custom you can select which components you want
installed on your system.
11
About the NetBotz Installer CD
Select a product feature option and then click Next to continue.
5. The Choose Install Folder window appears. Specify a directory to which
the program files will be installed or accept the default installation
directory. Click Next to continue.
6. The Pre-Installation Summary window appears and displays
information about the installation options you have chosen. Click
Install to begin installing program files.
7. The Installing NetBotz Advanced View progress window appears, and
after all files have been installed the Install Complete window appears.
Click Done to finish your installation and close the NetBotz Installer.
Installing on a Linux System
To install the applications and the JRE on a supported Linux system:
1. Place the NetBotz Installer CD-ROM in the CD-ROM drive of the
system that you will use to configure and manage your appliance. Be
sure to mount the drive if necessary.
2. Run install.bin from the Linux subdirectory on the CD. For example, if
you mounted the CD-ROM drive as /mnt/cdrom, execute the following
command:
3. sh /mnt/cdrom/linux/install.bin
4. The NetBotz Installer starts and the Welcome screen appears. Read the
window contents and then click Next to continue.
5. The License Agreement window appears. Read the window contents,
click I Accept the terms of the License Agreement to agree to the
terms and conditions of the license agreement and then click Next. If
you do not agree to the terms and conditions of the license agreement,
click Exit to close the installation program.
6. The Choose Install Set window appears. You can choose to install the
Typical product features, Minimal product features, or Custom product
features.
– If you choose Typical the Serial Configuration Utility, product
documentation, and Advanced View application will be installed on
your system.
– If you choose Minimal only the Advanced View application will be
installed on your system.
– If you choose Custom you can select which components you want
installed on your system.
Select a product feature option and then click Next to continue.
7. The Choose Install Folder window appears. Specify a directory to which
the program files will be installed or accept the default installation
12
About Your Appliance: NetBotz 320
About the NetBotz Installer CD
directory. Click Next to continue.
8. The Pre-Installation Summary window appears and displays
information about the installation options you have chosen. Click
Install to begin installing program files.
9. The Installing NetBotz Advanced View progress window appears, and
after all files have been installed the Install Complete window appears.
Click Done to finish your installation and close the NetBotz Installer.
Installing on a Solaris System
To install the applications and the JRE on a supported Sparc system running
Solaris 9 (with all patch bundles recommended by Sun installed):
1. Place the NetBotz Installer CD-ROM in the CD-ROM drive of the
system that you will use to configure and manage your appliance. Be
sure to mount the drive if necessary.
2. Run install.bin from the Solaris subdirectory on the CD. For example, if
you mounted the CD-ROM drive as /mnt/cdrom, execute the following
command:
sh /mnt/cdrom/solaris/install.bin
3. The NetBotz Installer starts and the Welcome screen appears. Read the
window contents and then click Next to continue.
4. The License Agreement window appears. Read the window contents,
click I Accept the terms of the License Agreement to agree to the
terms and conditions of the license agreement and then click Next. If
you do not agree to the terms and conditions of the license agreement,
click Exit to close the installation program.
5. The Choose Install Set window appears. You can choose to install the
Typical product features, Minimal product features, or Custom product
features.
– If you choose Typical the Serial Configuration Utility, product
documentation, and Advanced View application will be installed on
your system.
– If you choose Minimal only the Advanced View application will be
installed on your system.
– If you choose Custom you can select which components you want
installed on your system.
Select a product feature option and then click Next to continue.
6. The Choose Install Folder window appears. Specify a directory to which
the program files will be installed or accept the default installation
directory. Click Next to continue.
7. The Pre-Installation Summary window appears and displays
About Your Appliance: NetBotz 320
13
About the NetBotz Installer CD
information about the installation options you have chosen. Click
Install to begin installing program files.
8. The Installing NetBotz Advanced View progress window appears, and
after all files have been installed the Install Complete window appears.
Click Done to finish your installation and close the NetBotz Installer.
14
About Your Appliance: NetBotz 320
Configuring Network Settings
Before installing your NetBotz 320 appliance, you must configure your
appliance’s network settings. By default, your appliance is configured to
obtain its network settings using DHCP. Alternately, you can use the Serial
Configuration Utility to specify network settings (including IP address,
gateway address, subnet mask, hostname, NAT proxy, and speed and duplex
settings) to be used by the appliance.
Obtaining Network Settings Using DHCP
By default, your appliance is configured to attempt to obtain its network
settings using DHCP. When you connect the appliance to your network and
power it on, it automatically attempts to contact a DHCP server. The appliance
will wait 30 seconds for a response. If the DHCP server is configured to
provide a hostname the appliance will request either its configured hostname
or ‘netbotzxxxxxx’ (where xxxxxx is the last 6 digits of the appliance serial
number) as a hostname to be associated with the IP address granted by the
DHCP server, enabling you to use a web browser to connect to the appliance
at the http://netbotzxxxxxx without any additional configuration necessary.
The appliance will also request DNS server addresses, DNS domain, SMTP
server addresses, and NTP server addresses from the DHCP server.
Note
After your DHCP server has assigned network settings for the
appliance, you can use your system, a null modem cable, and the
Serial Configuration Utility to view the network settings. For
more information see “Using the Serial Configuration Utility”
on page 16.
DHCP Vendor Class Support
The DHCP client on your NetBotz 320 features vendor class support. When
requesting network configuration from your DHCP server, your NetBotz 320
provides the following vendor class string:
NetBotz320
Vendor classes enable you to define a set of DHCP settings for a specific
equipment vendor and apply those settings to any node falling into that class.
Vendor classes offer enhanced flexibility in assigning custom settings to
individual network clients without affecting others on the same network.
15
Configuring Network Settings
Using this vendor class, your NetBotz 320 can request a custom set of DHCP
settings that is appropriate for its configuration. For example, you might
assign longer lease durations for NetBotz 320 appliances, as they typically
remain on the network in use without interruption. To do this, you would
configure a vendor class on your DHCP server named NetBotz320 (no spaces)
and assign to it a longer lease period. Then, when any NetBotz 320 requests
network settings from the DHCP server, the appliance will automatically
receive a longer lease based on that vendor class.
Using the Serial Configuration Utility
You can use the Serial Configuration Utility (installed using the NetBotz
Installer CD-ROM. For more information, see “About the NetBotz Installer
CD” on page 11) to assign your appliance network settings.
To configure your appliance using the Serial Configuration Utility:
1. Click Start > Programs > NetBotz > Serial Configuration > Serial
Configuration Utility to start the Serial Configuration Utility. If the
Serial Configuration Utility has not yet been installed on your system,
see “About the NetBotz Installer CD” on page 11 for instructions on
how to do so.
2. Connect one end of the null modem cable to a serial connector on your
system and the other end of the cable to the serial port on the appliance.
3. If you will be obtaining network settings using DHCP, plug an Ethernet
cable into the Ethernet socket, and then connect the Ethernet cable to an
Ethernet wall jack or hub.
4. Plug the appliance power supply into a wall outlet, and then connect it
to the power cord connection. The Status LED will illuminate for 2-3
seconds immediately after you connect power to the appliance, and then
go dark. When the appliance is finished starting up (the process can take
as long as 2 minutes, depending on appliance configuration), the Status
LED will illuminate again. Once the Status LED is illuminated again
click Next to continue.
5. The Serial Configuration Utility automatically scans your systems COM
ports to determine if an appliance is connected to the system. If an
appliance is discovered the utility will note the presence of the appliance
in the Device column of the window. Select the radio button that
corresponds to the appliance you wish to configure and then click Next
16
About Your Appliance: NetBotz 320
Configuring Network Settings
to continue configuring your appliance.
Note
If the COM port associated with the port to which your serial
cable is connected is currently in use by another application, the
message beside the COM port in the Owner column will
indicate that the port is not currently available. To correct this,
close the application that is using the COM port and then click
Scan Serial Ports.
6. field the administrator account password for this appliance (by default
this password is set to “netbotz.” For more information see
“Administrator Account User ID & Password” on page 4) and then click
OK.
7. The utility scans the appliance and displays the network settings (IP
Address, Netmask, and Gateway) that are currently stored on the
appliance.
8. Configure the Ethernet Interface:
a. Specify the Network settings.
– To configure this interface to use network settings assigned by a
DHCP server select the Configure automatically via DHCP radio
button.If desired, specify a NAT proxy name or IP address that will
be used by a NAT Proxy server in your network to enable users to
connect to the appliance from outside the firewall. You can also
specify speed and duplex settings for use by this interface, or leave
them set to Auto Negotiate (the default value).
– To specify network settings for use by this interface, select the
Configure using these settings radio button and then provide an IP
address, subnet mask, and gateway address for the appliance. If
desired, specify a NAT proxy name or IP address that will be used
by a NAT Proxy server in your network to enable users to connect to
the appliance from outside the firewall. You can also specify speed
and duplex settings for use by this interface, or leave them set to
Auto Negotiate (the default value).
About Your Appliance: NetBotz 320
17
Configuring Network Settings
b. Check the Enable Interface check box, and then click OK to save
these settings and continue.
9. Specify the DNS Settings.
– To use DNS Settings that are provided by your DHCP server, check
the Use DHCP DNS Settings check box.
– To specify DNS Settings for this appliance manually uncheck the
Use DHCP DNS Settings check box and then provide the desired
domain and DNS server information.
10. Click Next to save your configuration settings. When the save process is
complete you can click Finish to close the Serial Configuration Utility.
To test the appliance IP connection, start your web browser and type the IP
address that was assigned to the appliance into the address field. Then, press
Enter. If the appliance is online and properly configured the Basic View will
be displayed in the browser window.
18
About Your Appliance: NetBotz 320
Installing Your Appliance
Once you have configured your appliance’s network settings, you are ready to
install the appliance. Before installing your appliance, please be sure to review
the information regarding the various appliance ports and connections in “The
NetBotz 320: A Closer Look” on page 5.
You need the following parts (included with the appliance) to complete the
following procedures:
• The NetBotz 320 appliance
• The power supply
• The Door Switch Sensor and its cable
• Black universal swivel wall mount (optional, included with wall models
only)
To install the NetBotz 320:
1. Mount the Door Switch Sensor that is included with the appliance.
Complete these steps to mount the switch:
a. Measure the distance between the location where you intend to
mount the switch and the location where you will install the NetBotz
320. Ensure that the Door Switch Sensor cable is long enough before
continuing.
b. Using one of the included adhesive strips, attach the wired portion of
the door switch to the door frame. When mounting this portion of the
switch, ensure that the flat side of the switch is flush with the door
frame.
c. Using another adhesive strip, mount the non-wired portion of the
switch to the door. Be sure to mount the second piece of the switch so
that when the door is closed the two portions of the switch are as
close to each other as possible.
Once both pieces of the door switch are mounted, there must be
no more than 1/4” of space between the two pieces when the
door is closed.
Note
2. Install the NetBotz 320 rack model in your server rack, or mount the
NetBotz 320 wall model to your wall.
– If you will be installing a rack model appliance, using a screwdriver
or a drill, mount the NetBotz 320 rack model to the rack. The screws
19
Installing Your Appliance
needed to mount the NetBotz 320 rack model depend on your rack.
Please refer to the documentation that came with your server rack for
more information.
– If you will be mounting a wall model appliance using the included
black universal swivel wall mount:
a. Select a location for the wall mount, and then use the included
NetBotz swivel wall mount template to mark the locations in which
the anchors need to be installed.
b. Install the screw anchors. Then, use the screws included with the
wall mount to secure the wall mount to your wall. Be sure to use the
included wall anchors and to tighten the screws enough to ensure that
the appliance will be securely fastened to the wall. Do not
overtighten the screws.
c. Using the bracket mount on the rear of the appliance, connect the
appliance to the wall mount by screwing the appliance onto the wall
mount until it is snug.
d. Use the swivel points on the wall mount to orient the NetBotz so that
it is pointed in the desired direction. When facing the bracket, you
can rotate the appliance clockwise and counter-clockwise by turning
the entire appliance; the post will rotate with the appliance. To swivel
the appliance vertically, turn the knob on the bracket just below the
point at which the appliance connects to the bracket, adjust the
position of the appliance as desired, and then tighten the knob again.
– If you will be mounting a wall model appliance flush against your
wall:
e. Select a location and then use the included flush wall mount template
to mark the locations in which the anchors need to be installed.
f. Install the screw anchors.
g. Screw one screw into each anchor until approximately 1/4” of each
screw is exposed. Then, hang the NetBotz on the screws.
3. Plug the power cord into the power socket. Note that the power cord is a
locking power cord, and you will need to pull the plug sleeve back to
unplug the cord.
4. Plug the Ethernet cable into the Ethernet socket.
5. Connect the Door Switch Sensor to the Door Switch Sensor connection.
6. Connect the Ethernet cable to an Ethernet wall jack or hub. Plug the
power cord into a wall socket. When you plug in the power cord, the
NetBotz will perform a power-on test and will then begin to collect data.
The LEDs on the NetBotz light up, the Status LED illuminates, and if
the Ethernet connection is live the Activity LED will flicker with
20
About Your Appliance: NetBotz 320
Installing Your Appliance
network traffic and the 10/100 LED will illuminate if you are connected
to a 100MB Ethernet network.
Note
Be sure to connect the Ethernet socket on your appliance to an
Ethernet network, using a standard RJ-45 Ethernet cable.
Connecting the Ethernet socket to a powered telephone jack or
using an incorrect cable type can cause permanent damage to
your appliance.
When you have completed the installation procedure, use a supported web
browser to verify that the NetBotz is online.
1. Start a supported web browser on any system in your network.
2. Enter the NetBotz 320 IP address in the Address or Website field and
then press Enter.
If the NetBotz 320 is online, the Basic View appears.
About Your Appliance: NetBotz 320
21
Installing Your Appliance
22
About Your Appliance: NetBotz 320
Installing Hardware Options
You can upgrade your NetBotz 320 hardware in the following ways:
• Connecting supported external sensors to the integrated external sensor
ports
• Changing the lens on the camera
Connecting External Sensors
To install an external sensor, plug the sensor into an available External Port on
your appliance.
Note
• Be sure to note the number of the External Port when you
connect the cable; you will need this information when you
use the Advanced View or Basic View to configure your
NetBotz 320. The External Port number is printed above
the port on the pod.
• If the external sensor cable is not long enough, use a
Extension Cable for External Sensors (available in 50’ and
100’ lengths from your NetBotz reseller) to lengthen the
cable.
When you have finished installing, use the Sensor Pods task to configure the
NetBotz 320 to use the external sensor. Once you have configured your
appliance, an additional generic sensor will appear in the Sensor Data pane
when the pod to which it is connected is selected from the Navigation pane.
You will be able to use the Advanced View Sensor Pods task to specify
thresholds for this external sensor.
Changing Camera Lenses
Your appliance lens uses a CS-standard lens mount, enabling you to replace
your lens with any standard CS- or C-mount lens (C-mount lenses require a Cto-CS adapter ring) that supports a .5” or larger imager. Changing lenses is a
simple procedure.
Note
Once the lens is removed, the digital imager assembly is
exposed. Do not touch the imager. Take care to ensure that dust
and dirt do not fall on the imager. If dust or dirt fall on the
imager, use a can of compressed air to clean the imager by
blowing the dust or dirt clear.
23
Installing Hardware Options
To change the lens, simply rotate the lens counter-clockwise until it is fully
extended. Then, using a small amount of force, continue rotating the lens
counter-clockwise until the lens unscrews from the housing. Then, install your
new CS-mount lens (or C-mount lens with CS-mount adapter) by screwing it
into the housing in a clockwise direction. When the lens is fully screwed in,
apply a small amount of additional force in a clockwise direction to ensure
that it is securely installed.
24
About Your Appliance: NetBotz 320
Operational Specifications
• Housing: Wall Model: 12.45cmW x 19.55cmH x 2.27cmD, 20 gauge
metal. Rack Model: 19” rack mount, 1U, 20 gauge metal.
• Indicators: Appliance operational/alert status, network speed, network
activity, temperature out-of-limit, camera activity, humidity out-oflimit, airflow out-of-limit, sound detected, external sensor violation
detected LEDs.
• Connectors: Ethernet: RJ-45 to Cat 5 network wiring; Serial: DB-9
receptacle; Power: 5 vdc power brick. 1 Door switch sensor connector
(Magnetic door sensor supplied). 4 External Sensor connectors.
• Data Speed: Ethernet 10/100 Mbps (10/100 BaseT).
• Protocols: TCP/IP, HTTP, SMTP, SNMP, DHCP, DNS, Socks V4 or V5
Proxy server.
• Management Interface: Supports Netscape Navigator 4.79, 6.0 or
later; Internet Explorer 5.5 or later, and Mozilla 1.3 or later on these
operating systems: Microsoft Windows (2000 or XP SP1), Red Hat EL
3, Fedora Core 3, or Debian GNU 3 or a Sparc workstation running
Solaris 9 with all patch bundles recommended by Sun. Use of the
Advanced View interface requires a one-time download of the Java
Runtime Environment Plug-in from Sun Microsystems. Display
Resolution 1024 x 768 minimum.
• Imager: Image processor that generates images up to 640x480
resolution, 24-bit color, and up to 20 frames per second.
• Lens: 48ºW by 37ºH CS-mount lens. Can be replaced by any standard
CS- or C-mount (with CS-mount adapter) lens.
• Operational Environment: Temperature: 2º to 50º C (35º F to 120º F).
Relative Humidity: 10% to 90% (non-condensing). For indoor use only.
Not designed for use in corrosive or caustic environments.
Integrated Sensors
• Temperature: Range: 2º to 50º C (35º to 120º F), Accuracy: +/- 1º C (+/
-1.8º F) typical.
• Relative Humidity: Range: 10% to 90% (non-condensing), Accuracy:
+/-5% RH.
• Air Flow Rate: 0-1,000 Meters Per Minute (0-3,248 Feet Per Minute).
• Audio: Built-in acoustic sensor detects audio above specified level.
• External Sensor Ports: 4, integrated with appliance.
• Camera Motion Sensing: Built in, region maskable.
25
Operational Specifications
26
About Your Appliance: NetBotz 320
Warranty and Service
Limited warranty
APC warrants the NetBotz 320 to be free from defects in materials and
workmanship for a period of 1 year (hardware) or 90 days (software) from the
date of purchase. Its obligation under this warranty is limited to repairing or
replacing, at its own sole option, any such defective products. This warranty
does not apply to equipment that has been damaged by accident, negligence,
or misapplication or has been altered or modified in any way. This warranty
applies only to the original purchaser.
Warranty limitations
Except as provided herein, APC makes no warranties, expressed or
implied, including warranties of merchantability and fitness for a
particular purpose. Some jurisdictions do not permit limitation or exclusion
of implied warranties; therefore, the aforesaid limitation(s) or exclusion(s)
may not apply to the purchaser.
Except as provided above, in no event will APC be liable for direct,
indirect, special, incidental, or consequential damages arising out of the
use of this product, even if advised of the possibility of such damage.
Specifically, APC is not liable for any costs, such as lost profits or revenue,
loss of equipment, loss of use of equipment, loss of software, loss of data,
costs of substitutes, claims by third parties, or otherwise. This warranty gives
you specific legal rights and you may also have other rights, which vary
according to jurisdiction.
Obtaining service
To obtain support for problems with your NetBotz 320:
0
1. Note the serial number. The serial number is located on the rear of the
unit.
2. Contact NetBotz Customer Support in the following ways:
– Phone: 1-512-439-5916, or toll-free at 1-877-908-2688
– Web: http://register.netbotz.com/how_to_contact.html
3. If you must return the product, the technician will give you a return
material authorization (RMA) number. If the warranty expired, you will
27
Warranty and Service
be charged for repair or replacement.
4. Pack the unit carefully. The warranty does not cover damage sustained
in transit. Enclose a letter with your name, address, RMA number and
daytime phone number; a copy of the sales receipt; and a check as
payment, if applicable.
5. Mark the RMA number clearly on the outside of the shipping carton.
6. Ship by insured, prepaid carrier to the address provided by the Customer
Support technician.
28
About Your Appliance: NetBotz 320
Life-Support Policy
General policy
American Power Conversion (APC) does not recommend the use of any of its
products in the following situations:
• In life-support applications where failure or malfunction of the APC
product can be reasonably expected to cause failure of the life-support
device or to affect significantly its safety or effectiveness.
• In direct patient care.
APC will not knowingly sell its products for use in such applications unless it
receives in writing assurances satisfactory to APC that (a) the risks of injury or
damage have been minimized, (b) the customer assumes all such risks, and (c)
the liability of American Power Conversion is adequately protected under the
circumstances.
Examples of life-support devices
The term life-support device includes but is not limited to neonatal oxygen
analyzers, nerve stimulators (whether used for anesthesia, pain relief, or other
purposes), autotransfusion devices, blood pumps, defibrillators, arrhythmia
detectors and alarms, pacemakers, hemodialysis systems, peritoneal dialysis
systems, neonatal ventilator incubators, ventilators (for adults and infants),
anesthesia ventilators, infusion pumps, and any other devices designated as
“critical” by the U.S. FDA.
Hospital-grade wiring devices and leakage current protection may be ordered
as options on many APC UPS systems. APC does not claim that units with
these modifications are certified or listed as hospital-grade by APC or any
other organization. Therefore these units do not meet the requirements for use
in direct patient care.
29
Life-Support Policy
30
About Your Appliance: NetBotz 320
www.netbotz.com
PN: 01345D03