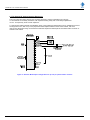
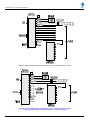
1
User’s Manual
TA7982 Series
Tower Top Amplifier System
Base Line 1.30
Document Number: INS41590-1
TA7982-01xx-12-xx Series User’s Manual
Company Overview
RFI has been serving the needs of the wireless communications market for over 30 years. First founded as a
manufacturer of antenna systems, RFI has grown to be a key player in the development, manufacturing and
distribution of wireless technology and energy products. Through our extensive network of resellers, systems
integrators and retail outlets, RFI is a key supplier to both industry and Government.
Our research and manufacturing facilities have talented people, sophisticated test equipment, state of the art
software with class leading manufacturing systems and techniques. Additionally, we have in place a quality
management program which is certified to ISO9001, environmental management system certification to ISO14001
and occupational health and safety standard AS4801 giving you complete confidence in everything we do.
RFI’s products are truly innovative and as a result we are active around the globe taking our Australian designed and
manufactured products to key markets in Asia Pacific, the Americas and EMEA regions via offices ‘in-region’ in
addition to exporting directly to in excess of 50 countries.
One of RFI’s key principals is to remain totally customer focused as we recognise our future depends on the success
of our customers. We know that to be chosen as your supplier we must add value to your business and to achieve
this we will work hard to deliver the best product when and where you need it and back this up with the very best
technical support available.
Asia Pacific | EMEA | Americas
2
TA7982-01xx-12-xx Series User’s Manual
Document Number INS41590-1
Copyright ã 2013 RF Industries Pty Ltd
First Printing: 20th May 2013
Version Number
Version Date
1.00
20th May 2013
1.20
19th November 2013
1.30
27th February 2014
_____________________________________________________________________________
Acknowledgements
Modified extracts of the Motorola Five Step Process for Receive System Verification documented process are
reproduced with permission.
Disclaimer
Product part numbering in photographs and drawings is accurate at the time of printing. Part number labels on RFI
products supersede part numbers given within this manual. Information is subject to change without notice.
Asia Pacific | EMEA | Americas
3
TA7982-01xx-12-xx Series User’s Manual
TABLE OF CONTENTS
1. GENERAL DESCRIPTION .............................................................................................................. 7
2. TTA - ELECTRICAL AND MECHANICAL SPECIFICATIONS ............................................... 9
3. RMC - ELECTRICAL AND MECHANICAL SPECIFICATIONS ............................................ 10
4. ORDERING INFORMATION ........................................................................................................ 12
5. INTERCONNECTION DIAGRAMS ............................................................................................. 13
6. TTA SYSTEM RF OUTPUT CAPACITY EXPANSION............................................................. 16
7. UNPACKING.................................................................................................................................... 19
8. FIRMWARE LICENSE AGREEMENT ........................................................................................ 20
9. INSTALLATION .............................................................................................................................. 21
10. OPERATION .................................................................................................................................. 24
11. COMMISSIONING ........................................................................................................................ 25
12. MANUAL SETUP AND OPERATION ........................................................................................ 31
12.1 Rear Panel Switches and LED Indicators .........................................................................................31
12.2 Front Panel Switches and LED Indicators ........................................................................................34
13. GUI SETUP AND OPERATION .................................................................................................. 36
13.1 Ethernet Connection Set-up ...............................................................................................................36
13.2 Log In Page ..........................................................................................................................................39
13.3 System Overview .................................................................................................................................40
13.4 Status Detail Menu ..............................................................................................................................41
13.5 Status Detail - RMC ............................................................................................................................42
13.6 Status Detail - TTA..............................................................................................................................44
13.7 Status Detail – System .........................................................................................................................46
13.8 Status Detail – Communications ........................................................................................................48
13.9 History Menu .......................................................................................................................................50
13.10 History – Performance Record .........................................................................................................51
13.11 Configuration Menu ..........................................................................................................................53
13.12 Configuration - RMC ........................................................................................................................54
13.13 Configuration – TTA .........................................................................................................................58
13.14 Configuration – User Data ................................................................................................................60
13.15 Configuration – Communications ....................................................................................................61
13.16 Maintenance Menu ............................................................................................................................63
13.17 Maintenance – Access Management ................................................................................................64
13.18 Maintenance – Date & Time .............................................................................................................66
13.19 Maintenance – Firmware Update.....................................................................................................67
13.20 Maintenance - Restart .......................................................................................................................68
13.21 About ..................................................................................................................................................69
13.22 Logout.................................................................................................................................................70
14. CONNECTORS .............................................................................................................................. 71
15. MAINTENANCE, INSPECTION AND REPAIR ADVICE....................................................... 72
16. BACKGROUND MATERIAL AND OTHER RESOURCES .................................................... 73
17. USER NOTES: ................................................................................................................................ 74
Asia Pacific | EMEA | Americas
4
TA7982-01xx-12-xx Series User’s Manual
Notice
The information contained in this document is subject to change without notice.
RF Industries Pty. Ltd. makes no warranty of any kind with regard to this material, including but not limited
to, the implied warranties of merchantability and fitness for a particular purpose. RF Industries Pty Ltd shall
not be liable for errors contained herein or for incidental or consequential damages in connection with the
furnishing, performance or use of the material.
All information contained in this manual has been reviewed. However RF Industries Pty Ltd accepts no
liability for any omissions, errors or construed information.
Ó 2012, RF Industries Pty Ltd. All rights reserved. Reproduction, adaptation or translation without prior
written permission is prohibited except as allowed under copyright laws.
For further information or help with this product contact your nearest RFI sales office or through the
following;
Region
USA
EMEA
ASIA PACIFIC
Sales email
Tech Support
Telephone Intl
Telephone local
Fax Intl
Web
[email protected]
[email protected]
+1 (330) 486 0706
330 486 0706
+ 1 (330) 486 0705
rfiamericas.com
[email protected]
[email protected]
+44 1869 255 772
01869 255 772
rfiemea.com
[email protected]
[email protected]
+61 7 3621 9400
1300 000 RFI
+61 2 9630 0844
rfi.com.au
Asia Pacific | EMEA | Americas
5
TA7982-01xx-12-xx Series User’s Manual
TT7982-01xx-12-AC Series
Tower Top Amplifier Unit
Front View
Bottom View
Receiver Multicoupler Unit
Front View
Rear View
Asia Pacific | EMEA | Americas
6
TA7982-01xx-12-xx Series User’s Manual
1. General Description
The TA7982 Series are full-featured, high performance systems comprising a Tower Top Amplifier (TTA) and a
Receiver Multicoupler/TTA Controller unit (RMC).
The TTA unit features a milled cavity bandpass preselector providing exceptional selectivity (>110dB) and a 28MHz
bandwidth (796-824MHz). Redundant quadrature low-noise amplifiers are included to overcome the system’s feeder
cable losses. An IP-rated milled aluminium housing provides excellent environmental ratings and the housing’s small
size also provides installation tower loading efficiency. Lightning surge protection is internally fitted to the TTA.
Each TTA amplifier stage is monitored to provide alarm indications in the event of failure, and to initiate automatic
change-over between the redundant amplifier paths. The status of these amplifier alarms, in addition to TTA
temperature, TTA power supply voltages, and other operational conditions, are sent to the RMC via the “Main”
coaxial feeder cable between the TTA and RMC, using an interface signalling protocol. DC power for the TTA is also
sourced from this cable.
Figure 1 - TTA Block Diagram
The TTA’s operating configuration can be controlled using either the user-friendly front panel switches, or via a local
(or remote) IP connection using the integral webserver Graphical User Interface (GUI) of the interconnected RMC.
A Test Port is provided on the TTA unit to facilitate TTA system testing from the ground equipment room.
A 30dB coupler in the TTA allows a signal to be injected to test the performance of both amplifier RF paths, and a
Test function allows measurements to be compared between a termination and the receive antenna to determine the
effective sensitivity of the network’s receiver system (refer Motorola Five Step Process for Receive System
Verification).
A Bypass capability is also included in the TTA Test Mode to allow both RF amplifiers to be bypassed during system
testing. This Bypass feature will time out after the user-configurable time period (factory default is 1 minute) to
ensure the system is not inadvertently left in this test mode.
RF path switching between the redundant amplifiers allow the RF signal path to be changed automatically using the
auto changeover feature, or manually using the RMC front panel switches or via GUI control. Manual changing
between amplifier paths may also be actioned for testing purposes, or for equipment life cycle sharing between the
two amplifiers’ circuitry.
Asia Pacific | EMEA | Americas
7
TA7982-01xx-12-xx Series User’s Manual
The RMC/TTA Controller (a.k.a. “RMC”) provides a power supply and signalling interface to the TTA, monitoring of
the TTA’s operational status and alarms and receive signal distribution to multiple base station receivers. It includes
adjustable gain to overcome the distribution cabling losses within the equipment building.
Configuration of the RMC is provided using rear panel rotary switches and configuration of the RMC/TTA Controller is
provided using front panel switches. Rear panel LED indicators show the status of power - and the use of the
optional post filter (if used). Front panel LED indicators show the status of power, TTA and RMC Fault status, the
selected TTA amplifier path, Term and Bypass modes, and whether the RMC is under Switch or LAN configuration
control.
In addition, SNMP and Form-C relay outputs are provided for interfacing to an alarm management system.
The RMC has adjustable attenuators for both Input and Distribution (Output) gain settings, adjustable in 1dB
increments. Rear panel CONFIG, INPUT GAIN ATTEN, and DIST. GAIN ATTEN switches provide a simple and
convenient method of configuring the RMC to meet Motorola’s guidelines for both Reserve (Input) gain, and
Distribution gain for the number of base stations connected to the TTA system.
The RMC unit distributes signals to 8 base station receivers (9 in Config Mode 2 – refer Section 12), and it can be
easily field expanded to cater for up to 128 base station receivers using additional 8way RMC Expansion Multicoupler
which may be ordered separately as required. Default TTA/RMC configurations are capable of 8 (or 9) and 16
outputs, but other output capacities may be easily ordered to suit system requirements.
ESS and mixed non-ESS/ESS base station equipment can be supported using Config Modes 6 and 7.
Figure 2 - RMC Block Diagram
A Test Port is provided on the RMC front panel to be used in conjunction with the TTA’s Bypass mode to sweep the
receive antenna system and antenna using a distance-to-fault (DTF) test set.
If desired, an integral web-server Graphical User Interface (GUI) resident in the RMC may also be used to configure
the TTA/RMC and to monitor the status of alarms and TTA/RMC operation. This webserver can be accessed locally
or remotely via TCP/IP network (or Internet) access. For software developers, a Command Line Interface (CLI) textbased command set is also available for interfacing to the TTA/RMC using a computer/workstation/mainframe and a
Telnet session if desired. New features can also be easily implemented via firmware upgrades using the GUI or CLI.
These TTA systems are available in 12VDC, 24VDC, 48VDC or 90-264VAC versions to suit different network or site
power systems.
Supporting documents including this User Manual, a Quick Start Guide (QSG), Design Guide and SNMP MIB files
are also available from RFI.
Asia Pacific | EMEA | Americas
8
TA7982-01xx-12-xx Series User’s Manual
2. TTA - Electrical and Mechanical Specifications
TTA Model Number
TA7982-0100-10-00
Frequency Band
700 / 800MHz
Preselector Included
Yes
Preselector Frequency Range
796–824MHz
Preselector Selectivity (High)
>110dB @ 851MHz
Preselector Selectivity (Low)
>110dB @ 776MHz
Type of Amplifier
Quadrature Coupled
Amplifier Switching
Automatic (configurable)
Type of Amplifier Switching
Solid State RF Switch
TTA Gain (input to output of TTA)
25dB +/-1dB
Noise Figure (Amplifier)
<1.5dB (1dB typ.)
Noise Figure (TTA)
<2.7dB typ.
<3.5dB
(includes TTA, 6dB feeder, and RMC)
Noise Figure (System)
TTA Amplifier IIP3
>+15dBm
Return Loss (All Ports)
>14dB
Power Requirements
Power Derived from “Main” port coaxial cable
Operating Temperature Range
Operating Temperature Range
(with minor performance degradation)
Redundancy
-22°F to 140°F / -30°C to +60°C
-22°F to 158°F / -30°C to +70°C
Automatic Changeover (configurable)
Lightning Protection
20kA IEC 61000-4-5 8/20uS
Test Port Included
Yes
Isolation (Coupling) of Test Port
30dB +/- 2dB
50ohm Termination Test
Yes (Receiver Multicoupler controlled)
Type of RF Test Switching
Solid State RF Switch
Bypass Test Mode
Yes (Receiver Multicoupler controlled)
Connectors (All Ports)
N-type (female)
Enclosure
NEMA Weather resistant housing
Table 1
Asia Pacific | EMEA | Americas
9
TA7982-01xx-12-xx Series User’s Manual
3. RMC - Electrical and Mechanical Specifications
Receiver Multicoupler Model Number
RX6996-3408-34-xxB
Frequency range
698-960MHz
8
(expandable to 128)
Number of RF Output Ports
Expansion Port
Yes
0 to +4dB
(-19 to +11dB available)
Net Gain or Loss (RMC In to RMC Out)
Amplifier Type
Quadrature Coupled
Amplifier Noise Figure
4dB max. (<1.9dB typ.)
rd
Amplifier Output 3 Order Intercept Point (3OIP)
>45dB (48dB typ.)
8way (field expandable to 128 way)
Supports ESS-only and mixed mode non-ESS/ESS operation
Number of Output Ports
RF Port Return Loss (All Ports)
>14dB
Connectors (to TTA)
N-type (female)
Receiver Connector
BNC-type (female)
Rx-Rx Port Isolation
>20dB
Receive Test Port
Yes
Test Port Input (front of Receiver Multicoupler)
BNC-type (female)
Test Port Output (rear of Receiver Multicoupler)
N-type (female)
Reserve (Input) Gain electronic attenuator
15dB (in 1dB steps)
Distribution Gain electronic attenuator
4dB (in 1dB steps)
Internal SMT surge protection
to supplement building entry point protection
Lightning Protection
Form-C contacts (n.o./n.c. 1A 60V)
SNMP V2c (Northbound Traps)
3pin Phoenix style (locking)
Alarms
Alarm Connector
Communications Connector
TCP/IP Ethernet port (RJ45)
Indicators
Power Requirements
Front panel LED's
12VDC nom. (10VDC to 18VDC floating)
24VDC nom. (18VDC to 36VDC floating)
48VDC nom. (36VDC to 60VDC floating)
90-264VAC 50/60Hz (plug pack on 12VDC model)
2.5A @ 12VDC
1.3A @ 24VDC
650mA @ 48VDC
DC Current Consumption (including TTA)
DC Connector
2pin Phoenix style (locking)
M6 stud (on RHS of rear panel)
M5 screw (on LHS of rear panel)
Earthing
Operating Temperature Range
32°F to 122°F / 0°C to +50°C
1RU 19inch Rack mount (8way)
2RU 19inch Rack mount (16way)
Mounting
Dimensions (W x H x D)
19 x 1.75 x 5.9” / 483 x 44.75 x 150mm (8way)
19 x 3.5 x 5.9” / 483 x 89.5 x 150mm (16way)
Table 2
Asia Pacific | EMEA | Americas
10
TA7982-01xx-12-xx Series User’s Manual
Expansion Multicoupler - Electrical and Mechanical Specifications
Receiver Multicoupler Model Number
RX0696-3008-31B
Frequency range
60-960MHz
Number of RF Output Ports
8
RF Port Return Loss (All Ports)
>14dB
Connectors
BNC-type (female)
Rx-Rx Port Isolation
>20dB
Power Requirements
None (Passive)
Operating Temperature Range
32°F to 122°F / 0°C to +50°C
Mounting
1RU 19inch Rack mount
Dimensions (W x H x D)
19 x 1.75 x 5.9” / 483 x 44.75 x 150mm
Table 3
Mains Power Supply - Electrical and Mechanical Specifications
Plug Pack Power Supply
RXTA0000-3060US-AC
Input Voltage
90-264VAC 50/60Hz
Input Plug
IEC
Input Cable
1.5m long USA plug
Output Voltage
12VDC @ 5A (60W)
Output Connector
2pin Phoenix style (locking)
Mounting
Free-standing
Dimensions (W x H x D)
5 x 1.25 x 2” / 125 x 31.5 x 50mm
Table 4
Asia Pacific | EMEA | Americas
11
TA7982-01xx-12-xx Series User’s Manual
4. Ordering Information
Ordering Information
System Model Numbers
Motorola E-CAT Part Number
DSTA7982010812AC
DSTA7982011612AC
RFI Part Number
Description
TA7982-0108-12-AC
TTA/RMC in “TTA01/RMC01” configuration
8 Port Receiver Multicoupler & Tower Top
Amplifier 796-824MHz, 90-264VAC (complete
with RXTA0000-3060US-AC Plug Pack Power
Supply)
TA7982-0116-12-AC
TTA/RMC in “TTA01/RMC01” configuration
16 Port Receiver Multicoupler & Tower Top
Amplifier 796-824MHz, 90-264VAC (complete
with RXTA0000-3060US-AC Plug Pack Power
Supply)
Separate Items
Motorola E-CAT Part Number
RFI Part Number
DSTA798201001000
TA7982-0100-10-00
DSRX6996340834ACB
RX6996-3408-34-ACB
DSRX0696300831B
RX0696-3008-31B
8 Port Expansion Multicoupler, 66-960MHz,
BNC Connectors
DSRXTA00003060USAC
RXTA0000-3060US-AC
90-264VAC 50/60Hz 12VDC Plug Pack
Power Supply c/w 1.5m IEC cable with USA
plug
Description
TTA in “TTA01” configuration
Tower Top Amplifier, 796-824MHz
RMC in “RMC01” configuration
8 Port Receiver Multicoupler, 698-960MHz,
90-264VAC (complete with RXTA00003060US-AC Plug Pack Power Supply)
Table 5
Asia Pacific | EMEA | Americas
12
TA7982-01xx-12-xx Series User’s Manual
5. Interconnection Diagrams
The TA7982 series of TTA systems are designed to be mounted into a wide range of configurations. The
Interconnection Diagrams (Figures 3 and 4) show two examples.
Figure 3 – TA7982-0108-12-xx Configuration (Config Switch position 1 and 2)
Asia Pacific | EMEA | Americas
13
TA7982-01xx-12-xx Series User’s Manual
Figure 4 – TA7982-0116-12-xx Configuration (Config Switch position 3, 4 and 5)
Asia Pacific | EMEA | Americas
14
TA7982-01xx-12-xx Series User’s Manual
Receive
Antenna
Tower Top
Amplifier
Ant
Test
Main
Receiver
Multicoupler
(Optional)
Post Filter
Filter
Filter
Test
Port
RF Input
Test Port
Lightning Surge
Protectors
To Expansion Multicouplers for capacities >8 channels
RF Outputs
Selection
Pushbuttons
Exp Port
Alarm
Ethernet
I/Face
10dB
To ESS Equipment Rack
To Site Alarm Management System
Power
DC In
DC or AC Power
AC In
Plug Pack
Figure 5 – TA7982-0116-12-xx Configuration (Config Switch position 6 and 7)
Asia Pacific | EMEA | Americas
15
TA7982-01xx-12-xx Series User’s Manual
6. TTA System RF Output Capacity Expansion
The TTA system RF output capacity may be easily expanded. Channel capacities from 8 through
to 128 channels can be easily catered for, with expansions being easily and conveniently implemented
on-site - as required by future network expansion.
To optimize site cabling material and installation effort, 8-way Expansion Multicouplers may be “distributed” around a
site equipment room, with one (or more) Expansion Multicouplers installed in each 19inch cabinet, with short
interconnect cables then being run between that cabinet’s Expansion Multicoupler and the base station receivers colocated in that cabinet.
Figure 6 - Receiver Multicoupler configuration for up to 8 (or 9) base station receivers
Asia Pacific | EMEA | Americas
16
TA7982-01xx-12-xx Series User’s Manual
Figure 7 - Receiver Multicoupler configuration for up to 16 base station receivers
Figure 8 - Receiver Multicoupler configuration for up to 64 base station receivers
(using multiple 8way Expansion Multicouplers for desired capacity)
Asia Pacific | EMEA | Americas
17
TA7982-01xx-12-xx Series User’s Manual
Figure 9 - Receiver Multicoupler configuration for up to 128 base station receivers
(using multiple 8way Expansion Multicouplers for desired capacity)
Asia Pacific | EMEA | Americas
18
TA7982-01xx-12-xx Series User’s Manual
7. Unpacking
The TTA and RMC units are packed in custom designed cardboard packaging, together with an AC to DC power
pack (if the AC option has been ordered).
Packed with the units will be the Factory Test Sheet (FTS) and Quick Start Guide (QSG). The User’s Manual will be
included on a USB memory stick.
It is recommended to retain the Factory Test Sheet for future reference.
An Ethernet jumper cable is included in the RMC packaging, provided for your convenience to connect and configure
the TTA and RMC via the RMC Graphical User Interface (GUI).
Although the packaging has been designed to provide suitable product protection during shipping, it is important to
report any visible damage to the carrier immediately.
It is the customers’ responsibility in the event of product damage, to lodge a damage claim with the carrier within a
short period of time after receipt of the package. The time window for lodging the claim should be ascertained from
the specific carrier as this may vary between carriers (typically 1 to 5 days).
Please dispose of all packaging material responsibly.
Asia Pacific | EMEA | Americas
19
TA7982-01xx-12-xx Series User’s Manual
8. Firmware License Agreement
This statement must be read in its entirety prior to the loading or use of the Firmware provided by RFI.
Introduction.
By loading any product related Firmware you agree without reserve with all the conditions as detailed in this RFI
Firmware License Agreement.
The term “Firmware” for the sake of this statement includes all software or firmware upgrades, either as a new
installation, revision, patches or upgrades. Any reference to software, for the purposes of this license agreement, will
therefore be included in the term Firmware.
RFI refers to the Australian registered company RF Industries Pty Ltd.
The copyright of all Firmware relating to this product remains the property in whole of RFI and is therefore protected
by the respective international copyright or trademark laws.
You agree that by using and or downloading any of the RFI product specific Firmware, that you have fully understood
and agree to comply and be bound by the all of the conditional requirements as detailed in this Firmware License
Agreement and accept the disclaimer thereof.
RFI reserves the right to update and change, from time to time, any attribute, function, feature and in the main any
content of the Firmware and any documentation attributed and referenced to the Firmware underwritten by this
Firmware License Agreement without notice to existing users.
The use of this Firmware is non-exclusive and non-sub licensable, nor does it give the user the right to re-sell, lease,
loan, distribute, or transfer the Firmware nor the rights thereof.
This Firmware License Agreement grants or implies no right, title, or interest in any intellectual property owned or
licensed by RFI.
Support and Firmware Updates.
RFI may elect to provide you with customer support and/or Firmware upgrades, enhancements, or modifications for
the RFI Firmware at its sole discretion, and may terminate such support at any time without notice to the user. RFI
may change, suspend, or discontinue any aspect of the Firmware at any time, including the availability of any
Firmware feature, database, or content.
From time to time RFI may provide notice through the RFI web site of any available updates or Firmware revision
downloads.
Fees.
RFI reserves the right to charge fees for upgrades or revisions of the applicable Firmware download.
Disclaimer.
Use of any Firmware enabling operation of the product or providing support for the product is at the user’s discretion
and risk. RFI will not be held responsible or liable for any damage or loss that results from the downloading and or
use of the Firmware or incompatibilities or other problems experienced as a result of any combination of operating
system(s), firmware, or software the user may use.
RFI will not be held responsible or liable for any inaccuracies, completeness or inadequacy regarding the Firmware
as the basis of the provision of the Firmware is on a “fit-for-purpose, best effort” approach.
RFI will not be liable to the user for claims and liabilities of any kind arising out of or in any way related to the use of
the Firmware by the user or any third party.
The failure of RFI to exercise or enforce any right or provision of this Firmware License Agreement shall not
constitute a waiver of such right or provision.
Asia Pacific | EMEA | Americas
20
TA7982-01xx-12-xx Series User’s Manual
9. Installation
Note: All installation works and practices should be carried out by qualified personnel and in compliance to
the Motorola R56 standard.
TTA Installation
The use of appropriate TTA mounting hardware that suits the installation’s specific tower or mast installation scenario
is important.
The TTA is provided with a general purpose
stainless steel mounting bracket that enables
the TTA to be installed onto many antenna booms,
mounting head frames, poles, masts, tower spaces,
or flat surfaces (such as building parapets or walls).
To cater for the variety of installation locations
and structures, any required hose clamps, bolts,
U-bolts or other hardware items required
to complete those installations must be
supplied by the customer or their installation
contractor.
The TTA must always be installed with the
connectors facing downwards to optimize
environmental sealing and to prevent water ingress.
After connecting the system coaxial feeder
cables to the TTA, it is recommended to wrap
connectors tightly with sealing tape. Starting
wrapping 2-3 inches away from the connector,
wrapping towards the connector, and finish by
completely covering the connector body –
making sure that the sealing tape overlaps the
connector and the round body of the
associated TTA’s bulkhead connector.
An M8 stud is provided on the TTA to allow an
earthing strap to be fitted between the TTA
and an appropriate grounding point on the
tower (or other mounting structure).
Both flat and lock washers are supplied on
this stud to ensure the earthing strap can be
secured for optimum connection integrity.
Note: All dimensions in inches.
Asia Pacific | EMEA | Americas
21
TA7982-01xx-12-xx Series User’s Manual
Lightning Protection
Lightning Protection and grounding of the system is important. Lightning suppressors are fitted internally in the TTA,
but corresponding lightning protectors must be fitted to the “Main” and “Test” coaxial feeder cables at the equipment
building entry point.
Note: The Lightning Surge Protectors used on the
coaxial feeder cable between the TTA “Main” port
and the RMC RF Input port must be a DC-Pass style
that is compatible with AISG signalling.
AISG signalling is widely used in the
telecommunications industry, and a choice of
protectors are available that meet these
requirements.
RFI recommends the Polyphaser 109-0501W-A and
109-0501W-B for use with its TTA systems. For
consistency, RFI recommends this style of lightning
protector be fitted to both the “Main” and “Test”
coaxial feeder cables.
The body of each lightning protector must be
connected to the Entry Point Ground Bus (refer
Figure 9) with a earthing cable or strap.
109-0501W-A / 109-0501W-B series
RMC Installation
The RMC is designed to be installed into standard 19inch rack mount frames or cabinet spaces.
Install the unit using four screws that match the 19in racking, ensuring nylon washers are used under the head of the
screws to protect the RMC front panel.
An M6 stud and M5 screw are located on the rear of the RMC for earthing to the Equipment Rack Ground Bar with an
earthing strap or cable. The Equipment Rack Ground Bar should then be tied back to the Entry Point Ground Bus via
the Equipment Room master ground Buss (refer Figure 5).
Connect the bases station receivers to the RF Output ports on the rear of the RMC using high quality coaxial cable
(solid or double-shielded jacket type). Unused RMC RF Outputs need not be terminated, however, any unused EXP
PORT should be terminated with 50ohms until connected to an Expansion Multicoupler..
For the RMC power supply, a cable from the DC source should be terminated into the supplied 2-pin plug, observing
the correct polarity, and then plugged into the polarized 2-pin Phoenix (F) socket on the rear of the RMC. For AC
Mains versions, an AC-to-DC plug pack is provided with a pre-terminated
2-Pin plug. This should be fitted into the power socket on the rear of the RMC.
Asia Pacific | EMEA | Americas
22
TA7982-01xx-12-xx Series User’s Manual
RX
TX
Internal Perimeter Ground (Halo) –Connected to Door and Window Frames, etc
To
Independent
Site Ground
Equipment Room Master Ground Buss
Tower Top Amplifier
(TTA)
Ant
Test
Main
Transmit
Combiner
Gnd
Equipment Rack
Ground Bar
Tx
Gnd
Building
Entry Plate
Tx
Test Port
Entry Point
Ground Buss
Front
Panel
Test
Port
RF Input
Lightning
Protectors
Copper
Ground
Strap
Receiver
Multicoupler
(RMC)
Site Ground
WARNING
Failure to correctly ground the TTA System may result
in equipment failure caused by electrical surge
Figure 10 – TTA System Installation
Installation Summary
Lightning protection, grounding, and the appropriate torqueing of connectors and the sealing of terminations are all
important facets of any system installation. Careful attention should be given in these areas.
The type of interconnecting coaxial feeder cables that may be used between the TTA and the RMC may vary, but
generally their type will be determined by their length (and resulting insertion loss) and associated jumper/tail
requirements.
Always follow the Motorola R56 standard and engineering best practices for equipment installation.
Asia Pacific | EMEA | Americas
23
TA7982-01xx-12-xx Series User’s Manual
10. Operation
A USB memory stick is provided with the RMC and contains copies of the QSG (Quick Start Guide) and the TTA
Series User's Manual.
The TTA and RMC can be configured using the RMC front and rear panel switches, or via the integral RMC Web
Browser GUI.
In addition to using the integral Web Browser GUI, the TTA and RMC can also be communicated with via the CLI
(Command Line Interface) using plain text format via a Telnet IP session. For information on the CLI format please
contact the RFI Technical Support team.
When the TTA has been installed and connected to the RMC via the coaxial feeder cables and suitable lightning
surge protectors (refer Figure 9), the power source to the RMC may be connected and switched on.
Check that the green “Power” LED light on the RMC front panel is illuminated.
All of the RMC front panel LEDs will flash on shortly afterwards, and the remaining illuminated LEDs will reflect the
current state of the TTA and RMC (and any current alarms).
The TTA System is now ready for configuration and/or operation.
Asia Pacific | EMEA | Americas
24
TA7982-01xx-12-xx Series User’s Manual
11. Commissioning
It is important that the TTA system is commissioned correctly to ensure that the best system performance is
achieved. The Motorola Five Step Process for Receive System Verification (the “Five Step Program”) outlines the
correct procedure for commissioning the TTA system and is designed to standardize the testing and performance
evaluation of these systems.
The Five Step Program outlines the following commissioning process;
·
·
·
·
·
Document RF Equipment
Evaluate and Adjust the Input (“Reserve”) Gain
Spectrum Analysis
Sensitivity Analysis
Antenna Isolation
Document RF Equipment
Capture and record the information required to fully understand RF compatibility. The information that should be
captured is; the antenna configuration, antenna separation, cable lengths and types, and other RF transmitters that
can be identified on site.
Coaxial feeder cable lengths and types information is used in configuring the TTA system.
Starting at the recommended Input Gain of 15dB for a 700/800MHz system, the Input Gain Attenuator switch position
(or optionally accessed with the webserver GUI) should be set as per the following table;
Required Input Gain
( “Reserve Gain”)
15 dB
15 dB
15 dB
15 dB
15 dB
15 dB
15 dB
“Main” TTA to RMC
Feeder Insertion Loss
0 dB
1 dB
2 dB
3 dB
4 dB
5 dB
6 dB
Input Gain Attenuator
Setting
6
5
4
3
2
1
0
For example ….. for the recommended Input Gain of 15dB, and if the “Main” TTA to RMC coaxial feeder cable has an
insertion loss of 3dB, then the Input Gain Attenuator switch should be set to position 3.
Examples:
TTA Gain
Internal Circuitry (loss)
TTA to RMC Feeder Insertion Loss
Input Gain Attenuator setting “3”
Input Gain (“Reserve Gain”)
25dB
- 4dB
- 3dB
- 3dB
15dB
This initial Input Gain Attenuator setting may be adjusted as a result of the Spectrum Analysis step following……
TTA Gain
Internal Circuitry (loss)
TTA to RMC Feeder Insertion Loss
Input Gain Attenuator setting “5”
Input Gain (“Reserve Gain”)
25dB
- 4dB
- 3dB
- 5dB
13dB
Asia Pacific | EMEA | Americas
25
TA7982-01xx-12-xx Series User’s Manual
The Distribution Gain of the RMC overcomes the distribution cabling losses between the RMC RF Outputs and the
connected base station receivers.
This switch is set to provide a value between 0 and 4 to provide distribution gain compensation as per the following
table;
Distribution Cable Loss
0 dB
1 dB
2 dB
3 dB
4 dB
DIST GAIN ATTEN Switch position
4
3
2
1
0
Note on Attenuator Settings:
The RMC unit contains digital attenuators for setting the Input Gain (a.k.a. “Reserve” gain) and the Distribution Gain.
Both the Input Gain and Distribution Gain must be configured as part of the TTA system’s commissioning.
The correct adjustment of these attenuators maintains protection of the base station receivers against high level
signals – while obtaining the best system sensitivity possible.
In 700/800MHz TTA system models, Input Gain is shipped from the factory with a default setting of switch position 3.
For an Input (“Reserve”) Gain of 15dB, this assumes a 3dB “Main” coaxial feeder cable insertion loss. Distribution
Gain is also shipped with a default switch position 3, which assumes a distribution cable insertion loss of 1dB.
The values selected may be determined by the RMC rear panel switches (factory default), or via the integral
webserver GUI that may be accessed using a computer and a web browser.
Asia Pacific | EMEA | Americas
26
TA7982-01xx-12-xx Series User’s Manual
Spectrum Analysis
Optimizing system sensitivity requires a knowledge of the levels being applied to the base station receivers –
particularly the maximum levels – to ensure that the base station receivers are not being over-driven and exceeding
their operating dynamic range capability.
If signals exceed this range, then the base stations receiver performance can degrade, with the sensitivity,
intermodulation rejection and adjacent channel selectivity degraded.
Figure 10 indicates the maximum signal levels that the base station receivers should be subject to – inside and
outside of the transmit and receive bands. Signal levels above the values indicated suggest a need for additional
attenuation in the RMC.
Figure 11 – Spectrum Analysis Limits
Receive Band
The spectrum where the receive frequencies reside must not contain signals above -35dBm. These are signals that are
intended to enter the receiver. If control stations or subscribers are near the infrastructure, the levels can be very high. If
the levels are above -35dBm, the Input Gain of the system must be reduced (or the source of the high level signals must be
reduced).
If the source of the high level signals cannot be reduced, then the Input Gain of the system should be reduced by 1dB for
every 2dB of signal over -35dBm found in the Spectrum Analysis.
For example ….. if input signals are seen at -31dBm (4dB above the -35dBm limit), the Input Gain Attenuator switch
should be changed to position 5 (an increase in Input Gain Attenuation of 2dB as each Input Gain Attenuator switch
position is a 1dB change).
Asia Pacific | EMEA | Americas
27
TA7982-01xx-12-xx Series User’s Manual
Transmit Band
The highest carrier that the receive system will consistently see is its own transmitter. The preselector of the receive
system must adequately remove these carriers to prevent over-drive. The goal of the preselector is to reduce all
transmit carriers below -55dBm. If the level of any transmit carrier is above -55dBm the preselector is not adequately
performing it job and must be enhanced with a post filter – or replaced.
The preselector in this RFI TTA system provides in excess of 110dB of transmit rejection. This selectivity will protect
receive systems against signals greater than -55dBm.
However, if an unusual deployment scenario results in signals greater than -55dBm being seen during the Spectrum
Analysis, a post filter can be easily installed to the RMC to further enhance the TTA preselector's performance.
(Refer Figures 3 and 4, and Sections 11.1 or 12.12 of this manual)
All Other Frequencies
The base station receiver is designed to monitor very low RF signal levels. To maximise their performance in this
task there must also be a minimum amount undesired energy exposure – even at frequencies outside the receive
band. The TTA preselector has very sharp selectivity and must reduce all carriers outside the bandwidth to levels
below -75dBm (except as stated above).
Similar to adding enhancement to the performance of the TTA preselector for the Transmit Band, a post filter can be
easily installed to the RMC to further enhance the TTA preselector’s performance. (Refer Figures 3 and 4, and
Sections 11.1 or 12.12 of this manual)
Sensitivity Analysis
Sensitivity is the measurement of the minimum signal required to produce RF modulation. The level required
depends on many factors: channel bandwidth, modulation type (digital vs. analogue), noise floor, and interference.
The basic function of sensitivity is to determine the carrier level required to overcome the Noise + Interference (N+I).
Sensitivity measurement requires establishing a benchmark with no external influences – and comparing this to the
sensitivity under normal circumstances. The two common methods used to measure sensitivity are SINAD
(analogue) and BER (digital). Use of one of these precision measurement techniques is required to accurately
measure sensitivity.
Definitions:
Static System Sensitivity (SSS) – measures the sensitivity of the receive system as seen with no outside signals
available (i.e. not connected to the receive antenna). All system components between the receive antenna and the
base station receiver are considered. This is the best level of sensitivity available to the system.
Effective Receiver Sensitivity (ERS) – is the sensitivity of the receive system when connected to the receive antenna
and represents the “real world” sensitivity seen by the system (and its subscribers).
Degradation – is the difference between the Static System Sensitivity and the Effective Receiver Sensitivity. This
represents the degradation level introduced by the environment.
Asia Pacific | EMEA | Americas
28
TA7982-01xx-12-xx Series User’s Manual
TTA Test Port
The TTA uses a non-directional coupler to inject test signals into the receive system from the RMC front panel Test
Port. The coupler has a value of 30dB (typ.). The insertion loss of the Test Port coaxial feeder cable must also be
taken into account.
Measuring Static System Sensitivity (SSS)
To measure the Static System Sensitivity the signal level into the first amplifier must be known. To do this, use one
of the Test Modes of the TTA system.
a)
Place the TTA into the Term Mode.
b)
Inject a test signal into the RMC Test Port on the test base station receiver frequency. Adjust the test signal level
until the nominated system SINAD or BER is indicated by the test receive frequency’s associated base station.
The Static System Sensitivity (SSS) is calculated using the formula;
SSS (dBm) = Injected level into RMC Test Port (dBm) - TTA Test Port Feeder Loss - TP Coupler (30dB)
Example …..
If the TTA Test Port Feeder cable is 3/8” and has 3.62dB of loss per 100ft and is 200ft long, then the TTA Test
Port feeder loss is 7.24dB. This derives an adjustment value of 37.2dB (3.62*2 + 30dB = 37.2dB). If the injected
signal into the RMC front panel Test Port was required to be at -86.8dBm to achieve the nominated system
performance BER, the actual Static System Sensitivity (SSS) would be -124dBm.
Measuring Effective Receiver Sensitivity (ERS)
To measure the Effective Receiver Sensitivity the receive antenna must now be connected.
c)
Disable the Term Mode.
d)
Re-adjust the test signal level until the nominated system SINAD or BER is again indicated by the test receive
frequency’s associated base station.
The Effective Receive Sensitivity (ERS) is calculated using the formula;
ERS (dBm) = Injected level into RMC Test Port (dBm) - TTA Test Port Feeder Loss - TP Coupler (30dB)
Example …..
If the injected signal into the RMC front panel Test Port is now required to be at -83.8dBm to achieve the
nominated system performance BER, for the same adjustment value of 37.2dB, the actual Effective Receive
System Sensitivity (SSS) would be -121dBm.
Asia Pacific | EMEA | Americas
29
TA7982-01xx-12-xx Series User’s Manual
Degradation
The degradation within the receiver system is the difference between the measured SSS and ERS values.
In the above examples, this is Degradation = 3dB.
History – Performance Record
The RMC allows the parameters determined in the SSS and ERS testing to be saved in the History – Performance
Record screen in the GUI.
The Performance Record provide a convenient and easy to use method for storing the parameters and measured
results of the SSS and ERS process, against a selected date. This data is stored in non-volatile memory within the
RMC.
If you do not wish to use the Performance Record feature in the GUI, please ensure you record all site equipment
details and measurements and store them in a secure place for later reference.
Asia Pacific | EMEA | Americas
30
TA7982-01xx-12-xx Series User’s Manual
12. Manual Setup and Operation
Figure 12 - RMC Front Panel Layout
Figure 13 - RMC Rear Panel Layout
12.1 Rear Panel Switches and LED Indicators
INPUT GAIN ATTEN switch
The Input Gain Atten switch configures the receiver system’s input ( or “Reserve”) gain. This value is the attenuator
value required to achieve the desired input gain – with the gain of the TTA, the loss of the receive coaxial feeder
cable, and the RMC input circuitry taken into account.
The input gain attenuator should be set based on the following table;
Required Input Gain
( “Reserve Gain”)
15 dB
15 dB
15 dB
15 dB
15 dB
15 dB
15 dB
“Main” TTA to RMC
Feeder Insertion Loss
0 dB
1 dB
2 dB
3 dB
4 dB
5 dB
6 dB
Input Gain Attenuator
Setting
6
5
4
3
2
1
0
If an invalid setting is selected (i.e. 16 to 98), the maximum attenuator value will be used, and the front panel
“SWITCH” LED will flash. If 99 is selected on the Input Gain Atten switches during the Power Up sequence, the RMC
will be forced into Switch control mode.
For a nominated “TTA to RMC Feeder Insertion Loss”, an Input Gain Attenuator setting above the value shown in the
above table will result in a corresponding decrease in the system’s Input Gain.
Asia Pacific | EMEA | Americas
31
TA7982-01xx-12-xx Series User’s Manual
Examples:
TTA Gain
Internal Circuitry (loss)
TTA to RMC Feeder Insertion Loss
Input Gain Attenuator setting “3”
Input Gain (“Reserve Gain”)
25dB
- 4dB
- 3dB
- 3dB
15dB
This initial Input Gain Attenuator setting may be adjusted as a result of the Spectrum Analysis step in the
Motorola Five Step Process for Receive System Verification (the “Five Step Program”)
TTA Gain
Internal Circuitry (loss)
TTA to RMC Feeder Insertion Loss
Input Gain Attenuator setting “5”
Input Gain (“Reserve Gain”)
25dB
- 4dB
- 3dB
- 5dB
13dB
CONFIG switch
The Config switch reflects the number of RMC RF outputs that are being used in the system. By setting the Config
switch, the RMC will configure its internal digital attenuators to enable the Distribution Gain to be correctly set with the
Distribution Gain Attenuator switch.
CONFIG Switch position
1
2
3
4
5
6
7
Operating Mode
Up to 8 RF Outputs available
Expansion Port is internally terminated
Up to 9 RF Outputs available
Expansion Port configured as an additional RF Output
Up to 16 RF Outputs available
Expansion Port configured for an 8way Expansion Deck to be connected
Up to 64 RF Outputs available
Expansion Port internally terminated
8way Expansion Multicoupler connected to each of 8 RF Outputs as required
Up to 128 RF Outputs available
Expansion Port configured for an 8way Expansion Deck to be connected
8way Expansion Multicoupler connected to each of 16 RF Outputs as required
Up to 8 RF Outputs available
Expansion Port gain configured for ESS Mode
10dB in-line attenuator to be fitted to RMC Expansion Port
Up to 64 RF Outputs available
Expansion Port gain configured for ESS Mode
10dB in-line attenuator to be fitted to RMC Expansion Port
DIST GAIN ATTEN switch
The Distribution Gain of the RMC overcomes the distribution cabling losses between the RMC RF Outputs and the
connected base station receivers.
This switch is set to provide a value between 0 and 4 to provide distribution cabling losses compensation as per the
following table;
Distribution Cable Loss
0 dB
1 dB
2 dB
3 dB
4 dB
DIST GAIN ATTEN Switch position
4
3
2
1
0
Asia Pacific | EMEA | Americas
32
TA7982-01xx-12-xx Series User’s Manual
RESET switch
The RESET switch has two modes of use;
1. To reset the RMC back to the Factory Default settings. This will also reset of all the RF Configuration settings and
the TCP/IP address parameters.
To perform a Factory Default Reset, simply switch the RMC off by removing the DC power cable connector.
Press the factory RESET button on the rear of the RMC, reconnect the DC power while continuing to hold the
RESET button down for up to 10 seconds. When the green power LED light starts flashing, the reset has started
and the reset button may be released.
Note: This will cause the IP address, subnet and gateway addresses and all other configuration data to be reset
back to factory default address.
2. To reset the RF Configurations only, without disconnecting the power source, simply press and hold down the
factory reset button until the green “Power” LED light starts flashing. The RESET button may then be released.
Factory Default settings
DHCP - Disabled
IP Address - 192.168.1.200
Subnet Mask - 255.255.255.0
Gateway - 192.168.1.254
Level 1 User Name: user
Level 1 Password: user
Level 2 User Name: admin
Level 2 Password: admin
RF Configuration Settings
Auto Mode – Enabled
Gain Control – Switch
Hardware Configuration In Use – 1
Input Gain AUTO Mode – Disabled
Distribution Gain AUTO Mode - Disabled
Config Switch Setting - 1
Input Gain Switch Setting – 3
Distribution Gain Switch Setting – 3
Post Filter – Disabled
Test Modes – All OFF
Test Mode Timeout – 10 minutes
Alarm Delay – 5 seconds
At the completion of either of the 2 reset options, you will need to wait a short time for the RMC to complete its
initialization sequence.
Asia Pacific | EMEA | Americas
33
TA7982-01xx-12-xx Series User’s Manual
IN-LINE FILTER switch
The in-line filter switch activates the rear panel filter ports and allows the inclusion of a TTA post filter into the system.
The use of a post filter can provide two benefits in a receiver system;
1.To increase receive system selectivity (i.e. improve out-of-band rejection) beyond that already provided by the
>110dB provided by the existing TTA preselector.
2.To reduce the TTA’s 796-824MHz passband to a narrower bandwidth to reject unwanted signals or to improve the
immunity of the receiver system to noise and/or interference.
When not enabled, the filter ports are bypassed internally within the RMC. When enabled, all RF signals are routed
via these ports prior to distribution to the RMC RF Outputs.
To enable the filter, press the recessed pushbutton switch located behind the lower hole between the filter BNC
connectors.
IN-LINE FILTER LED indicator
When enabled, the green LED indicator between the in-line filter ports will be lit.
TTA POWER indicator
When the TTA is powered, the green LED indicator between the RF Input and TEST ports will be lit.
POWER ON LED indicator
When the RMC is powered, the green LED indicator above the power connector will be lit.
12.2 Front Panel Switches and LED Indicators
SELECT and ENTER switches
The two SELECT switches on the front panel of the RMC determine the TTA/RMC function to be modified.
To operate, press either button and one of the front panel LEDs will flash. Using either of the Select switches, scroll
left or right until the desired function’s corresponding LED is flashing.
Press the ENTER switch to toggle the selected state of that function.
Using this method, valid combinations of the various TTA and RMC functions can be selected.
When first pressed, either SELECT switch will flash the corresponding LED for the function that was last selected –
allowing the last modification to be easily and quickly restored if required.
Note: The last configuration of features will be remembered and restored in the event of a power interruption.
The original default configuration is applied during either of the two reset button initiated reset modes.
TTA FAULT LED indicator
When lit, a fault condition is current in the TTA unit.
AUTO LED indicator
When lit, the selection of TTA RF path (“A” or “B”) is set to “AUTO” and is controlled and automatically maintained by
the RMC determined by any alarm condition being monitored from either Amplifier A or Amplifier B.
Asia Pacific | EMEA | Americas
34
TA7982-01xx-12-xx Series User’s Manual
AMP A / AMP B LED indicator
When lit, these LEDs indicate which TTA RF path is selected and active.
TERM LED indicator
When lit, this LED indicates when the Term switch is active, and the termination is switched into circuit in the TTA.
BYPASS LED indicator
When lit, this LED indicates when the Bypass switches are active, and the RF signal path is bypassing both RF AMP
A and RF AMP B.
SWITCH LED indicator
When lit, this LED indicates that the gain of the RMC is currently controlled by the rear panel
switches.
LAN LED indicator
When lit, this LED indicates that the gain of the RMC is currently controlled by the GUI settings.
RMC FAULT LED indicator
When lit, a fault condition is current in the RMC unit.
POWER LED indicator
When lit, power is applied to the RMC.
Asia Pacific | EMEA | Americas
35
TA7982-01xx-12-xx Series User’s Manual
13. GUI Setup and Operation
13.1 Ethernet Connection Set-up
Web Browser GUI (Graphical User Interface)
The RMC utilizes an on board Graphical User Interface (GUI) web server to provide configuration and status monitoring
using a web browser and a computer. This can be accessed either locally by connecting to the RMC with a short Ethernet
jumper cable from a laptop/notebook directly to the RMC or remotely via a TCP/IP network. The TTA is accessible via the
RMC GUI.
A standard Ethernet CAT5e jumper cable terminated with RJ45 connectors at either end is provided for convenience in the
packing box with the RMC. Plug one end of this Ethernet jumper cable into the RMC and the other end into your computer
Ethernet socket.
The following web browsers are compatible with the RMC GUI;
·
·
·
·
Internet Explorer 8
Firefox V3.6
Chrome V9
Safari V5.
IP Address
Initiate your web browser and type in the address field the following default address;
http://192.168.1.200 (RMC factory default address)
Connectivity to the RMC is successful when the following “Log In” page appears.
Asia Pacific | EMEA | Americas
36
TA7982-01xx-12-xx Series User’s Manual
Should the web browser be unable to open this session, it may be necessary to set the IP address
of your computer to an address in the same IP range (i.e. 192.168.1.180).
This is done for example in Windows XP™ in the following manner;
1. Select “Start” from status menu
2. Single click – “Control Panel”
3. Double click – “ Network Connections”
4. Double click - “Local Area Connection”
5. In Local Area Connections Status box, single click the “Properties” button.
6. When the Local Area Connection Properties box opens, select only
the “Internet Protocol (TCP/IP)” choice.
7. Click “Properties” button.
8. Click “Use the following IP address.
9. Enter next to IP address 192.168.1.180
10. Enter next to Subnet mask 255.255.255.0
11. Enter next to Default gateway 192.168.1.254
12. Click “OK” to initiate changes.
This is done for example in Windows 7™ in the following manner;
1. Select “Start” from status menu
2. Single click – “Control Panel”
3. Single click – “ Network and Sharing Center”
4. Single click - “Change Adapter Settings” on the left hand side menu
5. Single Click – “Local Area Connection” box
6. Single Click – “Change Settings of this Connection”
6. When the Local Area Connection Properties box opens, select only
the “Internet Protocol 4 (TCP/IPv4)” choice.
7. Click “Properties” button.
8. Click “Use the following IP address”.
9. Enter next to IP address 192.168.1.180
10. Enter next to Subnet mask 255.255.255.0
11. Enter next to Default gateway 192.168.1.254
12. Click “OK” to initiate changes.
Should you still be unable to successfully connect to the RMC via the default IP address then the
IP address may have already been changed. If there is no possibility of recovering the changed IP address, then it
will be necessary to reset the RMC to the factory default settings.
Asia Pacific | EMEA | Americas
37
TA7982-01xx-12-xx Series User’s Manual
Reset to factory default Ethernet addressing.
To reset the RMC back to the Factory Default settings will mean a complete reset of all RF settings and the IP
address parameters. To perform a Factory Reset, simply switch the RMC off by removing the DC power cable
connector. Press the factory RESET button on the rear of the RMC, reconnect the DC power while continuing to hold
the RESET button down for up to 30 seconds. When the green power LED light starts flashing, the reset has started
and the reset button may be released.
Note: This will cause the IP address, subnet and gateway addresses and all other configuration data
to be reset back to factory defaults.
Should you wish to only reset the RF configuration simply press the factory reset button for 10 seconds without
disconnecting the power source.
Factory Default settings
DHCP - Disabled
IP Address - 192.168.1.200
Subnet Mask - 255.255.255.0
Gateway - 192.168.1.254
Level 1 User Name: user
Level 1 Password: user
Level 2 User Name: admin
Level 2 Password: admin
RF Configuration Settings
Auto Mode – Enabled
Gain Control – Switch
Hardware Configuration In Use – 1
Input Gain AUTO Mode – Disabled
Distribution Gain AUTO Mode - Disabled
Config Switch Setting - 1
Input Gain Switch Setting – 3
Distribution Gain Switch Setting – 3
Post Filter – Disabled
Test Modes – All OFF
Test Mode Timeout – 1 minute
Alarm Delay – 5 seconds
Asia Pacific | EMEA | Americas
38
TA7982-01xx-12-xx Series User’s Manual
13.2 Log In Page
The default User Name is “admin” and Password is “admin”. This default user name and password provides complete
and unrestricted access to the RMC (level 2). Once logged in, this can be changed via the User Management screen
under the Maintenance menu tab.
User Name and Password Levels
Level 1: User name and password access via the web browser GUI interface displays only status screens.
Level 2: User name and password access via the web browser GUI interface displays status, and allows editing
of the configuration and maintenance screens.
Once the correct User Name and Password is entered the GUI will open to the first page of the GUI.
GUI Page Headers
The first page that appears in the GUI is the “System Overview” page.
This page is headed with the name of the product and the model reference. The “Customer Name” and “Site Name”
will display either the factory default fields (as “Not Defined”) or the names allocated to each under the “Configuration
– User Data” menu item which allows the user to define the customer name and respective site name.
Asia Pacific | EMEA | Americas
39
TA7982-01xx-12-xx Series User’s Manual
13.3 System Overview
This page displays an overview of the system status.
For the System, the overall summary alarm status is displayed, for the TTA, the RMC and the overall System.
Item:
The group of parameters relevant to each item title.
Alarm Status:
The “Fail” or “OK” summary status for the Group.
The “Refresh” button reloads the page, updating the status information.
Clicking the Item will navigate to that nominated item’s details page.
Asia Pacific | EMEA | Americas
40
TA7982-01xx-12-xx Series User’s Manual
13.4 Status Detail Menu
The “Status Detail” menu allows all of the System’s parameters to be viewed.
Selecting each indented topic under “Status Detail” will display that item as a separate display page.
Asia Pacific | EMEA | Americas
41
TA7982-01xx-12-xx Series User’s Manual
13.5 Status Detail - RMC
The RMC “Status Detail” page reports the current status of the RMC settings. The current alarm status is shown in the
background color … i.e. green = OK, red = Alarm.
Amplifier:
Indicates if one or both sides of the quadrature amplifier have a fault.
Temperature:
Indicates if the RMC operating temperature is within acceptable limits.
MUX Power:
Indicates if the RMC power supply voltages are within tolerances.
TTA Power Feed:
Indicates if the TTA power supply voltage is within of tolerances.
Asia Pacific | EMEA | Americas
42
TA7982-01xx-12-xx Series User’s Manual
Post Filter:
Indicates if the TTA Post Filter is selected.
Gain Control:
Indicates if the Input and Distribution Gain settings are being determined by the rear panel switches (Switch), or the
Ethernet (LAN) settings.
Auto Gain:
Indicates if the Auto Gain feature has been activated by a fault condition in one side of the RMC quadrature
amplifier. When a fault is detected on one side of the quadrature amplifier, the Distribution Gain of the RMC is
automatically increased to compensate by the lower gain that the quadrature amplifier will deliver in this fault state.
This feature ensures the optimum system performance can be maintained for subscribers until the fault condition is
rectified.
Hardware Configuration:
Indicates the setting of the Hardware Configuration, on both the rear panel CONFIG switch (Switch) and the Ethernet
(LAN) settings, and which is being presently used (In Use).
Input Gain Attenuator:
Indicates the setting of the Input Gain Attenuator, on both the rear panel INPUT GAIN ATTEN switch (Switch) and the
Ethernet (LAN) settings, and which is being presently used (In Use).
Distribution Gain Attenuator:
Indicates the setting of the Distribution Gain Attenuator, on both the rear panel DIST GAIN ATTEN switch (Switch)
and the Ethernet (LAN) settings, and which is being presently used (In Use).
Refresh:
Click this button to manually trigger one measurement and status update cycle.
Asia Pacific | EMEA | Americas
43
TA7982-01xx-12-xx Series User’s Manual
13.6 Status Detail - TTA
The TTA “Status Detail” page reports the current status of the TTA settings. The current alarm status is shown in the
background color – green = OK, red = Alarm.
Comms:
Indicates that signalling communications are present between the TTA and the RMC.
Power:
Indicates that the TTA power supply voltages are within tolerances.
Amp-A:
Indicates if Quadrature Amplifier A has a fault.
Amp-B:
Indicates if Quadrature Amplifier B has a fault.
Temperature:
Indicates if the TTA operating temperature is within acceptable limits.
Asia Pacific | EMEA | Americas
44
TA7982-01xx-12-xx Series User’s Manual
Auto:
Indicates if the “Auto” TTA quadrature amplifier change-over function is active. When “SELECTED”, the RMC will
monitor the alarm status of the TTA quadrature amplifiers and will automatically initiate a change in TTA amplifier
path should one path experience a failure.
Amp-A:
Indicates the operational mode of TTA quadrature amplifier “A” RF path. When in “AUTO”, the RMC will allocate TTA
Amp A as the active TTA RF path - unless it has a fault condition (see “Auto” above).
Amp-B:
Indicates the operational mode of TTA quadrature amplifier “B” RF path. When in “AUTO”, the RMC will allocate TTA
Amp B as the backup TTA RF path – unless it has a fault condition (see “Auto” above).
Terminated:
Indicates the state of the Term test mode switch in the TTA. When “on”, the input to the TTA (and therefore the
receive system) is switched to a 50ohm termination. When “off”, the system is in its normal operating mode, with the
input to the TTA is connected through to the Rx antenna (via the TTA preselector). This feature is used for
determining the Static System Sensitivity as part of the Motorola Five Step Process for Receive System Verification.
Bypass:
Indicates the state of the Bypass switch in the TTA. When “on”, the Bypass mode is selected, and the TTA
preselector output is connected through to the RMC (the TTA amplifiers and Test mode switch have been bypassed).
When “off”, the system is in its normal operating mode, with the output of the TTA preselector connected to the
selected quadrature amplifier RF path.
Test Port to Rx Input:
Indicates the state of the Test switch in the RMC. When “on”, the RMC front panel Test Port is connected to the rear
RMC RF Input port. This allows monitoring of the TTA input to the RMC for system measurement and fault finding
purposes. When “off”, the system is in its normal operating mode, with the rear RMC RF INPUT port connected to
the RF Outputs ports via the RMC quadrature amplifier.
Refresh:
Click this button to manually trigger one measurement and status update cycle.
Asia Pacific | EMEA | Americas
45
TA7982-01xx-12-xx Series User’s Manual
13.7 Status Detail – System
This System “Status Detail” page reports the current system settings and alarm summary.
shown in the background color – green = OK, red = Alarm.
The current alarm status is
RMC
Model:
The model designator of this RMC unit.
Firmware Version:
The version of the firmware.
GUI Version:
The version of the GUI.
Asia Pacific | EMEA | Americas
46
TA7982-01xx-12-xx Series User’s Manual
Hardware Revision:
The hardware revision status of the unit. Future hardware revision levels may add additional capabilities.
Serial Number:
The serial number of this unit.
Date, Time:
The date and time as maintained by the on-board real time clock. Refreshing the page will update this information.
TTA
Model:
The model designator of this TTA unit.
Firmware Version:
The version of the firmware.
Hardware Revision:
The hardware revision status of the unit. Future hardware revision levels may add additional capabilities.
Serial Number:
The serial number of this unit.
Alarms
RMC:
Indicates an alarm condition is present within the RMC.
TTA:
Indicates an alarm condition is present within the TTA.
Alarm Relay:
Indicates the state of the Alarm Relay on the rear panel of the RMC. A “FAIL” indicates an alarm condition is present
within the RMC or the TTA and that the Alarm Relay is activated.
Refresh:
Reloads the page, updating the status information.
Asia Pacific | EMEA | Americas
47
TA7982-01xx-12-xx Series User’s Manual
13.8 Status Detail – Communications
This Communications “Status Detail” page reports the current Communications settings.
Ethernet
MAC Address:
The physical MAC address of the unit.
DHCP:
If the stored value is enabled, the unit will attempt to get its IP Address, Subnet Mask and Gateway settings from a
DHCP server. If a DHCP server cannot be found, the stored settings will be used and the Currently In Use status will
show as disabled.
If disabled, the stored values will be used unconditionally.
IP Address:
The Stored and Currently In Use IP address values.
Subnet Mask:
The Stored and Currently In Use network address mask values.
Gateway:
The Stored and Currently In Use gateway address values.
Asia Pacific | EMEA | Americas
48
TA7982-01xx-12-xx Series User’s Manual
SNMP
Send Alarm Notifications (Traps):
Indicates if sending SNMP Traps are enabled or disabled.
SNMP Manager IP Address:
The IP address that SNMP notifications (Traps) will be sent to. Both a Primary and Secondary address may be used if
required for redundant SNMP server configurations.
SNMP Manager Listening Port:
The port number used by the SNMP Manager. Both a Primary and Secondary address may be used if required for
redundant SNMP server configurations.
Note: SNMP MIB files for the RMC are available from RFI.
Asia Pacific | EMEA | Americas
49
TA7982-01xx-12-xx Series User’s Manual
13.9 History Menu
The “History” menu allows the TTA and RMC’s logged data to be viewed.
Selecting each indented topic under “History” will display that item as a separate display page.
Asia Pacific | EMEA | Americas
50
TA7982-01xx-12-xx Series User’s Manual
13.10 History – Performance Record
This page saves the Performance Records for the TTA System.
Test Cable Loss:
The Test Cable coaxial feeder insertion loss for the system. The user should enter this value dependent on the
installed Test Cable type and installed length.
TTA Coupling Loss:
The known value for the TTA Test Port 30dB (+/-2dB) coupler. This is a factory preset value.
MUX Test Port Loss:
The known value for the RMC Test Port insertion loss. This is a factory preset value.
(This value is the value measured between the RMC front panel Test Port, and the rear panel Test Port).
Total Test Loss:
The sum of the above three values. A signal injected at the RMC front panel Test Port will be injected into the front
of the currently selected TTA RF amplifier path with this value of attenuation.
Asia Pacific | EMEA | Americas
51
TA7982-01xx-12-xx Series User’s Manual
Static System Sensitivity:
Static System Sensitivity (SSS) measures the sensitivity of the receive system with the receive antenna disconnected
(i.e. in Terminated mode). This is measured as part of the Motorola Five Step Process for Receive System
Verification and value measured is entered by the user into this field.
Measured at:
The user enters the test frequency on which this measurement was performed.
Date:
The user enters the test date on which this measurement was performed.
Effective Receiver Sensitivity:
Effective Receiver Sensitivity (ERS) measures the sensitivity of the receive system with the receive antenna
connected (i.e. not in Terminated mode). This is measured as part of the Five Step Process for Receive System
Verification and value measured is entered by the user into this field.
Measured at:
The user enters the test frequency on which this measurement was performed.
Date:
The user enters the test date on which this measurement was performed. A convenient calendar is available by
clicking on the calendar symbol next to the text field.
Note: A log of all Sensitivity Tests is kept in the RMC non-volatile memory. In a future firmware release, previous
test results can be viewed or downloaded, allowing any change in the system to be seen, assisting in network
performance (i.e. degradation) assessment and fault finding analysis.
Note: A convenient calendar is available by clicking on the calendar symbol next to the Date text fields.
Asia Pacific | EMEA | Americas
52
TA7982-01xx-12-xx Series User’s Manual
13.11 Configuration Menu
The “Configuration” menu allows all of the RMC and TTA’s configurable parameters to be programmed.
Selecting each indented topic under “Configuration” will display that item as a separate display page.
Note: The Configuration menu and screens are only visible from the Administrator (i.e. Level 1)
login level, and are not visible from the User (i.e. Level 2) login level.
Asia Pacific | EMEA | Americas
53
TA7982-01xx-12-xx Series User’s Manual
13.12 Configuration - RMC
The RMC “Configuration” page allows the configuration of the RMC settings.
Alarm Delay:
This setting defines the length of time (in seconds) for which an alarm must be continuously present or restored
before the alarm relay status changes.
Post Filter:
Switches the external Post Filter In or Out of the RF signal path.
Asia Pacific | EMEA | Americas
54
TA7982-01xx-12-xx Series User’s Manual
Settings Control:
Selects whether the unit's Gain settings are controlled through the rear panel Switches, or the LAN configured
settings.
For the following three settings, the current rear panel switch settings are displayed for information only and cannot
be changed via the GUI. They must be manually changed via the switches themselves.
The block of settings for the currently selected control mode are highlighted.
Hardware Configuration:
This selects the installed hardware configuration in accordance with the following table;
CONFIG Switch position
Operating Mode
1
Up to 8 RF Outputs available
Expansion Port is internally terminated
2
Up to 9 RF Outputs available
Expansion Port configured as an additional RF Output
3
Up to 16 RF Outputs available
Expansion Port configured for an 8way Expansion Multicoupler to be connected
4
Up to 64 RF Outputs available
Expansion Port internally terminated
8way Expansion Multicouplers connected to each of the 8 RF Outputs as required
5
Up to 128 RF Outputs available
Expansion Port configured for an 8way Expansion Multicoupler to be connected
8way Expansion Multicouplers connected to each of 16 RF Outputs as required
6
Up to 8 RF Outputs available
Expansion Port gain configured for ESS Mode
10dB in-line attenuator to be fitted to RMC Expansion Port
7
Up to 64 RF Outputs available
Expansion Port gain configured for ESS Mode
10dB in-line attenuator to be fitted to RMC Expansion Port
Input Gain Attenuator:
This value configures the Input Gain Attenuator setting and is determined by the required Input Gain and Main coaxial
feeder insertion loss value. Settings are as per the following table;
Required Input Gain
( “Reserve Gain”)
15 dB
15 dB
15 dB
15 dB
15 dB
15 dB
15 dB
“Main” TTA to RMC
Feeder Insertion Loss
0 dB
1 dB
2 dB
3 dB
4 dB
5 dB
6 dB
Input Gain Attenuator
Setting
6
5
4
3
2
1
0
If AUTO is selected, the attenuator setting will be automatically determined by an inbuilt algorithm, based on the
values defined in the Auto Input & Distribution Attenuation fields on this screen.
Asia Pacific | EMEA | Americas
55
TA7982-01xx-12-xx Series User’s Manual
Distribution Gain Attenuator:
This value configures the Distribution Gain Attenuator setting and determines the distribution gain of the RMC that
overcomes the insertion loss of the distribution cabling between the RMC and the base station receiver. Settings are
as per the following table;
Distribution Cable Loss
0 dB
1 dB
2 dB
3 dB
4 dB
DIST GAIN ATTEN Switch position
4
3
2
1
0
If AUTO is selected, the attenuator setting will be automatically determined by an inbuilt algorithm, based on the
values defined in the Auto Input & Distribution Attenuation fields on this screen
TTA Gain:
The TTA Gain shown in the Factory Test Report supplied with the TTA unit.
Input Gain:
The overall gain of the TTA sub-system (which includes the TTA gain, the Main coaxial feeder insertion loss, and the
RMC Input Attenuator). In 700/800MHz systems, a gain of 15dB is recommended. This 15dB value may need to be
reduced as a result of measurements made during Step 3 of the Motorola Five Step Process for Receive System
Verification.
Rx Cable Loss:
The estimated or actual insertion loss for the coaxial feeder cable between the TTA “Main” and RMC “RF Input” ports
(including jumper cables, etc, if fitted). Note that the maximum value for this cable’s loss (plus the TTA Post Filter
insertion loss if one is used) is recommended to be 6dB.
Post Filter Loss:
The insertion loss for the in-line Post Filter (including coaxial cables) if fitted. Note that the maximum value for this
filter’s loss (including connecting cable’s losses) is recommended to be 6dB.
Distribution Cable Loss:
The estimated or actual insertion loss for the coaxial cables between the RMC “RF Output” ports and the Base
Station receiver ports. Note that the maximum value for this cable’s loss is recommended to be 4dB.
Asia Pacific | EMEA | Americas
56
TA7982-01xx-12-xx Series User’s Manual
Defaults:
Clicking this sets all of the descriptions and values to the RMC default settings;
Gain Control – Switch
Hardware Configuration In Use – 1
Input Gain AUTO Mode – Disabled
Distribution Gain AUTO Mode - Disabled
Config Switch Setting - 1
Input Gain Switch Setting – 3
Distribution Gain Switch Setting – 3
Post Filter – Disabled
Test Modes – All OFF
Test Mode Timeout – 1 minute
Alarm Delay – 5 seconds
Discard Changes:
Click this button to restore the values to those present when the page was last re-displayed.
Note that if invalid values are being displayed after a Save attempt, these values may not match the current system
configuration. In this case, just select the Configure/User Data menu item again to re-display the current
configuration.
Save:
This will attempt to save and activate the values entered. If any out of range values are present, nothing will be saved
and the problem settings will be highlighted with a red background.
Asia Pacific | EMEA | Americas
57
TA7982-01xx-12-xx Series User’s Manual
13.13 Configuration – TTA
The TTA “Configuration” allows the configuration of the TTA settings.
Amplifier Mode:
This setting defines which amplifier path is being used in the TTA (Amp-A or Amp-B). If AUTO is selected, Amp-A is
used unless it has a fault condition, at which time the RMC will acknowledge the alarm state and action a change-over to
Amp-B automatically.
Test Mode:
Places the TTA system into the selected Test Mode(s).
Terminate
This is the Term Mode. When selected, the input to the selected TTA RF path is switched from the receive antenna (via
the TTA preselector) to a 50ohm termination. Refer Figure 1.
Bypass
This is the Bypass Mode. When selected, the RF signal path is switched to bypass the TTA RF amplifiers, with only the
TTA preselector between the receive antenna and the RMC. Refer Figure 1. This mode is used when both Amp-A and
Amp-B are faulty, and facilitates continued receive system operation – although at a degraded performance level.
This mode may also be used to confirm RF amplifier operation and gain if desired.
TP to RX
This is the Test Port Mode. When selected, the RMC front panel Test Port is switched through to the “Main” RF Input
port on the rear of the RMC. This allows the output of the TTA to be monitored if desired.
Asia Pacific | EMEA | Americas
58
TA7982-01xx-12-xx Series User’s Manual
Defaults:
Clicking this sets all of the descriptions and values to the RMC default settings;
Auto Mode – Enabled
Test Modes – All OFF
Test Mode Timeout – 1 minute
Apply:
This will attempt to save and activate the values entered. If any out of range values are present, nothing will be saved
and the problem settings will be highlighted with a red background.
Asia Pacific | EMEA | Americas
59
TA7982-01xx-12-xx Series User’s Manual
13.14 Configuration – User Data
On this page you can enter descriptive texts for the Customer Name and Site Name
Defaults:
Clicking this sets all of the descriptions to the predefined product default settings.
Discard Changes:
Click this button to restore the values to those present when the page was last re-displayed.
Note that if invalid values are being displayed after a Save attempt, these values may not match the current system
configuration. In this case, just select the Configure/User Data menu item again to re-display the current configuration.
Apply:
This will attempt to save and activate the values entered. If any out of range values are present, nothing will be saved and
the problem settings will be highlighted with a red background.
Asia Pacific | EMEA | Americas
60
TA7982-01xx-12-xx Series User’s Manual
13.15 Configuration – Communications
On this page you can change the RMC and SNMP IP address parameters.
Ethernet
DHCP:
If enabled, the unit will attempt to get its IP Address, Subnet Mask and Gateway settings from a DHCP server. If no
DHCP server is found, the configured settings will be used. If not enabled, the configured settings will always be
used.
IP Address:
The IP address for this unit.
Subnet Mask:
The network address mask to be used.
Gateway:
The address of the network gateway to be used.
Asia Pacific | EMEA | Americas
61
TA7982-01xx-12-xx Series User’s Manual
SNMP
Test SNMP
Sends a Test SNMP trap that will appear as a “Test Message”, not a fault condition, that may be used to confirm the
correct configuration of the SNMP parameters and communications to the SNMP Manager server.
Send Alarm Notifications (Traps):
Selects if sending SNMP Traps are enabled or disabled.
SNMP Manager IP Address:
Selects the IP address that SNMP notifications (Traps) will be sent to. Both a Primary and Secondary address may be
used if required for redundant SNMP server configurations.
SNMP Manager Listening Port:
Selects the port number used by the SNMP Manager. Both a Primary and Secondary address may be used if required
for redundant SNMP server configurations.
Note: SNMP MIB files for the RMC are available from RFI.
Defaults:
Clicking this button enters the factory default values for the Communications settings, which are:
DHCP
IP Address
Subnet Mask
Gateway
Disabled
192.168.1.200
255.255.255.0
192.168.1.254
Send Alarm Notifications
SNMP Manager IP Address
SNMP Manager Listening Port
Not Selected
0,0,0,0
162
Discard Changes:
Click this button to restore the values to those present when the page was last re-displayed.
Note that if invalid values are being displayed after a Save attempt, these values may not match the current repeater
configuration. In this case, just select the Configure/Communications menu item again to re-display the current
configuration.
Save:
This will attempt to save the values entered. If any out of range values are present, nothing will be saved and the
problem settings will be highlighted with a red background.
Note: Unlike the other configuration pages, this will not Activate (or “apply”) the Ethernet settings if they
have been changed. Ethernet changes can only be activated by restarting the RMC unit, either
by cycling the power, or through the Maintenance/Restart menu item.
Asia Pacific | EMEA | Americas
62
TA7982-01xx-12-xx Series User’s Manual
13.16 Maintenance Menu
The “Maintenance” menu allows all of the RMC’s interface and system-wide formatting parameters to be viewed.
Selecting each indented topic under “Maintenance” will display that item as a separate display page.
Asia Pacific | EMEA | Americas
63
TA7982-01xx-12-xx Series User’s Manual
13.17 Maintenance – Access Management
This page is used for managing access to the RMC. There are two levels of access available:
View Status only:
This is the “User” (i.e. Level 1) login level. Logging in at this level allows a user to view Status pages. Users logged in
with these credentials will not be able to change any Configuration settings.
View Status and Modify Settings:
This is the “Administrator” (i.e. Level 2) login level. Logging in at this level allows a user to have access to the
Configuration and Maintenance settings as well as the Status pages.
Note: User Names and Passwords may contain up to 16 characters each. Passwords are case sensitive, but User
Names are not. Passwords are strength tested, as they are entered, so that appropriate security is
maintained. Passwords must meet a Password Strength value of at least 50 to be accepted.
Asia Pacific | EMEA | Americas
64
TA7982-01xx-12-xx Series User’s Manual
Tips for strong passwords:
Make your password 8 characters or more in length.
Use mixed case letters (upper and lower case).
Make more than one digit a number.
Use special characters (!,@,#,$,%,^,&,*,?,_,~).
Discard Changes:
Click this button to restore the values to those present when the page was last redisplayed.
Note that if invalid values are being displayed after a Save attempt, these values may not match the current unit
configuration. In this case, just click on the Maintenance/User Management menu item to re-display the current
configuration.
Apply:
This will save and activate the values entered. If any out of range values are present, nothing will be saved and the
problem settings will be highlighted with a red background.
Asia Pacific | EMEA | Americas
65
TA7982-01xx-12-xx Series User’s Manual
13.18 Maintenance – Date & Time
The internally maintained real time clock Date and Time values may be adjusted using these fields.
Date Format:
Two styles of date format can be selected to cater for international format preferences.
Date:
Enter the current date in the displayed mm/dd/yy or dd/mm/yy format.
Time:
Enter the current time in the displayed hh:mm:ss format.
Discard Changes:
Click this button to restore the values to those present when the page was last re-displayed.
Apply:
This will save and activate the values entered. If any out of range values are present, nothing will be saved and the
problem settings will be highlighted with a red background.
Asia Pacific | EMEA | Americas
66
TA7982-01xx-12-xx Series User’s Manual
13.19 Maintenance – Firmware Update
This page is used for uploading firmware updates to the RMC.
Firmware upgrades are normally supplied using a “FFP” file extension (Firmware & File system Package).
Browse:
Enter the file path or Browse to nominate the system firmware update file location.
Send:
Once the update file’s location has been nominated, click the Send button to start the update file download process.
Depending on the speed of the connection, it can take several minutes for the file upload to complete and be
confirmed.
After waiting for about a minute, re-display the System Status page to confirm that the update completed
successfully. If the update process is interrupted or unsuccessful for any reason, the unit will restart with the previous
firmware.
Note: You may need to clear your browser's cache to view changed pages. If you happen to get a connection
timeout message, do not click the retry button. Instead, wait for a minute or so and then re-display the System
Status page to confirm that the update actually completed satisfactorily.
Asia Pacific | EMEA | Americas
67
TA7982-01xx-12-xx Series User’s Manual
13.20 Maintenance - Restart
Restart:
Clicking on this selection will initiate an RMC system “Restart”.
Note: The unit will normally only need to be restarted to activate new Communications settings.
If restarted, an RMC may take up to one minute to reboot and re-initialize itself before it becomes
available for a “Log in” and a web browser new session.
Asia Pacific | EMEA | Americas
68
TA7982-01xx-12-xx Series User’s Manual
13.21 About
Asia Pacific | EMEA | Americas
69
TA7982-01xx-12-xx Series User’s Manual
13.22 Logout
Clicking on this selection will present the “Log out” message box.
If “OK” is selected, the user will be logged out of the current webserver session and the original “Log in” screen will be
presented, ready for a new session…..
Asia Pacific | EMEA | Americas
70
TA7982-01xx-12-xx Series User’s Manual
14. Connectors
RMC DC Power connector (Phoenix 2-pin) pin-out:
The pin numbers on the polarized Phoenix 2-pin connector on the rear of the RMC are illustrated below.
Pin Function Table:
Pin
1
2
Function
DC Power Input -ve
DC Power Input +ve
RMC Alarm connector (Phoenix 3-pin) pin-out:
The pin numbers on the polarized Phoenix 3-pin connector on the rear of the RMC are illustrated below.
Pin Function Table:
Pin
1
2
3
Function
Fault – Closed when an alarm is present
Fault – Open when an alarm is present
Common
Asia Pacific | EMEA | Americas
71
TA7982-01xx-12-xx Series User’s Manual
15. Maintenance, Inspection and Repair Advice
No special maintenance program is required for the TTA or RMC. Testing and inspection of the TTA system may be
included in a Periodic Maintenance Inspection (PMI) program if desired.
Firmware upgrades may periodically be made available and may be uploaded for the TTA or RMC via the RMC GUI
or CLI if desired.
Checking that the RF connectors on all coaxial cables are correctly torqued (as per manufacturers’
recommendations) is considered good practice.
All other connectors (power, alarm, etc) must be firmly located and pushed into their corresponding mating sockets,
with fastening screws tightened securely.
Neither the TTA nor the RMC are considered field repairable. Should it be considered that any unit may be faulty
through diagnosis, they should be replaced - or returned to RFI for repair.
Asia Pacific | EMEA | Americas
72
TA7982-01xx-12-xx Series User’s Manual
16. Background Material and other resources
For Marketing Sheets, User Manuals, Firmware Upgrade files, SNMP MIB files, or additional information on the RFI range
of TTA and RMC products please visit:
http://www.rfi-motorola.com
Test Drive the RMC GUI (including the TTA) by visiting the RFI TTA on-line demonstration unit:
http://203.46.35.188
Level 1:
Level 2:
Username:
user
Password:
user
Username:
admin
Password:
admin
Please note that this unit is not connected to a “live” network and may be test driven and configured without impact on any
user. Demonstration units may be also be off-line periodically. If you cannot connect to this unit please contact your
nearest RFI Sales office so we can ensure it is available for your test drive.
Additional information is available from our RFI-Motorola website http://www.rfi-motorola.com
Contact Information
If you would like more information on the TTA/RMC products and their applications, please contact your nearest RFI Sales
Office. For more information on RFI products, please visit us at http://www.rfiwireless.com.au
RFI Americas
2023 Case Parkway North
Twinsburg, OH 44087, USA
Phone: +1 330 486 0706
Fax: +1 330 486 0705
Email: Sales and Enquiries
Asia Pacific | EMEA | Americas
73
TA7982-01xx-12-xx Series User’s Manual
17. User Notes:
Asia Pacific | EMEA | Americas
74
TA7982-01xx-12-xx Series User’s Manual
11. Maintenance
No special maintenance program is required for the APM or frequency banded Couplers.
Firmware upgrades may periodically be made available and will require uploading into the APM.
Physically checking that the 7/16DIN (M) RF connectors on the feeder cables from the combiner and to the antenna are correctly
torqued (as per manufacturers recommendations) onto the corresponding Coupler termination connectors is considered good
practice. All N Male termination connectors on the RF coaxial connectors on both the APM and Coupler/s must also be tightened.
The 2-pin Phoenix DC connector socket must be firmly located and pushed into the corresponding power plug on the APM.
Neither the APM nor the Coupler/s are considered field repairable and should it be considered that either unit may be faulty
through diagnosis, they will have to be returned to RFI.
Notes:
Asia Pacific | EMEA | Americas
75