1
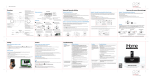
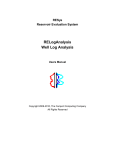
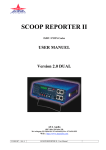
Table of Contents 1. Your Level One ISDN Router......................................................1 Connectors and Components .............................................................................1 Specifications ........................................................................................................3 2. Setup & Operation........................................................................4 Overview................................................................................................................4 Requirements .........................................................................................................4 Hardware Installation ...........................................................................................5 Software Installation.............................................................................................5 ISDN Router Setup ...............................................................................................6 PC Setup (Required for every PC) ......................................................................9 Operation..............................................................................................................11 3. Other Configuration....................................................................13 Overview..............................................................................................................13 DHCP ....................................................................................................................13 Routing.................................................................................................................14 ISDN......................................................................................................................14 4. Advanced Features .....................................................................15 Overview..............................................................................................................15 Access Control....................................................................................................15 Internet Applications .........................................................................................16 Dial-in....................................................................................................................17 LAN-to-LAN........................................................................................................18 5. Troubleshooting ..........................................................................19 Overview..............................................................................................................19 Internet Access ...................................................................................................19 Dial-in....................................................................................................................21 i Note: This is a condensed version of the User Manual. The full version is installed with the Windows Manager utility. Copyright 1999. All Rights Reserved. All trademarks and trade names are the properties of their respective owners. Document Version: 1.0 P/N: 95601A00A0 ii Your Level One ISDN Router 1 Connectors and Components Figure 1: Connectors and Components LEDs LAN LAN link LED (beside the LAN Port) is On when a LAN connection is established, and flashes when data is transmitted or received through the LAN. ISDN LEDs WAN Link LED (beside the WAN Port) is ON when an ISDN "D" channel connection is established. ISDN Data LED (front) flashes when data is transmitted or received via the ISDN "B" Channel. 1 Level One ISDN Router Data LEDs (Front) Note: The Data/Status LED has 2 colors - Orange and Green. Data/Status LED ISDN Data LED Description OFF OFF No power. ON (Orange, then Green) ON, then OFF Normal power ON (start up) sequence. ON (Green) OFF Idle Flashing (Green) Flashing Normal operation. Data is being received and transmitted. Flashing Orange, Green (repeated) - Hardware error. Contact technical support. DIP Switches SW1 SW2 Description OFF OFF Normal operation (default) OFF ON DHCP Server disabled. ON OFF Restore device IP and password (see below) ON ON Normal Operation Restore Device IP Address and Password Use the following procedure to: • Restore the device IP address to the factory default of 192.168.0.1 • Set the Network Mask to 255.255.255.0 • Set the password to NULL (no password) Procedure: 1. Power off the Level One ISDN Router. 2. Set DIP switch 1 to ON, and switch 2 to OFF. 3. Power on the Level One ISDN Router 2 Your Level One ISDN Router 4. Operate DIP switch 1 in the following sequence (you have 15 seconds to complete the sequence): • OFF • ON • OFF 5. If everything is OK, the Status LED should flash once after about 5 seconds. The Level One ISDN Router is now ready for use with the default IP Address and password. Specifications Dimensions 120mm(W) * 93mm(D) * 30mm(H) Operating Temperature 0° C to 40° C Storage Temperature -10° C to 70° C Network Protocol: TCP/IP Ethernet Interface: 1 * 10/100BaseT (RJ45) ISDN Interface: 1 * RJ45 for S/T interface. LEDs 2 * RJ45 connection status 2 * Data Transfer External Power Adapter 12 V DC FCC Statement: This device complies with Part 15 of the FCC Rules. Operation is subject to the following two conditions: (1) This device may not cause harmful interference. (2) This device must accept any interference received, including interference that may cause undesired operation. CE Marking Warning This is a Class A product. In a domestic environment this product may cause radio interference in which case the user may be required to take adequate measures. 3 Setup & Operation 2 Overview For most situations, this chapter contains all the information required to provide shared Internet access via the Level One ISDN Router. The required steps are: 1. Hardware Installation 2. Software Installation 3. Level One ISDN Router setup, using the supplied software. 4. PC and or/LAN configuration. Requirements • 10BaseT or 100BaseT Ethernet network. • ISDN phone line, fitted with a NT-1 (Network Termination 1) termination and RJ45 sockets for S/T connection. • Internet Access account with a local ISP (Internet Service Provider). • The Setup program requires Windows 95/98, or Windows NT4.0. If necessary, configuration may be performed using a Web browser instead of the supplied Windows utility. See Websetup, in the Manual folder on the CD-ROM, for details. 4 Setup & Operation Hardware Installation Figure 2: Installation The ISDN Router incorporates a DHCP Server. If you already have a DHCP Server, and wish to continue using it, set DIP switch 2 ON to disable the DHCP Server in the ISDN Router. 1. Use the supplied cable to connect the WAN port to the S/T connector on your ISDN NT1 (Network Terminator 1. 2. Connect the LAN port to your 10BaseT or 100BaseT hub. 3. Connect the supplied power supply. Software Installation 1. Insert the supplied CD-ROM into your drive. 2. If the install program does not start, run SETUP.EXE in the root directory. 3. Follow the prompts to complete the installation. 4. The setup program will now run. 5 Level One ISDN Router ISDN Router Setup 1. On the first screen, select the Level One ISDN Router, and click "Setup". Figure 3: Manager - first screen 2. If the current IP Address is unworkable, the IP Address screen (below) will suggest new values. • Change the suggested IP Address if is already in use by a device which is not powered on. • Click "Change" to continue. Note: If the current IP Address is OK, you will not see this screen. Figure 4: IP Address Screen 6 Setup & Operation 3. Enter the required data on the Quick Setup tab below. Figure 5: Quick Setup Tab 7 Level One ISDN Router Internet Access (from ISP) Account (User) Name Account name provided by your ISP (Internet Service Provider). Account Password Verify Password Password for the above account. IP Address from ISP Dynamic IP addresses are the most common. If Fixed, use the address provided by your ISP. Idle Time-out If a connection is idle for longer than this time period, it is dropped. DNS IP Address DNS IP address supplied or recommended by your ISP. Telephone ISP's telephone number; 2nd and 3rd numbers are optional. ISDN Details (from Telephone Company) Country Select your country If in the USA, select the entry to match the "Switch Type" used by your telephone company. SPID If you live in the USA, enter the SPID (Service Profile Identifier) provided by your phone company. LAN IP Address Network Mask 4. 8 These are read-only. Normally, no other configuration is required, but if your LAN has a router, or you wish to change the IP Addresses allocated by the DHCP Server, refer to Chapter 3. Setup & Operation PC Setup (Required for every PC) TCP/IP Setup If your LAN has a DHCP Server, or a Router, do NOT change the TCP/IP settings on the PCs. See Chapter 3 for further details. 1. Use Start - Settings - Control Panel - Network to locate the screen below. Figure 6: Network - Windows 95/98 2. Select the "TCP/IP -> Network card" entry, as highlighted above, and click Properties to see the screen below. Figure 7: TCP/IP Properties 9 Level One ISDN Router 3. Use the appropriate settings for your situation: • Use "Obtain an IP address automatically", as shown above, if using the DHCP Server feature in the Level One ISDN Router, or an existing DHCP Server. • If using "Specify an IP Address": • Do not make any changes on the IP Address tab. • On the Gateway tab, set the Default Gateway Address to the Level One ISDN Router's IP Address. • On the DNS Configuration tab, enter the same value used when configuring the Level One ISDN Router. Internet Settings 1. Run Start Menu-Settings-Control Panel-Internet Options. 2. On the Connection tab, click the Setup button. 3. Step through the Wizard, and ensure that Internet access to set to "via local area network (LAN)" and the other options are NOT selected. 4. Configuration is now complete. 10 • You can now use your Browser to access the Internet. • To access the E-Mail account provided by your ISP, your E-Mail program must be configured as detailed by your ISP. Setup & Operation Operation Internet Access Once configured, operation is automatic. You can use your Web Browser to access any Web Site. The Level One ISDN Router will connect and disconnect from your ISP as required. Special Internet Applications These server-based applications, such as Video-conferencing and on-line games, have special requirements, but many will work with the Level One ISDN Router. See Chapter 4 - Advanced Features for further details. Status Tab On the Windows Manager utility, the Status tab can be used to check the Level One ISDN Router. • • • Device section provides details of the Level One ISDN Router. ISDN shows the current connection status. Log lists messages regarding the connection. Common messages are shown in the following table. Message Description Dialing Dialing the ISP Try to establish physical connection. The device is trying to connect with the ISP. Busy error The number dialed was busy. Physical line is connected Physical connection to ISP has been established. Start PPP A PPP connection is now being established. PPP up fail The PPP connection could not be established. PPP up successfully The PPP connection was established succes sfully. 11 Level One ISDN Router 12 Stop PPP The PPP connection was terminated. This will occur at the end of a session, or an error condition. Idle timer expires The “Idle time-out” has been triggered. (There was no data sent or received for the duration of the “Idle time” period.) Other Configuration 3 Overview In most cases, the configuration covered in this chapter is not necessary. If required, chapter 2 will direct you to this chapter. DHCP A DHCP (Dynamic Host Configuration Protocol) server provides an IP address and related data to a DHCP client (PC or device) upon request. Existing DHCP Server If using an existing DHCP Server: • Configure it to provide the ISDN Router's IP Address as the Default Gateway. • The DHCP Server in the Level One ISDN Router should be disabled. This setting is on the LAN tab. ISDN Router's DHCP Server Normally, the default values do not need to be changed. However, if your LAN already has some devices using fixed IP Addresses, you need to set the IP Address range used by the DHCP Server to be compatible. • The ISDN Router's IP Address must be within the address range you wish to use. This should have been set during initial configuration. • DHCP Server settings (below) are on the LAN tab of the Manager utility. Enable/Disable Enable/Disable the DHCP Server. Start IP Address Finish IP Address Sets the addresses allocated to DHCP clients by the DHCP server. This also sets the number of DHCP clients maximum is 253. DNS IP Address If multiple entries are provided, the first available DNS will be used. 13 Level One ISDN Router Devices having fixed (static) IP Addresses must NOT use an IP Address within the range used by the DHCP Server. Routing The Routing feature (on the LAN tab) can be completely ignored if you do not have a router in your LAN. If you DO have a router, it is necessary to configure BOTH the Router and the Routing table in the Level One ISDN Router correctly. See the On-line manual, installed with the Manager utility, for further details. ISDN The ISDN tab on the Manager program allows you to: • Temporarily switch the ISDN link OFF. • Use 2 B Channels for Internet access, rather than 1. This will provide greater bandwidth, and therefore faster file transfers, but at increased telephone costs. • Set the outgoing call MSN and SAD. (MSN and SAD allow you to have multiple phone numbers). • Set the B Channel line speed, or enter an "Initial Sting" (Only if advised to do so by your phone company.) In most situations, there is no need to change these settings. 14 Advanced Features 4 Overview This Chapter is provided to help you decide whether or not you need to use a particular feature. For configuration and implementation details, refer to the on-line User Manual installed with the Manager utility. Access Control The Access Control feature allows administrators to restrict Internet Access by individual workstations (PCs). The process uses "Packet Filtering" to block or discard data packets. You can apply the pre-defined filters, and optionally define your own filters. • For convenience, restrictions are applied to a "Group" (of workstations), rather than to individual workstations. • To block access by an individual workstation, its details must be entered in the Workstation database. • Restrictions can be applied to ALL PCs without entering ANY workstation data, by applying restrictions to the "Everyone" group. • By default, filtering is disabled, and no packets are blocked or discarded. 15 Level One ISDN Router Internet Applications These features, on the Internet Application tab, are not available if you use the ISDN Router for LAN-to-LAN connection. Special Applications This feature is only required if you wish to use Internet applications which require 2-way communication, multiple connections, or combined TCP/UDP connections. • Examples of such applications are Internet Videoconferencing, Telephony, Games Servers, and other special-purpose Servers. A number of the more common applications have been pre-defined, and will appear in the list. • If a new Internet application is unable to function correctly, you can add it to the list. • At any time, each Special Application can be used by only 1 PC. Virtual Servers The Virtual Servers feature allows Internet users to access standard Servers on your LAN, via the Level One ISDN Router. Normally, Internet users would not be able to access a server on your LAN because: • Your Server does not have a valid external IP Address. • Attempts to connect to devices on your LAN are blocked by the firewall in the Level One ISDN Router. The "Virtual Server" feature solves these problems and allows Internet users to connect to your servers. However, your LAN must have an existing connection to the Internet. Internet users cannot open a connection. To Internet users, all virtual Servers on your LAN have the same IP Address (IP Address from ISP, on the Quick Setup screen). This address should be fixed (static) to make it easier for Internet users to connect to your Servers. Exposed PC This feature, if enabled, allows one (1) computer on your LAN to be exposed to all users on the Internet, allowing unrestricted 2-way communication between the "Exposed Computer" and other Internet users or Servers. 16 Advanced Features • Internet users will see the PC as having the IP Address from ISP shown on the Quick Setup screen of this device. (This is the same IP Address used by the Virtual Servers.) • Any Internet user who knows this address can connect to the Exposed Computer. What happens after connection depends on what software both computers are using. • Using this feature is a security risk. You should use this feature only if the "Special Applications" feature is insufficient to allow the desired application to function. Dial-in The Level One ISDN Router's dial-in feature allows remote users to: • Dial the ISDN Router using an ISDN TA and the same software that they use for dial-in Internet access. (e.g. Dial-up Networking). • Have their user name and password verified by the Level One ISDN Router. (If dial-in authentication is set to "None", no User name/password verification is performed.) • Access the LAN resources as if they were a local user. To other devices on the LAN, the dial-in user will appear to be a local PC having an IP Address allocated by the ISDN Router. For additional security, the call-back function can be used. In this situation, the Level One ISDN Router will hang-up the user's incoming connection, and then call them back. The Dial-in feature is unavailable when the ISDN Router is used for LAN-to-LAN connection. 17 Level One ISDN Router LAN-to-LAN The LAN-to-LAN feature allows the Level One ISDN Router to connect to a remote LAN, via the ISDN link. • The remote LAN must also have a Level One ISDN Router or compatible device; each device must be configured. • NAT (Network Address Translation) - the feature that allows all PCs on the LAN to share 1 external IP Address, and also provides firewall protection - is disabled when using the LAN-to-LAN function. If LAN-to-LAN is used, neither Internet Access nor Dialin are available. 18 Troubleshooting 5 Overview This section covers some common problems that may be encountered while using the Level One ISDN Router. If you follow the suggested steps and the Level One ISDN Router still does not function properly, contact your dealer for further advice. Internet Access Problem 1 ISDN Router is not listed in the Windows utility. Solution 1 Check the following: • The ISDN Router is properly installed, LAN connections are OK, and it is powered ON. • Ensure that your PC and the ISDN Router are on the same network segment. (If you don't have a router, this must be the case.) Problem 2 When I enter a URL or IP address I get a time out error. Solution 2 Try the following troubleshooting steps. 1. If using static IP Addresses, ensure that your workstations IP settings are correct, including IP address, default gateway and DNS. 2. Ping the ISDN Router. Use the “Run” command to enter the following command: Ping xxx.xxx.xxx.xxx where xxx.xxx.xxx.xxx is the ISDN Router's IP address. 3. If the ping command fails, check that the ISDN Router is connected and ON. If it is connected and on, there is a problem with your LAN. 4. On the Quick Setup screen, check that Enable Internet Access is checked. 5. Check the ISDN Status screen, and examine the Connection Log. For details of the Log messages, refer to page 11. 19 Level One ISDN Router 6. Check the "Proxy Server" settings on your PCs. • The ISDN Router is NOT a Proxy Server; PCs do not require "Proxy Server" settings to use it. • If you have Proxy Server on your local LAN, you should turn it Off, and disable the "Proxy Server" settings in your PC applications. • If your ISP has a Proxy Server, follow the instructions provided by the ISP. Problem 3 Some applications do not run properly when using the ISDN Router. Solution 3 The ISDN Router processes the data passing through it, so it is not transparent. The following applications and protocols are transparently supported by firmware V5.0 or later: Telnet, FTP, HTTP, ping POP/SMTP, Archie, NNTP TFTP, IRC, Gopher DNS, SNMP, Real Audio For applications which are not transparently supported, 2 features can be used: 20 • Special Applications (Internet Application tab). If possible, you should use this feature. You can add additional applications to those already listed, using the data provided by the service provider. Note: At any time, only 1 PC can use a particular Special Application. • Exposed Computer (Internet Application tab). If an Internet Application cannot be made to work using the Special Application feature, you can use this method. However, this is a security risk, so should only be used when essential. Troubleshooting Dial-in Problem 1 My modem can't establish a connection to the ISDN Router. Solution 1 You can NOT use a modem. You must use an ISDN TA, and establish an ISDN link. Problem 2 I always get a busy tone when I try to dial-in. Solution 2 Check the Usage setting on the ISDN tab. If set to "Always use 2 B channels", then dial-in is only possible when the ISDN Router is idle. If set to "Dynamically use 2 B Channels", then dial-in access will be provided by dropping 1 B channel if necessary. Problem 3 When using Dial-in, I get an IP Address conflict involving the dial-in PC. Solution 3 This can happen if you are not using the DHCP Server feature of the ISDN Router. The ISDN Router must allocate an IP Address to the dial-in PC, even if the DHCP Server is disabled. It allocates the IP Address shown in the Start IP Address field for the DHCP Server (on the LAN tab of the Manager utility). If this causes an IP Address conflict, you can change this value as follows: 1. On the LAN tab, enable the DHCP Server function. 2. Select an unused IP Address from the address range used on your PC, and enter it in the Start IP Address field. 3. Disable the DHCP Server function. 4. Click OK to save. 21