1
Calibrating the microStar (Diagnostic Radiology Users)
Step 3 - Determine the Calibration Type
For virtually all diagnostic radiology users, a linear calibration is sufficient to achieve the desired level of
accuracy (<10%). For those customers with special accuracy requirements, a non-linear calibration can
be used. Refer to the section for radiation oncology users to learn more about this feature.
Step 4 - Obtain the Calibration Dosimeters
Having chosen the application and the calibration type, you must next obtain a set of calibration
dosimeters. For diagnostic radiology customers, Landauer supplies a set of dosimeters exposed on a
PMMA phantom to 80 kVp x-rays (HVL = 2.9mm Al). These are supplied with the microStar when you
purchased it. Advanced users could create their own set using the technique outlined for radiation
oncology customers with the appropriate type of machine (fluoroscope, CT, mammograph)
Step 5 - Expose the Calibration Dosimeters
The calibration set supplied by Landauer will span the range of clinical applications for virtually all
diagnostic radiology users. Advanced users could create their own set using the technique outlined for
radiation oncology customers with the appropriate type of machine (fluoroscope, CT, mammograph).
Step 6 - Establish the microStar Performance
Using your set of calibration and QC dosimeters, you will next need to establish the intrinsic precision of
your microStar. This does not need to be done before each calibration; however, it is a useful test to
understand the intrinsic uncertainty of your measurements and to determine if your unit is functioning
properly. Simply follow the steps below:
1) Take a 100,000 mRad QC dosimeter (or a “high-dose” dosimeter if you created your own set) and
analyze it ten times. Be sure to remove the adapter from the unit and the dosimeter from the
adapter between each analysis to average out any mechanical variations in opening/positioning
the dosimeter. Don’t worry if the computed dose doesn’t agree with your expectations (at this
time).
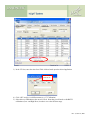
2) Copy down the “Counts” as displayed on the screen or export them using the “Import/Export”
function described in the Users Manual.
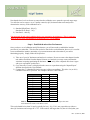
3) Compute the CV (Standard Deviation/Average) of these ten readings. This is the 1-σ (or 68%)
confidence interval for your unit. An example is shown in Table 1 below.
Rev. 2, June 10, 2009