1
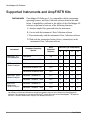
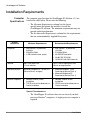
User Bulletin
GeneMapper® ID Software
November 30, 2004
SUBJECT:
Installation Procedures and New Features for
GeneMapper® ID Software v3.2
In This User
Bulletin
This user bulletin includes the following topics:
Overview
Section 1 Installation Procedures . . . . . . . . . . . . . . . . . . . . . . . . . . . 3
Section 2 New Features: All AmpFlSTR Kits . . . . . . . . . . . . . . . . 17
Section 3 New Features and Procedures: Yfiler Kit . . . . . . . . . . . . 25
Appendix A Verification Testing . . . . . . . . . . . . . . . . . . . . . . . . . . 41
Appendix B Troubleshooting the Installation . . . . . . . . . . . . . . . . . 57
GeneMapper® ID Software v3.1 has been upgraded to v3.2. This user
bulletin:
• Provides GeneMapper ID Software v3.2 installation
requirements and procedures
• Describes the new features in GeneMapper ID Software v3.2
and, where applicable, provides procedures for using them
• Describes verification testing of GeneMapper ID Software v3.2
DRAFT
November 30, 2004 11:05 am, 4352543A.fm
GeneMapper® ID Software
2
DRAFT
November 30, 2004 11:05 am, 4352543A.fm
User Bulletin
Section 1 Installation Procedures
Section 1
Installation Procedures
This section covers:
Supported Instruments and AmpFlSTR Kits . . . . . . . . . . . . . . . . . . 4
Installation Requirements . . . . . . . . . . . . . . . . . . . . . . . . . . . . . . . . . 6
Installation Procedures . . . . . . . . . . . . . . . . . . . . . . . . . . . . . . . . . . 10
Installation Procedures and New Features for GeneMapper® ID Software v3.2
DRAFT
November 30, 2004 11:05 am, 4352543A.fm
3
GeneMapper® ID Software
Supported Instruments and AmpFlSTR Kits
Instruments
GeneMapper ID Software v3.2 is compatible with the instruments,
operating systems, and Data Collection software listed in the table
below. Compatibility is defined as the ability of the GeneMapper ID
software to perform at least one of the following functions:
A. Analyze sample files generated from the instrument
B. Coexist with the instrument’s Data Collection software
C. Run concurrently with the instrument’s Data Collection software
D. Work with the automation feature (that is, autoanalysis) in the
instrument’s Data Collection software
Instrument
ABI PRISM ® 377
DNA Sequencer
ABI PRISM ® 310
Genetic Analyzer
ABI PRISM ® 3100
Genetic Analyzer
ABI PRISM ®
3100-Avant
Genetic Analyzer
Computer Operating
System
Macintosh®
Data
Collection
Software
Functions (as listed above)
A
B
C
D
a
2.6
X
—
—
—
Microsoft® Windows NT®
3.0
X
X
X
—
Macintosh® a
2.1
X
—
—
—
Microsoft® Windows NT®
v3.0
X
X
X
—
Microsoft® Windows® 2000
v3.0
X
X
X
—
Microsoft® Windows NT®
v1.1
X
—
—
—
Microsoft® Windows® 2000
v2.0
X
X
X
X
Microsoft® Windows NT®
v1.0
X
—
—
—
Microsoft® Windows® 2000
v2.0
X
X
X
X
a. Data generated from a 310 Genetic Analyzer or 377 DNA Sequencer using a Macintosh® platform must be
converted to a Microsoft® Windows®-based format before they can be used with the GeneMapper ID
software. For information on converting Macintosh® sample files, refer to the GeneMapper™ ID Software
Version 3.1 Human Identification Analysis User Guide (PN 4338775).
4
DRAFT
November 30, 2004 11:05 am, 4352543A.fm
User Bulletin
Supported Instruments and AmpFlSTR Kits
Chemistry Kits
GeneMapper ID Software v3.2 is specifically designed to work with
the following AmpFlSTR® kits:
•
•
•
•
•
•
•
•
•
•
AmpFlSTR® Yfiler™ PCR Amplification Kit
AmpFlSTR® Identifiler® PCR Amplification Kit
AmpFlSTR® SGM Plus® PCR Amplification Kit
AmpFlSTR® Profiler Plus® ID PCR Amplification Kit
AmpFlSTR® Profiler Plus® PCR Amplification Kit
AmpFlSTR® COfiler® PCR Amplification Kit
AmpFlSTR® SEfiler™ PCR Amplification Kit
AmpFlSTR® Profiler® PCR Amplification Kit
AmpFlSTR Blue™ PCR Amplification Kit
AmpFlSTR Green™ I PCR Amplification Kit
Installation Procedures and New Features for GeneMapper® ID Software v3.2
DRAFT
November 30, 2004 11:05 am, 4352543A.fm
5
GeneMapper® ID Software
Installation Requirements
Computer
Specifications
The computer specifications for GeneMapper ID Software v3.2 are
listed in the table below. Please note the following:
• The Minimum Requirements column lists the lowest
specifications that permit the installer to install the
GeneMapper ID software. The minimum requirements may not
provide optimal performance.
• The Recommended Requirements column lists the requirements
that are recommended by Applied Biosystems.
System
Component
Minimum Requirements
Recommended Requirements
Computer
• Intel Pentium® III processor,
540 MHz
• 256 MB of RAM
• 2-GB hard drive (free space)
• Intel Pentium® IV processor,
≥2.8 GHz
• 512 MB of RAM
• 40-GB EIDE hard drive
• 20/48X IDE CD-ROM
• 10/100 NIC with RWV (internal)
Monitor
800 × 600 pixels size
17-inch monitor
1024 × 768 or higher pixels size
19-inch or larger monitor
Operating System
Microsoft Windows NT® version 4.0
(Service Pack 5 or higher)
• Microsoft Windows® 2000
Professional (Service Pack 4)
• Microsoft Windows® XP
Professional (Service Pack 1)
Ethernet Capability
• Network card for Oracle®
installation
• TCP/IP must be installed prior to
Oracle installation
• Network card for Oracle®
installation
• TCP/IP must be installed prior to
Oracle installation
Special Considerations
• The GeneMapper ID software does not run correctly on dualprocessor Pentium® computers. A single-processor computer is
required.
6
DRAFT
November 30, 2004 11:05 am, 4352543A.fm
User Bulletin
Installation Requirements
• GeneMapper ID Software v3.2 runs on Windows NT®,
Windows® 2000, and Windows® XP platforms only. Conversion
utilities are included for analyzing data from Macintosh®-based
sample files. For conversion procedures, refer to the
GeneMapper™ ID Software Version 3.1 Human Identification
Analysis User Guide (PN 4338775).
• The GeneMapper ID Software v3.2 automated installer operates
only on computers running Microsoft Internet Explorer. If you
are using another browser, you will need to manually launch the
installer; instructions are provided in step 2 on page 12.
Compatibility
with Oracle
Databases
The GeneMapper ID software uses an Oracle® database.
GeneMapper ID Software v3.2 is compatible only with the Oracle
database installed with ABI PRISM ® 3100/3100-Avant Genetic
Analyzers Data Collection Software v2.0.
Be sure there is no other Oracle client or Oracle server on the
computer. GeneMapper ID Software v3.2 is not supported on any
other Oracle client or server configurations.
Special Considerations
• The version of the Oracle database in GeneMapper ID Software
v3.2 is an embedded license for use by five named users.
IMPORTANT! To accommodate more than five users, additional
GeneMapper ID software or Oracle database licenses must be
purchased.
• TCP/IP has to be installed before installing GeneMapper ID
Software v3.2.
Installation Procedures and New Features for GeneMapper® ID Software v3.2
DRAFT
November 30, 2004 11:05 am, 4352543A.fm
7
GeneMapper® ID Software
Compatibility
with 3100/3100Avant Genetic
Analyzers
The table below describes compatibility of GeneMapper ID
Software v3.2 with the Data Collection software for the
ABI PRISM ® 3100/3100-Avant Genetic Analyzers.
3100 Genetic
Analyzer
Data Collection
Version
3100-Avant
Genetic Analyzer
Data Collection
Version
Compatible with
Instrument Computer?
1.1
—
No. a
—
1.0
2.0
2.0
Yes
a. GeneMapper ID Software v3.2 can only exist with the Oracle database
installed by 3100/3100-Avant Genetic Analyzer Data Collection Software
v2.0.
IMPORTANT! To install GeneMapper ID Software v3.2 on a
computer connected to a 3100/3100-Avant Genetic Analyzer that
uses Data Collection Software v2.0, the Data Collection software
must be running. If the Data Collection software is not running, the
GeneMapper ID software does not register with the Data Service
software.
Login
Requirements
8
When installing GeneMapper ID Software v3.2, you must:
• Have Administrator privileges on the local computer (that is,
have complete and unrestricted access to the local computer)
• Log in to the local computer (not a network domain)
• Be sure there is no other Oracle client or Oracle server on the
computer. GeneMapper ID Software v3.2 is not supported on
these configurations.
DRAFT
November 30, 2004 11:05 am, 4352543A.fm
User Bulletin
Installation Requirements
PDF File Reader
To open the user documentation included on the GeneMapper® ID
Software v3.2 installation CD, use a program that reads PDF files,
such as the Adobe Acrobat® Reader software.
The GeneMapper ID Software v3.2 installer does not install Acrobat
Reader. If you do not have a program that reads PDF files, you can
download Acrobat Reader from either the Adobe or Applied
Biosystems websites:
• www.adobe.com
• www.appliedbiosystems.com/support/software.
Installation Procedures and New Features for GeneMapper® ID Software v3.2
DRAFT
November 30, 2004 11:05 am, 4352543A.fm
9
GeneMapper® ID Software
Installation Procedures
What Gets
Installed
Before You Begin
the Installation
The installer on the GeneMapper® ID Software v3.2 CD installs:
•
•
•
•
•
•
•
GeneMapper® ID Software v3.2
Oracle® database
Panel folder that contains AmpFlSTR® kit panels and bins
Microsatellite and SNP genotyping example data
Electronic (PDF) versions of the user guide and tutorial
Size standard folder that contains various size standards
Default plot and table settings
Before you begin the installation, be sure all requirements are met.
See the references listed below.
• “Computer Specifications” on page 6
• “Compatibility with Oracle Databases” on page 7
• “Compatibility with 3100/3100-Avant Genetic Analyzers” on
page 8
• “Login Requirements” on page 8
• “PDF File Reader” on page 9
Installation Time
The total time required to install the GeneMapper ID software is
approximately 60 minutes. This time may vary, depending on your
system configuration.
Procedure
Flowchart
If necessary, remove previous versions of the
GeneMapper® Software (page 11).
Install or upgrade the GeneMapper ID software
(page 11).
Installation
Procedures
Register the GeneMapper ID software (page 14).
Launch the GeneMapper ID software (page 14).
10
DRAFT
November 30, 2004 11:05 am, 4352543A.fm
User Bulletin
Installation Procedures
Remove
Non-Validated
GeneMapper
Software
(If Necessary)
If you have either GeneMapper® Software v3.0 or v3.5 on your
computer, you must remove it before installing the GeneMapper ID
software.
To remove GeneMapper software v3.0 or v3.5:
1. Log in to the local computer as an Administrator.
2. Select Start > Control Panel to open the Control Panel
window.
3. Double-click Add or Remove Programs to open the Add or
Remove Programs dialog box.
4. Select the GeneMapper software program, then follow the
prompts to uninstall/remove the GeneMapper software.
5. If prompted to do so, restart the computer.
6. Continue with “Install the Software” below.
Install the
Software
To install GeneMapper ID Software v3.2:
1. Log in to the local computer as an Administrator.
IMPORTANT! If you do not have Administrator privileges,
log off of the computer and log back in as a user with
Administrator privileges.
Installation Procedures and New Features for GeneMapper® ID Software v3.2
DRAFT
November 30, 2004 11:05 am, 4352543A.fm
11
GeneMapper® ID Software
To install GeneMapper ID Software v3.2: (continued)
2. Insert the GeneMapper® ID Software v3.2 CD into the CDROM drive.
The installer launches automatically, displaying the Main
Menu.
Note: If the installer does not launch automatically:
a. On the desktop, right-click the My Computer icon and
select Explore to open the My Computer window.
b. Double-click the CD drive to open the
GeneMapper ID v3.2 folder.
c. Double-click the Setup.exe file to launch the installer.
3. Click Installation Readme to view the
InstallationReadme.txt file on the GeneMapper® ID
Software v3.2 CD.
Note: The InstallationReadme.txt file may contain
installation information that is more current than the
information in this user bulletin.
12
DRAFT
November 30, 2004 11:05 am, 4352543A.fm
User Bulletin
Installation Procedures
To install GeneMapper ID Software v3.2: (continued)
4. Click Install GeneMapper® ID Software v3.2. to start the
InstallShield® Wizard.
5. Follow the onscreen instructions to install the software.
IMPORTANT! During installation, DOS commands are
executed and the DOS window is opened. Do not delete,
close, or click in the DOS window. If you click in it, press the
Esc key.
6. When the installation is complete, click Finish.
7. If prompted to do so, restart the computer.
8. Continue with “Register the Software” on page 14.
Installation Procedures and New Features for GeneMapper® ID Software v3.2
DRAFT
November 30, 2004 11:05 am, 4352543A.fm
13
GeneMapper® ID Software
Register the
Software
To register GeneMapper ID Software v3.2:
1. Locate the registration code on the Getting Started Card in
the software package.
2. IMPORTANT! Keep the registration code in a place where
you can easily retrieve it. You will need the registration code
the first time you start the GeneMapper ID software (below).
In addition, if you need to reinstall the software at any time,
you are prompted for the registration code again.
3. Complete the registration card and return it to Applied
Biosystems.
4. Continue with “Start the Software” below.
Start the
Software
To start GeneMapper ID Software v3.2 for the first time:
1. Log in to the local computer.
2. On the desktop, click Start > Programs > Applied
Biosystems > GeneMapper > GeneMapper ID v3.2.
The first time you start the GeneMapper ID software, the
Product Registration dialog box opens.
Note: If the GeneMapper ID software fails to start, see
“Troubleshooting the Installation” on page 57.
14
DRAFT
November 30, 2004 11:05 am, 4352543A.fm
User Bulletin
Installation Procedures
To start GeneMapper ID Software v3.2 for the first time:
3. Register the software:
a. In the Product Registration dialog box, enter your name,
organization, and registration code.
b. Click OK.
The software verifies the registration code, then displays the
Login dialog box.
Installation Procedures and New Features for GeneMapper® ID Software v3.2
DRAFT
November 30, 2004 11:05 am, 4352543A.fm
15
GeneMapper® ID Software
To start GeneMapper ID Software v3.2 for the first time:
4. The first time you launch the GeneMapper ID software,
complete the Login dialog box as follows:
a. Leave the User Name as gmid and leave the Password
field blank.
b. From the Database Host drop-down list, select the local
computer (that is, select the name of the computer you
are currently working on).
c. Click OK.
The Enter Password dialog box opens.
5. Create your password:
a. Leave the Old Password field blank.
b. In the Password field, enter a new, user-defined
password.
c. Confirm the password.
d. Click OK.
The GeneMapper ID software starts.
16
DRAFT
November 30, 2004 11:05 am, 4352543A.fm
User Bulletin
Section 2 New Features: All AmpFlSTR Kits
Section 2
New Features: All AmpFlSTR Kits
This section covers:
New Features Summary . . . . . . . . . . . . . . . . . . . . . . . . . . . . . . . . . 17
Export Combined Table Format . . . . . . . . . . . . . . . . . . . . . . . . . . . 18
Changes to the Electropherogram Displays . . . . . . . . . . . . . . . . . . 22
New Features Summary
Table 1 below provides a brief summary of the new features included
in GeneMapper ID Software v3.2. For more detailed information, see
the pages referenced in the table.
Table 1
New features summary
Feature
Description
Export Combined Table
format
• When exporting from the Samples view, you can now export
samples that do not pass sizing along with samples that pass
sizing. This feature combines columns from the sample table
and the genotype table and exports them as a single table.
See
Page
18
• You now have two display options when exporting samples:
– One line per marker
– One line per sample (This is similar to the Make Allele table
in the Genotyper® Software.)
Changes to the
electropherogram
displays
• The software now provides the option to display labeled peak
assignments for all size standards. This allows you to quickly
identify peaks visually and perform a size precision test.
37
The labeled peak assignments are printable.
• When switching from the “align by base pair” to the “align by
data point” views for the X-axis, the labels associated with
the peaks are now retained in both views.
Installation Procedures and New Features for GeneMapper® ID Software v3.2
DRAFT
November 30, 2004 11:05 am, 4352543A.fm
17
GeneMapper® ID Software
Export Combined Table Format
GeneMapper ID Software v3.2 can export data in the Export
Combined Table format. This new format:
• Allows you to track all samples in an electrophoresis run. That
is, when exported from the Samples view, samples that do not
pass sizing are exported along with samples that pass sizing.
• Provides two display options: one line per marker and one line
per sample
Size Quality
Status in the
Samples View
As shown in Figure 1 below, the size quality status is displayed in the
SQ column of the Samples view:
• Samples that do not pass sizing are flagged with a red circle.
• Samples that pass sizing are flagged with a green square.
When you create an Export Combined Table, both the passing and
low-quality samples are exported together, as shown in Figure 2 on
page 19 and Figure 3 on page 20. The procedure for creating an
Export Combined Table is on page 20.
These samples do
not pass sizing.
These samples
pass sizing.
Figure 1
18
Size quality status
DRAFT
November 30, 2004 11:05 am, 4352543A.fm
User Bulletin
Export Combined Table Format
Two Export
Display Options
Two display options are available to export samples that do not pass
sizing with samples that pass sizing:
• One line per marker
This option displays information for each marker on a separate
line for a given sample. In Figure 2 below for example, lines 2
through 15 display the information for each marker in sample
file A1012531.fsa.
Figure 2
One line per marker
Installation Procedures and New Features for GeneMapper® ID Software v3.2
DRAFT
November 30, 2004 11:05 am, 4352543A.fm
19
GeneMapper® ID Software
• One line per sample
This option displays the information for each sample on just one
line. In Figure 3 below for example, line 2 displays information
for Sample Name 12531. The subsequent lines display
information for different samples.
Figure 3
Creating an
Export Combined
Table
20
One line per sample
To create an Export Combined Table:
1. After analyzing your samples, go to the toolbar and select
File > Export Combined Table to open the Export
Combined Table window.
DRAFT
November 30, 2004 11:05 am, 4352543A.fm
User Bulletin
Export Combined Table Format
To create an Export Combined Table:
2. From the Look in drop-down list, select an appropriate
destination folder for the Export Combined Table.
3. From the Export File As drop-down list, select a file type.
4. From the Merge panel, select the format style:
• One line per marker, or
• One line per sample
Note: See page 19 and page 20 for an example of each
format.
5. If you selected One line per marker in step 4,
select/deselect the Include all marker information
checkbox, as necessary.
As shown in the pop-up text below, if you select this option,
marker information for samples with no sizing data will be
included in the Export Combined Table.
6. Type in a File name.
7. From the Files of type drop-down list, select the appropriate
file type/extension.
8. Click Export Combined Table.
Installation Procedures and New Features for GeneMapper® ID Software v3.2
DRAFT
November 30, 2004 11:05 am, 4352543A.fm
21
GeneMapper® ID Software
Changes to the Electropherogram Displays
In GeneMapper ID Software v3.2, two changes have been made to
the electropherogram displays:
• Labeled peak assignments can be displayed for all size standards
• Labels are retained in both the “align by base pair” and “align by
data point” views for the X-axis
Labeled Peak
Assignments for
All Size
Standards
GeneMapper ID Software v3.2 now provides the option to display
labeled peak assignments for all size standards in the
electropherograms. (That is, all defined size standard peaks are
labeled in the electropherogram per the size standard definitions).
This allows you to quickly identify peaks visually and perform a size
precision test.
To display peak assignments for all size standards:
1. In the Samples view, highlight all sample files in the project.
2. Click the Display Plots icon.
3. From the Plot Setting drop-down list, select AmpFLSTR
Genotyping.
4. Hide all dyes except the size standard dye (that is, red for
ROX™ dye or orange for LIZ® dye).
5. Select View > Show Size Standard Label.
6. Verify that all values for the 250-bp fragment peaks are
within ± 0.5 bp.
22
DRAFT
November 30, 2004 11:05 am, 4352543A.fm
User Bulletin
Changes to the Electropherogram Displays
To display peak assignments for all size standards: (continued)
7. If desired, select File > Print to print the electropherogram
plots. The examples below show both labeled and unlabeled
peak assignments.
Labeled peak assignments
Unlabeled peak assignments
Installation Procedures and New Features for GeneMapper® ID Software v3.2
DRAFT
November 30, 2004 11:05 am, 4352543A.fm
23
GeneMapper® ID Software
Labels Retained
in Base Pair and
Data Point Views
24
The X-axis can be displayed in either base pairs or data points. In
GeneMapper ID Software v3.1, when switching from the “align by
base pair” to the “align by data point” views for the X-axis, the labels
associated with the peaks were not retained in both views. In
GeneMapper ID Software v3.2, the labels are automatically retained
in both views, as shown below.
Figure 4
Align by base pair
Figure 5
Align by data point
DRAFT
November 30, 2004 11:05 am, 4352543A.fm
User Bulletin
Section 3 New Features and Procedures: Yfiler Kit
Section 3
New Features and Procedures:
Yfiler Kit
This section covers:
New Features and Procedures Summary. . . . . . . . . . . . . . . . . . . . .
Allele Calling Parameters for New Marker Repeat Types . . . . . . .
Plus Stutter Filtering and −2-bp Filtering Workaround. . . . . . . . . .
Creating HID Analysis Methods for the Yfiler Kit. . . . . . . . . . . . .
Creating a Table Setting and Uploading Exported Haplotype(s) . .
25
27
27
30
37
New Features and Procedures Summary
Two features have been added in GeneMapper ID Software v3.2 to
facilitate analysis of the AmpFlSTR® Yfiler™ PCR Amplification
Kit:
• Allele calling parameters for new marker repeat types
• Plus stutter filtering
Additionally, Applied Biosystems has developed several procedures
for using GeneMapper ID Software v3.2 with the Yfiler kit:
• Workaround for the DYS19 locus (−2-bp filtering)
• Creating HID analysis methods for the Yfiler kit
• Exporting haplotypes from GeneMapper ID Software v3.2
Table 2 on page 26 provides a brief summary of these new features
and procedures. For more detailed information, see the pages
referenced in the table.
Installation Procedures and New Features for GeneMapper® ID Software v3.2
DRAFT
November 30, 2004 11:05 am, 4352543A.fm
25
GeneMapper® ID Software
Table 2
New features and procedures summary
Feature/Procedure
New feature: Allele calling
parameters for new
marker repeat types
See
Page
Description
In GeneMapper ID Software v3.1, allele calling parameters
were only available for markers with tetranucleotide repeat
motifs. In GeneMapper ID Software v3.2, however, allele
calling parameters are available for four marker repeat types:
tri-, tetra-, penta-, and hexanucleotide.
27
The four allele calling parameters appear in the Allele tab of the
Analysis Method Editor (as shown in Figure 6 on page 29). You
may enter all related analysis values directly into the Tri, Tetra,
Penta, or Hexa column fields, which allows you to see all
values at once.
New feature: Plus stutter
filtering (for the DYS392
locus)
To aid in interpreting genotype profiles, two new fields have
been added to the Allele tab of the Analysis Method Editor
specifically to filter out the DYS392 plus stutter:
27
• Plus Stutter Ratio
• Plus Stutter Distance
Procedure: Workaround
for the DYS19 locus
(−2 bp filtering)
Laboratories may choose to implement a workaround for the
DYS19 locus by using the Minus A Ratio and Minus A Distance
fields in the Allele tab of the Analysis Method Editor. These
fields can be used to filter out the −2-bp stutter that is
observed at the DYS19 locus.
Procedure: Creating HID
analysis methods for the
Yfiler kit
Use the Analysis Method Editor in GeneMapper ID Software
v3.2 to set analysis parameter values for analyzing the Yfiler kit
data.
30
Procedure: Creating a
table setting and
uploading exported
haplotype(s) for searching
profiles with the Yfiler™
Haplotype Database
Using the Table Setting Editor, you can create a table setting in
GeneMapper ID Software v3.2 to export haplotypes
specifically for searching the Yfiler Haplotype Database for
profile match estimation.
37
26
DRAFT
November 30, 2004 11:05 am, 4352543A.fm
User Bulletin
Allele Calling Parameters for New Marker Repeat Types
Allele Calling Parameters for New Marker Repeat
Types
Peak Detection
Analysis
Parameters
The peak detection analysis parameters allow you to specify the
minimum peak height to be detected for analysis. This, in turn,
controls the number of peaks analyzed. Peaks falling below the
parameters specified are displayed in the electropherogram, but are
not labeled and will not be genotyped.
In the Allele tab of the Analysis Method Editor, a number of
parameters can be set to control allele calling, including:
•
•
•
•
New Marker
Repeat Types
Bin set
Marker-specific stutter ratio
Amelogenin cutoff
Marker repeat type
In GeneMapper ID Software v3.1, allele calling parameters were only
available for markers with tetranucleotide repeat motifs. In
GeneMapper ID Software v3.2, however, allele calling parameters
are available for four marker repeat types: tri-, tetra-, penta-, and
hexanucleotide.
The four allele calling parameters appear in the Allele tab of the
Analysis Method Editor (as shown in Figure 6 on page 29). You may
enter all related analysis values directly into the Tri, Tetra, Penta, or
Hexa column fields, which allows you to see all values at once.
Plus Stutter Filtering and −2-bp Filtering
Workaround
The following have been reported:
• Plus stutter at the DYS392 locus
• −2-bp stutter at the DYS19 locus
Further descriptions of these loci are provided on page 28. Allele
calling parameters that can be used as workarounds are provided on
page 28.
Installation Procedures and New Features for GeneMapper® ID Software v3.2
DRAFT
November 30, 2004 11:05 am, 4352543A.fm
27
GeneMapper® ID Software
Plus Stutter
(DYS392)
The DYS392 trinucleotide repeat locus displays the typical −3-bp
stutter but also a larger +3-bp stutter. Sequencing analysis of this
+3-bp stutter revealed that the product contains an additional repeat
unit relative to the true allele peak.
Based on developmental validation studies conducted by
Applied Biosystems, the highest percent stutter observed for any
DYS392 allele was 7.9%.
−2-bp DYS19
Stutter
It has been reported that the DYS19 tetranucleotide repeat locus
displays the typical −4-bp stutter but also a smaller −2-bp stutter.
Based on developmental validation studies conducted by
Applied Biosystems, the highest percent stutter observed for any
DYS19 locus was 10.21%.
Allele Calling
Parameters
The Allele tab of the Analysis Method Editor is used to set allele
calling parameters for data processing.
Select the Use marker-specific stutter ratio if available checkbox.
When this checkbox is selected, the software uses the stutter ratios
defined in the panel. These values are provided in the panels supplied
by Applied Biosystems.
To filter out the reproducible DYS19 tetranucleotide stutter, the
Minus A Ratio and Minus A Distance fields can be used.
Additionally, two new fields specifically developed to filter out the
DYS392 trinucleotide repeat plus stutter have been added to the
Analysis Method Editor: Plus Stutter Ratio and Plus Stutter Distance.
Figure 6 on page 29 shows allele calling parameters that can be used
with GeneMapper ID Software v3.2.
28
DRAFT
November 30, 2004 11:05 am, 4352543A.fm
User Bulletin
Plus Stutter Filtering and −2-bp Filtering Workaround
Figure 6
Allele calling parameters
Note: The circled values shown in Figure 6 above are based on
developmental validation studies conducted at Applied Biosystems
and should only be used as reference values. Each laboratory should
perform their own internal validation studies to determine the
appropriate values to enter. The DYS19 workaround is not locusspecific. All peaks for the tetranucleotide loci falling within the range
specified in the Minus A Ratio and Minus A Distance fields will be
filtered.
Installation Procedures and New Features for GeneMapper® ID Software v3.2
DRAFT
November 30, 2004 11:05 am, 4352543A.fm
29
GeneMapper® ID Software
Creating HID Analysis Methods for the Yfiler Kit
Use the Analysis Method Editor to set analysis parameter values for
analyzing the Yfiler kit data.
Note: The size distribution for the Yfiler kit is ~100 to 330 bp. As a
result, the 450-bp size standard peak does not need to be included in
the size standard definition for analysis.
Workflow
1. Import the Yfiler kit panels and bin sets.
See the GeneMapper™ ID Software Version 3.1 Human
Identification Analysis Tutorial (PN 4335523) for procedures on
importing panels and bin sets.
2. Create a new HID_Advanced analysis method for use with the
AmpFlSTR Yfiler kit (below).
3. Create a new HID_Classic analysis method for use with the
AmpFlSTR Yfiler kit (page 36).
Create the
HID_Advanced
Analysis Method
To create the HID_Advanced analysis method:
1. Select Tools > GeneMapper Manager to open the
GeneMapper Manager.
2. Select the Analysis Methods tab, then click New to open the
New Analysis Method dialog box.
3. Select HID, then click OK to open the Analysis Method
Editor with the General tab selected.
4. Select the analysis method settings shown in Table 3a on
page 31 through Table 3e on page 35.
IMPORTANT! You must select your settings on all the tabs
before you click OK to save the analysis method and return
to GeneMapper Manager!
30
DRAFT
November 30, 2004 11:05 am, 4352543A.fm
User Bulletin
Creating HID Analysis Methods for the Yfiler Kit
Analysis Method
Settings
IMPORTANT! The values shown in Table 3b on page 32 through
Table 3e on page 35 are based on developmental validation studies
conducted at Applied Biosystems and should only be used as
reference values. Each laboratory should perform their own internal
validation studies to determine the appropriate values to enter.
Table 3a Analysis method settings: General tab
Tab
Settings
General
Enter a name of
your choosing
here. See the
Notes below.
Notes for the General tab:
1. Enter a name of your choosing. For example, enter:
– AmpFlSTR_Yfiler_AdvancedMode, if you are creating an HID_Advanced analysis method, or
– AmpFlSTR_Yfiler_ClassicMode, if you are creating an HID_Classic analysis method
2. Select your instrument from the drop-down list.
Installation Procedures and New Features for GeneMapper® ID Software v3.2
DRAFT
November 30, 2004 11:05 am, 4352543A.fm
31
GeneMapper® ID Software
Table 3b Analysis method settings: Allele tab
Tab
Settings
Allele
Notes for the Allele tab:
1. Be sure to select the Use marker-specific stutter ratio if available checkbox. When this
checkbox is selected:
– The software uses the stutter ratios defined in the panel.
– The stutter ratios include all loci except for the DYS392 +3 stutter and the DYS19 −2 stutter. The
stutter ratios are defined in the Analysis Method Editor under the Allele tab, if applicable.
2. See “Plus Stutter Filtering and −2-bp Filtering Workaround” on page 27 for a discussion of the
Tetra column values in the Minus A Ratio/Distance fields and Tri column values in the Plus Stutter
Ratio/Distance fields.
32
DRAFT
November 30, 2004 11:05 am, 4352543A.fm
User Bulletin
Creating HID Analysis Methods for the Yfiler Kit
Table 3c Analysis method settings: Peak Detector tab
Tab
Settings
Peak Detector
Select
Advanced or
Classic here,
depending on
the analysis
method you are
creating. See the
Notes below.
Notes for the Peak Detector tab:
From the Peak Detection Algorithm drop-down list, select:
• Advanced, if you are creating an HID_Advanced analysis method, or
• Classic, if you are creating an HID_Classic analysis method
Installation Procedures and New Features for GeneMapper® ID Software v3.2
DRAFT
November 30, 2004 11:05 am, 4352543A.fm
33
GeneMapper® ID Software
Table 3d Analysis method settings: Peak Quality tab
Tab
Settings
Peak Quality
Notes for the Peak Quality tab:
The values shown in the Peak Quality tab have been chosen based on empirical data generated at
Applied Biosystems and should only be used as reference values. Each laboratory should perform
their own internal validation studies to determine the appropriate values to enter.
34
DRAFT
November 30, 2004 11:05 am, 4352543A.fm
User Bulletin
Creating HID Analysis Methods for the Yfiler Kit
Table 3e Analysis method settings: Quality Flags tab
Tab
Settings
Quality Flags
Notes for the Quality Flags tab:
The weighted values in the Quality Flag Settings section were ranked on a scale from most important
to least important. This ranking was performed by the Applied Biosystems HID Group.
Installation Procedures and New Features for GeneMapper® ID Software v3.2
DRAFT
November 30, 2004 11:05 am, 4352543A.fm
35
GeneMapper® ID Software
Create the
HID_Classic
Analysis Method
To create the HID_Classic analysis method:
1. Select Tools > GeneMapper Manager to open the
GeneMapper Manager.
2. Select the Analysis Methods tab, then click New to open the
New Analysis Method dialog box.
3. Select HID, then click OK to open the Analysis Method
Editor.
4. Select the analysis method settings shown in Table 3a on
page 31 through Table 3e on page 35.
IMPORTANT! You must select your settings on all the tabs
before you click OK to save the analysis method and return
to GeneMapper Manager!
What Next?
After creating analysis methods for the Yfiler kit, continue with data
analysis as follows:
1. Import sample files
2. Select analysis parameters
3. Analyze the project
For More
Information
36
For more information, refer to the following documents:
• GeneMapper™ ID Software Version 3.1 Human Identification
Analysis User Guide (PN 4338775)
• GeneMapper™ ID Software Version 3.1 Human Identification
Analysis Tutorial (PN 4335523)
• AmpFlSTR® Yfiler™ PCR Amplification Kit User’s Manual
(PN 4358101)
DRAFT
November 30, 2004 11:05 am, 4352543A.fm
User Bulletin
Creating a Table Setting and Uploading Exported Haplotype(s)
Creating a Table Setting and Uploading Exported
Haplotype(s)
Using the Table Setting Editor, you can create a table setting in
GeneMapper ID Software v3.2 to export haplotypes specifically for
searching the Yfiler™ Haplotype Database for profile match
estimation.
Database Online
Search Tool
The Yfiler Haplotype Database online search tool searches for
haplotypes generated with the Yfiler kit. The online search tool
allows you to:
• Estimate the frequency of a given Y-chromosome haplotype in
specified populations. (Frequency calculations are based on the
haplotype data generated from the 17 loci included in the Yfiler
kit. This data was compiled from more than 3000 samples from
a range of populations.)
• Estimate the frequency of haplotypes in a number of reference
populations.
• Search complete or partial profiles generated with the Yfiler kit.
• Compare the discrimination capacity of the Yfiler kit relative to
the recombination of Ystr loci.
Workflow
1. Use the Table Setting Editor to create a table setting in
GeneMapper ID Software v3.2 (below).
2. Upload the exported haplotype(s) into the Yfiler Haplotype
Database for profile match estimation (page 40).
Create a Table
Setting
Define custom Samples and Genotypes views for displaying the
Yfiler kit data.
To create a table setting:
1. From the GeneMapper Manager, select the Table Settings
tab.
2. Click New to open the Table Setting Editor.
Installation Procedures and New Features for GeneMapper® ID Software v3.2
DRAFT
November 30, 2004 11:05 am, 4352543A.fm
37
GeneMapper® ID Software
To create a table setting: (continued)
3. Select the General tab and complete it as follows:
a. Enter a Name of your choosing.
b. If desired, enter a Description.
4. Select the Samples tab and complete it as follows:
a. In the Column Settings section, deselect all options.
b. In the Font Settings section, leave the default values.
38
DRAFT
November 30, 2004 11:05 am, 4352543A.fm
User Bulletin
Creating a Table Setting and Uploading Exported Haplotype(s)
To create a table setting: (continued)
5. Select the Genotypes tab and complete it as follows:
a. In the Column Settings section, select:
– Sample Name
– Marker
– Allele
Deselect all of the other options.
b. In the Font Settings section, leave the default values.
c. In the Allele Settings section:
– Enter 2 in the Number of Alleles field.
– Deselect the Keep Allele, Size... check box.
6. Click OK to save the table settings, close the Table Setting
Editor, and return to the GeneMapper Manager.
Installation Procedures and New Features for GeneMapper® ID Software v3.2
DRAFT
November 30, 2004 11:05 am, 4352543A.fm
39
GeneMapper® ID Software
Upload the
Exported
Haplotype(s)
Upload the exported haplotype(s) into the Yfiler Haplotype
Database.
To upload the exported haplotype(s):
1. If you are not already there, open the project in GeneMapper
ID Software v3.2.
2. From the Table Settings drop-down list, select the table
setting you created specifically to export haplotype(s) for
searching the Yfiler Haplotype Database.
3. For the remaining upload procedures, see:
• The Yfiler Haplotype Database:
http://www.appliedbiosystems.com/yfilerdatabase/
or
• The AmpFlSTR® Yfiler™ PCR Amplification Kit User’s
Manual (PN 4358101)
40
DRAFT
November 30, 2004 11:05 am, 4352543A.fm
User Bulletin
Creating a Table Setting and Uploading Exported Haplotype(s)
Appendix A Verification Testing
This appendix covers:
Introduction . . . . . . . . . . . . . . . . . . . . . . . . . . . . . . . . . . . . . . . . . . .
Materials and Methods . . . . . . . . . . . . . . . . . . . . . . . . . . . . . . . . . .
Category 1: Peak Detection and Genotyping (Reproducibility) . . .
Category 2: Algorithm Testing . . . . . . . . . . . . . . . . . . . . . . . . . . . .
Category 3: Data Handling . . . . . . . . . . . . . . . . . . . . . . . . . . . . . . .
Category 4: Workflow . . . . . . . . . . . . . . . . . . . . . . . . . . . . . . . . . . .
Results for Category 1: Peak Detection and Genotyping
(Reproducibility) . . . . . . . . . . . . . . . . . . . . . . . . . . . . . . . . . . . . . . .
Results for Category 2: Algorithm Testing . . . . . . . . . . . . . . . . . . .
Results for Category 3: Data Handling . . . . . . . . . . . . . . . . . . . . . .
Results for Category 4: Workflow. . . . . . . . . . . . . . . . . . . . . . . . . .
Results Summary . . . . . . . . . . . . . . . . . . . . . . . . . . . . . . . . . . . . . .
Installation Procedures and New Features for GeneMapper® ID Software v3.2
DRAFT
November 30, 2004 11:05 am, 4352543A.fm
42
43
45
46
48
48
49
53
54
55
55
41
GeneMapper® ID Software
Introduction
Test Plan
Test Categories
The test plan, which Applied Biosystems has defined as verification
of the software, was designed to evaluate the performance of
GeneMapper ID Software v3.2 for the human identification
communities.
Applied Biosystems performed verification of GeneMapper ID
Software v3.2 to assess the performance, robustness, and feature
design in four specific categories:
•
•
•
•
Evaluation
Peak Detection and Genotyping (Reproducibility) (page 45)
Algorithm Testing (page 46)
Data Handling (page 48)
Workflow (page 48)
GeneMapper ID Software v3.2 verification was performed to:
• Confirm and document the functionality of the new software
features
• Assess the functionality of the minor modifications made to the
analysis method
Our findings demonstrate that GeneMapper ID Software v3.2 (with
its default settings and panels and bin sets) is valid for forensic,
paternity, and databasing analyses. GeneMapper ID Software v.3.2
accurately detects, genotypes, and performs quality checks when
performing STR analysis.
42
DRAFT
November 30, 2004 11:05 am, 4352543A.fm
User Bulletin
Materials and Methods
Materials and Methods
This section describes the AmpFlSTR® kit, sample types,
instruments, and software used for the GeneMapper® ID Software
v3.2 verification testing.
Kit
Sample Types
The AmpFlSTR® Yfiler™ PCR Amplification Kit was used to
amplify each sample type for the verification testing.
• Single-source DNA Samples – Eighty (80) DNA samples from
four (4) population groups
• Mixture Samples – Mixtures of male and male DNA were
amplified. These samples were mixed in defined ratios of 1:1,
3:1, 10:1, and 15:1, respectively. Additionally, mixtures of male
and female DNA were amplified. These samples were mixed in
defined ratios of 1:1000, 1:2000, 1:4000, and 1:8000,
respectively.
Note: The human genomic DNA samples were quantified using
Quantifiler™ Human DNA Quantification Kit and
Quantifiler™ Y Human Male DNA Quantification Kit. The
samples were amplified using a GeneAmp® PCR System 9700
with a silver 96-well block. The recommended cycling
conditions were used, as outlined in the AmpFlSTR® Yfiler™
PCR Amplification Kit User’s Manual (PN 4358101). The
amplified samples were injected on three or more
ABI PRISM ® instrument platforms.
Installation Procedures and New Features for GeneMapper® ID Software v3.2
DRAFT
November 30, 2004 11:05 am, 4352543A.fm
43
GeneMapper® ID Software
Instruments and
Software
Table 4
44
Table 4 below lists the instruments, Data Collection software
versions, computer operating systems, and run modules that were
used to process the samples for verification testing.
Forensic validated instrument platforms
Instrument
Data
Collection
Software
ABI PRISM ® 310
Genetic Analyzer
v3.0
Microsoft® Windows NT®
• GS STR Pop4 (1 ml) F
• GS STR Pop4 (1 ml) G5v2
ABI PRISM ® 3100
Genetic Analyzer
v1.1
Microsoft® Windows NT®
v2.0
Microsoft® Windows 2000
• GS 36_Pop4_F
• GS 36vb_Pop4_G5
Computer Operating
System
DRAFT
November 30, 2004 11:05 am, 4352543A.fm
Run Module
User Bulletin
Category 1: Peak Detection and Genotyping (Reproducibility)
Category 1: Peak Detection and Genotyping
(Reproducibility)
The first test category evaluated genotype concordance using singlesource population DNA samples, male:male mixture samples, and
male:female mixture samples. All samples were amplified with the
Yfiler kit.
Two comparison studies were conducted to verify genotype
concordance using DNA samples previously amplified with the
Yfiler kit. These data were used to compare the genotype results from
data analysis with GeneScan® Software v3.7.1 and Genotyper®
Software v3.7 (both running on the Windows NT operating system)
to GeneMapper ID Software v3.2 (running on the Windows 2000
operating system) using the Advanced mode.
Single-Source
Population DNA
Samples
The first comparison study consisted of:
•
•
•
•
Eighty (80) samples from the Yfiler kit population study
Four (4) positive controls
One (1) negative control
Six (6) ladders
These samples were electrophoresed on the ABI PRISM ® 3100
Genetic Analyzer and consisted of 1222 alleles from the samples, 60
alleles from the controls, and 137 alleles from the ladders. The
samples were examined for reproducibility.
Mixture Samples
The second comparison study consisted of mixture data produced
during the Yfiler kit developmental validation. This study was
conducted to verify that the same mixture samples (that is, PCR
product) gave concordant genotype calls between the
GeneScan/Genotyper software and the GeneMapper ID software
applications.
Installation Procedures and New Features for GeneMapper® ID Software v3.2
DRAFT
November 30, 2004 11:05 am, 4352543A.fm
45
GeneMapper® ID Software
The mixture samples were electrophoresed on three different
instruments and consisted of five (5) male:male and five (5)
male:female mixture samples. Table 5 below lists the mixture ratios
that were used in the mixture experiment.
Table 5
Mixture ratios
Male:Male
Male:Female
1:1
1:1000
3:1
1:2000
10:1
1:4000
15:1
1:8000
Category 2: Algorithm Testing
The second test category evaluated the functionality of GeneMapper
ID Software v3.2 to accurately filter out stutter based on the Marker
Specific Stutter ratio specified in the panel and in the Allele tab of
the Analysis Method Editor.
Stutter Evaluation
In the Allele tab of the Analysis Method Editor, one of the parameters
that can be set to filter out stutter is the Use marker-specific stutter
ratio if available check box.
Each allele within a locus displays a percent stutter that is
reproducible. The Use marker-specific stutter ratio if available
check box was selected in order to use the stutter ratio information
from the panel. Using GeneMapper ID Software v3.2, 27 population
samples were examined and the percent stutter recorded. The 27
population samples consisted of:
• 432 (n−4), (n−5), and (n−6) stutter peaks
• 27 DYS19 (n−2) stutter peaks
• 27 DYS392 (n+3) stutter peaks
46
DRAFT
November 30, 2004 11:05 am, 4352543A.fm
User Bulletin
Category 2: Algorithm Testing
Spectral Pull-Up
PQV
Laboratories that have implemented the ABI PRISM 3100 Genetic
Analyzers into their workflow to electrophorese DNA samples may
observe pull-up peaks within ±2 data points (in a different color)
from the main allele peak, which is causing the pull-up peak. To this
end, Applied Biosystems has made modifications to the analysis
method to flag spectral pull-up peaks in the range of ±2 data points.
The spectral pull-up PQV flag was evaluated to ensure that a peak
meeting specified criteria for spectral pull-up is appropriately
activated. The two criteria required to flag a peak as spectral pull-up
are as follow:
• The peak is ≤ 5% (or as specified by the value in the Pull-up
ratio field in the Peak Quality tab of the Analysis Method
Editor) of the main allele peak causing the pull-up
• The peak is within the ±2 data points range from the main allele
peak in a different color
Note: After installing GeneMapper ID Software v3.2, laboratories
should create new analysis methods specifically for use with
GeneMapper ID Software v3.2. Creating new analysis methods will
ensure that spectral pull-up peaks within ±2 data points from the
main allele peak are flagged appropriately.
Spectral Pull-UP PQV Study
To test the functionality of the spectral pull-up PQV, twenty-eight
(28) samples from the single-source population study were
electrophoresed on both the ABI PRISM ® 310 and 3100 Genetic
Analyzers (that is, the same PCR product was electrophoresed on two
different instruments) and were evaluated using the following
criteria:
• Each analyzed sample was evaluated for the presence of pull-up
peaks by noting whether or not the spectral pull-up PQV was
flagged.
• The data point (that is, ±0 data point, ±1 data point, or ±2 data
points) of the pull-up peak relative to the main allele peak was
recorded.
• The percent height of the pull-up peak relative to the main allele
peak was recorded (that is ≤ 5% of the main allele peak causing
the pull-up)
Installation Procedures and New Features for GeneMapper® ID Software v3.2
DRAFT
November 30, 2004 11:05 am, 4352543A.fm
47
GeneMapper® ID Software
Category 3: Data Handling
The third test category evaluated the Export Combined Table format
and the size standard printing functionality.
Export Combined
Table Format
Printing Labeled
Size Standard
Peaks
The purpose for evaluating the Export Combined Table format was to
verify that samples that do not pass sizing (that is, low-quality
samples) are exported along with samples that pass sizing.
In GeneMapper ID Software v3.2, the ability to display and print
labels on the size standards in different plot configurations was
tested.
Category 4: Workflow
The fourth test category evaluated the ability of GeneMapper ID
Software v3.2 to:
• Display labeled peak assignments for all size standards
• Retain labels in both the “align by base pair” and “align by data
point” views for the X-axis
Displaying
Labeled Peak
Assignments for
Size Standards
All samples within the Samples view were highlighted and only the
orange dye color was selected, as shown below.
The size standards were checked to ensure that all defined size
standard peaks were labeled appropriately.
Retaining Labels
in Base Pair and
Data Point Views
48
The electropherogram plots were displayed to verify that labels
associated with the peaks were retained when switching back and
forth between the “align by base pair” and “align by data point”
views for the X-axis.
DRAFT
November 30, 2004 11:05 am, 4352543A.fm
User Bulletin
Results for Category 1: Peak Detection and Genotyping (Reproducibility)
Results for Category 1: Peak Detection and
Genotyping (Reproducibility)
Single-Source
Population DNA
Samples
The first parameter evaluated the Peak Detection and Genotyping
category to assess genotyping concordance. Applied Biosystems
compared the genotype results from data analysis with GeneScan
Software v3.7.1 and Genotyper Software v3.7 (both running on the
Windows NT operating system) to GeneMapper ID Software v3.2
using the Advanced algorithm.
The analysis parameter settings for the software packages were
defined according to Applied Biosystems default analysis parameters
with a defined peak amplitude threshold (PAT) of 50 RFUs.
As shown in Figure 1 below, a side-by-side comparison between
Genotyper Software v3.7 and GeneMapper ID Software v3.2 was
evaluated to ensure the consistency of genotype results, where the
evaluation criteria was that all samples give concordant genotypes.
After the trained scientist completed data analysis, each population
sample tested gave 100% concordant genotype calls between the two
software programs (see Table 6 on page 50).
Genotyper Software v3.7
GeneMapper ID Software v3.2
Figure 1 Example of the Yfiler kit allelic ladder analyzed with
Genotyper Software v3.7 (left) and GeneMapper ID Software v3.2
displaying concordant results (right)
Installation Procedures and New Features for GeneMapper® ID Software v3.2
DRAFT
November 30, 2004 11:05 am, 4352543A.fm
49
GeneMapper® ID Software
As shown in Table 6 below, each sample type tested gave concordant
genotype calls between the two software programs.
Table 6 Genotype concordance between Genotyper Software
v3.7 and GeneMapper ID Software v3.2
Number of
Samples
Number of
Alleles
Concordant
Alleles
Population samples
80
1222
100%
Positive and negative
controls
5
60
100%
Allelic ladders
6
137
100%
Allele Source
Mixture Samples
After the trained scientist completed data analysis, Applied
Biosystems documented three observations when comparing the
results produced from GeneScan Software v3.7.1 and Genotyper
Software v3.7 (both running on the Windows NT operating system)
to the results produced from GeneMapper ID Software v3.2. Of the
272 loci examined, 267 loci produced concordant results between the
software packages and 5 loci/alleles produced non-concordant
results. These observations are further described on page 51.
Figure 2 below shows the genotyping concordance results when
comparing the analyzed data from GeneScan Software v3.7.1 and
Genotyper Software v3.7 (both running on the Windows NT
operating system) to the results from GeneMapper ID Software v3.2
Figure 2
50
Genotyping concordance results
DRAFT
November 30, 2004 11:05 am, 4352543A.fm
User Bulletin
Results for Category 1: Peak Detection and Genotyping (Reproducibility)
• Observation 1: 267 (98.20%) of the loci/alleles compared
produced concordant genotype calls.
• Observation 2: Three (1.08%) of the loci/alleles were
non-concordant because these loci/alleles fell just below the
50-RFU cutoff threshold value in GeneMapper ID Software v3.2
and were not genotyped.
• Observation 3: Two (0.72%) of the loci/alleles were
non-concordant because the alleles analyzed with Genotyper
Software v3.7 did not filter the stutter or the Minus A. The label
is removed from Peak A (the stutter peak) if Peak B (the true
allele) meets two criteria:
– Peak B is higher than Peak A by the specified percentage, and
– Peak B is within the specified proximity size (in base pairs)
range relative to Peak A
Table 7 below shows the results for observation 3.
Table 7
Observation 3: non-concordant loci
GeneMapper ID
Software v3.2
Genotyper Software v3.7
Marker/Locus
Allele 1
Allele 2
Allele 3
Allele 4
Allele 1
Allele 2
DYS439
11
OL
12
13
12
13
DYS456
15
16
OL
17
15
17
As shown in Figure 3 and Figure 4 on page 52, these two loci/alleles
did not meet these criteria due to −A product, resulting in the
detection of a third peak (Peak C). The filtering in Genotyper
Software v3.7 compared Peak A to Peak C. GeneMapper ID Software
v3.2 appropriately filtered the stutter and the shoulder peak using
defined bin sets
Installation Procedures and New Features for GeneMapper® ID Software v3.2
DRAFT
November 30, 2004 11:05 am, 4352543A.fm
51
GeneMapper® ID Software
Genotyper Software v3.7
GeneMapper ID Software v3.2
Figure 3
DYS439 Marker
Genotyper Software v3.7
GeneMapper ID Software v3.2
Figure 4
52
DYS456 Marker
DRAFT
November 30, 2004 11:05 am, 4352543A.fm
User Bulletin
Results for Category 2: Algorithm Testing
Results for Category 2: Algorithm Testing
Stutter Evaluation
Twenty-seven (27) population DNA samples were examined,
consisting of:
• 432 (n−4), (n−5), and (n−6) stutter peaks
• 27 DYS19 (n−2) stutter peaks
• 27 DYS392 (n+3) stutter peaks
The results were as follows:
• All (n−4, n−5, and n−6) stutter peaks were below the stutter
percent as defined in the panel and were properly filtered.
• The DYS19 locus (n−2) stutter peak was below the stutter
percent as defined in the Allele tab of the Analysis Method
Editor and were properly filtered.
• The DYS392 locus (n+3) stutter peak was below the stutter
percent as defined in the Allele tab of the Analysis Method
Editor and were properly filtered.
Spectral Pull-Up
PQV
Twenty-eight (28) single-source population samples were evaluated
for spectral pull-up. For each pull-up peak, the following was
recorded:
•
•
•
•
Size
Peak height
Data point
Spectral pull-up PQV activated
Seventy-eight (78) spectral pull-up peaks were identified. As shown
in Figure 5 on page 54, 97.44% (76) of these pull-up peaks were
correctly flagged by GeneMapper ID Software v3.2. The remaining
2.56% (2) of pull-up peaks that were not flagged were produced by
off-scale data. If a spectral pull-up peak is caused by an off-scale
allele peak, the spectral pull-up flag is not triggered for that peak.
This is because the ratio of pull-up to off-scale peaks cannot be
calculated (since the peak height for off-scale data cannot be
determined).
Installation Procedures and New Features for GeneMapper® ID Software v3.2
DRAFT
November 30, 2004 11:05 am, 4352543A.fm
53
GeneMapper® ID Software
Applied Biosystems recommends that you carefully review all offscale yellow PQV flags. Applied Biosystems recommends that you
dilute or re-run samples to obtain on-scale data to ensure the PQVs
reported by data analysis are accurate and to reduce spectral
separation (that is, pull-up).
Figure 5
Results for the spectral pull-up PQVs flagged
Results for Category 3: Data Handling
Export Combined
Table Format
Projects with their associated settings (that is, analysis methods, table
settings, plot settings, matrices, if applicable, and size standards)
consisting of samples that passed sizing as well as samples that did
not pass sizing were exported. The tables were exported from the
Samples view using the Export Combined Table format. Eighty (80)
samples from the Yfiler kit population study were used.
The results obtained verified that GeneMapper ID Software v3.2 is
100% functional in its ability to:
• Export projects using the Export Combined Table format
• Track all samples in an electrophoresis run (samples that do not
pass sizing as well as samples that pass sizing)
54
DRAFT
November 30, 2004 11:05 am, 4352543A.fm
User Bulletin
Results for Category 4: Workflow
Printing Labeled
Size Standard
Peaks
The purpose of this test was to verify that the size standard plots
could be printed in different display configurations.
The results obtained verified that GeneMapper ID Software v3.2 is
100% functional in its ability to display and print labels on size
standards in different plot configurations. For example, displaying
five labeled size standards separated into five panes, using three
levels of magnification.
Results for Category 4: Workflow
Displaying
Labeled Peak
Assignments
Retaining Labels
All size standards from eighty (80) DNA samples from the Yfiler kit
single-source population study were examined. All peaks were
correctly labeled.
The results obtained verified that GeneMapper ID Software v3.2 is
100% functional in its ability to switch back and forth between the
“align by base pair” and “align by data point” views for the X-axis.
Results Summary
Applied Biosystems verification testing demonstrates that human
identification laboratories can successfully adopt GeneMapper ID
Software v3.2.
Installation Procedures and New Features for GeneMapper® ID Software v3.2
DRAFT
November 30, 2004 11:05 am, 4352543A.fm
55
GeneMapper® ID Software
56
DRAFT
November 30, 2004 11:05 am, 4352543A.fm
User Bulletin
Results Summary
Appendix B Troubleshooting the Installation
This appendix covers:
Troubleshoot the Installation. . . . . . . . . . . . . . . . . . . . . . . . . . . . . .
Uninstall the Software . . . . . . . . . . . . . . . . . . . . . . . . . . . . . . . . . . .
Troubleshooting Checklist. . . . . . . . . . . . . . . . . . . . . . . . . . . . . . . .
How to Obtain Support . . . . . . . . . . . . . . . . . . . . . . . . . . . . . . . . . .
Installation Procedures and New Features for GeneMapper® ID Software v3.2
DRAFT
November 30, 2004 11:05 am, 4352543A.fm
58
59
61
63
57
GeneMapper® ID Software
Troubleshoot the Installation
Workflow
If the installation appears to be successful, but the GeneMapper ID
software fails to start and reports the error “Failed to connect to
database,” perform the troubleshooting procedures in this appendix in
the order shown below.
1. Check the Oracle® database installation (page 58).
2. Configure the Oracle database manually (page 58).
Check the Oracle
Database
Installation
Check to see if the Oracle database instance was installed correctly.
To check the Oracle database installation:
1. Select Start > Programs > Accessories > Command Prompt.
2. Type sqlplus, then press Enter. You should see:
SQL*Plus: Release 8.1.7.0.0...
3. Type the user name system, then press Enter.
4. Type the password manager, then press Enter. If:
• A “Connected to:” message is displayed, the Oracle
database was installed correctly. Proceed with “Configure
the Database Manually” on page 58.
• If the Oracle database was not installed correctly, an error
message appears. Complete Table 8, “Troubleshooting
Checklist,” on page 61, then contact Technical Support.
Configure the
Database
Manually
If the Oracle database was installed correctly, perform the following
steps in the Command Prompt window to configure the database
manually.
To configure the database:
1. Return to the open Command Prompt window (it should still be
open from step 4 above).
2. At the SQL prompt, type exit to exit the SQL Plus application.
3. At the drive prompt, type cd /d x:\GeneMapper\database,
where x is the drive where the GeneMapper ID software is
installed, then press Enter.
58
DRAFT
November 30, 2004 11:05 am, 4352543A.fm
User Bulletin
Uninstall the Software
4. At the drive prompt, type ifadb x:\oraclegm\oradata\ifa,
where x is the drive where the GeneMapper ID software is
installed, then press Enter.
• If “Succeeded” messages are displayed, the database is
configured correctly. Proceed to “Start the Software” on
page 14.
• If “Error” messages are displayed, the database is not
configured correctly. Proceed to “Uninstall the Software”
on page 59.
Uninstall the Software
If the software installation is not successful and the “Troubleshoot the
Installation” procedures on page 58 have not resolved the problem,
you may need to uninstall the GeneMapper ID software, then contact
Technical Support.
Workflow
1. Log onto the local domain of your computer as a user with
Administrator privileges (page 59).
2. Uninstall the software (page 59).
3. Complete the Troubleshooting Checklist, then contact Technical
Support (page 61).
Log Onto the
Computer
Uninstall the
Software
To uninstall the GeneMapper ID software, you must:
• Log onto the local computer (not a network domain)
• Have Administrator privileges on the local computer (that is,
have complete and unrestricted access to the local computer)
This procedure is for a standalone configuration only. This procedure
removes the GeneMapper ID Software v3.2 and the Oracle Database
Standard Edition v8.1.7.
To uninstall the software:
1. Save and close all applications (including the GeneMapper ID
software) and windows before proceeding with the uninstall.
2. Select Start > Settings > Control Panel.
3. Double-click Add or Remove Programs.
Installation Procedures and New Features for GeneMapper® ID Software v3.2
DRAFT
November 30, 2004 11:05 am, 4352543A.fm
59
GeneMapper® ID Software
4. Select GeneMapper ID v3.2, then click Change/Remove.
5. In the Welcome window, select Remove, then click Next.
6. At the prompt, click OK to confirm the uninstall. The
uninstaller removes all GeneMapper ID Software v3.2 and
Oracle Database Standard Edition v8.1.7 files and settings from
the computer.
7. When the uninstall is complete, the Maintenance Complete page
opens. Select Yes, I want to restart my computer now, then
click Finish.
8. Look for the x:\GeneMapper folder and delete it if it still exists
(sometimes the folder get left behind after an uninstall).
9. Complete the “Troubleshooting Checklist” on page 61.
60
DRAFT
November 30, 2004 11:05 am, 4352543A.fm
User Bulletin
Troubleshooting Checklist
Troubleshooting Checklist
Before you contact Applied Biosystems Technical Support for
troubleshooting assistance, complete the Troubleshooting Checklist
(pages 61 to 62).
Checklist
Table 8
Troubleshooting Checklist
Check
Information for Technical Support
Summarize the problem:
Have you been able to repeat the problem?
If yes, list the steps that you perform:
1.
2.
3.
4.
5.
6.
7.
Applied Biosystems personnel that you have contacted:
❏
❏
❏
❏
❏
❏
Field Applications Specialist
Field Service Engineer
Technical Support
Sales Representative
Order Administration
Other
Computer specifications
•
•
•
•
•
•
Operating system:
Version:
Processor:
Memory:
Hard disk space:
Hard disk configuration:
Installation Procedures and New Features for GeneMapper® ID Software v3.2
DRAFT
November 30, 2004 11:05 am, 4352543A.fm
61
GeneMapper® ID Software
Table 8
Troubleshooting Checklist (continued)
Check
Information for Technical Support
Software installed
❏
❏
❏
❏
Data Collection software version:
Status of Data Collection Services:
GeneMapper ID software version:
Other Applied Biosystems software:
Computer login information
• User privileges:
• Local or networked domain:
Software configuration installed
❏ Instrument
❏ Standalone
Instrument and instrument computer information
•
•
•
•
Model:
Data Collection software version:
Status of Data Collection Services:
Other Applied Biosystems software:
•
•
•
•
Capillary length:
Capillary lot number:
Run module:
Dye set:
Chemistry kit or reagent, with version number:
Be prepared to send to Technical Support:
•
•
•
•
•
•
•
•
62
Exported panels
Exported bins
Exported size standard definition
Exported analysis method
Sample (.fsa) files
GeneMapper_log.txt
PanelImportLog.txt
Printed results
DRAFT
November 30, 2004 11:05 am, 4352543A.fm
User Bulletin
How to Obtain Support
How to Obtain Support
Be sure to complete
the Troubleshooting
Checklist (page 61)
before contacting
Technical Support.
For the latest services and support information for all locations, go to
http://www.appliedbiosystems.com, then click the link for
Support.
At the Support page, you can:
• Search through frequently asked questions (FAQs)
• Submit a question directly to Technical Support
• Order Applied Biosystems user documents, MSDSs, certificates
of analysis, and other related documents
• Download PDF documents
• Obtain information about customer training
• Download software updates and patches
In addition, the Support page provides access to worldwide telephone
and fax numbers to contact Applied Biosystems Technical Support
and Sales facilities.
Installation Procedures and New Features for GeneMapper® ID Software v3.2
DRAFT
November 30, 2004 11:05 am, 4352543A.fm
63
© Copyright 2004, Applied Biosystems. All rights reserved.
For Research Use Only. Not for use in diagnostic procedures.
Notice to Purchaser: License Disclaimer.
Purchase of this software product alone does not imply any license
under any process, instrument or other apparatus, system, composition,
reagent or kit rights under patent claims owned or otherwise controlled
by Applera Corporation, either expressly, or by estoppel.
The GeneMapper ID Software has not undergone specific
developmental validation for human identification applications. Human
identification laboratories analyzing single-source or parentage samples
that choose to use the GeneMapper ID Software for data analysis
should perform their own developmental validation studies.
Information in this document is subject to change without notice.
Applied Biosystems assumes no responsibility for any errors that may
appear in this document. This document is believed to be complete and
accurate at the time of publication. In no event shall Applied Biosystems
be liable for incidental, special, multiple, or consequential damages in
connection with or arising from the use of this document.
Purchase or receipt of this software does not include or guarantee any
training by persons belonging to Applied Biosystems or Applera
Corporation.
TRADEMARKS:
ABI PRISM, AmpFlSTR, Applied Biosystems, COfiler, GeneMapper,
GeneScan, Genotyper, Identifiler, LIZ, Profiler, Profiler Plus, and SGM
Plus are registered trademarks and AB (Design), AmpFlSTR Blue,
AmpFlSTR Green, Applera, iScience (Design), Quantifiler, ROX, SEfiler,
and Yfiler are trademarks of Applera Corporation or its subsidiaries in the
U.S. and/or certain other countries.
Acrobat is a registered trademark of Adobe Systems Incorporated.
GeneAmp is a registered trademark of Roche Molecular Systems, Inc.
Macintosh is a registered trademark of Apple Computer, Inc.
Worldwide Sales and Support
Applied Biosystems vast distribution and
service network, composed of highly trained
support and applications personnel,
reaches 150 countries on six continents.
For sales office locations and technical support,
please call our local office or refer to our
Web site at www.appliedbiosystems.com.
Oracle is a registered trademark of Oracle Corporation.
Pentium is a registered trademark of Intel Corporation.
Windows and Windows NT are registered trademarks of Microsoft
Corporation.
All other trademarks are the sole property of their respective owners.
This product includes software developed by the Apache Software
Foundation (http://www.apache.org/). Copyright © 1999–2000 The
Apache Software Foundation. All rights reserved.
This product includes software developed by the ExoLab Project
(http://www.exolab.org/). Copyright © 2000 Intalio Inc. All rights
reserved.
Applera is committed to providing the
world’s leading technology and information
for life scientists. Applera Corporation
consists of the Applied Biosystems and
Celera Genomics businesses.
Headquarters
850 Lincoln Centre Drive
Foster City, CA 94404 USA
Phone: +1 650.638.5800
Toll Free (In North America): +1 800.345.5224
Fax: +1 650.638.5884
11/2004
www.appliedbiosystems.com
Part Number 4352543, Rev. A
Stock Number 112UB06-01