1
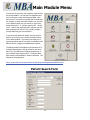
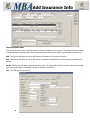
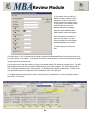
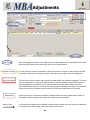
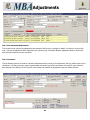
User Manual
Table of Contents
Patients
Insurance
Schedules
Review
Charges
Adjustments
Top Menu
1
Main Module Menu
To enter any of the seven main modules, simply click on
the desired module. You may also use keyboard shortcuts on this main screen and throughout MBA. Hold
down the ALT key and then the letter that is underlined.
For example, to enter the Patient Module, you may click
on the Patient button with your mouse or use the keyboard shortcut ALT - P. Review would be ALT - W and
so on. Look for the underlined letter and then use that
letter combined with the ALT key to quickly navigate
through MBA using just your keyboard.
If you know that patient ID number you may use the
Next Pt box by typing in the number and then clicking
on the desire module. This shortcut will allow you to
bypass the patient search form which is available for the
Patient, Review, Charges, and Adjustments modules.
The Billing Module will be added to this document or to
a system administrator or billing manual as well as details on the Top MBA menu including maintenance, reports, utilities and program options. The Report Manager Manual is also available in another document. This
manual can be accessed at:
http://www.tsma.com/portal/downloads/ReportManagerModuleManual.pdf
Patient Search Form
2
Add Patient Info
After entering the Patient’s Module of MBA you
come to a patient search form. The top drop
down item ‘Recently Accessed’ will give you the
option to choose from the last 20 accessed patients listed in order. If you have nothing in any
of the fields when OK is pressed it will bring up a
list of all the patients in the system. By entering
information in 1 or more of the name fields you
can pull up a list of all patients. For example all
patients with last name starting with “MED”, all
patients with first name “JANE”, or all patients
with first name starting with “J” and last name
with “SMI”. You can also enter patient number,
social security number, phone number, birth
date, chart number or superbill encounter number.
1. General
Enter the patient’s Name, SSN, Chart #, Birth Date, Contact Info, Address and other demographic information including Sex, Race, Marital Status, Patient Type, and Date of Death when applicable. There are
also fields to enter the patient's Emergency contact information and a Patient Alert that will noticeable in
other modules also.
The Patient Alert checkbox opens a user defined field in which all pertinent information regarding this patient
may be entered and highlighted in red. This field can be viewed in the patient’s account under the following
modules: Review, Charges, Adjustments, and Scheduling. The alert will also print on the 2nd page of the routing slip (if the 2nd page is set to print under program options).
You can exit this screen by clicking Save or Cancel. If you click Save, you will be notified if there are required
fields that must be entered prior to saving. One such field
3 is found in Tab 2. Billing ‘Primary Doctor’.
Add Patient Info
Print Chart Label: This button prints a chart label for this patient.
Print Patient Registration: This button prints a demographics sheet.
Print Routing Slip: This button prints a routing slip listing this specific patient’s demographics at the top.
2. Billing
Select the Primary Doctor, Referring Doctor and Primary Care Doctor from the drop down lists. You may use the
Add or Edit buttons to add or change the primary doctor or referring doctor’s information. Once Primary Doctor is entered you may save patient record and go back in at a later time to enter more information or continue setting up the
account.
Select the Billing Cycle from the drop down list.
Bad Debt/Collections can be selected for a patient for future MBA reports and optional Collections Module.
Suppress Overdue Notifications: Check to keep these notifications from being printed on the patient’s statement.
Suppress Interest Charges: Check this box to keep interest from being applied to this patient’s bill.
If available, add the patient’s Driver’s License number and State from the drop down list.
The Billing Comment’s field may be used to enter specific information about how this patient’ s billing should be handled.
This comment field can also be viewed in the review module. NOTE: This field will print on the superbill on both
page 1 and 2. Any sensitive information should be entered in the patient alert field in tab 1 unless Suppress billing comments is selected from Program Options.
Privacy Info: Enter the date the standard release was signed or use the calendar button to select the date.
Privacy Alert: Check yes if the patient’s account should be flagged with a privacy alert. This will highlight the privacy
tab red and open the privacy comments box for comments to be entered relating to patient privacy.
This alert will also show in the scheduler appointment information form, and the review comments tab 3. At this point
you are able to save or go on to the next tab 3 that includes4responsible party and insurance setup.
Add Patient Info
3. Insurance/Employer
Responsible Parties: Responsible Party CD 1 for Self will default as the saved responsible party. You may edit this
record by clicking the Edit button or add additional responsible parties is applicable. This ensures that there is a financially responsible party, whether that be the patient, a legal representative or a guardian. To begin, click Add or Edit.
Select the responsible
party CD from the
‘Responsible Party’ list on
the left.
1: This Patient
2: Another Patient
3: A Responsible Party
4: An Institution
5: Workmen’s Comp
This Patient Resp Party
CD 1 will be set as the
Default Resp Party as
indicated by the Yes
check mark box. This can
be changed if another
Resp Party is added and
made the default. If the
address was entered on
the first tab, it will be
added when the record is
saved.
REMEMBER!!!
5
None of the information entered into the patient account
fields is saved until you click ‘save’. Exiting this module by
clicking ‘cancel’, will do just that. It will cancel the creation
of this new patient account.
Add Patient Info
3. Insurance/Employer (continued)
Responsible Parties:
This Patient: The Responsible Patient # will default to this new MBA account number. Click yes to make this the default
responsible party. Check the box if the patient is uninsured otherwise leave it blank. In the description field and relationship field you may enter the patient’s name or SELF. Select the appropriate fee schedule to apply to this patient’s billing.
And also select the frequency with which the patient should receive a statement. The demographic info at the bottom
will default to information entered in tabs 1 and 2.
Another Patient: Enter the responsible patient’s MBA account number. Click yes to make this the default responsible
party. Check the box if the patient is uninsured otherwise leave it blank. In the description field and relationship field you
may enter the responsible party’s name. Select the appropriate fee schedule to apply to this patient’s billing. And also
select the frequency with which the patient should receive a statement. Enter the demographic info at the bottom that
applies to the responsible party.
A Responsible Party, An Institution, Workmen’s Comp: Click yes to make this the default responsible party. Check
the box if the patient is uninsured otherwise leave it blank. In the description field and relationship field you may enter
the responsible party’s name. Select the appropriate fee schedule to apply to this patient’s billing. And also select the frequency with which the patient should receive a statement. Enter the demographic info at the bottom that applies to the
responsible party.
Click Save. Another responsible party may be added by clicking Add or you may edit the existing responsible parties by
clicking edit. To permanently delete a responsible party click Delete. If the responsible party has been linked to a charge,
MBA will not allow you to delete that responsible party.
Employment Info
Enter the patient’s employer information
as well as other contact info into the
appropriate fields.
Select employment status from the drop
down list.
A contact name may be entered if there
is a specific point of contact at the patient’s place of employment. Any additional information may be entered in the
‘Additional Information’ field at the bottom.
After initially saving the patient’s account, all information can be updated or
edited at any time with the exception of
things linked to charges or payments.
6
Add Patient Info
4. Family
Enter the patient’s mother
and father’s information in
the blanks provided.
Enter the name of the patient’s spouse in the space
provided.
Add Family Members: This
function allows the user to
add family members with
MBA accounts to be linked
with this patient’s account.
Head of the Household: This function allows the user to set a different family member with an MBA account as the head of
the household. This function may be used when there are multiple patients of the same provider that would like only one bill
sent to the head of the household.
Remove Family Members: This function allows the user to remove family members from the list.
For example the patient you are currently entering is a minor and this patient’s mother and grandmother are both patient’s of
the same provider. While the mother is the patient’s technical guardian, all bills should be consolidated and sent to the grandmother. In this case, you would add the mother and grandmother as family members and then set the grandmother as the
head of the household.
5. Other Info
These fields are used for entering information related to the patient’s account and treatment. These user defined fields include General Comments, Allergies, Current Medications, and Drug Reactions. These fields may also be viewed from tab 3 in
the review module.
At the bottom of Tab 5 the user who first created this account and the user that last modified the account is listed with dates
7
and times.
Add Insurance Info
Patient Insurance Plans
This function allows the user to add the patient’s insurance information to the account. The primary insurance company
is listed first and the secondary and tertiary insurances follow in the list. Any inactive insurances will be listed in red.
Add: This function will allow the user to add insurance information for this patient’s account.
Edit: This function will allow the user to edit existing information associated with the insurance plans selected on the
account.
Delete: This function will delete a selected insurance policy. The system will not allow the user to delete an insurance
plan with any filing history, outstanding charges or payments attached to it.
Add or Edit will open the general tab.
8
Add Insurance Info
1. GENERAL
To add an insurance
company that is not
currently in the drop
down list click Add. This
will open the window
shown below. With
certain security permissions the button Edit
will allow you to edit
the existing insurance
record from the master
table.
1. GENERAL
Enter the Insurance Plan Name and Description into the fields provided. Select the Insurance Type and insurance group
from the drop down list. The Ins Group field is user defined and any group can be added to help filter these insurances for
reporting.
Enter the Claim and Refiling Addresses. The contact person and claim phone numbers can be listed below.
Select the Fee Schedule from the drop down list
Default Payment Code: Enter the payment description that should be associated by system default with this insurance plan
when posting payments for a patient account with this plan attached to it.
Default Adjustment Code: Enter the adjustment description that should be associated by system default with this insurance
9
when posting adjustments for a patient account with this plan attached to it.
Add Insurance Info
2. Plan Info
Pri Accept Assignment: Select according to office policy when this insurance plan is used as primary on the account.
Sec Accept Assignment: Select according to policy when this insurance plan is used as secondary on the account.
Timely Filing Limit: Enter the number of days the billing agent has to file claims for this insurance company before
they are considered unpayable due to timely filing limitations.
Anesth. Time Interval: Choose the corresponding claim units from the drop down box for the Anesthesia claims (if
applicable) for this insurance company.
Anesth. Claim Units: Choose the corresponding claim units from the drop down box for the Anesthesia claims (if applicable) for this insurance company.
Medigap Code: Either choose the corresponding number from the list in the drop down box or enter the code manually
in the field provided. *These codes are assigned by Medicare for automatic secondary crossover filing.
TPL: Enter (if applicable) the federally assigned Third Party Liability number for this insurance company.
Participating Provider: Check the box if the providers in the practice are participating providers for this insurance
company.
No Auto Sec HCFA: Check the box if no HCFA is wanted to automatically print when posting an ERA for the insurance
company being added.
Medicare Crossover: Check the box if the insurance is a Medicare Crossover company.
Referring Dr Required: Check the box if this insurance company requires a referring Dr for all charges submitted.
Submit Signed Release: Check this box if a signed release from Form with Claim should be sent with every claim sent
to this insurance company.
Capitation Plan: Check this box if the insurance company 10
has a capitation plan.
Add Insurance Info
3. Claim Info
File Claims: Choose the
corresponding answer
(Electronic, Paper, None)
from the drop down box.
This option tells the system that claims with
this insurance attached
to it usually go to the
claims offices this way.
The option may be overridden in the charge
screen.
Type of Processing: If
the file claims code is
Electronic, choose the
correct processing type
for the insurance plan.
NEIC Payer or Insurance Payer #: Select the NEIC Payer or Insurance Payer # from the drop down list. If you do not see
the correct code in the payer dropdown, then manually enter it in the manual field. NOTE: Even if you see a similar name
match in the payer dropdown, always check to make sure the number is correct.
Default Claim Form: Choose the corresponding answer from the drop down box. This option tells the system which claim
for to use when printing claims.
Clinic Provider#, Primary Doctor Provider #, Referring Doctor Provider #: If you want to override the default settings for printing claims, select the applicable choices from the drop down list.
Check the remaining option boxes yes when applicable.
4. Pre-Auth/Allowables
Check the instances when
pre-authorization is required.
Enter the Pre-Authorization
Phone # as well as Eligibility Phone # in the fields
provided.
In the field provided enter
any Pre-Authorization
Comments.
Payment Information: Enter the percentage and dollar
amounts that apply to the
insurance policy.
11
Add Insurance Info
5. User Defined
Tax ID Tag: In the instance that the insurance company requires a code to be added to the provider’s
tax id for claims to be filed, enter it in this field.
Other fields may be used as needed for special claims setup and other user defined needs.
6. Comments
Enter any comments related to this insurance plan.
12
Add Insurance Info
Insurance Plan:
Select the appropriate insurance plan
from the drop down list. If security
access permits, the user may ADD a
new plan to the main data base or
EDIT an existing plan.
ID Number: Patient’s insurance ID #.
Plan Number: Patient’s plan number.
Group Number: Patient’s group #.
Responsible Party: Select the associated responsible party from this list.
The Responsible Party list may be edited in Ins/Employer tab.
Filing Order: This number will default based on the insurance company’s order in the list as well as effective and termination dates. If an incorrect filing order number has been assigned to an insurance company you may change the filing order
number manually.( For example: If in the list above, United Healthcare should have been listed first as the primary insurance,
but was mistakenly listed as the secondary after Medicare, the user may select Medicare, click edit, and type the number 3 in
the filing order. This will automatically make United Healthcare primary and Medicare the secondary.) The proper way to
control the filing order is by setting the effective and termination dates.
Accept Assignment: Select the appropriate assignment from the drop down list.
Signature on File: Check the box if the patient’s signature is on file (corresponds to boxes 12 and 13 on CMS-1500). This
must be checked to Yes in order for the claim to be sent out electronically.
Effective Date / Termination Date: Enter the effective date and termination of the insurance policy. These dates will
automatically affect the filing order. Once an insurance plan has reached its termination date this plan will be listed in red to
indicate it cannot be used to file claims that fall outside the dates.
MC Secondary Type: Select the appropriate code and description from the drop down for Medicare Secondary claims.
Co-Payment Information: Check the applicable co-payment information.
Signed Release of Info: Select the appropriate type from the drop down list.
Signed Release Type: Select the appropriate type from the drop down list.
Special Program: Select the appropriate type from the drop down list.
Medicare Secondary Type: Select the appropriate type from the drop down list. This is used only for filing MedicareSecondary claims electronically.
Additional Claim Data: This is a user defined field.
13
Privacy (Y/N) ?: Check the box to select yes when applicable.
Add Insurance Info
MC Secondary Type
Codes 12 - 47 are
listed.
There are two codes
that are the most commonly used and most
likely to be approved by
MSP.
The first code is 12 for
patients over 65.
The second code is 43
for patients under 65.
The remaining codes
are rarely used but
available as needed.
Cardholder Information
Relationship: Select the relationship the patient has to the primary cardholder. If Self, stop here and the patient’s name
will auto populate.
If different than self enter the Cardholder’s information in the appropriate fields. Be sure to include the date of birth to
avoid claim rejections.
If the primary cardholder’s address is the same as the patient’s click the ‘Same As Patient’ box in the upper right hand corner to default to the information from the General tab of the patient record. There are also fields to enter the cardholder’s
sex and employer.
14
Add Insurance Info
2. Comments
This is a user defined field in
which the user can enter any
information associated with
the insurance.
3. Insurance Card Side
(1, 2, 3, and 4)
Tabs 3, 4, 5 and 6 are
used for scanning and
storing the patient's insurance card’s images.
15
Schedule Set Up
Schedule Set Up
Before utilizing the MBA
Scheduler, the system administrator must first set up
each provider under the
schedule set up option.
Click the Schedule Set Up
Button or use the keyboard
shortcut Alt-S to begin.
This screenshot shows six
providers and one nurse
setup individually and a
resource to be able to view
all schedules at the same
time on one screen for a
multi-provider view.
Add and Edit buttons
After opening “Schedule
Set Up” the set up window
will appear. This window
is used to make all
changes associated to the
appearance, timetable,
and preferences of each
provider.
When setting up a provider for the first time,
click the Add button with
the row selected for the
doctor you would like to
add to the schedule.
This will allow you to input
the providers specified
information including the
regular schedule clinic
hours.
16
Schedule Set Up
1. Appt Times
Next click on the row of the provider you would like to setup and click the Edit button. You now have the option to specify time parameters of the schedule as well other preference options.
Listed under Tab 1. Appt Times you will find columns labeled “In” and “Out”. These boxes are labeled according to Sunday-Saturday and coordinate with the times and days that will be included in your schedule. Feel free to create the schedule times according to what best suits your needs. When entering times in these fields please use the format as it is detailed in the example below. Days that will not be included in your schedule should be listed as “OFF”.
To setup a scheduled lunch break for any day enter the time the lunch will start in the first “Out” column and the time the
lunch will end in the second “In” column. Shown below is a lunch break from 12:30 pm to 2:00 pm on Monday only.
Also selected below is the ALL DOCS resource which will show a multi-provider view with clinic hours ranging from 9:00
am to 6:00 pm on Monday and 9:00 am to 4:00 pm Tuesday through Friday.
Each individual provider schedule will match the schedule setup specifically for them and does not have to match the ALL
DOCS schedule below. Also at anytime the schedule can be overrode using the override default schedule info feature allowing times to be blocked off for vacation, lectures, procedures, or anything else that may need to change from the regular schedule.
17
Schedule Set Up
2. Additional Setup
In tab 2, you will find additional options to further customize the schedule depending on the provider’s needs.
(#1) Default Number of Appointments: This option allows you to set the number of columns on the daily schedule. The default number of columns is two so if you select more than two you will need to save and then return to editing for the additional columns to appear for title and color editing. As shown below there are eight default number of
appointments which creates eight columns. The default name of the appointment column is shown below. You may
change the name and then double click to change the background color.
(#2) Number of Lines To Display Per Row: This option adjusts the number of lines per row listed in the daily
schedule. For larger fonts increase the number of lines per row. If you want to see more of the day with a smaller font
keep the setting between 1 and 3 columns.
(#3) Print Insurance / Print Chart Number on Scheduler Report: These two boxes affect the way the daily
schedule reports are formatted to print including the insurance company and/or the patient’s chart number if desired.
(#4) Blank Line On Scheduler Report: This feature allows an extra line to be printed between patients located on
the daily schedule when printed.
(#5) Group Schedule Report by Column: Printed schedule reports can be divided according to the column that
under which the appointment falls . (see #1)
(#6) Time Increments: The entire schedule may be formatted according to how often the provider would like to see
patients or schedule appointments. Once the increment is set for the provider, this option will no longer appear in
schedule set up for that provider and any changes to time increments would need to be made by support staff.
(#1)
(#2)
(#6)
(#3)
(#4)
(#5)
18
Scheduler Options
One of the key features of MBA Scheduler is the flexibility to customize it according to your specific needs.
These program options allow you to include only the features that best compliment your schedule.
Utilities
Additional Schedule Options can be found in the
top menu under “Utilities”.
Program Options
Then select “Program Options”.
4. Scheduler/Superbills
To access the additional schedule options,
select tab 4. Scheduler/Superbills
Then check or uncheck the options you need to
customize your scheduler. If Routing Slip 2nd
page is Yes, select the number of days of history
you want included on that second page.
19
Scheduler Options
Below is an example of the second page of a routing slip with 30 days of history.
20
Calendar Functions
Next Available Appointment: This function will take you directly to the next available appointment slot.
Find Patient Appointment: To search for an appointment that a patient already
has scheduled, click on the “Find Pt Appt” button. This will bring up the patient
search window. Upon locating the patient, the appointment list window will come
up. Then select the appointment you are looking for in the appointment list window.
Once you have selected it, click on find appointment. This will allow you to edit and
view the appointment.
Print Waiting List: This function allows you to print a list of all the patients waiting
for an earlier appointment. You can sort this report by patient name or patient ID#.
Print Schedule: This allows you to print a schedule and set date parameters for the
schedule printed.
Schedule Set Up: Before utilizing the MBA Scheduler, the system administrator
must first set up each provider under the schedule set up option.
Export To Outlook: This button will export the schedule in view to your Microsoft
Outlook Calendar. You have the opportunity to set the date and column parameters
as well as include non patient appointments.
Default To Last Schedule Selected: When this is checked, the
schedule program will open directly to the current day's daily
schedule of the last doctor that the user's computer had been
scheduling. This bypasses the first form where you must choose a
specific scheduler.
21
Make Appointment
Step 1: Double-click the provider or resource with which the appointment should be made. The icon will appear as
a clock for providers and a graph for resources. You can also left click once on the provider or resource desired and
then double click on the date you would like the appointment scheduled.
Step 2: Verify the date
using the day, week and
month arrow keys if
needed to select the
date of the appointment
to be scheduled.
Day View
Step 3: Upon arriving
on the appropriate date,
double click on the time
slot the appointment
should be in. Or to select
a larger time slot, click
on the beginning time
and drag the cursor
down to the end time as
shown in blue in the
Nurse column to the left.
Then click Next.
The Day View of the
multiple provider schedule is shown to the left.
Selecting “Day View”
or “Week View” will
change the way appointments are viewed
in the window.
Any time slots marked
“OFF” in schedule setup will not appear in
either view of the
schedule.
You can use the override default sched info
to make changes or as
shown to the right use
non-patient appointments to block of specific time periods.
22
Week View
Make Appointment
Step 4: After clicking Next in
Step 3, the patient search form
will load giving you various
choices.
23
•
At this point you may select
a patient by utilizing the
available fields to search for
an existing patient account.
This will take you to the established patient window.
•
A Non-Patient Appointment
can be entered.
•
Also, you can add a new patient by selecting the Add
button.
•
This will bring up the New
Patient window. Enter the
patient’s information and
click “Save”.
•
The only required fields are
name and phone number.
Primary doctor is only required when the patient is
added in the patients module. Once the appointment
is made, the patient record
can be updated at anytime.
If an appointment is not
made, MBA will not store the
name and phone number as
a new patient.
Make Appointment
Step 5: Once the correct
patient appears in the
window, you have the option to update the patient’s
information using the
“Update” button. (#1)
View other appointments
in the “Other Appointments” window. (#2)
Click “Make Appointment”.
(#3) This will take you to
the appointment info window.
(#1)
(#2)
(#3)
Once the Update button is clicked the fields will open up as shown below allowing changes to be made.
Click OK to save the revisions.
24
Make Appointment
Step 6:
•
All available appointment information can be added in this window.
•
In the upper left hand corner the patient’s name, account number and phone numbers are listed.
•
There is also a checkbox that can be selected to add the patient to a waiting list for an earlier appointment. (See Calendar Window Functions Page for list printing instructions.) You can also edit the patient’s info using the ‘Edit Pt Info’ button.
•
In the upper right hand corner the date and time of the appointment are listed. To add or to subtract additional time to
the appointment simply click the ‘Add’ or ‘Sub’ buttons.
•
Past appointments as well as all insurance information associated with the patient are located in the windows on the right.
•
Copays can be entered by selecting the Copay batch from the Batch # drop down list or by adding a Copay batch by clicking the ‘Add’ button. Then enter the Copay amount, select payment type from the drop down list, and enter the Check/
Auth# if applicable. You can also print a receipt for the Copay to give to the patient by clicking the ’Print Receipt’ button.
•
Click ‘Please click here for Patient Balance Information’ at the bottom to see patient’s current AR. You can also include all
family charges by checking that box or view the AR for only the scheduled doctor for this appointment.
25
Make Appointment
1. Appt Detail
When you click the Reason ‘Add’ or ‘Edit’ buttons the form above will load.
The color chosen to associate with the specific reason will appear that way
on the full schedule view. You may choose to add a background color and/
or a new text color.
26
•
Reason: Select a pre-existing reason from
the dropdown list. Otherwise The reason for
the visit can be added using the “Add” button or existing reasons can be edited using
the “Edit” button.
•
Responsible Party: This option allows you
to select the responsible party: self, guardian, primary insurance, etc.
•
Place of Service: Select from the drop
down list, the place where the service will
be provided.
•
Referring Doctor: If another physician
referred this patient, their information can
be added and edited here
•
Incident ID: If there is a corresponding
insurance authorization for this service, that
can be added and edited here. Once added
or selected, the pre-authorization number
and remaining office visits, if applicable, will
be displayed below.
•
At the bottom of Tab 1. the user name is
detailed with who created the appointment
with date and time as well as who last
modified the appointment with the date and
time of modification.
Make Appointment
2: Additional Details
•
Fee Schedule: This drop down field allows
you to select an established insurance fee
schedule associated with the patient’s account.
•
Patient Type: This drop down field assists
in identifying patients. Use the “Add” and
“Edit” buttons to specify patient type criteria.
•
Race: Patient’s race may be entered here for
identification purposes.
•
Patient Alert (Y/N): By clicking the checkbox a blank field for notes opens. This field
maybe used to input pertinent information
regarding the patient’s account status, health
conditions or special needs. By selecting
“Yes”, the patient alert will flash red upon
reopening the appointment window.
3. Privacy
Step 7:
•
Click Save or use the keyboard shortcut Alt-S.
27
•
Standard Release of Info Signed: In
accordance with the HIPPA privacy regulations the date when the patient signed
the standard release of information can
be entered here.
•
Privacy Alert (Y/N): This field can be
opened by clicking YES, to add information about the release of medical information associated with this patient.
Reschedule Appointment
Once an appointment has been made it will appear in
the time slot(s) to which it has been designated.
Step 1.
Step 1. If for any reason, the appointment needs to
be rescheduled simply double click on the appointment to open the appointment information window.
Step 2. Click on the “Pt Resc” button if it is the patient rescheduling the appointment and if it is the provider rescheduling the appointment, click on “Dr.
Resc”
This will close the appointment information window
and the appointment will disappear off of the schedule.
Step 3. By clicking on the new time/date slot, the
previous appointment information will be transferred
to the new time slot that you have selected. The appointment will appear in the information window to
offer the opportunity to edit any information if
needed.
Step 4. Click Save.
By clicking Cancel the appointment will be reset to its
original time.
28
Appt Info Window
Below you will find a more detailed explanation of these buttons and their functions.
Patient Rescheduled: This button may be used in the case where a saved appointment
needs to be rescheduled by the patient. Once it is selected the appointment is deleted from
its time slot. It can be retrieved however, by clicking in the time slot again to open the appointment window, then selecting save. This feature is best used in conjunction with the
“Copy Appt” button. (see below)
Patient Canceled: This button may be used in the case where a saved appointment must be
canceled upon the patient's request.
Doctor Rescheduled: This button may be used much in the same way as the “Patient Rescheduled” button. It is only specifies the physician as the source of the rescheduling.
Doctor Canceled: This button may be used in the case where a saved appointment must be
canceled upon the doctor's request.
Copy Appointment: This feature copy’s the appointment and all of its associated information to a different time. When using this feature in conjunction with the reschedule option, it
is best to copy the appointment before clicking reschedule as the reschedule option deletes
the appointment from its time slot.
Print Superbill: This function will print superbills for all patients in the current schedule
view.
Print Reminder: This function prints a label from a label printer that contains the patient
name, physician name, and the patient's future appointment dates and times. It can be used
to stick on the back of a business card and given to the patient as a reminder of his/her next
appt with the doctor.
Chart Request: This function is used to send a chart request to the chart room and used for
the program to track which doctor has the chart.
Patient Track Label: This function prints labels that include the provider’s name, patient's
name, chart number, patient ID number, date, and date of birth of the patient.
Error Delete: This button allows you to delete the appointment without using the doctor or
patient canceled buttons.
Save: This will save the appointment and close the appointment window.
Cancel: This will close the appointment window without saving the appointment in view.
29
Schedule Functions
Below you will find more detailed explanations of the above buttons and their functions.
•
After selecting Provider, Resource, or Multi select the appropriate choice
from the drop down list.
•
•
•
•
When a patient checks in before an appointment and checks out after being seen, you may
find it helpful to indicate such on the schedule.
By checking the box to “Yes” this will allow you to override the default schedule information as it was set up by the system administrator. To permanently change the schedule
format, see “Schedule Set-Up”
Selecting “Day View” or “Week View” will change the way appointments are viewed in the
window.
•
You can jump to the desired date by clicking on it in this calendar. Navigate months by using the left and right arrows at the top. Today’s date will
be listed at the bottom with a red circle. If you are in the same month of
today’s date it will be circled in red on the calendar.
•
•
The date in view can be changed by Month, Week or
Day, simply by clicking the left “<M, <W, or <D” to go
back, and >D, >W,>M, to go forward.
Use the location field to view appointments by a specific place of service.
Shows total number of appointments scheduled for the selected day for the selected provider,
resource, or all the providers if ALL DOCS is selected.
30
Schedule Functions
Below you will find more detailed explanations of these buttons and their functions.
Next: After selecting a time slot to which an appointment will be made, click next to open the
appointment details window.
Move Appointment: This function allows you to move an appointment and all of its saved information to a new date/time slot. Click once on the appointment time slot you wish to move, then
click on the “Move Appt” button. Then click on the new time/date slot you wish the appointment
to be moved to. The new appointment should appear.
Confirmed: When a patient confirms an appointment, it is easy to update your schedule simply
by selecting the appointment and then clicking on the “Confirmed” button. This will then indicate it
is confirmed with a **CON** before the patient’s name.
No Show: If a patient fails to show up for their scheduled appointment this information can be
recorded by selecting the appointment and then clicking on the “No Show” button. This indicate it
is a no show appointment with a **NS** before the patient’s name.
Next Available Appointment:
This function allows you to search
for an available appointment time
based on the criteria you enter in
the search window. Select the
saved appointment slot then click
“Next Avail Appt”. Search using
the time needed for the appointment, in time slots selected days
of the week or minutes. Search
using a needed time frame or
search between the columns.
Find Patient Appointment: To search for an appointment that a patient already has scheduled,
click on the “Find Pt Appt” button. This will bring up the patient search window. Upon locating the
patient, the appointment list window will come up. Then select the appointment you are looking
for in the appointment list window. Once you have selected it, click on find appointment. This will
allow you to edit and view the appointment.
Export To Excel: This button will export the schedule in view to a Microsoft Excel file.
31
Schedule Functions
Below you will find more detailed explanations of these buttons and their functions.
Export To Outlook: This button will
export the schedule in view to your
Microsoft Outlook Calendar. You have
the opportunity to set the date and
column parameters as well as include
non patient appointments.
Print Superbills: This function will print superbills
for all patients in the current schedule view.
Print Reminder: This function prints a label from a label printer that contains the patient name,
physician name, and the patient's future appointment dates and times. It can be used to stick on
the back of a business card and given to the patient as a reminder of his/her next appt with the
doctor.
Print Schedule: This allows you to print a schedule and set date parameters for the schedule printed.
Reminder Letters: This function will print reminder letters for all patients in the current schedule view.
DSB: This is a future enhancement called Digital Superbill.
Chg Font: This allows you to use the window to the right to
change the font, style and size.
Close: Exits schedule view.
Refresh: This button will refresh the view.
32
Review Module
In this module, the user will be allowed to review a patient’s current
information, history as well as reconcile the account or view the aging
for the patient. This module can be
used for follow-up on any outstanding balance for the patient.
Open the review module and the
patient search window will appear.
Enter the patient’s information to
search for the patient. You may
select the patient from the recently
accessed dropdown list. Click OK.
This will bring up the review window.
The totals shown in Tab 1. General can be filtered by selecting the Responsible Party from the drop down list or
by Primary Doctor or by Practice. If the patient is linked to a family account you can view that balance by checking the Include Family Charges box.
You can also move to the next patient by typing in the desired patient’s ID number in the Next Pt box. The Edit
Demographics button will open the patient module allowing you to make changes. The Yellow background on
Tab 3. Comments indicates there is a privacy alert. A red background indicates a patient alert. If there are privacy and patient alerts, the background color will match the color of the last alert.
To navigate between the eight tabs in Review, simply left click the desired tab or use the keyboard shortcuts
such as ALT-2 for History.
33
Review Module
1. General
Primary Doctor: From the drop down list the primary doctor may be selected.
Practice: From the drop down list the practice may be selected.
Responsible Party: The responsible party may be selected from the drop down list.
Include Family Charges: Checking this box will allow the user to view all charge information for all family members that
are linked to this patient account. Patients may be linked as family members under the Family tab in the Patient’s Module.
SSN: The patient’s social security number will reflect the number entered in the Patients Module.
Home Phone/Business Phone/Address: Patient contact information will reflect what is listed in the Patient’s Module.
Patient Since: This date will default to the first date of service that has been billed in MBA.
Last Charge: This date will default to the last date a charge was entered.
Next Appt: This date corresponds with the next appointment the patient has scheduled in MBA scheduler.
# of Visits Remaining: This applies only to incidents that have been created which allow a certain number of dates under a particular authorization code, before another authorization needs to be obtained.
Last Statement: This date defaults to the most recent date this patients statement was printed.
Last Insurance Filing Date: This date corresponds to the last date the charges billed on this patient’s account were
filed to their insurance.
Pre-Auth# (of last chg): This pre-authorization number is linked to the incident of the last charge requiring a preauthorization
Last Patient/Insurance Payment: The last payments made by the patient or the insurance default here with the
amounts paid.
Aging Window: In the grid at the bottom of the window, the aging on this patient’s account can be reviewed from current up to over 90 days. The unapplied column lists any amounts that have been posted as an unapplied amount.
34
Review Module
2. History
After clicking on this line the transaction details will appear at the bottom of the window. If you have a charge selected and you click on this show applied details for
trans selected, any payments or adjustments that have been made on this charge will appear with the transaction dates,
transaction codes, descriptions, source (ie, patient or insurance) and the amount applied. If you have a payment or adjustment selected and the applied details line is clicked the charges these payments or adjustments have been applied to will appear with the transaction date, code, description, source and amount.
By selecting a charge and clicking the File Next/Re-file button, this will file the claim either to the secondary or
tertiary insurance carrier or to the primary insurance again.
The Print Claim button will allow you to print a paper claim.
By selecting a charge and clicking the Bill Responsible Party button the charge selected will then be billed to the
responsible party.
Claim history provides the history of the filing of the claim including the insurance plan name or names, the date
(s) the claim has been submitted and the claim format rather it be
electronic or paper. You can also print off the history and delete as
needed.
Edit will open the transaction selected. This can also be accomplished by simply double clicking on the selected payment,
charge or adjustment.
35
Review Module
The delete function is useful when a batch is still open and a charge has been posted or a payment has been
posted incorrectly. It can simply be deleted by first selecting it and then clicking delete. If the charge has a payment posted to it or if the payment has been applied to charges the Delete function is not recommended.
By checking the appropriate boxes the order in which the transactions are viewed in the window can be changed.
If you only wish to view the open items or if you would like to view any charges that have previously been deleted
on the account, it can be specified here. In Show Applied Detail view you are able to view the charge with all associated adjustments and payments.
To only view transactions within a certain time frame, dates can be entered to narrow the viewing field.
These charges or patient transactions may be viewed in this window according to insurance
responsibility, patient responsibility or both.
36
Review Module
Type: The type of transaction is listed here as Chg (Charge) Adj (Adjustment) or Pmt (Payment)
Trans Date: The date the transaction was posted. Either the date the charge was entered, the date of service or the date
the payment was posted.
Trans Description: This is the description of the transaction. Any comments that are made to the specific transaction can
also be viewed in the transaction description window.
CPT Code: The CPT code is listed in this column.
M1: The primary modifier used in billing a charge is listed in this column.
PR: The payment responsibility column will list either RP for responsible party, PRI for primary insurance or SEC or TER for
secondary or tertiary on charges.
DR: The corresponding doctor of service is listed by his/her assigned provider number within MBA.
Trans Amount: This amount is the original amount either charged or posted.
Amount Applied: This amount is how much of the transaction amount was actually applied to the specific transaction.
Amount Remaining: This amount is the remaining amount after the amount applied has been deducted from the transactions amount.
Amount Allowed: This amount is the amount allowed by the insurance company.
Save/Cancel: Save to save changes made or cancel to not save any changes made.
Print: To print a summary of review for this specific patient click print. The window will prompt you to specifications.
37
Review Module
3. Comments
These user defined fields are for entering information relevant to the overall treatment of the patient. If a patient alert has been
added in this module or any other module within MBA, tab 3 will appear red to alert all users of this alert. If a privacy alert has
been added in this module or any other module within MBA, tab 3 will appear yellow to notify all users of this alert. If both
alerts have been added, tab 3 will appear in the color of the last alert added.
The Standard Release of Info Signed date carries over from the Patient Module. This allows information to be entered relating
to the HIPAA Standard Release of Info that must be signed by each patient. The date this document was signed can be entered
in the space provided. In the case that the patient has specific requests as to how his/her information is handled the Privacy
Alert box may be checked.
General Comments, Allergies, Current Medication and Drug Reactions will also show in the Patient Module.
38
Review Module
4. Insurance Info/Incidents
Insurance Plans:
Listed in this window are all the active and inactive insurance plans for this patient. To edit or view more detailed insurance
information double click on the insurance company that you are interested in viewing.
Incidents: Any prior authorization information may be entered by adding an incident. You may also edit or delete existing
incidents.
39
Review Module
5. Stmt Hist
This window shows a list of
all statements this particular
patient has received, the date
it has been printed, and the
aging balances.
You can view the statement
by clicking the View button
and delete by clicking the
Delete button.
Also included is the patient’s
appointment history.
40
Review Module
6. Contact History
This tab will allow the user to view, add and edit any contact for the patient in regards to follow-up or phone consultations regarding the account or patient status. While this option is more often used as a tool for patient follow-up,
the uses are not limited to patient follow-up alone and can be used for any account correspondence.
Patient Name
Select from the drop down
lists.
Enter the date of contact.
Enter the person contacted.
In the space provided enter
all comments associated
with this contact.
If during this contact a
promise to pay has been
made, check the box enter
the amount and date it
should be paid. If monthly
payments were promised,
click monthly.
41
Review Module
7. Patient Docs
This tab allows documents to be linked with the patient’s account. EOB’s and other correspondence can be scanned in, saved
and linked with the associated patient’s account. Click Add to add a new document or edit to edit an existing document. Delete will delete the highlighted document in the window. Launch will open the saved document for review or editing.
To add a new document click add. Begin by entering a description of the document and select the document category from the drop down list. This list may be added to or edited by clicking add or edit.
To select the document click update, this will open a windows search screen. Find the file where the document has
been saved and click okay. The document will then be linked with this patient’s account and the path to find the
original saved document is listed under path. The file name is listed below it. Click save to save your work and exit or
click cancel to exit without saving.
42
Review Module
8. Claims
This tab allows you to see the history of several claims at once. You can sort by date, or newer claims and can include
closed claims. You can also file next insurance or refile from this screen.
43
Charges Module
In this module, the user will be able
to document and bill all charges
incurred for individual patient’s.
Open the charges module and the
patient search window will appear.
Enter the patient’s information to
search for the patient with whom
the charges should apply. You may
select the patient from the recently
accessed dropdown list. Click Add.
This will bring up the charges window.
If the Place of Service selected is an
in-patient facility the Admitted and
Discharged fields will appear.
To quickly put in the current date, hit the space bar while in the Date of Service field. Remember you
can use the keyboard shortcuts throughout MBA by holding the Alt key then typing the underlined letter
in the description of the field you want to jump.
44
Charges Module
Batch#: The system allows the user to create as many batches as needed to enter charges and adjustments into the system. The user can ADD or EDIT several batches for different types of work. Once the work is complete for a specific batch,
the user must run a batch report and balance then close the open batch.
Add Batch:To add a batch , click on the Add button.
Batch#: The system will automatically assign a number
to the batch.
Description: This name is user defined. Usually a short
description and the users initials are used.
Practice: Enter the practice to be used for this batch.
Month/Year: The month and year for which the information is being entered.
Edit Batch: To edit a batch click on the Edit button. This
option allows the user to edit the description, month, and year for any open batch.
Save/Cancel: Save once the desired information is entered or Cancel to start again or exit out of the field.
45
Charges Module
Close Batch: Once all of the information is entered for a specific
batch, the user must balance and close the batch.
•
STEP ONE In the main menu on the top of the screen, select the Reports option. Then select the Close Batch option. A
list of open batches will appear.
•
STEP TWO Select the Batch that is ready to be closed by
highlighting the corresponding number.
•
STEP THREE Then select Batch Report. A report will print
showing all information that was actually entered into the system. The user should balance each item entered to the items
on the report.
•
STEP FOUR Once the batch report has printed and the information balances, select the balanced batch number and
select Close Batch. The system will close the batch and bring
the user back to the Main Menu.
Once a batch has been closed, the system only allows certain corrections to be made to the info in the batch.
Also from the close batch screen you can browse the charges, payments or adjustments that have been entered
into that batch. There is also a charge review report which that list in the order the charges were entered a summary of the charge including patient id, name, date of service, doctor, facility, cpt code, modifier, diagnosis code,
price and insurance id.
There is also a practice drop box if you have more that one practice file. To view a list of closed batches, check
the show closed batches box. You can print any report to screen or to the printer.
46
Charges Module
INCIDENT ID This option is used to store pre-authorization or other information regarding services provided other
than the standard or normal service. The user may Add or Edit the Incident ID for any specific patient.
INCIDENT DATE: List the date of the incident or first date of service.
DATE TYPE: Choose the date type that best describes the incident from the drop down box:: Accident Date, Date
of first symptom of illness, Date of Last Menstrual Period
INCIDENT CODE: Choose the code that best describes incident from the drop down box: Accident-Auto, Accident-Other, Accident-Employment, Accident/Tort Liability, Crime Victim, Elective, Illness, No Fault Accident,
Normal, Pregnancy, Surgery, Third Party Liability, Workman’s Comp
ACCIDENT STATE: Choose the correct state abbreviation for the state in which the incident occurred.
PRE AUTH #: Enter the pre-authorization number obtained from the insurance carrier for this incident.
AUTH EXP DATE: Enter the date when the authorization number expires for the patient for this incident
DOCTOR: Enter the name of the physician seeing the patient for this incident
VISITS REMAINING: Enter the number of visits remaining for this incident if applicable.
DESCRIPTION: Enter the description that can be used for this incident so that it is easily identified for future use
UB-92 INFO: When billing on UB-04 claim forms, fill in these fields accordingly: Occurrence Code/Dates, Condition Codes, and Value Code/Amount
LOAD DEFAULTS: Used for UB-04 billing and preset by the system administrator.
SAVE OR CANCEL: Save the information by clicking on Save or ALT + S or cancel the information by clicking on
cancel or ALT + C.
47
Charges Module
RESPONSIBLE PARTY: Choose the correct responsible party for the services performed.
PLACE OF SERVICE: Choose the correct place of service. The correct POS number will be preset by the system administrator or other with access. The Admitted and Discharged fields will appear when the POS is an in-patient facility.
DR OF SERVICE: Name of the provider performing the service for this charge.
REFERRING DR: Name of the provider who referred the patient to the practice if applicable.
TAB 1. Charges: This TAB will allow the user to enter needed information for a specific service provided.
DATE OF SERVICE:
Enter the correct date of service in one of the following methods: 010101, 01012001,
01/01/01,01/01/2001. MBA will format the date for the user.
CPT CODE/DESC: Enter the correct CPT/Procedure Code for the service provided. The user may enter the numbered code or tab over to the description and enter by description. Begin typing the code or description, using
the drop down arrow, arrow to the correct code and highlight the code, then tab to the diagnosis field(s).
The ADD, EDIT and SEARCH buttons above and to the right of this field are used to add, edit or search for a
CPT Code/Description.
DIAGNOSIS: Enter the correct Diagnosis/ ICD-9 code for the services provided. The user may enter the numbered code or tab over to the description and enter by description. Begin typing the code or description, using
the drop down arrow, arrow to the correct code and highlight the code, then tab to the modifier field(s). The
ADD, EDIT and SEARCH buttons above and to the right of this field are used to add, edit or search for the
Diagnosis Code/Description. There are EIGHT diagnosis fields available. Once the user has entered the first
diagnosis, another field will appear and so on. Only the top four will print on the claim forms.
REORDER: Use this tool to reorder the diagnosis code for this charge and your next charges when you click the
Add Another button.
48
Charges Module
In the case that a particular procedure code is not found in the search, a procedure code may be added
by clicking ADD next to the fields provided for CPT entry. The ADD function will bring up a search window where the user may do an additional search for the code or simply click New CPT to enter an entirely new code. This will bring up the procedures window where all information related to the CPT code
may be entered.
1. General
Procedure ID: Enter the CPT code in the spaces provided.
Short Description: Enter a short description of the procedure in the space provided. This will serve as a future
search identifier for the code.
Get Info for Existing CPT: After entering a valid CPT code in the procedure ID field, clicking Get Info for Existing CPT button will populate all information on this CPT code from the default information from the MBACorp Data
Base .
49
Charges Module
1. General
Detailed Description: Enter the full description of the procedure code.
Type of Service: Select the type of service from the drop down list.
CPT Category: Select the CPT category from the drop down list.
Default CPT Modifiers: Select the any CPT modifiers that should automatically be attached to this code when billed
from the drop down list. Up to four may be selected.
Additional Claim Info: Enter any additional claim information in the space provided.
Print Below Line Item: To enter additional information below the line item, check this box.
CPT Origin: Select the CPT origin from the drop down list.
Statement Description: Enter the description of the procedure that you would like to have appear on the patient’s
statement.
Taxable: Check yes if this this a taxable procedure to be charged.
Requires Referral? Check yes if this code requires a referral to be billed.
Post Op Days: Enter the number of post op days assigned to this procedure.
File Claims Code: Select the method in which this procedure should be filed to insurance from the drop down list.
50
Charges Module
2. Fee Schedules:
Enter the appropriate fee schedule amount for each of the fee schedules listed. To add more fee schedules please
use the Maintenance Menu from the main MBA screen. If a fee schedule is not used then simply leave the fee
amount as zero. The zero fee schedule number is the default unless otherwise specified on the responsible parties
for each patient.
The Medicare Allowable Fees for the current year or the previous year is listed at the bottom of the window. To
change between last year and the current year click the VIEW button on the right.
51
Charges Module
3. Procedure Details
CPT Type: Select the appropriate CPT type from the drop down list
Revenue Code: Select the appropriate REV code from the drop down list when applicable.
Replacement Code: In the case that this CPT code should expire, enter an alternate code to be used in the space
provided.
Charge Code: Select the appropriate method in which the charge should be billed: Units, Days, Months, Time
Sex: For sex specific procedures enter the sex of the patient that must correspond with the procedure.
Minimum/ Maximum Age: Enter any age cap or floor.
CLIA Type: In the case that the providers office houses an internal lab, enter the CLIA type in the space provided.
Valid From/Through: Enter the dates this code is valid from and through.
Documentation Required: If documentation is required for this code to be billed check yes.
Count As Visit: If the code being billed should count as an office visit check yes.
Print Description on Claim: Check yes if the description of the code should be billed on the claim.
UB92: If this code should be billed in the UB-04 format check yes. UB-04 replaced the UB-92.
DME: If this code is durable medical equipment check yes.
Type of EPSDT/KidMed Procedure: Select the applicable procedure type.
52
Charges Module
4.. Comments
Enter any additional comments regarding this CPT code or the method in which it should be billed.
5. CCI Edits
Please contact MBA support if you need this feature. This is for the ‘Correct Coding Initiative’ Edits.
53
Charges Module
In the case that a particular diagnosis code is not found in the search, a diagnosis code may be added by clicking ADD next to the fields provided for ICD-9 entry. The ADD function will bring up a search window and then
if the particular code or description is not found the diagnosis window will appear. (see above)
Diagnosis Code: Enter the ICD-9 code in the field provided.
Short Description: Enter a short description of the diagnosis in the space provided. This will serve as a future
search identifier for the code.
Alternate Code 1: Enter the first alternate code if applicable.
Alternate Code 2: Enter the second alternate code if applicable.
Valid From/Thru: Enter the dates that the code is identified as valid in the space provided.
Replacement Code: Enter the code that replaces this one after the Valid Thru date.
Required Additional Digit?: In the case that an additional digit is required when this code is billed, click yes.
Required Accident Info?: In the case where accident information is required in conjunction to the billing of
this code, click yes.
Inactive: Click yes if this code should no longer be active or used in billing for this practice.
Detailed Description: Enter any additional information regarding this code and the circumstances in which it
should be billed.
OK/Cancel: Click OK to save and return to the charges page or cancel.
54
Charges Module
TAB 1. Charges:
CPT Modifiers: Select the applicable modifiers from the drop down lists. (up to 4)
CPT Amount: After entering the CPT code the CPT amount should default based on the individual CPT fee schedule. An
amount may be entered manually in this field. A message will appear as you finalize the charge if you are entering a zero
amount.
# of Units: Enter the number of units that should be billed for this charge.
Consecutive Days: Use this field when the same service was provided for the patient several days in a row. The system
will automatically add the correct date range on the claim form. Use the # of Units field above to make sure the correct
amount is billed.
Anesthesia: Enter the hours and minutes that should be billed if this in an anesthesia charge.
Total Price: The total price will default based on the CPT amount and the units, days or anesthesia hours/min.
Print on Insurance: Select the method that this charge should be billed. Electronic, to file the claim electronically; No, to
not file the claim to any insurance company; or Paper, to file the claim on a hard copy claim form.
Assigned?: Click Yes or No to accept assignment. The system will default with the information that the patient’s insurance
file has in it (set in the patient module). This option may be modified per charge as needed.
Bill Resp Party?: Click yes or no. If clicked yes, this option tells the insurance is billed. The charge will then age in the
patient portion of the A/R.
Anesthesia From/To: Enter the actual time of day from and to that anesthesia was administered. The system will automatically calculate the number of units depending on the predetermined minute intervals set by the system administrator.
Charge on Hold: Click Yes or No. If clicked yes, you will be prompted to enter a hold reason. It will not be billed to the
insurance company or patient until the charge is taken off of hold status. When claims are run any charges on hold will
print out on the error report so as to remind you that this charge needs to be fixed.
55
Charges Module
TAB 2 Additional Data
Type of Accident: Enter the type of accident in the space provided.
Disability (T/P): Enter T for “total disability” or enter P for “partial disability”
Disabled From/ Through: Enter the dates of disability.
Return to Work: Enter the date the patient can return to work after this procedure.
Outside Charges: Enter the amount of any outside charges for this same service (such as Lab).
Lab/HHA Name: Enter the Lab or Home Healthcare Agency’s name and number. These facilities may
be added or edited from here.
First Consulted: Enter the date of the first consultation.
2nd/3rd Opinion: Enter 2 or 3 in the field provided if this charge is a second or third opinion.
UB92 Type of Bill: Enter extra UB-04 Bill if needed.
Hospital ID: Enter extra hospital ID if needed.
Emergency: Check yes if the service provided was emergent care.
Condition Rel to Empl: Check yes if this was an employment related charge.
Elective Procedure: Check yes if the procedure should be classified as elective.
Patient Insurance Information is listed in the box at the bottom of this tab as a convenient point of reference showing filing order, plan name, phone number, co-pay info and insurance ID number.
56
Charges Module
TAB 3. Doctors & Comments
Charge Comments: This user defined spaces may be used to add any additional information regarding the
billed charge.
Additional Claim Info: Information entered in this field will be included in the claim electronic file and in
Box 19 “Reserved for Local Use” of the CMS-1500.
Print Below Line Item: Check yes if the information entered in the “Additional Claim Info” field should be
printed on the HCFA.
Late Bill Override Reason Code/Date: Enter the late bill override reason code and date if applicable.
Field Avoidance (Y/N)?: Future enhancement. Call support for more information.
Unusual Position: Future enhancement. Call support for more information.
Anesthesia Number of Procedures: Enter the number of procedures performed while the patient was under anesthesia.
Patient Alert: If there is an existing patient alert it will be listed here. Otherwise check the patient alert box
and enter your comments in the field provided.
TAB 4. Other
Charges
This point of reference lists the other
charges billed on this
patient’s account.
57
Charges Module
FINALIZE: Choose this option to finalize the charges on this patient. The system will allow the user to check
all the charges added to the account before accepting or finalizing in the charge summary window. Once the
user decides that the charges are complete, choose to Apply Payments, Save, or Cancel. You can also print
a paper claim or summary.
CANCEL: This option will cancel any data entered. The system will ask the user to be sure this is the option
they want to choose before finalizing the cancel.
ADD ANOTHER: Choosing this option will save the data entered for the charge and bring the user back to the patient lookup screen to enter a charge for a new patient.
SKIP TO SUM: This option will NOT save data entered for a charge. This option should be used to view, add, edit, or delete
charges entered for this specific patient ONLY.
SAVE/CANCEL: Select to save or cancel all charges entered.
APPLY PAYMENTS: If this option is chosen, the system will bring the user to a modified adjustment screen. The user may
then apply a payment for that charge at that time using the same methods as applying payments in section five of this manual.
PRINT SUMMARY: This will print a charge summary report and batch ID.
PRINT CLAIM: This will print a paper claim.
ADD/EDIT/DELETE: Charges may be added, edited or deleted using these functions.
TOTAL NEW CHARGES: The total of the new charges entered is listed in red in the bottom center of the window. Charges
listed in red have been set to Hold.
PATIENT INFORMATION: Listed at the top of the window is a point of reference for patient information.
NEXT PATIENT: If you have the ID of the next patient you want to enter a charge for, enter it in the ‘Next Pt’ field.
NEXT SUPERBILL: Like the ‘Next Pt’ field, you can jump to the next superbill or encounter by entering it into this field.
COPAY: Enter the patient’s co-pay information in these fields if applicable.
58
Adjustments
Adjustments Module:
In this module, the user will be able to
post and adjust payments for individual
patient’s.
Open the adjustments module and the
patient search window will appear.
Enter the patient’s information to search
for the patient with whom the adjustments should apply. You may select the
patient from the recently accessed dropdown list. Click Add.
This will bring up the adjustments window.
In addition to posting and adjusting payments, you can also post denials.
Once the adjustment form is populated,
you can enter your next patient’s ID in
the Next Patient field next to the Save w/
Defaults button.
59
Adjustments
Batch#: The system allows the user to create as many batches as needed to enter charges and adjustments into the system.
The user can ADD or EDIT several batches for different types of work. Once the work is complete for a specific batch, the user
must run a batch report and balance then close the open batch.
Date: Enter the date of service, using the space provided or by using the button to the right of the field to use the calendar.
Adjustment Description: Select the appropriate adjustment description from the drop down list. If the user has permission to
add or edit adjustment descriptions, this can be done in Maintenance by selecting Adjustment Descriptions. Or this can also be
accessed by clicking the Add or Edit buttons.
Adjustment Code: An adjustment code is automatically assigned to each new adjustment by MBA.
Inactive: If the adjustment code should be classified as inactive and restricted from use, check the Inactive box yes.
Description: The description of the adjustment may be entered here.
Adjustment Type: Select either payment or adjustment from the drop
down list.
Transaction Type: Select Debit, Credit or No Change from the list.
Source: Decide if the adjustment is from the patient, insurance, a responsible party or other.
Comments Required?: Check the box yes if comments should be entered in conjunction with this specific
adjustment.
Refund Related Code?: Check this box if the adjustment that is being entered is related to a refund.
Color Change: The color with which the description of this adjustment will be listed can be changed using
this function.
60
Adjustments
Second Adjustment: If needed,
select the appropriate second adjustment description from the drop
down list.
Denial Code: Select the appropriate denial code description from the
drop down list, if the adjustment
includes a denial.
Responsible Party: Select the
corresponding responsible party
that should be linked with this adjustment/ payment.
Insurance Plan: Select the insurance plan for this adjustment.
Payment Type: If in the initial adjustment description is a payment, then select the payment type, Cash, Check, Credit
Card, Debit Card, Direct Deposit, Money Order
Check/Auth#: Enter the check number or authorization number that corresponds to the check, credit card, debit card,
direct deposit, or money order.
Total Amount: Enter the total amount of the payment or adjustment.
Running Total: In the case that a total amount is unavailable or inconvenient, the running total check box may be selected to tally a total amount based on the amounts entered in the Apply Amount and 2nd Adjustment fields.
Provider: Select the corresponding provider from the drop down list.
Print Receipt: Check this box if a receipt of this transaction should be printed.
Next Patient: Once the adjustment form is populated, you can enter the next patient’s ID before saving the adjustment
Balance Windows: The balance windows show amounts owed and credit amounts for the patient/responsible party or
insurance. The total amount due on the account is also listed.
Beginning Date to End Date: To view a specific range of dates of service or to view a single date of service, enter
the beginning date and end date in the spaces provided.
Sort By: Sort the charges listed by either charge amount, CPT, or Date of Service. Charges default using the date of
service.
Descending Order: To view the charges in descending order, from most recent to earliest, check the box.
Open Charges Only: To view only the open or unresolved charges, check the box.
Show Family Charges: To include the linked family members charges to this account, check the box.
Show Applied Amounts Only: To show only the applied amounts, check the box.
61
Adjustments
If posting a denial, select the
appropriate denial code from
the drop down list in the columns Denial Code1 and if
needed Denial Code2. There
is also a Denial Comment field.
In the charges window each separate billed charge is listed according to the date of service. This can be changed to sort by
charge amount or CPT code. To review the charge as it was billed double click on the line item you are interested in and the
charge will open in the Charges Module.
Date: Date of Service
CPT Code: The billed code and description
M1: The primary modifier as it was billed with the charge is listed here.
PR: Payment Responsibility will be listed as it was billed. For the primary insurance it will be listed with a PRI, secondary insurances are listed with a SEC and the responsible party is listed as RP.
Charge Amount: The amount billed for this particular code
Other Credits: The amount previously paid on this particular code.
Allowed Amount: If the insurance has specified an allowed amount, it should be entered here.
Apply Amount: The amount to apply to the charge.
2nd Adjustment: The second adjustment to the charge.
Co-Insurance: The amount due by the secondary insurance as specified by the primary insurance.
Co-pay: The amount due by the patient or responsible party that is considered their copay.
Deductible: This is the amount due by the patient or responsible party that is considered their deductible.
Auto Apply: Checking this box applies the full amount still due on the charge from the total amount of the payment without
having to manually enter the amount.
File Next: Checking this box sets the charge to file to the next insurance company.
Bill Patient: Checking this box sets the remaining amount to bill to the patient/responsible party.
Balance: This field changes as you complete the previous columns
62 showing the remaining balance of each charge.
Adjustments
Total Amount:
After entering applied amounts to the billed codes, the amount applied will be subtracted from the total
amount and will display at the bottom right as the Left to Allocate amount.
Provider of Charge:
To verify that the Provider the adjustment is being listed under is the same as the provider who billed
the charge, the Provider of Charge will appear in red next to the provider listed on the adjustment.
Save with Defaults:
The user may choose this option when posting bulk/mass checks from insurance companies. This option
will save the payment for this patient and also save the insurance payment voucher/EOB information
that was entered for this payment so that is may be used for the next patient listed on the same
voucher/EOB without having to reenter all of the same payment information over again. The system will
bring the user back to the patient look-up screen to find the next patient listed on the voucher.
Add Another:
Next Ins Plan:
Choosing this option will save the information entered and allow the user to add another payment to
this patient’s account without going through the patient look-up screen again.
In the case that the patient has a secondary insurance and the option to file next has been checked the
next insurance plan will be listed in red in the lower left hand corner.
63
Adjustments
Tab 2. New Payments/Adjustments
This window lists all the previous adjustments and payments. Nothing can be changed or edited, it is simply for a quick reference. It shows the adjustment date, adjustment type, payment type, Check/Auth Number, Adjustment Amount, Amount Applied, Amount Remaining and any comments.
Tab 3. Comments
This tab allocates space to be used for comments associated with the posting of this adjustment. Also any patient alerts may be
viewed here. The last insurance or patient payment date and amount are listed at the bottom of this tab for quick reference.
Also stamped is the MBA user ID of the person who created and modified the adjustment along with a date and time.
64
Top Menu
File
Use this drop down menu to Open another practice or to exit MBA. ALT - F will open the menu and then ‘O”
will open the practice list. A quicker shortcut is to use the F12 key. ALT—X will close MBA.
This drop down menu shows the Function Key shortcuts for
each module as well as the ALT - Letter shortcuts. For Patients
use the F1 key or ALT - P.
For Review use the F4 key or ALT - W and so on.
The Maintenance menu allows you to enter information about your
practice and further customize MBA to suit your needs. When you click
on Practice file or ALT - P, the screen below appears. Double click on
the practice you want to edit or highlight and click the View button.
65
Top Menu
66