1
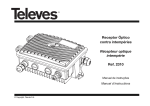
MODEM IP
ETHERNET
User Manual
© Copyright Televés S.A.
10-100Mb
Link
SR
SG
0
Ref. 5837
MODEM IP
CDC
PWR
Modem IP
Ref. 5837
INDEX
Page
INTRODUCTION
..................................................
TELEVÉS IP MODEM . . . . . . . . . . . . . . . . . . . . . . . . . . . . . . . . . . . . . . . . . . . . . . . . . .
TYPICAL APPLICATION . . . . . . . . . . . . . . . . . . . . . . . . . . . . . . . . . . . . . . . . . . . . . . . . .
SYSTEM REQUIREMENTS . . . . . . . . . . . . . . . . . . . . . . . . . . . . . . . . . . . . . . . . . . . . . . .
PACKET CONTENTS TELEVÉS IP MODEM . . . . . . . . . . . . . . . . . . . . . . . . . . . . . . . . .
5
5
5
5
6
GETTING TO KNOW THE TELEVÉS COAXIAL IP MODEM . . . . . . . . . . . . . . . . . . . . . . . .
MODEM PORTS
..................................................
7
7
INSTALLATION OF THE IP MODEM . . . . . . . . . . . . . . . . . . . . . . . . . . . . . . . . . . . . . . . . . .
8
INSTALLATION OF THE SOFTWARE . . . . . . . . . . . . . . . . . . . . . . . . . . . . . . . . . . . . . . . . .
CHANGING THE STATIC OR DYNAMIC ADDRESS OF THE MODEM . . . . . . . . . . . . .
CONNECTING TO A HEADEND . . . . . . . . . . . . . . . . . . . . . . . . . . . . . . . . . . . . . . . . . . .
9
12
15
ANNEX 0: SOLUTIONS FOR POSSIBLE CONNECTION PROBLEMS . . . . . . . . . . . . . . . .
21
ANNEX 1: DETECTION OF POSSIBLE CONNECTION PROBLEMS AFTER
OBSERVATION OF MODEM STATUS LEDS . . . . . . . . . . . . . . . . . . . . . . . . . .
25
TECHNICAL SPECIFICATIONS
29
.............................................
3
Modem IP
Ref. 5837
INTRODUCTION
Televés IP Modem
The IP MODEM lets you control Televés controllable headends from anywhere in the world
using an Internet connection.
Typical application
CDC
MODEM IP
INTERNET
PWR
CTRL
PWR
CDC
PRGM
MODEM IP
ETHERNET
MODEM TLF
10-100Mb
Link
SR
SG
LAN
ROUTER
ADSL
0234505
To control a headend from any PC, it is necessary to have installed the appropriate CDC software version (2.11 or upper), the “VSP Manager” program and the connection file which is unique to each IP MODEM. The necessary softtware together with the connection file is on the CD
that comes with the products. (See installation section). The PC requirements can be found in
the CDC software manual.
System requirements
- To use the device, you need an internet connection to connect the IP Modem
- The appropriate CDC Software (2.11 or upper) installed in the PC from which to control
the headend.
- The Software VSP Manager installed in the PC earmarked for head-end control. The operating system of the PC earmarked for head-end control should be Windows XP, and it will
shortly become available for Windows Vista
- Connection file for that IP MODEM
5
Modem IP
Ref. 5837
Packet contents “Televés IP Modem”
IP MODEM
Cable feed connector
An RJ45 crossover cable (with red ends)
A cable to connect the IP MODEM with the CDC module
An installation CD (include manual)
6
Modem IP
Ref. 5837
GETTING TO KNOW THE TELEVÉS IP MODEM
ETHERNET
10-100Mb
Link
SR
SG
MODEM IP
CDC
PWR
023
Powering
CDC
Ethernet
Modem ports
Ethernet
Connect the MODEM-IP to the LAN using an RJ45 cable or directly to the DSL router using an
RJ45 crossover cable (with red ends). It is also used to change the IP address of the MODEM
connecting it directly with the PC network card using an RJ45 crossover cable.
CDC
Connect the MODEM-IP to the CDC module, use the cable provided (not crossover)
Powering connector
Connection to T05 feed source should be done with the cable connector supplied, whether
connection is to the source itself or to any already fed T05 module (see details in Feed Source
Data Sheet).
7
Modem IP
Ref. 5837
INSTALLATION OF THE MODEM-IP
To connect the MODEM-IP to the CDC module, use the cable provided (not crossover) and
connect the “PRGM IP MODEM” connector (on the CDC module) to the connector labelled
“CDC” (on the IP MODEM module), as can be seen in figure 1.
Important: In the older CDC modules, the “PRGM IP MODEM” connector is labelled
only as “PRGM”
To connect the MODEM-IP to the LAN (or directly to the DSL router) use the connector labelled “ETHERNET” as can be seen in figure 2.
CDC
MODEM IP
INTERNET
CTRL
PWR
PWR
CDC
PRGM
MODEM IP
ETHERNET
MODEM TLF
10-100Mb
Link
SR
SG
LAN
ROUTER
ADSL
0234505 0
234551 01
ETHERNET
PWR
PWR
CDC
MODEM IP
MODEM IP
PWR
CDC
MODEM TLF
0 100Mb
Link
SR
SG
PWR
023
PWR
PWR
CDC
PRGM
MODEM IP
ETHERNET
MODEM TLF
CTRL
10-100Mb
Link
SR
SG
Fig. 2
Fig. 1
8
Modem IP
Ref. 5837
INSTALLATION OF THE SOFTWARE
If the installation does not start automatically, access the CD and press “Setup.exe”. Follow the
instructions that appear onscreen.
When you execute “Setup.exe” and the program starts, a screen such as the one below will
appear with a bar that indicates the progress of the preparation of the system to carry out the
installation, this process may take some time depending on the equipment where installation is
to be made.
Then the following screen will appear, where you must choose the language for the installation.
Choose the language from the drop-down menu, once the language has been selected as indicated in the program, press the Next button to continue.
9
Modem IP
Ref. 5837
The licence screen will appear. You must accept the licence terms to be able to continue, if you
do not accept these terms the software will not let you continue with the installation.
Once the terms have been accepted, click on the Next button to enter the selection screen; this
screen has got 3 options to install:
- The connection file that is unique for each MODEM-IP, this contains the necessary connection data for this modem, therefore, it is very important to have each IP MODEM identified
with its configuration file. This file will be installed in the route that you will select for the installation in “….\\FileCDC”. As you will see in the section dealing with the headend connections, it
will be necessary to load the “VSP Manager” program before connecting, in this way the CDC
software will identify the headend to which it should get connected. The name of this file is the
serial number of the MODEM to which it is connected using the vsp extension , we recommend
re-naming this file with a more descriptive name for example “Hotel las palmas.vsp” but always
maintaining the “.vsp” extension.
-“Configuration of the IP address” program. It is important to note that all the IP Modems
are configured by default to automatically obtain a dynamic IP address. This program will let
you give a static IP address to your MODEM-IP. If you have already installed this program in
your PC, it is not necessary to re-install it for each modem.
-“VSP Manager” program. This lets you load the connection file so that the CDC software gets connected to the IP MODEM and therefore with the headend that corresponds to that
file. It is only necessary to install this once per PC
10
Modem IP
Ref. 5837
11
Modem IP
Ref. 5837
CHANGING THE STATIC OR DYNAMIC IP ADDRESS OF THE MODEM
All the IP Modems are configured by default to automatically obtain a dynamic IP address. This
program lets you give a static IP address to your IP MODEM (or change from static to dynamic
IP). To do so, follow these steps:
Execute the “Configuration IP Modem” program
Next, you can see how to connect the MODEM directly to the PC using a crossover cable, that
is different from the rest because it has a red mark at each end, remember that you will not be
able to connect more than one IP MODEM at a time.
12
Modem IP
Ref. 5837
Once the connection has been carried out correctly, you can see the following screen. To carry
out any operation, it is obligatory to enter the IP MODEM password, and this can be found on
the label that comes with the installation CD. Two options are possible:
a) Obtain an IP address automatically: This option enables the IP MODEM to obtain a
dynamic IP address automatically. Remember that this is the default setting.
b) Configuration of a static IP address: When this option is selected you can enter a static address for the modem, you must also enter all the basic network configuration data
such as the “Subnet mask” and the “Gateway”.
If for any reason communication is lost with the modem during its configuration, the software
will try three times to connect with it. If, after these attempts, it is impossible to establish communication with the modem, the following screen will be displayed:
From this screen, you will be able to exit the program or try the connection again. Before
attempting to connect, check that the cables are properly plugged in, and read the help that
13
Modem IP
Ref. 5837
appears when you click on the small orange help box.
14
Modem IP
Ref. 5837
CONNECTING TO A HEADEND
To connect to a headend, follow these steps:
A. Execute the “Vsp Manager” program:
B. Make sure there is no file loaded in the “Vsp Manager”
If there is no file loaded onscreen, it will appear empty, as you can see below:
15
Modem IP
Ref. 5837
If there is a connection file loaded, it will appear on the main screen, as can be seen in the
following figure:
To erase it or the loaded connection files, select each one by clicking on “Virtual Serial Port.....”
and then click on “Remove”, until the whole screen is empty.
16
Modem IP
Ref. 5837
C. Load the connection file in the “Vsp Manager”. To do so, you must:
Press Add
In the following screen, press “Load”
At this moment, you will see the screen that is used to open a connection file. Do this by
locating it in the directory where the software was installed (see INSTALLATION OF SOFTWARE), which will normally be “C:\Programfiles\TELEVES\ModemIP\FileCDC”, where you
will find all the connection files (extension “.vsp”). Remember that each
17
Modem IP
Ref. 5837
connection file “.vsp” lets you carry out a connection with a single MODEM (this is why it is
advisable when installing the file to re-name it, using a more descriptive name of the installation where it will be located, but without changing the extension “.vsp”). Also to identify
which file corresponds to which Modem, you must know that the file name is the serial number that the Modem has on the label at the back.
Once the file tab “General properties” is open, you must select “Disabled”
Next, in the “Default serial settings (this is how it appeared on the original” tab, you must
select the 9600 options for bits per second (bps) and Off for the flow control.
18
Modem IP
Ref. 5837
Press “Accept” and the close the VSP Manager by pressing
.
Important: Remember that these steps must be repeated whenever you want to connect another IP Modem.
D. Start up the CDC software, by:
Making sure that the “Use IP Modem” option that appears next to the Session Log in button
is enabled.
19
Modem IP
Ref. 5837
Press “Start session ”
Enter the headend password:
The headend is now connected.
20
Modem IP
Ref. 5837
ANNEX 0: SOLUTIONS FOR POSSIBLE CONNECTION PROBLEMS
1.- Check that “dhcp” exists on your network and that IP addresses are provided; as we
have already mentioned, the IP Modems have the “dhcp” enabled by default, so they
take the IP address from the network. If you do not have a “dhcp” server, the IP Modem
will not work.
If this is the case, start the “IP configuration software” again, after connecting the IP Modem
directly to the equipment using the crossover cable that is provided. Once you arrive at the
screen that appears on page 12 of this manual, select “Configuration of a Static IP
Address”, and specify an IP address, a subnet mask and a gateway to the IP Modem as
indicated.
In any Windows XP system, to check that the dhcp is enabled, click on Start >> Control
Panels >> Network connections. A screen, which will be very similar to this, will appear:
Right-click on “Local area connection”, and press “Properties” on the list that appears, the
following screen will be displayed:
21
Modem IP
Ref. 5837
Select the highlighed option on the previous screen and press Properties which is also highlighted in the previous screen.
22
Modem IP
Ref. 5837
2.- Check the cables between the “IP Modem” and the “CDC”.
Check that the cables are connected between the “IP Modem” and the “CDC” as can be
seen in the figure.
CDC
MODEM IP
PWR
PWR
PWR
CDC
PRGM
MODEM IP
ETHERNET
MODEM TLF
10-100Mb
Link
SR
SG
23
Modem IP
Ref. 5837
ANNEX 1: DETECTION OF POSSIBLE CONNECTION PROBLEMS AFTER OBSERVATION
OF MODEM STATUS LEDS
The Status LEDS are located on the Connector marked as “ETHERNET”.
Important: The following explanation of the possible status of the LEDS is the usual one, but it
may vary, depending on various factors.
In a correct operating mode the LEDS should be as follows:
Orange ON
Green ON
OFF
Green ON
Modem does not detect the cable connection to the “ETHERNET” connector.
The possible faults may be:
Physical fault in the cable connector . . . . . . . . . . . . . . . . . . . . . . . . . . . . . . . . . . . .
Incorrectly inserted cable
25
Modem IP
Ref. 5837
In this case, the appearance of the LEDS is usually as follows:
OFF
OFF
OFF
Intermittently
blinking green
No connection at the other end of a cable that is properly connected to an “ETHERNET”
connector.
The possible faults may be:
Physical fault in the cable connector
Cable incorrectly inserted at the other end
A break inside the cable
In this case, the appearance of the LEDS is usually as follows:
OFF
OFF
OFF
Green ON
Possible fault in the Internet connection, the Modem does not access Internet :
Possible reasons:
ADSL Router is physically disconnected from Internet. Check physical router connections.
The Output Router does not permit the Modem to access Internet. Check Router configuration, making sure there is no blockage in port 6450, which is used by the Modem to
access Internet. (See your Router Manual)
26
Modem IP
Ref. 5837
If your network has a Proxy, you should check that the Proxy enables the Modem to
access Internet through port 6450. (See instructions for your Proxy)
Your network (LAN) works with fixed IP addresses, so there is no IP address server
(DHCP), in this case you should check that the fixed IP address on the Modem is correct
(within the rnage of your network). To configure a fixed IP address on the Modem, use
the “IP Modem Configuration” Program supplied with the Modem.
In this case, the appearance of the LEDS is usually as follows:
Orange ON
Green ON
OFF
Intermittently blinking
green
27
Modem IP
Ref. 5837
TECHNICAL SPECIFICATIONS
The technical features of this product will correspond to those of its main component module,
i.e:
Connectors
CDC interface
Connector RJ45 (RS232, TX/RX)
Ethernet interface
RJ45 Ethernet 10/100 BaseT
Serial interface
Serial interface
Levels RS232 (TX/RX)
Serial port specifications
Range 150-115200bps;
Parity: None, even, odd
7 or 8 bits/byte
Routing buffers
Size
12 Kbytes x 2
Power/Temperature
Power requirements
max. 2.5W
Working temperature
max. 45ºC
Protection Index
IP20
The features of the EM202 module are:
Parameter
EM202-00
Ethernet interface
10/100BaseT Ethernet, standard magnetics
Serial interface and I/O lines
CMOS-level; TX, RX, and 4 additional I/O
lines with RTS, CTS, DTR, DSR implemen
ted
Router buffers size
12Kbytes x 2*
Maximum load curent of I/O lines
10mA
Power requirements
DC 5V, +/-5%, app.230 mA (in 100BaseT
mode)
Device temperature during operation
+40 degrees C** (in 100BaseT mode)
Operating temperature
-10 to +70 degrees C
Operatind relative humidity
10-90%
Mechanical dimension (excl. leads)
App. 32.5x19x15.5 mm
Packing
Plastic tray, 30 modules/tray
*Maximum possible buffer size. Actual size may be smaller depending on how much RAM is
“consumed” by the firmware.
29
Modem IP
Ref. 5837
31
RED COMERCIAL - COMMERCIAL NETWORK
UNITED KINGDOM
FRANCE
GERMANY
TELEVES (UK) Ltd.
11 Hill Street Industrial Estate
Cwmbran, Gwent NP44 7PG
UNITED KINGDOM
Telephone: +44 1633 875821
Fax: +44 1633 866311
EMail: [email protected]
TELEVES FRANCE Sarl
1 Rue Louis de Broglie
Parc d'Activités de l'Esplanade
77400 St. Thibault des Vignes
FRANCE
Telephone: +33 1 6035 9210
Fax: +33 1 6035 9040
EMail: [email protected]
PREISNER KOMMUNIKATIONSTECHNIK GmbH
An den Kiesgruben 6, 73240 Wendlingen
DEUTSCHLAND
Telephone: +49 7024 55358
Fax: +49 7024 6295
EMail: [email protected]
CHINA
TELEVES CHINA
Unit 207-208, Building A, No 374
Wukang Rd, Xuhui District
200031 Shanghai
CHINA (P.R.C.)
Telephone: +86 21 6126 7620
Fax: +86 21 6466 6431
EMail: [email protected]
USA
TELEVES USA LLC.
9800 Mount Pyramid Court, Suite
400
80112 Englewood, CO
USA
Telephone : +1 303 256 6767
Fax : +1 303 256 6769
EMail: [email protected]
PORTUGAL
ITALY
MIDDLE EAST
TELEVES ELECTRONICA PORTUGUESA
Via Dr. Francisco Sa Carneiro, Lote 17
Zona Ind. Maia 1 Sector X
4470 Barca-Maia-Porto
PORTUGAL
Telephone: +351 22 94 78900
Fax: +351 22 94 78900
EMail: [email protected]
TELEVES ITALIA Srl.
Via Liguria 24
2068 Peschiera Borromeo (MI)
ITALIA
Telephone: +39 02 5165 0604
Fax: +39 02 5530 7363
EMail: [email protected]
TELEVES MIDDLE EAST FZE
P.O. Box 17199 Jebel Ali Free Zone
Dubai
UNITED ARAB EMIRATES
Telephone: +971 48 834 344
Fax: +971 48 834 644
EMail: [email protected]
Oficinas Centrales / Head Office
Delegaciones / Subsidiaries
Sucursales / Distributors
Para conocer nuestra red de sucursales en el mundo, le rogamos consulte en nuestra pagina web
Please visit Televés web site to find your nearest Official Distributor
Rúa Benéfica de Conxo, 17
15706 - Santiago de Compostela
ESPAÑA (SPAIN)
Tel: +34 981 52 22 00 - Fax: +34 981 52 22 62
[email protected] - www.televes.com
Miembro de número del
Empresa
Registrada
ER 224/1/94