1
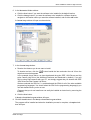
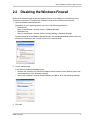
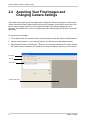
Basler ace QUICK INSTALLATION GUIDE FOR GigE CAMERAS Document Number: AW000897 Version: 04 Language: 000 (English) Release Date: 6 June 2011 For customers in the U.S.A. This equipment has been tested and found to comply with the limits for a Class A digital device, pursuant to Part 15 of the FCC Rules. These limits are designed to provide reasonable protection against harmful interference when the equipment is operated in a commercial environment. This equipment generates, uses, and can radiate radio frequency energy and, if not installed and used in accordance with the instruction manual, may cause harmful interference to radio communications. Operation of this equipment in a residential area is likely to cause harmful interference in which case the user will be required to correct the interference at his own expense. You are cautioned that any changes or modifications not expressly approved in this manual could void your authority to operate this equipment. The shielded interface cable recommended in this manual must be used with this equipment in order to comply with the limits for a computing device pursuant to Subpart J of Part 15 of FCC Rules. For customers in Canada This apparatus complies with the Class A limits for radio noise emissions set out in Radio Interference Regulations. Pour utilisateurs au Canada Cet appareil est conforme aux normes Classe A pour bruits radioélectriques, spécifiées dans le Règlement sur le brouillage radioélectrique. Life Support Applications These products are not designed for use in life support appliances, devices, or systems where malfunction of these products can reasonably be expected to result in personal injury. Basler customers using or selling these products for use in such applications do so at their own risk and agree to fully indemnify Basler for any damages resulting from such improper use or sale. Warranty Note Do not open the housing of the camera. The warranty becomes void if the housing is opened. All material in this publication is subject to change without notice and is copyright Basler Vision Technologies. Contacting Basler Support Worldwide Europe: Basler AG An der Strusbek 60 - 62 22926 Ahrensburg Germany Tel.: +49-4102-463-515 Fax.: +49-4102-463-559 [email protected] Americas: Basler, Inc. 855 Springdale Drive, Suite 203 Exton, PA 19341 U.S.A. Tel.: +1-610-280-0171 Fax.: +1-610-280-7608 [email protected] Asia: Basler Asia Pte. Ltd 8 Boon Lay Way # 03 - 03 Tradehub 21 Singapore 609964 Tel.: +65-6425-0472 Fax.: +65-6425-0473 [email protected] www.baslerweb.com Quick Installation Guide for GigE Cameras 1 Introduction The installation procedures in this guide assume that you want to get your ace GigE camera operational and begin capturing images as quickly and as simply as possible. Accordingly, this procedure makes the following assumptions: That you will be doing a test installation on your desk top of a single ace camera. That you will be using a PC equipped with one of the following operating systems: 32 bit Windows 2000 SP4 32 bit Windows XP SP2/SP3 32 bit Windows Vista 32 bit Windows 7 64 bit Windows XP x64 SP2 64 bit Windows Vista x64 64 bit Windows 7 That you will be connecting the ace camera directly to a single-port GigE network card in the PC and that the PC has only one network card. That the chipset on the network card in the PC is compatible with the Basler performance driver included in the pylon package. To see a current list of the compatible chipsets, look in the FAQ section of the Basler website: www.baslerweb.com That you will be using a GigE power injector or a 12 VDC camera power supply obtained from Basler (or the equivalent) to power the camera. That you will be installing the Basler pylon software package on your computer and that pylon software is being installed for the first time. You can download the pylon package from the Downloads section of the Basler website: www.baslerweb.com Be sure to download the pylon version that is appropriate for your operating system. This procedure assumes that you will be installing pylon version 2.3 (the most current version on the date this document was written). If you install an earlier version, the camera’s functionality may be limited. That you will be using the pylon Viewer to set the parameters on your camera and to view captured images. 1.1 General Preparations Make sure that the following items are available before starting installation: A Basler ace camera. A suitable power supply for the camera. A Cat 6E or better network cable (two cables if you are using a power injector). An appropriate lens. If you already know what lens you will be using in your application, use that lens. Otherwise, we suggest that you use a zoom lens for your initial testing and setup. Basler ace GigE 1 Quick Installation Guide for GigE Cameras 2 Installation Procedures 2.1 Installing Basler pylon If there are any cameras connected to your PC, disconnect them now. Once you have downloaded the software package, you can install the software by doing the following: 1. Close all open Windows-based applications on your computer. We most strongly recommend that you close all open applications now. 2. Use Windows Explorer to navigate to the location where you downloaded the pylon software installation package. Double-click the downloaded file. The program will prepare to install and then a Welcome window will open. 3. Click the Next button in the Welcome window. A License Agreement window will open. 4. Accept the agreement and click the Next button. A Customer Information window will open. 5. Enter the appropriate information in the Customer Information window and click the Next button. A Destination Folder window will open. 2 Basler ace GigE Quick Installation Guide for GigE Cameras 6. In the Destination Folder window: a. Click the Next button if you want the software to be installed in the default location. b. Click the Change button if you want the software to be installed in a different location, navigate to the location where you want the software installed, and click the OK button. A Custom Setup window will open as shown below. 7. In the Custom Setup window: a. Deselect the features you do not want to install: To deselect an item, click the dropdown menu that appears. button beside the item and select the red X from the In the example shown above, we have deselected the pylon IEEE 1394 Drivers and the pylon Camera Link Driver (the Additional Runtimes are deselected by default). If you will only be using GigE cameras with your PC, we strongly suggest that you deselect the IEEE 1394 Drivers and the Camera Link Driver. We have selected the SDK for C++ and deselected the SDKs for all of the other available programming languages. You should select the SDK for the programming language(s) you use and deselect those you do not use. (Features that you do not install now can easily be installed at a later time by rerunning the installer.) b. Click the Next button. A Ready to Install the Program window will open. 8. Click the Install button in the Ready to Install the Program window. The program will be installed and when the installation process is complete, a Completed window will open. Basler ace GigE 3 Quick Installation Guide for GigE Cameras 9. Click the Finish button. An Installer Information window may open informing you about the need to restart the computer. If you want to restart the computer now, click the Yes button. If you want to restart the computer later, click the No button. 10. Note that the installation program has added a shortcut to the desktop for the Pylon Viewer and for the Pylon IP Configuration Tool. 11. To see all of the installed software features: Click Start > All Programs > Basler Vision Technologies > Pylon x.x. 4 Basler ace GigE Quick Installation Guide for GigE Cameras 2.2 Disabling the Windows Firewall Basler pylon software requires that the Windows firewall to be disabled on all interfaces where cameras are connected. To disable the Windows firewall via the traditional control panel: 1. Open the Windows Firewall window: Depending on your operating system, use one of the following procedures: Windows XP: Start > Control Panel > Security Center > Windows Firewall Windows Vista: Start > Control Panel > Security Center > Change Settings > Windows Firewall On the General tab of the Windows Firewall window, the On (Recommended) option button can be selected. Disabling of the Firewall is done on the Advanced tab. 2. On the Advanced tab: In the Network Connection Settings group: Deselect the check box for the network adapter where camera will be attached (see Local Area Connection 1 in the following example). Leave your company’s network firewall enabled (see Basler AG in the following example). 3. Click OK. Basler ace GigE 5 Quick Installation Guide for GigE Cameras 2.3 Installing the Hardware 2.3.1 Precautions NOTICE Applying power that is outside of the specifications can result in severe damage to the camera. This installation procedure assumes that you will be using a GigE PoE injector or a power supply obtained from Basler (or the equivalent). Check the camera power specifications in the camera user’s manual and make sure that your power supply meets the specifications. NOTICE On all cameras, the lens thread length is limited. All cameras (mono and color) are equipped with a plastic filter holder located in the lens mount. The location of the filter holder limits the length of the threads on any lens you use with the camera. If a lens with a very long thread length is used, the filter holder or the lens mount will be damaged or destroyed and the camera will no longer operate properly. 2.3.2 Steps. In the first step, you will be removing the protective plastic seal from the camera’s lens mount. To avoid collecting dust or dirt on the imaging sensor, be sure that the lens mount is pointing down when you remove the seal. To install the camera hardware, follow these steps: 1. Remove the protective plastic seal from the lens mount on the camera and mount a lens on the camera. 2. Mount the camera in your test setup. Go on to step 3 if you are using a 12 VDC power supply obtained from Basler. Go on to step 4 if you are using a PoE power injector. 6 Basler ace GigE Quick Installation Guide for GigE Cameras 3. If you are using a 12 VDC camera power supply: a. Connect one end of a network cable to the network connector on the camera, and connect the other end of the cable to the network connector on the GigE network adapter in your PC. b. Connect one end of the AC cord for the power supply to the power supply’s body and the other end to an AC wall outlet. c. Connect the 6-pin connector on the output of the power supply to the 6-pin connector on the camera. d. Your camera will power up and will acquire an IP address from the PC (see the note below). e. Go on to Section 2.4 on page 8. 4. If you are using a GigE PoE power injector: a. Connect one end of a network cable to the network connector on the power injector labeled "Data In", and connect the other end of the cable to the network connector on the GigE network adapter in your PC. b. Connect one end of the AC cord for the power injector to the injector’s body and the other end to an AC wall outlet. c. Connect one end of a network cable to the network connector on the power injector labeled "PoE Out", and connect the other end of the cable to the network connector on the camera. d. Your camera will power up and will acquire an IP address from the PC (see the note below). e. Go on to Section 2.4 on page 8. The camera will take about 60 to 90 seconds to acquire an IP address. This happens because in our quick install situation, we have a direct connection between the camera and the PC and we are relying on the auto IP addressing functionality of this type of network connection. In a real-world install, you would probably install the camera on a network with a DHCP server or use fixed IP addressing. This would make the IP address acquisition process much faster. Basler ace GigE 7 Quick Installation Guide for GigE Cameras 2.4 Acquiring Your First Images and Changing Camera Settings The easiest way to acquire your first images and to change the camera’s settings is to use the pylon Viewer software that was installed earlier with the pylon package. In this section we will show you how to acquire images and how to set the camera so that it automatically adjusts gain and exposure. We will also show you how to adjust some basic settings that you will want to work with right away. To acquire your first images: 1. Put an object within the camera’s field of view and make sure that the object is well illuminated. 2. Open the lens aperture on your camera "halfway" by choosing an intermediate f-number. 3. Start the pylon Viewer, by clicking the icon on your computer’s desktop. The viewer window will open as shown below and you should see an entry in the Device tree for your ace camera. Menu Bar Tool Bar Device Tree Image Display Area 8 Basler ace GigE Quick Installation Guide for GigE Cameras 4. Click on your camera’s name in the Device tree to select the camera. A camera Features pane will open in the viewer as shown below. You will use the selections in the Features pane to adjust all of the camera’s parameter settings. Also notice the User Level setting below the Features pane. Choose the Beginner, Expert, or Guru level to display the basic, intermediate, or advanced camera parameters respectively. If you don’t have previous experience with Basler digital cameras, we suggest that you start as a beginner. Camera Features Pane User Level Selector Basler ace GigE 9 Quick Installation Guide for GigE Cameras 5. To get you capturing good quality images quickly. We will turn on the automatic gain and exposure controls. To turn on the controls: a. In the Camera Features Pane, click the + Sign next to the camera name. The tree will expand and will display a list of parameter groups. b. Click the + Sign next to the Analog Controls parameter group. The parameter group will open. c. Use the dropdown list next to the Gain Auto parameter to set the parameter value to Continuous as shown below. d. Scroll down and click the + Sign next to the Acquisition Controls group name. The parameter group will open. e. Use the dropdown list next to the Exposure Auto parameter to set the parameter value to Continuous. 10 Basler ace GigE Quick Installation Guide for GigE Cameras 6. Click the icon in the Menu Bar to place the camera into continuous image capture mode. The images captured by the camera will be displayed in a display window as shown below. 7. Focus the lens so that you get a good image. Notice that if you vary the light intensity on the object, the camera will automatically adjust the image quality. This happens because the auto gain and exposure controls are on continuously. 8. Now that you have started capturing images you should familiarize yourself with how three important parameters influence the quality of the captured images. But before you do this, you must disable the automatic controls that you enabled earlier: a. Go back to the Acquisition Controls group and set the Exposure Auto parameter to Off. b. Go back to the Analog Controls group and set the Gain Auto parameter to Off. You can now adjust the parameters "manually", and the camera’s automatic controls will not try to change your adjustments. 9. Go to the Analog Controls group and find the Gain (Raw) parameter. Use the slider next to the parameter to increase and decrease the parameter value. This parameter determines how much amplification is applied to the pixel values captured by the camera’s sensor. Notice how the changes affect the apparent brightness of the images. 10. In the Analog Controls group, find the Black Level (Raw) parameter. Use the slider next to the parameter to increase and decrease the parameter value. This parameter adds or subtracts an offset to the pixel values captured by the camera’s sensor. Notice how the changes affect the contrast in the images. Basler ace GigE 11 Quick Installation Guide for GigE Cameras 11. Go to the Acquisition Controls group and find the Exposure Time (Raw) parameter. Use the slider next to the parameter to increase an decrease the parameter value. This parameter determines the exposure time for each captured image. Notice how the changes affect the brightness of the image. 12. Now that you have started to learn your way around the pylon Viewer, you can look through the ace camera user’s manual and use the Viewer to adjust the other parameters associated with the camera features. 12 Basler ace GigE Revision History Revision History Doc. ID Number Date Changes AW00089701000 8 Feb 2010 This release is a preliminary version of the document. AW00089702000 10 Mar 2010 Updated the document to indicate that ace cameras should be used with pylon version 2.2. AW00089703000 4 Feb 2011 Changed the name of the document to indicate that this guide applies to GigE models of the camera. AW00089704000 6 Jun 2011 Updated software install procedure screen shots. Basler ace GigE 13 Revision History 14 Basler ace GigE