1
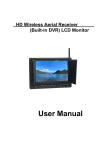
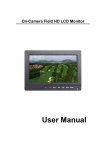
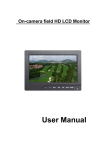
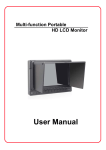
HD Color LCD Monitor
7" High Resolution On-Camera Field, Director Professional Monitor
User manual
Dear users:
Thank you for purchasing our On-Camera Field HD Monitor Kit. This
monitor employs professional digital signal processing circuit and TFT LCD
screen. The monitor with high brightness, low power consumption, steady
function, No radiation, strong compatibility and adjustable color temperature
control. Advanced features include Screen marker, CAMERA mode, Image
magnification, Image flip and Monochrome mode, which is an ideal portable
viewfinder camera kit.
This monitor is not only with high definition multimedia interface HDMI,
Component Ypbpr, Composite Video, Audio signal inputs, but also with HDMI,
Composite Video signal outputs to meet customers' needs.
Product Advanced Features:
◆ Peaking Filter (Peaking Focus Assist)
◆ Canon 5D Mark II Camera Mode(Full Screen Display, NO delay)
◆ Image magnification/scaling, image flip function
◆ Picture in picture(PIP)function
◆ Line field blanking
◆ Brightness histogram
◆ Front earphone hole
◆ Monochrome display: color, black, red, green, blue, closed
◆ Screen ratio: 4:3 full screen
◆ Scan mode: standard, underscan, overscan
◆ Screen marker: off, 96%, 93%, 90%, 85%
◆ Display pixel and the pixel point to point display
◆ Panel button function custom setting
◆ The current picture still, capture function
◆ LED backlight, Image display brighter ,screen does not flicker
1
To insure best use of the unit, please read the user's manual carefully.
CAUTION
1. Please use the adapter attached in the accessory.
2. Do not expose this product to direct sunlight, heat or humid conditions
3. Keep away from strong light while using this product so as to obtain the
clearest and the most colorful picture.
4. Please avoid heavy impact or drop on the ground.
5. Do not use chemical solutions to clean this unit. Please simply wipe with a
clean soft cloth to keep the brightness of the surface.
6. Without adjustable component in the unit, please do not take apart or
repair the unit by yourself, to avoid damage the product.
CONTENTS
1. Product description -------------------------------------------------- 3
1.1 Front panel view
--------------------------------------------- 3
1.2 Rear panel view
---------------------------------------------- 4
1.3 Bottom view ----------------------------------------------------- 5
1.4 Battery Plate -----------------------------------------------------5
1.5 Battery plates for various batteries ----------------------6
1.6 Power input way-------------------------------------------------7
1.7 Sun shade installation and remove ----------------------8
2. Button operating instruction --------------------------------------10
3. Function menu operating instruction --------------------------11
4. Signal format form ----------------------------------------------------16
5. Accessories--------------------------------------------------------------16
6. Parameters---------------------------------------------------------------18
7.Trouble shooting--------------------------------------------------------19
2
1. Product description
1.1
Front panel view
1. Power Indicator Light: Light turns red when standby, green when
working
2. F4: Custom button, can select(Screen marker, monochrome display,
point to point, peaking focus assist, false colors filter, exposure,
brightness histogram, scanning mode, center marker, segmentation )
one of them as definition function
3.HDMI: HDMI HD signal input selection button
4.F3:Custom button, see F4
5.YPbPr: YPbPr Color difference signal input selection button
6.F2:Custom button, see F4
7.VIDEO:Composite video signal input selection button
8.F1:Custom button, see F4
9.4:3/16:9: Screen ration 4:3/16:9 selection button
10.►: Volume up, in OSD menu for right adjustment, function confirm or
increase the value of analog on the menu
11.CAMERA:
Camera mode
12.◄ : Volume down, in OSD menu for left adjustment, function confirm
or decrease the value of analog on the menu
3
13.MENU: To activate or close OSD (on-screen display) menu
14.▲ : Up adjustment button, menu item selection button
15.▼ : Down adjustment button, menu item selection button, press the
button directly, which enables the movable picture still in the picture.
16.
: Earphone insert
17.Display screen
1.2
Rear panel view
1.Y-IN:Y signal input
2.VIDEO-IN:Video signal input
3.Pb-IN: Pb signal input
4.VIDEO-OUT:
5.Pr-IN:
Video signal output
Pr signal input
6.AUDIO-IN:
Audio signal input
7. Power ON/OFF Switch
8. HDMI-IN:
HDMI(High Definition Multimedia Interface)
signal input
9. HDMI-OUT: HDMI(High Definition Multimedia
Interface)signal
output(Optional)
10. Battery Plate slot:(According to the users' requirements
4
selection)-see attached instruction
11.4-pin XLR DC power input
12.DC power input interface
1.3
Bottom view
There are 1/4 Thread Mounting holes in the monitor, they are not only for fix
hot shoe mount, magic arm, but also convenient for customers' install sun
shade
1.4
Battery plates
F970
LP-E6
5
D28
Panasonic Anton Bauer
Sony V-Mount Plate
According to the different requirements of battery for the customers, attached
different battery plate slots. NO requirements, the factory defaults assembly
F970 battery plate.
1.4.1
Sony F970 battery slot for battery of Sony DV:
Sony F970 F960 F950 T930 F770 T750 F730 F570 F550 F530 QM91D OM91
QM90D QM90 QM71D QM71 QM70D QM70 QM51D QM51 FM71 FM70
series
1.4.2
Canon LP-E6 battery slot for battery of Canon DV
Canon LP-06
1.4.3
Panasonic D28 battery slot for battery of Panasonic DV
Panasonic D55 D54S D54SE D40 D35 D33 D32 D28 D25 D22 series
1.4.4
Sony V-mount camera battery Plate
1.4.5
Panasonic Anton Bauer battery Plate
1.5
Picture: Three types of batteries corresponding to the
upper three slots
F970
LP-E6
D28
Remark: Different specifications of the battery, capability is different.
6
The working time for the monitor will be different. Higher capability (working
time) will be longer.
1.6
Power input way
There are some ways to supply the power of the monitor.
1.6.1. The power supply by the adapter. 12V/1.0A is optional DC voltage
changer, insert DC power input interface directly. It can be choosed qualified
adapter which current with output voltage DC 6~24V, output capacity >10W
by customers
Please note that the polarity of power input is inner POSITIVE, outer
NEGATIVE. Otherwise will damage the product. (see attached image)
Please use the adapter attached in the accessories. If necessary to use other
specifications adapter, please note to provide the qualified adapter which
power supply should be not less than 10W (DC6V-15V)
1.6.2. Another option of power source is using batteries. The product back
case including battery slot is available for three types of batteries. Customers
can choose different battery slots according to their needs.
● Battery install way as below picture
7
Suggestion: Better remove the battery for long-term NO use this product.
Different specifications of the battery, capability is different. The working time
for the monitor will be different. Higher capability (working time) will be longer.
Without design charging circuit for the monitor, please remove the
battery to the battery charger for charge.
1.6.3
This product also can be by 4-Pin XLD interface to use the power
supplied from camera.
1.7
Sun shade installation and remove
1.7.1
Installation: Positive parallel alignment of the sun shade and
monitor, the projection of the sun shade hanging claw at the monitor sun
shade slot (see the monitor front view marked 1), pay attention to the position
should be aligned around inserted balanced slide down.
●
Picture
1.7.2
Remove: When you want to shade cover is removed from the
8
monitor, hands were clenched monitor and the sun shade, drag up shade
cover from monitor, that separates the sun shade from the monitor.
●
picture
1.7.3
Sun shade cover open/close steps:
Please follow steps, otherwise will damage the cover, please do not press the
L/R panel of the sun shade, if not, unable open the cover.
● Sun shade cover open (please follow steps)
● Sun shade cover close(follow steps)
9
2.
Button operating instruction
HDMI
→
High definition multimedia digital signal input selection
Ypbpr
→
Color difference component interface video signal input
selection
VIDEO
→
Composite video signal input selection
4:3/16:9
→
Screen ratio 4:3/16:9 full screen selection button
CAMERA
→
Canon 5D Mark II mode. Use 5D2 or 550D, open
CAMERA, full screen display, from the viewfinder to
recording when there is no time difference, image NO
deform, NO black, NO delay, perfect without distortion
F1
→
Custom button, according to the users' favorite, operating
habits, choose below (Screen marker, monochrome display,
point to point, peaking focus assist, false colors filter,
exposure, brightness histogram, scanning mode, center
marker, segmentation) setting one of the button as definition
function, enter the menu system to setting.
F2
→
Custom button, see F1 instruction
F3
→
Custom button, see F1 instruction
F4
→
Custom button, see F1 instruction
MENU: →
▲
→
Menu button
Enter menu operation for menu option and submenu up
selection
▼
→
Image still and menu operation down selection button.
No enter menu operation, press this button directly enables
10
the movable picture still in the picture. Enter menu operation
as menu option and submenu down selection
→
◄
Volume up, in OSD menu for right adjustment, function
confirm or increase the value of analog on the menu
→
►
Volume down, in OSD menu for left adjustment, function
confirm or decrease
3.
the value of analog on the menu
Menu function introduction
If in the operating status, press button“
”, then enter into OSD mode.
Press the unit button”▲”or “▼"to select the options which you need:
(display result)
(sound)
(system setting)
after select the button you need, press“
to exit OSD menu, repress button “
● Display result setting
Press "
press "
use "
◆
”or“
(scan position adjust),
on the unit to confirm, if need
”.
(this setting has 2 pages menu)
"key, pop up OSD menu as below, ”▲”or “▼"to select
" or "
" or "
,
" to confirm, press “▲”or“▼” to select the adjustment, then
" to adjust or select the adjustment. Press"
" to exit.
Menu page 1 picture
Contrast : To adjust the brightest and darkest ratio of the image
11
Brightness: To adjust the image's brightness
Saturation: To adjust the saturation
Sharpness: To adjust the depth to the image
Color Temp: Use the adjustment the color temperature can be
pre-set(user, 6500K.7300K, 9300K)
Picture Mode: The image of brightness, softness, user(contrast,
brightness, color settings) effect settings
Menu page 2 picture
◆
Aspect Ratio: To choose the aspect ratio, 16:9/4:3
Tint: In the composite video mode, adjust NTSC color signal, the
other modes are not valid
●
Sound setting
Press "
press "
use "
"key, pop up OSD menu as below, ”▲”or “▼"to select
" or "
" or "
,
" to confirm, press “▲”or“▼” to select the adjustment, then
" to adjust or select the adjustment. Press"
12
" to exit.
Volume: To adjust the volume
Balance:To adjust 2-channel(L&R)
● System setting
Press "
press "
use "
(this setting has 3 pages menu)
" key, pop up OSD menu as below,“▲”or“▼”to select
" or "
" or "
,
" to confirm, press “▲”or“▼”to select the adjustment, then
" to adjust or select the adjustment. Press"
" to exit.
◆ Menu page 1 picture
Language: Chinese, English
PIP: To display two input signal picture at the same time, can adjust
picture position, size, picture interchange, double picture, picture out
picture mode
S D I: HD SDI switch option(for with SDI input port modes, other modes
select close)
Screen Marker : Picture framing marker selection frame(off,96%,
13
93%,90%,85%)
Scan Mode: To deal with special image(standard, overscan,
underscan)
Menu Transparency: To select the OSD display effect
◆
Menu page 2 picture
Menu Timer: To control the automatic disappearance time after menu
pop up
Check Field: On the color saturation of images all closed function
makes it a monochrome image
H/V Delay: The image U/D, L/R flip
Image Flip: A line field blanking part optional switch
Camera: Canon 5D II or similar camera when shooting, image NO
deformation, NO black, NO delay, perfect without distortion
Dot By Dot: In the video, the point to point display. Observing the
image more clearly
◆
Menu page 3 picture
F1 : The corresponding panel button F1 custom button function
14
definition of choice setting(Screen marker, monochrome display, point
to point, peaking focus assist, false colors filter, exposure, brightness
histogram, scanning mode, center marker, segmentation).The user
can enter submenu select one item, press the "
" is identified as
the button function.
F2: The corresponding panel button F2 custom button function
definition of choice setting
F3: The corresponding panel button F3 custom button function
definition of choice setting
F4: The corresponding panel button F4 custom button function
definition of choice setting
Reset: On system parameters and settings recover factory settings
Ver 1.0: Program version serial number
● Scan adjust
Press "
press "
use "
" key, pop up OSD menu as below, “▲”or“▼to select
" or "
" or "
,
" to confirm, press “▲”or“▼” to select the adjustment, then
" to adjust or select the adjustment. Press"
" to exit.
Horizontal Position: To adjust the image display(L/R)
Vertical Position: To adjust the image display(U/D)
Horizontal Size: To adjust the image L/R stretch
Vertical Size: To adjust the image U/D stretch
15
4. Signal format form
Signal format form
Video signal
Support signal format
Composite video
PAL/NTSC auto recognize
Component(Y/Pb/Pr)
1080/ 50i/ 60i/ 50p/ 60p;
720/ 50p,720/ 60p ; 480i、480p;576i、576p;
HDMI
1080/ 24I/ 24p/ 25I/25p/ / 30i /30p/ 50i/ 50p/ 60i/ 60p;
720/ 50p,720/ 60p ; 480i、480p;576i、576p;
5. Accessories
5.1
Standard
HDMI cable (HDMI to Mini HDMI)
1 pcs
Sun Shade
1 pcs
Hot shoe mount
1 pcs
User manual
1 pcs
F970 battery plate(according to customers'
1 pcs
needs, see battery plate instruction)
HDMI cable
User manual
Hot shoe mount
F970 battery plate
16
Sun Shade
5.2
Optional
Battery
1pcs
BNC to RCA connector
6pcs
BNC cable
6pcs
Power adapter DC12V
1pcs
Canon LP-E6 battery plate
1pcs
Panasonic D28 series battery plate
1pcs
Sony V-mount battery plate
1pcs
Panasonic Anton Bauer battery plate
1pcs
Power adapter
(Optional)
BNC to RCA
connector
(Optional)
LP-E6
D28
battery plate
battery plate
(Optional)
(Optional)
BNC cable
(Optional)
Panasonic anton
battery plate
(Optional)
17
Battery
(Optional)
Sony V-mount
battery plate
(Optional)
6.Parameters
Panel size
7 ″ TFT LCD
Pixel
1024(H)× 600(V)pixels
Dot pitch
0.05(H)×0.15(V)mm
Brightness
250 cd/m²
Contrast ratio
700:1
Response time
10 ms
Viewing angle
150°(L/R) / 145°(U/D)
Display ratio
16:9
Backlight
Output signal
4:3
(adjustable)
LED
Input voltage
Input signal
/
DC 7 ~ 18 V
HDMI, Component Ypbpr, Composite Video, Audio
Composite Video, Audio earphone monitoring , HDMI
(option)
Power consumption
≤ 10.0 W
Working temperature
─ 10 ~ 55℃
Storage temperature
─ 20 ~ 65℃
Unit size (mm)
Unit weight
189 L × 134 W × 49 H (with battery plate F970)
520 g(with battery plate F970)
18
7. Trouble shooting
If there is any problem using the unit. You can try follow ways to inspect
and solve
●
Without image display
Trouble shooting
◆ Video cable off or connect Check the quality of the cable, make sure the
incorrectly
correct input interface
◆ Without video signal input
Check the signal source and output interface
connect is correct or not
◆ Monitor is not be powered on Check the power whether connected, put the
power switch to “on”position
◆ Supply voltage instability
The power adapter or battery is poor
connected with battery plate
◆ The power use is self-made, Reference "Power input way" reconnect
polarity connect inversely
●
Image/color display abnormal
◆ Video cable poor contact
Trouble shooting
Change video cable, try again
◆ Video signal interfered from Move to another environment to try again
external environment
◆ Video input signal amplitude Check signal source video output, or change
too low
◆Menu
signal source have a try.
color
adjustment closing
saturation Enter menu check color, or reset to factory
settings
◆ B/W set in monochrome or Press the B/W button, back to the color
black & white
◆ Image deformation
Reset the ratio
19
●
Speaker without sound
Trouble shooting
◆ Audio cable off or connect Confirm connected with the corresponding
improperly
◆Volume
input end
adjustment
was Reset the volume control is adjusted to a
closed
proper position
◆ HDMI cable poor connected
Check the quality of cable, or change cable
have a try
◆ No sound after switch video This monitor with audio signal only in audio
signal
input and HDMI
■ Remark:
If there are still other problems, please contact with our related deals
*If there are changes without prior notice.
20